Clinical-Scale Cell Therapy Manufacturing & Quality Control
1. Introduction to Clinical-Scale Cell Therapy Manufacturing
1.1 Overview of Cell Therapy Modalities and Clinical Applications
Cell therapy represents a transformative approach in modern medicine, leveraging living cells as therapeutic agents to treat a variety of diseases. This section provides a comprehensive overview of the main cell therapy modalities and their clinical applications, enriched with illustrative mind maps and practical examples.
Key Cell Therapy Modalities
- Autologous Cell Therapy: Cells are harvested from the patient, processed, and reintroduced to the same individual.
- Allogeneic Cell Therapy: Cells are sourced from a donor and administered to a different patient.
- Gene-Modified Cell Therapy: Cells are genetically engineered to enhance therapeutic efficacy.
- Stem Cell Therapy: Utilizes stem cells for tissue regeneration and repair.
- Immune Cell Therapy: Employs immune cells, such as T cells or NK cells, to target diseases.
Mind Map: Cell Therapy Modalities
Clinical Applications of Cell Therapies
-
Oncology
- CAR-T cell therapies targeting CD19 in B-cell malignancies (e.g., Kymriah, Yescarta).
- Tumor-infiltrating lymphocytes (TILs) for solid tumors.
-
Hematology
- Hematopoietic stem cell transplantation for leukemia and lymphoma.
-
Regenerative Medicine
- Mesenchymal stem cells for cartilage repair and graft-versus-host disease (GVHD).
-
Autoimmune Diseases
- T regulatory cell therapies to modulate immune response.
-
Infectious Diseases
- Virus-specific T cells for cytomegalovirus (CMV) or Epstein-Barr virus (EBV) infections.
Mind Map: Clinical Applications
Practical Examples
-
Example 1: Autologous CAR-T Therapy for B-Cell Acute Lymphoblastic Leukemia (ALL)
- Patient’s T cells are collected via leukapheresis.
- T cells are genetically modified to express chimeric antigen receptors (CARs) targeting CD19.
- Expanded ex vivo and infused back into the patient.
- Demonstrates high remission rates in refractory ALL.
-
Example 2: Allogeneic MSC Therapy for Graft-versus-Host Disease (GVHD)
- Donor-derived MSCs are expanded and administered to patients suffering from GVHD.
- MSCs modulate immune responses and promote tissue repair.
- Used as an adjunctive therapy to standard immunosuppressants.
-
Example 3: Hematopoietic Stem Cell Transplantation (HSCT)
- Used to treat hematological malignancies.
- Stem cells sourced from bone marrow, peripheral blood, or cord blood.
- Can be autologous or allogeneic depending on clinical scenario.
Summary
Understanding the diversity of cell therapy modalities and their clinical applications is fundamental for bioprocess engineers, QC specialists, and manufacturing leads. Each modality presents unique manufacturing and quality control challenges that must be addressed to ensure safe and effective therapies. The examples provided illustrate how these modalities translate into real-world clinical successes, setting the stage for subsequent discussions on manufacturing and quality control best practices.
1.2 Key Challenges in Scaling Up from Research to Clinical Manufacturing
Scaling up cell therapy manufacturing from research scale to clinical scale is a complex process that involves numerous technical, regulatory, and operational challenges. Understanding these challenges early on is critical for successful clinical translation and commercialization.
Major Challenges Overview
Variability in Cell Source and Maintaining Cell Quality
Challenge: Unlike traditional pharmaceuticals, cell therapies rely on living cells that can vary significantly between donors or batches. This variability can affect cell growth rates, phenotype, and therapeutic potency.
Example: In autologous CAR-T manufacturing, patient T cells collected via leukapheresis can vary in quality and quantity. Some patients may have low T cell counts or exhausted phenotypes, requiring process adjustments.
Best Practice: Implement robust cell characterization assays early in development to define critical quality attributes (CQAs). Use standardized protocols for cell isolation and expansion to minimize variability.
Process Reproducibility and Scale-Up
Challenge: Processes optimized at small scale (e.g., T-flasks or small bioreactors) may not translate directly to clinical scale due to differences in mixing, oxygenation, and nutrient gradients.
Example: Transitioning from static culture plates to stirred-tank bioreactors requires re-optimization of agitation speed and feeding strategies to maintain cell viability and phenotype.
Best Practice: Use scalable bioreactor systems with real-time monitoring (PAT tools) to maintain consistent culture conditions. Conduct scale-down models to predict large-scale behavior.
Regulatory Compliance and Documentation
Challenge: Clinical manufacturing must comply with GMP regulations, requiring extensive documentation, process validation, and quality assurance.
Example: A research lab may document experiments informally, but clinical manufacturing requires batch records, deviation reports, and change control documentation.
Best Practice: Develop a quality management system (QMS) early, including electronic batch records and training on GMP principles for all personnel.
Facility and Equipment Challenges
Challenge: Research labs often use open or semi-open systems, whereas clinical manufacturing requires closed, GMP-compliant environments with validated equipment.
Example: Switching from manual pipetting in a biosafety cabinet to automated closed systems reduces contamination risk but requires investment and operator training.
Best Practice: Design facilities with modular cleanrooms and invest in closed system technologies to improve sterility and scalability.
Supply Chain and Raw Material Consistency
Challenge: Raw materials such as culture media, growth factors, and reagents must be consistent and GMP-grade for clinical manufacturing.
Example: Variability in serum lots can affect cell growth; switching suppliers mid-process can lead to batch failures.
Best Practice: Qualify multiple suppliers, establish raw material specifications, and implement lot-to-lot testing.
Quality Control and Analytical Testing
Challenge: Developing and validating sensitive assays to assess identity, purity, potency, and safety of cell therapy products is complex.
Example: Flow cytometry panels must be optimized to distinguish therapeutic cells from contaminants and assess functional markers.
Best Practice: Integrate QC testing early in process development and use orthogonal methods to confirm results.
Summary
Scaling up cell therapy manufacturing requires a multidisciplinary approach addressing biological variability, process engineering, regulatory compliance, and quality assurance. Early identification of challenges and implementation of best practices with real-world examples can significantly improve the likelihood of successful clinical manufacturing.
For further reading, see sections 4 (Process Development), 7 (Quality Control), and 9 (Process Validation) for detailed strategies and case studies.
1.3 Regulatory Landscape and Compliance Requirements
Cell therapy manufacturing at clinical scale is tightly regulated to ensure patient safety, product efficacy, and consistent quality. Understanding the regulatory landscape and compliance requirements is essential for bioprocess engineers, QC specialists, and manufacturing leads to design and operate compliant processes.
Key Regulatory Authorities and Guidelines
-
FDA (U.S. Food and Drug Administration)
- Regulates cell therapies as biologics under the Public Health Service Act and the Federal Food, Drug, and Cosmetic Act.
- Key guidance documents include the FDA’s “Guidance for Industry: Current Good Manufacturing Practice for Phase 1 Investigational Drugs” and “CMC Information for Human Gene Therapy INDs.”
-
EMA (European Medicines Agency)
- Regulates Advanced Therapy Medicinal Products (ATMPs), including cell and gene therapies.
- Key regulations: Regulation (EC) No 1394/2007 on ATMPs, and guidelines on GMP for ATMPs.
-
PMDA (Pharmaceuticals and Medical Devices Agency, Japan)
- Oversees regenerative medicine products with specific regulations under the Act on the Safety of Regenerative Medicine.
-
Other regional agencies such as Health Canada, TGA (Australia), and MHRA (UK) have their own frameworks.
Regulatory Framework Mind Map
Compliance Requirements Overview
-
Good Manufacturing Practices (GMP)
- Facilities must meet cleanroom standards (e.g., ISO 14644-1).
- Validated equipment and processes.
- Controlled raw materials and supply chain.
-
Quality Management System (QMS)
- Document control, deviation management, CAPA (Corrective and Preventive Actions).
- Training and personnel qualification.
-
Product Characterization and Control
- Defining Critical Quality Attributes (CQAs).
- In-process and release testing.
-
Traceability and Chain of Identity
- Especially critical for autologous therapies.
- Barcoding and electronic batch records.
-
Regulatory Submissions and Reporting
- IND/IMPD submissions.
- Adverse event reporting.
Compliance Requirements Mind Map
Example: FDA cGMP Compliance in a Clinical-Scale CAR-T Manufacturing Facility
Scenario: A manufacturing lead is preparing a clinical-scale CAR-T cell therapy production line for an IND submission.
- Facility: Designed to meet ISO 7 cleanroom standards with segregated zones to prevent cross-contamination.
- Process Validation: Includes qualification of automated cell processing equipment and closed system workflows.
- Documentation: Electronic batch records implemented to ensure traceability.
- Quality Control: Flow cytometry-based identity testing and sterility testing protocols validated.
- Training: Personnel trained on aseptic techniques and GMP principles with documented competency assessments.
This example highlights how regulatory requirements are integrated into facility design, process development, and quality control to ensure compliance.
Practical Tips for Navigating Regulatory Compliance
- Engage regulatory experts early in process development.
- Develop a comprehensive Quality Management System tailored to cell therapy specifics.
- Use risk-based approaches to prioritize validation and testing efforts.
- Maintain clear and thorough documentation to facilitate audits and inspections.
- Stay updated with evolving regulations and guidance documents.
By embedding regulatory compliance into every stage of clinical-scale cell therapy manufacturing, organizations can accelerate development timelines while ensuring patient safety and product quality.
1.4 Best Practice: Establishing a Robust Technology Transfer Process with Example Case Study
Technology transfer is a critical step in clinical-scale cell therapy manufacturing, bridging the gap between research-scale development and GMP-compliant clinical production. A robust technology transfer process ensures that the manufacturing process, analytical methods, and quality systems are effectively communicated, understood, and implemented by the receiving manufacturing site.
Key Components of a Robust Technology Transfer Process
Step-by-Step Best Practices
-
Early and Detailed Planning:
- Engage cross-functional teams early (R&D, manufacturing, QC, QA).
- Define clear objectives, scope, and timelines.
- Example: For a CAR-T therapy, planning included aligning on critical quality attributes (CQAs) and process parameters to be transferred.
-
Comprehensive Documentation Package:
- Provide detailed process descriptions, batch manufacturing records, and analytical protocols.
- Include rationale behind process steps to aid understanding.
- Example: The process description for an allogeneic cell therapy included detailed cell expansion and harvesting steps with flow diagrams.
-
Hands-On Training and Knowledge Transfer:
- Conduct workshops and on-site training sessions.
- Use mock runs or pilot batches to familiarize the receiving team.
- Example: During transfer of a mesenchymal stem cell (MSC) process, the receiving team performed side-by-side runs with R&D experts.
-
Effective Communication Channels:
- Schedule regular meetings to discuss progress and challenges.
- Implement issue tracking systems to document and resolve transfer-related problems.
- Example: Weekly video conferences helped resolve discrepancies in cell viability testing methods.
-
Validation and Qualification:
- Perform equipment qualification and process validation at the receiving site.
- Validate analytical methods to ensure consistency.
- Example: Validation of flow cytometry panels was critical to confirm identity and purity of T-cell products.
-
Risk Management:
- Identify risks such as material variability or equipment differences.
- Develop mitigation plans, e.g., alternate suppliers or backup equipment.
- Example: Risk assessment identified potential contamination risks during cell washing, leading to adoption of closed-system processing.
Example Case Study: Technology Transfer of an Autologous CAR-T Cell Therapy Process
Background: A biotech company developed an autologous CAR-T therapy at their R&D site and planned to transfer the manufacturing process to a clinical manufacturing facility for Phase I/II trials.
Process:
- Initial planning involved a cross-functional team including process scientists, manufacturing leads, QC specialists, and QA.
- A detailed technology transfer package was created, including SOPs, batch records, and analytical methods.
- Hands-on training sessions were conducted at the receiving site, with R&D scientists supporting initial pilot runs.
- Communication was maintained via weekly meetings and a shared electronic issue log.
- Equipment qualification and process validation runs were performed, with data reviewed jointly.
- Risk assessment identified potential bottlenecks in cell expansion scalability; mitigation included additional bioreactor qualification.
Outcome:
- Successful transfer enabled consistent manufacturing of clinical-grade CAR-T products.
- Early identification and resolution of issues reduced delays.
- The receiving site achieved regulatory compliance and passed subsequent audits.
Summary Mind Map of the Case Study
Final Tips for Successful Technology Transfer
- Start early and involve all relevant stakeholders.
- Document everything clearly and thoroughly.
- Foster open communication and collaborative problem-solving.
- Use pilot batches to identify gaps before full-scale production.
- Continuously monitor and improve the process post-transfer.
By following these best practices and learning from real-world examples, bioprocess engineers, QC specialists, and manufacturing leads can ensure a smooth and effective technology transfer, enabling successful clinical-scale cell therapy manufacturing.
2. Facility Design and Environmental Control
2.1 Designing GMP-Compliant Cleanrooms for Cell Therapy Production
Designing GMP-compliant cleanrooms is a foundational step in ensuring the safety, quality, and efficacy of clinical-scale cell therapy manufacturing. Cleanrooms provide controlled environments that minimize contamination risks, maintain product integrity, and comply with regulatory standards such as FDA and EMA guidelines.
Key Considerations in Cleanroom Design
-
Classification of Cleanrooms: Determined by the maximum allowable particle counts per cubic meter, cleanrooms are classified according to ISO 14644-1 standards. For cell therapy manufacturing, ISO Class 5 (Grade A) and ISO Class 7 (Grade B) environments are typical.
-
Airflow and Filtration: Use of High-Efficiency Particulate Air (HEPA) filters to maintain unidirectional airflow and positive pressure differentials to prevent ingress of contaminants.
-
Materials and Surfaces: Selection of non-porous, easy-to-clean materials that resist microbial growth and withstand cleaning agents.
-
Personnel and Material Flow: Designing separate entry and exit points, airlocks, and gowning areas to reduce contamination risks.
-
Environmental Monitoring: Integration of systems to continuously monitor particle counts, temperature, humidity, and microbial load.
Mind Map: Core Elements of GMP-Compliant Cleanroom Design
Example: Designing a Cleanroom Suite for Autologous CAR-T Cell Manufacturing
Scenario: A biopharma company is establishing a clinical manufacturing site for autologous CAR-T therapies requiring high sterility and flexibility.
-
Cleanroom Layout: The suite includes an ISO Class 7 (Grade B) background area with ISO Class 5 (Grade A) laminar flow workstations for critical processing steps such as cell transduction and formulation.
-
Air Handling: HEPA-filtered air is supplied at a minimum of 60 air changes per hour with unidirectional airflow in Grade A zones.
-
Material Flow: Separate airlocks for personnel and materials prevent cross-contamination. Materials enter through a pass-through autoclave and gowning is performed in a dedicated changing room.
-
Surface Materials: Walls and floors are made of seamless epoxy resin, facilitating easy cleaning and preventing microbial harboring.
-
Environmental Monitoring: Continuous particle counters and microbial air samplers are installed, with real-time alerts for deviations.
Best Practice: Modular Cleanroom Systems
Modular cleanrooms offer flexibility and scalability, allowing rapid deployment and reconfiguration as manufacturing demands evolve.
Example: A cell therapy manufacturer implemented modular cleanrooms with pre-fabricated panels and integrated HVAC systems. This approach reduced construction time by 40% and allowed easy expansion to accommodate new product lines.
Mind Map: Benefits of Modular Cleanrooms
Summary
Designing GMP-compliant cleanrooms for cell therapy production demands a holistic approach balancing regulatory requirements, process needs, and contamination control. Incorporating best practices such as proper classification, airflow design, material selection, and environmental monitoring ensures a robust manufacturing environment that supports clinical success.
For more insights on environmental monitoring strategies, see section 2.2.
2.2 Environmental Monitoring Strategies and Best Practices
Environmental monitoring (EM) is a critical component in clinical-scale cell therapy manufacturing to ensure product safety, quality, and compliance with GMP standards. It involves systematically assessing the manufacturing environment to detect and control potential sources of contamination.
Key Objectives of Environmental Monitoring
- Detect microbial and particulate contamination in cleanrooms and controlled environments.
- Ensure compliance with regulatory limits for air, surfaces, and personnel.
- Identify trends or deviations early to prevent product contamination.
- Validate cleaning and disinfection procedures.
Environmental Monitoring Components
Airborne Monitoring
Active Air Sampling:
- Uses devices like slit-to-agar samplers or impaction samplers to actively pull a known volume of air over agar plates.
- Example: In a Grade A laminar flow hood, active air sampling is performed during critical operations to detect viable particles.
Passive Air Sampling (Settle Plates):
- Agar plates are exposed to the environment for a set time to capture settling microorganisms.
- Best Practice: Place settle plates at critical locations and open them only during operations.
Example: In a clinical-scale CAR-T manufacturing cleanroom, active air sampling is conducted every 4 hours during production, while settle plates are placed near the filling station to monitor potential contamination.
Surface Monitoring
Contact Plates:
- RODAC plates with agar media pressed onto surfaces to detect microbial contamination.
- Best Practice: Regularly sample critical surfaces such as workbenches, equipment handles, and door knobs.
Swabs:
- Used for irregular or hard-to-reach surfaces.
- Example: Swabbing the inside of bioreactor ports after cleaning to verify disinfection efficacy.
Example: After cleaning a biosafety cabinet, contact plates are used to sample the work surface. If microbial growth is detected, cleaning protocols are reviewed and enhanced.
Personnel Monitoring
Glove Prints:
- Contact plates pressed against gloves after aseptic operations to detect contamination.
Garment Monitoring:
- Sampling gowns and sleeves to ensure personnel hygiene compliance.
Best Practice:
- Perform personnel monitoring at the end of aseptic operations.
- Use results for targeted retraining if contamination is detected.
Example: During a cell therapy batch production, glove prints showed occasional contamination, prompting refresher training on aseptic technique for operators.
Particle Monitoring
- Continuous particle counters monitor non-viable particles in real-time.
- Critical for maintaining Grade A/B environments.
Example: A sudden spike in particle counts during cell processing triggered an immediate investigation, revealing a malfunctioning HEPA filter that was promptly replaced.
Data Review and Trending
- Establish alert and action limits based on regulatory guidelines (e.g., EU GMP Annex 1).
- Use software tools to analyze trends over time.
- Early detection of upward trends allows proactive interventions.
Example: Trending data revealed a gradual increase in surface contamination near the media preparation area, leading to a review and improvement of cleaning schedules.
Best Practices Summary
Integrated Example: Environmental Monitoring in a Clinical-Scale Allogeneic Cell Therapy Facility
In a facility manufacturing allogeneic mesenchymal stem cells (MSCs) at clinical scale, an integrated EM program was implemented:
- Air Monitoring: Active air sampling every 4 hours in Grade A zones; settle plates placed at filling stations.
- Surface Monitoring: Daily contact plate sampling of biosafety cabinets and incubators.
- Personnel Monitoring: Glove prints taken after each aseptic operation.
- Particle Monitoring: Continuous real-time particle counting with alarms set for Grade A limits.
- Data Management: Automated data capture and trending software flagged a rising trend in microbial counts on incubator surfaces.
Outcome: Prompt investigation identified a cleaning procedure gap. After revising cleaning SOPs and retraining staff, microbial counts returned to acceptable levels, ensuring batch quality and regulatory compliance.
Conclusion
Effective environmental monitoring is vital to maintain aseptic conditions and product integrity in clinical-scale cell therapy manufacturing. By combining multiple monitoring methods, adhering to best practices, and integrating data-driven decision-making, facilities can proactively manage contamination risks and ensure consistent product quality.
2.3 Case Example: Implementing Modular Cleanroom Solutions to Enhance Flexibility
In clinical-scale cell therapy manufacturing, flexibility and scalability of cleanroom environments are critical to accommodate evolving process needs, varying batch sizes, and multiple product lines. Modular cleanroom solutions offer a strategic advantage by enabling rapid deployment, reconfiguration, and cost-effective expansion while maintaining GMP compliance.
What Are Modular Cleanrooms?
Modular cleanrooms are prefabricated, self-contained units constructed from standardized panels and components. Unlike traditional stick-built cleanrooms, modular cleanrooms can be assembled, disassembled, and relocated with minimal disruption.
Benefits of Modular Cleanrooms in Cell Therapy Manufacturing
- Flexibility: Easily reconfigured to support different processes or scale-up.
- Speed: Faster installation compared to traditional construction.
- Cost Efficiency: Reduced downtime and construction costs.
- Compliance: Designed to meet GMP and ISO cleanroom standards.
- Scalability: Additional modules can be added as production demands grow.
Mind Map: Key Advantages of Modular Cleanrooms
Real-World Example: XYZ Biotherapeutics
Background: XYZ Biotherapeutics, a mid-sized cell therapy manufacturer, faced challenges with their traditional cleanroom due to increasing product lines and variable batch sizes. The company needed a solution that would allow quick adaptation without interrupting ongoing manufacturing.
Solution: They implemented a modular cleanroom system consisting of multiple interconnected modules, each designed for specific unit operations such as cell expansion, harvesting, and formulation.
Outcomes:
- Reduced installation time by 60% compared to stick-built expansion.
- Enabled simultaneous manufacturing of two different cell therapy products by isolating processes in separate modules.
- Improved environmental monitoring by segmenting clean zones.
- Facilitated easier maintenance and upgrades without halting production.
Mind Map: XYZ Biotherapeutics Modular Cleanroom Implementation
Best Practices for Implementing Modular Cleanrooms
-
Early Planning and Design Collaboration: Engage cross-functional teams including manufacturing, quality, and engineering early to align cleanroom design with process needs.
-
Define Clear Zoning and Airflow Requirements: Modular units should be designed to maintain appropriate pressure differentials and airflow patterns to prevent cross-contamination.
-
Incorporate Scalable Utilities: Plan for modular utility connections (e.g., HVAC, gases, electrical) that can be expanded or re-routed as needed.
-
Validate and Qualify Modules Individually and as a System: Each module must be validated for cleanliness and environmental control, as well as integrated system performance.
-
Plan for Future Expansion: Design modules with standardized interfaces to allow easy addition of new units.
Example: Airflow and Pressure Control in Modular Cleanrooms
Maintaining unidirectional airflow and positive pressure in each module is critical. For instance, XYZ Biotherapeutics used HEPA-filtered air supply with differential pressure sensors between modules to ensure contamination control.
Summary
Modular cleanroom solutions provide a versatile and efficient approach to meet the dynamic demands of clinical-scale cell therapy manufacturing. By enabling rapid deployment, easy reconfiguration, and compliance with regulatory standards, modular cleanrooms help manufacturers like XYZ Biotherapeutics optimize production workflows, reduce downtime, and maintain high-quality standards.
For bioprocess engineers and manufacturing leads, adopting modular cleanroom strategies can be a game-changer in achieving operational agility and ensuring product quality in the fast-evolving cell and gene therapy landscape.
2.4 Contamination Control and Risk Mitigation Approaches
Maintaining sterility and preventing contamination are paramount in clinical-scale cell therapy manufacturing due to the high sensitivity of living cells and the critical impact contamination can have on patient safety and product efficacy. This section explores comprehensive contamination control strategies and risk mitigation approaches, supported by practical examples and mind maps to facilitate understanding.
Key Sources of Contamination
- Personnel: Human operators are the most common source of contamination through skin flakes, respiratory droplets, and improper gowning.
- Environment: Airborne particles, microbial flora, and surface contaminants within cleanrooms.
- Materials and Equipment: Raw materials, reagents, and manufacturing equipment can introduce contaminants if not properly qualified and maintained.
- Process Steps: Open processing steps or manual interventions increase contamination risk.
Mind Map: Contamination Sources and Control Measures
Contamination Control Mind Map
Best Practices for Contamination Control
Facility and Environmental Controls
- Cleanroom Classification: Maintain ISO 5 (Class 100) environments for critical processing steps, with surrounding areas at ISO 7 or better.
- Air Handling Systems: Use HEPA-filtered air with appropriate air changes per hour (e.g., 300-600 ACH) to reduce particulate load.
- Pressure Differentials: Maintain positive pressure gradients to prevent ingress of contaminants.
- Environmental Monitoring: Routine sampling of air, surfaces, and personnel to detect microbial and particulate contamination early.
Example: A clinical-scale CAR-T manufacturing facility implemented continuous particle counters and weekly microbial settle plates, enabling early detection of a filter breach that was promptly addressed, preventing batch contamination.
Personnel Practices
- Gowning Procedures: Strict gowning protocols including sterile gloves, masks, gowns, and hair covers.
- Training: Regular refresher training on aseptic techniques and contamination awareness.
- Behavioral Controls: Minimizing talking, movement, and unnecessary entry into critical zones.
Example: A bioprocessing team introduced a ‘buddy system’ during gowning to ensure compliance, reducing gowning errors by 40%.
Material and Equipment Controls
- Supplier Qualification: Only approved suppliers with robust quality systems.
- Material Handling: Use of sterile, single-use components where possible.
- Cleaning and Sterilization: Validated cleaning protocols and sterilization cycles for reusable equipment.
- Closed or Semi-Closed Systems: Minimize open handling to reduce contamination risk.
Example: Transitioning from reusable stainless steel bioreactors to single-use bioreactors reduced cleaning validation burdens and contamination incidents in an allogeneic cell therapy process.
Process Controls
- Closed System Processing: Use of closed, sterile connectors and tubing sets to avoid open exposure.
- Automation: Automated cell counting, media addition, and sampling reduce manual interventions.
- Aseptic Techniques: Strict adherence to aseptic processing during manual steps.
Example: Implementing a closed system for cell washing and formulation reduced contamination events by 70% compared to manual open processing.
Risk Mitigation Strategies
- Risk Assessment: Conduct Failure Mode and Effects Analysis (FMEA) to identify contamination risks and prioritize controls.
- Redundancy: Backup systems for critical utilities like HVAC and sterilization.
- Environmental Monitoring Trending: Analyze trends to predict and prevent contamination events.
- Rapid Response Plans: Defined procedures for contamination event investigation and containment.
Mind Map: Risk Mitigation Workflow
Practical Example: Contamination Control in Autologous Cell Therapy Manufacturing
A clinical-scale autologous cell therapy manufacturer faced recurrent contamination during the cell expansion phase. After performing a root cause analysis, they identified that manual open handling during media exchanges was the contamination source. The team implemented the following:
- Switched to a closed, single-use bioreactor system with sterile connectors.
- Enhanced personnel gowning and aseptic technique training.
- Increased environmental monitoring frequency during critical processing.
- Installed automated media addition systems.
Result: Contamination rates dropped from 15% to under 2%, enabling consistent batch release and improved patient safety.
Summary
Effective contamination control and risk mitigation in clinical-scale cell therapy manufacturing require a multi-layered approach encompassing facility design, personnel practices, material and equipment controls, and robust process management. Integrating these best practices with continuous monitoring and risk assessment ensures product quality and patient safety.
3. Raw Material Sourcing and Qualification
3.1 Critical Raw Materials in Cell Therapy Manufacturing
Cell therapy manufacturing relies heavily on the quality and consistency of raw materials used throughout the process. Critical raw materials (CRMs) directly impact the safety, efficacy, and reproducibility of the final cell therapy product. Understanding these materials, their sources, and how to manage variability is essential for bioprocess engineers, QC specialists, and manufacturing leads.
What Are Critical Raw Materials?
CRMs are components without which the manufacturing process cannot proceed or which significantly affect the quality attributes of the cell therapy product. These include culture media, growth factors, cytokines, sera, buffers, and consumables such as cell culture vessels and filtration devices.
Mind Map: Overview of Critical Raw Materials
Cell Culture Media and Supplements
The basal media provides essential nutrients, salts, and energy sources for cell growth. Supplements such as growth factors and cytokines stimulate proliferation and maintain cell phenotype.
Example:
- For CAR-T cell manufacturing, media supplemented with IL-2 is commonly used to promote T cell expansion.
- Variability in growth factor lots can lead to inconsistent cell growth rates, emphasizing the need for supplier qualification and lot-to-lot testing.
Serum and Serum Alternatives
Serum, such as Fetal Bovine Serum (FBS), has traditionally been used as a rich source of growth factors but carries risks of contamination and variability.
Best Practice:
- Transitioning to chemically defined, serum-free media reduces variability and regulatory concerns.
Example:
- A manufacturing facility replaced FBS with human platelet lysate for mesenchymal stem cell culture, improving batch consistency and reducing immunogenicity risks.
Buffers and Reagents
Buffers like PBS maintain pH and osmolarity during cell processing steps. Enzymes such as trypsin are used for cell detachment.
Example:
- Using animal-origin-free trypsin reduces the risk of introducing adventitious agents.
Consumables and Plastics
Single-use bioreactors, cell culture bags, and sterile filters are critical for maintaining aseptic conditions.
Example:
- Switching to gamma-irradiated single-use bags minimized contamination events in a clinical manufacturing campaign.
Cryopreservation Materials
Cryoprotectants like DMSO protect cells during freezing but must be carefully controlled due to toxicity.
Example:
- Optimizing DMSO concentration and freezing rate improved post-thaw viability in hematopoietic stem cell products.
Mind Map: Managing Critical Raw Materials
Summary
Critical raw materials form the foundation of clinical-scale cell therapy manufacturing. Their careful selection, qualification, and management ensure product quality and patient safety. By adopting best practices such as transitioning to serum-free media, qualifying suppliers rigorously, and implementing robust incoming testing, manufacturers can mitigate risks associated with raw material variability.
Additional Example: Managing Variability in Serum Lots
A cell therapy manufacturer experienced inconsistent cell growth due to lot-to-lot variability in FBS. They implemented a qualification protocol involving:
- Testing multiple FBS lots for cell proliferation performance
- Selecting a primary lot and retaining reserve lots
- Establishing a bridging protocol to qualify new lots before use
This approach stabilized the manufacturing process and improved batch-to-batch consistency.
3.2 Supplier Qualification and Auditing Best Practices
Supplier qualification and auditing are critical components in ensuring the quality, consistency, and compliance of raw materials used in clinical-scale cell therapy manufacturing. A rigorous supplier qualification process minimizes risks related to material variability, contamination, and supply chain disruptions.
Key Steps in Supplier Qualification
-
Initial Supplier Assessment
- Evaluate supplier’s reputation, certifications (e.g., ISO, GMP), and history.
- Review quality management systems and documentation practices.
-
Material Specification Review
- Confirm raw materials meet defined quality attributes and regulatory requirements.
- Assess Certificates of Analysis (CoA) and batch-to-batch consistency.
-
Risk Assessment
- Identify critical raw materials with high impact on product quality.
- Prioritize suppliers based on risk level.
-
On-site Audits
- Conduct thorough audits to verify manufacturing processes, storage, and handling.
- Evaluate supplier’s corrective and preventive action (CAPA) systems.
-
Qualification Approval & Monitoring
- Approve suppliers based on audit outcomes and material quality.
- Implement ongoing monitoring through periodic re-audits and quality reviews.
Best Practices Mind Map
Example: Qualification of a Serum Supplier
Context: Serum is a critical raw material for many cell culture processes but is known for variability and contamination risks.
Approach:
- Initial Assessment: Verified supplier holds GMP certification and has a history of supplying to biopharma companies.
- Material Review: Requested detailed CoAs for multiple serum lots; analyzed for endotoxin levels, mycoplasma, and viral contaminants.
- Risk Assessment: Identified serum as a high-risk material due to biological origin.
- On-site Audit: Conducted audit focusing on animal sourcing, collection, processing, and storage conditions.
- Approval & Monitoring: Approved supplier with conditional acceptance; implemented quarterly review of CoAs and annual audits.
Outcome: Consistent serum quality was maintained, reducing batch failures and contamination events.
Auditing Best Practices
- Prepare Thoroughly: Review supplier documentation and previous audit reports before the visit.
- Use a Standardized Checklist: Ensure all critical areas such as quality control, documentation, personnel training, and equipment maintenance are evaluated.
- Engage Cross-Functional Teams: Include quality, manufacturing, and regulatory experts in audits for comprehensive evaluation.
- Focus on CAPA Effectiveness: Verify that previous audit findings have been addressed effectively.
- Document Findings Clearly: Provide detailed reports with actionable recommendations.
- Follow-Up: Track corrective actions and re-assess as needed.
Auditing Mind Map
Example: Auditing a Media Supplier
Context: A supplier provides specialized cell culture media critical for expansion of therapeutic cells.
Audit Highlights:
- Verified supplier’s quality control testing includes sterility, pH, osmolality, and endotoxin.
- Observed manufacturing environment met ISO 14644-1 Class 7 standards.
- Reviewed training records and found comprehensive GMP training for personnel.
- Noted a previous audit finding related to documentation control was adequately addressed.
Result: Supplier maintained qualification status, and the audit reinforced confidence in supply chain robustness.
Summary
Supplier qualification and auditing are foundational to maintaining high-quality raw materials in clinical-scale cell therapy manufacturing. By integrating structured assessments, risk-based prioritization, and continuous monitoring, bioprocess engineers and quality control specialists can mitigate risks and ensure consistent product quality.
Leveraging real-world examples and mind maps helps clarify complex processes and supports effective implementation of best practices.
3.3 Example: Managing Variability in Serum and Media Components
Managing variability in serum and media components is critical for ensuring consistent cell therapy manufacturing outcomes. Variability can arise from differences in raw material lots, supplier sources, and storage conditions, potentially impacting cell growth, viability, and product quality.
Understanding Variability Sources
Best Practice: Raw Material Qualification and Lot Screening
To manage variability, establish a rigorous raw material qualification program:
- Supplier Audits: Evaluate supplier quality systems and consistency.
- Lot Screening: Test multiple lots of serum/media for critical parameters before approval.
- Functional Assays: Use cell-based assays to assess performance impact.
- Establish Acceptance Criteria: Define allowable ranges for critical attributes.
Example:
A cell therapy manufacturer observed inconsistent cell expansion rates when switching serum lots. By implementing a lot screening protocol involving cell proliferation assays, they identified lots that supported optimal growth and rejected those that did not meet criteria, reducing batch failures by 30%.
Example Mind Map: Lot Screening Workflow
Media Optimization and Serum Alternatives
To reduce variability, many manufacturers move toward serum-free or chemically defined media. However, transitioning requires careful optimization:
- Stepwise Adaptation: Gradually adapt cells to new media.
- Comparative Studies: Evaluate cell growth, phenotype, and potency.
- Supplement Consistency: Use recombinant growth factors with defined activity.
Example:
A clinical-scale CAR-T manufacturing site replaced fetal bovine serum (FBS) with a serum-free formulation. Through a 3-month adaptation and testing period, they demonstrated equivalent cell expansion and functionality, improving batch-to-batch consistency and reducing regulatory concerns related to animal-derived components.
Mind Map: Strategies to Manage Serum and Media Variability
Practical Tips
- Maintain a database of raw material lots with performance data.
- Collaborate closely with suppliers to understand raw material variability.
- Implement in-process controls to detect early signs of variability impact.
- Use statistical tools to analyze trends and identify root causes.
By proactively managing serum and media variability through these best practices and examples, bioprocess engineers and QC specialists can ensure more consistent, reliable clinical-scale cell therapy manufacturing outcomes.
3.4 Establishing Material Traceability and Documentation
In clinical-scale cell therapy manufacturing, establishing robust material traceability and comprehensive documentation is critical to ensure product quality, regulatory compliance, and patient safety. Traceability enables tracking every raw material and intermediate through the entire manufacturing process, facilitating root cause analysis in case of deviations or product failures.
Key Components of Material Traceability
- Unique Identification: Assigning unique batch or lot numbers to all raw materials and reagents.
- Supplier Information: Documenting supplier details, certificates of analysis (CoA), and qualification status.
- Receipt and Storage Records: Logging dates, conditions, and locations of material receipt and storage.
- Usage Logs: Recording quantities used, dates, and operators involved.
- Chain of Custody: Maintaining records that link materials from receipt through processing to final product.
Best Practices for Documentation
- Use electronic batch records (EBR) or validated paper records with controlled access.
- Implement barcode or RFID scanning to reduce manual entry errors.
- Maintain version control and audit trails for all documents.
- Regularly review and reconcile inventory records.
Mind Map: Material Traceability Workflow
Example 1: Traceability in Media Preparation
A bioprocess engineer receives a new lot of cell culture media. The lot number and CoA are scanned into the electronic batch record system upon receipt. The media is stored in a temperature-controlled refrigerator with continuous monitoring. When preparing media for a batch, the operator scans the media container, and the system logs the quantity used, operator ID, and preparation date. This information is linked to the specific manufacturing batch, enabling full traceability.
Mind Map: Documentation Flow for Raw Material
Example 2: Handling a Raw Material Deviation
During a routine check, a QC specialist notices that a raw material’s temperature log shows a deviation during storage. The deviation is documented immediately, and an investigation is initiated. The batch records linked to that material lot are reviewed to assess potential impact. The supplier is contacted for additional information, and corrective actions are implemented. All findings and actions are documented in the deviation report, maintaining traceability and compliance.
Tips for Implementing Traceability Systems
- Standardize Naming Conventions: Consistent labeling reduces confusion.
- Train Personnel: Ensure all staff understand the importance and procedures.
- Leverage Technology: Use LIMS or ERP systems tailored for biopharma.
- Regular Audits: Conduct internal audits to verify traceability integrity.
By integrating these traceability and documentation best practices, manufacturing leads and QC specialists can ensure a transparent, compliant, and efficient cell therapy production process that supports patient safety and regulatory expectations.
4. Cell Culture Process Development and Scale-Up
4.1 Optimizing Cell Expansion Protocols for Clinical Scale
Cell expansion is a critical step in clinical-scale cell therapy manufacturing, as it directly impacts the yield, quality, and functionality of the final therapeutic product. Optimizing cell expansion protocols ensures robust, reproducible, and scalable processes that meet clinical demand while maintaining cell potency and safety.
Key Considerations for Cell Expansion Optimization
- Cell Source and Starting Material Quality
- Culture Medium Composition and Supplements
- Culture Vessels and Bioreactor Selection
- Seeding Density and Growth Kinetics
- Feeding Strategies and Media Exchange
- Environmental Parameters: Temperature, pH, DO
- Process Monitoring and Control
- Scalability and Automation
Mind Map: Factors Influencing Cell Expansion Optimization
Best Practice: Stepwise Scale-Up with Controlled Parameters
A common best practice is to implement a stepwise scale-up approach starting from small-scale static cultures to larger dynamic bioreactors. This allows for process parameter optimization at each stage and reduces risk during scale-up.
Example:
- Start with T-flasks or multilayer flasks to optimize seeding density and media formulation.
- Transition to spinner flasks or rocking bioreactors to evaluate mixing and oxygen transfer.
- Scale to stirred-tank bioreactors with controlled pH, DO, and temperature for clinical-scale production.
Each step includes monitoring cell growth kinetics, viability, and phenotype to ensure consistency.
Example: Optimizing Seeding Density and Feeding Strategy for MSC Expansion
Scenario: A manufacturing team is expanding mesenchymal stem cells (MSCs) for clinical use and wants to optimize seeding density and feeding strategy to maximize yield without compromising cell quality.
- Initial Approach: Seed at 3,000 cells/cm² in multilayer flasks with batch feeding.
- Optimization: Tested seeding densities from 1,000 to 6,000 cells/cm² and compared batch vs fed-batch feeding.
- Findings:
- Higher seeding density (5,000 cells/cm²) reduced lag phase and shortened culture duration.
- Fed-batch feeding improved nutrient availability and cell viability.
- Outcome: Implemented 5,000 cells/cm² seeding with fed-batch feeding, resulting in 30% higher cell yield and >95% viability.
Mind Map: Feeding Strategies in Cell Expansion
Monitoring Growth Kinetics and Cell Quality
Regular monitoring of cell density, viability, and phenotype markers during expansion is essential to detect deviations early and maintain product quality.
Example:
- Use automated cell counters combined with trypan blue exclusion to assess viability daily.
- Flow cytometry to confirm expression of identity markers (e.g., CD73, CD90, CD105 for MSCs).
- Metabolite analysis (glucose, lactate) to adjust feeding schedules.
Case Study: Transition from Static to Bioreactor Expansion for CAR-T Cells
A clinical manufacturing site optimized expansion of CAR-T cells by moving from static culture bags to gas-permeable bioreactors.
- Challenge: Static bags limited scale and oxygen transfer.
- Solution: Adopted a stirred-tank bioreactor with controlled pH and DO.
- Result: Achieved 5-fold increase in cell yield with maintained transduction efficiency and cytotoxic function.
Summary
Optimizing cell expansion protocols at clinical scale requires a holistic approach considering cell biology, culture environment, and process engineering. Employing stepwise scale-up, selecting appropriate feeding strategies, and implementing rigorous monitoring ensures robust and reproducible manufacturing processes that deliver high-quality cell therapy products.
4.2 Bioreactor Selection and Operation Best Practices
Selecting and operating bioreactors effectively is critical for successful clinical-scale cell therapy manufacturing. The right bioreactor choice and optimized operation ensure robust cell growth, maintain cell phenotype, and support scalability while meeting regulatory requirements.
Key Considerations for Bioreactor Selection
- Cell Type Compatibility: Different cell types (e.g., T cells, stem cells, dendritic cells) have unique growth requirements.
- Scale and Throughput: Clinical-scale manufacturing demands bioreactors that can handle volumes from a few liters to hundreds of liters.
- Closed vs. Open Systems: Closed systems reduce contamination risk and support GMP compliance.
- Control and Monitoring Capabilities: Real-time monitoring of parameters like pH, dissolved oxygen (DO), temperature, and agitation.
- Ease of Cleaning and Sterilization: Single-use bioreactors reduce cleaning validation burden.
- Regulatory Compliance: Equipment should meet GMP and FDA guidelines.
Types of Bioreactors Commonly Used in Cell Therapy
Best Practices for Bioreactor Operation
Parameter Optimization
- Agitation Speed: Optimize to ensure sufficient mixing without causing shear stress.
- Dissolved Oxygen: Maintain levels appropriate for cell metabolism; use sparging or surface aeration.
- pH Control: Use automated pH control systems to maintain physiological pH.
- Temperature: Maintain consistent temperature, typically 37°C for mammalian cells.
Monitoring and Control
- Implement Process Analytical Technology (PAT) tools for real-time monitoring.
- Use sensors for continuous measurement of key parameters.
- Automate feedback loops for parameter adjustments.
Scale-Up Strategies
- Maintain geometric similarity and power input per volume to preserve cell growth conditions.
- Use modeling and simulation to predict scale-up performance.
Sterility and Contamination Control
- Use closed or single-use systems to minimize contamination.
- Perform regular environmental monitoring.
Example: Transitioning from Static Culture to Stirred-Tank Bioreactor
Scenario: A manufacturing team is scaling up CAR-T cell expansion from T-flasks (static culture) to a 5L stirred-tank bioreactor.
- Challenge: Maintaining cell viability and phenotype under agitation.
- Approach:
- Start with low agitation speed (e.g., 30 rpm) to minimize shear.
- Gradually increase speed as cells adapt.
- Monitor cell viability and surface markers daily.
- Optimize dissolved oxygen by adjusting gas flow rates.
Outcome: Successful scale-up with comparable cell quality and yield to static culture.
Mind Map: Bioreactor Operation Best Practices
Summary
Selecting the appropriate bioreactor and following operation best practices are essential to ensure consistent, scalable, and GMP-compliant cell therapy manufacturing. Integrating real-time monitoring, optimizing parameters, and carefully planning scale-up can significantly improve process robustness and product quality.
4.3 Example: Transitioning from Static Culture to Stirred-Tank Bioreactors
Transitioning from static culture systems (such as T-flasks or cell stacks) to stirred-tank bioreactors is a critical step in scaling up cell therapy manufacturing. This shift enables improved control over culture conditions, enhanced scalability, and better reproducibility, which are essential for clinical-scale production.
Key Considerations in the Transition
- Cell Type and Growth Characteristics: Understanding how the specific cell type behaves in suspension or adherent conditions.
- Shear Sensitivity: Cells may be sensitive to agitation; optimizing impeller speed and design is crucial.
- Oxygen Transfer and pH Control: Stirred-tank bioreactors allow precise control but require careful parameter optimization.
- Process Monitoring: Integration of sensors for real-time monitoring of parameters such as dissolved oxygen (DO), pH, and temperature.
Mind Map: Transitioning from Static Culture to Stirred-Tank Bioreactors
Step-by-Step Example: Transitioning an Adherent Cell Therapy Product
-
Assessment of Cell Growth in Static Culture:
- Cells grown in T-flasks show robust growth and desired phenotype.
- Limitations identified: labor-intensive handling and limited batch size.
-
Selection of Bioreactor Type:
- Chose a stirred-tank bioreactor with microcarriers to support adherent cell growth.
-
Microcarrier Optimization:
- Tested different microcarrier materials (e.g., dextran, collagen-coated) to maximize cell attachment and growth.
-
Agitation Speed Tuning:
- Started with low impeller speeds (20-30 rpm) to minimize shear.
- Gradually increased while monitoring cell viability and attachment.
-
Oxygen and pH Control Setup:
- Integrated DO and pH probes.
- Established setpoints based on static culture conditions.
-
Small-Scale Bioreactor Runs:
- Performed multiple runs at 1-2 L scale to optimize parameters.
- Measured cell density, viability, and phenotype markers.
-
Scale-Up to Clinical Scale:
- Applied geometric and power input scaling principles to move to 50 L bioreactor.
- Validated process consistency.
-
Quality Control:
- Ensured identity, purity, and potency met release criteria.
Mind Map: Optimizing Stirred-Tank Bioreactor Parameters
Practical Example: Monitoring Cell Viability During Transition
- In static culture, cell viability routinely measured by Trypan Blue exclusion.
- In bioreactor, implemented automated sampling combined with flow cytometry for viability and phenotype.
- Observed transient viability dip during initial agitation increase; adjusted impeller speed accordingly.
Lessons Learned and Best Practices
- Conduct thorough small-scale studies before scale-up.
- Use microcarriers for adherent cells to maintain phenotype.
- Optimize agitation speed to balance mixing and shear stress.
- Integrate real-time monitoring tools to enable process control.
- Document all changes and results to support regulatory submissions.
Transitioning from static culture to stirred-tank bioreactors is a complex but manageable process that, when executed with careful optimization and monitoring, can significantly enhance the scalability and robustness of clinical-scale cell therapy manufacturing.
4.4 Process Analytical Technologies (PAT) for Real-Time Monitoring
Process Analytical Technologies (PAT) are critical tools in clinical-scale cell therapy manufacturing, enabling real-time monitoring and control of critical process parameters (CPPs) and critical quality attributes (CQAs). Implementing PAT ensures consistent product quality, reduces batch failures, and accelerates process development.
What is PAT?
PAT is a system for designing, analyzing, and controlling manufacturing through timely measurements of critical quality and performance attributes of raw and in-process materials and processes, with the goal of ensuring final product quality.
Why PAT Matters in Cell Therapy Manufacturing
- Heterogeneity of Cell Products: Cell therapies involve living cells that can vary widely; PAT helps monitor this variability.
- Complexity of Processes: Multiple steps like expansion, harvesting, and formulation require tight control.
- Regulatory Expectations: Agencies encourage PAT to support Quality by Design (QbD) and continuous process verification.
Key PAT Tools and Technologies for Cell Therapy
- Spectroscopic Techniques: Raman, NIR, and fluorescence spectroscopy for metabolite and nutrient monitoring.
- Flow Cytometry: Real-time cell counting, viability, and phenotype assessment.
- Impedance Spectroscopy: Monitoring cell growth and morphology in bioreactors.
- Microscopy and Imaging: Automated imaging for cell confluency and morphology.
- Biosensors: Online glucose, lactate, pH, and dissolved oxygen sensors.
Mind Map: PAT Technologies and Their Applications
Example: Implementing Raman Spectroscopy for Metabolite Monitoring
A clinical-scale CAR-T manufacturing facility integrated Raman spectroscopy probes into their stirred-tank bioreactors. This allowed real-time monitoring of glucose and lactate levels, enabling dynamic feed adjustments to optimize cell expansion. The result was improved batch consistency and reduced manual sampling.
Mind Map: Benefits of PAT in Cell Therapy Manufacturing
Best Practice: Integrating Flow Cytometry as an In-Process PAT Tool
Flow cytometry traditionally used as a release test can be adapted for in-process monitoring. For example, automated sampling coupled with rapid staining protocols allows near real-time assessment of cell viability and phenotype during expansion. This enables timely decisions on process adjustments or batch termination.
Example: A manufacturing lead implemented an automated flow cytometry platform that reduced turnaround time from 24 hours to under 4 hours, significantly improving responsiveness.
Challenges and Considerations
- Data Integration: Combining PAT data streams into centralized control systems.
- Sensor Calibration and Validation: Ensuring accuracy and regulatory compliance.
- Sample Handling: Minimizing contamination risk during in-line or at-line measurements.
- Cost and Complexity: Balancing investment with expected benefits.
Summary
PAT is indispensable for modern clinical-scale cell therapy manufacturing. By leveraging technologies like spectroscopy, flow cytometry, and biosensors, manufacturers can achieve real-time insight into their processes, enabling proactive control and ensuring high-quality, consistent cell therapy products.
Additional Resources
- FDA Guidance on PAT: https://www.fda.gov/media/71012/download
- ISPE PAT Community of Practice
- Case studies from leading cell therapy manufacturers
5. Cell Harvesting, Washing, and Formulation
5.1 Techniques for Efficient Cell Harvesting at Scale
Efficient cell harvesting is a critical step in clinical-scale cell therapy manufacturing. It directly impacts product yield, viability, and overall process consistency. Scaling up from small laboratory volumes to clinical manufacturing requires adapting harvesting methods to maintain cell integrity and purity while minimizing contamination risks.
Key Objectives of Cell Harvesting
- Maximize viable cell recovery
- Minimize cell stress and damage
- Maintain sterility and closed processing
- Enable scalability and reproducibility
Common Techniques for Cell Harvesting
Centrifugation
- Description: Uses centrifugal force to separate cells from culture media.
- Best Practice: Use gentle centrifugation speeds optimized for cell type to avoid shear stress.
- Example: For mesenchymal stem cells (MSCs), centrifugation at 300 x g for 5 minutes balances yield and viability.
Filtration
- Description: Cells are separated by passing the culture through filters that retain cells but allow media to pass.
- Best Practice: Use low-shear, single-use filtration devices designed for cell therapy.
- Example: Hollow fiber filters with pore sizes of 0.2–0.45 µm are used to concentrate T cells while removing debris.
Automated Cell Separation Systems
- Description: Closed, automated systems integrate cell washing and concentration.
- Best Practice: Employ systems like Sepax or CliniMACS Prodigy to reduce manual handling and contamination risk.
- Example: CAR-T manufacturing uses automated cell washers to harvest and wash cells prior to formulation.
Tangential Flow Filtration (TFF)
- Description: Crossflow filtration technique that concentrates cells by filtering media tangentially across a membrane.
- Best Practice: Optimize flow rates and membrane pore sizes to minimize cell damage.
- Example: TFF is used for large-scale expansion of induced pluripotent stem cells (iPSCs) to harvest cells efficiently.
Mind Map: Cell Harvesting Techniques
Best Practices for Scaling Cell Harvesting
- Closed System Processing: Use closed or semi-closed systems to reduce contamination risk during harvesting.
- Process Parameter Optimization: Optimize centrifugation speed, filtration flow rates, and processing times specific to cell type.
- Viability Monitoring: Implement real-time viability and concentration assessments during harvesting.
- Minimize Processing Steps: Reduce the number of transfers and handling steps to preserve cell quality.
Example: Scaling Up Autologous CAR-T Cell Harvesting
In a clinical-scale CAR-T manufacturing process, cells are expanded in bioreactors up to 2 L volumes. For harvesting:
- Step 1: Cells are transferred into a closed automated cell washer (e.g., Sepax) for centrifugation and washing.
- Step 2: The system performs gentle centrifugation at 400 x g for 10 minutes to pellet cells.
- Step 3: Cells are washed with formulation buffer to remove residual media and debris.
- Step 4: Harvested cells are concentrated to the target dose volume and transferred aseptically for formulation.
This approach minimizes open handling, maintains >90% viability, and ensures reproducibility across batches.
Mind Map: Best Practices for Cell Harvesting at Scale
Summary
Efficient cell harvesting at clinical scale requires a combination of optimized techniques and best practices tailored to the specific cell therapy product. Employing gentle centrifugation, filtration, or automated closed systems can maximize viable cell recovery while maintaining sterility and scalability. Integrating real-time monitoring and minimizing manual handling further enhances product quality and consistency.
By applying these principles with practical examples, bioprocess engineers and manufacturing leads can ensure robust and reproducible cell harvesting processes that meet clinical manufacturing demands.
5.2 Washing and Concentration Methods to Ensure Product Purity
In clinical-scale cell therapy manufacturing, washing and concentration are critical downstream processing steps that directly impact the purity, potency, and safety of the final cell product. These steps remove residual impurities such as culture media components, dead cells, cell debris, and unwanted proteins, while concentrating the viable therapeutic cells to the desired dose volume.
Key Objectives of Washing and Concentration
- Remove residual reagents and impurities
- Eliminate dead or damaged cells
- Concentrate viable cells to target dose
- Maintain cell viability and functionality
- Minimize contamination risk
Common Washing and Concentration Techniques
-
Centrifugation-Based Methods
- Differential centrifugation to pellet cells and remove supernatant
- Density gradient centrifugation for dead cell removal
-
Tangential Flow Filtration (TFF)
- Uses membrane filtration to wash and concentrate cells
- Gentle on cells, scalable, and closed system compatible
-
Filtration and Cell Capture Devices
- Depth filters or hollow fiber filters to retain cells
- Can be integrated into closed systems
-
Automated Closed-System Platforms
- Devices like Sepax, CliniMACS Prodigy that combine washing and concentration
- Reduce contamination risk and operator variability
Mind Map: Washing and Concentration Methods Overview
Best Practices for Washing and Concentration
- Maintain Closed or Closed-Equivalent Systems: To minimize contamination risk, use closed or semi-closed systems wherever possible.
- Optimize Centrifugation Parameters: Balance centrifugal force and time to maximize cell recovery and viability while effectively removing impurities.
- Validate Membrane Selection in TFF: Choose membranes with appropriate pore size and material compatible with cell type.
- Monitor Cell Viability and Recovery: Use viability assays (e.g., Trypan Blue exclusion, flow cytometry) post-wash to ensure process effectiveness.
- Implement Process Controls: Monitor parameters such as flow rates, pressure, and temperature during filtration to prevent cell damage.
Example 1: Transitioning from Open Centrifugation to Automated Closed-System Washing
A clinical manufacturing site producing CAR-T cells initially used manual centrifugation in open centrifuge buckets for washing and concentration. This led to batch-to-batch variability and contamination concerns.
Solution: They implemented the Sepax system, an automated closed platform that performs washing and concentration with programmable protocols.
Outcome:
- Reduced contamination risk
- Improved cell recovery from ~70% to >85%
- Standardized process with reduced operator variability
Example 2: Using Tangential Flow Filtration for Mesenchymal Stem Cell (MSC) Concentration
In scaling up MSC manufacturing, a bioprocess team adopted TFF with hollow fiber membranes to wash and concentrate cells after expansion.
Key Points:
- Cells were washed with isotonic buffer to remove residual serum proteins.
- TFF parameters optimized to maintain low shear stress.
- Achieved concentration from 1 million cells/mL to 10 million cells/mL.
Benefits:
- Gentle processing preserved MSC viability (>95%) and differentiation potential.
- Closed system reduced contamination risk.
Mind Map: Best Practices for Washing & Concentration
Summary
Effective washing and concentration are essential to ensure the purity and potency of clinical-scale cell therapy products. Selecting appropriate methods tailored to the cell type and process scale, combined with best practices such as closed-system processing and rigorous process control, can significantly improve product quality and manufacturing consistency.
Integrating automated platforms and filtration technologies can further enhance scalability and reduce contamination risks, ultimately supporting successful clinical outcomes.
5.3 Best Practice: Closed System Processing to Minimize Contamination Risks
Closed system processing is a cornerstone best practice in clinical-scale cell therapy manufacturing, designed to significantly reduce contamination risks and ensure product sterility throughout the manufacturing workflow. This approach involves performing all critical processing steps within a sealed, sterile environment, preventing exposure to external contaminants such as microbes, particulates, and endotoxins.
Why Closed System Processing Matters
- Minimizes contamination risk: Eliminates open handling steps where environmental contaminants can enter.
- Enhances product consistency: Reduces batch-to-batch variability caused by environmental factors.
- Facilitates compliance: Meets stringent GMP and regulatory requirements for aseptic processing.
- Improves scalability: Enables automation and integration of processes for clinical-scale manufacturing.
Key Components of Closed System Processing
Examples of Closed System Technologies and Applications
-
Closed Bioreactors:
- Example: Use of single-use stirred-tank bioreactors with sterile connectors to expand T cells without opening the system.
- Benefit: Maintains aseptic conditions while allowing real-time monitoring and control.
-
Single-Use Connectors and Tubing Sets:
- Example: Aseptic welding and sterile connectors (e.g., Thermo Fisher’s TSCD or Sartorius’ Click & Go) enable sterile fluid transfer between bags and devices.
- Benefit: Eliminates manual open transfers, reducing contamination risk.
-
Automated Cell Washing Systems:
- Example: Systems like the Sepax or LOVO platforms perform closed washing and concentration of cells post-harvest.
- Benefit: Minimizes operator intervention and exposure.
-
Closed Filling and Formulation:
- Example: Use of closed vial filling machines integrated with isolators or RABS (Restricted Access Barrier Systems).
- Benefit: Ensures sterile final product filling and packaging.
Integrated Closed System Workflow Example
Practical Tips for Implementing Closed Systems
- Early Integration: Design closed system processes early in process development to avoid costly retrofits.
- Vendor Collaboration: Work closely with equipment suppliers to ensure compatibility and sterile connectivity.
- Operator Training: Train staff extensively on aseptic techniques and closed system operation.
- Process Validation: Conduct thorough validation of closed system integrity, including leak testing and sterility assurance.
- Documentation: Maintain detailed SOPs and batch records reflecting closed system workflows.
Case Study: Closed System Processing in CAR-T Cell Manufacturing
A leading cell therapy manufacturer transitioned from open bag handling to a fully closed system using single-use bioreactors, sterile welding connectors, and automated cell washers. This transition resulted in:
- A 75% reduction in contamination incidents.
- Improved batch consistency and yield.
- Streamlined regulatory inspections with clear aseptic process controls.
The closed system approach enabled the company to scale up production to meet clinical demand while maintaining high product quality.
In summary, adopting closed system processing is a best practice that significantly enhances the safety, quality, and scalability of clinical-scale cell therapy manufacturing. Through the integration of advanced technologies and rigorous process design, manufacturers can minimize contamination risks and deliver consistent, high-quality cell therapy products.
5.4 Case Study: Formulation Strategies to Enhance Cell Viability Post-Thaw
Cell therapy products often require cryopreservation to maintain cell viability and functionality during storage and transport. However, the thawing process can impose significant stress on cells, leading to reduced viability and therapeutic efficacy. This case study explores formulation strategies designed to enhance cell viability post-thaw, illustrating best practices with practical examples.
Understanding the Challenges of Post-Thaw Cell Viability
- Cryoinjury: Ice crystal formation during freezing and thawing can damage cell membranes.
- Osmotic Stress: Changes in solute concentration during freezing/thawing can cause cell shrinkage or swelling.
- Toxicity of Cryoprotectants: Some cryoprotectants can be toxic at higher concentrations or prolonged exposure.
Key Formulation Strategies
Example 1: Optimizing Cryoprotectant Concentration
Background: Dimethyl sulfoxide (DMSO) is the most common cryoprotectant used at 10% v/v concentration. However, high DMSO levels can be cytotoxic.
Approach: A biopharma manufacturer tested formulations with reduced DMSO (5%) combined with trehalose, a disaccharide known to stabilize membranes.
Outcome: Post-thaw viability improved from 70% (10% DMSO alone) to 85% (5% DMSO + 100 mM trehalose), with reduced toxicity and better functional recovery.
Example 2: Incorporating Antioxidants to Reduce Oxidative Stress
Background: Oxidative stress during thawing can damage cells.
Approach: Addition of 1 mM glutathione to the formulation buffer during freezing.
Outcome: Cells showed a 15% increase in viability and enhanced proliferation capacity post-thaw compared to controls without antioxidants.
Example 3: Serum-Free Formulation with Polymers
Background: Serum proteins like albumin provide protection but introduce variability and regulatory concerns.
Approach: Replacement of serum with 1% polyvinylpyrrolidone (PVP) and optimized ionic buffer.
Outcome: Achieved comparable post-thaw viability (~80%) and improved batch-to-batch consistency.
Best Practice: Controlled Thawing and Dilution
- Rapid thawing in a 37°C water bath minimizes ice recrystallization.
- Gradual dilution of cryoprotectants post-thaw reduces osmotic shock.
Summary
Formulation strategies that combine optimized cryoprotectant concentrations, osmoprotectants, antioxidants, and serum-free additives, alongside controlled thawing protocols, significantly improve cell viability and function post-thaw. These approaches reduce cytotoxicity, osmotic and oxidative stress, and enhance reproducibility — critical factors for clinical-scale cell therapy manufacturing.
References & Further Reading
- Baust, J. G., et al. “Advances in cryopreservation of stem cells and cell therapies.” Stem Cells Translational Medicine, 2017.
- Baust, J. M., et al. “Cryopreservation: An emerging paradigm change.” Organogenesis, 2014.
- Rowley, S. D., et al. “Cryopreservation of hematopoietic progenitor cells: current status and future directions.” Bone Marrow Transplantation, 2011.
6. Cryopreservation and Storage
6.1 Principles of Cryopreservation for Cell Therapy Products
Cryopreservation is a critical step in the manufacturing and supply chain of cell therapy products. It enables long-term storage and transportation of viable cells without compromising their functionality, ensuring that patients receive effective therapies.
What is Cryopreservation?
Cryopreservation is the process of preserving cells, tissues, or any biological constructs by cooling them to sub-zero temperatures, typically using liquid nitrogen at -196°C or mechanical freezers at around -80°C. At these temperatures, all biological activity, including biochemical reactions that lead to cell death, is effectively halted.
Key Principles of Cryopreservation
- Controlled Cooling Rate: Cooling cells too quickly can cause intracellular ice formation, damaging cell membranes. Cooling too slowly can lead to excessive dehydration and solute concentration, which is also harmful.
- Cryoprotectants: Substances like DMSO (dimethyl sulfoxide) or glycerol are added to protect cells from ice crystal formation and osmotic shock.
- Storage Temperature: Cells must be stored at sufficiently low temperatures to maintain viability; typically in vapor phase liquid nitrogen to avoid contamination.
- Thawing Process: Rapid thawing is generally preferred to minimize ice recrystallization, which can damage cells.
Mind Map: Principles of Cryopreservation
Example: Optimizing Cryoprotectant Concentration for CAR-T Cells
In one clinical manufacturing process for CAR-T therapies, the team optimized the DMSO concentration to 10% (v/v) in the freezing medium. Lower concentrations led to reduced post-thaw viability, while higher concentrations increased cytotoxicity during freezing and thawing steps.
The optimized protocol included:
- Using 10% DMSO in a serum-free cryopreservation medium
- Controlled-rate freezing at approximately 1°C per minute down to -80°C
- Transfer to vapor phase liquid nitrogen storage
- Rapid thawing in a 37°C water bath
This approach resulted in >85% viability and maintained CAR-T cell cytotoxic functionality post-thaw.
Mind Map: Example Cryopreservation Workflow for CAR-T Cells
Additional Considerations
-
Container Selection: Cryovials are common for small volumes, while cryobags are preferred for larger clinical doses. The container must be compatible with freezing and storage conditions.
-
Osmotic Stress Management: During freezing and thawing, cells experience changes in osmotic pressure. Proper cryoprotectant formulation and controlled cooling rates help mitigate this.
-
Regulatory Compliance: Cryopreservation protocols must be validated and documented to meet GMP and regulatory standards.
-
Quality Control: Post-thaw viability, sterility, and potency assays are essential to ensure product quality.
Summary
Cryopreservation is a delicate balance of physical and chemical parameters designed to preserve cell viability and function. Understanding and controlling cooling rates, cryoprotectant use, storage conditions, and thawing methods are essential best practices in clinical-scale cell therapy manufacturing.
By integrating these principles with robust process controls and quality assessments, manufacturers can ensure consistent delivery of safe and effective cell therapy products.
6.2 Optimizing Cryoprotectant Formulations with Practical Examples
Cryopreservation is a critical step in clinical-scale cell therapy manufacturing, ensuring long-term storage and maintaining cell viability and functionality upon thawing. Optimizing cryoprotectant formulations is essential to minimize cryo-injury caused by ice crystal formation, osmotic shock, and toxicity.
Understanding Cryoprotectants (CPAs)
Cryoprotectants are substances that protect biological tissue from freezing damage. They are broadly classified into:
- Permeating CPAs: Small molecules that penetrate the cell membrane (e.g., DMSO, glycerol).
- Non-permeating CPAs: Larger molecules that remain extracellular and help control osmotic balance (e.g., sugars like trehalose, polymers like hydroxyethyl starch).
Mind Map: Types of Cryoprotectants and Their Roles
Key Considerations for Optimizing Cryoprotectant Formulations
-
Cell Type Specificity: Different cell types (e.g., T cells, mesenchymal stem cells, hematopoietic stem cells) respond differently to CPAs. Optimization requires tailoring concentrations and combinations.
-
Toxicity vs. Protection Balance: Higher CPA concentrations improve cryoprotection but increase cytotoxicity. Finding the optimal concentration minimizes toxicity while preserving viability.
-
Freezing and Thawing Rates: CPA effectiveness depends on controlled-rate freezing and rapid thawing to reduce ice formation and osmotic stress.
-
Serum vs. Serum-Free Formulations: Serum-containing formulations can improve survival but pose regulatory and variability concerns. Serum-free or xeno-free formulations are preferred for clinical applications.
Practical Example 1: Optimizing DMSO Concentration for CAR-T Cells
- Background: DMSO is the most common permeating CPA used at 10% (v/v) concentration. However, some CAR-T cell products show reduced viability due to DMSO toxicity.
- Approach: A study tested 5%, 7.5%, and 10% DMSO concentrations combined with 2% hydroxyethyl starch (HES) in a serum-free medium.
- Outcome: 7.5% DMSO + 2% HES yielded >90% post-thaw viability and retained cytotoxic function, reducing toxicity compared to 10% DMSO.
Practical Example 2: Incorporating Trehalose for Mesenchymal Stem Cells (MSCs)
- Background: Trehalose is a sugar that stabilizes membranes and proteins during freezing.
- Approach: MSCs were cryopreserved using 5% DMSO with 0.2 M trehalose in a serum-free medium.
- Outcome: The addition of trehalose improved post-thaw viability by 15% compared to DMSO alone and enhanced recovery of differentiation potential.
Mind Map: Steps to Optimize Cryoprotectant Formulation
Practical Example 3: Serum-Free Cryopreservation of Hematopoietic Stem Cells (HSCs)
- Background: Regulatory agencies encourage serum-free formulations to reduce variability.
- Approach: A formulation using 10% DMSO, 5% human serum albumin (HSA), and 0.1 M sucrose was tested.
- Outcome: Comparable viability and engraftment efficiency to serum-containing controls, with improved regulatory compliance.
Tips for Implementation
- Perform small-scale pilot studies to screen CPA combinations and concentrations.
- Use viability assays (e.g., trypan blue exclusion, flow cytometry with viability dyes) and functional assays (e.g., cytotoxicity, differentiation) post-thaw.
- Monitor osmolarity and pH of cryoprotectant solutions to avoid additional stress.
- Document all formulation parameters and batch-to-batch consistency.
Summary
Optimizing cryoprotectant formulations is a balance between maximizing cell survival and minimizing toxicity. Incorporating both permeating and non-permeating CPAs, tailoring to specific cell types, and using serum-free media where possible are key best practices. Practical examples demonstrate how adjusting DMSO concentration, adding sugars like trehalose, and replacing serum with human albumin can significantly improve clinical-scale cryopreservation outcomes.
6.3 Controlled-Rate Freezing and Storage Best Practices
Controlled-rate freezing (CRF) is a critical step in the cryopreservation of cell therapy products, ensuring optimal cell viability and functionality post-thaw. This process carefully manages the cooling rate to prevent intracellular ice formation and osmotic shock, which can damage cells.
Key Principles of Controlled-Rate Freezing
- Optimal Cooling Rate: Typically ranges between -1°C/min to -3°C/min depending on cell type.
- Nucleation Induction: Initiating ice formation at a controlled temperature to avoid supercooling.
- Holding Steps: Pauses during freezing to allow temperature equilibration.
- Final Cooling: Rapid cooling to storage temperature (usually below -150°C).
Mind Map: Controlled-Rate Freezing Process
Best Practices for Controlled-Rate Freezing
-
Standardize Freezing Protocols: Develop and validate freezing profiles specific to each cell therapy product.
-
Use Automated Controlled-Rate Freezers: These devices provide precise temperature control and reproducibility.
-
Induce Ice Nucleation Consistently: Manual seeding or automated nucleation reduces variability.
-
Monitor and Document Temperature Profiles: Use data loggers to record temperature changes for batch records.
-
Validate Cryoprotectant Concentrations: Optimize cryoprotectant (e.g., DMSO) levels to balance toxicity and protection.
-
Implement Redundant Storage Systems: Use dual storage tanks or locations to mitigate risk of loss.
-
Regularly Calibrate Equipment: Ensure freezers and temperature sensors are within specification.
Example: Implementing Controlled-Rate Freezing for CAR-T Cells
A manufacturing facility producing CAR-T cells standardized their freezing protocol as follows:
- Cell suspension mixed with 10% DMSO cryoprotectant.
- Loaded into cryobags compatible with controlled-rate freezer.
- Freezing profile:
- Cool from room temperature to -5°C at -1°C/min.
- Manual nucleation induced by touching the bag with a precooled metal rod.
- Continue cooling at -1°C/min to -40°C.
- Hold for 15 minutes at -40°C.
- Rapid cooling to -150°C.
- Transfer to vapor phase liquid nitrogen storage.
This protocol improved post-thaw viability from 75% to 90%, reducing batch failures.
Mind Map: Storage Best Practices for Cryopreserved Cell Therapies
Example: Managing Cold Chain Logistics
A clinical trial site received cryopreserved allogeneic cell therapy products shipped on dry ice. Upon arrival:
- The shipment was immediately transferred to vapor phase liquid nitrogen storage.
- Temperature data loggers confirmed maintenance of -80°C during transit.
- Prior to administration, cells were rapidly thawed and processed within 30 minutes.
This strict cold chain management ensured cell viability above 85%, supporting successful patient dosing.
Summary
Controlled-rate freezing and proper storage are essential to preserving the quality and efficacy of clinical-scale cell therapy products. By implementing standardized freezing protocols, leveraging automation, and maintaining rigorous storage conditions, manufacturers can maximize cell viability and ensure consistent therapeutic outcomes.
6.4 Monitoring and Managing Cold Chain Logistics
Effective cold chain logistics are critical to maintaining the integrity, potency, and safety of cell therapy products during storage and transportation. Any deviation in temperature or handling can compromise product quality, leading to failed clinical outcomes or regulatory non-compliance. This section covers best practices, monitoring strategies, and real-world examples to ensure robust cold chain management.
Key Components of Cold Chain Logistics
- Temperature Control: Maintaining specified temperature ranges (typically -80°C to -196°C for cryopreserved cells).
- Packaging: Use of validated insulated containers and dry ice or liquid nitrogen shippers.
- Transportation: Reliable carriers with cold chain expertise.
- Monitoring: Real-time temperature tracking and alarm systems.
- Contingency Planning: Procedures for deviations or delays.
Mind Map: Cold Chain Logistics Overview
Best Practices for Monitoring Cold Chain
-
Use Validated Temperature Monitoring Devices:
- Deploy calibrated data loggers or wireless sensors capable of continuous temperature recording.
- Example: A clinical-scale CAR-T therapy manufacturer implemented RFID-enabled temperature sensors in dry ice shippers, enabling real-time alerts if temperatures rise above -78°C.
-
Real-Time Data Access and Alerts:
- Integrate monitoring devices with cloud-based platforms to allow remote tracking.
- Example: A cell therapy logistics provider uses a dashboard that triggers SMS/email alerts to manufacturing leads and QC specialists if excursions occur during transport.
-
Comprehensive Documentation:
- Maintain temperature logs as part of batch records to demonstrate compliance.
- Example: During an audit, a QC team successfully demonstrated cold chain integrity by providing continuous temperature data from shipment to receipt.
-
Regular Calibration and Maintenance:
- Schedule periodic calibration of monitoring devices to ensure accuracy.
- Example: A bioprocess engineering team established a quarterly calibration schedule for all temperature probes used in storage freezers.
Mind Map: Temperature Monitoring Workflow
Managing Cold Chain Logistics: Packaging and Transport
-
Packaging Validation:
- Perform thermal qualification studies to validate packaging maintains temperature for expected transit times.
- Example: An allogeneic stem cell therapy company conducted worst-case scenario testing with extended dry ice duration to validate packaging robustness.
-
Dry Ice vs. Liquid Nitrogen:
- Dry ice is commonly used for -78°C storage; liquid nitrogen vapor phase is required for ultra-low temperatures (-150°C and below).
- Example: For long-distance shipments exceeding 48 hours, a manufacturer switched from dry ice to liquid nitrogen shippers to prevent temperature excursions.
-
Transport Partner Selection:
- Choose carriers experienced in handling biologics with cold chain capabilities.
- Example: A manufacturing lead partnered with a logistics firm specializing in cell and gene therapy shipments, reducing delays and temperature excursions by 30%.
Mind Map: Packaging and Transport Considerations
Contingency Planning and Excursion Management
-
Standard Operating Procedures (SOPs):
- Define clear steps for handling temperature excursions, including quarantine, investigation, and disposition.
- Example: Upon receiving a shipment with a temperature excursion, a QC specialist initiated an SOP that involved retesting cell viability and notifying regulatory affairs.
-
Backup Storage Solutions:
- Maintain emergency storage units with backup power to safeguard products during equipment failure.
- Example: A manufacturing site installed liquid nitrogen backup tanks and UPS systems to ensure continuous cryogenic storage during power outages.
-
Training and Communication:
- Train all personnel involved in cold chain logistics on procedures and escalation pathways.
- Example: Regular cross-functional training sessions improved response times to cold chain deviations by 40%.
Mind Map: Contingency Planning
Summary Example: End-to-End Cold Chain Management
A clinical-scale cell therapy manufacturer shipping autologous CAR-T products implemented a comprehensive cold chain strategy:
- Used validated liquid nitrogen vapor shippers with RFID temperature sensors.
- Partnered with a specialized logistics provider offering real-time tracking dashboards.
- Established SOPs for temperature excursions, including immediate notification and product quarantine.
- Trained personnel across manufacturing, QC, and logistics teams on cold chain protocols.
This integrated approach resulted in zero temperature excursions over 50 shipments and improved regulatory inspection outcomes.
By adopting these best practices and leveraging technology-enabled monitoring, bioprocess engineers, QC specialists, and manufacturing leads can ensure the highest quality and safety of clinical-scale cell therapy products throughout their cold chain journey.
7. Quality Control Testing Framework
7.1 Defining Critical Quality Attributes (CQAs) for Cell Therapies
Critical Quality Attributes (CQAs) are the physical, chemical, biological, or microbiological properties or characteristics that must be controlled within predefined limits to ensure the desired product quality, safety, and efficacy. In cell therapy manufacturing, defining CQAs is a foundational step for establishing a robust quality control framework.
What Are CQAs in Cell Therapies?
CQAs represent the measurable attributes that directly impact the therapeutic function and patient safety of the cell therapy product. These attributes guide process development, in-process controls, release testing, and stability assessments.
Key Categories of CQAs for Cell Therapies
Mind Map: Critical Quality Attributes (CQAs) for Cell Therapies
Examples of CQAs in Specific Cell Therapy Modalities
-
CAR-T Cell Therapy
- Identity: Expression of CAR transgene confirmed by flow cytometry or PCR.
- Potency: Ability to kill target tumor cells in vitro (cytotoxicity assay).
- Viability: >70% viable cells post-thaw.
- Safety: Negative for replication-competent lentivirus and endotoxin <5 EU/kg.
-
Hematopoietic Stem Cell Therapy (HSCT)
- Identity: CD34+ cell count as a marker of stem cell population.
- Purity: Low contamination with T cells to reduce graft-versus-host disease.
- Viability: >80% viable cells at infusion.
- Potency: Colony-forming unit assays demonstrating hematopoietic potential.
Establishing CQAs: Best Practices
- Start with Product Understanding: Map the mechanism of action and critical biological functions.
- Use Risk-Based Approaches: Prioritize attributes that impact safety and efficacy.
- Leverage Analytical Tools: Employ flow cytometry, molecular assays, and functional tests.
- Iterative Refinement: Update CQAs based on clinical data and manufacturing experience.
Example: Defining CQAs for an Allogeneic MSC Therapy
| Attribute | Measurement Method | Acceptance Criteria | Rationale |
|---|---|---|---|
| Identity | Flow cytometry (CD73+, CD90+, CD105+) | >95% positive cells | Confirm MSC phenotype |
| Purity | Flow cytometry (CD45-, CD34-) | <2% hematopoietic cells | Minimize contamination |
| Potency | Immunomodulatory assay (e.g., T-cell suppression) | >50% suppression of T-cell proliferation | Demonstrate functional activity |
| Viability | Trypan blue exclusion or automated viability assay | >85% viable cells | Ensure cell survival |
| Safety | Sterility testing, endotoxin assay | Sterile, <0.5 EU/mL | Prevent infection and pyrogenic reactions |
Mind Map: Workflow for Defining CQAs
Summary
Defining CQAs for cell therapies is a multidisciplinary effort that combines biological understanding, analytical rigor, and regulatory compliance. By clearly identifying and controlling these attributes, bioprocess engineers and QC specialists can ensure consistent product quality and patient safety throughout clinical-scale manufacturing.
7.2 In-Process and Release Testing Strategies
In-process and release testing are critical components of quality control in clinical-scale cell therapy manufacturing. These testing strategies ensure that the cell therapy product meets predefined quality attributes throughout the manufacturing process and before it is released for clinical use. Implementing robust testing strategies helps to maintain product safety, efficacy, and consistency.
In-Process Testing
In-process testing monitors critical quality attributes (CQAs) during manufacturing to detect deviations early and enable timely corrective actions. Key in-process tests include:
- Cell Viability and Count: Ensures cells remain viable and proliferate as expected.
- Phenotypic Analysis: Confirms identity and purity of the cell population.
- Metabolic Activity: Measures parameters like glucose consumption and lactate production to assess cell health.
- Sterility Checks: Early detection of microbial contamination.
- pH and Osmolality: Maintains optimal culture conditions.
Example:
During expansion of CAR-T cells, flow cytometry is used at multiple time points to verify the expression of CAR markers and T-cell subsets, ensuring the product maintains the desired phenotype.
Release Testing
Release testing is performed on the final product batch to confirm it meets all quality specifications before administration to patients. Typical release tests include:
- Identity Testing: Confirms the correct cell type and genetic modifications.
- Purity and Potency: Ensures the product is free from unwanted cell types and demonstrates biological activity.
- Viability: Confirms sufficient live cells are present.
- Sterility and Endotoxin Testing: Guarantees the product is free from microbial contamination and pyrogens.
- Mycoplasma Testing: Detects mycoplasma contamination.
Example:
A final batch of allogeneic mesenchymal stem cells (MSCs) undergoes a potency assay measuring their immunomodulatory effect on activated T-cells, ensuring therapeutic efficacy.
Mind Map: In-Process and Release Testing Overview
Best Practices for Testing Strategies
- Integrate Real-Time Monitoring: Use Process Analytical Technologies (PAT) such as online flow cytometry or metabolic sensors to reduce delays.
- Use Qualified Analytical Methods: Ensure all assays are validated for accuracy, precision, and robustness.
- Implement Risk-Based Testing Frequency: Increase testing frequency during critical process steps or when process changes occur.
- Maintain Comprehensive Documentation: Record all test results and deviations to support regulatory compliance.
Example: Implementing Flow Cytometry for In-Process Identity and Purity Assessment
A clinical-scale manufacturing campaign for autologous T-cell therapy incorporated flow cytometry at day 3, 7, and 10 of expansion to monitor CD3+ T-cell percentages and CAR expression. This approach allowed early detection of culture drift and timely process adjustments, improving batch consistency.
Mind Map: Best Practices and Examples
Summary
In-process and release testing strategies are essential to ensure the quality and safety of clinical-scale cell therapy products. By integrating robust testing methods, leveraging real-time monitoring technologies, and following best practices, manufacturers can confidently deliver therapies that meet stringent regulatory and clinical requirements.
7.3 Example: Implementing Flow Cytometry for Identity and Purity Assessment
Flow cytometry is a cornerstone analytical technique widely used in clinical-scale cell therapy manufacturing to assess critical quality attributes such as cell identity, purity, viability, and phenotype. This section provides a detailed example of how flow cytometry can be implemented effectively for identity and purity assessment, integrating best practices and practical examples.
What is Flow Cytometry?
Flow cytometry is a laser-based technology that analyzes physical and chemical characteristics of cells or particles in a fluid as they pass through at least one laser. It enables multiparametric analysis of thousands of cells per second.
Why Use Flow Cytometry for Cell Therapy QC?
- Identity: Confirm the presence of target cell populations by detecting specific surface markers.
- Purity: Quantify contaminating cell types or unwanted populations.
- Viability: Assess live/dead cell ratios using viability dyes.
- Functionality: Measure expression of functional markers (e.g., activation markers).
Step-by-Step Implementation Example
Define Critical Quality Attributes (CQAs)
- Identify key markers that define the therapeutic cell type.
- Example: For CAR-T cells, CD3+ (T cells), CD4+ and CD8+ subsets, CAR expression.
Panel Design and Antibody Selection
- Choose fluorochrome-conjugated antibodies targeting relevant markers.
- Include viability dye (e.g., 7-AAD, Zombie Aqua).
- Example Panel:
- CD3-FITC (T cell marker)
- CD4-PE (Helper T cells)
- CD8-APC (Cytotoxic T cells)
- CAR-PE-Cy7 (Chimeric Antigen Receptor)
- Viability Dye
Sample Preparation
- Harvest cells from the manufacturing batch.
- Wash and resuspend in staining buffer.
- Incubate with antibody cocktail for 20-30 minutes at 4°C in the dark.
- Wash and resuspend for acquisition.
Instrument Setup and Calibration
- Perform daily QC and calibration using beads.
- Set compensation controls to correct spectral overlap.
Data Acquisition
- Acquire at least 10,000 events per sample.
- Use gating strategy to exclude debris and doublets.
Data Analysis and Reporting
- Gate on live cells using viability dye exclusion.
- Identify target populations (e.g., CD3+CAR+).
- Calculate purity as percentage of target cells over total live cells.
- Example Result: 92% CD3+CAR+ cells indicating high purity.
Mind Map: Flow Cytometry Implementation Workflow
Best Practices
- Use appropriate controls: Include unstained, single-stained, and fluorescence-minus-one (FMO) controls to ensure accurate gating.
- Standardize protocols: Maintain consistent staining and acquisition protocols to reduce variability.
- Automate analysis: Utilize software tools for reproducible gating and reporting.
- Document thoroughly: Record all instrument settings, reagent lots, and analysis parameters for traceability.
Practical Example: CAR-T Cell Identity and Purity Assessment
A clinical manufacturing site implemented flow cytometry to assess CAR-T cell products before batch release. The process included:
- Designing a 5-color panel targeting CD3, CD4, CD8, CAR, and viability.
- Running daily instrument QC with calibration beads.
- Using FMO controls to set gates precisely.
- Analyzing samples from 20 batches, achieving an average purity of 90-95% CD3+CAR+ cells.
- Detecting and troubleshooting batches with lower purity by investigating upstream process deviations.
This example highlights how flow cytometry data can guide manufacturing decisions and ensure product quality.
Summary
Implementing flow cytometry for identity and purity assessment in clinical-scale cell therapy manufacturing is essential for meeting regulatory and quality requirements. By following a structured workflow, applying best practices, and leveraging robust data analysis, bioprocess engineers and QC specialists can confidently release safe and effective cell therapy products.
7.4 Microbial and Endotoxin Testing Best Practices
Microbial and endotoxin testing are critical components of quality control in clinical-scale cell therapy manufacturing. Ensuring that cell therapy products are free from microbial contamination and endotoxins is essential for patient safety and regulatory compliance. This section outlines best practices, methodologies, and practical examples to help bioprocess engineers, QC specialists, and manufacturing leads implement robust testing strategies.
Importance of Microbial and Endotoxin Testing
- Microbial contamination can lead to product spoilage, patient infections, and batch rejection.
- Endotoxins, primarily from Gram-negative bacteria, can cause severe inflammatory responses even if bacteria are not viable.
- Regulatory agencies (FDA, EMA) require stringent testing before batch release.
Best Practices for Microbial Testing
Selection of Appropriate Test Methods
- Sterility Testing: Use compendial methods such as USP <71> sterility test or rapid microbiological methods (RMM).
- Environmental Monitoring: Regular sampling of cleanroom air, surfaces, and personnel.
- In-Process Controls: Bioburden testing during critical stages.
Sample Handling and Preparation
- Use aseptic techniques to avoid false positives.
- Validate sampling volumes and dilution factors.
Test Method Validation
- Validate detection limits, specificity, and robustness.
- Example: Validating a rapid microbial detection system (e.g., ATP bioluminescence) against traditional culture methods.
Risk-Based Testing Frequency
- Increase testing frequency for high-risk steps or new processes.
Documentation and Trending
- Maintain detailed records.
- Use trending data to identify contamination sources early.
Best Practices for Endotoxin Testing
Test Method Selection
- Limulus Amebocyte Lysate (LAL) Assay: The gold standard for endotoxin detection.
- Alternative Methods: Recombinant Factor C (rFC) assay for animal-free testing.
Sample Preparation
- Proper dilution to avoid interference.
- Use endotoxin-free materials and reagents.
Validation of Assays
- Spike recovery tests to confirm assay accuracy.
- Establish assay sensitivity and specificity.
Setting Acceptance Criteria
- Define endotoxin limits based on product type and administration route.
Routine Monitoring
- Test raw materials, in-process samples, and final products.
Mind Map: Microbial Testing Workflow
Mind Map: Endotoxin Testing Best Practices
Practical Examples
Example 1: Implementing Rapid Microbial Testing in a CAR-T Manufacturing Process
- Challenge: Traditional sterility testing takes 14 days, delaying batch release.
- Solution: Validation of a rapid microbial detection system using ATP bioluminescence.
- Outcome: Reduced detection time to 24 hours, enabling faster product release without compromising safety.
Example 2: Overcoming Interference in Endotoxin Testing of Cell Therapy Formulations
- Challenge: High protein content in cell formulation interfered with LAL assay.
- Solution: Optimized sample dilution and used endotoxin-specific buffer to neutralize interference.
- Outcome: Reliable endotoxin results with consistent spike recoveries between 50-200%.
Example 3: Environmental Monitoring to Prevent Contamination in an Allogeneic Cell Therapy Facility
- Practice: Daily air and surface sampling combined with personnel monitoring.
- Result: Early detection of increased microbial counts led to corrective actions (cleaning, retraining), preventing batch contamination.
Summary
- Microbial and endotoxin testing are non-negotiable for clinical cell therapy product safety.
- Employ validated, sensitive, and rapid methods where possible.
- Maintain rigorous aseptic sampling and documentation.
- Use risk-based approaches to optimize testing frequency.
- Continuous environmental monitoring supports contamination control.
By integrating these best practices, manufacturing teams can ensure high-quality, safe cell therapy products ready for clinical use.
8. Analytical Method Development and Validation
8.1 Selecting Appropriate Analytical Techniques for Cell Therapy QC
Selecting the right analytical techniques for quality control (QC) in cell therapy manufacturing is critical to ensure product safety, efficacy, and consistency. Cell therapies are complex biological products, often involving living cells with unique characteristics that require specialized testing methods. This section explores key considerations, common analytical techniques, and practical examples to guide bioprocess engineers, QC specialists, and manufacturing leads in choosing the most appropriate QC tools.
Key Considerations When Selecting Analytical Techniques
- Critical Quality Attributes (CQAs): Identify the CQAs relevant to the specific cell therapy product (e.g., identity, purity, potency, viability, sterility).
- Regulatory Expectations: Ensure methods meet regulatory guidelines (FDA, EMA, ICH) for validation, sensitivity, and specificity.
- Throughput and Turnaround Time: Balance the need for rapid results with accuracy, especially for autologous therapies with short shelf lives.
- Sample Volume and Availability: Consider the limited sample sizes typical in cell therapy products.
- Complexity and Cost: Evaluate the complexity of the method and operational costs.
- Automation and Standardization: Favor techniques that allow for automation to reduce variability.
Mind Map: Factors Influencing Analytical Technique Selection
Common Analytical Techniques for Cell Therapy QC
-
Flow Cytometry
- Measures cell identity, purity, viability, and phenotype.
- Multiparametric analysis allows simultaneous detection of multiple markers.
- Example: Using CD3, CD4, CD8 markers to characterize T-cell subsets in CAR-T products.
-
qPCR (Quantitative Polymerase Chain Reaction)
- Detects and quantifies gene expression or vector copy number.
- Important for gene-modified cell therapies.
- Example: Measuring lentiviral vector integration levels to assess transduction efficiency.
-
ELISA (Enzyme-Linked Immunosorbent Assay)
- Quantifies secreted proteins such as cytokines or growth factors.
- Useful for potency assays or monitoring cell activation.
- Example: Measuring IFN-γ secretion as a potency indicator for activated T cells.
-
Microscopy and Imaging
- Assesses cell morphology and confluency.
- Live/dead staining to evaluate viability.
- Example: Phase-contrast microscopy combined with fluorescent viability dyes.
-
Sterility Testing
- Culture-based methods or rapid microbiological methods.
- Essential for ensuring product safety.
- Example: BacT/ALERT system for automated sterility testing.
-
Endotoxin Testing
- Limulus Amebocyte Lysate (LAL) assay to detect bacterial endotoxins.
- Critical for injectable cell therapy products.
-
Potency Assays
- Functional assays measuring biological activity.
- Example: Cytotoxicity assays for CAR-T cells measuring target cell killing.
Mind Map: Analytical Techniques and Their Applications
Practical Examples
Example 1: Flow Cytometry for Identity and Purity
A manufacturing lead at a clinical-scale CAR-T facility implemented a flow cytometry panel including CD3, CD4, CD8, and viability dyes to confirm the identity and purity of the final product. This approach allowed rapid detection of contaminating cell populations and ensured that >90% of cells expressed the expected T-cell markers before batch release.
Example 2: qPCR for Vector Copy Number
QC specialists used qPCR to quantify lentiviral vector copy number in gene-modified hematopoietic stem cells. By establishing a validated standard curve and controls, they ensured the vector copy number remained within the therapeutic window, balancing efficacy and safety.
Example 3: ELISA-Based Potency Assay
To assess the potency of natural killer (NK) cell therapies, an ELISA was developed to measure IFN-γ secretion after target cell stimulation. This assay provided a quantitative and reproducible measure of functional activity, supporting batch release decisions.
Summary
Selecting appropriate analytical techniques for cell therapy QC requires a thorough understanding of product-specific CQAs, regulatory requirements, and operational constraints. Combining multiple complementary methods often provides the most comprehensive quality assessment. Incorporating automation and validated assays enhances reliability and supports consistent clinical-scale manufacturing.
For further reading, consider exploring regulatory guidance documents such as FDA’s “Guidance for Industry: Chemistry, Manufacturing, and Control (CMC) Information for Human Gene Therapy Investigational New Drug Applications (INDs)” and EMA’s guidelines on advanced therapy medicinal products (ATMPs).
8.2 Validation Protocols and Regulatory Expectations
Validation is a critical component in ensuring that analytical methods used in cell therapy quality control are reliable, reproducible, and compliant with regulatory standards. This section covers the essential elements of validation protocols and highlights key regulatory expectations with practical examples.
What is Method Validation?
Method validation is the documented process of demonstrating that an analytical method is suitable for its intended purpose. It ensures accuracy, precision, specificity, sensitivity, and robustness of the assay.
Key Validation Parameters
Example: For a flow cytometry-based identity assay of CAR-T cells, specificity ensures that the method distinguishes CAR-T cells from other lymphocytes, while precision confirms consistent results across different operators and days.
Validation Protocol Structure
A typical validation protocol includes:
- Objective: Define the purpose and scope of the validation.
- Method Description: Detailed procedure of the analytical method.
- Acceptance Criteria: Predefined limits for each validation parameter.
- Experimental Plan: Number of replicates, sample types, and controls.
- Data Analysis: Statistical methods to evaluate results.
- Conclusion: Summary of whether the method meets criteria.
Regulatory Expectations
Regulatory agencies such as the FDA, EMA, and ICH provide guidance documents outlining expectations for validation:
- FDA Guidance for Industry: Bioanalytical Method Validation (2018)
- ICH Q2(R1): Validation of Analytical Procedures: Text and Methodology
- EMA Guideline on the Requirements for the Chemical and Pharmaceutical Quality Documentation Concerning Investigational Medicinal Products in Clinical Trials
Key expectations include:
- Validation must be performed before method implementation.
- Use of qualified reference standards and controls.
- Documentation must be thorough and auditable.
- Revalidation is required if significant changes occur.
Mind Map: Regulatory Expectations
Practical Example: Developing a Potency Assay Validation Protocol for CAR-T Cells
Objective: Validate a flow cytometry-based assay measuring CAR expression and cytokine secretion as potency indicators.
Validation Parameters & Approach:
- Accuracy: Spike known quantities of CAR-positive cells into negative matrix; recover within ±10%.
- Precision: Repeatability assessed by three analysts over three days; %CV ≤ 15%.
- Specificity: Confirm no signal in CAR-negative control cells.
- Linearity: Test serial dilutions from 10^6 to 10^3 cells/mL; R² ≥ 0.99.
- Robustness: Vary incubation times ±10% and reagent lots.
Outcome: Method met all acceptance criteria and was approved for routine QC use.
Tips for Successful Validation
- Engage cross-functional teams early (QC, manufacturing, regulatory).
- Use risk-based approaches to prioritize critical parameters.
- Maintain clear and organized documentation.
- Plan for method transfer and training.
Summary
Validation protocols ensure analytical methods for cell therapy QC are fit-for-purpose and comply with regulatory standards. Understanding and implementing these protocols with clear documentation and practical examples, such as potency assay validation, supports robust quality control and regulatory approval.
8.3 Case Example: Developing a Potency Assay for CAR-T Cell Products
Developing a robust potency assay for CAR-T cell products is a critical step in ensuring product efficacy, safety, and regulatory compliance. Potency assays measure the biological activity of the cell therapy and serve as a surrogate for clinical effectiveness. This section walks through best practices, challenges, and examples in designing and validating a potency assay tailored for CAR-T therapies.
Understanding Potency Assays for CAR-T Cells
Potency assays for CAR-T cells typically assess the ability of the engineered T cells to recognize and kill target cancer cells or produce cytokines upon antigen engagement. The assay must be sensitive, specific, reproducible, and feasible for routine quality control.
Key Objectives:
- Measure functional activity (e.g., cytotoxicity, cytokine release)
- Reflect mechanism of action (MoA)
- Provide quantitative and reproducible results
Mind Map: Components of a Potency Assay for CAR-T Cells
Step-by-Step Example: Developing a Flow Cytometry-Based Cytotoxicity Potency Assay
Step 1: Define the MoA and Select Assay Type
- CAR-T cells kill target tumor cells by recognizing a specific antigen.
- Cytotoxicity assay chosen to directly measure killing activity.
Step 2: Select Target Cells
- Use a tumor cell line expressing the target antigen (e.g., CD19+ NALM-6 cells for CD19 CAR-T).
Step 3: Label Target Cells
- Stain target cells with a fluorescent dye (e.g., CFSE) to distinguish them from effector CAR-T cells.
Step 4: Co-culture Setup
- Mix CAR-T cells with labeled target cells at different effector-to-target (E:T) ratios (e.g., 1:1, 5:1, 10:1).
- Incubate for a defined period (e.g., 4 hours).
Step 5: Measure Target Cell Death
- Add viability dye (e.g., 7-AAD or propidium iodide) to identify dead cells.
- Analyze by flow cytometry: dead target cells are CFSE+ and viability dye positive.
Step 6: Calculate Cytotoxicity
- % Cytotoxicity = [(Dead target cells in sample - Dead target cells in control) / Total target cells] × 100
Step 7: Include Controls
- Non-transduced T cells as negative control.
- Known active CAR-T batch as positive control.
Step 8: Validate Assay
- Test specificity by using target cells lacking antigen.
- Assess reproducibility by repeating assay across multiple days and operators.
Mind Map: Validation Parameters for CAR-T Potency Assay
Practical Example: Overcoming Common Challenges
| Challenge | Solution / Best Practice | Example |
|---|---|---|
| Variability in target cell lines | Use well-characterized, authenticated cell lines | Regular mycoplasma testing and antigen expression verification before assay use |
| Low assay sensitivity | Optimize E:T ratios and incubation times | Increasing incubation from 2 to 4 hours improved cytotoxicity signal detection |
| Operator variability | Standardize protocols and provide training | Use of detailed SOPs and inter-operator comparison studies to ensure consistency |
| Data interpretation complexity | Implement automated flow cytometry gating strategies | Use software templates and blinded analysis to reduce bias and improve reproducibility |
Summary
Developing a potency assay for CAR-T cell products requires a clear understanding of the product’s mechanism of action, selection of appropriate assay formats, and rigorous validation. Flow cytometry-based cytotoxicity assays provide a direct and quantitative measure of CAR-T function and are widely used in clinical manufacturing QC. Incorporating best practices such as robust controls, standardized protocols, and thorough validation ensures the assay reliably supports product release and regulatory submissions.
Additional Resources
- FDA Guidance on Potency Tests for Cellular and Gene Therapy Products
- ISCT (International Society for Cell & Gene Therapy) Best Practices
- Recent Publications on CAR-T Potency Assay Development
This example illustrates how integrating scientific principles with practical QC considerations leads to a successful potency assay development for clinical-scale CAR-T cell manufacturing.
8.4 Data Integrity and Electronic Records Management
Maintaining data integrity and effective electronic records management is critical in clinical-scale cell therapy manufacturing to ensure compliance with regulatory standards such as FDA 21 CFR Part 11 and EMA Annex 11. These regulations emphasize the accuracy, reliability, and traceability of data throughout the product lifecycle.
Key Principles of Data Integrity
- ALCOA+ Framework:
- Attributable: Data must be linked to the individual who generated or modified it.
- Legible: Data should be clear and readable.
- Contemporaneous: Data must be recorded at the time the activity is performed.
- Original: The first recorded data or a certified true copy.
- Accurate: Data must be correct and free from errors.
- Complete: All data including repeats and reanalysis must be included.
- Consistent: Data must follow a logical sequence.
- Enduring: Data must be recorded on durable media.
- Available: Data must be accessible for review and audit throughout its retention period.
Mind Map: Data Integrity Principles
Electronic Records Management in Cell Therapy Manufacturing
Electronic records replace traditional paper documentation, offering advantages such as improved data accessibility, reduced errors, and streamlined workflows. However, they require robust controls to ensure compliance.
Best Practices:
- System Validation: Ensure electronic systems (LIMS, MES, ELN) are validated to demonstrate they perform as intended.
- Access Controls: Implement role-based access to restrict data entry, modification, and review.
- Audit Trails: Maintain secure, computer-generated, time-stamped audit trails to track all data changes.
- Electronic Signatures: Use compliant electronic signatures to authenticate records.
- Data Backup and Recovery: Regularly back up data and have disaster recovery plans.
- Training: Train personnel on system use and data integrity principles.
Mind Map: Electronic Records Management Components
Example 1: Implementing Audit Trails in a LIMS
A clinical-scale cell therapy manufacturer implemented a Laboratory Information Management System (LIMS) to track QC sample testing. The system was configured to automatically log every data entry, modification, and deletion with user ID, date, and time. When a QC specialist updated a cell viability result, the audit trail recorded the original value, the new value, the reason for change, and the approver’s electronic signature. This ensured full traceability and compliance with regulatory expectations.
Example 2: Managing Electronic Signatures for Batch Release
During batch release, manufacturing leads use electronic signatures within the Manufacturing Execution System (MES) to approve final product release. The system enforces multi-factor authentication and records the signature with a timestamp. This practice eliminates paper-based approvals, reduces errors, and ensures that all approvals are attributable and contemporaneous.
Challenges and Mitigation Strategies
| Challenge | Mitigation Strategy |
|---|---|
| Unauthorized data modification | Implement strict access controls and segregation of duties |
| Data loss due to system failure | Regular backups and disaster recovery plans |
| Incomplete audit trails | Use validated systems with enforced audit trail features |
| User non-compliance | Conduct regular training and competency assessments |
Mind Map: Challenges and Mitigations
Summary
Data integrity and electronic records management form the backbone of quality assurance in clinical-scale cell therapy manufacturing. Adhering to ALCOA+ principles, leveraging validated electronic systems with robust audit trails and electronic signatures, and fostering a culture of compliance through training are essential best practices. These measures not only ensure regulatory compliance but also enhance product quality and patient safety.
9. Process Validation and Batch Release
9.1 Establishing Process Validation Protocols for Clinical Manufacturing
Process validation is a critical step in clinical-scale cell therapy manufacturing to ensure that the process consistently produces a product meeting its predetermined quality attributes. Establishing a robust process validation protocol helps mitigate risks, ensures regulatory compliance, and ultimately safeguards patient safety.
Key Objectives of Process Validation
- Demonstrate consistent manufacturing performance
- Confirm reproducibility of critical quality attributes (CQAs)
- Identify and control sources of variability
- Provide documented evidence for regulatory submissions
Stepwise Approach to Process Validation
Components of a Process Validation Protocol
- Purpose and Scope: Clearly define the process steps and product types covered.
- Process Description: Detailed description of manufacturing steps, equipment, and materials.
- Critical Process Parameters (CPPs) and Critical Quality Attributes (CQAs): Identification and rationale.
- Validation Strategy: Prospective, concurrent, or retrospective validation approach.
- Acceptance Criteria: Predefined limits based on product specifications and regulatory guidance.
- Sampling Plan: Number of batches, sampling points, and tests to be performed.
- Data Analysis Plan: Statistical methods and decision rules.
- Responsibilities: Roles of personnel involved.
- Deviation Management: Handling out-of-specification (OOS) and out-of-trend (OOT) results.
Example: Process Validation Protocol for an Autologous CAR-T Cell Manufacturing Process
- Purpose: Validate the cell expansion and harvesting steps for clinical batch production.
- Scope: Includes leukapheresis processing, T-cell activation, expansion in bioreactors, harvesting, and formulation.
- CPPs: Cell density, cytokine concentration, incubation time, temperature.
- CQAs: Cell viability (>70%), transduction efficiency (>30%), sterility, endotoxin levels.
- Validation Strategy: Prospective validation with three consecutive successful batches.
- Acceptance Criteria: Viability between 70-90%, transduction efficiency consistent within ±10% of target.
- Sampling Plan: Samples taken at start, mid, and end of expansion; final product tested for sterility and potency.
Mind Map: Example Validation Workflow
Best Practices
- Early Engagement with Regulatory Authorities: Discuss validation plans during pre-IND meetings to align expectations.
- Risk-Based Approach: Prioritize validation efforts on high-risk process steps impacting product quality.
- Use of Statistical Tools: Apply control charts and capability analysis to interpret validation data.
- Thorough Documentation: Maintain traceability of all validation activities and results.
- Cross-Functional Collaboration: Involve manufacturing, quality, and analytical teams from protocol design through execution.
Common Pitfalls and How to Avoid Them
| Pitfall | Mitigation Strategy |
|---|---|
| Insufficient number of validation batches | Follow regulatory guidance (minimum 3 batches) |
| Undefined acceptance criteria | Establish clear, measurable criteria before validation |
| Poor sampling strategy | Design sampling to capture variability across process |
| Inadequate documentation | Use standardized templates and review cycles |
| Ignoring deviations | Investigate and document all deviations promptly |
Summary
Establishing process validation protocols in clinical-scale cell therapy manufacturing is a foundational step to ensure product quality and patient safety. By following a structured approach, incorporating best practices, and learning from real-world examples, bioprocess engineers and quality specialists can develop robust validation programs that withstand regulatory scrutiny and support successful clinical outcomes.
9.2 Best Practice: Using Risk-Based Approaches to Prioritize Validation Activities
In clinical-scale cell therapy manufacturing, process validation is a critical step to ensure product quality, safety, and efficacy. However, given the complexity and resource intensity of validation activities, employing a risk-based approach allows bioprocess engineers and quality teams to prioritize validation efforts effectively, focusing on the most critical aspects that impact patient safety and product consistency.
What is a Risk-Based Approach?
A risk-based approach systematically identifies, assesses, and mitigates risks associated with manufacturing processes and quality attributes. This approach aligns validation activities with the level of risk posed by each process step or component, optimizing resource allocation and regulatory compliance.
Mind Map: Risk-Based Validation Framework
Step 1: Risk Identification
Identify all potential risks associated with the manufacturing process, including critical process parameters (CPPs), critical quality attributes (CQAs), equipment, raw materials, and analytical methods.
Example: In a CAR-T cell manufacturing process, risks might include variability in cell expansion rates, potential contamination during cell harvesting, or inconsistencies in cryopreservation.
Step 2: Risk Assessment
Assess each identified risk based on:
- Severity: Impact on product quality or patient safety if the risk occurs.
- Probability: Likelihood of the risk occurring.
- Detectability: Ability to detect the risk before product release.
A common tool used here is the Failure Mode and Effects Analysis (FMEA).
Mind Map: FMEA Components
Step 3: Risk Control and Prioritization
Based on the Risk Priority Number (RPN), prioritize validation activities:
- High RPN: Immediate and thorough validation required.
- Medium RPN: Validation with monitoring and controls.
- Low RPN: Routine checks and periodic review.
Example: If the risk of microbial contamination during cell washing has a high RPN, validation will focus extensively on aseptic processing and environmental monitoring.
Step 4: Risk Review and Continuous Improvement
Risk assessments are living documents. Regularly review and update risk evaluations based on process changes, deviations, or new data.
Practical Example: Prioritizing Validation in a Cell Therapy Process
| Process Step | Identified Risk | Severity | Probability | Detectability | RPN | Validation Priority |
|---|---|---|---|---|---|---|
| Cell Expansion | Variability in cell growth rate | 8 | 6 | 5 | 240 | High - Extensive validation |
| Cell Harvesting | Contamination risk | 9 | 4 | 6 | 216 | High - Aseptic process validation |
| Washing & Concentration | Cell loss or damage | 7 | 5 | 7 | 245 | High - Process robustness validation |
| Cryopreservation | Cell viability loss post-thaw | 8 | 3 | 8 | 192 | Medium - Focused validation |
| Final Formulation | Incorrect formulation concentration | 6 | 4 | 7 | 168 | Medium - Analytical method validation |
Mind Map: Validation Prioritization Based on Risk
Benefits of Risk-Based Validation
- Efficient use of resources by focusing on critical areas.
- Enhanced product quality and patient safety.
- Improved regulatory compliance with a science-based rationale.
- Flexibility to adapt validation efforts as processes evolve.
Summary
Using a risk-based approach to prioritize validation activities in clinical-scale cell therapy manufacturing ensures that validation efforts are targeted, effective, and aligned with patient safety and product quality goals. By systematically identifying, assessing, and controlling risks, manufacturing leads and QC specialists can optimize their validation strategies, reduce unnecessary work, and maintain compliance with regulatory expectations.
9.3 Example: Documenting Consistency Across Multiple Manufacturing Batches
Ensuring consistency across multiple manufacturing batches is critical in clinical-scale cell therapy production to guarantee product safety, efficacy, and regulatory compliance. Proper documentation of this consistency not only supports batch release decisions but also underpins process validation and continuous improvement efforts.
Key Elements to Document for Batch Consistency
- Batch Records: Detailed records capturing every step of the manufacturing process.
- Critical Process Parameters (CPPs): Parameters that directly impact Critical Quality Attributes (CQAs).
- Critical Quality Attributes (CQAs): Measurable properties such as cell viability, identity, purity, and potency.
- In-Process Controls: Monitoring data collected during manufacturing.
- Deviation and Investigation Reports: Documentation of any process deviations and corrective actions.
- Analytical Testing Results: QC test outcomes for each batch.
Mind Map: Documentation Components for Batch Consistency
Example Scenario: Documenting Three Consecutive Batches of an Autologous CAR-T Cell Therapy
Context: A manufacturing lead is responsible for documenting consistency across three consecutive batches of CAR-T cells intended for clinical use.
-
Batch Records:
- Each batch record includes timestamps, operator names, equipment IDs, and detailed stepwise procedures.
- Example: Batch #001 shows cell expansion from Day 0 to Day 10 with recorded media changes and cell counts.
-
CPP Monitoring:
- Temperature maintained at 37°C ± 0.5°C.
- pH monitored continuously, maintained between 7.2 and 7.4.
- Agitation speed in bioreactors kept at 60 rpm.
-
CQAs Assessment:
- Cell viability consistently above 85% across all batches.
- Identity confirmed by flow cytometry showing >95% CD3+ T cells.
- Purity assessed by absence of contaminating cell types.
- Potency assay results within predefined acceptance criteria.
-
In-Process Controls:
- Sampling at Day 3, Day 7, and Day 10 for cell count and viability.
- Real-time pH and dissolved oxygen logged automatically.
-
Deviations:
- Batch #002 experienced a transient pH drop at Day 5.
- Root cause analysis identified a sensor calibration issue.
- Corrective action: recalibration and enhanced sensor checks implemented.
-
Analytical Testing:
- All batches passed sterility and endotoxin testing.
Mind Map: Example Documentation Workflow
Best Practices for Documenting Consistency
- Use standardized batch record templates to ensure uniform data capture.
- Implement electronic batch records (EBR) for real-time data logging and audit trails.
- Regularly review CPP and CQA trends across batches to detect early signs of drift.
- Maintain clear and timely documentation of deviations with thorough investigations.
- Engage cross-functional teams (manufacturing, QC, QA) in batch review meetings.
Summary
Documenting consistency across multiple manufacturing batches involves comprehensive recording of process parameters, quality attributes, and any deviations encountered. Through detailed examples and structured documentation workflows, manufacturing leads can demonstrate process control and product reliability, which are essential for regulatory approval and patient safety.
9.4 Criteria and Procedures for Batch Release Decisions
Batch release is a critical step in clinical-scale cell therapy manufacturing, ensuring that only products meeting predefined quality attributes reach patients. This section outlines the essential criteria and standardized procedures for making informed batch release decisions.
Key Criteria for Batch Release
-
Critical Quality Attributes (CQAs) Compliance
- Identity: Confirming the cell type and phenotype.
- Purity: Absence of unwanted cell populations or contaminants.
- Potency: Demonstrated biological activity relevant to therapeutic effect.
- Viability: Minimum viable cell percentage post-processing.
- Safety: Negative for microbial contamination, endotoxins, and mycoplasma.
- Genetic Stability: Absence of unwanted mutations or chromosomal abnormalities.
-
In-Process Controls
- Process parameters within validated ranges.
- Documentation of deviations and corrective actions.
-
Regulatory Compliance
- Adherence to GMP and regulatory agency guidelines.
- Complete and accurate batch records.
-
Stability Data
- Confirmed stability under storage and transport conditions.
Standardized Procedures for Batch Release
-
Review of Batch Manufacturing Records (BMRs)
- Verify completeness and accuracy.
- Confirm all critical steps were performed as per SOPs.
-
Quality Control (QC) Testing Review
- Confirm all required tests are completed and results meet specifications.
- Examples include flow cytometry for identity, sterility tests, endotoxin assays, and potency assays.
-
Deviation and Investigation Assessment
- Review any deviations, non-conformances, and their investigations.
- Ensure corrective and preventive actions (CAPA) are documented and effective.
-
Final Quality Assurance (QA) Review and Approval
- QA reviews all documentation and test results.
- QA issues the batch release certificate if all criteria are met.
-
Communication and Documentation
- Communicate release status to manufacturing and clinical teams.
- Archive all batch release documentation per regulatory requirements.
Mind Map: Batch Release Decision Workflow
Example: Batch Release Decision for an Autologous CAR-T Cell Product
-
Scenario: A CAR-T cell batch has completed manufacturing for a clinical trial.
-
Review of BMR: All steps documented; however, a minor deviation was noted during cell washing.
-
QC Testing:
- Identity: >95% CD3+ CAR+ cells (meets spec)
- Viability: 85% viable cells (meets spec)
- Potency: Functional cytotoxicity assay passed
- Sterility: Negative
- Endotoxin: Below threshold
-
Deviation Assessment: The deviation involved a delayed centrifugation step. Investigation concluded no impact on product quality.
-
QA Decision: After review, QA approves batch release with documented justification.
-
Outcome: Batch released for clinical use.
Best Practice Tips
- Implement a checklist-based review to ensure no criteria are overlooked.
- Use electronic batch records and integrated QC systems to streamline data review.
- Establish cross-functional release committees involving manufacturing, QC, and QA for complex products.
- Maintain traceability of all decisions and supporting data for audits.
Summary
Effective batch release decisions rely on comprehensive review of manufacturing data, rigorous quality control testing, and thorough deviation assessments. Adhering to standardized procedures and clear criteria ensures patient safety and product efficacy in clinical-scale cell therapy manufacturing.
10. Automation and Digitalization in Cell Therapy Manufacturing
10.1 Role of Automation in Enhancing Process Consistency and Throughput
Automation plays a transformative role in clinical-scale cell therapy manufacturing by improving process consistency, increasing throughput, reducing human error, and enabling scalable, reproducible production. Given the complexity and sensitivity of cell therapy products, automation helps standardize workflows, maintain stringent quality standards, and accelerate manufacturing timelines.
Key Benefits of Automation in Cell Therapy Manufacturing
- Improved Process Consistency: Automated systems reduce variability introduced by manual handling, ensuring uniform cell culture conditions, harvesting, and formulation.
- Increased Throughput: Automation enables parallel processing and faster cycle times, essential for meeting clinical demand.
- Reduced Contamination Risk: Closed automated systems minimize open handling steps and operator interventions.
- Enhanced Data Capture: Automated equipment often integrates real-time monitoring and electronic data logging, supporting quality control and regulatory compliance.
Mind Map: Automation Benefits in Cell Therapy Manufacturing
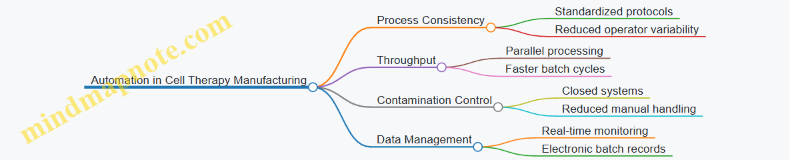
Common Automation Applications and Examples
-
Automated Cell Culture Platforms
- Example: Use of automated bioreactors with integrated sensors for pH, dissolved oxygen, and cell density enables precise control of culture conditions.
- Case: A clinical manufacturing site implemented an automated stirred-tank bioreactor system with feedback loops, reducing batch-to-batch variability by 30%.
-
Automated Cell Counting and Viability Assessment
- Example: Automated image-based cell counters replace manual hemocytometer counts, providing rapid, objective, and reproducible cell concentration and viability data.
- Case: Integration of automated cell counters into the manufacturing workflow reduced QC turnaround time by 50%.
-
Closed-System Cell Processing
- Example: Automated cell washing and formulation systems using closed tubing sets minimize contamination risk and operator intervention.
- Case: A facility transitioned from manual centrifugation to an automated cell washing system, achieving a 40% reduction in contamination events.
-
Automated Cryopreservation and Storage Management
- Example: Automated controlled-rate freezers and inventory management software ensure consistent freezing profiles and traceability.
Mind Map: Automation Applications in Cell Therapy

Best Practices for Implementing Automation
- Assess Process Steps for Automation Suitability: Identify high-variability or labor-intensive steps that benefit most.
- Integrate Systems for Seamless Data Flow: Ensure automation platforms communicate with MES/LIMS for traceability.
- Validate Automated Processes Thoroughly: Confirm equivalency or superiority to manual methods.
- Train Personnel on Automated Systems: Equip staff to operate, troubleshoot, and maintain equipment.
Example Workflow Incorporating Automation
| Step | Manual Process | Automated Process Example | Benefit |
|---|---|---|---|
| Cell Expansion | Manual flask culture | Automated bioreactor with sensor feedback | Consistency, scalability |
| Cell Counting & Viability | Hemocytometer and trypan blue staining | Automated image-based cell counter | Speed, reproducibility |
| Cell Washing | Manual centrifugation and resuspension | Closed automated cell washing system | Reduced contamination risk |
| Cryopreservation | Manual freezing in controlled-rate freezer | Automated freezing with software-controlled profile | Uniform freezing, traceability |
In conclusion, automation is a cornerstone of modern clinical-scale cell therapy manufacturing. By embedding automation thoughtfully into the process, manufacturers can achieve higher consistency, throughput, and compliance, ultimately accelerating the delivery of life-saving therapies to patients.
10.2 Implementing Manufacturing Execution Systems (MES) and LIMS
Introduction
In clinical-scale cell therapy manufacturing, maintaining stringent control over production processes and quality data is critical. Manufacturing Execution Systems (MES) and Laboratory Information Management Systems (LIMS) are pivotal digital tools that streamline operations, ensure compliance, and enhance data integrity.
What are MES and LIMS?
- MES: A software solution that manages and monitors work-in-process on the factory floor. It tracks production workflows, equipment status, personnel activities, and material usage in real time.
- LIMS: A software system designed to manage laboratory samples, associated data, and workflows. It supports sample tracking, test scheduling, data capture, and reporting.
Benefits of MES and LIMS in Cell Therapy Manufacturing
- Real-time process monitoring and control
- Enhanced traceability and audit readiness
- Improved data accuracy and reduction of manual errors
- Streamlined batch record management
- Integration of quality control and manufacturing data
Key Considerations for Implementation
- System Integration: Seamless communication between MES, LIMS, and other enterprise systems (ERP, SCADA).
- Regulatory Compliance: Ensure systems support 21 CFR Part 11 compliance for electronic records and signatures.
- Scalability: Ability to adapt to increasing production volumes and new product lines.
- User Training: Comprehensive training programs to ensure smooth adoption.
Mind Map: MES Implementation in Cell Therapy Manufacturing
Mind Map: LIMS Implementation in Cell Therapy QC Labs
Example 1: Integrating MES for Real-Time Manufacturing Control
A leading cell therapy manufacturer implemented an MES to replace paper batch records. The MES provided real-time visibility into cell expansion stages, enabling operators to monitor culture conditions and intervene promptly if deviations occurred. This reduced batch failures by 15% within the first year and improved regulatory audit outcomes due to comprehensive electronic documentation.
Example 2: Using LIMS to Streamline QC Testing
In a clinical cell therapy QC lab, LIMS was deployed to automate sample tracking and test result management. The system integrated with flow cytometry instruments to directly capture identity and purity data, minimizing transcription errors. Automated alerts ensured timely instrument calibrations and SOP reviews, enhancing overall lab efficiency and compliance.
Best Practices for Successful MES and LIMS Implementation
- Cross-Functional Collaboration: Engage manufacturing, QC, IT, and quality assurance teams early to define system requirements.
- Phased Rollout: Start with pilot projects to validate system functionality before full-scale deployment.
- Data Migration Planning: Carefully plan migration of legacy data to avoid loss or corruption.
- Continuous Training: Provide ongoing training and support to users to maximize system utilization.
- Vendor Partnership: Choose vendors with experience in cell therapy manufacturing and strong regulatory knowledge.
Conclusion
Implementing MES and LIMS in clinical-scale cell therapy manufacturing is a transformative step that enhances process control, data integrity, and regulatory compliance. By leveraging these systems effectively, bioprocess engineers, QC specialists, and manufacturing leads can drive operational excellence and accelerate delivery of life-saving therapies.
10.3 Example: Automated Cell Counting and Viability Assessment Integration
Automated cell counting and viability assessment have become indispensable tools in clinical-scale cell therapy manufacturing. These technologies enable rapid, accurate, and reproducible measurements that are critical for ensuring product quality, consistency, and compliance with regulatory standards.
Why Automate Cell Counting and Viability?
- Speed: Manual counting is time-consuming and limits throughput.
- Accuracy: Automated systems reduce human error and variability.
- Reproducibility: Consistent results across batches and operators.
- Data Integration: Seamless connection with manufacturing execution systems (MES) and quality control databases.
Common Technologies for Automated Cell Counting and Viability
- Image-Based Systems: Use microscopy and image analysis algorithms.
- Impedance-Based Counters: Measure electrical properties of cells.
- Fluorescence-Based Systems: Use viability dyes (e.g., propidium iodide, calcein AM).
Integration Workflow Example
Case Study: Implementing Automated Cell Counting in a CAR-T Manufacturing Facility
Background: Manual hemocytometer counts were causing delays and inconsistent viability data.
Solution: Integration of an image-based automated cell counter with viability dye staining.
Implementation Steps:
- Validation: Verified accuracy against manual counts across multiple operators.
- Training: Staff trained on sample prep and instrument operation.
- SOP Update: Incorporated automated counting steps into batch records.
- Data Integration: Connected instrument output to MES for real-time monitoring.
Outcome:
- Reduced counting time by 70%.
- Improved data consistency with <5% variability.
- Enabled faster batch release decisions.
Best Practices for Successful Integration
- Standardize Sample Preparation: Consistent staining and dilution protocols.
- Regular Calibration and Maintenance: Ensure instrument accuracy.
- Cross-Validation: Periodically compare automated counts with manual methods.
- Data Review: Implement automated alerts for unexpected results.
- Training and Competency: Continuous operator training to minimize errors.
Mind Map: Best Practices for Automated Cell Counting Integration
Additional Examples
- Example 1: Using fluorescence-based automated counters to distinguish live/dead cells in stem cell cultures, improving purity assessment.
- Example 2: Integrating impedance-based counters in closed-system bioreactors for real-time monitoring without sample removal.
In summary, integrating automated cell counting and viability assessment systems into clinical-scale manufacturing workflows enhances efficiency, accuracy, and regulatory compliance. By following best practices and leveraging modern technologies, bioprocess engineers and QC specialists can significantly improve product quality and operational throughput.
10.4 Data Analytics and Predictive Quality Control
In clinical-scale cell therapy manufacturing, data analytics and predictive quality control (PQC) are transformative tools that enable manufacturers to anticipate quality deviations, optimize processes, and ensure consistent product quality. Leveraging large datasets generated during manufacturing, PQC applies statistical models and machine learning algorithms to predict potential failures or quality issues before they occur.
Key Concepts of Data Analytics in Cell Therapy Manufacturing
- Data Collection: Gathering comprehensive data from bioreactors, environmental monitoring, in-process controls, and QC testing.
- Data Integration: Combining heterogeneous data sources into unified platforms for holistic analysis.
- Descriptive Analytics: Summarizing historical data to understand trends and variability.
- Predictive Analytics: Using models to forecast future quality outcomes based on current and historical data.
- Prescriptive Analytics: Recommending actions to optimize processes and mitigate risks.
Mind Map: Data Analytics Workflow in Cell Therapy Manufacturing
Predictive Quality Control (PQC) in Practice
PQC uses historical and real-time data to predict deviations in critical quality attributes (CQAs), enabling proactive interventions.
Example: A cell therapy manufacturer collects real-time data on cell viability, nutrient consumption, and metabolite accumulation during expansion in bioreactors. By applying machine learning models trained on previous batches, the system predicts a drop in viability 12 hours before it occurs. This early warning allows operators to adjust feeding rates or environmental parameters, maintaining product quality and avoiding batch failure.
Mind Map: Predictive Quality Control Components
Best Practices for Implementing Data Analytics and PQC
-
Ensure Data Quality: Accurate, complete, and timely data collection is foundational. Implement automated data capture to minimize human error.
-
Cross-Functional Collaboration: Engage bioprocess engineers, QC specialists, data scientists, and IT teams to develop meaningful models.
-
Model Validation: Rigorously validate predictive models using historical data and prospective runs to ensure reliability.
-
Integration with Manufacturing Systems: Embed analytics tools within MES and LIMS for seamless workflow integration.
-
Continuous Improvement: Use feedback loops to refine models and analytics based on new data and outcomes.
Real-World Example: Predictive Analytics in CAR-T Cell Manufacturing
A leading CAR-T therapy manufacturer implemented a predictive analytics platform that monitored cell growth kinetics and cytokine profiles. By analyzing patterns associated with successful expansions, the system predicted suboptimal batches early. This enabled timely interventions such as adjusting cytokine supplementation or extending culture duration, improving overall batch success rates by 15%.
Summary
Data analytics and predictive quality control are critical enablers for robust, scalable, and compliant clinical-scale cell therapy manufacturing. By harnessing data-driven insights, manufacturers can reduce variability, enhance product quality, and accelerate time-to-patient delivery.
References & Further Reading:
- FDA Guidance on Process Analytical Technology
- ISPE Good Practice Guide: Data Integrity
- Recent publications on machine learning applications in cell therapy manufacturing
11. Personnel Training and Operational Excellence
11.1 Designing Training Programs for GMP Cell Therapy Manufacturing
Designing effective training programs for GMP (Good Manufacturing Practice) in cell therapy manufacturing is critical to ensure product quality, patient safety, and regulatory compliance. Given the complexity and sensitivity of cell therapy processes, training must be comprehensive, role-specific, and continuously updated.
Key Objectives of GMP Training Programs
- Ensure understanding of GMP principles and regulatory requirements
- Develop technical skills specific to cell therapy manufacturing
- Promote adherence to SOPs (Standard Operating Procedures)
- Foster a culture of quality and continuous improvement
- Prepare personnel to handle deviations and corrective actions
Core Components of a GMP Training Program
Step-by-Step Approach to Designing the Training Program
-
Training Needs Assessment
- Identify roles (e.g., operators, QC specialists, manufacturing leads)
- Determine required competencies for each role
- Evaluate existing skill gaps
-
Curriculum Development
- Develop modular content tailored to cell therapy processes
- Include GMP regulations, aseptic processing, equipment handling, and quality control
- Integrate case studies and real-world examples
-
Training Delivery Methods
- Classroom sessions for theory
- Hands-on workshops for practical skills
- E-learning modules for flexibility
- Simulation exercises for aseptic technique
-
Assessment and Certification
- Conduct written and practical assessments
- Issue certifications upon successful completion
- Schedule periodic re-assessments
-
Documentation and Record-Keeping
- Maintain training records per GMP requirements
- Track training completion and competency status
-
Continuous Improvement
- Collect trainee feedback
- Update training materials based on process changes and audit findings
Example: Training Program for Aseptic Processing Operators
- Objective: Ensure operators can perform aseptic manipulations without contamination
- Modules:
- GMP Basics and Cleanroom Behavior
- Aseptic Technique Principles
- Use of Personal Protective Equipment (PPE)
- Equipment Operation and Cleaning
- Environmental Monitoring Awareness
- Training Methods:
- Classroom lectures with visual aids
- Hands-on gowning and aseptic technique practice
- Simulation of contamination scenarios
- Assessment:
- Practical gowning test
- Media fill participation
- Written quiz on contamination control
Example: Cross-Functional Training for Manufacturing Leads
- Objective: Equip leads with knowledge to oversee GMP compliance and troubleshoot manufacturing issues
- Modules:
- GMP Regulatory Framework and Documentation
- Process Flow and Critical Control Points
- Quality Risk Management
- Deviation Handling and CAPA (Corrective and Preventive Actions)
- Leadership and Communication Skills
- Training Methods:
- Interactive workshops
- Case study discussions
- Role-playing scenarios for deviation management
- Assessment:
- Group presentations
- Scenario-based problem solving
Tips for Effective GMP Training Programs
- Use clear, jargon-free language to enhance understanding
- Incorporate visual aids like videos and flowcharts
- Encourage active participation and questions
- Align training content with actual manufacturing processes
- Regularly update training to reflect regulatory changes and technological advances
By designing structured, role-specific, and engaging GMP training programs, biopharma organizations can empower their workforce to maintain high standards in clinical-scale cell therapy manufacturing, ultimately ensuring patient safety and product efficacy.
11.2 Best Practice: Competency Assessments and Continuous Improvement
Ensuring that personnel involved in clinical-scale cell therapy manufacturing are competent and continuously improving is critical to maintaining product quality, compliance, and operational excellence. Competency assessments combined with a culture of continuous improvement help identify skill gaps, reinforce best practices, and drive overall process optimization.
Why Competency Assessments Matter
- Regulatory Compliance: Regulatory agencies such as the FDA and EMA require documented evidence of personnel competency to meet GMP standards.
- Product Quality & Patient Safety: Skilled operators reduce risks of errors, contamination, and deviations.
- Operational Efficiency: Competent staff improve process consistency and reduce rework.
Key Components of Competency Assessments
Example: Competency Assessment Workflow in a Cell Therapy Facility
- Role Definition: Identify critical roles such as Bioreactor Operator, QC Analyst, and Aseptic Technician.
- Skill Matrix Development: List essential skills (e.g., aseptic technique, equipment operation, data entry).
- Assessment Tools: Use a combination of written quizzes, hands-on demonstrations, and supervisor observations.
- Feedback & Remediation: Provide immediate feedback; schedule retraining if needed.
- Documentation: Record all assessments in a Learning Management System (LMS) for audit readiness.
Continuous Improvement: Embedding a Culture of Learning
Continuous improvement is a proactive approach to enhance skills, processes, and quality outcomes. It complements competency assessments by fostering ongoing development rather than one-time evaluations.
Example: Continuous Improvement in Action
- Scenario: A manufacturing lead notices an increase in aseptic processing deviations.
- Action: Conduct a root cause analysis revealing gaps in aseptic technique.
- Response: Update training materials, conduct targeted workshops, and increase frequency of competency assessments.
- Result: Reduction in deviations by 40% over the next quarter.
Integrating Competency Assessments with Continuous Improvement
- Use assessment data to identify common weaknesses and tailor improvement initiatives.
- Encourage open communication channels for staff to report challenges and suggest improvements.
- Regularly review and update competency frameworks to align with evolving technologies and regulatory expectations.
Summary
Competency assessments and continuous improvement are interdependent pillars that ensure personnel maintain high standards in clinical-scale cell therapy manufacturing. By systematically evaluating skills and fostering a culture of learning, organizations can enhance product quality, compliance, and operational efficiency.
Additional Resources
- FDA Guidance on Training and Qualification of Personnel
- ISPE Good Practice Guide: Training and Qualification
- Example Competency Matrix Template for Cell Therapy Manufacturing
This section highlights practical approaches and real-world examples to help manufacturing leads and QC specialists implement effective competency assessments and continuous improvement programs.
11.3 Example: Cross-Functional Team Collaboration to Reduce Process Deviations
In clinical-scale cell therapy manufacturing, process deviations can lead to significant delays, increased costs, and potential risks to product quality and patient safety. One of the most effective strategies to minimize these deviations is fostering strong cross-functional team collaboration. This approach brings together expertise from manufacturing, quality control (QC), quality assurance (QA), engineering, and supply chain teams to proactively identify, investigate, and resolve issues.
Why Cross-Functional Collaboration Matters
- Holistic Problem Solving: Different departments provide unique perspectives, enabling comprehensive root cause analysis.
- Faster Response Times: Coordinated teams can quickly address deviations before escalation.
- Continuous Improvement: Shared knowledge leads to process optimizations and reduced recurrence of deviations.
Mind Map: Key Elements of Cross-Functional Collaboration
Practical Example: Reducing Deviations in Cell Culture Media Preparation
Scenario: A clinical-scale manufacturing site experienced repeated deviations related to media preparation inconsistencies, causing batch delays and impacting cell growth performance.
Cross-Functional Approach:
- Identification: Manufacturing operators reported variability in media pH and osmolality.
- Initial Investigation: QC specialists performed additional testing and confirmed deviations.
- Team Formation: A cross-functional team was assembled including manufacturing leads, QC analysts, process engineers, and QA representatives.
- Root Cause Analysis:
- Manufacturing and engineering teams reviewed equipment calibration and SOP adherence.
- Supply chain verified raw material lot variability.
- QA reviewed deviation trends and previous CAPAs.
- Findings:
- Calibration schedule for pH meters was overdue.
- Raw material supplier had introduced a new lot with slightly altered buffer composition.
- SOPs lacked clarity on media preparation steps.
- Corrective Actions:
- Immediate recalibration of all measurement instruments.
- Supplier engagement to standardize raw material specifications.
- SOP revision with detailed stepwise instructions and quality checks.
- Preventive Actions:
- Implemented electronic deviation tracking with automated alerts.
- Scheduled cross-departmental training sessions.
- Established weekly cross-functional review meetings.
Outcome: Within two manufacturing cycles, media preparation deviations dropped by 90%, leading to improved batch consistency and on-time deliveries.
Mind Map: Workflow for Cross-Functional Deviation Management
Additional Example: Collaborative Approach to Reduce Aseptic Processing Deviations
Context: During aseptic filling of cell therapy products, an increase in environmental monitoring excursions was observed.
Cross-Functional Strategy:
- Environmental monitoring data was shared in real-time with manufacturing and QA teams.
- Engineering evaluated HVAC system performance and identified airflow disruptions.
- Manufacturing adjusted gowning procedures and personnel flow paths.
- QA coordinated training refreshers emphasizing aseptic techniques.
Result: Environmental excursions decreased by 75% over the next quarter, with improved compliance and product sterility assurance.
Best Practices for Effective Cross-Functional Collaboration
- Establish clear communication channels and regular meeting cadences.
- Define roles and responsibilities upfront to avoid ambiguity.
- Utilize collaborative digital tools for real-time data sharing.
- Encourage a culture of openness where team members can raise concerns without hesitation.
- Document all investigations and CAPAs comprehensively for regulatory readiness.
By integrating cross-functional collaboration into the cell therapy manufacturing quality culture, organizations can significantly reduce process deviations, enhance product quality, and accelerate timelines for delivering life-saving therapies to patients.
11.4 Change Management and Documentation Control
Effective change management and documentation control are critical pillars in clinical-scale cell therapy manufacturing. They ensure that any modifications to processes, equipment, or materials are systematically evaluated, approved, and implemented without compromising product quality, patient safety, or regulatory compliance.
Why Change Management Matters
- Cell therapy manufacturing is highly complex and sensitive to variations.
- Uncontrolled changes can lead to batch failures, regulatory non-compliance, or safety risks.
- Structured change management minimizes risks and supports continuous improvement.
Core Components of Change Management
Step-by-Step Best Practices
-
Initiation of Change Request (CR):
- Any stakeholder identifies a need for change.
- Example: A QC specialist notices a new reagent supplier with better consistency.
- CR form is filled with detailed description and rationale.
-
Impact and Risk Assessment:
- Cross-functional team evaluates potential effects on product quality, safety, and compliance.
- Example: Assess if the new reagent affects cell viability or assay sensitivity.
- Use risk matrices to prioritize changes.
-
Approval Process:
- Quality, manufacturing, and regulatory teams review and approve or reject the CR.
- Example: Manufacturing lead approves equipment upgrade only after validation plan is in place.
-
Implementation:
- Execute change according to approved plan.
- Train personnel on new procedures.
- Communicate changes clearly.
- Example: After equipment calibration change, operators receive hands-on training.
-
Post-Implementation Review:
- Monitor impact and verify change effectiveness.
- Document lessons learned.
- Example: Review batch data post-change to confirm no adverse effects.
Documentation Control: The Backbone of Compliance
Proper documentation ensures traceability, accountability, and regulatory readiness.
Best Practices for Documentation Control
- Standardized Templates: Use consistent formats for all documents to reduce errors.
- Electronic Document Management Systems (EDMS): Facilitate version control, access restrictions, and audit trails.
- Regular Reviews and Updates: Schedule periodic SOP reviews to keep documents current.
- Training on Documentation Practices: Ensure all personnel understand documentation expectations.
Example: Managing SOP Updates
- A new cell washing step is introduced requiring SOP revision.
- The document owner drafts changes and submits for review.
- Quality reviews and approves the updated SOP.
- Training sessions are conducted for manufacturing staff.
- Old SOP version is archived with clear version history.
Integrated Example: Change Management and Documentation Control in Action
Scenario: Introduction of a new closed-system cell harvesting device.
- Change Request: Manufacturing lead submits CR detailing device benefits and implementation plan.
- Risk Assessment: QC and quality teams evaluate impact on sterility and cell viability.
- Approval: Regulatory team confirms compliance with GMP standards.
- Documentation: SOPs for harvesting are updated; batch records modified.
- Training: Operators trained on device use and documentation updates.
- Implementation: Device introduced in production.
- Review: Post-implementation monitoring confirms improved sterility rates.
- Closure: Change is formally closed with all documentation archived.
Summary
Robust change management combined with stringent documentation control ensures that clinical-scale cell therapy manufacturing remains compliant, efficient, and capable of delivering safe, high-quality products. Embedding these best practices into daily operations fosters a culture of quality and continuous improvement.
References & Further Reading
- FDA Guidance for Industry: Process Validation
- ISPE Good Practice Guide: Change Management
- PDA Technical Report No. 65: Quality Systems Approach to Pharmaceutical CGMP Regulations
12. Case Studies and Lessons Learned from Clinical-Scale Manufacturing
12.1 Case Study: Overcoming Scale-Up Challenges in Autologous Cell Therapies
Autologous cell therapies, where a patient’s own cells are harvested, modified, and re-administered, present unique scale-up challenges due to their personalized nature. This case study explores a real-world example of a clinical-scale manufacturing facility that successfully addressed these challenges through strategic process optimization, automation, and quality control enhancements.
Background
- Therapy Type: Autologous CAR-T cell therapy for hematologic malignancies.
- Initial Scale: Small-scale, manual processes suitable for early-phase clinical trials.
- Goal: Scale up to support multi-center Phase II/III clinical trials with consistent product quality and regulatory compliance.
Key Scale-Up Challenges
Strategies Implemented
Process Standardization and Optimization
- Developed a harmonized cell expansion protocol using optimized cytokine cocktails and culture media.
- Introduced closed-system bioreactors (e.g., G-Rex and CliniMACS Prodigy) to reduce contamination risk and improve scalability.
- Example: Transitioned from T-flasks to automated bioreactors, increasing cell yield by 3x while maintaining viability >90%.
Automation and Closed Systems
- Automated cell washing and formulation steps using closed system technologies.
- Implemented robotic liquid handlers for media exchanges and sampling.
- Example: Automated cell counting with integrated flow cytometry reduced operator variability and improved throughput.
Enhanced Quality Control Framework
- Adopted Process Analytical Technology (PAT) tools for real-time monitoring of cell growth parameters (pH, dissolved oxygen).
- Developed rapid potency assays based on cytokine secretion profiles.
- Example: Reduced batch release time from 7 days to 3 days by introducing rapid microbial detection methods.
Supply Chain and Material Management
- Established qualified supplier networks with rigorous raw material testing.
- Implemented lot-to-lot consistency tracking and risk assessments.
- Example: Switched to serum-free media to minimize variability and regulatory concerns.
Mind Map: Solutions and Outcomes
Lessons Learned and Best Practices
- Early Integration of Automation: Incorporating automation early in scale-up reduces manual errors and enhances reproducibility.
- Closed-System Processing: Minimizes contamination risk, critical for autologous therapies with limited product availability.
- Robust Quality Control: Real-time monitoring and rapid assays enable faster decision-making and batch release.
- Raw Material Control: Switching to serum-free media and qualifying suppliers reduces variability and regulatory hurdles.
- Cross-Functional Collaboration: Close coordination between manufacturing, QC, and supply chain teams is essential for successful scale-up.
Summary
This case study demonstrates that overcoming scale-up challenges in autologous cell therapy manufacturing requires a multifaceted approach combining process optimization, automation, stringent quality control, and supply chain management. By implementing these best practices, the manufacturing facility successfully increased throughput, improved product consistency, and met regulatory expectations, paving the way for broader clinical application of the therapy.
12.2 Example: Implementing Quality by Design (QbD) in Allogeneic Cell Therapy Production
Quality by Design (QbD) is a systematic approach to pharmaceutical development that emphasizes designing quality into the product and process from the outset. In the context of allogeneic cell therapy production, QbD helps ensure consistent product quality, safety, and efficacy by understanding and controlling variability in manufacturing.
What is QbD in Cell Therapy?
QbD involves identifying critical quality attributes (CQAs), critical process parameters (CPPs), and establishing a design space where manufacturing consistently yields products meeting predefined criteria. This approach reduces risks and improves regulatory compliance.
Mind Map: Core Components of QbD in Allogeneic Cell Therapy
Step-by-Step Example: Applying QbD in Allogeneic Cell Therapy Manufacturing
-
Define the Quality Target Product Profile (QTPP):
- Product: Allogeneic mesenchymal stem cells (MSCs) for immunomodulation.
- Route: Intravenous infusion.
- Potency: Suppression of T-cell proliferation.
-
Identify Critical Quality Attributes (CQAs):
- Viability > 85% post-thaw.
- Expression of MSC markers (CD73+, CD90+, CD105+).
- Absence of microbial contamination.
- Potency measured by in vitro T-cell suppression assay.
-
Determine Critical Process Parameters (CPPs):
- Media lot variability.
- Culture temperature and CO2 levels.
- Passage number of cells.
- Bioreactor agitation speed.
-
Risk Assessment:
- Use FMEA to evaluate impact of CPPs on CQAs.
- Example: High passage number may reduce potency.
-
Design of Experiments (DoE):
- Conduct factorial experiments varying temperature and agitation speed.
- Identify optimal ranges that maintain viability and potency.
-
Establish Design Space:
- Define acceptable ranges for CPPs where CQAs meet specifications.
-
Control Strategy:
- Implement real-time monitoring of pH and dissolved oxygen.
- In-process sampling for viability and marker expression.
-
Continuous Improvement:
- Analyze batch data to refine process parameters.
- Update control strategy based on new insights.
Mind Map: Risk Assessment and DoE Workflow
Practical Example: Managing Media Lot Variability
- Challenge: Different lots of culture media can cause variability in cell growth and potency.
- QbD Approach:
- Characterize media lots for key components.
- Include media lot as a factor in DoE.
- Establish acceptance criteria for media lots based on impact on CQAs.
- Implement supplier qualification and raw material testing.
Summary
Implementing QbD in allogeneic cell therapy production enables a thorough understanding of how process parameters influence product quality. Through systematic risk assessment, experimental design, and control strategies, manufacturers can ensure consistent, safe, and effective cell therapy products at clinical scale.
This example demonstrates how integrating QbD principles with practical tools like FMEA and DoE can drive robust process development and quality control in the complex landscape of cell therapy manufacturing.
12.3 Lessons Learned from Regulatory Inspections and Audits
Regulatory inspections and audits are critical milestones in the clinical-scale cell therapy manufacturing process. They ensure compliance with Good Manufacturing Practices (GMP) and other regulatory requirements, safeguarding product quality, patient safety, and data integrity. Over the years, manufacturers have gained valuable insights from these inspections that help refine processes, enhance quality systems, and mitigate risks.
Key Lessons Learned
-
Documentation and Data Integrity
- Maintaining complete, accurate, and contemporaneous records is essential.
- Electronic records must comply with 21 CFR Part 11 requirements.
- Example: A cell therapy manufacturer was cited for missing batch records during an FDA inspection, leading to a corrective action plan emphasizing real-time documentation and electronic audit trails.
-
Process Consistency and Control
- Demonstrating process reproducibility across batches is critical.
- Deviations must be investigated thoroughly with root cause analysis.
- Example: An audit revealed inconsistent cell viability results due to uncalibrated equipment; implementing a rigorous calibration schedule resolved the issue.
-
Training and Personnel Competency
- Inspectors focus on personnel qualifications and ongoing training programs.
- Cross-training helps reduce errors and improve flexibility.
- Example: A manufacturing site improved audit outcomes by instituting quarterly competency assessments and refresher training.
-
Environmental Monitoring and Contamination Control
- Continuous environmental monitoring data must be reviewed and trended.
- Rapid response to excursions is expected.
- Example: A facility faced observations due to unexplained microbial excursions; corrective actions included enhanced cleaning protocols and staff retraining.
-
Change Control and Deviation Management
- All changes impacting product quality require documented change control.
- Deviations should be minimized and managed proactively.
- Example: A site was commended for implementing a digital change control system that improved traceability and approval timelines.
-
Supplier and Raw Material Qualification
- Suppliers must be qualified and regularly audited.
- Raw material variability should be controlled and documented.
- Example: An audit found gaps in supplier qualification for critical media components; the company introduced a supplier scorecard and periodic requalification.
Mind Map: Regulatory Inspection Focus Areas
Mind Map: Corrective Actions Post-Inspection
Practical Example: Addressing a Data Integrity Observation
During a recent FDA inspection, a clinical-scale cell therapy manufacturer received an observation related to incomplete electronic batch records where certain data fields were manually overwritten without justification. The company responded by:
- Conducting a thorough root cause analysis that identified gaps in user training and system access controls.
- Implementing an upgraded electronic batch record system with enhanced audit trail capabilities.
- Instituting mandatory data integrity training for all manufacturing and QC personnel.
- Establishing a periodic internal audit program focused on electronic data compliance.
This proactive approach not only resolved the observation but also improved overall data reliability and inspector confidence.
Summary
Regulatory inspections and audits serve as invaluable feedback mechanisms. By embracing lessons learned—ranging from rigorous documentation practices to robust personnel training—manufacturers can elevate their clinical-scale cell therapy production quality. Integrating these insights into continuous improvement cycles ensures sustained compliance, product safety, and ultimately, patient benefit.
12.4 Future Trends and Innovations in Clinical-Scale Cell Therapy Manufacturing
As the field of cell therapy rapidly evolves, clinical-scale manufacturing must continuously adapt to incorporate cutting-edge technologies and innovative approaches. These advancements aim to improve scalability, reduce costs, enhance product quality, and accelerate patient access. Below, we explore key future trends and innovations shaping the landscape, supported by practical examples and mind maps to illustrate their interconnections.
Automation and Closed-System Manufacturing
Automation is revolutionizing cell therapy manufacturing by minimizing manual interventions, reducing contamination risk, and enhancing reproducibility.
-
Example: Automated cell processing platforms like the CliniMACS Prodigy enable integrated cell selection, activation, expansion, and formulation in a closed system, reducing operator variability.
-
Benefits: Increased throughput, consistent product quality, and streamlined regulatory compliance.
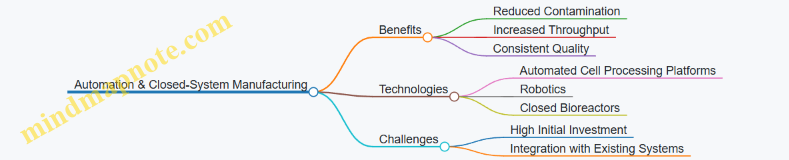
Artificial Intelligence (AI) and Machine Learning (ML) for Process Optimization
AI and ML algorithms analyze complex datasets from manufacturing processes to predict outcomes, optimize parameters, and detect deviations early.
-
Example: Using ML models to predict cell growth kinetics based on bioreactor sensor data, enabling real-time process adjustments.
-
Benefits: Enhanced process robustness, reduced batch failures, and accelerated process development.
Advanced Bioreactor Technologies
Next-generation bioreactors are designed to support higher cell densities, better control over microenvironments, and scalability.
-
Example: Microcarrier-based stirred-tank bioreactors allow expansion of adherent cells at clinical scale with improved surface area-to-volume ratios.
-
Benefits: Enhanced cell growth efficiency, scalability, and process control.
Gene Editing and Synthetic Biology Integration
Incorporating gene editing tools (e.g., CRISPR) and synthetic biology approaches enables the creation of next-generation cell therapies with enhanced functionality.
-
Example: Manufacturing CAR-T cells with CRISPR-mediated PD-1 knockout to improve anti-tumor efficacy.
-
Manufacturing Impact: Requires integration of gene editing QC assays and novel process controls.
Real-Time, Non-Invasive Quality Control Techniques
Emerging analytical technologies enable real-time monitoring of critical quality attributes without destroying samples.
-
Example: Raman spectroscopy integrated inline to monitor metabolite levels and cell viability during expansion.
-
Benefits: Faster release decisions, reduced sample consumption, and improved process understanding.
Modular and Flexible Manufacturing Facilities
Modular cleanroom designs and flexible manufacturing suites allow rapid reconfiguration to support multiple products and scales.
-
Example: Deploying prefabricated cleanroom modules that can be expanded or relocated based on demand.
-
Benefits: Reduced capital expenditure, faster facility commissioning, and adaptability.

Supply Chain Innovations and Cold Chain Management
Advanced tracking technologies and optimized logistics improve the reliability of transporting sensitive cell therapy products.
-
Example: Blockchain-based tracking systems ensuring end-to-end traceability of autologous cell therapy shipments.
-
Benefits: Enhanced product integrity, reduced delays, and improved patient safety.
Summary
The future of clinical-scale cell therapy manufacturing is poised for transformative change driven by automation, AI, advanced bioreactors, gene editing integration, real-time quality control, flexible facilities, and innovative supply chains. Adopting these trends will empower bioprocess engineers, QC specialists, and manufacturing leads to deliver safer, more effective therapies to patients faster and at scale.
By embracing these innovations with practical implementation strategies and continuous learning, organizations can maintain competitive advantage and meet the growing demand for personalized and allogeneic cell therapies.