Hydroponic and Aeroponic Towers for Home Growing
1. Soilless Tower Growing Fundamentals
1.1 What Hydroponic and Aeroponic Towers Do Differently
Hydroponic and aeroponic towers both grow plants without soil, but they deliver water and oxygen in different ways. That difference changes how roots behave, how you maintain the system, and what kinds of problems show up when something goes wrong.
The Core Difference in Root Environment
In a hydroponic tower, roots sit in a moist growing medium or in a channel where nutrient solution flows or is periodically delivered. The root zone stays wet for longer stretches, so oxygen must be supplied through dissolved oxygen in the solution and careful circulation.
In an aeroponic tower, roots hang in air and receive a fine mist. The mist wets the roots briefly, then they drain and re-expose to air. This creates a root zone that cycles between wet and oxygen-rich air, which is why aeroponics often feels more “hands-on” during setup and troubleshooting.
Water Delivery Patterns
Hydroponic towers typically use one of two patterns:
- Recirculating flow: A pump moves nutrient solution through lines, and gravity returns it to a reservoir.
- Drip or periodic feed: A timer runs a pump for a set interval, then the tower drains back.
Aeroponic towers use misting cycles. A pump pressurizes a line to nozzles, which spray a controlled droplet pattern. The goal is coverage without turning the tower into a constant rainstorm.
Oxygen Availability and Why It Matters
Roots need oxygen for respiration, not just water. In hydroponics, oxygen comes from aeration, water movement, and the fact that solution is not perfectly uniform everywhere. In aeroponics, oxygen comes from the air exposure between misting cycles.
A practical way to think about it: hydroponics is like keeping a sponge damp, while aeroponics is like wetting the sponge and then letting it breathe. If you mist too little in aeroponics, roots dry out. If you keep solution too stagnant in hydroponics, roots can suffocate.
Maintenance Differences You Will Actually Notice
Hydroponic maintenance often focuses on:
- Keeping nutrient solution mixed and oxygenated
- Preventing algae in light-exposed areas
- Managing mineral buildup from evaporation and concentration
Aeroponic maintenance often focuses on:
- Preventing nozzle clogging from minerals and biofilm
- Ensuring consistent mist coverage across the tower
- Calibrating mist timing so roots get wet enough but not constantly drenched
Both systems benefit from clean reservoirs and good filtration, but aeroponics adds a higher sensitivity to nozzle performance.
Example: Two Towers, Same Crop, Different Setup
Imagine growing basil in two identical tower footprints.
-
Hydroponic approach: You set a feed schedule that periodically floods or flows through the root channel. You monitor reservoir pH and EC, and you check that return flow is unobstructed. If growth slows, you first suspect nutrient balance or circulation issues.
-
Aeroponic approach: You set mist pressure and cycle duration so roots stay glossy but not dripping. You also inspect nozzles for uneven spray. If growth slows, you check whether one section is getting less mist than the rest.
In both cases, the “same crop” does not mean the same troubleshooting path.
Mind Map: Hydroponic vs Aeroponic Towers
Quick Comparison Checklist
- If you want a system that tolerates minor timing variation more easily, hydroponics is often simpler to stabilize.
- If you want precise control over root wetness and can commit to nozzle cleanliness, aeroponics can be very effective.
- In both systems, the most reliable results come from consistent delivery and clean water handling.
1.2 Core Plant Requirements for Indoor Soilless Production
Indoor soilless towers trade soil for controlled delivery. That means plants still need the same basics—light, water, oxygen, nutrients, and stable conditions—but the “how” changes. Get these core requirements right, and most tower problems become predictable and fixable.
Light
Plants convert light into energy, and in towers the limiting factor is often the light level and the match between light and plant stage.
- Leafy greens and herbs usually do well with strong, consistent light. Aim for uniform coverage so lower leaves don’t become shadows.
- Seedlings need gentler intensity than mature plants. A common approach is to start with slightly lower intensity and increase as plants establish.
- Photoperiod matters. Many home setups run 12–16 hours for leafy crops. If growth slows while leaves remain pale, it’s often light duration or intensity rather than nutrients.
Example: If your basil stays short and thin, check whether it’s receiving the same light as the top of the tower. Uneven placement can make the “same crop” behave like two different crops.
Water and Oxygen
Soilless systems deliver water and nutrients directly to roots, but roots also need oxygen. In hydroponic towers, oxygen comes from dissolved oxygen and surface agitation. In aeroponic towers, oxygen availability is high because roots are exposed to mist and air.
- Hydroponic towers: Keep flow steady and avoid long stagnation periods. If roots look brown or slimy, oxygen and cleanliness are usually involved.
- Aeroponic towers: Mist must reach roots consistently. Dry patches can happen when nozzles clog or pressure drops.
Example: A hydroponic tower with a timer set too long can look fine at first, then develop dull leaves after several days. Shortening run times and ensuring proper circulation often restores root vigor.
Nutrients
Plants need mineral nutrients in specific ratios. In towers, you control those ratios through the nutrient solution’s pH and EC (or nutrient strength).
- pH stability affects nutrient availability. If pH drifts, plants may show deficiency symptoms even when you “added enough fertilizer.”
- EC targets should match growth stage. Seedlings typically need lower strength than fast-growing leafy plants.
- Balance beats boosts. Adding more fertilizer to fix a symptom can worsen the problem if the real issue is pH, light, or root oxygen.
Example: If lettuce tips curl and leaves look slightly scorched, the instinct might be “more calcium.” Often the real cause is nutrient strength too high or pH out of range.
Temperature and Air Exchange
Indoor towers are sensitive to temperature because pumps, nutrient chemistry, and plant metabolism all respond.
- Root zone temperature should stay in a comfortable range for the crop. Warm nutrient solution holds less dissolved oxygen.
- Air temperature and humidity influence transpiration. When humidity is too high, plants may transpire less, which can reduce nutrient uptake.
- Air exchange helps manage humidity and reduces stagnant air around foliage.
Example: If your tower grows well at first but later leaves feel limp despite “correct” pH and EC, check room temperature and humidity. A warm, humid corner can quietly reduce oxygen availability and uptake.
Root Support and Plant Stability
Towers rely on net pots, collars, and growing media (or no media) to position roots correctly.
- Root contact should be consistent. If roots hang too far from flow or mist, growth becomes uneven.
- Crown placement matters. The crown should not sit in constant wetness that encourages rot.
- Spacing affects airflow and light distribution. Crowded plants compete and create microclimates.
Example: Two identical seedlings can behave differently if one crown sits slightly lower in the net pot. That small placement difference can change how quickly roots establish and how clean the root zone stays.
Mind Map: Core Plant Requirements
Quick Self-Check for Setup Quality
Use this checklist when plants look “off,” because it narrows the cause fast.
- Are leaves pale while roots look healthy? Likely light or nutrient strength mismatch.
- Are roots brown, slimy, or smelly? Likely oxygen and cleanliness.
- Are plants uneven across the tower? Likely flow/mist coverage or placement.
- Are symptoms changing after a temperature or humidity shift? Likely environment, not fertilizer.
Example: If only the top third of the tower looks vigorous, your issue is often light distribution or mist/flow uniformity, not the nutrient recipe.
1.3 Choosing Crops That Match Tower Growth Habits
Tower systems reward crops that fit the tower’s geometry: lots of vertical space, limited root volume, and a need for consistent water or mist coverage. The easiest way to choose is to match crop traits to tower traits, then confirm the crop’s growth habit fits your harvest goals.
Start with Tower Constraints
A hydroponic tower typically cycles nutrient solution through channels or down a column, while an aeroponic tower mists roots. In both cases, roots live in a smaller, more controlled environment than in soil. That means crops with compact root systems and predictable growth are usually easier. It also means you should plan for how the tower handles plant height: if your tower is short, tall plants will shade lower sites and make maintenance awkward.
A practical rule: pick crops that stay within the tower’s usable height for most of their life. For leafy greens and herbs, that often means harvesting before the plant becomes leggy. For compact fruiting crops, it usually means selecting dwarf varieties and training them early.
Match Growth Habit to Tower Layout
Towers have repeating “sites” around the column. Crops that tolerate being spaced closely and that don’t sprawl work well. Look for plants that naturally grow upward or in tight rosettes.
- Leafy greens: Many form rosettes or compact heads, so they fill the site without crowding neighbors.
- Herbs: Herbs like basil and cilantro can work, but they need careful pruning so they don’t turn into tall, floppy stems.
- Compact fruiting plants: These can work if you control height and support stems, but they demand more attention to flowering and fruit set.
If your tower has net pots at fixed heights, consider how the crop’s canopy will overlap. A crop that grows wide will compete for light and airflow, which can lead to uneven growth across the tower.
Choose Crops by Root and Water Tolerance
In soilless towers, roots must handle wet conditions without suffocating. Hydroponic towers keep roots in a nutrient environment more continuously, while aeroponic towers rely on mist cycles. Either way, crops with roots that like steady moisture and oxygen balance tend to perform better.
A simple selection checklist:
- Root size: Prefer compact or moderately sized roots.
- Growth speed: Faster crops help you learn your system before you commit to long cycles.
- Sensitivity: If a crop is extremely sensitive to small pH or nutrient shifts, it can be harder to dial in.
- Harvest style: Choose crops you can harvest in a way that doesn’t require removing the whole plant.
Pick Crops That Fit Your Harvest Method
Your harvest method should determine your crop choice.
- Cut-and-come-again works well for towers because you can keep plants productive while you learn your feeding schedule. Leafy greens and many herbs fit this pattern.
- Single harvest can work for crops like lettuce heads, but it concentrates your workload into a shorter window.
- Successive plantings are easiest with crops that mature quickly and don’t require long-term support.
If you want steady weekly harvests, prioritize crops that can be harvested repeatedly from the same plants.
Concrete Crop Examples for Tower-Friendly Choices
Leafy greens (best for learning and consistency):
- Lettuce types: Choose varieties that stay compact. Harvest outer leaves to keep plants in the tower’s height range.
- Spinach: Tends to be forgiving and quick, but it can slow when conditions push it toward stress.
- Kale (baby or compact types): Works if you manage height and don’t let it shade lower sites.
Herbs (great flavor, requires pruning):
- Basil: Works well with frequent tip pruning. If you let it grow untrimmed, it can become tall and uneven.
- Cilantro: Good for shorter cycles. Harvest leaves often to delay bolting.
- Mint (use caution): Mint can be vigorous and may crowd other sites. If you grow it, treat it as a dedicated crop with strict pruning.
Compact fruiting crops (possible with discipline):
- Dwarf peppers: Choose compact varieties and plan for support. Expect more management than greens.
- Strawberries: Tower sites can work, but you must ensure plants receive enough light and that crowns aren’t buried or constantly soaked.
Mind Map: Crop Selection Logic for Towers
Quick Decision Example
If your tower is short and you want weekly harvests, start with compact lettuce and spinach. Harvest outer leaves, keep plants trimmed to the tower’s usable height, and use the same nutrient and pH targets across batches. Once you can maintain stable growth across multiple sites, add basil with a pruning routine so it doesn’t outgrow the tower before you finish learning your system.
1.4 Understanding Water, Oxygen, and Nutrient Delivery in Towers
In tower systems, plants don’t “drink” in the same way they would in soil. Water, oxygen, and nutrients arrive as a controlled delivery pattern, and the roots respond by growing toward the best mix. The goal is simple: keep roots consistently moist, supply enough dissolved oxygen, and deliver nutrients at a rate the plant can use.
Water Delivery: How Roots Get Moisture Without Drowning
In hydroponic towers, water is typically circulated through the tower and drains back to a reservoir. Roots sit in a wet environment, but the system still needs periodic drainage or aeration so the root zone doesn’t become oxygen-poor.
In aeroponic towers, water is delivered as a fine mist. The roots are exposed to air between misting cycles, which is why aeroponics often tolerates higher oxygen levels. The tradeoff is that misting must be frequent enough to prevent drying, especially under strong airflow or warmer rooms.
A practical way to think about water delivery is “wet time” versus “dry time.” If wet time is too long in hydroponics, roots can suffocate. If dry time is too long in aeroponics, roots can desiccate and slow down.
Oxygen Delivery: Why Air Matters Even When Water Is Present
Roots need oxygen for respiration, the process that turns stored sugars into energy for growth. Oxygen comes from two places: dissolved oxygen in water and oxygen in the air around roots.
Hydroponic towers rely on dissolved oxygen in the circulating solution. That’s why reservoir aeration, proper pump sizing, and avoiding stagnant zones matter. If water moves slowly or sits in low-flow pockets, oxygen drops and roots turn pale or brown.
Aeroponic towers rely more on air exposure. Mist droplets provide water and nutrients, but the root surface also needs oxygen from the surrounding air. If misting is too heavy or too continuous, the root zone can become waterlogged, reducing oxygen.
Nutrient Delivery: Concentration, Timing, and Root Uptake
Nutrients are carried by water. The plant absorbs them through root surfaces, and uptake depends on both concentration and how long the roots are in contact with nutrient solution.
In hydroponics, nutrients are usually present continuously in the circulating water, so the system must keep pH and electrical conductivity (EC) stable. In aeroponics, nutrients are delivered during misting, so the schedule controls how often roots receive a nutrient “dose.”
A helpful rule of thumb is to match delivery to growth stage. Seedlings have smaller root systems and lower nutrient demand, so they need gentler conditions. As plants grow, they can handle higher uptake rates, but the system still must avoid swings that stress roots.
Mind Map: Water, Oxygen, and Nutrients Working Together
Example: Hydroponic Tower Timing That Protects Oxygen
Imagine a hydroponic tower where water runs continuously through the top and drains slowly. The roots may look wet all day, but the root zone can become oxygen-starved because water movement is limited. A better approach is to ensure strong circulation and reliable drainage so the roots experience wet contact without staying submerged in low-oxygen water.
Concrete checks:
- Touch test: the grow media should feel damp, not swampy.
- Root color: healthy roots are typically light and firm; oxygen stress often shows darker, mushy, or slimy roots.
- Flow check: verify that water reaches all channels, not just the easiest path.
Example: Aeroponic Misting Schedule That Balances Wet and Dry
Suppose an aeroponic tower mists every 10 minutes for a long duration. Roots may stay coated in droplets, which can reduce oxygen exchange with air. Shortening the mist time and increasing frequency can improve oxygen availability while still preventing drying.
Concrete checks:
- Root surface: after a mist cycle, roots should be visibly wet; before the next cycle, they should not look cracked or shriveled.
- Nozzle coverage: uneven misting creates “dry islands” where growth lags.
- Temperature awareness: warmer rooms increase evaporation, so mist timing must match the actual environment.
Putting It Together: The Delivery Triangle
Think of the root zone as balancing three inputs: moisture, oxygen, and nutrient concentration. If one corner goes wrong, the others can’t fully compensate. A tower that delivers nutrients at the right EC but keeps roots oxygen-poor will still underperform. A tower that oxygenates well but delivers nutrients too rarely will stall. The best results come from aligning water delivery method, oxygen availability, and nutrient timing so roots can do the job they were built for: grow.
1.5 Planning Your Indoor Layout for Light, Water, and Access
A good tower layout prevents the two most common home-growing headaches: uneven growth from inconsistent light and messy maintenance from awkward access. Start by treating the room like a system with three priorities—light delivery, water flow, and human access—then design around the constraints you actually have.
Light Placement That Matches Tower Behavior
Towers grow upward, so the top usually receives more light than the bottom. Place towers so the strongest light source faces the tower evenly. If you use LED grow lights, mount them so the light footprint covers the full tower height, not just the top. A practical check is to look for visible shadowing on the lower plants when the lights are on.
If you have multiple towers, avoid arranging them in a tight row where one tower blocks another. Leave a small gap between towers so airflow and light can reach each one. For leafy greens and herbs, aim for consistent coverage rather than maximum intensity; consistent beats extreme.
Example: Put a single tower centered under a grow light, then add a second tower only after you confirm the lower leaves on both towers receive similar brightness. If the second tower’s lower leaves look dimmer, widen spacing or use a second light.
Water Routing That Minimizes Leaks and Work
Plan where water will go before you connect anything. Choose a location for the reservoir that is stable, level, and easy to reach for refilling and testing. Keep tubing runs short and avoid sharp bends that make flow harder and cleaning more annoying.
Route lines so they don’t cross walkways or create trip hazards. If you must pass tubing near outlets, keep it elevated and secured so it can’t sag into a wet area. Use drip trays or a waterproof mat under the tower base and reservoir area; it’s easier to contain a small spill than to hunt for the source.
Example: If your reservoir sits on a shelf, place it on a tray with a lip and run tubing down the shelf leg. This reduces the chance that a slow leak spreads across the floor.
Access Planning for Daily Checks and Weekly Tasks
Indoor towers still need hands-on time. You’ll be checking plants, inspecting roots, and adjusting settings. Plan access so you can reach the top and the control area without moving the tower.
A simple rule: you should be able to remove a net pot or access the tower’s top without standing in a puddle or reaching over electrical components. Leave clearance for opening doors, pulling out a tray, and wiping condensation.
Example: If the tower sits in a corner, ensure you can reach the front face comfortably. A “corner tower” often becomes a “corner frustration” when you can’t access the back row of plants.
Humidity and Airflow Layout
Towers create localized humidity, especially with aeroponics. Place towers where air can circulate around them without blasting directly at the plants. Strong direct airflow can dry leaves unevenly, while stagnant air increases the chance of surface algae and persistent wet spots.
Use a fan to move air across the room, not just at the tower. Position the tower so the airflow path doesn’t concentrate condensation on one side. If you see water pooling on surfaces, adjust tower placement or airflow direction.
Example: If the tower is near a wall, move it slightly away so mist and condensation don’t repeatedly hit the same spot.
Power and Safety Layout
Plan electrical placement early. Keep power strips and timers above any likely spill level and away from direct mist. Use cable management to prevent tension on plugs and to make it easy to unplug safely.
If your system uses a pump with a timer, mount the controller where you can see it and reach it quickly. That matters when you need to stop a cycle after a clog or a leak.
Mind Map: Indoor Layout Planning
Quick Layout Checklist with Concrete Decisions
- Choose the tower location first, then confirm light coverage across the full height.
- Place the reservoir where you can test pH and EC without moving the tower.
- Ensure you can reach the top and front plants comfortably during routine checks.
- Confirm tubing can run with minimal bends and without crossing walkways.
- Add spill containment under both tower and reservoir zones.
- Set airflow so the room moves air, not just one side of the tower.
Example: If you can’t comfortably reach the top of the tower from your usual standing position, the layout is wrong even if the light and plumbing look fine. Fix access first, then adjust light and water routing around it.
2. System Selection and Tower Design Criteria
2.1 Comparing Tower Types for Home Use
Hydroponic and aeroponic towers both grow plants without soil, but they move water and nutrients to roots in different ways. That difference affects how you set up the system, how often you maintain it, and which crops behave best.
Hydroponic Towers in Plain Terms
A hydroponic tower delivers nutrient solution either as a continuous flow or as timed recirculation through channels or a reservoir. Roots sit in a moist environment, often with air gaps depending on the design. Because roots are consistently wet, hydroponic towers tend to be forgiving when you miss a check or two.
Easy example: If you grow basil in a hydroponic tower, you can usually keep the plants stable while you learn the routine. When you notice slower growth, you can adjust pH or EC and see results within days rather than hours.
What to watch: The main risk is oxygen shortage if flow is weak or if the system runs too long without adequate aeration. Another common issue is nutrient solution buildup on surfaces, which can encourage algae if light reaches the reservoir.
Aeroponic Towers in Plain Terms
An aeroponic tower mists roots with nutrient solution. Roots hang in air and receive droplets on a schedule, typically controlled by a pump, pressure regulator, and nozzle set. This approach can deliver lots of oxygen to roots because they spend more time exposed to air.
Easy example: If you grow lettuce in an aeroponic tower, you may see fast establishment because roots get frequent misting and oxygen. Once the plants are established, you still need consistent mist coverage to avoid dry patches.
What to watch: Aeroponic systems are more sensitive to nozzle clogging, pressure changes, and timer mistakes. A small blockage can create uneven misting, and uneven misting shows up as patchy growth.
Side-By-Side Decision Points
Use these comparisons to choose the tower type that matches your tolerance for maintenance and your crop goals.
- Root exposure: Hydroponic roots stay wet; aeroponic roots alternate between mist and air.
- System sensitivity: Aeroponic towers react faster to changes but also fail faster when something goes wrong.
- Clogging risk: Aeroponic towers have nozzles, so filtration and cleaning matter more.
- Oxygen delivery: Aeroponic towers often provide more oxygen to roots by design.
- Learning curve: Hydroponic towers usually feel simpler during early setup and troubleshooting.
- Water use and evaporation: Aeroponic towers can lose more water to evaporation, which affects concentration if you don’t top off.
Mind Map: Choosing Between Hydroponic and Aeroponic Towers
Practical Examples for Real Home Scenarios
Scenario A: You want low-friction learning with herbs. Choose a hydroponic tower. Start with a small batch of basil or mint, and focus on consistent light and a stable nutrient mix. If growth slows, you can correct pH or EC and keep going without chasing mist patterns.
Scenario B: You want quick turnover for leafy greens. Consider an aeroponic tower if you can commit to filtration and routine checks. Use a timer you can verify, and inspect nozzle output regularly. If you see uneven heads in lettuce, check mist distribution before changing nutrients.
Scenario C: You travel or can’t check daily. Hydroponic towers generally handle missed checks better because roots remain in a wet environment. Aeroponic towers can dry out quickly if mist cycles stop or if the system under-delivers.
A Simple Selection Checklist
Pick the tower type that matches your habits:
- If you prefer fewer moving parts to babysit, lean hydroponic.
- If you prefer more frequent, controlled root exposure and can maintain nozzles and filtration, lean aeroponic.
- If your space has limited ability to manage humidity and evaporation, hydroponic usually causes fewer concentration surprises.
- If you can observe roots and system output during the first week, either type can work well.
Quick Summary
Hydroponic towers are typically easier to stabilize for beginners and forgiving during minor routine slips. Aeroponic towers can support vigorous root oxygenation and fast establishment, but they demand consistent mist delivery and careful clog prevention. The best choice is the one that fits your monitoring style and the crops you plan to grow first.
2.2 Evaluating Pumping, Misting, and Flow Control Requirements
A tower’s performance depends less on “having a pump” and more on matching flow behavior to the plant’s root zone needs. Hydroponic towers typically move nutrient solution continuously or in cycles, while aeroponic towers deliver short mist pulses that must reach roots without flooding them.
Mind Map: Pumping, Misting, and Flow Control Inputs
Hydroponic Flow Control: What “Enough” Looks Like
Start by deciding whether your tower is designed for continuous circulation or timed cycling. Continuous flow is simpler to reason about: roots stay submerged or evenly wetted, and oxygen comes from aeration and surface agitation. Timed cycling can work well when the return drains quickly and the pump can restart reliably without overshooting the reservoir.
A practical evaluation method is to test flow under real conditions. Measure how long it takes to raise solution to the top outlet and how evenly it returns. If one side fills faster, you’ll see uneven growth because roots get different oxygen and nutrient exposure.
Example: A small hydroponic tower uses a submersible pump rated at 600 L/h at zero head. Once you add tubing height and fittings, actual flow might drop to 250–350 L/h. If the tower’s top outlet is narrow, that reduced flow can still look “fine” during a quick test, but it may not fully wet all channels during each cycle. Run a timed test for the same duration you plan to use, then inspect return speed and whether any section stays dry.
Aeroponic Mist Control: Coverage Beats Volume
Aeroponic towers require mist that reaches roots as droplets suspended in air, not as a steady stream. The goal is consistent wetting followed by drainage, so roots alternate between hydrated and oxygenated conditions.
Begin by matching nozzle spray angle and placement to the tower geometry. A nozzle that sprays a wide cone can waste mist on walls, while a narrow cone can miss roots if the manifold is slightly off-center. Then verify pressure stability. Many nozzle systems are sensitive: small pressure drops can reduce droplet size and coverage.
Example: You set a mist cycle to “30 seconds on, 10 minutes off.” If the nozzle pressure is slightly low, you might get visible mist near the nozzle but weak coverage at the far end. The far roots stay pale and dry while near roots look glossy. Fixing the schedule alone won’t solve it; you need to correct pressure, nozzle count, or manifold alignment.
Evaluating Pump and Nozzle Performance Together
For hydroponics, pump performance is about head pressure and return completeness. For aeroponics, nozzle performance is about pressure, clog risk, and coverage uniformity. In both cases, flow control is a system property, not a single component spec.
Use a simple checklist during evaluation:
- Head pressure reality check: Confirm the pump can deliver the needed flow at your actual tubing height and fittings.
- Distribution check: Verify wetting or mist coverage across the full tower footprint.
- Drain check: Ensure returns clear quickly enough to prevent constant pooling.
- Cycle check: Run the exact timer settings you plan, then observe root zone behavior.
- Clog risk check: Add filtration and confirm it doesn’t starve flow or reduce pressure.
Flow Control Settings That You Can Test Immediately
Instead of guessing, test short cycles and observe root zone response.
- Hydroponic cycling test: Run a short cycle, then check whether the return path empties fully before the next cycle. If it doesn’t, shorten cycle time or improve drainage.
- Aeroponic pulsing test: Run a short mist pulse, then check whether roots glisten briefly and then drain. If roots stay wet for long periods, reduce pulse duration or increase off time.
Mind Map: Quick Diagnostic Observations
Case Study: Choosing Between Continuous and Cycled Hydroponics
A home grower wants faster growth from a leafy-greens tower. They start with continuous circulation and notice roots are always submerged, with limited visible aeration. Switching to timed cycling improves oxygen exposure because the return drains between cycles. The key change is not “more pump power,” but better timing: cycles are long enough to wet the root zone thoroughly, yet short enough to let the return clear before the next run.
The takeaway is straightforward: evaluate flow control by observing what the roots actually experience—wetness duration, drainage speed, and uniform coverage—then adjust pump delivery pattern and cycle timing to match.
2.3 Sizing Reservoirs, Plumbing, and Drainage for Reliability
A reliable tower system depends on three things working together: enough nutrient volume to resist swings, plumbing that delivers flow where it’s needed, and drainage that removes water cleanly without flooding or backflow. The goal is simple: when something small changes—pump speed, room temperature, or plant uptake—the system should respond calmly, not chaotically.
Reservoir Sizing That Prevents Nutrient Swings
Start with the idea that plants consume nutrients and water at different rates across growth stages. A larger reservoir slows down changes in pH and EC because the solution has more “buffer.” For home towers, a practical rule is to size the reservoir so the system can run at least 7–14 days before a full adjustment, depending on how frequently you monitor.
- Small single-tower setups: Aim for 10–20 liters for hydroponic towers and 8–15 liters for aeroponic towers, because aeroponic mist cycles often use less total liquid but still benefit from stability.
- Multi-tower setups: Increase volume proportionally and avoid “one reservoir to rule them all” unless you can measure and adjust consistently. If you connect multiple towers, plan for 25–50 liters per 2–4 towers, then fine-tune based on your crop and monitoring habits.
Concrete example: If you grow basil and lettuce in a hydroponic tower and you notice pH drifting quickly after 3–4 days, your reservoir is likely too small for your uptake rate. Doubling reservoir volume often reduces the drift rate enough that weekly adjustments become realistic.
Plumbing Layout That Keeps Flow Predictable
Plumbing reliability is mostly about friction losses and avoiding “mystery bottlenecks.” Use smooth tubing, keep runs short, and reduce unnecessary fittings.
- Use the right diameter: Smaller tubing increases resistance, which can reduce flow at the far end and cause uneven growth. If you must use smaller tubing, compensate with a stronger pump or shorter runs.
- Minimize elbows and tees: Each fitting adds resistance. A few gentle bends beat many sharp turns.
- Include a service path: Add a way to disconnect or flush lines without dismantling the whole tower.
Concrete example: Two identical hydroponic towers are fed from the same reservoir. Tower A has 1 meter of tubing and two elbows; Tower B has 3 meters and six elbows. Even with the same pump, Tower B may receive less flow, leading to drier roots and slower growth. Fixing the layout (shorter run, fewer fittings) often works better than “turning up the pump” because it improves uniformity.
Drainage Design That Avoids Flooding and Backflow
Drainage is where many home builds get messy. A drainage system must handle two situations: normal runoff and occasional surges (like a pump restart or a mist cycle ending).
- Use gravity drainage with a clear path: Drain lines should slope continuously back to the reservoir or drain tank.
- Prevent siphoning: If your drain line can create a siphon, it may pull water out of the tower too aggressively. Add an air break or design the drain outlet height to break siphon action.
- Avoid backflow into the tower: Install check valves where appropriate, especially on pump discharge lines. For hydroponic towers, ensure the return path cannot push water upward when the pump stops.
Concrete example: An aeroponic tower uses a mist pump with a return line that dips below the reservoir inlet. When the pump stops, water can reverse direction briefly, wetting the wrong areas and encouraging biofilm. Raising the return line outlet and ensuring a consistent slope fixes the behavior.
Reliability Checks for Sizing Decisions
Before final assembly, do a “flow and drain test” with plain water.
- Measure delivery time: Run the pump and time how long it takes to fill the tower’s active channels or return to a stable level.
- Check uniformity: If your tower has multiple levels or outlets, confirm water reaches them all. Uneven wetting usually traces back to plumbing resistance or clogged/partially blocked ports.
- Verify drain capacity: With the pump running, confirm the drain line carries runoff without backing up into the tower.
Mind Map: Reliability Plumbing Checklist
Example: A Practical Hydroponic Tower Build Plan
For a single hydroponic tower growing leafy greens, choose a 15-liter reservoir. Use a pump sized for the tower’s required flow rate, then keep discharge tubing short—around 1–2 meters—with minimal fittings. Route the return line with a steady slope back to the reservoir and include an air break if the drain outlet risks siphoning. During the water-only test, confirm the tower fills to its intended level and drains fully without lingering water in the wrong compartments. This combination usually eliminates the “it works for a day, then gets weird” pattern.
2.4 Selecting Materials That Withstand Nutrient Water and Humidity
Tower systems live in a wet, nutrient-rich environment where two things quietly attack your setup: minerals and moisture. Minerals scale surfaces, and moisture encourages grime, biofilm, and fast wear on parts that were never meant to be constantly damp.
What “Good Material” Means in a Tower
A suitable material should resist three common stressors:
- Nutrient solution contact: Many plastics and rubbers tolerate water but not fertilizer salts.
- Humidity cycling: Aeroponic towers especially see wet/dry cycles that stress seals and coatings.
- Cleaning chemistry: You’ll eventually flush, scrub, or sanitize. Materials should survive repeated exposure.
A practical way to judge is to ask: “If this part stays wet for weeks and gets cleaned monthly, will it warp, crack, or shed gunk?”
Plastics and Their Real-World Behavior
For tower plumbing and reservoirs, look for plastics that are stable with water and nutrient salts.
- Food-grade HDPE: Often a strong choice for reservoirs and tubing components because it’s tough and resists many common cleaning routines. It also tolerates temperature swings better than brittle plastics.
- PVC (pressure-rated where needed): Works well for rigid plumbing. It’s not ideal for flexible sections that must bend frequently, and it can be less forgiving if you need frequent disassembly.
- Polypropylene (PP): Useful for fittings and lids. It tends to handle moisture well and is generally less prone to cracking than some softer plastics.
- Avoid unknown “mystery plastics”: If a part doesn’t specify the polymer, assume it may be fine for a short trial and then become cloudy, stiff, or smelly after repeated nutrient exposure.
Example: A home builder swaps a cheap reservoir tote for an HDPE container. After a few weeks, the tote’s surface stays smooth and easy to wipe, while the cheap plastic develops a rough film that traps residue around the bulkhead fitting.
Rubber, Seals, and Gaskets That Don’t Turn into Dust
The weak link in many towers is not the pipe—it’s the gasket. Nutrient water plus constant wetting can harden elastomers and cause leaks.
- EPDM: Common in water systems and often a good balance for wet environments.
- Silicone: Flexible and easy to work with, but some grades can swell depending on additives and cleaning agents.
- Nitrile (Buna-N): Can work for certain water applications, but check compatibility with your cleaning approach.
When selecting seals, prioritize compression fit designs that don’t require constant stretching. Also choose gaskets sized for the groove so they seat evenly; uneven seating creates tiny leak paths that become mineral deposits.
Example: Two towers use the same pump and tubing. The one with a properly seated EPDM gasket stays leak-free. The other develops a slow seep at the fitting, and within days a crust forms around the joint, making the next disassembly harder.
Metals, Coatings, and Why “Stainless” Still Needs Attention
Metal parts can be fine, but you want the right kind and the right location.
- Stainless steel (commonly 304 or 316): Generally suitable for humid, wet indoor use. 316 is more corrosion-resistant in harsher conditions.
- Avoid mixed metals in direct contact: When dissimilar metals touch in a wet nutrient environment, corrosion can accelerate.
- Watch for plated hardware: Plating can wear or pit, and once it does, the underlying metal may corrode.
Example: A tower uses stainless screws in the humid frame area, but the reservoir lid uses plated hardware. After cleaning cycles, the plated heads show pitting, and residue collects in the pits.
Nozzles, Filters, and the “Clog-Resistant” Material Question
Aeroponic towers depend on nozzles that survive mineral buildup. Material choice affects how easily deposits form and how hard they are to remove.
- Nozzle bodies: Look for materials that resist scaling and tolerate disassembly for cleaning.
- Filters: Choose filter housings that won’t crack under repeated rinsing and that seal reliably.
Even with good materials, you still need correct water quality and routine flushing. Material helps, but it doesn’t replace maintenance.
Example: A nozzle set made from a more scale-resistant material stays within acceptable spray pattern longer. The owner still cleans on schedule, but the spray remains more uniform between cleanings.
Cleaning Compatibility and Surface Finish
A tower that’s easy to clean is a tower that stays healthy.
- Smooth interior surfaces: Reduce places where biofilm can anchor.
- Avoid porous or heavily textured plastics: They trap residue and smell.
- Confirm chemical tolerance: If you use a sanitizer or descaler, ensure the materials won’t soften, craze, or lose shape.
Example: A reservoir with a glossy interior wipes clean in seconds. A reservoir with a rough interior requires longer scrubbing, and the extra time increases the chance of damaging seals.
Mind Map: Material Selection for Nutrient Water and Humidity
Quick Example Checklist for Buying and Assembly
Before you commit, verify these points in your parts list:
- Reservoir and plumbing material is clearly identified (not “generic plastic”).
- Bulkhead fittings use compatible seals sized for the groove.
- Any metal fasteners in wet zones are stainless and not mixed with other metals.
- Nozzles and filters are designed to be cleaned without destroying the part.
- Surfaces that touch nutrient water are smooth enough to wipe clean.
When these basics are handled, most tower problems shift from “material failure” to normal grower issues like flow tuning and nutrient balancing—much easier to diagnose and fix.
2.5 Building a Practical Shopping and Parts Checklist
A good checklist prevents two common problems: buying the wrong size for your tower and forgetting the small items that make maintenance possible. Use this as a “buy once, use for years” baseline, then adjust for your exact tower model.
What to Measure Before You Buy
Start with three measurements so you don’t guess:
- Tower footprint and height: confirms where you can place the reservoir, pump, and drain.
- Number of growing sites: determines how much nutrient solution you’ll need and how many fittings you’ll use.
- Hose or pipe diameter requirements: matches the tower’s inlet and outlet ports.
Example: If your tower uses 1/2" tubing for the inlet, buying 3/4" tubing forces adapters that can leak or restrict flow.
Core Parts Checklist
Use the categories below so you can compare hydroponic vs aeroponic needs without mixing parts.
Hydroponic Tower Essentials
- Water reservoir sized for your tower’s recirculation volume
- Submersible pump with head height matched to your tower height
- Air pump and airstone (optional in some designs, helpful for oxygenation)
- Tubing and fittings for inlet and outlet connections
- Drain plumbing that returns to the reservoir reliably
- Timer for pump cycles if your system isn’t continuous
- Net pots or tower inserts sized for your crop and tower openings
- Grow media (commonly rockwool, coco coir plugs, or similar)
Easy example: For leafy greens, you can often run shorter cycles more consistently than a long continuous run, but only if your timer and pump flow are sized correctly.
Aeroponic Tower Essentials
- Reservoir sized for misting cycles and evaporation
- High-pressure pump matched to nozzle requirements
- Nozzles (buy the exact type your tower expects)
- Tubing, barbs, and quick-connects for nozzle lines
- Pressure regulator and gauge if your setup needs stable misting
- Timer or controller for mist schedule
- Filter to reduce nozzle clogging
- Drain plumbing back to reservoir
- Root zone supports that keep plants stable while roots hang in mist
Easy example: If you choose nozzles with a different flow rate than the tower’s design, you may get uneven mist coverage even when the system “runs.”
Monitoring and Control Parts
These are small, but they prevent most silent failures.
- pH meter plus calibration solutions
- EC/TDS meter (pick one and stick with it for consistent records)
- Thermometer for reservoir temperature checks
- Graduated measuring cups for nutrient mixing
- pH adjustment supplies (commonly acid and base) in bottles you can label
- Replacement tubing segments for quick fixes
Example: If your pH drifts upward after mixing, you’ll want to know whether it’s measurement error or actual solution change. Calibration supplies make that distinction fast.
Cleaning and Maintenance Parts
Maintenance is part of the system, not an afterthought.
- Filter spares (especially for aeroponic)
- Extra o-rings and gaskets for common leak points
- Food-safe cleaning tools (soft brushes, dedicated cloths)
- Descaling agent suitable for nutrient systems
- Waste container for draining and cleaning
Easy example: A clogged filter can reduce flow enough to cause uneven growth, and you’ll only notice after plants start lagging. A spare filter makes troubleshooting straightforward.
Mind Map: Shopping Checklist Structure
Example Shopping Lists by Scenario
Example: One Hydroponic Tower Starter
- Reservoir (food-safe, sized to your tower volume)
- Submersible pump sized for your height and flow
- Tubing kit and fittings matching tower ports
- Timer (if your tower uses timed recirculation)
- Net pots and grow media plugs
- pH meter + calibration solutions
- EC/TDS meter
- Spare tubing and a few extra fittings
- Soft brush and a descaling agent
Example: One Aeroponic Tower Starter
- Reservoir (food-safe)
- High-pressure pump matched to nozzle specs
- Nozzles for your tower model
- Filter and spare filter elements
- Pressure regulator and gauge if required
- Tubing kit, barbs, and quick-connects
- Timer/controller for mist cycles
- pH meter + calibration solutions
- EC/TDS meter
- Spare o-rings and gaskets
- Cleaning tools and descaling agent
Final Checklist Rules That Save Money
- Buy matching diameters: adapters are where leaks and flow restrictions start.
- Buy spares for wear parts: nozzles, filters, and o-rings are the usual suspects.
- Label everything you mix: nutrient bottles, adjustment bottles, and measuring tools.
- Keep a “parts drawer”: small fittings and tubing segments prevent long downtime.
When your shopping list is complete, you should be able to assemble, run, clean, and restart without improvising with random connectors. That’s the difference between a system you can maintain and one you constantly troubleshoot.
3. Indoor Environment Setup for Maximum Yield
3.1 Lighting Selection and Placement for Leafy Greens and Herbs
Leafy greens and herbs are mostly about getting enough light at the leaf surface, consistently, without overheating the plants or drying the root zone. In a tower, the challenge is that light intensity changes with height and angle, so placement and fixture choice matter as much as wattage.
1) Choose the Right Light Type
For indoor towers, LEDs are usually the most practical because they run cool and let you aim light where it’s needed. Look for:
- Full-spectrum or white LEDs for general leafy growth, since herbs don’t need a specialized “flowering” spectrum.
- Adequate output per area rather than chasing the highest number on the box.
- Good optics (lenses or reflectors) if your tower is narrow, because you want light to land on the plants instead of bouncing around the room.
A simple rule of thumb: if you can’t measure or estimate intensity, you’ll end up compensating by moving fixtures closer, which can create heat and uneven coverage. Better to select a fixture with controllable placement and predictable spread.
2) Understand Height and Coverage in Towers
Tower plants sit at different heights, so the top often receives more light than the bottom. If your tower is tall, plan for one of these approaches:
- Single fixture centered above the tower with a wide enough beam to cover the full vertical height.
- Two fixtures spaced so their overlap covers the middle and lower sections.
- Adjustable mounting so you can raise or lower the light after you see early growth.
Example: If your tower has 6 growing levels and you use one narrow-beam fixture, the top two levels may grow fast while the bottom levels stay pale and slow. Switching to a wider optic or adding a second fixture usually fixes the imbalance without changing nutrients.
3) Position the Fixture for Leaf-Level Intensity
Start with the fixture above the top of the tower, then adjust based on plant response and practical measurements. If you have a light meter, target a consistent range at the leaf canopy. If you don’t, use these observable indicators:
- Healthy, compact growth with minimal stretching suggests adequate intensity.
- Long stems and widely spaced leaves suggest the light is too far or too weak.
- Leaf edge curling or bleaching can indicate excessive intensity or heat stress.
Example: Many people begin with the light too high “to be safe.” For greens, that often leads to thin, leggy plants. Lowering the fixture in small steps (a few inches at a time) usually improves leaf thickness and reduces stretching.
4) Set Photoperiod and Keep It Consistent
Leafy greens and most culinary herbs generally do well with a steady daily light schedule. Consistency matters because plants treat changes like a new environment.
- Common starting point: 14–16 hours per day for greens and many herbs.
- If growth is slow: increase time gradually or improve intensity, not both at once.
- If tips burn or leaves look stressed: reduce intensity by raising the light or shorten the photoperiod.
Example: If you switch from 12 hours to 18 hours overnight, you may see stress before you see benefits. Adjust one variable at a time so you can tell what helped.
5) Manage Heat and Airflow Around the Leaves
Even LED fixtures can warm the air, and towers trap humidity near the plant canopy. Place the fixture so it doesn’t block airflow, and ensure the room ventilation can remove excess moisture.
Practical checks:
- Feel the air near the top leaves after the lights have been on for an hour.
- Watch for condensation on nearby surfaces; it often means airflow is too weak or the light is too close.
Example: If the top leaves stay wet longer than the lower ones, you may be creating a microclimate. Raising the fixture slightly and improving airflow can reduce surface wetness without changing the misting or nutrient schedule.
6) Use Simple Placement Experiments
You don’t need a lab. You need repeatable comparisons.
- Mark the tower levels (top, middle, bottom).
- Keep everything else the same (nutrients, temperature, watering cycles).
- Change only the light height or number of fixtures.
Example: Run a two-week test where you lower the light by a fixed amount and compare leaf color and stem length at each level. If only the top improves, your beam is too narrow. If all levels improve, you’ve likely hit a better coverage pattern.
Mind Map: Lighting Selection and Placement
Case Study: One Fixture vs Two Fixtures in a 6-Level Tower
A home grower used one LED centered above a narrow 6-level tower. After 10 days, the top two levels looked darker and thicker, while the bottom two levels stayed lighter with longer stems. The nutrients and misting schedule were unchanged.
Fix: They added a second identical fixture and positioned it so the overlap covered the middle and lower levels. After another 10 days, the bottom levels caught up in leaf color and stem thickness. The key change wasn’t “more power,” it was more even light distribution across height.
Technical Spec: Quick Setup Checklist
- Fixture centered over tower
- Optics wide enough for vertical coverage
- Adjustable mounting for early tuning
- Photoperiod set to 14–16 hours
- Airflow sufficient to prevent canopy condensation
- One-variable-at-a-time adjustments during the first two weeks
3.2 Ventilation, Air Exchange, and Humidity Management
Indoor towers trade soil for a wet, enclosed microclimate. That means you manage air like you manage water: on purpose, with measurements, and with a plan for what happens when conditions drift.
Why Air Exchange Matters in Towers
Plants transpire, roots respire, and pumps move warm water. Even if the tower looks “still,” moisture and heat build up around the canopy and the reservoir. Without adequate air exchange, you get three predictable outcomes: higher leaf wetness duration, slower drying between mist or drips, and a reservoir that warms and encourages biofilm.
A practical rule: aim for steady, gentle airflow across the growing area rather than blasting one side. Think “consistent breeze,” not “wind tunnel.”
Humidity Targets That Keep Leaves Dry
Humidity is not a single number; it’s a balance between the rate of moisture added (misting or splashing, plant transpiration) and the rate removed (ventilation and dehumidification). For most indoor leafy crops, a workable target range is 45–60% relative humidity during the light period and 40–55% during the dark period.
If you don’t have a dehumidifier, ventilation becomes your main tool. If you do, use it to prevent long periods above 65% RH, especially near the canopy.
Example: If your aeroponic tower mists every 5 minutes, you may see RH spike right after misting. That’s normal. What matters is whether RH stays elevated for 30–60 minutes. If it does, increase air exchange or adjust mist timing.
Airflow Design That Works Without Causing Stress
Good airflow does two jobs: it moves moisture away from leaves and it prevents stagnant pockets around the tower column.
Use these principles:
- Place a small fan to create cross-flow across the tower, not directly at the plants. Direct blasts can dry leaf edges unevenly.
- Keep airflow consistent across the day. Turning fans off at night often leads to condensation when temperatures drop.
- Avoid dead zones behind the tower where mist can settle and linger.
A simple layout: one intake path from the room, one exhaust path out of the room, and a circulation fan that stirs the air around the tower. If you can feel a gentle, steady breeze at plant height, you’re close.
Ventilation Sizing with a Simple Method
Instead of guessing, estimate how much air you need to exchange based on room volume and how wet your system runs.
Start with this approach:
- Measure room volume (length × width × height).
- Choose a starting air exchange rate of 0.5–1.5 air changes per hour for typical home setups.
- Adjust after observing RH and condensation.
Example: A 10 m³ room with 1 air change per hour needs about 10 m³ of airflow per hour. If your RH stays above target, increase fan speed or add a dehumidifier. If RH drops too low (below ~35%), reduce ventilation or run it less aggressively.
Managing Condensation and Surface Wetness
Condensation is the enemy of “clean leaves.” It forms when moist air contacts a cooler surface, often near the tower base, reservoir area, or ducting.
Concrete fixes:
- Insulate cold plumbing if it runs near cooler walls.
- Keep reservoir temperature stable so the air above it doesn’t swing wildly.
- Route exhaust so it doesn’t blow humid air back into the growing zone.
Example: If you see droplets on the tower exterior after misting, check whether the room temperature dips during the mist cycle. Raising the room setpoint by 1–2°C can reduce condensation without changing the plant schedule.
Humidity Control by Scheduling and Sensor Placement
Sensors should represent the plant zone, not the far corner of the room. Place a hygrometer at canopy height, about 20–40 cm from the tower, away from direct fan airflow.
Then coordinate humidity with your system schedule:
- For aeroponics, run mist cycles so there’s enough time for air to dry the canopy between cycles.
- For hydroponics, ensure any spray or splash is not creating continuous wetness.
Example: If your aeroponic tower mists for 30 seconds every 5 minutes, try shortening the mist duration and increasing frequency slightly, then re-check RH after 1–2 days. The goal is not “more mist,” but “enough moisture without long drying delays.”
Troubleshooting with Clear Signals
When humidity is off, the symptom usually points to the cause.
- RH climbs steadily during the light period: ventilation is insufficient or mist/drip rate is too high.
- RH spikes immediately after misting then falls quickly: airflow is likely adequate; you may only need minor timing tweaks.
- Condensation on tower or nearby surfaces: temperature swings or cold surfaces are causing moisture to condense.
- Musty odor near the reservoir: humidity plus warm water can accelerate biofilm; improve airflow around the reservoir and verify cleaning schedule.
Mind Map: Ventilation, Air Exchange, and Humidity Management
Example: Aeroponic Tower in a Small Room
You run mist cycles and notice RH hovering around 68% for an hour after each mist burst. Your hygrometer is at canopy height and you see occasional droplets near the tower base.
A workable adjustment sequence:
- Increase circulation fan speed slightly to improve cross-flow.
- Add or increase exhaust so the room air exchange rate moves toward ~1 air change per hour.
- Shorten mist duration while keeping total mist time similar over the hour.
- Re-check RH 24 hours later and confirm droplets are reduced.
If RH drops below 40% and leaves look overly dry at edges, reduce ventilation intensity and return to the 45–60% band.
Example: Hydroponic Tower with Splash-Induced Humidity
Your hydroponic tower uses a recirculating flow that splashes into the top channels. RH rises slowly across the day, and the room feels damp even when lights are on.
Fixes that usually help:
- Reduce splash by adjusting flow rate or adding a simple splash guard.
- Ensure the reservoir area has airflow so moisture doesn’t accumulate above it.
- Keep ventilation steady during the dark period to avoid condensation when temperatures drop.
In both systems, the goal is the same: keep leaves from staying wet too long, keep air moving where plants actually are, and use humidity measurements to guide small, testable changes.
3.3 Temperature Control and Heat Management for Pumps and Plants
Temperature is the quiet governor of tower performance. It affects how fast plants grow, how much dissolved oxygen the water can hold, and how reliably pumps run. In a home setup, the goal is not to chase a single perfect number; it’s to keep temperatures stable enough that plants and equipment don’t spend the day “recovering” from swings.
Why Temperature Matters in Towers
Most tower systems are water-based, so the water temperature is usually the limiting factor. Warmer water holds less dissolved oxygen, which can slow root uptake and make roots look tired even when nutrients are correct. Heat also changes nutrient behavior: salts can become less forgiving when temperatures rise, and pH can drift faster.
For plants, temperature influences metabolism. If it’s too cool, growth slows and roots may not absorb nutrients efficiently. If it’s too warm, plants can drink more quickly, but roots may not supply enough oxygen, leading to pale leaves or stalled growth.
Pump Heat Management That Prevents Slowdowns
Pumps generate heat through electrical resistance and internal friction. In many towers, the pump sits in or near the reservoir, so its heat can gradually warm the solution. That warming is usually small at first, but it can become noticeable in small reservoirs or poorly ventilated cabinets.
Start with placement. Keep the pump out of direct sunlight and away from heat sources like HVAC vents blowing hot air. If your tower sits in a closet, add ventilation so the pump area doesn’t become a warm pocket.
Next, manage runtime. If your system uses timed cycles, avoid running the pump continuously unless the design requires it. For hydroponic towers, intermittent circulation often maintains oxygenation while limiting heat buildup. For aeroponic towers, misting cycles should be scheduled to match the crop’s needs rather than “more is better.”
Finally, use a simple temperature check. Measure reservoir temperature at the same time each day, ideally mid-cycle and mid-off. If the pump area is consistently warmer than the room by more than a few degrees, you’ll want better airflow or a cooler reservoir location.
Plant Temperature Targets and Practical Ranges
For many leafy greens and herbs, a comfortable indoor range works well. Aim for a stable air temperature where you can comfortably stand without adjusting clothing. Then treat the water temperature as the real constraint.
A practical approach is to target water temperature within a narrow band. If your room is around 20–24°C (68–75°F), many setups land in a workable water range. If your room runs hot, you’ll need active cooling of the reservoir or a different placement strategy.
Watch for symptoms that point to temperature issues rather than nutrient issues. Cool water often shows slow growth and darker, slower-to-expand leaves. Warm water can show faster wilting or limp leaves even when the system is running, plus roots that look less firm.
Heat Control Methods That Actually Work
Use passive methods first because they’re reliable.
- Shade and insulation: Wrap the reservoir with reflective insulation or a light-colored cover to reduce heat gain from nearby surfaces.
- Reservoir size: Larger reservoirs resist temperature swings. If you’re choosing between two setups, bigger volume usually means steadier water temperature.
- Airflow around the reservoir: A small fan moving air across the reservoir exterior can reduce heat soak.
When passive methods aren’t enough, use controlled cooling.
- Chiller or cooling unit: If you use one, place the temperature sensor where it represents the bulk solution, not where it’s directly influenced by tubing.
- Ice-bag or cold-water swaps: This can work short-term, but it’s easy to overcorrect. If you do it, do small adjustments and recheck after the solution mixes.
Avoid “hot fixes” like adding random cold water without measuring. Temperature changes can be as disruptive as nutrient changes.
Heat and Humidity Interaction
Aeroponic towers add another variable: mist increases local humidity. High humidity can reduce plant transpiration, which changes how plants regulate temperature. That can make leaves feel cooler while roots experience different conditions depending on water temperature.
To manage this, keep airflow consistent around the tower. The goal is not to blast plants with wind, but to prevent stagnant, saturated air from building up around the canopy.
Mind Map: Temperature Control and Heat Management
Example: Troubleshooting a Warm Reservoir
You notice roots look less firm and the reservoir temperature climbs from 23°C to 27°C over the day. The room temperature is steady. The pump is running on a long cycle.
First, confirm the pattern by checking temperature at the same times for two days. Then reduce pump runtime if the system allows it, and improve airflow around the reservoir area. If the temperature still rises, insulate the reservoir and relocate it away from any warm surfaces. Only after those steps should you consider active cooling.
Example: Preventing Overcooling During Adjustments
A quick fix attempt drops the reservoir temperature by several degrees using cold water. Within hours, plants show slowed growth and leaves look stressed.
The issue is usually the size of the change and the lack of mixing time. Instead of large temperature jumps, adjust in smaller increments and recheck after the solution has circulated long enough to represent the whole reservoir.
Temperature control in towers is mostly about stability: stable water temperature, stable airflow, and stable pump behavior. When those three are consistent, nutrient management becomes simpler because the system isn’t fighting heat every day.
3.4 Airflow Patterns to Prevent Microclimates and Disease Pressure
Airflow is the quiet workhorse of indoor towers. It keeps leaves drying at a steady pace, prevents stagnant pockets around the crown, and reduces the chance that spores and bacteria get a long, comfortable stay. The goal is not to blast plants with wind; it’s to create consistent movement that breaks up humidity gradients.
What Microclimates Look Like in Towers
Microclimates form when airflow and moisture don’t mix evenly. In towers, the most common trouble spots are:
- Crown zones where roots and stems meet the net pot. Water droplets and humid air linger there.
- Shadowed sides of the tower where leaves receive less light and stay cooler, so moisture condenses more easily.
- Corners of the grow space where air circulation is weak.
A simple indicator is uneven drying: if one side of the tower dries noticeably slower, that side is likely hosting higher humidity and lower evaporation.
Airflow Design Principles That Actually Matter
- Move air across leaves, not just around the room. A fan aimed at the tower should create a gentle sweep across the plant faces.
- Avoid direct, constant blasting on seedlings. High local wind can dry small plants too fast and stress them, which then makes them more vulnerable.
- Create a circulation loop. Pair intake and exhaust so air doesn’t just spin in place. Even a small loop helps equalize humidity.
- Keep airflow continuous during the light period. Plants transpire more when lights are on, so humidity is higher then.
- Use low speed and multiple passes. Two slower fans placed to cross airflow often outperform one strong fan.
Practical Layouts for Common Home Setups
Layout A: One Tower, One Fan, One Return Path
- Place a small oscillating fan so it blows across the tower at leaf height.
- Keep a clear path for air to return to the room (don’t block the fan’s back side with a wall or storage bin).
- If the tower sits near a wall, leave a gap so air can move behind it.
Layout B: Two Towers, Crossflow
- Use two fans on opposite sides of the towers, both set to low speed.
- Aim them so airflow crosses the tower faces rather than both fans pushing in the same direction.
- This reduces the chance that one tower side becomes a humidity pocket.
Layout C: Tower in a Closet or Small Room
- Use a small exhaust fan near the top and an intake opening near the bottom.
- Add a gentle internal circulation fan to prevent dead zones.
- Keep the exhaust running during lights-on, and reduce speed during lights-off if humidity stays stable.
Mind Map: Airflow Strategy for Tower Health
Concrete Examples You Can Copy
Example 1: The “One Side Stays Damp” Fix You notice condensation on the left side after lights-on. Instead of turning up the fan, rotate the tower 90 degrees or reposition the fan so the airflow sweeps the damp side first. Then verify drying after one full light cycle. Often the issue is a shadowed, cooler surface plus weak airflow behind the tower.
Example 2: Seedlings That Wilt After You Added a Fan If seedlings look droopy shortly after fan use, the airflow is too direct. Move the fan farther away, lower speed, or switch to oscillation so each plant gets brief, gentle passes. The target is steady movement, not constant wind pressure.
Example 3: High Humidity Spikes After Lights-Off If RH rises sharply when lights go out, the room air is cooling and can’t hold as much moisture. Keep a low-speed circulation fan running during the transition period so humidity doesn’t pool around the crown. If you also have an exhaust, run it at a modest level during lights-off until RH stabilizes.
Quick Troubleshooting Checklist
- Condensation persists on leaves: increase crossflow, add clearance, or reduce obstructions.
- Uneven growth on one tower side: airflow likely differs across faces; re-aim or rotate.
- Drying too fast on seedlings: reduce directness; use oscillation or lower speed.
- Biofilm smell near the crown area: airflow alone won’t fix it, but poor drying can worsen it—improve circulation and confirm your misting or flow schedule isn’t over-wetting.
Good airflow is measurable in outcomes: leaves dry more evenly, crowns stay less wet, and the tower environment becomes less hospitable to the usual indoor culprits.
3.5 Safety and Convenience Planning for Water and Electricity
Indoor towers combine water, nutrients, pumps, and lights, so the goal is simple: prevent leaks from becoming electrical problems, and prevent daily use from turning into a chore that people skip. Plan safety and convenience together, because the easiest system to maintain is usually the safest.
Safety First: Separate Water Risk from Power
Start with a “wet zone” and a “dry zone.” The wet zone includes reservoirs, pump bases, tubing connections, and any area where drips could land. The dry zone includes power strips, timers, and outlets. Keep them apart physically, not just “covered.” If you can’t keep distance, use a drip loop and a protected enclosure.
A drip loop means the cable runs down below the outlet level before rising again, so water traveling along the cable drips off instead of reaching the outlet. Place power connections higher than any expected spill path. If your tower sits on a stand, route cables along the stand’s back edge rather than across the front where you’ll bump them.
Use ground-fault protection for anything that touches water. In many homes this is already provided by GFCI outlets, but don’t assume. Confirm the outlet type, and test it using the built-in test button before you start a growing cycle.
Practical Convenience: Make Daily Checks Low Effort
Convenience isn’t about comfort; it’s about consistency. If checking pH, EC, and water level takes five minutes and is easy to do, you’ll do it. If it takes twenty minutes and involves moving heavy parts, you’ll postpone it.
Plan access paths before you assemble. Leave space to reach the reservoir fill point, the drain or siphon point, and the sensor ports if you use them. If your tower has a top fill, make sure you can reach it without standing on a chair over wet surfaces.
Label controls clearly. A timer labeled “Lights” and another labeled “Pump” prevents the common mistake of running the pump during a cleaning session. If you use multiple towers, label each pump and each reservoir so you can troubleshoot without guessing.
Water Management Details That Prevent Accidents
Choose a reservoir location that can handle spills. Put it on a tray or in a secondary containment bin sized to hold the full reservoir volume minus a small safety margin. This catches leaks from fittings and helps you notice problems early.
Use quick-release fittings only if you can secure them properly. Loose fittings are convenient until they aren’t. After installation, run the system and inspect every connection while the pump is running, not just when it’s off.
Plan for cleaning water. If you drain into a sink, confirm the hose length and slope so it doesn’t backflow. If you drain into a bucket, keep a dedicated bucket and a dedicated siphon so you don’t mix tools between crops.
Electrical Layout Checklist
- Power strip or timer location: dry zone, elevated, and protected from splashes.
- GFCI protection: verified and tested.
- Cable routing: away from drip lines; drip loop installed.
- Switches: accessible without reaching over the reservoir.
- Pump power: use a properly rated pump and keep connections off the floor.
- Condensation: prevent droplets from forming on power components by keeping them out of the mist stream.
Mind Map: Safety and Convenience Planning
Example: A Simple Setup That Stays Safe
Place the reservoir in a plastic storage bin used only for that tower. Set the bin on a larger tray so any leak stays contained. Route the pump cable up the back of the stand, then down into a drip loop before it reaches the outlet area. Mount the power strip on the stand’s side above the tray height, and keep it outside the mist reach.
For convenience, add a marked fill line on the reservoir so you can top up to the same level each day. Put pH and EC bottles on a small shelf next to the tower, not on the floor near the reservoir. When you drain for cleaning, use the same siphon and the same bucket every time, so you don’t improvise mid-task.
Example: Troubleshooting Without Making Things Worse
If a pump stops, don’t immediately reach into the wet zone to “check the connection.” First, turn off power at the outlet or switch. Then inspect the pump intake for clogs and check the tubing for kinks. Only after the system is safe and dry around the connections should you re-seat fittings.
This workflow prevents the two most common mistakes: touching electrical connections while wet, and restarting a problem that’s actually caused by a blocked line.
4. Water Quality and Nutrient Management Basics
4.1 Testing Water Sources and Interpreting Results
Before you mix nutrients, you need to know what your water is already bringing to the party. In towers, small chemistry shifts show up quickly because the root zone is constantly fed and recirculated. Testing turns “it seems fine” into numbers you can act on.
What to Test First
Start with four measurements: pH, alkalinity, hardness, and electrical conductivity (EC) or total dissolved solids (TDS).
- pH tells you how acidic or basic the water is. Nutrients are formulated to work best in a specific pH range, so starting pH affects how much adjustment you’ll need.
- Alkalinity indicates the water’s buffering capacity, meaning how strongly it resists pH change. High alkalinity can fight your pH adjustments.
- Hardness (often reported as calcium and magnesium) affects nutrient balance and scaling risk.
- EC/TDS estimates how many dissolved ions are already present. Even “clean” tap water can be nutrient-like, just not in the proportions your plants need.
If you can, also note chlorine/chloramine and iron/manganese. These don’t always show up in pH/EC, but they can affect roots and clogging.
How to Test Without Getting Misled
Use fresh samples and consistent timing. If you test water from a tank after it sits for days, you may measure changes from air exposure or settling.
- Measure pH and EC on the same sample. If you adjust pH later, EC can shift slightly, but the starting relationship helps interpretation.
- Calibrate meters before testing. A pH meter that’s off by 0.3 can lead you to chase the wrong problem.
- Record the water source. “Tap” can vary by season, and well water can vary by depth and pumping schedule.
Interpreting Results with Practical Meaning
Use the results to decide what to adjust and what to watch.
- Low EC (near 0–0.3 mS/cm) usually means your water contributes little dissolved content. You’ll rely more on your nutrient solution for minerals.
- Moderate EC (around 0.3–0.8 mS/cm) suggests some background ions. You may need slightly lower nutrient concentration to avoid overshooting EC targets.
- High EC (above ~0.8 mS/cm) often indicates hard or mineral-rich water. You’ll likely need careful nutrient dosing and more attention to pH stability and scaling.
For pH and alkalinity:
- pH below your target means you’ll add acid sooner. If alkalinity is high, pH may rebound after adjustment.
- pH above your target means you’ll add base or dilute. High alkalinity again makes correction harder.
For hardness:
- High calcium/magnesium can be helpful up to a point, but it can also push your solution toward imbalance. If you see frequent precipitation or crusting, hardness plus alkalinity is a common culprit.
Mind Map: Water Testing Workflow
Example: Tap Water with High Alkalinity
You test tap water and get:
- pH: 8.2
- EC: 0.6 mS/cm
- Alkalinity: high (for example, reported as 180 ppm as CaCO3)
What this means: your water is already basic and strongly buffered. If you mix nutrients and then try to bring pH down, it may climb back between checks.
A practical approach:
- Mix nutrients to your planned starting EC target, but consider that background EC is already 0.6.
- Adjust pH after mixing, not before.
- Check pH again sooner than usual (for example, within a few hours) to see how fast it rebounds.
Example: Well Water with High EC
You test well water and get:
- pH: 7.1
- EC: 1.2 mS/cm
- Hardness: high
What this means: the water already contains many dissolved ions. If you add nutrients at a standard concentration, your final EC can overshoot quickly, and mineral buildup becomes more likely.
A practical approach:
- Reduce nutrient concentrate so the mixed solution lands at your target EC.
- Monitor for crusting on fittings and tower surfaces.
- Keep pH adjustments small and frequent rather than large and rare.
Example: Interpreting Conflicting Clues
Sometimes pH looks fine but EC is high. For instance:
- pH: 6.8
- EC: 1.0 mS/cm
This can happen when dissolved salts are present but don’t strongly shift pH. In that case, don’t assume “low pH means low minerals.” Use EC and hardness to guide nutrient dosing and scaling prevention.
What to Record After Each Test
Write down the exact numbers and the source conditions:
- Date and time
- Source type (tap, well, filtered)
- pH, EC/TDS
- Alkalinity and hardness values
- Any notes about odor, color, or sediment
These notes make later troubleshooting faster because you can match plant issues to water chemistry changes rather than guessing.
4.2 pH Measurement, Calibration, and Adjustment Methods
pH is a measure of how acidic or basic your nutrient solution is, and it affects how well plants can take up nutrients. In soilless towers, small pH shifts can change leaf color and growth speed because roots are in direct contact with the solution. The goal is not a perfect number forever; it’s stable readings and consistent adjustment.
Measuring pH Correctly
Start with clean technique. Rinse the sample container with a bit of the same nutrient solution you’re testing, then collect a small fresh sample. Avoid dipping the probe into the reservoir unless the manufacturer recommends it; reservoir testing mixes in temperature swings, debris, and biofilm.
Temperature matters because pH meters compensate for it differently depending on the probe. Measure at roughly the same temperature each time, or at least note the temperature and let the meter’s temperature compensation do its job. If your tower runs warm during the day and cool at night, test at a consistent time.
Take multiple readings. Stir gently in the sample container, wait for the reading to settle, then record. If the number keeps drifting after a reasonable settling time, the probe may be dirty, the sample may be unstable, or the meter may need calibration.
Calibration That Actually Holds
Calibrate on a schedule that matches your use. If you test daily, calibrate more often; if you test weekly, calibrate before the first test of the week. Always calibrate with fresh buffer solutions stored properly.
Use two-point calibration for most home towers: one buffer near the low end and one near the target range. For typical indoor nutrient targets, a common pair is pH 4.0 and pH 7.0, or pH 6.86 and pH 4.01 depending on what your buffers provide.
Between buffers, rinse the probe with distilled or deionized water, then gently blot with a lint-free tissue. Don’t wipe aggressively; wiping can create static and scratch the sensing surface.
If your meter allows it, enable automatic temperature compensation. If not, keep buffer and sample temperatures close.
Adjusting pH Without Creating a New Problem
Adjustment is easiest when you add small amounts and mix thoroughly. Use pH up or pH down products designed for nutrient solutions. Measure the product carefully; “a splash” is how you end up chasing pH like it’s a runaway shopping cart.
Add adjuster in small increments, such as 1–2 mL per liter for concentrated products, then mix for 30–60 seconds and re-test after the reading stabilizes. The exact increment depends on your product strength, so treat the first adjustment as a learning step for your specific setup.
Always adjust in the direction you need. If you overshoot, don’t keep forcing it back and forth; repeated corrections can change solution chemistry and make readings less trustworthy.
A Simple Decision Flow
    flowchart TD
A[Take pH reading from fresh sample] --> B{Reading stable after settling?}
B -- No --> C[Check probe cleanliness and buffer freshness]
C --> A
B -- Yes --> D{pH within target range?}
D -- Yes --> E[Record and stop]
D -- No --> F[Add small increment of pH adjuster]
F --> G[Mix thoroughly]
G --> H[Wait for stabilization]
H --> A
Mind Map: pH Workflow
Example: Calibrating Before a Weekly Check
You test your reservoir every week. On test day, you calibrate with two buffers. After calibration, you rinse the probe, blot gently, and measure a fresh sample. The meter reads pH 5.9 and stabilizes quickly. You record it, then adjust only if your target is different.
If calibration drifts—say the meter won’t hold the buffer values—don’t adjust the nutrient yet. Fix the calibration first because a miscalibrated meter can make every adjustment wrong.
Example: Adjusting a Reservoir in Small Steps
Your target is pH 5.8, but your reading is 6.2. You add pH down in a small increment, mix, and wait. After stabilization, the reading becomes 5.9. You stop there because you’re close and stable. If you keep adding to chase 5.8 exactly, you risk overshooting and then compensating again.
Example: When Readings Keep Drifting
You take a reading and it slowly climbs from 5.7 to 6.0 over several minutes. First, check whether the probe was rinsed and blotted properly. Next, inspect the probe tip for residue. If the probe is clean and the drift persists, recalibrate with fresh buffers. Drift usually points to probe condition, buffer quality, or temperature instability.
Practical Targets and Consistency
Use a target range rather than a single magic number. Nutrient uptake is sensitive, but plants also tolerate small day-to-day variation. What matters most is that your measurement method is consistent and your adjustments are incremental, mixed, and re-tested after stabilization.
4.3 EC and TDS Targets for Common Indoor Crops
EC (electrical conductivity) measures how many dissolved ions are in your nutrient solution. TDS (total dissolved solids) is a rough estimate of dissolved material, usually reported as mg/L. In practice, EC is the more useful control knob because it responds predictably to nutrient concentration changes.
A common rule of thumb is: TDS ≈ EC × 500 (some meters use ×640). That means an EC of 1.6 often reads around 800 ppm on a 500-factor meter. Treat the conversion as meter-specific, not universal.
How Targets Work in Towers
Tower systems often run smaller reservoirs than soil setups, so EC can drift faster when plants drink unevenly or when you top off with plain water. Your target is best treated as a range tied to crop stage and growth speed.
If you see EC rising day to day, you’re likely topping off with water too rarely, or plants are consuming more water than nutrients. If EC drops quickly, you may be adding water too often without nutrients, or you have a leak or mis-set timer.
EC and TDS Targets by Crop
Below are practical starting ranges for indoor soilless towers. Use them as baseline targets, then adjust based on plant response and your system’s stability.
| Crop | Growth Stage | EC Target (mS/cm) | TDS Target (ppm, ×500) |
|---|---|---|---|
| Leaf Lettuce | Seedling to early growth | 1.0–1.4 | 500–700 |
| Leaf Lettuce | Rapid growth | 1.4–1.8 | 700–900 |
| Spinach | Early growth | 1.2–1.5 | 600–750 |
| Spinach | Steady harvest | 1.5–1.9 | 750–950 |
| Basil | Early growth | 1.2–1.6 | 600–800 |
| Basil | Frequent harvest | 1.6–2.0 | 800–1000 |
| Cilantro | Early growth | 1.1–1.5 | 550–750 |
| Cilantro | Leaf production | 1.5–1.9 | 750–950 |
| Kale | Early growth | 1.3–1.7 | 650–850 |
| Kale | Harvest cycles | 1.7–2.2 | 850–1100 |
| Mint | Early growth | 1.2–1.6 | 600–800 |
| Mint | Vigorous growth | 1.6–2.2 | 800–1100 |
| Pak Choi | Early growth | 1.3–1.7 | 650–850 |
| Pak Choi | Fast growth | 1.7–2.2 | 850–1100 |
| Strawberries | Vegetative growth | 1.3–1.8 | 650–900 |
| Strawberries | Fruiting | 1.8–2.2 | 900–1100 |
Mind Map: Choosing EC Targets
Examples That Make the Numbers Real
Example 1: Lettuce in a hydroponic tower You start seedlings at EC 1.2. After three days, EC reads 1.7 because the reservoir is shrinking and you’ve been topping off with nutrient-free water. You have two options: either top off with water plus a small nutrient adjustment to bring EC back toward 1.4–1.6, or reduce the next top-off frequency and keep the reservoir closer to your target volume.
Example 2: Basil under frequent harvesting Basil often grows fast after you cut the tips, so it can handle a slightly higher EC than lettuce. If your basil leaves look healthy but growth slows and new shoots are smaller, try moving from EC 1.6 toward 1.8 while keeping pH stable. If you overshoot, you’ll usually notice leaf-edge stress before the whole plant collapses.
Example 3: Cilantro that suddenly looks washed out If cilantro leaves turn lighter and growth stalls while EC is drifting down (for example, from 1.6 to 1.2), the simplest cause is dilution. Instead of adding a big nutrient dose, bring EC back gradually by adding concentrated nutrient solution in small increments and re-checking after mixing.
Practical Adjustment Rules
- Change one variable at a time. If you adjust EC, keep pH steady and don’t also change lighting or airflow.
- Mix thoroughly before measuring. Stratification can make readings jump around.
- Use small step changes. Moving EC by 0.2 mS/cm at a time is easier to control than large swings.
- Watch the trend, not just the snapshot. A stable EC that matches the crop’s stage usually beats chasing a single reading.
4.4 Nutrient Solution Mixing and Storage Best Practices
Mixing nutrient solution is mostly about consistency: same water, same order, same targets, and the same storage habits. Towers are forgiving about plant size, but they are not forgiving about sloppy chemistry.
Mixing Order and Why It Matters
Most nutrient products come as separate parts because certain salts can react and form solids if mixed in the wrong sequence. A simple rule prevents most problems: add nutrients in the order the label suggests, and never dump everything in at once.
Practical example: If you use a two-part liquid fertilizer, start with water in the reservoir, then add Part A while stirring, then add Part B while stirring. If you accidentally mix Part B into the water first, you may still get a usable solution, but you increase the chance of precipitation and uneven strength.
Stirring tip: Use a small pump, a powerhead, or a dedicated mixing tool. Gentle circulation is enough; you just want the solution to become uniform before you measure pH and EC.
Water First, Then Nutrients, Then Adjustments
Always begin with water in the mixing container. Add nutrients after the water is fully mixed, then measure EC. Adjust pH only after nutrients are dissolved and the EC reading is stable.
Concrete workflow:
- Fill container with the exact water source you plan to use.
- Add nutrients slowly with stirring.
- Wait 5–10 minutes for complete dissolution.
- Measure EC and pH.
- Adjust pH in small increments, then recheck after mixing for a few minutes.
This order matters because pH adjusters can slightly change EC, and nutrients can shift pH as they dissolve.
Measuring EC and pH Like a Grown-Up
EC meters drift if they are not calibrated. pH probes drift if they are not stored properly.
Best practice checklist:
- Calibrate pH with fresh buffers at the temperature you’re measuring.
- Rinse probes with clean water and blot gently before switching buffers.
- For EC, use the calibration solution specified by the meter.
- Take readings after the solution has mixed and settled for a moment.
Example: If your pH reads 6.0 right after mixing but 5 minutes later it reads 5.7, you likely adjusted too early. Give the solution time to stabilize before making another correction.
Temperature Control for Stable Readings
EC and pH readings depend on temperature. Nutrient solutions also behave differently when cold.
Practical example: If you mix at 18°C and later top up the reservoir with 26°C water, your EC reading will shift even if the nutrient amount is unchanged. Try to mix and top up with water that’s close to the reservoir temperature.
Storage Rules That Prevent Biofilm and Precipitation
Nutrient solution should be stored in a way that limits light, contamination, and temperature swings.
- Use opaque containers or cover them to block light. Light encourages algae and surface films.
- Keep containers clean and dedicated. Residue from cleaners or old fertilizer can throw off pH and EC.
- Avoid metal contact unless the container is designed for it. Some metals can react with nutrient salts.
- Label the batch with date, crop stage, target EC, and target pH.
Example: If you store two batches for different growth stages, label them clearly. Mixing the wrong batch into a tower is one of the easiest ways to create “mystery” leaf issues.
How Long You Can Store It
The goal is not to find a perfect universal number; it’s to avoid letting the solution change. Over time, nutrients can precipitate, pH can drift, and biological growth can start.
Best practice: Mix what you can use promptly. If you must store longer, keep the container covered, cool, and clean, and recheck EC and pH before using.
Example: If a stored batch’s EC is unchanged but pH has dropped, something is consuming alkalinity or shifting chemistry. Recheck and correct before adding it to the tower.
Topping Up Without Breaking the Mix
Topping up is where many people accidentally dilute nutrients or change ratios.
- If you’re topping up for evaporation, add water, not nutrients.
- If you’re topping up for drain-and-refill losses or contamination, remix to the target instead of guessing.
Concrete example: If your reservoir level drops by 2 cm due to evaporation, add water until the level returns. Then recheck EC. If EC rises, you may have concentration changes from temperature or measurement timing.
Mind Map: Nutrient Mixing and Storage
Example: A Simple Batch Plan for a Tower
Suppose you want a consistent weekly routine.
- Choose your target EC and pH for the crop stage.
- Mix a batch in a covered container using the same water source each time.
- Add Part A, stir, then add Part B, stir.
- Wait 5–10 minutes, measure EC and pH.
- Adjust pH slowly, stir, then recheck.
- Store covered until use, then recheck EC and pH right before pouring into the reservoir.
The result is boring in the best way: your plants get a predictable solution, and your troubleshooting becomes about the tower and the plants rather than the chemistry.
4.5 Preventing Precipitation and Maintaining Solution Clarity
Precipitation is what happens when dissolved nutrients stop staying dissolved and form solids. In a tower system, those solids can clog emitters, coat roots, and make your pH readings feel “mysteriously wrong” because the solution chemistry is no longer uniform. The goal of this section is simple: keep nutrients in a stable form, keep them mixed evenly, and keep the system clean enough that nothing unwanted gets a foothold.
1) Know what causes precipitation
Most precipitation problems come from one of these triggers:
- pH drift into the wrong range. Many nutrient salts become less soluble as pH moves. Even if your target pH is correct at mixing, it can drift after the solution sits.
- Over-concentration. If you mix stronger than needed, you raise the chance that some ions will exceed solubility limits.
- Mixing order mistakes. Some nutrients should not be combined directly in a single container before dilution, because they can react before they’re fully dispersed.
- Hard water and alkalinity. Calcium and bicarbonates can react with phosphate and other ions, forming solids.
- Temperature swings. Solubility changes with temperature; warmer solution can sometimes hold more, then precipitate as it cools.
- Biofilm and contamination. Organic buildup can change local chemistry around roots and surfaces.
A practical way to think about it: precipitation is usually a “chemistry meeting” that happens either because the solution is out of balance or because the ions are brought together in the wrong conditions.
2) Build a mixing routine that prevents ion collisions
Use a repeatable mixing process so you’re not relying on memory.
Example mixing routine for a typical two-part fertilizer (A/B):
- Fill your mixing container with water to about 70% of the final volume.
- Add Part A while stirring thoroughly.
- Add Part B only after Part A is fully dispersed.
- Top up with water to the final volume.
- Measure pH and EC after the solution stabilizes for a few minutes.
If you’re using single-part products, follow the label order exactly. The point isn’t superstition; it’s that some formulations are designed to stay stable only when mixed in the recommended sequence.
3) Control pH drift with a “measure, then adjust” habit
Adjusting pH too frequently or too aggressively can create its own problems. Instead:
- Measure pH at consistent times (for example, right after mixing and again after the first day).
- Adjust in small steps, then wait for mixing to homogenize.
- If pH keeps drifting quickly, treat it as a system issue (water alkalinity, nutrient ratio, or contamination), not just a “keep correcting” problem.
Example: If pH drops steadily over 24 hours, check whether you’re using a fertilizer ratio that’s pushing more acidic components than your water can buffer. If pH rises, you may be dealing with alkalinity effects or insufficient mixing before measurement.
4) Keep the solution mixed and oxygenated
Even if the overall solution is correct, poor circulation can create micro-zones where ions meet at higher local concentrations.
- Ensure the pump or circulation path moves water through the reservoir and returns it to the tower.
- Avoid dead zones in plumbing where solution sits without flow.
- For hydroponic towers, confirm that drain-back and refill cycles don’t leave pockets of stagnant solution.
Example: A tower that runs fine for a week, then starts clogging emitters, often has a circulation or filter issue. The solids may be forming gradually in low-flow areas.
5) Use filtration and cleaning to stop solids from forming and sticking
Filtration doesn’t prevent precipitation by chemistry alone, but it prevents particles from becoming a clogging problem.
- Use an appropriate filter for your system (and clean it on schedule).
- Keep reservoir lids closed to reduce dust and algae growth.
- Remove and rinse any components that show residue, especially around emitters and connectors.
Example: If you see a faint “snow” at the bottom of the reservoir, that’s often the first sign. Catching it early is easier than dealing with clogged nozzles later.
6) Watch for early warning signs
Clarity changes are useful indicators:
- Cloudiness that increases over time suggests fine particulates forming.
- Sediment at the bottom suggests precipitation or contamination.
- Emitter performance changes (uneven flow, reduced mist) suggest buildup.
- pH readings that fluctuate more than expected can indicate non-uniform mixing or solids affecting measurement.
When you see these signs, don’t immediately “chase” the numbers. First, verify mixing order, check water source, and inspect circulation and filters.
7) Mind Map: Preventing Precipitation and Maintaining Solution Clarity
8) Case Example: From “clear at first” to “clogging later”
A common pattern is a solution that looks clear on day one, then becomes slightly cloudy by day three. The first check is mixing order and concentration: if the fertilizer was mixed stronger than planned, precipitation can start slowly. Next, check water source hardness and alkalinity; calcium and bicarbonates can react with phosphate and form solids. Finally, inspect circulation and filtration: if solution sits in a low-flow section, local concentration rises and solids form where you can’t easily see them.
The fix is usually a combination: correct the mixing routine, confirm target EC, verify pH stability, and clean the reservoir and emitter path. After that, the solution should stay clearer for longer, and flow should remain consistent through the next cycle.
5. Hydroponic Tower Installation and Commissioning
5.1 Assembling a Hydroponic Tower Step By Step
A hydroponic tower is mostly plumbing plus careful plant support. The goal is simple: deliver nutrient solution evenly, keep roots oxygenated, and route excess back to the reservoir without leaks or dead spots.
Step 1: Choose a Stable Work Area
Set the tower where it will live before you start tightening fittings. Hydroponic setups hate “temporary” moves because you’ll end up rechecking connections. Put down a tray or mat under the tower base and keep a bucket nearby for test water.
Example: If your tower sits on a shelf, place a waterproof mat under the shelf, not just under the tower. A small drip becomes a big stain after a few weeks.
Step 2: Inventory and Dry-Fit the Parts
Lay out the tower body, reservoir (or base tank), net pots or growing cups, tubing, fittings, grommets, bulkheads, and the pump. Dry-fit the main pieces without sealant so you can see how they align.
Mind the direction of flow: many towers rely on gravity return, so the drain path must slope continuously back to the reservoir.
Step 3: Install the Tower Base and Drain Path
Attach the tower’s bottom outlet and connect the drain tubing to the reservoir return. Ensure the drain tubing has a consistent downward slope and no kinks.
Practical check: Fill the tower with a few liters of plain water and watch the return. If water pools anywhere, fix the slope before adding nutrients.
Step 4: Mount the Pump and Set the Water Level
Place the pump in the reservoir at the manufacturer-recommended depth. If the pump sits too high, it can run dry during evaporation and small leaks. If it sits too low, it can pull debris.
Example: Add a simple pre-filter sponge or screen on the pump intake if your reservoir collects sediment. Clean it during routine maintenance.
Step 5: Connect the Feed Line and Confirm the Lift
Run the feed tubing from the pump to the tower’s top distribution point. Tighten fittings firmly but avoid over-torquing plastic threads.
Then do a short test run with plain water. You’re looking for two things: (1) water reaches the distribution area, and (2) it flows down the intended channels rather than escaping at joints.
Step 6: Build the Distribution System
Install the top manifold, spray ring, or distribution nozzle system (depending on your tower design). Make sure the outlets are clear and aligned so water spreads across the growing columns.
Reasoning: uneven distribution creates uneven root zones. One side stays wetter, the other side dries, and plants respond quickly.
Step 7: Seal and Leak-Test Before Planting
Use the correct seals for your fittings: gaskets for bulkheads, thread seal tape where specified, and food-safe silicone only where the manufacturer allows it. After assembling, run the system for 30–60 minutes with plain water.
Leak test method: wipe every joint dry, run the pump, then inspect. If any spot stays damp after the run, fix it now. Nutrient solution makes leaks harder to clean and easier to damage plants.
Step 8: Install Growing Cups and Support Media
Insert net pots or growing cups into the tower openings. If you use a collar or foam insert, ensure it sits snugly so the plant stem doesn’t rub against plastic edges.
Example: For leafy greens, many growers use rockwool or coco coir cubes. Keep the cube centered so roots develop evenly around the water return path.
Step 9: Prime the System and Verify Flow Uniformity
Prime the pump if your design requires it. Then run the system and observe water behavior around several cups.
Uniformity check: pick three positions—top, middle, and bottom—and confirm each receives solution flow. If the top is wet but the bottom is dry, you likely have a restriction, air pocket, or insufficient pump head.
Step 10: Set Timers and Start with a Gentle Schedule
For most home towers, begin with shorter cycles and observe plant response. The exact schedule depends on crop and environment, but the assembly phase should focus on stable operation.
Example: Start with a modest run time during the first week, then adjust based on how quickly the media dries between cycles.
Mind Map: Hydroponic Tower Assembly Workflow
Example: Quick Assembly Checklist for a First-Time Build
- Dry-fit tower sections and confirm drain slope.
- Connect pump to feed line and run plain water for 5 minutes.
- Install distribution head and confirm water reaches the top.
- Run 30–60 minutes, wipe joints, and fix any damp spots.
- Install cups and center media.
- Prime and verify flow at multiple heights.
- Start with a conservative timer and adjust after observing media moisture.
Technical Spec: Assembly Verification Points
- Drain returns freely with no pooling.
- Feed line reaches distribution point without air leaks.
- Distribution outlets are unobstructed.
- No persistent dampness at fittings after test run.
- Pump intake remains submerged during operation.
- Flow appears at top, middle, and bottom growing positions.
5.2 Setting Up Plumbing, Timers, and Drainage Paths
A tower system is only as reliable as its plumbing. The goal is simple: deliver nutrient solution where it belongs, keep it moving on schedule, and remove excess water without flooding your floor or starving your roots.
Plumbing Layout That Prevents “Dead Ends”
Start by planning the path from reservoir to tower and back again. Use gravity and flow direction to your advantage. If your return line rises above the tower’s outlet, you’ll create a “dead end” where water sits and stagnates.
A practical rule: every line should either slope continuously toward the reservoir return or be designed so the pump handles the lift. For example, if your reservoir sits on a shelf below the tower, you can run the return line with a steady downward slope and let gravity do the work.
Use unions or quick disconnects on the pump outlet and at the tower inlet. That way, you can remove the tower for cleaning without cutting tubing. Add a shutoff valve near the reservoir so you can stop flow during troubleshooting.
Timers That Match Plant Needs and System Reality
Timers control two different things: pump runtime and mist or flow cycles. The plumbing setup determines how quickly water moves, so your timer settings should reflect your actual flow rate.
For hydroponic towers, a common starting point is intermittent pump cycles that wet the root zone and then allow drainage. If your tower uses a drain-to-reservoir return, aim for cycles long enough to fill the tower channels, but short enough that the return line clears before the next cycle.
For aeroponic towers, mist timing depends on nozzle output and droplet size. You’re trying to keep roots moist without turning the whole tower into a constant waterfall. A useful approach is to start with shorter mist pulses and increase only if roots dry out between cycles.
Use separate timers or programmable outlets if you have both pump and mist systems. That prevents accidental overlap when you’re testing. Also include a manual override switch so you can run a single cycle while you check for leaks and coverage.
Drainage Paths That Keep Roots Oxygenated
Drainage is not just “getting rid of water.” It’s how the system pulls oxygen into the root zone. Your return path should be sized to handle the maximum flow from the tower outlet.
Key details:
- Keep the return line diameter consistent or larger than the tower outlet.
- Avoid sharp kinks and long horizontal runs.
- Ensure the return line discharges into the reservoir below the liquid level to reduce splashing and air bubbles.
If your tower has an overflow outlet, route it to the reservoir or a dedicated catch container. Never vent it to the floor. Overflow is a sign of either a clogged drain, an undersized return line, or a timer cycle that’s too long.
Mind Map: Plumbing, Timers, and Drainage Decisions
Example: Hydroponic Tower Plumbing with Gravity-Return
Assume your reservoir is on the floor and the tower sits above it. Run the supply line from pump to tower inlet with no need for steep slopes, since the pump pushes water up. For the return, use a continuous downward slope from the tower outlet to the reservoir.
Set a timer to run the pump for a short cycle, then stop and watch the tower drain. If water still trickles after the next cycle begins, shorten the runtime or check for a partially blocked return line. If the tower drains too quickly and roots look dry, lengthen the runtime slightly.
During setup, place a small towel or tray under the tower outlet and inlet. You’re not trying to be tidy; you’re trying to spot slow leaks before they become nutrient loss.
Example: Aeroponic Tower with Mist Pulses and Overflow Catch
For aeroponic towers, mist nozzles distribute droplets across the root zone. The drainage path must handle runoff from misting without backing up.
Route the tower’s drain outlet to the reservoir with a return line that doesn’t rise. Add an overflow catch line from any secondary outlet to a separate container. If that container fills, you know the main drain is failing or the mist cycle is too long.
Start with mist pulses that you can observe. Run one cycle, then wait through the off-time and check root surface moisture. Adjust cycle length so roots stay evenly damp without pooling.
Quick Setup Checklist
- Plumbing
- Supply line secured and leak-checked
- Return line sloped or pump-lifted by design
- Overflow routed to reservoir or catch container
- Timers
- Manual override available
- Pump and mist controlled separately if needed
- Cycle tested by observing fill and drain
- Drainage
- Return line sized for outlet flow
- Reservoir discharge below water surface
- No kinks or long horizontal traps
Once plumbing, timers, and drainage paths are set, your next adjustments become smaller and more predictable. You’ll spend less time chasing symptoms and more time tuning the system to the plants.
5.3 Priming Pumps and Verifying Flow Uniformity
Priming is the step where you get water moving through the system before you ask plants to do the hard work. In towers, small air pockets can cause uneven flow, which shows up later as patchy growth, dry spots, or roots that look “fine” on one side and stressed on the other.
Priming Pumps with Clear, Repeatable Steps
- Confirm the system is leak-free and fully connected. Tighten fittings, verify clamps, and make sure the drain path is open. If water can’t return to the reservoir, priming will stall and you’ll chase the wrong problem.
- Fill the reservoir to the operating level. Many towers have a minimum level mark. Running low during priming can pull air into the pump inlet.
- Remove trapped air from the highest points. If your plumbing includes any loops or high elbows, temporarily open a cap or loosen a fitting at the highest point until water flows steadily. Retighten immediately.
- Prime the pump inlet. For submersible pumps, ensure the pump is fully submerged and the intake screen is not blocked by debris. For external pumps, follow the pump’s priming method (often a fill port) so the pump housing starts full of water.
- Start with short runs. Turn the pump on for 10–20 seconds, then off for 10 seconds. Repeat until you see consistent movement at the tower outlets or return lines. Short cycles help air migrate out without overheating a pump that’s still cavitating.
- Watch the return to confirm circulation. A healthy system shows water leaving the tower and returning to the reservoir without gurgling or surging.
A practical example: if your tower has multiple feed rings, you may see water reach the first ring quickly but not the upper rings. That usually means air is trapped in the upper plumbing. Pause, check the highest connection, and repeat short runs after you’ve cleared the air pocket.
Verifying Flow Uniformity Without Guesswork
Uniformity means each growing site receives roughly the same amount of solution over time. You can’t measure “exactly equal” at home, but you can verify whether the system is close enough to avoid systematic underfeeding.
Simple visual checks
- Observe wetting patterns. For hydroponic towers, look for consistent wetting of channels or evenly dripping outlets. For aeroponic towers, check that mist reaches each nozzle zone.
- Use a temporary collection method. Place small cups or paper towels under representative outlets for 5–10 minutes. Compare how quickly they become wet.
- Check timing consistency. If your system uses a timer, confirm the pump starts and stops cleanly. Uneven start/stop can cause some outlets to run longer than others.
Quantitative check with minimal tools
- Weigh-and-compare approach. Put a small container under each outlet you want to test. Run the pump for a fixed interval (for example, 3 minutes). Weigh each container before and after, then compare the differences. Even a basic kitchen scale is enough to spot major imbalances.
- Repeat after adjustments. If one outlet is consistently low, adjust that branch first (clog, kink, valve position, or nozzle alignment) and retest.
A practical example: suppose the bottom third of a hydroponic tower wets quickly while the top third stays dry. Common causes include a partially blocked line, a kink near the top, or a restriction that’s too tight on the feed side. Loosen the suspected restriction, confirm the line is straight, then rerun the same 3-minute test so you can compare results.
Common Priming and Flow Problems and Fixes
- Air bubbles that keep returning. Check for loose fittings on the suction side, verify the reservoir level, and ensure the pump intake is submerged.
- Gurgling or surging. Often indicates cavitation from low water level or an intake restriction. Clean the intake screen and refill to the operating mark.
- One zone consistently underfed. Look for a clogged nozzle, misaligned aeroponic head, or a hydroponic outlet blocked by mineral residue. Clean and verify the branch is unobstructed.
- Uneven flow that improves after running longer. That can happen when air is still migrating. Keep using short runs until the system stabilizes, then retest.
Mind Map: Priming and Flow Verification
Quick Example Workflow for a First Commissioning
- Fill reservoir, start pump for 15 seconds, stop, repeat until return is steady.
- Run for 3 minutes with containers under each representative outlet.
- Compare weights; identify any outlet that is far lower than the rest.
- Fix the likely cause (clog, kink, alignment), then repeat the same 3-minute test.
- Once differences are small and patterns stay stable, you’re ready to tune pH/EC and begin plant establishment.
5.4 Initial pH and EC Tuning for Seedlings and Transplants
Getting pH and EC right at the start prevents a lot of slow, confusing problems later. Seedlings are small, their roots are delicate, and they can’t compensate for nutrient mistakes the way established plants sometimes can. The goal is simple: start with a solution that lets roots absorb nutrients efficiently, then adjust based on what the plants actually do.
What “Initial” Means in a Tower
For seedlings and transplants, “initial” usually covers the first 3–10 days after they enter the tower. During this window, you’re balancing two things:
- Nutrient strength (EC): too high can stress roots; too low can slow growth.
- Acidity (pH): if pH drifts out of range, nutrients become less available even if EC looks fine.
A practical approach is to set a conservative starting EC, then fine-tune after you see stable uptake.
Starting Targets for Seedlings and Transplants
Use crop type and growth stage to choose targets, but keep the logic consistent.
- pH target: aim for 5.5–6.0 for most leafy greens and herbs in soilless systems.
- EC target: start around 0.8–1.2 mS/cm for seedlings and young transplants.
If your tower is hydroponic (continuous or recirculating flow), roots contact the solution more consistently, so you can start slightly steadier. If your tower is aeroponic (misting), roots may experience more intermittent wetting, so starting a bit gentler on EC helps avoid root tip stress.
How to Tune pH Without Guessing
pH changes are usually caused by mixing order, water chemistry, and plant uptake. To tune pH reliably:
- Mix nutrients first according to the label, using the same order each time.
- Measure pH after mixing, not before. Nutrients can shift pH.
- Adjust pH gradually using a pH-down or pH-up solution.
- Wait 5–10 minutes, then measure again. pH meters read more consistently after the solution stabilizes.
A common mistake is chasing pH with large adjustments. Small changes are easier to control and less likely to overshoot.
Mind Map: pH Tuning Logic
How to Tune EC Without Overcorrecting
EC reflects total dissolved salts, not nutrient balance. That’s why EC tuning should be paired with pH checks.
- Set EC by dilution or concentration: if EC is high, add water; if low, add nutrient concentrate.
- Recheck pH after EC changes because dilution and added concentrates can shift pH.
- Avoid rapid swings: adjust once, then observe.
If you’re using a two-part nutrient system, mix both parts in the correct ratio before measuring EC. Measuring after only one part can mislead you.
Example: Two-Stage Setup for Transplants
You transplant 24 herb seedlings into a hydroponic tower.
- Your tap water reads pH 7.6 and EC 0.2 mS/cm.
- You mix nutrient to reach EC 1.0 mS/cm.
- After mixing, the solution pH reads 6.3.
- You add pH-down in small increments until pH reaches 5.7.
- You wait 10 minutes, then confirm pH 5.7 and EC 1.0.
For the next 3 days, you only recheck. If EC rises slightly (common as plants take up water faster than salts), you top off with water to stabilize EC rather than adding more nutrients.
Measurement Routine That Prevents Confusion
Use the same routine every time so your readings mean something.
- Calibrate pH meter before use.
- Rinse probes between samples.
- Measure at the same temperature range when possible.
- Record: date, solution EC, solution pH, and what you changed.
Even a simple log helps you connect cause and effect. If pH keeps drifting upward, your adjustment method or water source may be the culprit.
Mind Map: Measurement and Adjustment Workflow
What Plant Signals Mean in the First Week
Don’t diagnose from one leaf. Look for patterns.
- If EC is too high: you may see slow root growth, wilting despite wet roots, or leaf edges looking stressed.
- If pH is off: new growth may look pale or uneven even when EC seems reasonable.
When you see issues, adjust one variable at a time. For example, if pH is correct but growth is sluggish, consider lowering EC slightly rather than changing pH again.
Quick Reference Targets for This Stage
- pH: 5.5–6.0
- EC: 0.8–1.2 mS/cm
- Adjustment style: small changes, wait, recheck
- First-week habit: measure daily, top off with water before adding nutrients
5.5 Leak Testing, Fail-Safes, and First-Week Monitoring
A tower that runs well is usually one that never surprises you. Leak testing and monitoring are how you catch problems while they’re small, before they turn into wet floors, dead pumps, or soggy roots.
Leak Testing Before Powering Plants
Start with a dry run mindset: you’re checking paths, seals, and gravity routes, not plant performance.
- Dry assembly check: Confirm every bulkhead, grommet, and threaded connection is fully seated. If a fitting feels “almost tight,” it’s usually not.
- Water-only pressure test: Fill the reservoir with plain water. Run the pump for short intervals (for example, 2–5 minutes), then stop and inspect.
- Inspect in layers:
- Top layer: Look around the tower inlets, nozzle mounts, and any cap seals.
- Middle layer: Check tubing connections and elbows. Small leaks often appear as dampness at the seam.
- Bottom layer: Verify the drain outlet and any collection tray. A leak here can be hidden by water pooling.
- Paper towel method: Wrap a paper towel around suspected joints. If it stays dry after a run, that joint is likely fine.
- Static soak: After a successful short run, leave water in the system for 30–60 minutes with the pump off. Leaks from slow seepage show up during this phase.
Example: If you see a wet ring around a bulkhead after the pump stops, tighten the fitting slightly and re-test. If the ring persists, replace the gasket or re-seat the bulkhead rather than forcing it.
Fail-Safes That Prevent Water Damage
Fail-safes are simple behaviors and physical safeguards that reduce the impact of a mistake or a component failure.
- Leak catch tray: Place the tower on a tray that can hold at least a few liters. Even if you can’t measure the exact volume, “enough to notice” is the goal.
- Overflow route: Ensure the drain path can handle the maximum flow your pump can deliver. If the drain is undersized, it will back up.
- Float switch or level sensor: Use a shutoff when the reservoir level drops too low. This protects the pump from running dry.
- Timer limits: For hydroponic cycles, keep pump run times within your design. For aeroponic towers, ensure mist cycles are not so long that water accumulates where it shouldn’t.
- Electrical safety: Use a grounded outlet and a properly rated GFCI device. Keep connections above the tray level.
Mind Map
Mind Map: Leak Testing, Fail-Safes, and First-Week Monitoring
First-Week Monitoring Plan
The first week is about learning your system’s rhythm. You’re looking for trends, not perfection.
Daily Checks for the First 7 Days
- Reservoir level: Note how much water is used each day. A sudden jump usually means a leak or excessive drain.
- Flow or mist behavior:
- Hydroponic: Confirm water reaches the intended distribution points and drains cleanly.
- Aeroponic: Watch for uneven misting or dry spots that suggest partial nozzle clogging.
- Tray and floor inspection: Check the tray surface and any nearby floor edges. If you’re seeing dampness, find the source before it grows.
- pH and EC spot checks: Measure at least once every 1–2 days. Don’t chase tiny fluctuations; look for a direction. If pH drops quickly, something is off in mixing, buffering, or contamination.
Example: If EC rises faster than expected on Day 2, check whether you topped off with nutrient water instead of plain water, or whether the reservoir volume is smaller than you thought due to a slow leak.
Weekly Checks
- Drain performance: Verify the drain outlet isn’t partially blocked by mineral residue or debris. A slow drain can cause root-zone saturation.
- Nozzle or emitter condition (aeroponic): Inspect for crusting. If mist coverage becomes patchy, clean the nozzles and confirm the filter is doing its job.
- Tubing and fittings: Re-check joints after the system has run. Materials can settle slightly after first exposure to water.
- Root-zone appearance: Healthy roots should look consistent with your crop stage. If roots appear consistently brown or slimy, address oxygen delivery and cleanliness before adjusting nutrients.
A Simple Monitoring Log Template
Use a small table so you can compare days without rewriting your notes.
| Day | Reservoir Level Change | Flow/Mist Notes | pH | EC | Wet Spots Found | Action Taken |
|---|---|---|---|---|---|---|
| 1 | ||||||
| 2 | ||||||
| 3 | ||||||
| 4 | ||||||
| 5 | ||||||
| 6 | ||||||
| 7 |
What to Do When You Find a Leak
- Stop the pump if water is escaping beyond the tray.
- Dry and isolate: Wipe the area, then run again briefly to pinpoint the exact joint.
- Fix the cause, not the symptom: Tightening may help for a loose connection, but persistent seepage usually means a gasket, seal, or fitting alignment issue.
- Re-test with water-only runs and a static soak before returning to normal operation.
Example: If you find a leak at a tubing barb, cut the tubing end square and re-seat it with the correct clamp pressure. Then repeat the paper towel test at that joint.
By the end of the first week, you should know your system’s normal water use, how quickly pH and EC move, and which joints stay dry. That’s the baseline you need for confident, repeatable growing.
6. Aeroponic Tower Installation and Commissioning
6.1 Assembling an Aeroponic Tower Step by Step
Aeroponic towers work when roots get a fine mist often enough to stay oxygen-rich, but not so often that they never dry between cycles. Assembly is mostly about getting three things right: stable mounting, reliable mist delivery, and predictable drainage.
Step 1: Choose a Stable Location and Mounting Surface
Place the tower where you can reach the reservoir, check levels, and access power safely. Use a level surface, because uneven mounting can cause uneven misting and inconsistent drainage. If the tower sits on a stand, tighten all fasteners before adding plumbing so you don’t fight alignment later.
Example: If your tower has a vertical column and a separate reservoir, set the reservoir first, then position the tower so the drain outlet lines up with the reservoir inlet without forcing hoses.
Step 2: Identify the Main Parts Before You Connect Anything
Lay out components in a simple order: reservoir, pump, tubing, manifold, nozzles, tower columns, and drain fittings. Confirm nozzle count and nozzle type match the tower design. If the tower uses a manifold ring, ensure it has the correct number of ports.
Reasoning: Aeroponic systems are sensitive to small flow differences. If you start with mismatched parts, troubleshooting later becomes guesswork.
Step 3: Install the Reservoir and Drain Path
Set the reservoir on the floor or stand so it can collect runoff without splashing. Install the drain return fitting and route the drain line upward only if the tower requires it; otherwise keep the drain line as direct as possible. Use clamps or barbed fittings as specified by the kit.
Example: A common mistake is routing the drain line so it kinks when the tower is moved. Test the hose path with the tower in place before tightening anything.
Step 4: Mount the Tower and Fit the Growing Columns
Attach the tower base and any vertical supports. Install the growing columns or stack sections, then check that net pots or collars seat evenly. If the tower uses grommets or foam collars, press them in firmly so mist doesn’t leak into unintended gaps.
Reasoning: Leaks don’t just waste water; they change where droplets land, which affects root moisture and oxygen balance.
Step 5: Build the Mist Delivery Line
Connect the pump outlet to the supply tubing. Add any inline filter if your kit includes one, and place it where you can access it for cleaning. Route tubing to the manifold with gentle bends and no sharp kinks.
Then install the manifold and nozzles. Tighten nozzle fittings snugly but avoid over-torquing plastic threads. Verify nozzle orientation: most tower nozzles should aim toward the root zone, not sideways into the column wall.
Example: If you have adjustable nozzles, set them all to the same angle before running water. Later you can fine-tune based on mist coverage.
Step 6: Connect Drain Return and Confirm Gravity Flow
Attach the drain line from the tower to the reservoir. Ensure the drain outlet is below the tower’s mist zone so runoff can collect and return. Check that the drain line slopes downward continuously.
Reasoning: Aeroponics depends on cycling. If drainage is slow, the reservoir can overflow and the tower can stay too wet between cycles.
Step 7: Add a Simple Leak and Fit Check
Before powering the pump, run a water-only test. Fill the reservoir to the recommended level, then pour water into the tower’s intended drain area (or run the pump briefly if you’re confident in wiring). Watch for leaks at nozzle fittings, manifold joints, and drain connections.
Example: Put a paper towel under each connection point. If it stays dry after a few minutes, you’ve likely solved the “small leak that becomes a big problem” issue.
Step 8: Prime the Pump and Verify Flow Uniformity
Prime the pump according to the manufacturer instructions. Start the system and observe mist behavior. You’re looking for consistent droplet coverage across the root zone and no sputtering from air pockets.
If the tower has multiple nozzle levels, compare them. One weak level usually means a clogged nozzle, a partially blocked manifold port, or a tubing restriction.
Step 9: Set Initial Timer Cycles and Run a Short Test Session
Use a conservative starting schedule: short mist bursts with enough time for drainage to settle. Monitor reservoir level and check that the tower doesn’t flood.
Example: Run 1–2 short cycles, then pause. Inspect roots through the openings and confirm droplets are reaching the intended area.
Step 10: Record Baseline Measurements
Measure and record reservoir pH and EC after mixing your nutrient solution later, but for assembly testing record water level, pump behavior, and any unusual noise. Note nozzle count and any adjustments you made.
Reasoning: Baselines make troubleshooting faster because you can compare “what changed” against a known starting point.
Mind Map: Aeroponic Tower Assembly Checklist
Example: Quick Assembly Flow for a Two-Level Tower
- Mount the tower base and columns first.
- Install the drain line with a steady downward slope into the reservoir.
- Connect pump to supply tubing, then attach manifold and nozzles.
- Run a water-only test for leaks.
- Prime the pump and run short mist cycles.
- Compare mist coverage at both levels and adjust nozzle angles if needed.
- Confirm drainage returns to the reservoir cleanly before adding nutrients.
6.2 Nozzle Selection, Placement, and Clogging Prevention
Aeroponic towers live or die by the mist. The goal is simple: deliver a fine, even spray to the root zone without wasting water or creating wet pockets where roots and biofilm can party together.
Nozzle Selection
Start with nozzle type and then match it to your tower geometry.
- Nozzle style: Use fan or cone nozzles when you want coverage across a ring or column. Use full cone when you need mist to reach deeper into a vertical stack. If your tower has multiple levels, choose nozzles that can cover one level cleanly rather than trying to “spray everything” from one height.
- Droplet size: Smaller droplets increase surface wetness and oxygen exchange, but they also clog faster if your water isn’t well filtered. A practical approach is to pick a nozzle that produces a mist you can see as a light haze at the root zone, not a visible stream.
- Flow rate and pressure: Nozzles are usually rated for a pressure range. If you run below the range, you get larger droplets and uneven coverage. If you run far above it, you increase mist drift and wear. Match pressure to your pump and keep it stable with a regulator if needed.
- Material: Choose nozzles made for chemical exposure and mineral water. Stainless and engineering plastics are common. Avoid mixed metals in the same line if your water chemistry is aggressive.
Example: If your tower has 6 levels and each level has a dedicated nozzle, pick nozzles whose rated flow fits your total pump capacity with headroom. Then set pressure so each nozzle produces a steady mist during its run time.
Nozzle Placement
Placement is about coverage and root-zone targeting.
- Height relative to roots: Aim the mist so it lands where roots actually hang. If the nozzle is too high, mist hits the upper support and never reaches lower roots. If it’s too low, it wets the growing medium and encourages algae.
- Angle and overlap: For multi-level towers, stagger nozzle angles so mist from adjacent levels overlaps slightly at the edges. Overlap prevents dry bands, which show up as slower growth stripes.
- Distance to root zone: Keep a consistent standoff distance. Too close can create pooling; too far can cause mist to disperse before it reaches roots.
- Alignment with airflow: If you have fans for air exchange, place nozzles so airflow doesn’t blow mist sideways out of the root column.
Example: In a tower where roots sit in a central column, place each nozzle so its spray cone intersects the root curtain at mid-depth. Then run a short mist test and look for uniform wetting on the roots, not just on the walls.
Clogging Prevention
Clogs usually come from three sources: particles, precipitation, and biofilm.
- Filtration: Install a filter before the nozzle line. Use a mesh size that matches your nozzle tolerance. If you see reduced mist output over days, your filter is likely too coarse or not being cleaned.
- Water chemistry control: Mineral buildup forms when pH and alkalinity drift or when nutrients precipitate. Keep pH in range and avoid letting the reservoir sit warm for long periods.
- Nutrient mixing discipline: Add nutrients in the recommended order and mix thoroughly before filling the reservoir. Incomplete mixing can create localized precipitation that later travels to the nozzle.
- Run-time scheduling: Continuous misting can keep surfaces constantly wet, which encourages biofilm. Use cycles that allow roots to dry slightly between mists while still preventing desiccation.
- Flush routine: After each crop cycle, flush the system with clean water to remove nutrient residue. During a cycle, consider a brief clean-water flush between nutrient adjustments if your tower allows it.
- Nozzle cleaning method: If mist becomes uneven, remove the nozzle and clean it gently. Use a soft brush for external buildup and soak only if the nozzle material supports it.
Example: If one nozzle starts spraying a thicker jet while others remain fine, swap it with a clean spare. If the problem follows the nozzle, it’s clogging. If the problem stays at the same height, check line pressure and placement.
Mind Map: Nozzle Selection, Placement, and Clogging Prevention
Quick Setup Checks
- Run a short mist test and observe root-zone coverage for 2–3 cycles.
- Measure pressure at the nozzle line if you can; stable pressure beats frequent guessing.
- Keep a simple log of reservoir pH, EC, and filter cleaning dates so you can connect mist changes to system conditions.
Example: After cleaning the filter, you should see mist return to uniform coverage within the next cycle. If not, the nozzle may already be partially blocked or the line pressure may have shifted.
6.3 Misting Cycles, Pressure Settings, and Run-Time Scheduling
Aeroponic towers succeed or fail on timing and coverage. The goal is simple: keep roots moist enough to absorb water and nutrients, while giving them enough dry time to pull in oxygen. Your mist schedule should match the plant’s stage, the tower’s airflow, and the nozzle behavior.
Misting Cycle Logic
Start with a baseline cycle and adjust based on root appearance and system behavior.
- Seedlings and cuttings: shorter mist bursts and more frequent cycles. Small roots dry out quickly, but they also clog nozzles more easily when solutions are not well filtered.
- Established plants: longer bursts with longer intervals. Larger root systems tolerate brief dry periods and benefit from oxygen exposure.
- Hot or dry rooms: increase mist frequency or burst duration because evaporation steals moisture faster.
- Cool or humid rooms: reduce mist frequency to avoid constant wetness and condensation.
A practical rule: if roots look uniformly wet all the time, you are misting too much; if they look dry and light-colored between cycles, you are misting too little.
Pressure Settings That Match Nozzles
Pressure affects droplet size and mist reach. Higher pressure often creates finer droplets that can drift and miss the target, while lower pressure can produce larger droplets that fall quickly and wet only the lower roots.
Use these steps to set pressure without guessing blindly:
- Check nozzle rating (if your kit provides it). Use it as a starting point, not a law.
- Aim for consistent coverage across the tower height. You should see mist reaching the upper root zone during each burst.
- Avoid constant wetting on the tower walls. If walls stay coated, droplets are too large or pressure is too low, causing heavy fall.
- Listen and watch. A pump running at a pressure that causes frequent sputtering or uneven spray usually means the filter is restricted or the pressure regulator is mis-set.
If your system has a pressure regulator, adjust in small steps and test for at least one full cycle. Changing pressure changes droplet behavior immediately, but plant response takes days.
Run-Time Scheduling That Balances Moisture and Oxygen
Run-time scheduling is usually expressed as mist duration per cycle and time between cycles. The total misting time per hour matters, but so does the spacing.
A common starting approach for home towers:
- Seedlings: mist for 10–20 seconds, pause 2–5 minutes.
- Vegetative growth: mist for 20–40 seconds, pause 5–10 minutes.
- Harvest-ready leafy greens: mist for 20–60 seconds, pause 8–15 minutes.
These are starting points, not universal settings. Use your observations to refine.
How to Observe Root Response
During the first week, check roots at the same time each day, preferably right before the next mist cycle begins.
- Healthy moisture: roots look dark and slightly glossy, with no crusty dry patches.
- Too wet: roots appear slimy or uniformly glossy, and you see persistent condensation on the tower interior.
- Too dry: roots look pale, feel dry to the touch through the net pot opening, or show shriveled tips.
Adjust one variable at a time. If roots are too wet, shorten mist duration first. If roots are too dry, increase mist frequency first.
Mind Map: Misting Controls and Adjustments
Example Scheduling Scenarios
Example: Seedlings in a Warm Room
Your room sits around 78°F (25.5°C) with moderate airflow. Start with 15 seconds mist, 3 minutes pause. If roots are still glossy right before the next cycle, reduce to 12 seconds. If tips look dry, change to 15 seconds mist and reduce pause to 2 minutes.
Example: Established Greens in a Cooler, Humid Space
Your room is around 68°F (20°C) with higher humidity. Start with 30 seconds mist, 10 minutes pause. If you see condensation pooling, increase pause to 12–15 minutes. If roots look pale between cycles, reduce pause to 7–8 minutes.
Example: Uneven Coverage Across Tower Height
Upper roots look dry while lower roots stay wet. First check nozzle alignment and ensure the tower is level. Then adjust pressure upward slightly if droplets are falling too quickly, or downward slightly if mist drifts past the upper zone. Make only one change, then observe for a full day.
Practical Scheduling Tips
- Use a timer that can handle short intervals reliably. If your controller drifts, your cycles become inconsistent.
- Keep filtration clean. Clogged nozzles change droplet behavior and force you to compensate with pressure.
- Record settings and root observations for at least the first week. Small adjustments become easier when you can see what changed and when.
A good mist schedule feels boring: predictable cycles, stable root appearance, and no constant wall wetting. When those three are true, you’re doing the timing part correctly.
6.4 Root Zone Conditioning for Seedlings and Established Plants
Root zone conditioning is the set of practices that help roots start fast, stay oxygenated, and adapt to the tower’s delivery pattern. In towers, the “root environment” is not just water and nutrients; it’s also oxygen availability, moisture timing, and how quickly the roots can recover after each pump or mist cycle.
What Conditioning Means in a Tower
For seedlings, conditioning focuses on gentle establishment: stable moisture, mild nutrient strength, and consistent oxygen. For established plants, it shifts toward maintaining root function under higher demand: preventing oxygen dips, avoiding salt buildup, and ensuring the root zone experiences the same delivery pattern every day.
A simple way to think about it: roots need three things in the right order—oxygen first, then water, then nutrients. If nutrients are too strong early, roots spend energy coping instead of growing.
Conditioning Seedlings in Hydroponic Towers
Start seedlings with a lower EC than you plan to run later. A practical target is about half-strength nutrient solution for the first 7–14 days after transplant, then gradually increase as new roots branch and the plant shows steady growth.
Keep the root zone consistently wet, but not stagnant. If your tower runs on timed flow, use shorter cycles at first so roots don’t dry between runs. Example: if your mature schedule is 15 minutes on / 45 minutes off, try 10 minutes on / 20 minutes off during the first week, then return to the mature rhythm.
Support matters too. If the net pot sits too high, roots may hang in air longer than intended. If it sits too low, roots can be submerged deeper than the system expects, reducing oxygen exchange. Aim for roots to reach the wet zone without being crushed or tightly packed.
Conditioning Seedlings in Aeroponic Towers
Aeroponics is more sensitive to timing because roots can dry quickly. Conditioning begins with gentler misting: lower pressure if your system allows it, shorter run times, and more frequent cycles.
Example schedule for newly transplanted seedlings: mist for 10–20 seconds every 5–10 minutes during the first 3–5 days, then increase either run time or frequency as roots visibly fill the growing space. The goal is to keep roots moist and oxygenated without turning the root surface into a constant drip-and-dry cycle.
Nozzle placement also affects conditioning. If mist coverage is uneven, some roots get frequent wetting while others get long dry gaps. During the first week, check coverage by looking for consistent wetting patterns on multiple plants, not just one.
Conditioning Established Plants in Hydroponic Towers
Established plants usually tolerate stronger nutrient solutions, but the root zone still needs oxygen stability. If you notice slower growth during hot hours, it often correlates with reduced dissolved oxygen or warmer reservoir temperatures.
A practical adjustment is to increase flow duration slightly during the warmest part of the day rather than changing nutrients. Example: if your baseline is 15 minutes on / 45 minutes off, shift to 20 minutes on / 40 minutes off during peak heat, keeping EC and pH targets steady.
Also condition the system against salt accumulation. Even when you top off with water, nutrients remain. Use a simple rule: when EC trends upward faster than expected, partially refresh the reservoir rather than trying to “fix” it with pH changes.
Conditioning Established Plants in Aeroponic Towers
For established plants, aeroponics conditioning focuses on maintaining root surface health. Roots that stay too wet can develop slimy biofilm; roots that dry too often can become brown and brittle.
Example: if you see root tips turning brown while the plant’s leaves look otherwise fine, reduce mist intensity slightly or shorten the longest dry intervals. If roots look pale and overly soft, increase mist frequency or run time modestly.
Keep an eye on root mass. As roots expand, they can block mist pathways. If you see uneven misting after a few weeks, check whether roots have grown into areas that were previously clear.
Mind Map for Root Zone Conditioning
Quick Examples You Can Apply Immediately
- Seedling hydroponics: Run half-strength nutrients for 10 days, and shorten off-time by about half compared to your mature schedule.
- Seedling aeroponics: Mist in frequent, short bursts for the first week, then increase run time once roots show active branching.
- Established hydroponics: During hot hours, increase flow duration slightly while keeping pH and EC targets unchanged.
- Established aeroponics: If roots look slimy, reduce mist time or frequency; if they look brittle, increase mist frequency before changing nutrients.
Conditioning Checks That Prevent Most Mistakes
Before changing nutrients, confirm delivery. Look at root moisture patterns, check that timers are consistent, and verify that pumps or nozzles are producing the expected flow or mist. Then adjust one variable at a time—schedule first, nutrient strength second—so you can connect cause to effect.
6.5 Commissioning Checks for Uniform Mist Coverage
Uniform mist coverage is the difference between “it’s growing” and “it’s growing evenly.” Commissioning is where you verify that every plant site gets the right amount of moisture, without wasting water or creating soggy pockets.
What You Are Checking
You’re confirming four things: (1) mist reaches every level, (2) mist lands where roots can use it, (3) mist timing matches plant needs, and (4) the system doesn’t drift out of spec after a few minutes.
A simple way to think about it: if you can predict which tower sites will be wet and which will be dry before you start, you’re already halfway to diagnosing problems.
Step 1: Dry Run with Visual Markers
Run the system with no plants (or with empty tower sites) and use a temporary visual marker. Options include food-safe dye in water or a washable mist tracer. The goal is to see where droplets travel and where they stop.
Procedure:
- Fill the reservoir with plain water.
- Set the pump and mist cycle to your intended starting values.
- Run for 10–15 minutes.
- Inspect each level and each nozzle’s “landing zone.”
What “good” looks like: droplets appear across the full height with no long dry bands, and each nozzle contributes to a shared coverage pattern rather than spraying only one side.
Step 2: Coverage Grid Inspection
Create a quick coverage grid on the tower exterior. Divide the tower into horizontal bands (for example, top, upper, middle, lower) and vertical sectors (left, center, right). Then record what you see.
Use a simple scoring method:
- 0 = no visible droplets
- 1 = light misting
- 2 = consistent droplets
- 3 = heavy pooling
Aim for mostly 2s, with occasional 1s near edges. Avoid 3s because pooling often leads to uneven oxygenation and biofilm.
Mind Map: Uniform Mist Coverage Checks
Step 3: Confirm Spray Pattern and Nozzle Orientation
Even if pressure is correct, a nozzle aimed slightly off-axis can create a “shadow” zone. Check each nozzle’s spray pattern against the tower geometry.
Concrete checks:
- Look for a consistent fan or cone shape.
- Ensure the nozzle angle aims toward the center of the root zone, not just the inner wall.
- Verify that nozzles are not rotated after tightening.
If you see a dry band directly opposite a nozzle, adjust orientation first before changing pressure.
Step 4: Pressure Stability over Time
Mist coverage that starts strong but fades after 5–10 minutes usually indicates pressure drop, partial clogging, or a pump that can’t maintain flow.
Commissioning test:
- Run for 20–30 minutes.
- Note pressure (if you have a gauge) at 0, 10, 20, and 30 minutes.
- If pressure falls, inspect filters, check for mineral buildup, and confirm tubing is fully seated.
A stable system keeps the coverage grid score similar across the run.
Step 5: Root Zone Wetting Without Constant Saturation
Uniform mist isn’t just “everywhere gets wet.” Roots need wetting cycles that allow oxygen to return between mist events.
Practical method:
- Place a few representative net pots or root inserts at different levels.
- Run the system for your planned cycle.
- After the cycle ends, check how long droplets persist on surfaces.
Good behavior: droplets dissipate within a reasonable time, and you don’t see continuous runoff or standing water in the tower base.
Example: Diagnosing a Dry Middle Band
You run a tracer test and score the grid. Results:
- Top band: mostly 2s
- Middle band: mostly 0s and 1s
- Lower band: mostly 2s
Likely causes and fixes:
- Nozzle aim: middle nozzles may be angled too high or too low. Adjust orientation so the spray intersects the root zone at that band.
- Uneven distribution: if your plumbing branches feed different nozzle groups, check for flow restriction on the line serving the middle band.
- Partial clog: if middle nozzles show a narrower spray pattern, clean or replace the affected nozzle.
After each adjustment, repeat the tracer run and re-score the grid.
Example: Fixing Pooling at the Top
Grid shows top band scoring 3s (pooling) while lower bands are 2s.
Likely causes and fixes:
- Cycle too long: reduce mist duration so the top doesn’t stay wet.
- Nozzle overlap: top nozzles may be aimed to converge. Re-aim to reduce direct overlap.
- Drain path issue: confirm the tower drains freely so water doesn’t back up.
Re-run the tracer test and confirm the top band drops from 3s toward 2s.
Step 6: Record and Repeat
Keep a short commissioning log: nozzle positions, initial pressure setting, cycle timing, and the coverage grid scores. Then repeat the tracer run once after any changes.
If the second run produces the same grid pattern, you’ve verified that your system isn’t just “lucky” on the first attempt.
7. Growing from Seed to Harvest in Towers
7.1 Germination and Transplant Timing for Soilless Systems
Soilless towers reward timing because roots meet a ready-made environment. If you transplant too early, roots spend extra time adapting to moisture and oxygen levels. If you wait too long, seedlings become root-bound in their starter medium and lose vigor during the move.
Germination Targets That Match Tower Reality
Start by choosing a germination method that produces sturdy roots without long delays. For most leafy greens and herbs, aim for transplant readiness when seedlings have:
- A healthy root system for the next step, not just a sprout.
- Two true leaves (not counting the seed leaves), which usually means the plant can handle nutrient exposure.
- A stem that can stand upright in the net pot without collapsing.
A practical rule: transplant when you can gently lift a seedling and see roots that hold together as a small cluster. If roots break easily, the seedling is not ready.
Timing Hydroponic vs Aeroponic Moves
Hydroponic towers typically tolerate a slightly earlier transplant because water contact is continuous or frequent. Aeroponic towers require more careful timing because roots must handle intermittent misting.
- Hydroponic timing: transplant once roots are visible and seedlings have at least two true leaves.
- Aeroponic timing: transplant when roots are longer and more established, often closer to the two-true-leaf stage plus a bit more root mass.
If you’re unsure, start with hydroponic timing for both systems, then adjust in your next batch based on what you observe in the first week.
Seedling Stage Plan with Clear Milestones
Use a simple schedule anchored to your crop’s typical germination time.
- Day 0: sow seeds in a starter medium that stays evenly moist.
- Day 2–5: monitor for emergence. Keep conditions stable; temperature swings slow germination.
- Day 7–14: wait for true leaves. This is where timing matters most for towers.
- Transplant day: move seedlings into tower supports and begin the tower’s feeding rhythm.
Example: For basil, you might see emergence around day 5 and transplant around day 14 when true leaves appear. For lettuce, emergence may be earlier and transplant can happen sooner if seedlings are compact.
Transplant Technique That Reduces Root Stress
Transplanting is less about speed and more about minimizing root disturbance.
- Handle seedlings by the leaves, not the stem.
- Keep roots shaded and cool during the move.
- If using starter cubes, keep them intact so roots don’t tear.
- Set the net pot so the root zone sits where moisture and oxygen are balanced for your system.
A common mistake is letting roots dry for a few minutes while you adjust plumbing. Plan your workflow so the tower is ready before you lift seedlings.
Starting Nutrient Exposure Without Overcorrecting
Seedlings don’t need full-strength nutrient immediately. The goal is to avoid salt stress while still encouraging steady growth.
- Begin with a mild nutrient concentration at transplant.
- Increase gradually over several days if plants remain upright and leaves stay a normal color.
Example: If your normal EC target for mature plants is higher, start at a fraction of that value for the first week. Watch for slow growth or leaf edge issues; those are signals to adjust.
Mind Map: Germination and Transplant Timing
Case Example: Two Batches, One Adjustment
Batch A: You transplant lettuce at two true leaves into a hydroponic tower and start mild nutrients the same day. Growth looks steady, and new leaves appear without discoloration.
Batch B: You transplant spinach into an aeroponic tower at the same seedling stage. After a few days, growth slows and leaves look slightly limp during the mist cycle.
Adjustment: In the next batch, wait an extra few days for more root mass before transplanting into the aeroponic tower, and keep the initial nutrient concentration mild for the first week. This keeps the mist schedule from becoming a stress test.
Quick Checklist for Transplant Day
- Seedlings have two true leaves.
- Roots are intact and not fragile.
- Tower is assembled, filled, and running on the intended schedule.
- Nutrient solution is at a mild starting strength.
- You can transplant without leaving roots exposed to air for long.
When these pieces line up, germination timing becomes predictable, and tower growth starts with fewer surprises.
7.2 Net Pot, Collar, and Support Choices for Tower Stability
A tower is only as stable as the parts that hold plants upright while water and airflow do their thing. Net pots, collars, and supports each solve a different problem: net pots manage roots and drainage, collars center the plant and protect the stem area, and supports prevent wobble when the tower is bumped or when roots expand.
Net Pot Shape and Mesh Choices
Start with a net pot that matches how your tower delivers water. In most towers, water flows or mists through the growing column, so you want a pot that drains quickly but doesn’t let media fall out.
- Diameter matters for stability. A larger net pot gives more surface area for the collar to grip and reduces rocking. If your tower openings are fixed, choose the largest pot that fits without forcing it.
- Mesh size affects media retention. Fine mesh holds media better, which helps when you use rockwool, coco plugs, or small clay pellets. Coarser mesh can work with larger media, but it may let loose particles escape and clog lines.
- Bottom geometry affects root behavior. Flat bottoms can trap a thin layer of water longer than sloped or open designs. For hydroponic towers, quicker drainage helps keep oxygen high around roots.
Example: If you’re growing basil in a hydroponic tower and you notice media drifting downward after a few cycles, switch from a coarse-mesh pot to a finer-mesh pot or add a thin media barrier like a small piece of inert mesh around the plug.
Collar Functions and Fit
A collar is the interface between plant and tower. Its job is to center the stem, reduce abrasion, and keep the plant from sliding when the tower is wet.
- Centering prevents uneven growth. When the stem isn’t centered, leaves can lean toward the light and you’ll get a lopsided canopy. A collar that fits snugly around the net pot and opening helps keep the plant vertical.
- Stem protection reduces damage. Collars with a smooth inner edge reduce rubbing. This matters most for tender seedlings that haven’t developed thick stems yet.
- Grip style controls movement. Some collars rely on friction; others use a snap or threaded ring. Friction fits are easy to adjust, but they can loosen if the tower is frequently handled.
Example: For lettuce, use a collar that grips the net pot firmly but leaves the stem area free. If the collar pinches the stem, you’ll see slowed growth and leaf edge damage within a week.
Support Structures for Tower Stability
Supports keep the tower from becoming a stack of wobbling platforms. Even if your tower is designed to be rigid, supports help during maintenance, harvest, and accidental bumps.
- Use a rigid frame and level base. A level base prevents uneven load distribution. If the tower leans, plants at one side can receive slightly different moisture and airflow.
- Add internal bracing where openings create weak points. Towers with many stacked ports can flex. A simple brace or spacer between sections reduces movement.
- Secure the net pot against vertical slip. Some towers need a stop ring or collar lip that prevents the pot from dropping when roots expand.
Example: After a few weeks, you may notice a pot slowly settling lower as roots fill the space. If your tower allows vertical play, add a stop feature so the pot stays at the same height and doesn’t change mist or flow exposure.
Mind Map: Choosing Parts for Stability
Practical Selection Checklist
Use this quick checklist when assembling or upgrading a tower.
- Confirm net pot diameter matches the tower opening with minimal force.
- Choose mesh that retains your specific media without shedding particles.
- Ensure the collar centers the stem and doesn’t pinch as the plant grows.
- Verify the pot cannot drop when roots expand or when you remove a plant.
- Check the tower frame is level and add bracing if you see flex at stacked ports.
Example: If you’re switching from hydroponic to aeroponic within the same tower frame, re-check collar fit. Aeroponic mist can loosen friction-based parts faster because the tower stays wet and gravity does its quiet work.
7.3 Root Development Strategies for Healthy Establishment
Healthy roots are the foundation of tower growing because they control how quickly plants drink, how efficiently they use nutrients, and how well they recover from small mistakes. In towers, the root zone is exposed to moving water or mist, so the goal is simple: keep roots oxygenated, evenly supported, and consistently fed without drowning them.
Start with the Right Transplant Moment
Transplant when roots are ready to explore the new medium, not when they are still fragile. For most tower crops, that means using seedlings with a short, sturdy root system and avoiding plants that are root-bound in their starter tray. A practical rule: if you can gently lift a seedling and see multiple healthy white roots with minimal browning, it’s usually ready. If roots are long and tangled, they may tear during transfer, which slows establishment.
Use a Support That Prevents Root Stress
Roots need contact with moisture and air, but they also need stability. Net pots that are too large let the plant wobble, which repeatedly breaks fine root tips. Too small, and the plant gets squeezed, limiting root expansion. Aim for a snug fit where the stem is held upright while the root mass can settle without being forced.
Example: If you’re moving from rockwool cubes to net pots, trim only the outer edges of the cube so it fits the opening. Keep the cube intact; shaving it down too far can expose roots and create a “dry-out zone” during the first days.
Manage Oxygen Like It’s a Nutrient
In hydroponic towers, roots rely on dissolved oxygen in the nutrient stream. In aeroponic towers, roots rely on frequent misting plus air movement around the root mass. Either way, low oxygen shows up as slow growth, brown roots, and a sour smell.
Concrete approach:
- Keep pump schedules consistent during establishment.
- Avoid long dry gaps in aeroponics.
- Ensure the tower’s return path drains freely so roots don’t sit in stagnant liquid.
Example: If you notice roots staying pale and slow after transplant, check whether your timer is cutting mist or flow too early. Many “it should be fine” schedules are fine for mature plants but not for newly disturbed roots.
Condition Roots Gradually When Switching Systems
Switching from one environment to another can shock roots, especially when moving from a wetter starter setup to a more aerated tower routine. Gradual conditioning reduces stress.
Example: If you’re moving seedlings into an aeroponic tower, start with a slightly longer mist cycle for the first 2–3 days, then return to your normal schedule. Keep the goal steady moisture without turning the root zone into a constant puddle.
Keep the Root Zone Clean and Unclogged
During establishment, roots are small and easily damaged by debris. Biofilm and clogged emitters can create uneven misting or uneven flow, which leads to patchy root growth.
Practical steps:
- Use clean water and freshly mixed nutrient solution for the first week.
- Confirm that emitters or return lines are clear before transplanting.
- Remove any loose plant material that falls into the reservoir.
Example: If one side of an aeroponic tower roots noticeably slower, inspect nozzle output. A partially clogged nozzle often produces a weak mist cone that looks “mostly working” but doesn’t wet the root tips consistently.
Tune pH and EC for Establishment, Not Just Growth
New roots are less tolerant of swings. Keep pH stable and avoid aggressive EC targets. If your system allows, measure pH and EC at the same time each day during the first week so you can spot drift.
Example: Suppose your normal EC target is higher for mature plants. During establishment, run a lower EC that still supports growth, then step up once you see active root branching and new white growth.
Use a Simple Root Health Checklist
A quick daily look prevents small issues from becoming root rot.
- Color: healthy roots are typically white to light tan; browning suggests stress.
- Texture: firm roots indicate good hydration and oxygen; mushy roots indicate damage.
- Smell: a clean, neutral smell is normal; a strong sour odor suggests low oxygen or biofilm.
- Plant posture: drooping can mean root uptake is delayed, not necessarily that the plant needs more light.
Example: If the plant droops but leaves are not yellowing, focus on root oxygen and mist/flow timing before changing nutrients.
Mind Map: Root Development Priorities
Case Example: Two-Stage Establishment Plan
Day 0–2: Transplant seedlings into the tower with a slightly gentler routine—steady flow or mist, stable pH, and a conservative EC. Inspect nozzle output or flow uniformity before leaving the system unattended.
Day 3–7: Keep conditions consistent and watch for new white root tips. If roots are slow, first verify oxygen and coverage (timer settings, drainage, emitter clogging). Only after roots show active growth should you move toward your standard feeding targets.
This approach works because it treats establishment as a separate job: roots are rebuilding their connection to water and nutrients, so the system should be predictable rather than aggressive.
7.4 Training, Spacing, and Harvest Sequencing for Continuous Yield
Continuous yield in towers is mostly about timing and plant geometry. You’re trying to keep each plant in the “sweet spot” where it has enough light and airflow, but isn’t so crowded that leaves block each other or roots compete for solution.
Training for Tower Growth
Start with the growth habit of the crop. Leafy greens and herbs usually need minimal training: you’re managing height and leaf spread. Compact fruiting crops need more structure so they don’t turn the tower into a tangled hedge.
For leafy greens:
- Keep the crown at the same height relative to the net pot. If seedlings stretch, adjust support or transplant depth so the crown sits level with the rim.
- Remove damaged outer leaves as soon as they show persistent yellowing. This reduces shading and keeps the plant spending energy on new growth.
For herbs:
- Pinch the top once the plant has 3–5 sets of leaves. This encourages branching, which increases harvestable surface area without increasing plant height.
- Harvest from the outside first. For basil-like growth, take a few centimeters above a node so the plant can branch again.
For compact fruiting crops:
- Use a simple tie or clip to guide the main stem upward. Keep lateral growth trimmed to 1–2 strong branches so the canopy stays within the tower’s light zone.
- If flowers appear early, remove the first few to establish structure. This prevents the plant from “spending” on fruit while it’s still building a stable canopy.
Spacing That Prevents Leaf Conflicts
Tower spacing is fixed by the design, but you still control effective spacing through how you manage canopy size.
A practical rule: aim for leaf overlap only near the top where light is strongest. In the lower sections, keep leaves from touching neighboring plants.
How to do it:
- Choose crops with similar leaf size for a given tower. Mixing large-leaf plants with tiny-leaf plants creates uneven shading.
- Use staggered harvest heights. If you harvest lower leaves more aggressively, the lower canopy stays thinner and light reaches plants above.
- Watch for airflow bottlenecks. If you see persistent dampness around crowded leaves, reduce canopy density by removing older leaves and pinching tops.
Example spacing strategy for a mixed tower:
- Top third: basil or cilantro with regular pinching.
- Middle third: lettuce-type greens harvested as “cut-and-come-again.”
- Bottom third: smaller herbs or faster greens, harvested more frequently to keep them from spreading.
Harvest Sequencing for Continuous Yield
Harvest sequencing is easiest when you treat the tower like a set of zones with different plant ages.
Use a three-bucket approach:
- Bucket A: plants 0–2 weeks after transplant. No harvest; focus on establishment.
- Bucket B: plants 2–5 weeks. Light harvest starts here.
- Bucket C: plants 5+ weeks. Main harvest happens here.
Then schedule planting so each week you move one bucket forward.
A simple weekly rhythm:
- Week 1: transplant into Bucket A.
- Week 2: transplant into Bucket A again while Bucket B begins light harvesting.
- Week 3: Bucket C becomes the main harvest zone while Bucket B continues light harvest.
Harvest method by crop stage:
- Leafy greens: start with outer leaf cuts. Once the plant reaches a stable size, switch to a partial “cut-and-come-again” harvest, leaving the crown intact.
- Herbs: harvest small amounts frequently. This keeps regrowth steady and prevents the plant from going into a “big cut then slow recovery” pattern.
- Fruit crops: harvest as they ripen, but keep training tight so new flowers can form on supported branches.
Mind Map: Training, Spacing, and Harvest Flow
Case Example: One Tower, One Week of Work
Assume a tower with 20 sites and a weekly transplant plan.
- Sites 1–7 (Bucket C): harvest outer leaves on 5–7 plants, leaving crowns untouched.
- Sites 8–14 (Bucket B): take small herb snips or 1–2 outer leaves per plant.
- Sites 15–20 (Bucket A): do not harvest; check crown height and remove any leaf that blocks airflow.
After harvesting, re-check spacing. If leaves from adjacent plants are touching, remove the oldest leaf on the more shaded plant rather than cutting deeper into both.
This sequencing keeps production steady because you’re never asking the newest plants to perform while they’re still building roots, and you’re not stripping mature plants so hard that regrowth stalls.
7.5 Crop-Specific Handling for Leafy Greens, Herbs, and Compact Fruits
Tower systems reward crops that fit the tower’s realities: limited root volume, frequent nutrient contact, and the need for steady light and airflow. The trick is matching each crop’s growth pattern to your tower’s delivery method and spacing.
Leafy Greens That Like Consistency
Leafy greens (lettuce, arugula, spinach) grow fast when the tower keeps conditions steady. Start with shorter harvest windows so you can learn your system without committing to a long, fragile cycle.
- Seedling timing: Germinate until roots are visible, then move to net pots. If you transplant too early, roots may not reach the nutrient stream before the plant needs more water.
- Spacing: Use tighter spacing for cut-and-come-again greens. For head-forming types, give more vertical room and harvest earlier to avoid crowding.
- Light management: Leafy greens show stress quickly as pale leaves or slow growth. If you see uneven color across the tower, rotate the tower position or adjust how far plants sit from the light.
- Harvest method: Cut outer leaves with clean scissors and leave the inner growth point. This keeps the tower producing instead of forcing a full restart.
Example: For a hydroponic tower, plant a row of lettuce for continuous harvest. Harvest outer leaves every 7–10 days. Keep pH and EC stable during the cut cycle so regrowth doesn’t stall.
Herbs That Need a Root Rhythm
Herbs (basil, cilantro, mint in moderation, parsley) often struggle when their roots stay too wet for too long or when airflow is weak. Towers can help because they deliver nutrients efficiently, but you still need to manage moisture balance.
- Basil: Basil prefers warmth and steady moisture. In aeroponic towers, mist frequency matters; too infrequent and tips dry, too frequent and leaves can stay wet longer than they should.
- Cilantro and parsley: These tolerate cooler conditions better than basil. They also benefit from slightly gentler feeding early on, then stronger feeding once leaves are established.
- Pruning: Pinch tops to encourage branching. In towers, pruning is not just for shape; it prevents one tall stem from hogging light.
Example: In an aeroponic tower, start cilantro with shorter mist cycles for the first week after transplant. Once roots are established, increase mist duration gradually while keeping airflow strong to dry leaf surfaces between cycles.
Compact Fruits That Need Support and Patience
Compact fruits (strawberries, dwarf peppers, cherry tomatoes in carefully managed setups) are possible in towers, but they require extra attention to structure and pollination. Choose varieties that stay compact and harvest frequently.
- Support: Use a trellis string or a tower-compatible stake early. Waiting until vines are heavy makes plants harder to train and increases breakage risk.
- Flower and fruit handling: For strawberries, keep crowns above the growing medium so they don’t rot. For peppers and tomatoes, ensure consistent airflow and gentle vibration or manual brushing of flowers to improve set.
- Nutrient emphasis: Fruit crops typically need more potassium than leafy greens. Adjust feeding as soon as flowering begins, not after fruit is already sized.
- Water stability: Fruit development is sensitive to fluctuations. If your reservoir level drops quickly, top up promptly and recheck EC and pH after adjustments.
Example: For strawberries in a hydroponic tower, place plants so crowns remain above the net pot opening. Harvest ripe berries often to reduce stress on the plant and keep new flowers forming.
Mind Map: Crop-Specific Handling in Towers
Practical Handling Checklist by Crop
- Leafy greens: Keep conditions steady, harvest often, and remove damaged leaves immediately to reduce disease pressure.
- Herbs: Prioritize airflow and avoid letting leaves stay wet between cycles, especially in aeroponic towers.
- Compact fruits: Train early, adjust feeding when flowering starts, and keep plant structure supported so stems don’t bend under fruit weight.
Example: If your tower shows slow growth across leafy greens but herbs look fine, check light distribution and nutrient stability first. If herbs show leaf spotting or persistent dampness, increase airflow and review mist timing rather than changing nutrients immediately.
8. Crop Nutrition and Feeding Schedules That Work
8.1 Building Feeding Plans by Growth Stage
A feeding plan is just a schedule for nutrients and a method for adjusting it when reality disagrees with the spreadsheet. In towers, the “reality” usually shows up as pH drift, EC changes, and uneven growth between plants at different heights. The goal is to feed enough for steady growth while keeping the root zone stable.
Growth Stages That Matter in Towers
Most tower crops fit into four practical stages. You can use them for both hydroponic and aeroponic systems, but the targets differ slightly because aeroponics tends to be more oxygen-rich and can handle slightly different EC ranges.
-
Seedling and Establishment: roots are short, uptake is limited, and the plant is sensitive to high EC.
-
Vegetative Growth: leaves expand quickly, and the plant needs consistent nitrogen and balanced calcium and potassium.
-
Pre-Harvest Conditioning: growth continues, but you reduce stress by tightening pH control and avoiding nutrient spikes.
-
Harvest and Reset: you finish the cycle cleanly, then sanitize and start fresh so salts don’t accumulate.
Mind Map: Feeding Plan Logic
Practical Feeding Targets and How to Use Them
Use EC targets as your main “how much” knob, and pH as your “can the plant actually use it” knob. Start with a conservative EC, then increase only after you see normal growth and stable root color.
Seedling and Establishment (Days 0–10 for many leafy crops)
- EC: 1.0–1.2 mS/cm
- pH: 5.6–5.8
- Example: If you mix a batch at EC 1.1 and pH 5.7, check again after 24 hours. If EC climbs to 1.3, top off with water to bring EC back to 1.1 before adjusting anything else.
Vegetative Growth (Next 2–4 weeks depending on crop)
- EC: 1.4–1.8 mS/cm
- pH: 5.7–6.0
- Example: For a tower of lettuce, raise EC from 1.1 to 1.5 over two adjustments (for instance, day 3 and day 6). This avoids shocking roots while still matching the plant’s rising demand.
Pre-Harvest Conditioning (Final 3–7 days)
- EC: hold steady or reduce slightly (about 0.1–0.2 mS/cm)
- pH: 5.7–5.9
- Example: If your plants are thick and healthy, keep EC at 1.6 but correct pH immediately if it drifts outside range. If you see leaf edge browning, reduce EC by 0.1–0.2 and confirm calcium availability rather than chasing pH alone.
Harvest and Reset
- Replace or flush the solution after harvest so salts and biofilm byproducts don’t carry into the next batch.
- Example: If you’re running a continuous schedule, keep a “fresh mix” container ready. When you harvest, swap the reservoir, then clean the tower surfaces that contact nutrient mist or drips.
Adjustment Rules That Prevent Most Mistakes
- EC rises usually means water evaporated faster than nutrients were used. Top off with water first, then re-check EC.
- EC falls can mean dilution from leaks, overflow, or heavy plant uptake. If pH is stable and roots look healthy, bring EC back to target.
- pH drift is often the earliest warning sign. Correct pH in small steps and re-check after a few hours, especially after adding any acid or base.
Example Weekly Plan for Leafy Greens in a Hydroponic Tower
- Day 0: Mix to EC 1.1, pH 5.7. Start seedlings.
- Day 1–2: Check pH daily; adjust only if outside 5.6–5.8. Check EC every other day.
- Day 3: If growth is normal and EC is on target, raise to EC 1.4.
- Day 6: Raise to EC 1.6 if leaves are expanding and pH stays within 5.7–6.0.
- Day 14–18: Hold EC at 1.6. Focus on pH stability.
- Final 3–5 days: Reduce EC to 1.5 if you see any edge stress; otherwise keep it steady.
- Harvest day: Replace solution and clean.
Mind Map: What You Check Each Day

A good feeding plan is simple: set stage targets, measure consistently, and adjust with a clear order of operations—water first for EC drift, pH second for usability, then nutrients for demand.
8.2 Adjusting pH and EC During Rapid Growth and Harvest Cycles
Rapid growth and harvest cycles change what your plants “want” from the solution. In towers, the effect shows up quickly because roots are exposed to the circulating mix and because water volume is often smaller than in large reservoirs. The goal is not constant tinkering; it’s making a few well-timed adjustments based on measurements and plant response.
What Changes During Rapid Growth
During fast leaf expansion, plants absorb nutrients at a higher rate, which can shift EC and pH in opposite directions depending on your water source and nutrient formulation. If your water is slightly alkaline, pH often drifts upward as plants remove more nitrate than ammonium. If your water is soft and nutrients dominate, pH can swing downward as the solution becomes more acidic.
EC typically rises when water evaporates faster than you top up, especially in warm rooms or near lights. It can also rise if you run frequent cycles without enough drain-back dilution. Conversely, EC can fall if you top up with plain water too aggressively or if your system drains and refills more than you expect.
A Simple Measurement Routine That Doesn’t Waste Time
Check pH and EC at the same points in the cycle each time. For hydroponic towers, measure after the system has circulated for a few minutes so the solution is mixed. For aeroponic towers, measure after misting has run long enough to stabilize the reservoir.
Use a two-step approach:
- Measure pH and EC.
- Adjust only one variable at a time, then recheck after mixing.
If you adjust pH and EC in the same moment, you’ll spend the next measurement trying to guess which change caused what.
How to Adjust pH Safely and Predictably
pH adjustment is about direction and mixing, not magic. Add small amounts of pH up or pH down, mix thoroughly, and wait long enough for the solution to equalize.
A practical rule: make changes in small increments, then remeasure. If your pH meter reads 5.6 and your target is 5.8, don’t jump straight to 5.8 in one pour. Add a little, mix, and confirm.
Also remember that pH solutions can change EC slightly. That’s usually minor compared to nutrient EC, but it matters when you’re already near your target.
How to Adjust EC Without Overcorrecting
EC adjustment is mostly about dilution versus concentration.
- If EC is high: top up with water (not nutrient) to dilute, then mix and recheck.
- If EC is low: add nutrients according to your mixing ratio, then mix and recheck.
Avoid “chasing” EC every time you measure. Plants respond to trends over days, not to a single reading taken at 7:10 a.m.
Targets That Match Growth and Harvest
Use targets as ranges, not exact numbers. For many leafy greens and herbs in soilless towers, a common working range is:
- pH: 5.6 to 6.2
- EC: 1.2 to 2.2 mS/cm (varies by crop and stage)
During rapid growth, you can run toward the upper end of EC if your plants are actively expanding and roots look healthy. During harvest cycles, you often keep EC steady rather than pushing higher, because the plant’s demand can drop as you remove leaves and reduce total biomass.
Mind Map: pH and EC Adjustment Logic
Example: EC High, pH Drifting Up
You measure and find pH 6.4 and EC 2.3 mS/cm. Your target pH range is 5.8 to 6.1, and your EC range for the crop is 1.6 to 2.0.
- Dilute first: top up with water to bring EC down. This also tends to move pH toward the water’s baseline.
- Mix and remeasure.
- If pH is still above target, add small pH down increments, mix, and recheck.
This order matters because if you lower pH first, you may add enough acid to change EC enough that you then have to dilute anyway.
Example: pH Low, EC Stable
You measure pH 5.3 and EC 1.8 mS/cm. EC is already in range, so don’t dilute just to fix pH.
- Add a small amount of pH up.
- Mix thoroughly.
- Recheck until pH lands in the target range.
If pH keeps dropping after adjustments, check whether your water source is changing, whether you’re adding nutrients with a different ratio than before, or whether your system is not mixing well between cycles.
Example: Harvest Day Changes the Pattern
On harvest day, you remove a portion of the canopy. Over the next 12 to 24 hours, you may see EC rise because fewer roots are consuming water and nutrients at the same rate, while evaporation continues.
Instead of immediately lowering EC aggressively, confirm the trend:
- Measure again after the next full circulation period.
- If EC is consistently climbing, dilute in small steps to return to your usual working EC.
This keeps the solution stable for the remaining plants and avoids swings that can slow regrowth.
Quick Checklist for Each Adjustment
- Measure at a consistent cycle point.
- Adjust one variable at a time.
- Mix thoroughly and wait before rechecking.
- Use small increments.
- Record pH, EC, water level, and what you changed.
When you follow that pattern, pH and EC become manageable inputs rather than a daily guessing game.
8.3 Managing Calcium, Magnesium, and Potassium for Indoor Crops
Calcium, magnesium, and potassium are the “big three” that show up in different ways across tower systems. Calcium supports cell structure and new growth, magnesium sits at the center of chlorophyll, and potassium helps plants regulate water movement and overall vigor. In soilless towers, you control their supply directly, so the goal is steady nutrition rather than constant tinkering.
Calcium Management for Strong Growth
Calcium demand rises as plants build new leaves and roots. In towers, calcium deficiency often appears as distorted new growth because older leaves can look fine for a while. A practical approach is to keep calcium consistent and avoid sudden swings in pH and concentration.
What to watch
- New leaves that curl, look thickened, or develop irregular edges.
- Growing points that stall while older leaves remain green.
- In some setups, tip issues that don’t match a simple nitrogen shortage.
How to manage it
- Use a complete nutrient formulation that includes calcium rather than relying on “add-ons.”
- Maintain pH stability; calcium availability changes with pH, and rapid shifts can make plants behave like calcium is missing.
- If you use hard water, confirm your baseline calcium so you don’t double-dose unknowingly.
Easy example If your basil tops start growing slowly and the newest leaves look misshapen after you changed your pH target, return to the previous pH range and keep EC steady for a few days. Calcium symptoms often improve in new growth once conditions stabilize.
Magnesium Management for Leaf Color and Photosynthesis
Magnesium is the core of chlorophyll, so deficiency shows up as leaf color changes. In indoor towers, magnesium issues can be subtle at first because plants may keep growing while color fades.
What to watch
- Older leaves turning yellow between veins while veins stay greener.
- Reduced growth rate paired with paler leaf color.
How to manage it
- Ensure your nutrient mix includes magnesium in the correct ratio for your crop.
- Avoid overcorrecting potassium; high potassium can interfere with magnesium uptake.
- If you adjust EC upward, do it gradually so you can distinguish “more food” from “wrong balance.”
Easy example You raise EC to push growth, but spinach leaves start yellowing from the bottom. Instead of adding more nitrogen, check your potassium level and confirm magnesium is present in your base nutrient. A small EC reduction plus balanced magnesium can restore color without forcing the plant to “eat harder.”
Potassium Management for Water Balance and Yield Quality
Potassium supports stomata function and helps plants manage internal water movement. It also influences enzyme activity and overall plant performance, which is why potassium shows up as “everything feels off” when it’s low.
What to watch
- Leaf edges that look scorched or dry, especially on older leaves.
- Weak stems or plants that seem less resilient to normal indoor fluctuations.
- In some cases, slower recovery after trimming or harvest.
How to manage it
- Keep potassium within the range your nutrient manufacturer targets for leafy greens or herbs.
- Don’t chase potassium by adding potassium-only products unless you have measurements. Potassium interacts with magnesium and calcium uptake.
- Watch for salt buildup; as solutions concentrate unevenly, potassium can become relatively high even if your mix started balanced.
Easy example After several days without topping off, your reservoir volume drops and EC rises. Leaves show edge dryness. The fix is often not “more potassium,” but dilution and solution refresh so the ratios return to normal.
Balancing Interactions and Avoiding Common Mistakes
Calcium, magnesium, and potassium compete and cooperate through uptake. High potassium can reduce magnesium uptake, and imbalanced calcium can affect how plants build new tissue. The most common home-tower mistake is correcting one nutrient based on a symptom without checking the overall solution strength.
A simple decision rule
- Confirm whether the symptom is on new growth or older leaves.
- Check pH and EC against your target range.
- Review how long the reservoir has been running and whether it’s concentrated.
- Adjust the solution using a complete nutrient approach first, then consider targeted corrections only if measurements and symptoms align.
Mind Map: Calcium, Magnesium, Potassium Management
Practical Example: One Week of Corrections Without Chaos
Start with a complete nutrient mix and a stable pH target. On day 3, you notice older leaves yellowing between veins. You check EC and find it slightly high from evaporation. Instead of adding magnesium immediately, you top up with water to bring EC back to target and confirm pH hasn’t drifted. On day 5, new leaves look greener and growth resumes. The lesson is simple: nutrient balance is often a concentration problem, not a missing bottle.
On day 6, you harvest a batch and trim back. The next day, you see mild edge dryness on older leaves. You refresh the reservoir rather than adding potassium. After the refresh, the symptom stops progressing because the solution ratios return to normal. In tower systems, “resetting the mix” is often the cleanest correction when the solution has been running long enough to concentrate.
8.4 Using Supplements Correctly Without Overcorrecting
Supplements are useful when they fix a specific limitation, but they can also create new problems when added “just in case.” In tower systems, the root zone is small and the nutrient solution is recirculated, so mistakes show up quickly—often as leaf symptoms before you realize the cause.
Start with a simple rule: change one variable at a time. If you adjust pH, do not also add extra calcium or a new micronutrient blend. Wait for the next measurement cycle, then decide whether a supplement is truly needed.
The Supplement Decision Process
- Confirm the baseline: measure pH and EC (or conductivity) before adding anything. If pH is drifting, supplements won’t fix the underlying imbalance.
- Identify the likely category: deficiency symptoms usually point to either macronutrients (N, P, K, Ca, Mg, S) or micronutrients (Fe, Mn, Zn, Cu, B, Mo). Many “deficiency” looks are actually pH or root oxygen issues.
- Check solution strength: if EC is already high, adding more salts can push osmotic stress even when leaves look pale.
- Use small doses: supplements are typically concentrated. A cautious approach is to add a fraction of the recommended amount, then re-test.
Mind Map: Supplement Logic for Tower Systems
Common Supplements and How to Use Them
Calcium (Ca) Calcium deficiency often appears as new growth that looks distorted or weak, especially on fast-growing plants. Before adding calcium, confirm pH is in range because low pH can reduce calcium availability. If pH is correct and EC is not excessive, add calcium using the smallest practical dose, then re-check pH and EC after mixing.
Magnesium (Mg) Magnesium deficiency can show as older leaves paling while veins may remain greener. If you add magnesium while pH is off, you may worsen nutrient availability. Also watch EC: magnesium supplements raise EC, so add gradually.
Iron (Fe) Iron is the classic “looks like a deficiency” nutrient. But iron availability depends heavily on pH and the chelate form. If you see interveinal yellowing on new leaves, first verify pH. If pH is already stable and within target, then a small iron supplement dose can help. If pH is drifting high, iron supplementation alone may not work.
Potassium (K) Potassium supports overall vigor and leaf edge function. If you add potassium because leaves look tired, check whether the plants are simply underfed overall or whether the solution is too strong. Overcorrecting potassium can antagonize magnesium and calcium uptake.
Micronutrient Mixes Micronutrient mixes are best treated like “fine-tuning,” not a default fix. If you’re using a complete nutrient formula, additional micronutrients are usually unnecessary unless you’ve confirmed a specific imbalance. Add only when you have a measurement-based reason.
Example: Correcting a “Yellowing” Problem Without Guessing
A home grower notices lettuce tips turning pale over two days. They measure pH and find it has drifted upward. EC is moderate, not high.
- Step 1: Adjust pH back into target range using the appropriate pH adjuster.
- Step 2: Do not add iron immediately.
- Step 3: Wait for the next measurement cycle and observe new growth.
If new leaves remain pale after pH stabilizes, then a small iron supplement dose is reasonable. If the color improves, the original issue was availability, not missing iron.
Example: Calcium Addition When EC Is Already High
A basil plant shows slow growth and slightly curled new leaves. The grower measures EC and finds it is already near the upper end for their crop stage.
- Step 1: Skip calcium supplementation at first.
- Step 2: Check flow and mist coverage to ensure roots are receiving oxygen and solution.
- Step 3: If flow is fine, consider lowering EC by replacing part of the reservoir with fresh solution at the correct strength.
This prevents the common mistake of adding more salts to a system that is already near stress levels.
Mind Map: Overcorrection Traps to Avoid
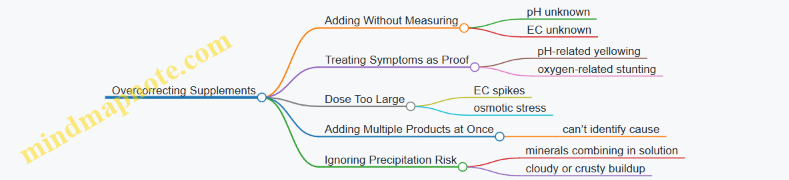
Practical Dosing Habits
Use a consistent routine: mix supplement into a small portion of solution first, then add it to the reservoir while stirring. Record the amount added and the resulting pH/EC. If you overshoot, the fastest correction is usually a partial solution change rather than stacking more supplements.
When in doubt, prioritize stability: correct pH, maintain proper flow or misting, and keep EC within the crop’s typical range. Supplements work best as targeted adjustments, not as a substitute for a well-behaved nutrient solution.
8.5 Documenting Changes to Improve Results Across Batches
Keeping notes turns “I think that might be the issue” into “here’s what we changed, when we changed it, and what happened next.” In tower growing, small shifts in pH, EC, light intensity, or mist timing can show up days later in leaf color, growth rate, and root appearance. A good log makes those delays easier to interpret.
What to Record Every Time
Record only what you can measure or observe consistently. Aim for a short entry you can repeat.
- Date and batch ID: Example: Batch A-03 (started 2026-04-01).
- Crop and stage: Seedlings, transplanting, vegetative, harvest window.
- Environmental readings: Air temperature, humidity (if available), and light schedule.
- Nutrient solution readings: pH and EC at the same time each day (or at least at refill).
- Water level and top-off method: Refill vs. top-off, and whether you add water only or water plus nutrients.
- System settings: Pump/mist schedule, run time, and any timer changes.
- Maintenance actions: Filter cleaning, nozzle unclogging, reservoir cleaning, tubing adjustments.
- Plant observations: Leaf color, tip burn, wilting, growth speed, and any visible root issues.
A practical rule: if you changed something, write it down the same day. If you didn’t change anything, still note readings so you can compare “same inputs, different outputs.”
A Simple Log Template
Use a consistent format so you can scan it later.
-
Daily entry
- pH: __ EC: __ Water level: __
- Light: __ hours Temp: __°C Humidity: __%
- System: __ minutes on / __ minutes off
- Notes: __
-
Event entry
- Event: pH adjusted / EC adjusted / nozzle cleaned / timer changed
- Before: pH __ EC __
- After: pH __ EC __
- Time: __
- Expected effect: __ (one sentence)
That last line matters. It forces you to connect the change to a likely plant response, which helps you avoid random “fixes.”
Mind Map: What Changes You Should Track
How to Interpret Results Without Guessing
Symptoms rarely appear instantly. Treat your log like a timeline.
- Find the baseline: Identify the earliest days when plants looked normal.
- Mark the first meaningful change: Not every adjustment counts; focus on changes that affect delivery or nutrient concentration.
- Count forward: If you adjusted EC on Day 2, check for effects around Day 4–6 for many leafy crops.
- Look for patterns, not single events: One odd day can happen. Two or three consistent entries tell you more.
Example: If Batch A shows pale leaves starting two days after EC was raised, and Batch B shows the same pattern after a similar EC change, you likely have a nutrient imbalance or uptake issue rather than random variation.
Example: Turning a Problem Log into a Fix
Batch C: Basil tower.
- Day 1: pH 5.8, EC 1.2, mist schedule unchanged.
- Day 3: Leaves look slightly lighter.
- Day 4: EC increased to 1.4 during a top-off; pH stayed near 5.8.
- Day 6: Leaves show more yellowing; roots look fine but slightly less white.
Action decision using the log:
- Instead of continuing to raise EC, return EC to the previous target and keep pH stable.
- Also check whether the top-off method added nutrients too aggressively (for example, adding nutrient concentrate without accounting for existing solution strength).
After adjustment:
- Day 7–10: Leaf color stabilizes and new growth returns to normal.
The key improvement wasn’t the “right number” alone. It was the ability to connect the symptom timing to a specific input change and a specific method.
Example: Comparing Two Batches with One Variable Changed
Batch D and Batch E: Lettuce.
- Both batches use the same light schedule and the same seedling starter.
- Batch D: pH adjusted daily.
- Batch E: pH adjusted only at refill.
If Batch E stays within a narrow pH band without daily adjustments, and growth is similar, you can simplify your routine. If Batch D shows more frequent swings and slower growth, you may be overcorrecting.
The log helps you choose between “more attention” and “better consistency.”
A Closing Habit That Makes Logs Useful
At harvest, summarize each batch in three lines:
- What we changed: timers, pH/EC targets, cleaning schedule.
- What we observed: growth speed, leaf quality, root condition.
- What we’ll do next: one adjustment for the next batch.
Short summaries keep the learning loop tight. When you repeat the process, your notes stop being paperwork and start being a practical tool for better results.
9. Monitoring, Troubleshooting, and Root Health
9.1 Daily Checks That Prevent Most Failures
Daily checks are less about catching disasters and more about noticing small drifts early. In tower systems, most failures start as “everything seems fine” and then quietly become “why is growth uneven?” A short routine keeps you ahead of that curve.
The Daily Checklist
Use the same order every day so you don’t skip the important stuff when you’re busy.
-
Look at the plants first
- Check leaf color and posture across the tower, not just the top. If one band looks paler, it often matches a flow or light pattern.
- Feel the leaves lightly. Limp leaves can mean low oxygen or inconsistent delivery, especially in aeroponics.
-
Check water level and flow behavior
- Confirm the reservoir level is stable. A slow drop can mean a small leak, evaporation, or a drain that isn’t returning correctly.
- Watch the first minutes after a pump or mist cycle starts. If flow is delayed or sputters, you may have air in the line or a partially blocked path.
-
Verify pH and EC trends
- Measure pH and EC at the same time each day, ideally after the system has mixed for a bit.
- Don’t chase tiny fluctuations. Focus on direction: steady drift over several days is the signal.
- If pH swings quickly, check whether you’re dosing consistently and whether the solution is mixing well.
-
Inspect the root zone conditions
- For hydroponic towers, look for root browning or a sour smell. Healthy roots are usually pale to light tan and firm.
- For aeroponic towers, confirm mist coverage is reaching the roots. Dry patches often show up as slower growth in specific pockets.
-
Check for clogs and residue
- Look for mineral crust around fittings, especially after you’ve adjusted pH.
- In aeroponics, check nozzle output visually. Uneven spray patterns are a common cause of patchy growth.
-
Listen and feel for equipment issues
- Pumps can develop cavitation or partial blockage. A change in sound or vibration is a useful early warning.
- Make sure tubing isn’t kinked and that clamps are still snug.
Mind Map: Daily Checks That Catch Problems Early
Examples You Can Use Immediately
Example: Uneven leaf color in one tower band
- What you notice: The middle section looks slightly yellow while the top stays greener.
- What the daily checks reveal: pH is stable, but flow start-up is slower than yesterday and the reservoir level is dropping faster.
- What it likely means: A partially restricted return or a flow imbalance that’s affecting that height range.
- What to do today: Inspect the drain path and fittings for residue, then confirm pump output during the first minutes of the cycle.
Example: Aeroponic roots look dry in one pocket
- What you notice: Growth is slower on one side of the tower.
- What the daily checks reveal: Nozzle output is uneven; two nozzles produce a narrower mist stream.
- What it likely means: Mineral buildup or a partially clogged nozzle.
- What to do today: Remove and inspect the affected nozzles, then run the system briefly to confirm uniform spray.
Example: EC drifts upward while pH stays steady
- What you notice: EC increases over two days.
- What the daily checks reveal: Reservoir level is dropping, and you’re topping off with plain water rather than replacing the full volume.
- What it likely means: Concentration from water loss without matching nutrient replacement.
- What to do today: Correct the reservoir volume and recheck EC after mixing.
A Simple Daily Log Template
Record only what changes. Consistency beats volume.
- Date and time
- Reservoir level: stable / low / high
- pH: value and direction (up/down/flat)
- EC: value and direction (up/down/flat)
- Plant notes: uniform / uneven (where)
- Root notes: healthy / browning / dry patches
- Equipment notes: normal / unusual sound / unusual vibration
When a “Daily Check” Becomes a “Fix Today”
Treat these as immediate actions rather than “monitor and see”:
- pH or EC changes direction sharply compared to the last few days.
- You see dry root zones, persistent uneven mist, or repeated flow delays.
- Roots brown quickly or the reservoir develops a strong odor.
- Reservoir level drops faster than normal without a clear reason.
A tower system rewards small, consistent attention. If you do the same checks daily, you’ll spend less time guessing and more time adjusting with evidence.
9.2 Interpreting Root Color, Texture, and Odor Signals
Roots are your system’s “dashboard.” In towers, you can’t see soil structure or hidden moisture, so root appearance becomes the most direct feedback about oxygen delivery, nutrient balance, and sanitation.
What Healthy Roots Look Like
Healthy roots usually share three traits: consistent color, firm texture, and a neutral smell.
- Color: Most common tower crops show pale white to light tan roots early, then slightly darker as they mature. Some species naturally produce more pigment, so compare to your own baseline from the same crop and age.
- Texture: Healthy roots feel springy rather than mushy. They hold shape when gently lifted from the net pot area.
- Odor: Expect little to no smell. If you notice an odor, treat it as a signal to investigate water movement and cleanliness.
Root Color Signals
Color changes often point to specific causes, but the key is pairing color with texture and odor.
- Brown or darkening tips: Often indicates normal aging, especially near the oldest portions. If the tips are browning while new growth is still pale and firm, it may be routine turnover.
- Uniform browning with softening: More concerning. This pattern often aligns with low oxygen, stagnant flow, or a biofilm-heavy environment.
- Yellowing or translucent roots: Can occur when roots are stressed by nutrient imbalance or insufficient oxygen. If roots are also thin and easily break, prioritize oxygen and solution circulation checks.
- Red or purple tones: Sometimes appear with certain varieties or nutrient uptake patterns. If the color change is accompanied by poor texture or odor, don’t assume it’s harmless.
- White roots turning slimy: Color alone isn’t enough. Sliminess plus odor usually indicates microbial growth on root surfaces.
Root Texture Signals
Texture is the fastest way to separate “stress” from “damage.”
- Firm, slightly glossy roots: Typical for well-aerated systems.
- Slimy or stringy roots: Often means biofilm is coating roots. In hydroponic towers, this can happen when flow is inconsistent or when cleaning is delayed. In aeroponic towers, it can also follow nozzle clogging that reduces mist coverage.
- Mushy roots that collapse: Usually indicates significant oxygen deprivation or prolonged exposure to poor solution conditions.
- Dry, brittle roots: Can happen when roots repeatedly dry out between cycles, especially in aeroponic setups with mist timing that’s too short or pressure that’s too low.
Odor Signals
Odor is a strong indicator because it reflects what microbes are doing in the water and on surfaces.
- Neutral or faint earthy smell: Usually acceptable, especially in early stages.
- Sour, rotten, or “swampy” smell: Common with anaerobic conditions, biofilm buildup, or stagnant solution. If odor appears quickly after a maintenance gap, suspect sanitation and circulation first.
- Musty smell with visible surface film: Often pairs with algae or biofilm on reservoir walls and tubing.
Mind Map: Root Interpretation Workflow
Examples from Real Tower Checks
Example 1: Hydroponic tower with brown tips You notice brown tips on older roots, but the newest roots are still pale and firm. Odor is neutral. This pattern fits normal turnover. The practical move is to keep monitoring and avoid overcorrecting pH or EC based on aging alone.
Example 2: Aeroponic tower with slimy roots and sour smell Roots look white at the top but become slimy lower down, and the reservoir smells sour. That combination points to biofilm and reduced oxygen delivery, often from inconsistent mist coverage. The first checks are nozzle output uniformity and whether any nozzles are partially clogged.
Example 3: Aeroponic tower with brittle roots Roots appear dry and break easily, while odor remains mostly neutral. This suggests the mist cycle isn’t providing enough wetting time or pressure to keep roots from drying between pulses. Adjusting cycle timing and verifying pressure stability usually resolves the issue faster than changing nutrients.
Quick Decision Rules
- Firm + neutral odor: treat as normal; compare to your baseline.
- Soft or mushy + sour odor: prioritize oxygen and sanitation checks.
- Slimy roots + musty or film-like surfaces: focus on biofilm control and cleaning.
- Brittle roots + signs of drying: focus on mist coverage and cycle settings.
Root signals work best when you observe them together. Color tells you what changed; texture tells you how badly; odor tells you what’s happening in the water and on surfaces.
9.3 Fixing Uneven Growth Caused by Flow or Coverage Issues
Uneven growth in towers usually comes from one of two things: some plants get less water/nutrient than others, or they get it at the wrong time or in the wrong pattern. The fastest way to fix it is to treat the tower like a system with measurable inputs (flow, pressure, mist coverage) and observable outputs (leaf color, growth rate, root behavior).
Step 1: Identify the Pattern
Start by mapping where the slow growers are. Look for clustering and gradients.
- Horizontal bands (same height across the tower): often a distribution or plumbing issue at that level.
- One side slower than the other: often a pump output split, clogged line, or nozzle placement bias.
- Random pockets: often blocked media, a clogged emitter, or a plant support that blocks flow.
- Only older plants affected: often biofilm buildup narrowing passages over time.
Example: If plants around the middle ring are pale while top and bottom look fine, check whether the middle section has a partially blocked return path or a flow restriction.
Step 2: Check Flow Uniformity in Hydroponic Towers
Hydroponic towers rely on consistent circulation through the channels and returns.
- Inspect the return path: If water backs up, some outlets run dry while others overflow. Look for standing water in the wrong places.
- Verify pump output under load: A pump that seems fine at first can lose pressure as lines clog. Compare flow at multiple outlets by observing how quickly each site fills and drains.
- Look for partial clogs: Mineral scale, root hairs, or debris can narrow a single outlet. A telltale sign is one row that stays wetter/drier than neighbors.
Quick test: Run the system for 10 minutes, then turn it off and observe water level differences across levels. Even small differences can translate into weeks of growth gaps.
Step 3: Check Coverage Uniformity in Aeroponic Towers
Aeroponic towers depend on mist reaching each plant site.
- Confirm nozzle alignment: Nozzles that are slightly off-angle can create a “shadow zone.” Plants in that zone will be smaller and slower.
- Measure pressure and run time: Low pressure can produce a fine mist that doesn’t travel far, while high pressure can create overspray that misses the target.
- Check for nozzle clogging: Clogs often start as intermittent performance. If one nozzle area is consistently behind, remove and clean it.
- Inspect droplet behavior: You want droplets to land and wet the root zone without constantly flooding the tower.
Example: If every plant on one side is smaller and their roots look dry or brown at the tips, start with the nozzles nearest that side. Even a single partially clogged nozzle can reduce mist delivery enough to matter.
Step 4: Use Root Clues to Confirm the Cause
Roots tell you whether the issue is water delivery, oxygen availability, or both.
- Dry, brown, or brittle root tips: likely insufficient wetting or flow.
- Slimy roots or strong odor: likely stagnant flow or biofilm, which can also cause uneven oxygen.
- White roots that stall: sometimes the plant is receiving water but not enough nutrients at the right concentration, or the root zone is staying too wet.
Example: If plants with slow growth also have roots that never fully turn white, treat it as a delivery problem first, not a nutrition problem.
Step 5: Fixes That Usually Work
Pick fixes based on what you found.
- Outlet or emitter partially blocked: clean or replace the affected component, then flush the system.
- Uneven plumbing slope or return restriction: adjust tubing routing so water drains freely and consistently.
- Nozzle coverage gaps: reposition nozzles, ensure they’re seated firmly, and clean them before re-testing.
- Plant support blocking flow: confirm net pots and collars don’t obstruct the intended wetting path.
- Pump cycling or timer mismatch: ensure the schedule matches the tower’s delivery rate; too short can starve plants, too long can flood.
Mind Map: Flow and Coverage Unevenness
Case Example: Middle Band Slowdown
A grower notices plants at the same height are pale while top and bottom look normal. They run the hydroponic tower and see that water lingers at that level before draining. The fix is to clear a partially blocked return channel and flush the line. After re-starting, the water level equalizes across levels, and within a week the previously slow plants show new leaf growth at the same pace as neighbors.
Case Example: One-Side Aeroponic Dryness
In an aeroponic tower, plants on the left side are smaller and their roots are dry at the tips. The nozzle inspection finds one emitter with reduced output. After cleaning and reseating the nozzle, mist coverage becomes consistent across the tower. The next week shows improved root color and steadier growth rate on the left side.
Step 6: Re-Test with a Simple Measurement
After any change, don’t rely on “it looks better.” Re-check uniformity using the same observation method you used at the start, such as water level differences after 10 minutes (hydroponics) or mist landing consistency at each plant site (aeroponics). Consistent delivery should show up quickly in root condition, then in leaf growth.
9.4 Correcting Nutrient Imbalances From Leaf Symptoms
Leaf symptoms are your system’s handwriting. The trick is to read it in context: which leaves show it, how fast it appeared, and whether your tower is running at the same pH and EC as usual. Start by confirming the basics—then correct the smallest thing that explains the most symptoms.
Step One: Confirm the Measurement Story
Before changing nutrients, verify what the numbers say right now.
- Measure pH and EC after the system has run for at least 10–15 minutes, so you’re not testing a stale pocket.
- Check temperature of the reservoir or solution line. Warmer solution can change uptake speed and make symptoms show up faster.
- Inspect flow or mist coverage. Uneven delivery can mimic nutrient problems because some roots get more oxygen and solution than others.
Example: If only one side of a tower shows pale leaves, don’t jump straight to “nitrogen deficiency.” First check whether that side’s emitters or return path are partially blocked.
Step Two: Match Symptoms to Likely Nutrient Issues
Use the pattern, not a single leaf.
- Older leaves first, yellowing between veins often points to nitrogen deficiency.
- Leaf edges browning or crisping can indicate potassium imbalance, high EC, or inconsistent watering cycles.
- New growth distorted or pale more often suggests calcium or iron availability issues, especially if pH is drifting.
- Interveinal chlorosis on new leaves commonly aligns with iron deficiency, but it can also happen when pH is too high for iron to stay available.
Example: If the newest leaves are pale while older leaves look mostly normal, treat it as an availability problem first (usually pH), not a “missing nutrient” problem.
Step Three: Correct with Small, Measurable Changes
Make one adjustment at a time and give the plant time to respond.
- If pH is off, correct pH before changing nutrient strength. pH affects how nutrients dissolve and how roots can take them up.
- If EC is high, dilute the reservoir with clean water and recheck EC after mixing.
- If EC is low, top up with a measured amount of nutrients to reach the target.
Practical rule: adjust by no more than a small step (for example, a modest pH correction or a modest EC correction), then re-measure after the solution has circulated.
Mind Map: Leaf Symptoms to Actions
Example: Iron-Like Chlorosis That Isn’t Iron
You notice pale new leaves with green veins. EC is normal, but pH reads 6.6 when your target is closer to 5.6–6.0.
- Correct pH first.
- Keep EC steady.
- After circulation, recheck pH.
If the next set of leaves improves, the issue was availability, not a missing ingredient.
Example: High EC Mimicry from Dry Cycles
In an aeroponic tower, mist timing is slightly short. Roots dry between cycles, uptake slows, and leaves show edge burn.
- Increase mist runtime or frequency to restore consistent wetting.
- Recheck EC after the system stabilizes.
- Avoid immediately lowering nutrients if the real problem is inconsistent delivery.
Example: “Deficiency” That Comes from Flow
In a hydroponic tower, only the top third looks stressed. EC and pH are correct in the reservoir, but the top return line is partially blocked.
- Clear the blockage.
- Confirm flow rate and drainage.
- Monitor leaf changes after new growth appears.
Nutrient corrections won’t fix a root zone that isn’t receiving solution.
Step Four: Confirm Improvement and Stop Chasing
After an adjustment, look for confirmation in the right place.
- New growth is the best indicator because it reflects current conditions.
- Old damaged tissue won’t reverse; it may stay yellow or browned while new leaves normalize.
- If symptoms persist unchanged after two adjustment cycles, re-check measurements and system delivery rather than adding more corrections.
A calm approach works: measure, match the pattern, correct one variable, and verify with the next leaves.
9.5 Restoring Systems After Power Loss or Pump Interruptions
When power drops or a pump stops, the goal is to restore flow and correct the root zone without creating a second problem. In towers, the most common follow-up issues are oxygen starvation, nutrient drift from delayed recirculation, and clogged lines from settled mineral residue.
Step 1: Make the situation safe and stable
- Unplug or switch off the system before touching plumbing or reservoirs. Wet electricity is not a hobby.
- Check for leaks around fittings and tower seams. A small leak can become a big one once flow resumes.
- Confirm how long the interruption lasted. If you know the time window, you can choose a gentler restart.
Step 2: Inspect the root zone before turning anything back on
- Hydroponic towers: Look for roots that appear dry, brown, or slimy. Dryness usually shows up quickly; sliminess can indicate stressed roots and early biofilm.
- Aeroponic towers: Check whether the roots look desiccated or whether the misting chamber is still wet. Aeroponic roots can dry faster, so you prioritize moisture restoration.
A quick rule: if roots look dry or the tower has been dry, treat this as an urgent restart. If roots look fully wet and cool, you can restart more calmly.
Step 3: Restore flow in a controlled way
- Hydroponic restart: Start the pump and let it run continuously for a short “catch-up” period (for example, 10–20 minutes) before returning to your normal timer schedule. This helps re-mix the reservoir and re-establish circulation.
- Aeroponic restart: Start the pump and mist cycle, but avoid immediately jumping to the longest mist duration. Begin with a shorter cycle (for example, half your usual mist time) for the first hour, then return to normal. This reduces the chance of uneven wetting after a dry spell.
If you use a filter or screen, check it right after restart. A clogged screen can look fine until flow resumes and then suddenly starves the tower.
Step 4: Re-check pH and EC after recirculation
Power loss can cause nutrient stratification, especially if the reservoir sat without mixing. After the catch-up run:
- Measure pH and EC.
- Adjust only toward your target range rather than trying to “fix everything at once.”
- Re-measure after mixing time (stir or run the pump briefly) so readings reflect the whole reservoir.
Example: If EC is low after a long interruption, it may be dilution from condensation or measurement variability. If EC is high, it may be evaporation concentration. Adjust gradually and confirm with a second reading.
Step 5: Flush or clear lines when interruption was long
If the system was off long enough for minerals to settle, lines may partially clog.
- Hydroponic lines: Run the pump and observe flow at the tower outlets. If flow is uneven, flush the line by running clean water through the system briefly, then return to nutrient solution.
- Aeroponic nozzles: If mist coverage is patchy, remove and inspect nozzles. Mineral buildup often forms at the nozzle orifice. Clean and reinstall, then test mist distribution.
Use a consistent test: place a clean surface under the outlet and confirm that mist or droplets distribute where they should.
Step 6: Watch plants for the next 24 hours
Your restart plan isn’t complete until you confirm plant response.
- Leaves: Look for droop that doesn’t recover after circulation resumes.
- Roots: For hydroponics, check whether roots regain a healthy color and firmness. For aeroponics, confirm that roots stay evenly moist during the mist cycle.
- System behavior: Listen for pump strain and check for unusual vibration, which can indicate air locks or partial blockages.
Mind Map: Power Loss Recovery Workflow
Example: 3-Hour Power Outage on a Hydroponic Tower
- You restart the pump and run it continuously for 15 minutes.
- You measure pH and EC; pH is slightly high and EC is slightly low.
- You adjust pH toward target and add a small amount of nutrient concentrate to bring EC back, then mix and re-check.
- You confirm outlet flow is uniform across the tower.
- Over the next day, leaves regain normal posture and roots look firm rather than dry.
Example: 45-Minute Pump Interruption on an Aeroponic Tower
- You restart misting with a shorter cycle for the first hour.
- You check nozzle output: mist is uneven on one side.
- You clean the affected nozzle and retest distribution.
- After the first hour, you return to the normal mist schedule.
- Roots remain evenly moist during the cycle, and leaf turgor stabilizes.
A good recovery is mostly boring: safe restart, quick measurements, and a careful look at flow and roots. If you do those steps in order, you prevent the interruption from turning into a longer problem.
10. Managing Pests, Diseases, and Biofilm in Indoor Towers
10.1 Preventing Biofilm With Cleaning and Water Handling Practices
Biofilm is the slimy community that forms when water, nutrients, and surfaces team up. In towers, it can clog emitters, dull flow, and create a steady source of “mystery” nutrient drift. The good news: most biofilm problems are preventable with consistent cleaning habits and water-handling discipline.
What Biofilm Needs to Form
Biofilm forms when three conditions line up: a surface to attach to, a steady supply of dissolved organics or fine particles, and time. Even if you use clean nutrients, tap water can carry organics and minerals that leave residue. In hydroponic towers, stagnant pockets in tubing and slow-draining sections are common attachment points. In aeroponic towers, nozzle interiors are small, so even a thin film can reduce misting.
Cleaning Philosophy That Works
Think in two layers: remove what feeds biofilm, then remove what biofilm already built.
- Keep solids out: filters and good flushing reduce the “food” load.
- Reduce time on surfaces: don’t let nutrient solution sit longer than needed.
- Use the right cleaner at the right frequency: strong enough to break down residue, not so aggressive that you damage plastics or seals.
Water Handling Practices That Reduce Biofilm
Use filtration and pre-settling. If your water source has visible cloudiness or lots of fine sediment, run it through a simple inline filter before it ever reaches the tower. For reservoirs, let water sit briefly before mixing nutrients if your source is dusty; you’re aiming to reduce suspended particles that later become film.
Avoid topping off with old solution. Topping off adds fresh nutrients to an existing biofilm environment. Instead, when you need to adjust volume, drain and refill on a schedule, or at minimum do partial water changes that remove the oldest solution.
Mix nutrients thoroughly and promptly. Poor mixing can leave localized nutrient concentrations that encourage residue. Mix in a separate container, then add to the reservoir. If you see sediment at the bottom of your mixing container, that’s your cue to improve mixing and filtration.
Keep reservoir temperatures reasonable. Warmer water speeds microbial growth. If your indoor space is warm, insulate the reservoir or place it away from heat sources. Consistency matters more than chasing a perfect number.
Cleaning Schedule That Matches Tower Reality
A practical schedule is based on how often you run the system and how quickly you see residue.
- Daily or every run session: quick checks for unusual odor, visible slime, and clogged return paths. Remove debris from intakes and confirm drains are clear.
- Weekly: flush lines with clean water to reduce buildup. In hydroponic towers, pay attention to low points where water lingers.
- Every crop cycle or when performance drops: full reservoir and component cleaning, including tubing and emitter/nozzle inspection.
If you’re growing continuously, treat “weekly” as minimum and “performance drops” as the trigger to clean sooner.
Step-By-Step Cleaning Method
1. Power down and drain. Remove plants carefully so you don’t splash residue into clean areas.
2. Rinse to remove loose film. Use clean water to flush until the returning water looks clear. This step prevents you from smearing biofilm around.
3. Clean the surfaces that matter.
- Hydroponic: focus on reservoir walls, return tubing, and any slow-draining sections.
- Aeroponic: focus on nozzle bodies and the mist manifold. Don’t assume “it looks clean” means the inside is clean.
4. Use a compatible cleaner and follow contact time. Apply the cleaner according to your product instructions, then rinse thoroughly. Over-concentrating doesn’t help if you skip rinsing; it can also leave residues that feed future growth.
5. Reassemble and run a short clean-water test. Confirm flow uniformity and check for leaks. For aeroponic towers, verify mist coverage across outlets.
Mind Map: Biofilm Prevention with Cleaning and Water Handling
Example: Hydroponic Tower with Weekly Flush
A home grower notices that lettuce growth slows and return tubing looks slightly cloudy after two weeks. They add an inline filter, stop topping off, and switch to a weekly clean-water flush. After two cycles, the return tubing stays clearer and the reservoir needs fewer pH corrections because the solution composition stays more stable.
Example: Aeroponic Tower with Nozzle Clogging
An aeroponic tower starts producing uneven mist: top outlets spray, bottom outlets barely mist. The grower removes the nozzles, rinses the manifold, and performs a nozzle-focused cleaning with proper contact time, then runs a clean-water test. Mist coverage returns, and the root zone stays more consistent because the spray pattern is no longer intermittently starving sections.
Quick Checklist for the Next Cleaning
- Did you reduce solids entering the system?
- Did you flush before scrubbing or soaking?
- Did you clean the parts that hold water the longest?
- Did you verify flow or mist coverage after reassembly?
- Did you stop topping off with old solution?
Biofilm prevention is mostly routine: keep the water cleaner, keep the contact time shorter, and clean the specific surfaces that let it start.
10.2 Identifying Common Indoor Soilless Problems by Symptom
Indoor soilless towers tend to fail in predictable ways because the root zone is controlled and the plant has fewer “buffer” options than in soil. When something goes wrong, the symptom usually points to one of three places: water delivery, nutrient balance, or root oxygen and hygiene.
Symptom Mind Map
Leaf Symptoms and What They Usually Mean
Yellowing leaves often starts where the plant is most “hungry” or where the nutrient is least available.
- Old leaves yellow first commonly indicates nitrogen or overall nutrient weakness. In towers, this can also happen when pH drifts out of range, making nutrients less available even if you mixed the solution correctly.
- New leaves yellow first frequently points to iron deficiency or a pH issue that prevents iron uptake. A practical check is to compare your current pH reading to your target range and verify the meter calibration.
Browning leaf tips are usually about salt concentration or inconsistent water contact.
- If tips brown while the rest of the leaf looks mostly green, think high EC or salt buildup from evaporation and top-off without correcting the full solution.
- If tips brown along with wilting between cycles, think delivery timing that is too aggressive for the plant stage.
Leaf curling can be confusing because it can come from both nutrient and environmental causes.
- If curling appears alongside slow growth, suspect root restriction from clogged lines, weak flow, or poor oxygenation.
- If curling appears right after a lighting change or temperature swing, suspect stress from the environment rather than the nutrient mix.
Root Zone Symptoms That Point to the Cause
Healthy roots in hydroponics are typically light-colored and firm; in aeroponics they should look fresh and not collapse when you gently inspect them.
Brown, slimy, or foul-smelling roots usually indicate low oxygen and biofilm.
- In hydroponic towers, low oxygen can come from pump underperformance, clogged return paths, or a reservoir that runs too warm.
- In aeroponic towers, it can come from mist coverage gaps or nozzle clogging that leaves parts of the root zone dry.
Black, hollow roots are a sign of severe oxygen loss or prolonged pump interruption. The symptom is fast and the fix is immediate: restore flow, correct the cause of interruption, and remove any dead tissue so it doesn’t feed biofilm.
Growth Pattern Symptoms
Stunted plants often trace back to one of three bottlenecks: light, nutrients, or root access.
- If plants are uniformly small across the tower, check light intensity and your feeding schedule.
- If only some plants are stunted, check whether those positions receive less flow or mist. Towers can have “dead zones” where plumbing geometry or emitter clogging reduces delivery.
Uneven height or patchy vigor is a strong clue for delivery problems.
- In hydroponics, uneven flow can happen if the return line is partially blocked or if the pump output is too low for the head height.
- In aeroponics, unevenness often comes from clogged nozzles or pressure that is too low to reach the top.
Water and System Clues
Algae on surfaces usually means light is reaching nutrient water or wet surfaces.
- A simple fix is to reduce light exposure to the reservoir and any exposed plumbing.
- Also check for leaks that keep parts of the tower constantly wet.
Clogged nozzles or reduced misting is common with hard water.
- If you see intermittent misting, inspect filters and confirm you’re using appropriate filtration and cleaning intervals.
Smell from the reservoir is a practical indicator of biofilm.
- If odor increases quickly, it often means the system is staying warm, not being cleaned between cycles, or receiving organic contamination from plant material.
Quick Symptom-to-Check Guide
| Symptom | First Checks | Most Likely Cause |
|---|---|---|
| Old leaves yellow first | pH vs target, EC trend | Nutrient availability or low feed |
| New leaves yellow first | pH calibration, iron availability | pH drift or iron lockout |
| Browning tips | EC vs target, top-off method | Salt buildup |
| Slimy roots, bad smell | pump performance, reservoir temp | Low oxygen and biofilm |
| Patchy growth | nozzle/flow coverage at positions | Clogged emitters or uneven delivery |
| Algae on surfaces | light exposure to reservoir | Light reaching wet nutrient areas |
Example: Matching a Symptom to a Likely Fix
A grower notices that only the middle section of an aeroponic tower looks healthy, while top plants are smaller with slightly curled leaves. The reservoir pH is within range, but mist coverage at the top looks weaker during the cycle. The most efficient next step is to inspect the top nozzles and verify pressure at the tower inlet. If a few emitters are partially clogged, cleaning or replacing them typically restores uniform coverage and the plants resume normal growth without changing the nutrient recipe.
10.3 Cleaning Protocols for Reservoirs, Lines, and Tower Components
Clean towers are mostly about two things: removing residue that feeds microbes, and restoring flow paths so water or mist reaches roots evenly. A good protocol is repeatable, timed, and documented, so you don’t end up guessing after the first “weird” symptom.
Cleaning Goals and What You’re Removing
Reservoirs collect the stuff you can’t see: nutrient salts, biofilm, and fine particles that cling to plastic and fittings. Lines and emitters trap mineral deposits and organic film, which can narrow flow or change mist patterns. Tower components also hold moisture in corners and seams, so cleaning needs to reach crevices, not just the visible surfaces.
A practical rule: clean until surfaces feel smooth and look uniform, then sanitize until you can’t smell “old water” when the system is empty.
Tools and Setup
Use dedicated measuring cups, a soft brush, and non-scratch pads. Keep a bucket for dirty rinse water and another for clean rinse water. Plan for drainage: place towels under fittings and have a way to catch runoff from the tower base.
Before you start, unplug the system and remove the tower from any power source. If you’re using an aeroponic tower, avoid running pumps dry during cleaning.
Step-by-Step Reservoir Cleaning
- Drain completely. Remove the nutrient solution and any floating debris. If you skip this, you’ll dilute residue and make the next steps less effective.
- Initial rinse. Fill the reservoir with clean water, swish, and drain. This knocks loose salts so the cleaner doesn’t have to work through a thick layer.
- Clean the walls and bottom. Scrub all surfaces that contact solution, including the underside of baffles and the area around the return inlet.
- Flush the pump path. Run the pump briefly with clean water to move loosened debris through the lines, then drain again.
- Sanitize. Use a sanitizing solution appropriate for food-contact systems. Circulate it through the reservoir and lines, then let it sit for the recommended contact time.
- Final rinse. Rinse until there’s no lingering odor and the rinse water runs clear. For towers, run a short cycle with clean water so emitters or drippers clear.
Lines and Fittings Cleaning
Lines need two different actions: dislodging deposits and restoring flow. Mineral buildup often forms at bends and near fittings where water slows down.
- Remove and inspect where possible. If your design allows, detach sections and check for cloudiness or crust near elbows.
- Brush only where you can reach. For rigid tubing, a flexible cleaning tool can help, but don’t force it through tight barbs.
- Flush directionally. Flush from the reservoir toward the tower components so loosened material travels out, not deeper in.
- Check flow after cleaning. For hydroponic towers, verify return flow is steady and evenly distributed. For aeroponic towers, verify mist coverage is consistent across nozzles.
Tower Components Cleaning
Tower parts include net pots, collars, lids, and any internal channels. These are often the “hidden mess” because they trap water.
- Net pots and collars. Remove media and rinse thoroughly. Scrub surfaces where roots or algae may have contacted.
- Internal channels and seams. Use a soft brush to clean corners. If algae forms along the waterline, focus there first.
- Nozzles and emitters. For aeroponic towers, never poke the nozzle orifice with metal. Soak components in a compatible cleaning solution, then rinse with clean water and reinstall.
- Drying. After final rinse, let components drain fully. Excess water left in reservoirs can dilute the next nutrient mix and encourage early biofilm.
Cleaning Schedule That Matches Real Use
A simple schedule works best:
- Between crop cycles: full clean and sanitize.
- During a long cycle: quick checks and targeted rinses when you notice reduced flow, cloudy return water, or odor.
- After power interruptions: inspect for stagnation. If water sat in lines, flush with clean water before restarting nutrient feeding.
Mind Map: Cleaning Protocol Workflow
Example: Hydroponic Tower Clean After Leafy Greens
After harvesting, drain the reservoir and rinse once to remove salt residue. Scrub the reservoir bottom and the area around the return inlet. Run the pump with clean water for 1–2 minutes, then drain again. Sanitize by circulating through the reservoir and lines, then let it sit for the contact time. Rinse until the return water is clear, then run a short clean-water cycle so the tower channels are fully flushed.
Example: Aeroponic Tower Nozzle and Line Clean
Drain and rinse the reservoir, then remove nozzles if your design allows. Soak nozzles in a compatible cleaning solution, rinse thoroughly, and reinstall. Flush lines with clean water while the pump runs briefly, then sanitize by circulating through the reservoir and lines. After final rinsing, run a mist cycle with clean water and confirm that each nozzle produces a similar spray pattern.
Quick Quality Checks After Cleaning
- Smell test: empty system should not smell like “old water.”
- Visual check: reservoir walls should not show slimy film.
- Flow or mist check: distribution should look uniform across the tower.
- First nutrient mix behavior: pH and EC should stabilize without rapid drift caused by leftover cleaner.
A clean tower doesn’t just look better; it behaves better. Consistent flow and predictable nutrient conditions are what make the next crop cycle easier to manage.
10.4 Managing Algae, Condensation, and Surface Growth
Algae and surface growth show up when light reaches nutrient water or wet surfaces stay warm and nutrient-rich. Condensation adds another layer by keeping tower walls and lids damp, which helps biofilm and algae get a foothold. The goal is simple: reduce light exposure, reduce standing moisture, and keep water moving and clean.
Algae Control That Actually Works
Block light from the reservoir and plumbing. Even indirect light can feed algae in clear or translucent tubing. Use opaque covers, wrap lines with light-blocking material, and keep the reservoir in a cabinet or behind a panel. A quick check is to shine a flashlight through tubing during the day; if you can see light inside, algae will eventually find a way.
Keep nutrient solution out of open air. If your reservoir has a wide open top, mist and splashes can deposit nutrients on nearby surfaces. Use a tight-fitting lid with only the necessary openings for plumbing and monitoring.
Use filtration and periodic skimming. Fine debris becomes algae’s starter kit. A simple inline filter or a small mechanical filter at the return line can catch particles before they settle. If you see a thin film on the water surface, skim it during routine checks rather than waiting for it to spread.
Example: the “green return line” fix. A common pattern is algae first appearing in the return tubing because it’s exposed to light. Wrapping the tubing with opaque insulation and adding a small filter on the pump outlet often clears the problem within a couple of weeks, assuming you also clean the reservoir walls.
Condensation Management for Tower Walls and Lids
Condensation forms when warm, moist air contacts cooler surfaces. In indoor towers, the cooler parts are often the reservoir lid, the underside of grow modules, and any metal or thick plastic near the floor.
Match humidity to your lighting schedule. If lights run for long periods, plants transpire more and humidity rises. Run a basic humidity target: keep relative humidity steady rather than letting it spike right after lights turn on. If your tower sits in a closet, add gentle exhaust or a small fan to prevent stagnant air.
Improve air movement around the tower. Airflow doesn’t need to blast plants; it just needs to prevent a damp pocket from forming. Aim a low-speed fan so air passes across tower surfaces and then exits the room.
Insulate cold surfaces. If the reservoir or plumbing is significantly cooler than the room, condensation will keep returning. Insulating the reservoir and exposed lines reduces temperature swings and lowers the amount of water that collects.
Example: condensation under a tower cap. If you notice droplets collecting on the underside of a top cover, the cover is likely acting like a cold plate. Switching to a more insulated cover or adding a small gap for airflow beneath it can reduce droplet formation.
Surface Growth and Biofilm Prevention
Surface growth includes biofilm on walls, slimy residue near water outlets, and fuzzy buildup around net pots. Biofilm is not just “gross”; it can reduce oxygen exchange at the root zone and make nutrient levels harder to control.
Keep wet surfaces clean and dry between cycles. In hydroponic towers, water movement helps, but surfaces still get coated. In aeroponic towers, mist can settle on plastic and fittings. Wipe accessible surfaces during maintenance and ensure drains fully clear so water doesn’t sit.
Avoid nutrient spills and splash zones. If solution drips onto the tower frame or floor, it becomes a nutrient-rich film. Route drips back into the system or into a catch tray that you empty and rinse.
Use consistent cleaning intervals. Don’t wait for visible slime. A practical approach is to clean high-contact areas on a schedule tied to your crop length—short leafy cycles need less time between cleanings than long fruiting cycles.
Example: slimy buildup near the return outlet. This often happens when the outlet creates a splash that wets the same spot repeatedly. Adjusting the outlet angle to direct flow downward into the drain path, plus wiping the area during weekly checks, usually stops the buildup from becoming entrenched.
Mind Map: Algae, Condensation, and Surface Growth
Quick Troubleshooting Examples
Green film on water surface: Block light to the reservoir, skim the film, and check for debris in the pump intake.
Wet walls and recurring droplets: Reduce humidity spikes, add gentle airflow, and insulate the coldest surfaces.
Slime around outlets or net pot areas: Eliminate splash onto frames, ensure drains clear, and wipe the hotspot during routine maintenance.
Practical Checklist for Weekly Checks
- Reservoir and tubing are opaque and not receiving daylight.
- Lids are seated and openings are minimal.
- Drains clear fully with no puddles.
- Hotspots near outlets are dry or wiped.
- Humidity is stable and airflow is present around the tower.
- Any surface film is removed before it thickens.
10.5 Integrated Control Steps That Fit Home Indoor Conditions
Indoor towers usually fail for boring reasons: the water chemistry drifts, the flow becomes uneven, the roots get oxygen-starved, or biofilm builds up quietly. Integrated control means you handle those causes with a small set of repeatable steps that match how home setups actually run—timers, limited time, and a few measuring tools.
A simple control rhythm
Use a three-layer routine: quick checks, scheduled maintenance, and symptom-based corrections.
- Daily quick checks (5 minutes): confirm the system is running on schedule, scan plants for obvious wilting or discoloration, and verify reservoir level is not dropping faster than normal.
- Weekly control (20–40 minutes): measure pH and EC, inspect roots for color and smell, and clean any visible buildup on intakes or filters.
- Every 2–4 weeks: do a deeper clean of lines and tower components, refresh the nutrient solution, and sanitize surfaces that contact nutrient water.
This rhythm prevents “surprise problems” by catching drift early. It also keeps you from overcorrecting, which is a common way to make things worse.
Mind Map: Integrated control workflow
Step-by-step actions that connect causes to fixes
1) Start with flow and coverage before chemistry. If plants look uneven, assume delivery issues first. In hydroponic towers, check that each outlet is producing a consistent trickle or return flow. In aeroponic towers, confirm misting reaches the root zone evenly; a few clogged nozzles can create dry pockets even when the reservoir chemistry is perfect.
Example: If the top section is thriving but the lower section is pale, don’t immediately raise EC. First, inspect the lower return path and any filters. Once flow is restored, then recheck pH and EC.
2) Measure pH and EC, then correct in the right order. pH affects nutrient availability, so correct pH first. EC reflects concentration, but it can be misleading if water level is low or if biofilm is consuming nutrients. After pH adjustment, wait and recheck within about a day to confirm stability.
Example: If pH is drifting upward and leaves show mild yellowing, adjust pH back into range, then observe for new growth color over the next week. If you jump EC up immediately, you may intensify stress.
3) Use root observations as a biofilm and oxygen signal. Healthy roots in soilless towers are firm and show consistent color for your crop type. Sour odor, slimy surfaces, or dark, mushy roots point to oxygen problems or biofilm. Fixing chemistry alone won’t solve a clogged line or a pump that runs too briefly.
Example: If roots smell “stale” and look coated, clean the tower and lines, then shorten the time between solution refreshes. Also verify pump runtime or mist cycle duration matches the crop stage.
4) Correct one variable at a time. Home setups often involve timers, small reservoirs, and frequent handling. When you change multiple things at once—pH, EC, runtime, and cleaning schedule—you lose the ability to tell what helped.
Example: During a weekly check, you notice EC is low and roots look slightly pale. First, refresh or top up with properly mixed solution to restore EC. If roots still decline after the next cycle, then review runtime and cleaning.
5) Keep solution handling consistent. Evaporation concentrates salts, while topping up with plain water can dilute them. Track reservoir level and top-up method so EC changes make sense. If you always top up with water but sometimes forget to mix fresh nutrients, EC will swing and pH will follow.
Example: Mark the “normal” fill line on the reservoir. If the level drops by the same amount each day, you can predict concentration changes and plan a solution refresh without guessing.
Case Study: Fixing a slow decline
A home grower notices that after two weeks, growth slows and lower leaves yellow slightly. Daily checks show the pump runs on schedule, but reservoir level is dropping faster than before.
- Week 1 check: pH is drifting upward; EC is higher than expected.
- Action: top up only with the correct mixed nutrient solution to restore the target EC, then adjust pH back into range.
- Root inspection: roots show a thin film and a mild odor.
- Action: clean tower contact surfaces and flush lines, then shorten the interval to the next solution refresh.
- Result: new growth improves after the next week because delivery and chemistry stabilize.
The key is that the fix matched the likely cause: concentration drift plus early biofilm.
Quick reference: Integrated control checklist
- Confirm flow or mist coverage is even.
- Measure pH and EC before changing feeding strength.
- Inspect roots for oxygen and biofilm signs.
- Make one change at a time, then recheck within a day.
- Keep reservoir level and top-up method consistent.
- Clean on a schedule, not only when problems appear.
11. Maintenance, Cleaning, and Component Longevity
11.1 Routine Maintenance Schedules for Pumps, Timers, and Filters
A good maintenance schedule is less about “doing everything” and more about catching the small failures before they become plant problems. Towers are compact, so a clogged filter or a mis-timed pump cycle can show up as uneven growth within days.
What to Maintain and Why It Matters
- Pumps move nutrient solution or mist water; wear changes flow rate and pressure.
- Timers control cycle timing; drift or miswiring changes how long roots sit wet or how often they get misted.
- Filters trap debris; buildup reduces flow and can force pumps to work harder.
A simple rule: if you can measure it, you can schedule it. If you can’t measure it, you schedule it by time and verify by observation.
Weekly Maintenance Schedule
Every week (about the same day each week):
-
Check flow or mist behavior
- Hydroponic: confirm solution reaches the top channels and drains cleanly.
- Aeroponic: confirm mist reaches the intended height without “dry zones.”
- Example: if one tower column looks slower, compare it to the others before touching nutrients.
-
Inspect filter condition
- If your filter has a transparent housing, look for visible sediment.
- If it’s not transparent, check pressure/flow symptoms: slower return, uneven distribution, or pump noise.
- Example: after a week of leafy growth, you may see fine root hairs or mineral dust accumulating.
-
Verify timer settings
- Confirm the on/off times match your crop stage schedule.
- If you use a plug-in timer, ensure it hasn’t been accidentally switched to a different mode.
- Example: a common mistake is leaving a “test” cycle enabled after setup.
-
Clean pump intake area
- Remove visible debris from the intake strainer if your pump has one.
- Avoid disassembling the pump unless you see performance issues.
Monthly Maintenance Schedule
Every month:
-
Service the filter properly
- Rinse media with clean water until flow improves.
- If the filter uses replaceable cartridges, replace based on condition, not just calendar time.
- Example: if you notice frequent clogging, you may need a finer pre-filter or better source water settling.
-
Check pump performance indirectly
- Hydroponic: compare how quickly the tower fills and drains.
- Aeroponic: compare mist coverage consistency across nozzles.
- Example: if drain time doubles, the issue is often partial clogging in lines or a filter that’s not fully cleared.
-
Inspect tubing and fittings
- Look for soft spots, mineral crust near fittings, and loose clamps.
- Tighten gently; overtightening can deform tubing.
-
Test timer reliability
- Run a short manual cycle and confirm it stops when expected.
- If your timer has a battery-backed clock, ensure it’s holding time.
Every 3 Months Maintenance Schedule
Every 3 months:
-
Descale pump and related parts if needed
- Mineral buildup shows as roughness, reduced flow, or higher pump noise.
- Use descaling only when you have symptoms; unnecessary chemical exposure can shorten component life.
-
Inspect nozzles and mist distribution components
- Aeroponic towers: check for partial blockage and uneven spray patterns.
- Example: one nozzle producing a thin stream usually means a localized clog.
-
Replace wear items
- Replace gaskets, O-rings, or seals if they look flattened or brittle.
- Keep a small spare kit so repairs don’t turn into downtime.
Mind Map: Maintenance Workflow
Example Schedules for Two Common Setups
Example 1: Hydroponic tower with a simple inline filter
- Weekly: check top channel flow and rinse the filter if sediment is visible.
- Monthly: remove and clean the filter housing thoroughly; inspect tubing for mineral crust.
- Every 3 months: descale the pump only if drain time slows or pump noise increases.
Example 2: Aeroponic tower with multiple nozzles and a pre-filter
- Weekly: confirm mist reaches the intended height on every nozzle; rinse the pre-filter.
- Monthly: clean nozzles if any show reduced spray; verify timer cycles match your crop stage.
- Every 3 months: inspect nozzle alignment and replace any seals that look worn.
Quick Checklist for Each Maintenance Session
- What changed since last week: flow, noise, mist coverage, drain time.
- What you cleaned: filter media, intake strainer, tubing fittings.
- What you verified: timer times, distribution uniformity.
- What you recorded: date, observations, and any parts replaced.
Keeping notes is not about paperwork; it’s about connecting cause and effect. When a tower suddenly underperforms, your log helps you identify whether the issue started after a filter service, a timer adjustment, or a change in water source.
11.2 Descaling and Preventing Mineral Buildup
Mineral buildup is what happens when dissolved salts in water leave the solution and stick to surfaces. In towers, that usually shows up as cloudy film on tubing, crusty deposits near emitters, and reduced flow through fittings. The goal is twofold: remove scale that already formed, and stop new scale from forming fast enough to matter.
Why Scale Forms in Towers
Hard water contains calcium and magnesium. When water is heated, aerated, or repeatedly cycled through pumps and nozzles, concentration at the surface increases and salts precipitate. Aeroponic towers are especially sensitive because mist droplets dry quickly and leave minerals behind. Hydroponic towers can still scale, particularly where water repeatedly passes through narrow sections like elbows, valves, and return fittings.
A practical way to think about it: if your system keeps “evaporating” water at the surface (even without visible evaporation), minerals will follow.
Descaling Without Damaging Components
Use descalers designed for food-contact equipment when possible, and always follow the label dilution. Avoid strong acids on unknown plastics or seals. If you’re unsure, test on a small section first and check for clouding, swelling, or softening after a short soak.
Safe workflow for most home towers
- Run a plain-water flush to remove loose debris.
- Drain the reservoir and remove filters if your system has them.
- Circulate diluted descaler through the tower for the time recommended by the product.
- Soak only the parts that need it if you see heavy crusting at emitters or inside tubing.
- Rinse thoroughly by running clean water through until there’s no lingering odor and the water looks clear.
- Do a short “test run” with no plants to confirm flow and mist pattern.
If your tower uses fine nozzles, don’t rely on soaking alone. Circulation helps carry loosened scale out of the flow path.
Spotting Buildup Early
Early signs are easier to fix than full cleanouts.
- Flow slows in one section first, often near valves or elbows.
- Nozzle output becomes uneven or produces a “stringy” mist instead of a consistent spray.
- Tubing looks slightly hazy where water repeatedly passes.
- Reservoir film forms quickly after mixing.
A simple check schedule helps: inspect emitters and visible tubing every 1–2 weeks, and record any change in flow rate or mist coverage.
Preventing Mineral Buildup with Better Water Handling
Prevention starts before you ever add nutrients.
1. Start with the right water
If you can, test your source water for hardness. Higher hardness means you’ll need more frequent descaling or stronger prevention steps. Even without a lab, you can often infer hardness from how quickly tap water leaves spots on glass.
2. Keep nutrient solution from concentrating at the surface
Top off with the correct method for your system. If your tower design allows water to evaporate from the reservoir, minerals become more concentrated over time. Use a covered reservoir when possible and maintain stable levels.
3. Avoid long stagnation
Stagnant solution encourages precipitation and biofilm, which then traps minerals. Plan feeding so the reservoir is refreshed on a schedule you can actually follow.
4. Use filtration where it helps
A basic filter can reduce particulate matter that acts as a “seed” for scale. It won’t remove dissolved hardness, but it can reduce the mess that makes scale worse.
5. Control temperature swings
Large temperature changes increase precipitation risk. Keep the reservoir away from direct sun and drafts that cause rapid heating and cooling.
Example: Hydroponic Tower with Slow Return Flow
You notice the return line gurgles less and water takes longer to cycle. Inspection shows a chalky film near a valve.
- Descale plan: flush with water, circulate diluted descaler through the tower, then rinse until clear.
- Prevention tweak: reduce how long the reservoir sits between refreshes, and check the valve for partial clogging during routine maintenance.
After cleaning, flow should return to normal quickly. If it doesn’t, the valve may need disassembly and manual cleaning.
Example: Aeroponic Tower with Uneven Mist Coverage
One ring of nozzles produces a weaker spray. The tubing near that section has a faint white residue.
- Descale plan: remove the affected nozzle(s) if your design allows, soak them in diluted descaler for the label time, then flush the line by running clean water through.
- Prevention tweak: keep mist cycles consistent so droplets don’t sit and dry on surfaces longer than intended, and inspect nozzles more frequently in hard-water conditions.
If you see the same nozzle group failing repeatedly, the issue is usually mineral scale at that location, not pump power.
Mind Map: Descaling and Preventing Mineral Buildup
Quick Checklist for Your Next Cleaning
- Measure or estimate water hardness before you change anything.
- Descale based on observed symptoms, not just a calendar.
- Rinse thoroughly and run a short test cycle.
- Adjust one prevention factor at a time so you can tell what worked.
11.3 Replacing Wear Parts and Planning Spare Inventory
Wear parts are the bits that quietly take the hit: pumps that run daily, nozzles that get mineral deposits, tubing that stiffens, and filters that clog. Replacing them on schedule is less about perfection and more about keeping the system inside the “it still works” zone.
What Counts as Wear Parts
In tower systems, wear parts usually fall into four groups:
- Flow components: pump heads, impellers, check valves, and any restrictors.
- Distribution components: aeroponic nozzles, mist lines, and spray bars.
- Filtration and protection: inlet strainers, inline filters, and filter cartridges.
- Seals and tubing: O-rings, gaskets, soft tubing, and any fittings that see frequent disassembly.
A simple rule helps: if the part is designed to contact nutrient water directly and it’s small, it’s probably a wear part.
Build a Replacement Rhythm
Start with two clocks: runtime and interval. Runtime matters because pumps and nozzles degrade with hours of operation. Interval matters because even a low-use system can suffer from mineral buildup during long gaps.
Use this practical rhythm:
- Weekly: inspect for reduced flow, uneven mist, or filter bypass signs.
- Monthly: clean nozzles and check valves if your system supports it.
- Every 3–6 months: replace filters and inspect pump performance.
- Annually: plan a deeper refresh of pump-related wear items and any seals that show flattening or cracking.
If your tower runs more than typical indoor schedules, shorten the intervals proportionally.
How to Decide What to Replace First
When you notice a performance change, don’t guess randomly. Use a quick triage sequence:
- Check the filter first. A clogged filter can mimic a failing pump.
- Verify flow rate or mist coverage. Compare to a known-good baseline from earlier weeks.
- Inspect distribution parts. In aeroponics, uneven mist often points to partially clogged nozzles.
- Only then suspect the pump. If flow is low after filter cleaning and distribution checks, the pump may be losing efficiency.
This order prevents replacing expensive parts when the issue is actually a cheap one doing its job a little too well.
Planning Spare Inventory Without Hoarding
Spare inventory should match your risk level and your downtime tolerance. A home grower usually benefits from a small set of “swap fast” parts.
A good starter spare kit includes:
- One spare filter element sized for your system.
- Two to four spare aeroponic nozzles (or one nozzle set if you use fewer, larger nozzles).
- A small seal kit: common O-rings and gaskets used in your tower and pump connections.
- One spare check valve if your setup includes them.
- A spare pump impeller or pump head only if you already know your model’s typical wear pattern.
Keep spares in labeled bags with the part name, system model, and the date you installed them. That last detail matters when you’re troubleshooting later and trying to remember what “recently” means.
Example Spare Plan for a Small Hydroponic Tower
Assume a single hydroponic tower with a reservoir, an inline filter, and a submersible pump.
- Spare filter: 2 cartridges
- Spare seals: 1 small O-ring assortment bag
- Spare check valve: 1
- Spare tubing: 1 short length of the exact diameter
Replacement approach:
- Replace the filter cartridges every 3–4 months.
- Replace seals when you notice seepage or when you open the system for a deeper clean.
- Swap the check valve if flow becomes noisy or inconsistent.
This plan keeps downtime short because the most likely failure points are easy to replace.
Example Spare Plan for an Aeroponic Tower
Assume an aeroponic tower with a mist pump, a nozzle manifold, and a nozzle cleaning routine.
- Spare nozzles: 4–8 depending on nozzle count
- Spare filter element: 2 cartridges
- Spare seals: 1 seal kit for pump and mist fittings
- Spare mist line fittings: 2–3 quick-connect pieces
Replacement approach:
- Replace nozzles when cleaning no longer restores uniform mist.
- Replace filters on schedule even if they look “mostly fine,” because partial clogging can still reduce coverage.
- Inspect seals at every major cleaning session.
Aeroponics is more sensitive to distribution changes, so having extra nozzles prevents a slow decline in plant performance.
Mind Map: Wear Parts and Spares
Practical Storage and Tracking
Store spares dry and away from direct sunlight. Label each item with the system it fits and the installation date when applicable. Keep a simple log entry each time you replace something: part name, date, and the reason (scheduled, reduced flow, uneven mist, seepage). That log turns troubleshooting into a repeatable process rather than a memory game.
Finally, replace parts in a way that preserves alignment. For example, when swapping aeroponic nozzles, keep the nozzle manifold orientation consistent so mist patterns stay comparable. Small alignment changes can look like a clog, even when the new part is fine.
11.4 Sanitizing Between Crop Cycles Without Damaging Materials
Sanitizing between crop cycles is mostly about two things: removing residue that microbes can use as food, and using cleaners that won’t quietly degrade your tower parts. The goal is clean, not “sterile museum.” If you keep the process consistent, you’ll spend less time troubleshooting and more time harvesting.
What You’re Actually Cleaning
Start by separating “visible mess” from “invisible buildup.” Visible mess includes plant debris, root fragments, and mineral crust. Invisible buildup includes biofilm on inner tubing, slimy film on emitters, and nutrient salts left behind when water evaporates. Even if the tower looks fine, biofilm can seed the next batch.
Choose Sanitizers That Match Your Materials
Different tower materials tolerate different chemicals. A safe approach is to use a sanitizer that is effective at low residue and easy to rinse, then follow with a thorough water rinse.
- Plastics and tubing: Prefer sanitizers that don’t attack common plastics (like PVC, PP, and silicone). Avoid strong solvents and harsh oxidizers unless the manufacturer explicitly allows them.
- Metal parts: If your tower includes stainless hardware, keep contact time controlled and rinse well. Prolonged exposure to aggressive cleaners can pit surfaces.
- Nozzles and emitters: These are the most sensitive. Use gentle cleaning, short contact time, and avoid anything that leaves residue or swells seals.
A Practical Between-Cycle Workflow
Use a repeatable sequence so you don’t skip steps when you’re busy.
- Drain completely. Remove nutrient solution and flush with clean water until the return line runs clear.
- Remove plant material. Pull roots and net pot media. If you used rockwool or similar blocks, discard them rather than trying to reuse.
- Pre-clean for residue. Wash the tower interior and plumbing with warm water and a mild, non-foaming detergent. This step matters because sanitizers work poorly on heavy residue.
- Rinse thoroughly. Rinse until there’s no slippery feel and no detergent smell.
- Sanitize with controlled contact time. Fill the reservoir and circulate through lines (or soak components that can be soaked) for the time specified by the sanitizer label.
- Rinse to remove sanitizer. Run clean water through the system until you can’t detect sanitizer odor or residue.
- Dry or reassemble with clean water. Let parts air-dry if your design allows it, or reassemble and start with fresh nutrient solution only after rinsing is complete.
Mind Map: Between-Cycle Sanitizing Plan
Examples That Fit Real Home Schedules
Example: Hydroponic Tower After Leafy Greens
- Drain and flush with clean water.
- Remove roots and discard grow media.
- Wash the tower channels and return line with warm water plus mild detergent.
- Rinse until the water runs clear.
- Circulate sanitizer through the system for the label’s contact time.
- Flush with clean water until odor-free.
- Inspect the return elbow and any low spots; biofilm often hides there.
Example: Aeroponic Tower After Herbs Aeroponic systems are more prone to nozzle residue because mist leaves tiny droplets that dry.
- Drain reservoir and wipe accessible surfaces.
- Remove and rinse the nozzle manifold carefully.
- Pre-clean lines with warm water and mild detergent, then rinse.
- Sanitize with short, controlled circulation time.
- Flush thoroughly, then run a short “water-only” test cycle to confirm even misting.
Quality Checks That Prevent Repeat Problems
After sanitizing, verify cleanliness with simple observations:
- Return water clarity: If it’s cloudy or slimy, you didn’t remove residue before sanitizing.
- Inspection points: Check corners, low-flow sections, and any fittings where water lingers.
- Odor and feel: Detergent or sanitizer residue can interfere with the next nutrient solution.
Common Mistakes and How to Avoid Them
Skipping pre-clean is the biggest failure mode; sanitizers can’t penetrate thick residue. Overexposure is the second: longer contact time doesn’t always mean better results, and it can damage seals or leave residue. Finally, incomplete rinsing can cause nutrient imbalance in the next cycle, because the system starts with leftover chemicals.
A good between-cycle routine takes time, but it’s predictable time. When you treat sanitizing as a checklist rather than a mood, your towers stay consistent and your next crop starts on clean footing.
11.5 Wastewater Handling and Safe Disposal Practices
Wastewater is the part of soilless growing that feels least “plant-like,” but it’s where good habits prevent most headaches. In towers, wastewater usually comes from drain-off during cycles, periodic flushing, and occasional troubleshooting runs. Treat it as nutrient-containing water, not as plain rinse water.
What Counts as Wastewater in Tower Systems
Most home towers produce three categories:
- Routine drain-off: water that returns to the reservoir or drains to a collection container when the system cycles.
- Solution changes: when you replace nutrient solution due to pH drift, EC drift, or root-zone issues.
- Cleaning flushes: water used to rinse lines, nozzles, or reservoirs during sanitation.
A simple rule: if it touched nutrient solution or plant roots, it goes into the same “nutrient wastewater” handling path.
Mind Map: Wastewater Flow and Decisions
Collection and Storage That Doesn’t Create New Problems
If your tower drains back into the reservoir, you may only need to handle wastewater during solution changes and cleaning. If it drains to a floor drain or bucket, use a dedicated container with a lid. Nutrient water attracts curiosity from pets and insects, and lids reduce both.
Label containers with three items: date, type (solution change or cleaning flush), and approximate volume. This prevents the common “mystery bucket” situation where you can’t tell whether it’s safe to pour or should be treated as contaminated.
Reducing Wastewater Before You Dispose
You can cut wastewater volume without changing your growing goals:
- Top up instead of replacing: when EC rises slowly, adjust with water rather than dumping the whole reservoir.
- Use a controlled flush: if you must reset the root zone, flush only the affected lines or sections rather than the entire system.
- Catch and separate first flush water: the first rinse often carries the most biofilm and loosened debris. Collect it separately so you can dispose of it as “more contaminated.”
Disposal Options and Safe Boundaries
Disposal rules vary by location, so the safe approach is to follow local guidance for nutrient-containing liquids. In general, avoid dumping large volumes of concentrated nutrient solution into household drains.
Use these practical boundaries:
- Small amounts of dilute, well-mixed water: often handled through household plumbing if local rules allow. Keep it modest and avoid repeated dumping.
- Concentrated solution changes: store and dispose according to local wastewater guidance rather than “pouring it out” repeatedly.
- Cleaning flushes with added chemicals: treat as contaminated. If you used any sanitizer or descaling agent, do not assume it’s safe for drains.
When in doubt, store wastewater in labeled containers and dispose according to local requirements. It’s less convenient than pouring, but it prevents accidental chemical release.
Handling Solids and Filters
Biofilm slough, root debris, and filter media should not go down drains. Collect solids in a bag or container, then dispose with household waste according to local rules. If you use a filter sock or sponge, rinse it into the wastewater container rather than into the sink.
Safety Practices That Actually Matter
Wear gloves when handling nutrient water, especially during cleaning. Nutrient solutions can irritate skin, and cleaning water can be harsher than you expect. Use eye protection when flushing lines or spraying nozzles.
Keep wastewater away from food prep areas. A separate bucket and a dedicated cleaning set reduce cross-contamination.
Example: A Typical Solution Change
You notice EC has climbed and pH is drifting despite adjustments. You decide to replace the reservoir.
- Turn off the pump and let the tower drain back to the reservoir.
- Measure and record the current pH and EC.
- Pump the old solution into a labeled container: “Nutrient wastewater, solution change, 12 L.”
- Rinse the reservoir with a small measured amount of water, then add that rinse to the same container.
- Clean the reservoir and refill with fresh solution.
- Dispose of the stored wastewater per local guidance.
This approach keeps the cleanup predictable and prevents “extra” water from turning into a larger disposal job.
Example: Cleaning Flush After Root Issues
If roots show heavy slime or you suspect biofilm buildup, do a targeted cleaning.
- Remove tower components that can be cleaned separately.
- Flush lines with the minimum volume needed to clear visible residue.
- Collect flush water in a labeled container: “Cleaning flush, potentially contaminated.”
- Dispose of that container separately from routine solution changes.
Separating types of wastewater makes disposal decisions clearer and reduces the chance of mixing contaminated water with relatively clean rinse water.
Quick Checklist for Safe Disposal
- Label containers with date, type, and volume.
- Keep wastewater covered and away from pets.
- Collect solids and filter debris for trash disposal.
- Store concentrated or chemically treated liquids for proper disposal.
- Use gloves and eye protection during cleaning.
- Record pH/EC when you change solution so you can spot patterns later.
12. Practical Build Plans and Example Setups
12.1 Hydroponic Tower Starter Setup With Target Crops
A hydroponic tower starter setup works best when you treat it like a small, repeatable production line: stable water chemistry, predictable lighting, and a crop plan that matches tower flow. The goal is not maximum complexity; it’s consistent harvests.
Target Crops That Fit Tower Flow
Pick crops that tolerate frequent wetting of roots and benefit from steady nutrition.
- Leafy greens: lettuce, baby kale, arugula. Fast cycles and forgiving growth.
- Herbs: basil, cilantro, mint (mint needs extra containment). Strong flavor payoff.
- Compact greens: spinach and chard in shorter tower sections.
Example plan: start with lettuce and basil for the first run, because they show clear growth differences within 2–3 weeks.
System Layout and Crop Placement
Most tower issues come from uneven access to light and inconsistent root exposure.
- Top vs bottom: place the most light-hungry plants near the brightest side or top openings.
- Spacing: keep net pots from touching so airflow can reach leaves.
- Staggering: don’t fill every site at once. Use a staggered schedule so you’re not harvesting everything on the same day.
Example placement: fill every other opening for the first 10–14 days, then add the next batch once roots establish.
Water and Nutrient Setup
Start with a simple, measurable approach.
- Reservoir volume: choose a size that won’t swing pH wildly. Larger volume buffers mistakes.
- pH target: keep it in the typical leafy-green range (commonly around 5.5–6.0).
- EC target: begin moderate and adjust as plants grow (commonly 1.0–1.8 mS/cm for many leafy crops).
- Mixing order: add nutrients to water, then fine-tune pH after mixing.
Example routine: check pH and EC twice per week during the first month, then move to every 1–2 days once plants are actively growing and temperatures rise.
Lighting and Timing
Lighting determines whether your tower “works” or just “stays wet.”
- Photoperiod: use a consistent daily schedule, often 14–16 hours for leafy greens.
- Intensity: aim for enough light that leaves stay upright and don’t stretch.
- Distance: keep fixtures at a fixed height and adjust only after observing leaf posture.
Example: if seedlings look tall and thin, raise light intensity or reduce distance rather than changing nutrients.
Pump Scheduling and Root Exposure
Hydroponic towers typically cycle nutrient solution through the root zone.
- Seedling phase: shorter cycles to avoid overly saturated roots.
- Established phase: longer or more frequent cycles to support faster uptake.
Example schedule to start: run on a timer so roots get solution regularly, then allow drainage so oxygen can reach the root zone. If you see algae or sour smells, reduce run time and improve cleaning.
Seeding, Net Pots, and Support
A starter setup succeeds when roots start clean and stable.
- Net pot choice: use sizes that match your tower openings and allow airflow around the collar.
- Growing medium: use a consistent medium for germination and transplanting.
- Transplant timing: move seedlings when they have a small but healthy root mass.
Example: germinate lettuce in small starter plugs, then transplant into tower net pots once roots are visible and the plant has 2–3 true leaves.
Mind Map: Hydroponic Tower Starter Setup
Example Starter Run Plan
Week 0–1: Install tower, fill reservoir, set pump timer, and verify flow. Germinate lettuce and basil. Keep lighting on a fixed schedule.
Week 1–2: Transplant seedlings into net pots. Start with moderate nutrient strength and check pH/EC after the first full cycle.
Week 2–4: Adjust pump timing based on root appearance and leaf growth. Thin or reposition if leaves crowd. Harvest outer lettuce leaves as plants mature.
Week 4 onward: Begin the next staggered batch so you always have plants at different growth stages.
Quick Checklist Before You Start
- pH and EC measurement working and calibrated
- Pump timer set and drainage clear
- Lighting schedule fixed
- Crops chosen for fast, forgiving cycles
- Staggered planting plan to avoid one-day harvest spikes
This setup is intentionally straightforward: once the tower delivers consistent solution and the light schedule stays stable, the plants do most of the work.
12.2 Aeroponic Tower Starter Setup With Target Crops
Aeroponic towers work best when you treat the setup like a system, not a gadget. Your goal is consistent mist coverage, stable root-zone conditions, and a crop plan that matches the tower’s strengths.
Target Crops That Fit Aeroponic Towers
Start with crops that tolerate frequent wetting and have relatively fast early growth.
- Leafy greens: lettuce, arugula, baby spinach. They establish quickly and let you learn mist timing without long waits.
- Herbs: basil, cilantro, parsley. They respond well to steady nutrition and frequent harvests.
- Compact greens: mustard greens and similar quick-cut crops. They help you practice spacing and harvest sequencing.
Avoid starting with slow, heavy feeders (like large fruiting plants) until you’ve dialed in your mist schedule and nutrient stability.
Starter Setup Goals
Aim for these measurable outcomes during your first week:
- Uniform wetting: roots should look evenly damp, not dry on one side and soaked on the other.
- Stable pH and EC: small swings are normal; large swings usually mean mixing or measurement issues.
- No persistent pooling: aeroponics should keep roots moist without turning the tower into a constant drip system.
Equipment Checklist for a Practical First Build
Use this as a “minimum viable aeroponic tower” list.
- Aeroponic tower with reservoir and root chamber
- Submersible pump sized for your nozzle count
- Nozzles matched to your pressure range
- Timer or controller for mist cycles
- Tubing, fittings, and a way to drain and flush
- Net cups and support media (often inert foam or similar)
- pH and EC meters with calibration supplies
- Catch tray or drain line to manage overflow safely
Mind Map: Aeroponic Starter Setup
Aeroponic Tower Starter Setup Mind Map
Step-By-Step Setup with Clear Reasoning
1) Assemble and leak test before you grow anything
Fill the reservoir with clean water, run the pump briefly, and inspect every fitting. Fixing a leak now is faster than fixing it after you’ve seeded.
2) Prime and verify mist coverage
Run short cycles (for example, a few minutes) and look at the root chamber. If mist is uneven, adjust nozzle alignment or spacing before adding nutrients.
3) Calibrate pH and EC, then mix nutrients
Aeroponics concentrates attention on measurement because roots are exposed to solution repeatedly. Calibrate your meters, mix nutrients to a conservative starting EC, and adjust pH to your target range for leafy greens.
4) Start with seedlings or rooted starts
Seedlings can be started in a separate medium and moved once roots are ready to handle mist. If roots are too small, they dry out between cycles; if they’re too large, they can trap droplets and create uneven wetting.
5) Use a conservative mist schedule for the first days
Begin with shorter cycles and more frequent misting while roots establish. As roots grow and the tower stabilizes, you can lengthen cycles or reduce frequency.
Example: Lettuce Starter Cycle Plan
- Days 1–3: shorter mist cycles, more frequent repeats to prevent drying.
- Days 4–10: slightly longer cycles as roots fill the chamber.
- After establishment: settle into a consistent routine that keeps roots evenly damp.
If you see roots drying at the edges, increase mist frequency. If you see constant dripping or pooling, reduce cycle length or check nozzle pressure.
Example: Basil Starter Cycle Plan
Basil tends to be less forgiving of inconsistent conditions. Keep the schedule steady and adjust one variable at a time.
- Start with a conservative EC so leaves don’t show stress early.
- If leaves look pale while roots are healthy, increase nutrient strength gradually.
- If roots look dark and slimy, pause and check cleaning, nozzle clogging, and solution handling.
Tuning Checklist for Mist and Nutrition
- Mist tuning: uniform dampness beats “more mist.”
- Nutrient tuning: change EC slowly; pH drift often follows EC changes.
- Clog prevention: filter if your water has sediment, and keep nozzles clean.
Mind Map: Troubleshooting Signals
Troubleshooting Signals Mind Map
Daily Routine for the First Two Weeks
- Check reservoir level and top off with the correct water chemistry.
- Inspect roots visually during a cycle and right after it ends.
- Confirm the timer is running and that mist coverage looks consistent.
This routine is boring on purpose. Aeroponic towers reward steady observation and small adjustments, not guesswork.
12.3 Scaling Up To Multi-Tower Production Without Overcomplication
Scaling from one tower to several is mostly about reducing “surprises.” The goal is to keep the system predictable: the same measurements, the same routines, and the same failure responses, even when you add more plants.
Start with a Standard Unit
Treat one tower as a repeatable module. Define what “normal” looks like for that module: typical reservoir volume, typical pump run time, typical pH and EC ranges, and typical daily water level changes. When you add a second tower, you should not be guessing whether it behaves differently; you should be checking whether it behaves the same.
A practical way to do this is to standardize three things across towers:
- Nutrient delivery schedule: same timer settings and same cycle pattern.
- Root zone support: same net pot size, same media type, same seedling start method.
- Monitoring cadence: same days and times for pH/EC checks and same method for recording results.
Example: If Tower A runs 15 minutes on and 45 minutes off for hydroponics, Tower B should start with the same schedule. If Tower B needs different settings, you adjust it after you confirm the cause, not before you have baseline data.
Use One Control Strategy, Not Many
Multi-tower setups get complicated when each tower has its own “unique” configuration. Instead, use a shared control strategy and only allow differences where they matter.
A clean approach is to group towers by crop and growth stage. Leafy greens that share similar nutrient needs can run on the same schedule. If you mix very different crops, you’ll end up with conflicting pH targets and inconsistent harvest timing.
Example: If you run two towers of basil and two towers of lettuce, you can keep one nutrient schedule for the basil group and another for the lettuce group. You still get variety, but the control logic stays manageable.
Design for Maintenance Access
Scaling isn’t just about growing more plants; it’s about being able to service the system without turning every task into a contortion exercise.
Plan for:
- Clear access to reservoirs for topping up and measuring.
- Easy access to filters and valves so you can clean them without dismantling half the tower.
- Drain paths that let you remove solution cleanly.
Example: If your towers share a common drain line, label the drain valves and keep a bucket near the system. When you need to flush, you should be able to do it in minutes, not hours.
Decide Between Shared and Separate Reservoirs
Reservoir design is the biggest “complexity lever.”
- Separate reservoirs per tower: simpler troubleshooting because each tower’s chemistry is isolated. If one tower develops a problem, the others keep running.
- Shared reservoir for multiple towers: fewer total tanks and less mixing work, but a problem in one branch can affect all towers.
A balanced compromise is to keep reservoirs separate for the first scale-up step, then consider sharing only after you’ve proven your routine and measurement accuracy.
Example: With four hydroponic towers, start with four reservoirs. Once you can maintain stable pH and EC for each tower for several weeks, you can evaluate whether a shared reservoir would reduce workload without increasing risk.
Standardize Measurement and Adjustment Rules
When you add towers, you also add measurement volume. Without rules, you’ll end up making inconsistent adjustments.
Create a simple decision rule set:
- Measurement rule: check pH and EC at the same point in the cycle (for example, right after a pump run).
- Adjustment rule: adjust only if readings are outside your target band.
- Mixing rule: after adding nutrients or pH adjusters, wait a fixed time before re-measuring.
Example: If your target EC band is 1.2–1.6 mS/cm, you don’t react to a reading of 1.58. You react when you see 1.10 or 1.75. That one choice prevents constant micro-adjustments that can destabilize the solution.
Keep Troubleshooting Local
Multi-tower systems fail in patterns: clogged lines, pump wear, uneven flow, or root-zone issues. You want to identify which tower is responsible without shutting down everything.
Use isolation where it matters:
- Valves per tower branch so you can stop flow to one tower.
- Independent timers or independent control channels so one malfunction doesn’t force a full system pause.
- A consistent “symptom-to-check” order so you don’t waste time.
Example: If Tower C shows slower growth, you first check flow rate and reservoir level, then check pH/EC, then check nozzle or emitter performance (depending on hydro vs aero). You don’t start by changing nutrient recipes across all towers.
Mind Map: Multi-Tower Scaling Without Overcomplication
Case Example: Four Towers with Two Crop Groups
You run two hydroponic towers of lettuce and two of cilantro. You keep separate reservoirs at first. Each group shares the same timer settings and the same target pH/EC band. You measure each reservoir on the same day and at the same point in the cycle.
When Tower 3 starts showing pale leaves, you isolate it using its branch valve and confirm flow and solution levels. You find a partially clogged return path, clean it, and the tower returns to normal without changing the cilantro towers’ nutrient adjustments. The system stays stable because the routines and rules were consistent, and the troubleshooting stayed local.
12.4 Example Nutrient and Monitoring Logs for Realistic Schedules
A good log is not a diary. It’s a short record that lets you connect what you changed to what the plants did. Below are two realistic examples—one hydroponic, one aeroponic—showing what to measure, when to measure it, and how to record adjustments without turning every day into a chemistry exam.
Mind Map: What to Record and Why
Mind Map: Hydroponic Tower Example Schedule

Example: Hydroponic Tower Log for Leafy Greens
Assume a 3-tower setup growing butterhead lettuce and basil starts from transplants. The goal is steady growth, so the schedule emphasizes small corrections.
Day 1 (setup day)
- Target: pH 5.8, EC 1.2 mS/cm
- Record: pH 5.7, EC 1.1
- Action: Add nutrient concentrate to raise EC to 1.2
- Note: Wait 3 hours, then recheck
Day 1 (3 hours later)
- pH 5.8, EC 1.2
- Action: None
- Visual: Leaves upright, no spotting
Day 2
- pH 5.9, EC 1.25
- Water level: down 1.0 L (evaporation)
- Action: Top up with water only to restore level
- Recheck after 2 hours: pH 5.8, EC 1.2
Day 3
- pH 6.0, EC 1.18
- Visual: Slight paling on older leaves
- Action: No immediate EC change; verify light intensity and airflow first
- Note: If EC rises next day, skip nutrient additions
Day 4
- pH 5.7, EC 1.22
- Root check: white roots, no sour smell
- Action: None; keep feeding steady
Day 5
- pH 5.6, EC 1.30
- Action: Top up with water only, then adjust pH back to 5.8 using small increments
- Recheck after 4 hours: pH 5.8, EC 1.25
Day 6-7
- Continue daily pH/EC checks
- If EC keeps climbing faster than water loss, inspect for clogged returns or uneven flow
This log shows a key habit: when water level drops, you top up with water first, then re-test. That prevents “chasing” EC with nutrient additions while the real issue is concentration drift.
Mind Map: Aeroponic Tower Example Schedule

Example: Aeroponic Tower Log for Compact Herbs
Aeroponics can change conditions quickly because roots get frequent wetting and the system can concentrate nutrients faster if misting is aggressive.
Day 1 (start of week)
- Target: pH 5.7, EC 1.0 mS/cm
- pH 5.6, EC 0.95
- Action: Add nutrient to reach EC 1.0
- Mist cycle: 5 minutes on, 25 minutes off
Day 2
- pH 5.8, EC 1.10
- Water level: down 0.6 L
- Action: Water-only top up
- After next cycle: pH 5.7, EC 1.02
- Visual: Roots bright, no browning
Day 3
- pH 5.9, EC 1.08
- Observation: One tower section shows slightly drier roots
- Action: Pause, inspect nozzle line for that section
- Note: Record nozzle cleaning time and what was cleaned
Day 3 (after nozzle cleaning)
- Next mist cycle: roots regain uniform moisture
- Recheck after 2 hours: pH 5.8, EC 1.05
- Action: None
Day 4
- pH 5.6, EC 1.15
- Leaf note: tips slightly darker
- Action: Reduce nutrient addition next top-up; keep EC stable by using water-only until EC drops
Day 5-7
- Continue daily pH/EC checks
- If EC rises while pH falls, prioritize water-only top-ups and verify mist timing hasn’t drifted
Example Log Template You Can Copy
A practical rule: write down the target range you’re using that week, then keep entries short. If you do that, your logs become a map of cause and effect rather than a stack of numbers.
12.5 Harvest, Storage, and Quality Control for Fresh Indoor Food
Harvesting starts before you pick anything. If you know your tower’s rhythm, you can harvest at the right size, avoid overgrown leaves, and keep the next growth cycle on schedule.
Harvest Timing and Technique
For leafy greens and herbs, harvest when plants have enough leaf mass to handle trimming. A practical rule is to harvest in the morning when lights have just warmed the space and plants are less stressed. Use clean scissors and cut above the crown or above the lowest healthy leaf set, depending on the crop. For example, basil responds well to frequent tip harvesting: snip the top growth so side shoots can fill in.
For tower systems, uneven growth is common if flow or mist coverage varies by height. When you harvest, note which levels look best and which lag. That observation becomes quality control data, not just a “huh” moment.
Handling After Harvest
Fresh produce keeps longer when you reduce heat and water loss. Move harvested greens into a cool, shaded area immediately. If you rinse, do it quickly and dry thoroughly; soggy leaves spoil faster. A simple approach is to rinse only if you see residue, then spin-dry in a salad spinner or blot with clean towels.
Keep harvested items separated by crop and by harvest time. Mixing early and late harvests makes it harder to judge quality and can hide problems like uneven nutrient uptake.
Storage Methods That Match Crop Behavior
Leafy greens usually store best with controlled moisture. Store them in breathable containers or perforated bags with a paper towel to absorb excess moisture. Herbs like cilantro and parsley often do better with stems supported and leaves kept slightly drier. For example, wrap herb stems in a lightly damp paper towel, place in a bag, and refrigerate.
Avoid stacking heavy containers on delicate greens. Compression bruises leaves and creates wet spots that turn into spoilage centers.
Quality Control Checks You Can Do at Home
Quality control is about catching issues early, not grading produce like a judge.
Leaf and stem inspection
- Look for limpness, yellowing, and translucent patches.
- Check for slimy surfaces, especially near cut ends.
- Smell is useful: sour or “off” odors usually mean the shelf life is already shrinking.
Texture and moisture
- Crisp leaves should snap slightly when handled.
- Excess moisture on the container lid is a warning sign.
Taste testing with purpose
- Sample one leaf from each harvest batch.
- If bitterness or strong off-flavors appear, it often correlates with harvest timing or nutrient balance.
Mind Map: Harvest to Storage Workflow
Example: Two Harvest Batches from the Same Tower
Batch A is harvested at the first “ready” size. Leaves are firm, and the container stays mostly dry after refrigeration. Batch B is harvested two days later because the plants looked “almost there.” Batch B shows more yellowing at the outer leaves and a slightly bitter taste. The storage container also collects more condensation, suggesting the leaves were more stressed at harvest.
Next time, you harvest Batch B’s crop earlier, and you keep a consistent rule for each crop. You also record which tower heights produced the best leaves so you can adjust your pruning and monitoring focus.
Example: Preventing Storage Failures
If you notice slimy cut ends within two days, check two things. First, drying after any rinse: wet surfaces accelerate spoilage. Second, how tightly you pack the container: tight stacking traps moisture and bruises leaves. Loosen packing, add a dry paper towel, and ensure greens are fully dry before bagging.
Simple Record Keeping That Improves Quality
Maintain a short log for each harvest batch: crop, harvest date, tower height notes, whether rinsed, and the first quality check result after refrigeration. When you see repeated issues, you can connect them to one step in the workflow, such as harvesting too late, rinsing unnecessarily, or packing too tightly.