Modern Strategies for Cross-Channel Commerce Journeys
1. Foundations for Cross-Channel Commerce Journeys
1.1 Defining Cross-Channel Journeys Across Discovery Engagement and Purchase
A cross-channel commerce journey is the path a shopper takes when they encounter your brand, evaluate products, and complete a purchase—while moving across multiple channels and devices. The key difference from a single-channel funnel is that the journey treats channels as cooperating steps, not separate campaigns. Discovery engagement is where attention becomes intent; purchase is where intent becomes an order. Your job is to make those transitions feel consistent, even when the shopper’s route is not.
What Counts as a Journey Step
A journey step is any meaningful interaction that changes what the shopper knows, feels, or can do. Examples include viewing a category page, saving an item, comparing sizes, clicking a product recommendation, starting checkout, or completing payment. Each step should have a clear purpose and a measurable outcome.
- Discovery engagement steps: search results clicks, product page views, video starts, social profile visits, email opens that lead to a landing page.
- Purchase steps: add to cart, checkout initiation, payment completion, order confirmation page views.
A common mistake is treating “impression” as a step. Impressions are useful for reach, but they rarely explain why someone moved forward. A journey step should connect to a shopper decision.
The Journey’s Core Logic
Cross-channel journeys work best when you define three things: intent, context, and continuity.
- Intent answers “How close is this shopper to buying?” A shopper who searches “waterproof trail running shoes size 10” has different needs than someone who browses “running shoes.”
- Context answers “What constraints and preferences apply right now?” Examples include location, device type, loyalty status, shipping expectations, and whether the shopper already viewed the product.
- Continuity answers “What should carry over?” If a shopper clicks a promotion for a specific model, the landing experience should preserve that model and the offer terms.
When these three are defined, channel execution becomes simpler because each channel knows what job it is doing.
Mind Map: Cross-Channel Journey Definition
Example: One Shopper, Three Routes
Consider a shopper looking for a specific kitchen blender.
Route A: They see a short video on a social app → click to a product page → add to cart on mobile → complete checkout on desktop.
- Discovery engagement step: video click to product page.
- Continuity rule: keep the same product and price across mobile and desktop.
Route B: They search on a search engine → compare two models on your site → leave to read reviews on a partner marketplace → return via email.
- Discovery engagement step: comparison behavior.
- Continuity rule: email should reference the model they compared and include review-friendly details.
Route C: They browse a category page → save items → later click a sponsored listing → start checkout but abandon.
- Discovery engagement step: save action.
- Continuity rule: sponsored listing should match the category merchandising, and follow-up should address checkout blockers like shipping cost or delivery date.
All three routes are the same journey in structure, even though the channels differ.
Defining Boundaries So Teams Don’t Argue
A journey definition should include boundaries that prevent endless debate.
- Entry criteria: what qualifies someone to enter the journey. Example: first-time product page view for a target category, or a search click for a high-intent query.
- Exit criteria: what ends the journey. Example: purchase completion, or a time-based stop after repeated non-engagement.
- Suppression rules: what prevents redundant messaging. Example: do not send a “cart reminder” if the shopper already purchased.
These boundaries keep discovery engagement from turning into spam, and they keep purchase messaging from ignoring earlier context.
A Practical Checklist for Writing Your Definition
Use this checklist to turn a vague idea into an operational journey.
- Name the journey outcome: “Move shoppers from discovery engagement to purchase for [product/category].”
- List the top discovery engagement steps and their intent meaning.
- List the purchase steps and the exact signals that indicate readiness.
- Write continuity rules for product, offer, and messaging.
- Specify entry, exit, and suppression rules.
- Define the minimum measurement set: step outcomes and conversion.
If you can’t explain why each step exists, you probably don’t have a journey yet—you have a set of channel activities.
1.2 Mapping Touchpoints by Intent and Customer Context
Touchpoints are not just “where” a customer meets your brand; they’re “why” they’re there and “what they know” at that moment. Mapping by intent and customer context keeps teams from treating every click like the same click. A customer comparing options needs different help than a customer ready to buy, even if both actions happen on the same device.
Intent First, Then Context
Start with intent categories that reflect decision pressure. A practical set is:
- Discover: learning what exists and whether it solves a problem.
- Evaluate: comparing options, features, and tradeoffs.
- Decide: choosing a specific product or plan.
- Purchase: completing checkout.
- Post-Purchase: using the product and reducing returns.
Next, layer customer context that changes what “help” looks like. Common context dimensions include:
- Knowledge level: new to the category vs. already informed.
- Constraints: budget, shipping deadlines, compatibility requirements.
- Risk sensitivity: worried about quality, returns, or setup complexity.
- Channel familiarity: comfortable with your site vs. first-time visitor.
- Device and environment: mobile browsing vs. desktop research.
A touchpoint can serve multiple intents, but it should have one primary job. If your primary job is unclear, your content and measurement will be too.
A Systematic Mapping Method
- List touchpoints by channel and format: search results, category pages, product pages, email, social posts, retail media listings, customer support chat, and so on.
- Assign primary intent using observed behavior. Example: a user who searches “waterproof hiking boots size 11” is likely in Evaluate or Decide, not Discover.
- Attach context signals from events and attributes. Example signals: returning visitor, product viewed count, cart value, prior purchases, and whether the user has opened shipping or returns pages.
- Define the job-to-be-done in one sentence per touchpoint. Example: “Answer whether this boot fits narrow feet and ships within two days.”
- Specify the content type that matches the job. Example: comparison table, sizing guide, delivery promise, or warranty summary.
- Set success criteria that match the intent. Example: for Evaluate, measure add-to-comparison or time-to-specs; for Decide, measure checkout start or payment completion.
This method prevents a common failure mode: optimizing a Discover touchpoint for purchase metrics. If you do that, you’ll “improve” the wrong thing.
Mind Map: Intent and Context Mapping
Concrete Examples That Stay Consistent
Example 1: Search to Product Page
- Touchpoint: Search results for “cordless drill 18v brushless.”
- Primary intent: Evaluate.
- Context: likely already knows the category; may care about torque and battery compatibility.
- Mapping: Use results snippets that highlight key specs (battery system, runtime, warranty). On the product page, prioritize comparison specs and a “battery compatibility” section.
- Success criteria: product page spec engagement and add-to-comparison, not immediate purchase.
Example 2: Email After Cart Abandonment
- Touchpoint: Email triggered by cart abandonment.
- Primary intent: Decide.
- Context: risk sensitivity often spikes here; constraints may include shipping cost or delivery speed.
- Mapping: Include the exact cart items, a clear delivery estimate, and a returns reassurance block. If the user opened shipping/returns pages earlier, surface those details first.
- Success criteria: checkout return rate and checkout completion, not email opens.
Example 3: Retail Media Listing for a Returning Visitor
- Touchpoint: Sponsored product listing.
- Primary intent: Decide.
- Context: returning visitor likely has narrowed choices; they may need proof and friction removal.
- Mapping: Use creative that emphasizes availability, shipping timeline, and customer ratings. Keep the landing page aligned with the exact product and avoid forcing a category detour.
- Success criteria: product page engagement leading to add-to-cart.
Turning the Map Into Operational Clarity
Once each touchpoint has an intent and context assignment, teams can standardize decisions:
- Content writers know what to prioritize.
- Media planners know which metrics matter.
- Analysts know how to interpret performance without mixing stages.
- Support teams know what questions are likely next.
The goal is not to create a perfect diagram; it’s to make every touchpoint answer the same two questions: “What is the customer trying to do?” and “What constraints or knowledge shape the answer they need?”
1.3 Establishing Journey Objectives Measurement Scope and Success Criteria
A cross-channel journey needs objectives that are specific enough to measure, broad enough to guide decisions, and stable enough to survive normal business changes. Start by separating what you want to happen from how you will know it happened.
Step 1: Define Objectives by Outcome Type
Use three outcome types so teams don’t argue about what “success” means.
- Discovery engagement: actions that indicate interest before purchase. Example: product page views, search usage, video watch completion, or adding items to a wishlist.
- Consideration: actions that show evaluation. Example: comparing products, reading reviews, downloading specs, or viewing shipping and returns information.
- Purchase readiness: actions that move toward checkout. Example: cart additions, checkout starts, completed orders, or first-time purchase for new customers.
Example: If your journey targets “people who browsed running shoes but didn’t buy,” your objective might be: increase checkout starts within 14 days while maintaining the same or better return rate.
Step 2: Set Measurement Scope So You Don’t Measure the Wrong Thing
Measurement scope answers four practical questions.
- Who is in scope: new vs returning customers, geography, device types, or membership status.
- Which channels are included: onsite, email, paid search, social, retail media, or partner marketplaces.
- Which events count: define event names and required properties (product ID, campaign ID, timestamp, channel).
- What time window applies: decide how long after an entry event you will observe outcomes.
A common failure mode is mixing windows. For instance, using a 7-day window for email but a 30-day window for paid search makes performance comparisons meaningless.
Example scope statement: “Measure customers who viewed a product detail page on mobile in the last 30 days, exposed to email and paid search, and evaluate outcomes within 21 days of the first qualifying view.”
Step 3: Translate Objectives Into Success Criteria
Success criteria should be testable and operational. Use a simple structure: metric + direction + target + constraint.
- Metric: the primary number you will optimize.
- Direction: increase or decrease.
- Target: a specific threshold.
- Constraint: a guardrail metric that must not worsen.
Example success criteria for a “browse-to-cart” journey:
- Primary metric: checkout starts per 1,000 qualifying visitors increase by 12%.
- Constraint: refund rate stays within ±0.5 percentage points.
If you only set the primary metric, teams may chase clicks that don’t convert or that increase returns. Constraints keep the journey honest.
Step 4: Choose Attribution Rules That Match the Journey Design
Attribution is not a moral judgment; it’s a bookkeeping method. Pick rules that align with how customers actually move.
- Last touch within journey: credit the most recent journey touchpoint before conversion.
- First touch within journey: credit the entry touchpoint that started the journey.
- Multi-touch with weights: distribute credit across touches using defined weights.
Example: If your journey is triggered by a browse event, first-touch attribution often matches reality better than last-touch, because the browse event is the true entry signal.
Step 5: Create a Measurement Plan with Event Definitions
Write down event definitions so the same action means the same thing everywhere.
- Entry event: “Product detail page view with product category = Running Shoes.”
- Engagement events: “Wishlist add,” “Compare click,” “Video watch > 50%.”
- Conversion events: “Cart add,” “Checkout start,” “Order completed.”
Also define exclusions: suppress customers who already purchased the same SKU in the last 30 days, or who are ineligible due to region restrictions.
Mind Map: Objectives, Scope, and Success Criteria
Example: Turning a Brief Into Measurable Criteria
Brief: “Help people who viewed a specific category return to complete purchase.”
- Entry event: category page view OR PDP view in category “Running Shoes.”
- Scope: customers in the US, mobile and desktop, onsite + email + paid search.
- Time window: 21 days after entry.
- Primary success metric: checkout starts per 1,000 entry events.
- Constraint: average order value not lower than the baseline by more than 3%.
- Attribution rule: first-touch within the journey for entry-triggered journeys.
With this structure, teams can build the journey, instrument the events, and evaluate results without debating definitions midstream.
1.4 Building a Shared Vocabulary for Marketing Commerce and Experience Teams
A shared vocabulary prevents the classic problem where two teams describe the same thing with different words, then argue about “facts” that are really definitions. Start by agreeing on terms that show up in planning, execution, and measurement: what a customer is doing, what a system does, and what success means.
Step 1: Define the Journey Objects Everyone Uses
Treat the journey as a set of objects, not a story. Marketing teams usually talk about audiences and messages; commerce teams talk about products, inventory, and pricing; experience teams talk about pages, components, and flows. Your vocabulary should name the objects each team touches.
Use a simple three-layer model:
- Customer intent: why the customer is there (browse, compare, buy, replenish).
- Experience surface: where the interaction happens (search results, product detail page, email, sponsored listing).
- Commerce action: what changes in the shopping system (viewed item, added to cart, applied promo, completed checkout).
Example: A “promo email” is not a vocabulary term by itself. Break it into objects: intent (compare), surface (email), and action (applied promo).
Step 2: Standardize Terms for Events and Outcomes
Teams often mix “events” and “outcomes.” An event is something that can be logged; an outcome is something you care about.
Adopt this rule:
- Event answers: “What happened?”
- Outcome answers: “What improved?”
Example event set for a product page:
product_viewedvariant_selectedadd_to_cart_clickedcheckout_started
Example outcomes:
- “More customers reach checkout”
- “Higher add-to-cart rate for size selection users”
Keep outcome definitions measurable. If someone says “engagement,” require a specific event or metric behind it.
Step 3: Create a Glossary with Ownership and Examples
A glossary without examples becomes a dictionary contest. For each term, include:
- Plain-language definition
- Where it appears (brief, ticket, dashboard)
- Who owns it (data owner, content owner, experience owner)
- One good example and one bad example
Example entries:
- Surface: “A UI or channel location where a customer interacts.”
- Good: “Search results page.”
- Bad: “A campaign.”
- Offer: “The specific commercial condition shown to the customer.”
- Good: “10% off plus free shipping over $50.”
- Bad: “A discount.”
- Suppression: “A rule that prevents messaging or personalization for a defined group.”
- Good: “Do not email customers who purchased in the last 7 days.”
- Bad: “Don’t send too often.”
Step 4: Align on Segments and Eligibility Rules
Segments are where vocabulary breaks most often. Marketing may define segments by demographics; commerce may define them by purchase history; experience may define them by on-site behavior. Your shared vocabulary should separate:
- Segment criteria: the logic that selects people
- Eligibility: whether they can receive a specific action right now
Example: “Cart abandoners”
- Segment criteria: users with
add_to_cart_clickedbut nocheckout_completedin 24 hours. - Eligibility: only those with in-stock items and consent to receive email.
This avoids the situation where a segment exists but the system refuses to act.
Step 5: Use a Common Naming Convention for Assets
When teams name things differently, reporting becomes guesswork. Define naming conventions for:
- campaign identifiers
- creative variants
- landing page templates
- product feed versions
Example convention:
stage_intent_surface_offer_variant
So a label like compare_search_freeShip_v2 tells you the intent, surface, offer type, and creative variant without opening a spreadsheet.
Mind Map: Shared Vocabulary Building Blocks
Case Example: One Brief, Three Team Views
A single brief should map to the same objects:
- Marketing writes: “Email for compare intent with a free-shipping offer.”
- Commerce writes: “Offer is valid for in-stock SKUs; inventory must be synced before send.”
- Experience writes: “Email deep-link goes to the product page with the selected variant prefilled.”
If each team uses the same terms—intent, surface, offer, eligibility, and event/outcome—then the handoffs become checklists instead of negotiations.
Quick Reference Checklist for the First Workshop
- Every term has a definition, owner, and example.
- Every metric ties to an event or a computed rule.
- Every segment has criteria and eligibility constraints.
- Every asset name follows the same pattern.
When this is in place, teams spend less time translating and more time fixing the actual problem: the customer experience and the commerce outcome.
1.5 Documenting Journey Assumptions with Evidence from Data and Research
Cross-channel journeys fail quietly when assumptions go undocumented. This section gives you a practical way to write down what you believe, prove it with evidence, and keep the record usable for teams who weren’t in the room when the idea was formed.
Step 1: Separate Assumptions from Observations
Start with a simple rule: observations describe what happened; assumptions describe why you think it happened.
- Observation example: “Customers who view size guides have a higher add-to-cart rate.”
- Assumption example: “Size guides reduce uncertainty, so customers feel confident enough to add to cart.”
Write each assumption as a single sentence that includes a mechanism. If you can’t name the mechanism, you probably don’t have enough evidence yet.
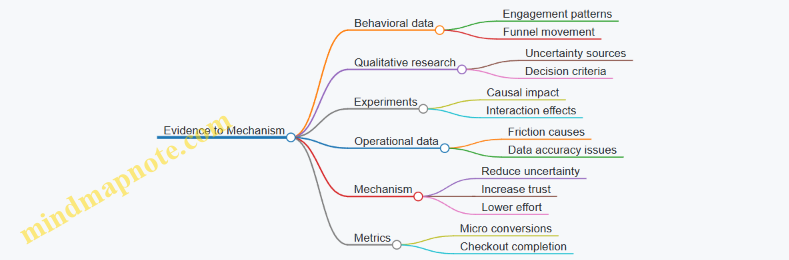
Step 2: Choose the Right Evidence for Each Assumption
Not all evidence answers the same question. Use a small evidence menu so you don’t mix apples and dashboards.
- Behavioral data answers “What did customers do?” Examples: click paths, time on page, scroll depth, repeat visits.
- Experiment results answer “Did changing X change Y?” Examples: A/B tests on messaging, offer placement, or page layout.
- Qualitative research answers “What did customers think or feel?” Examples: usability interviews, support ticket themes, survey comments.
- Operational data answers “Was the system working?” Examples: inventory availability, shipping promise accuracy, checkout errors.
When evidence is missing, document that gap explicitly. A blank field is still information; it tells you what to test next.
Step 3: Build an Assumption Record That Teams Can Use
Use a consistent template so the record stays readable during planning, QA, and post-launch review.
Assumption record fields
1. Assumption statement (mechanism included)
2. Journey stage (discovery, consideration, purchase, post-purchase)
3. Target audience (segment or persona definition)
4. Expected customer behavior (observable metric)
5. Expected business outcome (revenue, margin, retention, reduced returns)
6. Evidence sources (data sets, study types, time window)
7. Confidence level (high/medium/low based on evidence strength)
8. Risks and failure modes (what would disprove the assumption)
9. Validation plan (how you will test or monitor)
Example assumption record
- Assumption: “Showing delivery estimates earlier reduces checkout hesitation, increasing conversion.”
- Stage: Consideration
- Audience: First-time visitors from paid search
- Expected behavior: Higher click-through from product page to cart
- Expected outcome: Higher purchase conversion rate
- Evidence: Product page analytics showing delivery-widget engagement; 2026-03-28 usability notes where participants asked about timing
- Confidence: Medium
- Risks: If delivery estimates are inaccurate, engagement could increase without conversion
- Validation plan: A/B test delivery estimate placement and monitor conversion and checkout error rates
Step 4: Connect Evidence to Customer Logic
Evidence becomes useful when it maps to a customer logic chain. Write the chain as “If customers experience X, then they will do Y.”
- If customers understand fit and care instructions
- then they reduce perceived risk
- so they add to cart and complete checkout
This logic chain helps you avoid confusing correlation with causation. It also makes it easier to spot missing evidence. If the chain includes “reduce perceived risk,” you need either qualitative support or an experiment that changes risk cues.
Step 5: Use Mind Maps to Keep Assumptions Coherent
A mind map helps you see whether assumptions are isolated guesses or part of a connected model of the journey.
Mind Map: Assumption Documentation Model
Mind Map: Evidence to Mechanism Mapping
Step 6: Validate with Clear Decision Rules
Validation should not be “see what happens.” Define decision rules that connect back to the assumption.
- Pass condition example: “If conversion increases by at least 2% with no rise in returns, keep the change.”
- Fail condition example: “If engagement rises but conversion does not, the cue may be interesting but not decision-relevant.”
Also specify what you will monitor for operational failure modes, such as inventory mismatches or shipping promise errors. A journey can look effective until the system breaks at the last step.
Step 7: Keep the Record Alive After Launch
After launch, update the assumption record with what you learned. Replace “expected” with “observed,” and note whether the mechanism held.
A good record answers three questions quickly:
- What did we believe?
- What evidence supported it?
- Did it work, and why?
When those answers are written down, cross-channel teams stop re-litigating the same ideas and start improving the journey with fewer surprises.
2. Customer Data Architecture for Journey Orchestration
2.1 Designing Identity Resolution for Omnichannel Customer Profiles
Identity resolution is the process of deciding which events and attributes belong to the same real person across channels. In commerce journeys, it matters because a “view” on mobile and a “purchase” on desktop are only useful together if you connect them to the same customer profile. The goal is not perfect certainty; it’s consistent, explainable matching that supports activation and measurement.
Start with the Data You Actually Have
Begin by listing identity signals by reliability. Typical sources include:
- Deterministic identifiers: email, phone number, customer ID, loyalty ID.
- Semi-deterministic identifiers: hashed email, hashed phone, account-linked social IDs.
- Probabilistic identifiers: device IDs, browser cookies, IP-derived location, user agent patterns.
- Contextual attributes: shipping country, language, recent cart contents.
A practical rule: treat deterministic identifiers as “join keys,” and treat probabilistic identifiers as “assist keys.” If you try to force probabilistic signals to behave like deterministic ones, you’ll create confident wrong merges.
Define Identity Entities and Their Lifecycles
Create a clear model for what you store.
- Person: the human-level profile with stable attributes and consent state.
- Account: an optional container for logged-in behavior.
- Device: browser/app identifiers that can change over time.
- Session: time-bounded activity.
- Event: the atomic record you want to attribute.
Then define lifecycle rules. For example, a device can map to different persons over time, while an account usually maps to one person. Sessions should always link to a device and optionally to a person if the user is authenticated.
Use a Matching Strategy That Produces a Score and a Reason
A robust approach uses layered matching:
- Exact match: same customer ID, or same normalized email.
- Hash match: same hashed email/phone when raw values are not stored.
- Link match: account linking events like “user logged in on this device.”
- Probabilistic match: combine device similarity, recent activity overlap, and contextual consistency.
Each match should output:
- Match score
- Match reason (which signals contributed)
- Confidence tier (high, medium, low)
This is how you keep the system auditable. When a customer complains that they received the wrong offer, you need to know which signals caused the merge.
Normalize Inputs Before You Match
Identity resolution fails quietly when inputs are inconsistent. Normalize:
- Email: trim spaces, lowercase, remove dots only if your business rules allow it.
- Phone: country code handling and digit-only formatting.
- Names: store raw and normalized forms; don’t use name alone for matching.
- Address fields: avoid using full addresses as primary keys due to formatting variance.
Normalization should be deterministic and documented so the same input always yields the same canonical form.
Handle Consent and Privacy Without Breaking Matching
Consent affects what you can store and how you can activate. Keep consent state at the person level, but allow event ingestion at the event level when permitted. If consent is withdrawn, you may still need historical attribution for reporting, but you should stop using the profile for targeted activation.
Mind Map: Identity Resolution Components
Example: From Anonymous Browsing to a Unified Profile
A shopper browses on mobile without logging in. The system records events linked to a device and session.
Later, they log in on the same device using an email address. At login time:
- You create or retrieve the person by deterministic email match.
- You link the current device and past sessions to that person.
- You mark the merge as high confidence with reason “authenticated email match.”
Now a desktop purchase event can be attributed to the same person even if the desktop device is different. The journey becomes coherent: browse → login → purchase.
Example: Avoiding a Wrong Merge
Two customers share the same device in a household. Both browse, but only one logs in.
- If you merge based on device alone, you’ll mix carts and send the wrong follow-up.
- Instead, keep device-linked events separate until a deterministic identifier appears.
- When the logged-in email arrives, only then link that person to the device for the relevant time window.
Case Study: A Practical Matching Workflow
On 2026-03-15, a team introduced a two-tier policy:
- Tier 1 merges only on deterministic or link matches.
- Tier 2 uses probabilistic matches only to suggest candidate merges for review.
Result: fewer incorrect merges, and analysts could explain why profiles changed because every Tier 2 suggestion included a match reason and contributing signals.
Implementation Notes for a Clean Audit Trail
Store an explicit identity link table with fields like person_id, device_id, confidence tier, match reason, and effective time range. This turns identity resolution from a black box into a traceable set of decisions—useful for debugging, measurement, and customer support.
2.2 Unifying Events Product Catalog and Content Metadata
Unifying events, the product catalog, and content metadata means every “what happened” can be explained by “what was shown” and “what it referred to.” Without this, analytics becomes a pile of timestamps with no meaning, and personalization becomes guesswork with better dashboards.
Core Idea: One Customer Action, Three Linked Truths
When a user clicks, views, searches, or adds to cart, you want three linked records:
- Event: the action and context (who, what, when, where).
- Catalog entity: the product or offer being referenced (SKU, brand, price rules, availability).
- Content metadata: the creative and page context (template, module type, campaign, placement, language).
A practical rule: every event must carry stable identifiers that let you join to catalog and content metadata without fuzzy matching.
Step 1: Define Stable Identifiers Before You Touch Data
Start with identifiers that do not change when marketing teams rename things.
- Product identifiers: prefer SKU or a canonical product ID over display names.
- Content identifiers: use content IDs for modules, landing pages, and creatives.
- Placement identifiers: represent where content appeared (e.g., PDP hero, search results slot 3).
Example: if an event says “viewed product,” it should include product_id. If it says “clicked banner,” it should include content_id and placement_id.
Step 2: Create a Canonical Catalog Model That Events Can Reference
Your catalog model should separate concerns:
- Merchandising attributes: category, brand, size, color.
- Commerce attributes: price, currency, promotions, inventory status.
- Decision attributes: eligibility flags like “shippable to region” or “requires prescription.”
Events should reference the catalog with a single product_id, while the catalog provides the rest. This prevents events from duplicating product details that later change.
Step 3: Model Content Metadata as Page and Module Context
Content metadata answers: “What exactly was shown, and how was it assembled?”
- Page context: page type, URL pattern, locale.
- Module context: recommendation block, search results list, comparison widget.
- Creative context: campaign ID, variant ID, CTA label.
Keep module metadata granular enough to explain behavior differences. If you only store “homepage banner,” you cannot tell whether clicks came from the hero image or the secondary CTA.
Step 4: Standardize Event Payloads with Joinable Keys
A unified schema makes joins predictable. Here is a minimal event payload pattern:
{
  "event_id": "evt_0001",
  "event_type": "product_view",
  "timestamp": "2026-03-15T10:22:31Z",
  "customer_id": "cust_123",
  "product_id": "SKU_9A12",
  "content_id": "mod_rec_77",
  "placement_id": "pdp_reco_hero",
  "session_id": "sess_44",
  "device": "mobile"
}
The key is that product_id and content_id are stable join keys, not derived labels.
Step 5: Handle Many-to-Many Relationships Without Losing Meaning
One event can involve multiple products (e.g., a carousel view), and one content module can show different products over time. Use event-to-entity linking:
- Event header: the action and context.
- Event line items: each product shown or interacted with.
This keeps “viewed carousel” from pretending it was “viewed one product.”
Step 6: Validate with Consistency Checks That Catch Real Errors
Run checks that compare event references to catalog and content tables:
- Orphan references: event has
product_idnot found in catalog. - Stale content IDs: content metadata missing for
content_id. - Placement mismatch:
placement_idnot compatible with the page type.
Fixing these early prevents silent data corruption later.
Mind Map: Unifying Events, Catalog, and Content Metadata
Example: From Click to Meaningful Insight
Suppose a user clicks a “recommended bundle” module on a PDP.
- The event records
event_type=click,product_idfor the clicked item, andcontent_idfor the recommendation module. - The catalog resolves the clicked item’s attributes and eligibility.
- The content metadata explains that the module was a “bundle recommendation” variant on the PDP hero placement.
Now you can measure not just clicks, but which module type and placement produced clicks for eligible products, and whether the clicked item’s catalog attributes align with the module’s intent.
2.3 Implementing Consent and Preference Management for Commerce Journeys
Consent and preferences are the guardrails that keep personalization lawful, respectful, and operationally consistent. In cross-channel commerce journeys, the tricky part is not collecting consent once, but using it correctly everywhere: when triggering emails, when showing personalized recommendations, and when deciding whether to measure behavior for optimization.
Core Concepts and Data Boundaries
Start by separating three ideas that often get mixed together:
- Consent answers whether you may process specific categories of data for specific purposes. Example: “May we use browsing behavior to personalize product recommendations?”
- Preferences answer what the customer wants to receive or how they want it delivered. Example: “Send me weekly deals by email.”
- Identity and scope answer whose data you are using and which channels are allowed. Example: “This preference applies to email only, not SMS.”
A practical rule: consent is about permission; preferences are about choice; scope is about where the choice applies.
Consent Lifecycle from Capture to Enforcement
A robust lifecycle has five steps.
- Capture at the moment of relevance. Example: show a consent banner on first visit, but also provide a preference center link in the checkout confirmation page.
- Record with purpose, legal basis, timestamp, and version. Example: if you change the wording of a purpose, treat it as a new version so you can prove what the customer agreed to.
- Normalize into a machine-readable policy model. Example: map “marketing emails” and “behavioral personalization” into internal purpose codes.
- Enforce at decision points. Example: if consent is withdrawn for personalization, stop recommendation personalization immediately, but keep transactional emails running.
- Audit changes. Example: log who updated preferences (customer vs. support agent) and what changed.
Preference Center Design That Customers Can Actually Use
A preference center should reduce confusion and prevent accidental lockouts.
- Granular toggles for channel and message type. Example: separate “Product updates” from “Promotions.”
- Clear defaults that match your consent model. Example: if personalization consent is off, the “Recommended for you” toggle should be disabled or explain why.
- Easy reversal. Example: one click to opt out of promotional emails without affecting order updates.
- Channel-specific rules. Example: SMS may require explicit consent even if email consent exists.
A small but important detail: show the effect of each choice. Example: “If you turn this off, we will still send shipping confirmations.”
Operational Enforcement in Cross-Channel Journeys
Enforcement should happen where actions are triggered, not only in reporting.
Email trigger example:
- Event: user browses a category.
- Decision: if personalization consent is granted, include recommended items; if not, send a generic category reminder.
- Delivery: if marketing email consent is absent, suppress the entire promotional email but allow transactional messages.
Retail media example:
- If a customer opted out of behavioral measurement, avoid using their browsing events to build audience segments.
- Still allow contextual targeting based on page category, because it does not rely on the opted-out behavioral profile.
Mind Map: Consent and Preference Management
Example: A Simple Policy Model and Decision Logic
Use a policy table that maps purposes to allowed actions.
Purpose codes:
- PERS_RECO: personalize recommendations
- MKT_EMAIL: send marketing emails
- MEAS_BEHAV: measure behavior for optimization

Decision inputs:
- consent[PERS_RECO]
- consent[MKT_EMAIL]
- consent[MEAS_BEHAV]
- preference[email_frequency]

Actions:
- include_recommendations = consent[PERS_RECO]
- send_marketing_email = consent[MKT_EMAIL]
- enable_behavioral_optimization = consent[MEAS_BEHAV]
Then apply it at runtime. Example: if consent[MKT_EMAIL] is false, you do not schedule the promotional flow at all, even if preference[email_frequency] says “weekly.”
Case Study: Handling Withdrawal Without Breaking Journeys
Consider a customer who initially agreed to marketing emails and personalization on 2026-03-20, then withdraws personalization while keeping marketing emails.
- Before withdrawal: browse event triggers an email with recommended products.
- After withdrawal: the same browse event still triggers an email if marketing consent remains, but the email switches to a non-personalized template.
- Measurement impact: if behavioral measurement was tied to personalization, stop using those events for optimization, but keep the email delivery logic intact.
This approach prevents “all-or-nothing” failures and keeps the journey coherent while honoring the updated consent state.
2.4 Creating Segments That Support Real-Time Activation
Real-time activation works only when your segments are both meaningful and operational. Meaningful means they reflect customer intent or needs. Operational means they can be computed quickly, updated reliably, and used immediately by downstream systems like email, ads, and on-site personalization.
Segment Foundations That Make Activation Possible
Start with a segmentation goal. For example, you might want to trigger a “ready to buy” message when someone shows strong product interest, or suppress reminders when someone already purchased. Then define the decision boundary: what event or state qualifies a customer for the segment.
A practical segment definition includes four parts:
- Identity scope: which customer identifiers you will match (logged-in user ID, email hash, device ID). If you mix identifiers without rules, your segment will look inconsistent across channels.
- Eligibility rules: what must be true to enter the segment (e.g., viewed a product in the last 30 minutes and has not purchased it).
- Exclusion rules: what removes the customer (e.g., purchased, opted out, or reached a frequency cap).
- Time window: how long the segment remains valid after the triggering event (e.g., 2 hours for “high intent,” 7 days for “considering”).
These parts prevent the common failure mode where segments are “nice to have” reports but cannot drive immediate actions.
Designing Segments for Speed and Consistency
Real-time systems need segments that can be computed from recent events and stable attributes. Keep segment logic event-light and attribute-stable.
- Event-light logic: prefer one or two key events over long chains. For instance, “added to cart” is stronger and simpler than “viewed category, then viewed brand, then compared.”
- Attribute-stable logic: use catalog fields that change infrequently, like category, price band, or shipping eligibility. If you depend on frequently changing fields, your segment may flip during activation.
Also decide where the truth lives. If your activation platform uses a segment service, that service should be the source of segment membership. If each channel computes membership separately, you will get mismatched audiences and confusing results.
Segment Types That Map Cleanly to Touchpoints
Use a small set of segment patterns so teams can reuse logic.
- Behavioral intent segments: based on recent actions.
- Lifecycle segments: based on relationship stage like new visitor, first-time buyer, repeat buyer.
- Preference segments: based on declared interests or browsing affinity.
- Suppression segments: based on purchase completion, returns, or opt-out.
Example: For a home fitness store, a behavioral intent segment might target customers who viewed “adjustable dumbbells” in the last 60 minutes. A suppression segment would remove anyone who purchased that exact product within the last 24 hours.
Mind Map: Segment Design for Real-Time Activation
Operational Checks That Prevent “It Worked in Testing”
Before you activate, validate four operational properties:
- Update frequency: how quickly membership changes after events arrive. If your event pipeline lags by 10 minutes, a “last 30 minutes” segment becomes effectively “last 20 minutes.”
- Latency budget: the maximum time from event to action. For example, if email sending takes 2 minutes after segment update, your segment window should be long enough to tolerate that delay.
- Frequency caps: segments should not cause repeated triggers. If someone stays in “high intent” for 2 hours, you still need a rule like “send at most one email per 24 hours.”
- Channel mapping: confirm that the segment’s eligibility aligns with each channel’s constraints. Ads may require a minimum audience size; on-site personalization may require product-level context.
Example: A Segment That Drives One Clear Action
Consider a skincare brand launching a “routine builder” quiz.
- Trigger event: user completes the quiz.
- Eligibility: quiz result indicates “sensitive skin,” and the user has not purchased in the last 30 days.
- Exclusion: user opted out of email.
- Time window: membership lasts 14 days.
Activation: send a single email with a tailored routine recommendation and a link to a pre-filtered product page. If the user purchases after the email, the suppression rule removes them immediately so they do not receive follow-up reminders.
This segment is effective because it is specific (quiz result), operational (clear rules), and safe (suppression and caps). It also stays consistent across channels because membership is computed once and reused.
Example: Segment Logic That Avoids Overfitting
A tempting but fragile segment is “viewed product page three times and spent 20+ seconds each time.” It often breaks when page load times vary or when users scroll without clicking.
A more robust alternative is “viewed product page and returned to the site within 2 hours without purchasing.” It still captures intent, but it relies on fewer assumptions about behavior mechanics.
When you keep segment logic stable and grounded in observable events, real-time activation becomes predictable rather than mysterious.
2.5 Governance for Data Quality Catalog Accuracy and Event Integrity
Cross-channel journeys fail in boring ways: product pages show the wrong price, recommendations point to out-of-stock items, or analytics reports “mysteriously” disagree with what customers experienced. Governance prevents those failures by treating catalog data and event streams as operational assets with clear ownership, rules, and checks.
Core Principles for Governance
Start with three principles. First, define what “correct” means for each data type. For catalog attributes, correctness includes product identity, availability, and pricing rules. For events, correctness includes event meaning, required fields, and timing. Second, assign ownership. Catalog governance needs product data owners and commerce ops owners; event governance needs analytics engineering and marketing operations owners. Third, enforce consistency through validation at the source and reconciliation downstream.
A practical way to make this concrete is to write a Data Quality Contract for each dataset. The contract lists required fields, allowed values, freshness expectations, and how to handle missing or conflicting data. If you cannot describe the contract in plain language, you do not yet have governance.
Catalog Accuracy Controls
Catalog accuracy is mostly about identity and state. Identity answers “is this the same product across systems?” State answers “is it available and sellable right now?”
-
Stable Product Identity: Use a single canonical product ID and map all upstream IDs to it. When a supplier changes SKUs, you update the mapping rather than creating a new product record.
-
Attribute Completeness: Require minimum fields for journey use, such as title, brand, category, image URL, and variant identifiers. If a field is missing, your journey should degrade gracefully, like showing a generic product tile instead of breaking the layout.
-
Pricing and Promotion Rules: Store base price and promotion adjustments separately. That separation prevents double-discount bugs when multiple systems apply offers.
-
Availability and Sellability: Availability should reflect inventory and purchase constraints. For example, “in stock” is not enough if the item is restricted to certain shipping regions.
-
Change Management: Every catalog update should carry a reason code. “Corrected image” and “price change” are not the same operational event, and they should trigger different validation checks.
Event Integrity Controls
Event integrity is about meaning and traceability. A “view_item” event must always represent the same customer action with the same schema.
-
Event Schema Versioning: Lock event field names and types. When you change the schema, version it and keep backward compatibility for a defined window.
-
Required Fields and Constraints: Define required fields such as event timestamp, session or user identifiers, canonical product ID, and page or placement context. Add constraints like “quantity must be a positive integer.”
-
Deduplication and Ordering: Mobile apps and browsers can resend events. Use idempotency keys (for example, event_id) and define ordering rules for sequences like add-to-cart followed by purchase.
-
Timestamp Discipline: Use event time for behavioral analysis, but also capture ingestion time for operational monitoring. If ingestion delays spike, your journey logic may appear “late.”
-
Attribution-Ready Context: Events should include the information needed to connect discovery engagement to purchase, such as campaign ID, placement, and creative variant when applicable.
Reconciliation and Monitoring
Governance is not complete until you reconcile. Reconciliation compares what systems say happened with what the commerce system actually fulfilled.
-
Catalog Reconciliation: For each product shown in a journey, verify that the canonical ID exists, images render, and sellability matches the journey’s logic. If a product becomes unsellable, suppress it.
-
Event-to-Outcome Reconciliation: Compare purchase events against order records. If purchase events are missing product IDs, fix the tracking source rather than patching reports.
-
Quality Dashboards: Track completeness rates, schema error counts, deduplication rates, and mismatch rates between event product IDs and catalog product IDs.
Mind Map: Governance Scope and Checks
Example: A Simple Governance Workflow
Imagine a “browse abandonment” journey that targets users who viewed a product but did not purchase. The workflow should include three gates.
-
Catalog Gate: Before sending the email, confirm that the canonical product ID exists, has a valid image, and is sellable for the customer’s region. If not, suppress the product and send a category-based alternative.
-
Event Gate: Confirm that the “view_item” event includes the canonical product ID and a valid timestamp. If the product ID is missing, do not infer it from page URLs; instead, mark the event as invalid and alert the tracking owner.
-
Reconciliation Gate: After the campaign runs, compare the number of “purchase” events for those product IDs against orders. If purchases are present in orders but absent in events, the issue is tracking coverage, not customer behavior.
Example: Data Quality Contract Snippet
A Data Quality Contract can be written as a checklist used by both engineering and operations.
-
Product dataset
- Required fields: canonical_id, title, brand, category, image_url, variant_id
- Sellability logic: inventory > 0 AND region allowed AND not discontinued
- Freshness: updated at least every 24 hours
- Failure behavior: suppress product tiles and fall back to category
-
Event dataset
- Required fields: event_name, event_time, canonical_product_id, session_id, page_context
- Constraints: quantity >= 1 for add_to_cart
- Deduplication: idempotency_key required
- Failure behavior: drop invalid events and log schema errors
Governance works when it is operational: contracts define correctness, gates prevent bad data from reaching customers, and reconciliation proves whether your journey story matches reality.
3. Channel Roles and Experience Patterns That Drive Conversion
3.1 Assigning Channel Functions Across the Journey Lifecycle
Channel functions are easiest to manage when you treat each channel as a job role, not a marketing costume. The goal of this section is to define what each channel should do at each stage of the journey, then translate those definitions into practical rules for content, timing, and measurement.
Start with Journey Stages and Decision Moments
A cross-channel commerce journey usually includes discovery, consideration, intent, and purchase. Within each stage, customers face decision moments that are different in kind. For example, discovery decisions are about relevance (“Is this for me?”), consideration decisions are about comparison (“How does it stack up?”), intent decisions are about friction (“Can I buy this easily?”), and purchase decisions are about confidence (“Will this work for me?”).
Assign channel functions by matching channel strengths to those decision moments.
- Discovery: channels that broaden reach and help customers self-identify.
- Consideration: channels that explain differences and reduce uncertainty.
- Intent: channels that remove friction and bring customers back to the exact path.
- Purchase: channels that confirm the order and prevent post-purchase regret.
Define Channel Roles Using a Simple Function Matrix
A channel role should include four elements: purpose, primary customer action, required content type, and success signal.
- Purpose: what job the channel performs in the journey.
- Primary customer action: what the customer should do next.
- Required content type: what the channel must show to make that action easy.
- Success signal: what you measure to confirm the job is done.
Example roles:
- Search: intent capture. Purpose is to meet active demand. Primary action is clicking a product or category result. Content is accurate titles, pricing cues, and relevant filters. Success is qualified clicks and add-to-cart rate from search sessions.
- Paid social: discovery and early consideration. Purpose is to help customers find a product category or use case. Primary action is landing-page engagement or product page views. Content is use-case framing and clear product benefits. Success is product page views and downstream conversion within a defined window.
- Email: consideration to intent. Purpose is to bring back shoppers with context. Primary action is returning to a specific product or category. Content is dynamic product blocks and helpful reminders. Success is click-through to the intended destination and conversion from those clicks.
- Retail media: purchase acceleration. Purpose is to place products where shoppers already compare. Primary action is clicking sponsored listings. Content is catalog-accurate product cards and consistent offer terms. Success is purchase rate and return on ad spend at the SKU or category level.
Set Boundaries So Channels Don’t Step on Each Other
Channel overlap is normal, but unmanaged overlap causes inconsistent experiences. Create boundaries using three rules.
- One channel owns the “next step.” If a customer is in intent, the next step should be clear and consistent across channels. Email should not send them to a generic homepage when the site search result page would be more direct.
- One offer policy governs all channels. If free shipping is available for a segment, every channel must reflect the same eligibility and expiration date.
- One suppression logic prevents duplicates. If a customer converts, they should stop receiving messages that assume they are still browsing.
A practical example: a shopper views a product page, then leaves. Search ads may still run, but email should focus on the exact product and include the same price and shipping terms shown on the landing page. If the shopper adds to cart but abandons, email shifts to cart recovery while paid search can reduce bids to avoid paying twice for the same return.
Translate Roles Into Operational Touchpoint Patterns
Once roles and boundaries are clear, define touchpoint patterns that teams can reuse.
- Discovery pattern: paid social or display introduces a category landing page with filters that match the ad’s promise.
- Consideration pattern: email sends a comparison-oriented message after a product page view, linking to a page that highlights key differences.
- Intent pattern: search and retargeting focus on product pages and cart paths, with friction checks like stock status and delivery estimates.
- Purchase pattern: post-purchase email confirms order details and sets expectations for delivery and returns.
Each pattern should specify entry criteria, content requirements, and the measurement event. For instance, “entry criteria = product page view in the last 7 days” and “measurement event = add-to-cart within 48 hours.”
Mind Map: Channel Functions by Journey Stage
Example: Assigning Roles for a Single Product Launch
Imagine a new running shoe arrives on March 15, 2026. The channel assignment could look like this:
- Discovery: paid social runs creative that highlights “daily trainer” use cases and links to a category page with price and size filters.
- Consideration: email sends after product page views, showing top-rated features and a short “fit guide,” linking back to the same product page.
- Intent: search bids prioritize the shoe name and model number, while cart recovery email triggers only for shoppers who started checkout.
- Purchase: retail media sponsors the SKU on relevant category pages, and transactional email confirms delivery estimates and return eligibility.
The key is that every channel’s job matches the customer’s current decision moment, and every message points to the next step that makes sense for that moment.
3.2 Using Search and Browse Patterns to Capture High Intent Demand
High intent usually shows up as behavior, not as a label. The job of this section is to translate search and browse signals into practical actions: what to show, where to show it, and how to avoid wasting attention on people who are still exploring.
Start with Intent Signals You Can Actually Observe
Search intent is easiest to spot because it comes with words. Browse intent is trickier because it comes from movement: what categories someone opens, how far they scroll, and whether they compare items.
Use three signal types and keep them separate in your logic:
- Query intent: the meaning of what someone typed.
- Navigation intent: the meaning of where someone went.
- Interaction intent: the meaning of what they did next (click, refine, add to cart, save).
Example: A shopper searches “waterproof hiking boots wide toe box.” That’s query intent with strong specificity. Another shopper lands on “Boots > Hiking” and then filters by “Wide” and “Waterproof.” That’s navigation plus interaction intent, even without a precise query.
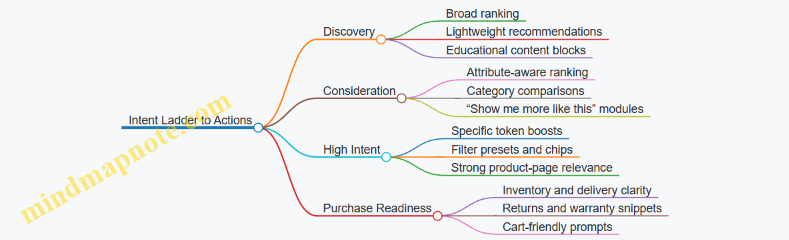
Build a Simple Intent Ladder
Before you optimize anything, define an intent ladder that maps signals to stages. Keep it small so it’s usable by teams.
- Stage 1: Discovery — broad queries or category browsing with minimal refinement.
- Stage 2: Consideration — mid-specific queries or repeated browsing of a few related categories.
- Stage 3: High Intent — specific queries, strong refinements, or comparison behavior.
- Stage 4: Purchase Readiness — cart actions, checkout starts, or repeated product-page visits.
Example: “running shoes” is Stage 1. “women’s stability shoes size 8” is Stage 2. “size 8 stability shoes with gel cushioning” is Stage 3. “size 8 stability shoes gel cushioning free returns” often lands in Stage 4 because it includes decision friction reducers.
Mind Map: Search and Browse Pattern to Action
Translate Patterns Into Concrete Rules
You need rules that are understandable and testable. Start with four rule families.
-
Specificity threshold: treat queries with multiple attribute tokens as higher intent.
- Example: “leather belt 34 brown” outranks “belt” because it names material, size, and color.
-
Refinement density: count how many filters are applied in a short session.
- Example: If someone selects “Waterproof,” “Wide,” and “Men’s” within one session, they’re likely comparing options, not browsing randomly.
-
Repeat behavior: multiple visits to the same product category or brand suggests narrowing.
- Example: Two separate sessions returning to “Trail Running Shoes” with different sizes often indicates active selection.
-
Attribute overlap: match what the user is signaling to what you can fulfill.
- Example: If a user filters for “compatible with iPhone 15,” show accessories that actually list that compatibility rather than generic “fits most phones.”
Use Search Results to Confirm Intent, Not Just Display Products
High intent capture fails when the search page looks like a generic catalog. Instead, make the first screen do two jobs: confirm the user’s constraints and reduce the next decision.
Practical approach:
- Show a top set of results that match the most specific tokens.
- Surface refinement chips that reflect the user’s likely next step.
- Add a small “decision support” block when the query includes friction reducers.
Example: For “warranty 5 years outdoor speakers,” prioritize results with the warranty term and include a short snippet that states warranty length and coverage conditions.
Use Browse Patterns to Trigger the Right Merchandising
Browse behavior should change what appears on category pages and product recommendation modules.
Example workflow:
- User enters “Outdoor Jackets,” then filters by “Insulated” and “Windproof.”
- On the category page, reorder subcategories to “Insulated Windproof” first.
- In product modules, emphasize items that match both filters and show “temperature range” or “layering guidance” if those attributes are present in your catalog.
This is not personalization for its own sake. It’s a way to keep the user from redoing work they already signaled.
Mind Map: Intent Ladder to On-Site Actions
Validate with Session-Level Checks
Don’t rely on aggregate conversion alone. Validate that high-intent capture is working by checking whether the next step becomes easier.
Use these session checks:
- After a high-intent query, does the user apply fewer filters to reach a product page?
- After a high-intent browse pattern, do they click product cards more quickly?
- Do users who show purchase readiness get the right friction reducers (returns, delivery, warranty) without hunting?
Example: If “wide toe box” queries are high intent, but users still apply three extra filters before clicking a product, your results page is likely missing one of the key attributes or failing to rank the best matches early.
Guardrails That Prevent Waste
High intent targeting can backfire if you ignore context.
- Suppression: stop showing the same high-intent prompts after purchase or after a clear “no inventory” outcome.
- Mismatch checks: if the user’s filters conflict with your catalog availability, show alternatives with the closest attribute overlap rather than empty results.
- Frequency control: keep on-site modules and follow-up messages from repeating the same suggestion every visit.
Example: A user filters for “in stock” and then sees repeated out-of-stock items in recommendations. That’s not just annoying; it trains them to distrust the page.
When search and browse patterns are turned into explicit intent rules, the experience becomes consistent: users see what they already asked for, and the site does the next step instead of making them start over.
3.3 Designing Social and Video Experiences for Discovery and Consideration
Social and video work best when they do two things in sequence: first, they earn attention with a clear reason to care; then they reduce uncertainty so people can move toward a product page, category page, or cart. The trick is to design for the moment each viewer is in, not for an imaginary “average customer.”
Core Principles for Discovery
Start with a simple question: what problem does this viewer think they have? Discovery content should answer that problem in under a minute, often under ten seconds. Use one primary message per asset, and make the first frame do the job.
A practical rule: if the viewer can’t tell what the product is within the first few seconds, the rest of the video is just decoration. For social posts, the same applies to the first line of copy and the first visible product detail.
Example: a skincare brand posts a short video showing a texture close-up and the exact step where it’s used. The caption names the skin concern and the routine step, not the brand story.
Core Principles for Consideration
Consideration content should help people compare. That means showing differences, tradeoffs, and “what happens next.” Instead of repeating claims, demonstrate outcomes: before-and-after under consistent lighting, fit and sizing guidance, or how the product behaves in a real scenario.
A useful pattern is the “decision trio”: (1) what it does, (2) who it’s for, (3) what to expect. Each part can be a separate clip, a carousel panel, or a pinned comment thread.
Example: a home fitness brand uses a carousel where panel one shows the workout setup, panel two lists who it suits and who should skip it, and panel three shows the first session results with a clear disclaimer about effort and consistency.
Creative Formats That Map to Intent
Use formats that match how people browse.
- Short video for discovery: fast context, one benefit, one product visual.
- Longer video for consideration: step-by-step use, comparisons, and objections handled on-screen.
- Carousels for scanning: each slide answers one question, with consistent typography.
- Stories for momentum: polls and quick Q&A that lead to a product page.
A simple workflow: create one “discovery master” asset, then cut it into three consideration variants by adding comparison frames, usage steps, and a clear next action.
Social-to-Commerce Path Design
Every social asset needs a destination that matches the viewer’s likely next question.
- If the viewer is unsure what to buy, send them to a category page with filters.
- If they know the product type but not the exact choice, send them to a product comparison or a best-seller list.
- If they’ve already shown intent, send them to the exact product page with relevant size or variant defaults.
Keep the landing page aligned with the asset. If the video shows “how it fits,” the landing page should start with fit details, not a generic hero banner.
Mind Map: Social and Video Experience Design
Example: One Product, Three Assets
Assume a customer is browsing for a new backpack.
- Discovery short video: shows the backpack opening and the main compartment organization in five seconds, with on-screen text: “Find your stuff fast.” The caption mentions the use case: commuting.
- Consideration carousel: slide 1 shows capacity; slide 2 shows laptop fit and sleeve dimensions; slide 3 shows weather protection; slide 4 lists who it fits best and who should choose a different model. The final slide includes a clear “choose your size” prompt.
- Consideration video: a 45-second walkthrough of packing a typical day, including what doesn’t fit and why. The last ten seconds show the exact variant selection on the product page.
The integrated logic is consistent: each asset answers the next question the viewer is likely to have, and each landing destination matches that question.
Practical Quality Checks
Before publishing, verify three things.
- Message-to-visual match: the first visual supports the first claim.
- Next-step clarity: the viewer knows what to do after watching.
- Landing alignment: the first section on the landing page repeats the same decision criteria shown in the asset.
If any of these fail, the experience feels like a detour even when the content is good.
3.4 Optimizing Email and Messaging for Engagement and Retention
Email and messaging work best when they do two things consistently: (1) reduce the customer’s effort to decide, and (2) keep the brand’s promises aligned with what the customer actually sees next. The trick is to treat every message as a small, testable journey step rather than a standalone announcement.
Foundations for Engagement and Retention
Start with a simple segmentation rule: group customers by what they are trying to accomplish right now, not just by demographics. For example, a shopper who viewed running shoes twice in two days is likely comparing options; a shopper who purchased last week is likely looking for size confirmation, delivery updates, or care instructions.
Next, define message types that map to intent:
- Discovery support: help them find the right product category or use case.
- Consideration support: answer objections like fit, compatibility, or shipping time.
- Purchase support: reduce post-click friction with clear next steps.
- Retention support: encourage repeat behavior with replenishment timing or usage tips.
Finally, set a baseline cadence. A common mistake is sending “more” to compensate for weak relevance. Instead, keep frequency stable while improving targeting and content. If you need a starting point, use a conservative schedule for new subscribers and increase only when engagement signals remain healthy.
Message Design That Matches Customer Effort
Write messages around one primary action and one primary reason. If the reason is “you might like this,” the action should be “view these items.” If the reason is “your cart is waiting,” the action should be “return to checkout.”
Use a consistent structure:
- First line: state the customer’s context in plain language.
- Middle: provide the smallest set of helpful details.
- Bottom: include the single next step with a clear label.
Example: a browse-abandon email for a camera.
- First line: “Still thinking about the Canon R50 you viewed?”
- Middle: “Here’s what’s different: kit lens options, battery life, and typical delivery window.”
- Bottom button: “See the R50 details.”
This avoids the “scroll until you find the point” problem.
Trigger Logic for Real-Time Relevance
Triggers should be specific enough to feel timely, but not so narrow that they miss customers. Use event-driven logic with guardrails.
Common triggers and what to send:
- Browse event without purchase: show the viewed item plus 1–2 close alternatives.
- Cart added then no checkout: remind them of the exact cart contents and highlight shipping or returns.
- Purchase confirmation: send order status and what to expect next.
- Post-purchase engagement: request a review only after the product has had time to arrive and be used.
Guardrails prevent message fatigue:
- Suppress triggers when a purchase already happened.
- Cap messages per day and per week per customer.
- Add a cooldown after a click so you don’t immediately send another similar message.
Dynamic Content Without Confusing Customers
Dynamic content should change the “what,” not the “why.” Keep the message goal stable while swapping product blocks, sizes, or offers.
A practical rule: if you personalize a product recommendation, also personalize the supporting detail. If the recommendation is a specific size, include the size-specific guidance. If the recommendation is a bundle, include what’s included.
Example: a replenishment message for skincare.
- Personalization: “Your cleanser is due around 30 days after the last order.”
- Supporting detail: “This formula is gentle for daily use; pair it with your toner for best results.”
- Action: “Reorder cleanser.”
Deliverability and Compliance That Protect the Experience
Deliverability isn’t just a technical checkbox; it affects whether customers ever see the message. Use clean lists, respect unsubscribe requests immediately, and avoid sending to addresses that repeatedly bounce.
For compliance, ensure consent and preference controls are consistent across email and messaging. If a customer opts out of promotional messages, transactional updates should still arrive, but promotional offers should not.
Measurement That Connects to Retention
Track metrics by message purpose:
- Engagement: open rate is useful only when paired with click-through rate.
- Conversion support: measure click-to-product and click-to-checkout for commerce messages.
- Retention: measure repeat purchase rate and time-to-next-purchase after each lifecycle flow.
Use holdouts to avoid misleading results. For example, if you test a “browse reminder” email, compare holdout customers who did not receive the email against those who did, and evaluate both immediate clicks and later purchases.
Mind Map: Email and Messaging Optimization
Example: A Cohesive Lifecycle Flow
A simple lifecycle set can cover most retention needs without overwhelming customers.
- New subscriber welcome: introduce the store’s best-fit categories and include one low-friction action like “browse best sellers.”
- Browse reminder: show the exact item plus one alternative; include shipping/returns clarity.
- Cart recovery: remind them of cart contents; highlight delivery timing and payment options.
- Post-purchase care: send usage tips and a “what to expect” checklist.
- Replenishment or usage follow-up: send a reorder prompt only when timing aligns with typical consumption.
Each step has a distinct purpose, and each message’s content supports the next step rather than repeating the same pitch in a different outfit.
3.5 Aligning Retail Media and Sponsored Placements with Purchase Goals
Retail media works best when it behaves like a set of purchase-supporting tools, not a standalone advertising channel. The core idea is simple: every sponsored placement should be tied to a specific purchase goal, and that goal should determine targeting, creative, merchandising, and measurement.
Start with Purchase Goals and Placement Intent
Begin by choosing purchase goals that are measurable and operational. Common goals include increasing product page views that lead to add-to-cart, raising conversion rate for a specific category, or improving share of sales for a brand during a promotion window. Then map each goal to placement intent:
- Discovery intent: help shoppers find relevant items they did not search for yet.
- Consideration intent: help shoppers compare options quickly.
- Conversion intent: remove last-mile friction so the shopper can buy now.
Example: If the goal is conversion for a new coffee subscription, prioritize sponsored placements that appear near product details and checkout-adjacent surfaces, not only top-of-search banners.
Define Placement Inventory and Where It Fits the Journey
Treat retail media inventory as a set of surfaces with different shopper mindsets. Typical surfaces include:
- Search results: shoppers already have intent; sponsored items should match the query.
- Category pages: shoppers are browsing; sponsored items should fit the category and price band.
- Product pages: shoppers are deciding; sponsored items should complement or substitute.
- Cart and post-cart surfaces: shoppers are close to purchase; sponsored items should reduce decision stress.
Operational rule: the more advanced the placement surface, the stricter the relevance requirements should be. A mismatch on a product page is more expensive than a mismatch on a category page.
Build a Relevance Model Using Catalog and Behavior Signals
Sponsored placements should be selected using two kinds of signals:
- Catalog signals: category, brand, price, size, compatibility, and availability.
- Behavior signals: search terms, clicks, views, add-to-cart, and purchase history.
Example: For a skincare brand, if a shopper viewed a moisturizer and then searched for “barrier repair,” sponsored placements should favor barrier-focused products and avoid unrelated cleansers even if they are in the same category.
To keep this practical, define a short list of eligibility rules. For instance:
- Only show sponsored items that are in stock.
- Only show items within a defined price range band for the shopper segment.
- Prefer items with strong historical conversion for that surface.
Align Creative and Messaging with the Purchase Step
Creative should match the decision step. On search, the shopper expects fast confirmation: price, size, and key attributes. On product pages, the shopper expects reassurance: ratings, benefits, and compatibility.
Example: If a sponsored tile appears on a category page for running shoes, avoid a long lifestyle headline. Use a compact value statement like “Breathable mesh, daily comfort” plus the price and a clear product image.
Also ensure that sponsored creative does not contradict the landing experience. If the sponsored tile promises “free returns,” the landing page should show the returns policy immediately.
Coordinate Sponsored Placements with Onsite Merchandising
Retail media is not separate from merchandising; it is part of the same decision flow. Sponsored placements should complement the existing assortment and ranking logic.
A simple coordination approach:
- Merchandising sets the baseline: what shoppers see by default.
- Retail media adds targeted lift: what changes for specific shopper segments.
Example: During a promotion, merchandising may already boost the promoted items. Retail media should then focus on adjacent items that increase basket size, such as accessories or refills, rather than duplicating the same promoted SKU.
Measurement That Connects Placements to Purchase Outcomes
Track metrics that reflect the goal, not just ad performance. Use a measurement stack that includes:
- Surface engagement: impressions-to-click rate by placement.
- Commerce progression: click-to-product-page view, view-to-add-to-cart.
- Purchase outcome: conversion rate and revenue per session for the same cohort.
To avoid misleading conclusions, measure at the right grain. If you optimize for conversion, report conversion by placement surface and product category, not only by campaign name.
Mind Map: Retail Media to Purchase Alignment
Example: Turning a Goal Into a Placement Plan
Goal: Increase add-to-cart rate for a mid-priced meal kit during a weekend promotion.
- Choose intent: conversion intent.
- Select surfaces: product pages for related meal kits and category pages for “weeknight dinners.”
- Set eligibility: in-stock only; exclude shoppers who recently purchased the exact kit.
- Creative: show “serves 2, ready in 30 minutes” and the promo price.
- Coordinate with merchandising: if the promoted kit is already top-ranked, use sponsored placements to push complementary add-ons like sauces or dessert kits.
- Measure: compare add-to-cart rate for the targeted cohort versus a holdout cohort, segmented by surface.
When these pieces connect, sponsored placements stop being a separate activity and start behaving like a controlled set of decisions that lead to purchase.
4. Journey Mapping with Practical Touchpoint Workflows
4.1 Building Journey Maps from Funnel Stages and Behavioral Triggers
A journey map is a structured story of what a customer does, what they see, and what you measure. To build one that actually helps decisions, start with two anchors: funnel stages (why they’re there) and behavioral triggers (what they did). Funnel stages give you intent; triggers give you timing.
Step 1: Define Funnel Stages as Decision Points
Use a small set of stages that match how your business buys. A practical set for commerce journeys is:
- Discovery: learning what exists and whether it solves a problem.
- Consideration: comparing options, checking details, and validating trust.
- Intent: showing purchase readiness through strong signals.
- Purchase: completing checkout and confirming the order.
- Post Purchase: reducing returns and increasing repeat behavior.
Example: If someone searches “waterproof hiking boots size 10,” they’re likely in Discovery or Consideration depending on whether they also view product comparisons and reviews.
Step 2: Choose Behavioral Triggers That Are Observable
Triggers should be specific events you can track reliably. Group them by customer action:
- Engagement triggers: viewed a category, watched a product video, scrolled a product page.
- Evaluation triggers: opened size guide, clicked reviews, compared two products.
- Intent triggers: added to cart, started checkout, applied a promo code.
- Friction triggers: cart abandoned, checkout error, payment failed.
- Purchase triggers: order confirmed, subscription started.
- Post purchase triggers: delivered, opened support ticket, requested return.
Example: “Added to cart” is a trigger; “seems interested” is not. The map should rely on events you can measure without guessing.
Step 3: Connect Stages to Triggers with Entry and Exit Rules
For each stage, list the triggers that typically move someone forward and the ones that indicate they’re stuck.
- Discovery → Consideration: viewed product details after category browse.
- Consideration → Intent: clicked reviews, opened FAQs, or compared variants.
- Intent → Purchase: started checkout or selected shipping method.
- Intent → Back to Consideration: payment failed or checkout abandoned.
Exit rules prevent the map from becoming a never-ending loop. Example: once a customer purchases, suppress “cart abandonment” messages for that order window.
Step 4: Add Touchpoints and Content Requirements per Step
Each journey step should include:
- Channel touchpoint: email, paid search, onsite module, SMS, retargeting ad.
- Customer view: what the customer sees and why it matches their stage.
- Content requirement: the exact information needed at that moment.
- Operational requirement: what systems must provide (catalog, pricing, inventory, shipping).
Example: For checkout started but not completed, the content requirement is not “a generic reminder.” It’s the cart summary, shipping estimate, and a clear path back to checkout.
Step 5: Define Measurement at the Step Level
Tie metrics to the stage goal, not just clicks.
- Discovery: product detail views, engaged sessions, add-to-wishlist.
- Consideration: review clicks, size guide opens, compare actions.
- Intent: checkout starts, payment method selection.
- Purchase: completed orders, conversion rate.
- Post purchase: return rate, support contact rate, repeat purchase.
Example: If checkout abandonment is high, measure where it happens: shipping selection drop-off vs payment failure.
Step 6: Validate the Map with Real Sessions
Before building automation, test the logic against past behavior.
- Pick 20–50 anonymized sessions per stage.
- Check whether the triggers occur in the order the map assumes.
- Adjust triggers or add missing steps where customers commonly stall.
This is where “it looks right” becomes “it works in practice.”
Mind Map: Funnel Stages and Behavioral Triggers
Example: A Complete Stage-to-Trigger Slice
- Stage: Consideration
- Entry trigger: product detail view after category browse
- Step touchpoint: onsite comparison module + email with top questions answered
- Content requirement: key specs, shipping/returns clarity, and one comparison table
- Progression trigger: opens reviews or size guide
- Next stage: Intent
- Exit rule: if “order confirmed” occurs, stop all reminders tied to that cart
This slice shows the map’s purpose: it turns customer behavior into a sequence of decisions you can execute and measure.
4.2 Translating Journey Steps Into Operational Workflows
A journey map tells you what should happen. A workflow tells you who does what, when it happens, and what data proves it happened. The translation is easiest when you treat each journey step as a small contract: inputs, decision rules, actions, and outputs.
Step 1: Convert Journey Steps Into Workflow Contracts
Start by rewriting each journey step in four fields.
- Trigger: the event or condition that starts the step (example: “Viewed product page twice in 7 days”).
- Eligibility: who qualifies and who is excluded (example: “Has not purchased; consent granted; inventory available”).
- Action: the concrete operation (example: “Send email with recommended accessories; update suppression list”).
- Evidence: the measurable proof (example: “Email delivered; click on accessory category; no purchase within 24 hours”).
Example: If your journey map says “Consideration through comparison content,” the workflow contract might say “When a customer views a comparison page and spends 60+ seconds, show a comparison module on-site and send a follow-up message with the same comparison points.” The map becomes a set of operational rules, not a vague intention.
Step 2: Define Decision Logic and Suppression Rules
Most workflow failures come from missing “no” conditions. For each step, write explicit decision logic.
- Stop conditions: purchase completed, return initiated, consent revoked.
- Cooldowns: avoid repeating the same offer within a time window.
- Priority rules: if multiple steps trigger, decide which one wins.
Example: A customer adds an item to cart, then browses a different category. Your workflow should prevent a “cart reminder” from being replaced by a generic “browse welcome” message. Priority logic might say: cart-related messages override browse nudges for 72 hours.
Step 3: Assign Ownership Across Teams and Systems
Operational workflows need clear handoffs. Assign each contract field to an owner.
- Marketing operations owns audience eligibility rules and message templates.
- Commerce operations owns inventory and pricing constraints.
- Data engineering owns event definitions and identity resolution.
- Experience design owns on-site modules and content requirements.
Example: If the workflow action is “Show size guide,” experience design specifies the module. Commerce operations ensures the guide matches the selected product variant. Data engineering ensures the “variant selected” event exists and is reliable.
Step 4: Specify Data Inputs and Output Events
Workflows should be testable. That means every action must emit output events.
- Input events: view, click, add-to-cart, search, category browse.
- Reference data: product catalog, pricing, availability, content assets.
- Output events: message queued, delivered, on-site module shown, conversion attributed.
Example: For a “browse abandonment” step, inputs include “product page view” and “no add-to-cart within 24 hours.” Outputs include “email queued” and “email clicked.” If you can’t name the output events, you can’t measure the step.
Step 5: Build the Workflow Mind Map
Use a mind map to keep the translation consistent across steps.
Mind Map: Journey Step to Workflow
Step 6: Turn Contracts Into a Repeatable Workflow Template
Once you have one step working, reuse the structure. A template prevents teams from reinventing logic each time.
Example workflow template for a “Consideration Follow-Up” step:
- Trigger: comparison page viewed.
- Eligibility: consent granted; no purchase; product in stock.
- Decision logic: if cart exists, route to cart workflow instead.
- Action: show a comparison summary module and send a message with the same key specs.
- Evidence: module impressions, message delivered, click on “specs” section.
Step 7: Validate with a Dry Run and Edge Cases
Before launch, run a dry run with realistic scenarios.
- Happy path: trigger occurs, eligibility passes, action fires.
- Suppression path: trigger occurs but consent is missing, so nothing sends.
- Conflict path: trigger occurs while a higher-priority step is active.
- Data gap path: missing product variant event leads to fallback content.
Example edge case: A customer views a product, then changes region. Your workflow should re-check eligibility using the updated region-specific catalog and avoid sending offers that don’t match shipping rules.
Step 8: Document the Workflow in Operational Terms
Documentation should read like instructions, not a story.
- List the trigger and eligibility rules in plain language.
- Record the decision logic and stop conditions.
- Specify the exact action outputs and required events.
- Include a short “what to do when data is missing” rule.
When every journey step becomes a workflow contract with named inputs, explicit decisions, and measurable outputs, the journey map stops being a diagram and starts behaving like a system.
4.3 Capturing Entry Exit Criteria and Suppression Rules
Cross-channel journeys break down when “who gets what, when” is unclear. Entry and exit criteria define when a customer becomes eligible for a specific touchpoint, while suppression rules prevent redundant or harmful messages. Together, they keep the journey from turning into a polite spam festival.
Entry Criteria That Match Real Intent
Entry criteria should be specific enough to avoid accidental enrollment, but simple enough to implement reliably.
Start with an event that signals intent or context. Examples:
- Product discovery: Viewed a category page for running shoes.
- Consideration: Added a product to cart but did not purchase.
- High intent: Started checkout.
- Support need: Opened a returns policy page.
Then add constraints that reduce noise:
- Channel eligibility: Email only if the customer has a valid email and consent.
- Timing window: Only enter if the event happened within the last 7 days.
- Device or locale: Only for customers in the US and on mobile if the landing experience differs.
- Frequency cap readiness: Ensure the customer has not already received the same campaign in the last 14 days.
Concrete example: A “Browse Running Shoes” email flow.
- Entry event: Category page view.
- Constraints: US locale, consented email, event within 7 days.
- Exclusion: If the customer already purchased running shoes in the last 30 days.
Exit Criteria That Stop Messages at the Right Time
Exit criteria should reflect the reason the touchpoint exists. If the goal is to move someone from consideration to purchase, the journey should stop when purchase happens.
Common exit triggers:
- Purchase completed: Order status becomes “paid” or “confirmed.”
- Journey goal achieved: For example, a coupon redeemed.
- Customer no longer fits context: For example, product becomes unavailable.
- Time-based stop: If no action occurs within a defined period.
Concrete example: A “Cart Reminder” SMS.
- Entry: Added to cart, phone consented.
- Exit: Purchase completed OR cart cleared OR 24 hours elapsed.
A practical rule: exit conditions should be evaluated in the same identity space as entry. If you match events by email for entry but by device for exit, you’ll accidentally keep sending.
Suppression Rules That Prevent Redundancy and Conflict
Suppression rules block messages when sending would be redundant, conflicting, or counterproductive.
Use suppression in three layers:
- Hard exclusions: Never send if the customer is ineligible.
- Unsubscribed from email.
- Blocked from SMS.
- Fraud or chargeback risk flag.
- Goal-based suppression: Don’t send if the customer already achieved the outcome.
- If purchased the exact SKU, suppress “back in stock” emails for that SKU.
- Cross-campaign suppression: Avoid overlaps across different programs.
- If the customer is already in a “VIP retention” flow, suppress “standard win-back” messages.
Concrete example: A weekly promotion email.
- Hard exclusion: Unsubscribed.
- Goal-based suppression: Purchased in the last 14 days.
- Cross-campaign suppression: If enrolled in an active “Cart Reminder” flow, suppress the weekly email to avoid two competing calls to action.
Mind Map: Entry, Exit, Suppression Logic
Rule Precedence and Conflict Handling
When multiple rules apply, define precedence so behavior is deterministic.
A simple precedence order:
- Hard exclusions (never send)
- Exit conditions (stop immediately)
- Goal-based suppression
4. Cross-campaign suppression
5. Entry criteria (only if still eligible)
Concrete example: A customer purchases right after triggering cart entry.
- If purchase event arrives before the first scheduled send, exit should prevent the message.
- If purchase arrives after the send, suppression should prevent follow-up messages in the same flow.
Implementation Checklist for Reliable Logic
- Define the exact event fields used for entry and exit (SKU, cart ID, order ID).
- Deduplicate events so a single action doesn’t create multiple enrollments.
- Use consistent identity keys across channels.
- Document precedence and test with at least three scenarios: eligible, excluded, and conflicting.
Concrete test scenarios:
- Category view + consent + no purchase in 30 days → enroll.
- Cart added + consent + purchased before first send → no send.
- Weekly promo eligible but already in cart reminder flow → suppressed.
With clear criteria and suppression rules, each touchpoint earns its place, and customers see fewer repeats of the same idea wearing different hats.
4.4 Creating Channel Specific Content Requirements by Touchpoint Type
Channel-specific content requirements are easiest to manage when you treat each touchpoint as a small product: it has inputs, constraints, a job to do, and a measurable outcome. The goal is not to write different “versions” of the same message; it’s to produce the right content for the customer’s current intent, the channel’s format rules, and the journey’s operational logic.
Start with Touchpoint Inputs and Constraints
For every touchpoint type, capture these requirements in plain language:
- Customer context inputs: what you know (category viewed, size preference, loyalty tier), and what you must not assume.
- Catalog inputs: which product fields are required (name, price, availability, image), and which are optional.
- Offer inputs: discount type, eligibility rules, minimum spend, and expiration.
- Compliance inputs: consent status, region restrictions, and required disclosures.
- Channel constraints: character limits, image aspect ratios, supported deep links, and rendering differences.
A practical example: a “browse abandonment” email needs product images, a stable product URL, and an eligibility check for any promotion. A “search results” onsite module needs ranking logic and category-level messaging, not a single-item offer.
Define Content Jobs by Touchpoint Type
Use touchpoint types as the organizing layer. Each type gets a content job statement, then a checklist of required elements.
- Discovery touchpoints (social posts, short video, sponsored discovery): job is to create relevance fast. Requirements emphasize category clarity, benefit framing, and frictionless paths to browse.
- Engagement touchpoints (email nurture, retargeting display, onsite recommendations): job is to keep momentum. Requirements emphasize personalization signals and clear next actions.
- Purchase touchpoints (cart reminders, checkout prompts, order confirmation): job is to reduce uncertainty and complete the transaction. Requirements emphasize trust, delivery expectations, and accurate pricing.
- Post-purchase touchpoints (shipping updates, replenishment reminders, support prompts): job is to protect the relationship. Requirements emphasize order identifiers, service details, and helpful guidance.
Build a Requirement Checklist That Teams Can Execute
Create a reusable template with the same fields for every touchpoint type:
- Primary objective: one sentence describing the customer action.
- Required content blocks: headline, product module, offer module, proof module, CTA.
- Allowed personalization fields: list exactly which attributes can be inserted.
- Prohibited personalization: list what must never appear (e.g., “your exact size is back” if inventory is unknown).
- Linking rules: where the CTA goes, and how parameters are formed.
- Fallback rules: what happens when product data is missing or out of stock.
- Creative and format rules: image sizes, safe areas, and mobile-first layout.
- Measurement hooks: event names and what counts as engagement.
Example: For an onsite “recommended for you” carousel, the required blocks might be product image, price, rating, and a CTA. Personalization fields could include “recently viewed category” and “preferred brand.” Prohibited fields could include “discount you saw in an email” because onsite recommendations should not mirror a specific campaign unless eligibility is confirmed.
Mind Map: Channel Requirements by Touchpoint Type
Example Requirements by Touchpoint Type
Example: Social Discovery Post
- Objective: drive clicks to a category page.
- Required blocks: category name, one benefit, product image, CTA.
- Personalization allowed: broad interest category only.
- Fallback: if interest category is missing, use best-selling collection.
- Measurement: track click-through to category with campaign parameters.
Example: Email Browse Abandonment
- Objective: bring the customer back to the exact product.
- Required blocks: product image, price, availability note, CTA to product page.
- Personalization allowed: product viewed and brand.
- Prohibited personalization: “in stock now” unless inventory is confirmed.
- Fallback: if product is unavailable, swap to a close alternative within the same category and include a “similar items” label.
- Measurement: track product click and downstream add-to-cart.
Example: Cart Reminder With Offer
- Objective: complete checkout.
- Required blocks: cart summary, discount details, expiration, delivery estimate, CTA to checkout.
- Personalization allowed: cart contents and eligible discount.
- Prohibited personalization: discount amount if eligibility fails.
- Fallback: remove discount module and switch CTA to “review cart.”
- Measurement: track checkout start and purchase completion.
Quality Checks That Prevent Content Failures
Before launch, validate three things for each touchpoint type: data completeness, eligibility correctness, and channel rendering. Data completeness means every required field is present. Eligibility correctness means offers and claims match the rules. Rendering means the content still makes sense on the smallest screen and with missing images. If you can pass those checks, your content requirements are not just well-written—they’re usable.
4.5 Validating Journey Maps with Stakeholder Reviews and Pilot Runs
A journey map is only useful if people can agree on what it means and if the organization can execute it without surprises. Validation has two parts: stakeholder review to confirm shared understanding, and pilot runs to confirm operational reality.
Stakeholder Reviews That Produce Decisions
Start by choosing the smallest set of roles that can approve the journey map’s “what” and “how.” Typical reviewers include marketing, commerce operations, customer support, analytics, and legal or privacy. The goal is not consensus for its own sake; it is to remove ambiguity before teams build anything.
Use a structured review agenda:
- Journey intent and scope: Confirm the entry criteria, the exit criteria, and which channels are in or out. Example: if the map includes “browse abandonment,” define whether it means leaving the product page, leaving the cart page, or both.
- Touchpoint logic: Walk through the decision points in order. Example: “If a user views a category but never views a product, send a guide email; if they view a product twice, show a comparison module.” Reviewers should be able to restate the logic without looking at the diagram.
- Content and offer constraints: Validate that each touchpoint has required inputs. Example: product recommendations require catalog availability, pricing rules, and inventory status; if any are missing, the map must specify fallback behavior.
- Measurement plan: Confirm which events are tracked and which outcomes are attributed. Example: define whether “engaged” means click-through, add-to-cart, or time on page.
- Risk and compliance checks: Ensure consent, suppression rules, and customer data handling are consistent. Example: if a customer opts out of marketing email, the map should specify what replaces the email touchpoint.
To keep the review productive, capture decisions in a single change log. Each comment should result in one of three outcomes: approve, revise, or defer with a named owner and date. A practical cadence is a 60–90 minute session followed by a 48-hour async review window.
Mind Map: Review Inputs and Outputs
Journey Map Validation Mind Map
Pilot Runs That Test Execution, Not Just Ideas
A pilot run should validate the journey map end-to-end with controlled scope. Choose a limited audience segment and a time window long enough to observe the full path. For example, run a two-week pilot starting on 2026-03-15 for a single region and one product category.
Pilot checklist:
- Data readiness: Confirm identity resolution and event capture for triggers like view, add-to-cart, and purchase.
- Catalog and inventory sync: Verify that recommendations and availability checks update correctly.
- Channel delivery: Test email rendering, ad feed eligibility, and landing page routing.
- Suppression and frequency: Ensure customers do not receive conflicting offers or duplicate messages.
- Customer support alignment: Provide support with the journey’s purpose and the most common customer questions. Example: if the journey offers a discount code, support should know where it appears and when it expires.
Example Pilot Script for a Browse Abandonment Path
Define a single path and test it with real or simulated users:
- Trigger: user views a product page and leaves without adding to cart.
- Touchpoint 1: show a reminder email within 2 hours with the exact product and a “complete your setup” message.
- Touchpoint 2: if the user clicks but does not purchase within 24 hours, show a landing page module with reviews and compatible accessories.
- Exit: stop all messages after purchase or after 7 days.
During the pilot, record three categories of issues: missing data (events not firing), incorrect logic (wrong branch chosen), and broken experience (landing page mismatch or out-of-stock display).
Mind Map: Pilot Run Evidence
Pilot Run Evidence Mind Map
Turning Findings Into a Final Journey Map
After the pilot, update the journey map with evidence-based edits. If a trigger is unreliable, revise the trigger definition rather than forcing the system to “make do.” If a touchpoint performs but creates support load, adjust the messaging to reduce avoidable questions. The final output should be a journey map with approved logic, validated operational requirements, and a measurement plan that matches what actually happened.
5. Content and Offer Strategy Across the Commerce Journey
5.1 Developing Content Pillars That Support Discovery and Engagement
Content pillars are the small set of themes that your brand repeatedly earns attention with. They help you decide what to publish, where it should appear, and how it should connect to product discovery without turning every post into a sales pitch. A good pillar system is not a content calendar; it’s a decision system.
Start with Audience Jobs, Not Channel Formats
Discovery content should answer a customer’s job-to-be-done at the moment they’re trying to figure things out. Begin by listing the top jobs your customers have before they know exactly what they want. For example, a home fitness brand might see jobs like “choose a beginner-friendly routine,” “compare equipment sizes,” and “avoid buying the wrong accessories.” Each job becomes a pillar candidate.
Then define what “engagement” means for that pillar. Engagement is not just clicks. It’s the customer taking a next step that reduces uncertainty: saving a checklist, watching a comparison video to the end, reading sizing guidance, or adding a product to a list.
Define Pillar Boundaries Using Three Tests
To keep pillars from blurring together, apply three tests.
- Distinct question: Each pillar should answer a different primary question. If two pillars could share the same headline, they’re probably the same pillar.
- Reusable asset types: Each pillar should support multiple formats. A pillar about “fit and sizing” can include guides, calculators, and short videos.
- Product linkage: Each pillar should connect to a product decision path. The linkage can be indirect, but it must be clear.
Example: If you sell skincare, “how to layer products” and “how to choose for sensitive skin” are distinct questions. Both can link to product selection, but they guide different decisions.
Build Pillars with a Simple Structure
For each pillar, document four items.
- Core promise: One sentence describing what the customer learns.
- Primary audience: Who benefits most and why they care now.
- Key proof: What makes the guidance trustworthy (materials, measurements, expert input, real usage scenarios).
- Next-step actions: The engagement behaviors you want.
This structure prevents content from becoming generic. It also makes it easier to coordinate with other touchpoints like search, email, and product pages.
Map Pillars to the Discovery-to-Consideration Path
Discovery content should reduce uncertainty early, while consideration content helps customers compare options. You can do this without changing the pillar; you change the angle.
- Early discovery: Focus on education and problem framing. Example: “How to measure your wrist for a watch band”.
- Mid journey: Focus on selection criteria and tradeoffs. Example: “Three band materials and who they’re best for”.
- Late consideration: Focus on decision support and confidence. Example: “Band length chart plus common fit mistakes” with direct product links.
The pillar stays consistent; the content becomes more specific.
Mind Map: Pillars, Content Types, and Engagement Behaviors
Example Pillar Set with Integrated Use
Consider a retailer selling outdoor cookware.
-
Pillar A: Choose the Right Size
- Core promise: Customers can measure and match cookware to their cooking style.
- Proof: Capacity charts, weight comparisons, and real meal examples.
- Engagement actions: Download a “pan size matcher,” watch a “how to measure” clip.
- Discovery angle: “How to measure your pot without guessing.”
- Consideration angle: “Which size for 2 vs 6 servings and why.”
-
Pillar B: Cooking Performance Basics
- Core promise: Customers understand heat distribution and material tradeoffs.
- Proof: Temperature tests, boil-time notes, and cleaning outcomes.
- Engagement actions: Save a comparison table, read a material FAQ.
- Discovery angle: “What ‘even heating’ means in practice.”
- Consideration angle: “Stainless vs nonstick for sauces and cleanup.”
-
Pillar C: Care and Longevity
- Core promise: Customers avoid common damage and keep performance stable.
- Proof: Care instructions, stain examples, and maintenance schedules.
- Engagement actions: Start a care checklist, view a “common mistakes” carousel.
- Discovery angle: “First-time care for new cookware.”
- Consideration angle: “How to remove residue without scratching.”
Notice the pattern: each pillar has a clear learning outcome, multiple asset types, and a measurable next step. Product pages can then reference the pillar directly, such as showing “size guidance” on the product page or surfacing “care and longevity” in the FAQ.
Operationalize Pillars with a Content-to-Decision Checklist
Before publishing, confirm three things: the piece answers the pillar’s core promise, it includes proof that fits the audience’s uncertainty, and it offers a next step that moves the customer toward a decision. If any of those are missing, the content may still be interesting, but it won’t reliably support discovery and engagement.
5.2 Crafting Offers That Match Intent and Reduce Friction
An offer is the promise you attach to an action. In cross-channel journeys, the offer must do two jobs at once: (1) fit the customer’s current intent and (2) make the next step feel easy and fair. When either job fails, customers either bounce or stall—usually without telling you why.
Start with Intent, Not Channel
Before writing copy or choosing a discount, define intent in plain terms. Use a short label and a measurable signal.
- Discovery intent: “I’m comparing options.” Signals include broad browsing, category exploration, and early search.
- Consideration intent: “I’m narrowing choices.” Signals include product page depth, spec lookups, and adding to a list.
- Purchase intent: “I’m ready to decide.” Signals include cart creation, checkout starts, and repeated visits to the same SKU.
A useful rule: the offer should reduce the biggest uncertainty for that intent level.
- Discovery uncertainty: “Is this right for me?”
- Consideration uncertainty: “How does it compare, and what will I get?”
- Purchase uncertainty: “Will it work for me, and will it be worth the cost?”
Offer Components That Reduce Friction
Think of an offer as a bundle of components. You can mix and match, but each component must be true and easy to deliver.
- Value: what the customer gains (free shipping, bundle savings, extended warranty).
- Proof: why the value is believable (ratings, compatibility notes, return policy clarity).
- Effort: what the customer must do (one-click checkout, minimal form fields, clear steps).
- Risk control: what happens if it doesn’t work (returns, size exchange, trial period).
- Timing: when the value applies (today-only shipping cutoff, limited stock notice).
If you can’t support a component operationally, remove it. “Nice-sounding” offers create friction when they fail at checkout.
Match Offer Type to Intent
Use different offer types at different intent levels.
- Discovery offers should be low-commitment and information-forward.
- Example: “Free returns” or “Compare sizes” paired with a guide. The action might be “view the guide” rather than “buy now.”
- Consideration offers should help customers decide with less effort.
- Example: “Bundle and save 10%” with a clear bundle builder and a short comparison table.
- Purchase offers should remove last-mile uncertainty.
- Example: “Arrives by Friday” plus a transparent shipping cutoff and a checkout progress indicator.
A practical test: if the offer requires the customer to do extra work to understand it, it’s probably mismatched.
Keep the Offer Specific and Operationally True
Specificity reduces cognitive load. Replace vague claims with concrete terms.
- Instead of “Save on your order,” use “Save $15 on orders over $75 with code SPRING15.”
- Instead of “Fast shipping,” use “Ships in 24 hours for orders placed before 2 PM local time.”
Operational truth matters most for cross-channel consistency. If an ad promises free shipping but the cart shows a fee, the journey breaks. Align your offer logic with your checkout rules, including inventory constraints.
Mind Map: Offer Design Logic
Example: Same Product, Three Offers
Consider a customer looking at a running shoe.
- Discovery email: “Free returns and a size guide.” CTA: “Find your size.”
- Why it works: it addresses fit uncertainty without asking for a purchase.
- Consideration retargeting: “Bundle and save: socks + shoe.” CTA: “Build your bundle.”
- Why it works: it supports comparison and decision-making with a clear bundle.
- Purchase-stage message: “Order today for delivery by Friday.” CTA: “Checkout.”
- Why it works: it removes timing uncertainty and keeps the step direct.
Notice that the offers change, but the product stays consistent. That’s how you reduce friction without confusing the customer.
Example: Offer Copy That Prevents Misunderstandings
A good offer statement includes three details: what you get, how it’s applied, and what limits exist.
- “Free shipping on orders over $50. Applied automatically at checkout. Excludes gift cards.”
This format prevents the most common failure mode: customers discovering the limit only after they’ve invested time.
Advanced Detail: Build Offer Rules, Not One-Off Messages
To keep offers consistent across channels, define rules that govern when each offer appears.
- Eligibility: customer segment, geography, and device constraints.
- Inventory and pricing: SKU availability, bundle composition, and promo validity.
- Suppression: avoid stacking offers that conflict (for example, two shipping incentives).
- Fallbacks: if an offer can’t be fulfilled, show the closest alternative with the correct terms.
When these rules are explicit, your team can scale offers without turning every campaign into a manual negotiation with reality.
5.3 Personalizing Product Recommendations With Clear Business Rules
Personalized recommendations work best when they behave like a well-trained assistant: helpful, consistent, and explainable. Clear business rules turn “personalization” from a vague idea into a repeatable decision system that respects constraints like margin, inventory, shipping cost, and brand fit.
Start with the Decision Goal and the Allowed Outcomes
Before picking algorithms, define what the recommendation is allowed to do. A common goal is to increase the probability of purchase for a specific session, but the allowed outcomes must be explicit. For example:
- Allowed: show up to 6 items on a product listing page.
- Allowed: prioritize in-stock items that can ship to the customer’s region.
- Not allowed: recommend items that are out of stock, restricted, or not eligible for the customer’s promotions.
- Not allowed: show the same product repeatedly across consecutive sessions without a meaningful reason.
A practical rule of thumb: every rule should map to a user-visible behavior. If a rule can’t be observed, it probably isn’t operational.
Build a Simple Candidate Pool Before Ranking
Most recommendation failures come from ranking the wrong set of items. Start with a candidate pool built from business constraints, then rank within that pool.
Example candidate pool rules for an ecommerce catalog:
- Eligibility filter: item must be in stock and sellable in the customer’s country.
- Catalog filter: item must match the page context (category page vs. search results vs. cart).
- Safety filter: exclude items with known compliance restrictions for the customer segment.
- Diversity filter: limit items from the same brand or same price band if the page already contains similar items.
This approach keeps the ranking model focused on relevance rather than basic feasibility.
Define Business Signals as Feature Inputs with Guardrails
Business rules often rely on signals that are not purely “preference.” Treat them as inputs with guardrails.
Common signals and how to constrain them:
- Margin or contribution: use it as a tie-breaker, not the primary driver. If you rank purely by margin, you’ll recommend expensive items even when relevance is low.
- Inventory: prefer items with sufficient available quantity, but avoid starving popular items by over-penalizing.
- Shipping speed: if two items are equally relevant, prefer the one that arrives sooner.
- Promotion eligibility: only apply promotional messaging when the item is actually eligible.
Guardrail example: “Never show a promotional badge unless the item is eligible for the customer’s current offer.” That prevents confusing UI and reduces support tickets.
Turn Rules Into a Deterministic Scoring Order
To keep recommendations consistent, use a scoring pipeline with explicit precedence.
A straightforward precedence model:
- Hard filters remove ineligible items.
- Relevance score ranks remaining items.
- Business adjustments apply only within relevance bands.
- Diversity constraints reshape the final list.
Example: If relevance score is above a threshold, apply a small margin boost. If relevance is below the threshold, do not apply margin boosts at all.
Make Personalization Explainable with Rule Traces
Users don’t need a full audit log, but internal explainability matters. Store a short “rule trace” for each recommended item, such as:
- “Matched category intent + in-stock + eligible for region shipping.”
- “Similar to items viewed + same brand diversity cap respected.”
This trace helps you debug cases where recommendations look “off,” like showing unrelated items after a search.
Mind Map: Recommendation Rules Pipeline
Example: Category Page with Inventory and Promotion Constraints
Imagine a customer browsing “Running Shoes.” They viewed two models earlier but haven’t added to cart.
Business rules:
- Show 6 items.
- Only in-stock items.
- If the customer is eligible for a seasonal promotion, show at most 3 promoted items.
- Prefer items that ship in under 3 days when relevance is close.
- Avoid recommending the exact same SKU they viewed in the last session.
How it plays out:
- Candidate pool removes out-of-stock shoes and restricted items.
- Relevance ranks shoes similar to the viewed models and the category intent.
- Among near-ties, shipping speed breaks the tie.
- Final list caps promoted items at 3 and ensures variety across price bands.
The result is a list that feels tailored without violating operational realities.
Example: Cart Page with “Don’t Upsell Blindly” Rules
On a cart page, the customer intent is closer to purchase than discovery. A common mistake is pushing unrelated accessories aggressively.
Business rules for cart recommendations:
- Primary: show complementary items that are commonly purchased with cart contents.
- Secondary: show alternatives only if the cart item is low stock or has a size issue.
- Hard stop: do not show items from unrelated categories.
- UX rule: keep recommendations to 4 items to avoid crowding the checkout path.
This keeps personalization aligned with the moment: help them finish, not start a new journey.
Mind Map: Rule Types and When They Apply
Clear business rules make personalization stable. When rules are explicit, the system can be tested, monitored, and corrected without guessing whether the model or the constraints caused the outcome.
5.4 Managing Promotions Pricing and Inventory Constraints in Messaging
Promotions fail in two common ways: the price promise doesn’t match what customers can buy, or the inventory reality arrives too late. Messaging has to carry both truths at once—without making customers do math or guess.
Start with the Promotion Contract
A promotion contract is the set of rules your messaging must reflect. Define these inputs before you write copy:
- Offer type: percent off, fixed amount off, bundle, free gift, free shipping.
- Eligibility: new customers, loyalty tier, specific categories, minimum cart value.
- Price scope: which SKUs, brands, or categories the discount applies to.
- Inventory scope: which SKUs have limited stock, and how that limit is enforced.
- Timing: start and end times, plus any “while supplies last” cutoff.
Example: “20% off running shoes” is incomplete if only 300 units of a specific model are available. Your contract should say whether the discount applies to all running shoes or only to the ones that still have stock.
Translate Inventory Into Customer-Facing Rules
Inventory constraints should become simple customer rules. Convert raw stock into messaging-friendly states:
- In stock and eligible: show the promo normally.
- Low stock: show the promo but add a clear limit statement.
- Out of stock for promo: remove the promo claim or switch to an alternative offer.
- Partial eligibility: keep the promo claim only for eligible items.
A practical approach is to maintain a small set of “promo availability statuses” per SKU or promo group. Then your messaging logic maps statuses to copy.
Build a Pricing Consistency Checklist
Customers notice mismatches fast, especially when they compare the ad, the product page, and the cart. Use this checklist for every promotion message:
- Displayed price vs. computed price: the discount shown must equal the discount applied at checkout.
- Rounding rules: percent discounts should round the same way everywhere.
- Tax and shipping: decide whether the promo messaging references pre-tax totals, shipping included, or shipping excluded.
- Stacking rules: if the promo can’t combine with another discount, say so in the same place you state the price.
Example: If “$10 off $50+” is applied after another coupon, your messaging must reflect the final outcome. If it’s not stackable, don’t imply it is by omission.
Use Messaging Patterns That Match Constraint Type
Different constraints need different phrasing. Choose patterns based on what’s actually limited.
Pattern 1: Limited Quantity
Use this when the promo is tied to a stock cap.
- Good: “While supplies last: 20% off select items.”
- Avoid: “20% off all select items” when some items will drop out mid-promo.
Pattern 2: Limited SKU Set
Use this when only certain items qualify.
- Good: “Save 20% on Brand X hoodies in sizes S–L.”
- Avoid: “Save 20% on hoodies” if only Brand X qualifies.
Pattern 3: Limited Cart Value Window
Use this when eligibility depends on cart composition.
- Good: “$15 off $75+ on accessories when purchased with a watch.”
- Avoid: “$15 off accessories” if the watch requirement exists.
Mind Map: Promotion Messaging Logic
Example: One Promotion, Three Customer Experiences
Assume a promo: “25% off select headphones” with limited stock on two models.
- Customer views an eligible model with stock
- Message: “25% off today on Select Headphones.”
- Product page: shows the discounted price and the same eligibility note.
- Customer views an eligible model with low stock
- Message: “25% off today on Select Headphones. While supplies last.”
- Product page: keeps the discount visible but adds a stock note like “Limited quantity.”
- Customer clicks a promo link after the model sells out
- Message: either remove the promo claim or switch to a different eligible model.
- Cart behavior: no surprise price changes; the checkout discount matches what the message implied.
Operationalize the Rules Without Making Copy Fragile
To keep messaging reliable, separate content templates from constraint logic.
- Templates handle tone and structure: “Save X on Y” plus optional limit text.
- Rules decide which template variant is used based on SKU eligibility and inventory status.
Example template variants:
- Variant A: “Save 25% on Select Headphones.”
- Variant B: “Save 25% on Select Headphones. While supplies last.”
- Variant C: “Select Headphones deals available on eligible items only.”
This prevents the common failure mode where teams edit copy manually to fix inventory issues, then forget to update the cart experience.
QA Scenarios That Catch Real Problems
Run targeted checks across the journey:
- Ad to landing: the promo claim matches the landing page price.
- Landing to product: the product page eligibility matches the promo scope.
- Product to cart: the discount applies exactly as stated.
- Edge cases: cart contains both eligible and ineligible items; verify only eligible items receive the discount.
If you can answer “What does the customer see, and what do they pay?” for each scenario, your messaging is doing its job.
5.5 Ensuring Consistent Brand and Product Information Across Channels
Consistency is not sameness. It is the discipline of using the same facts—brand voice, product attributes, pricing rules, shipping terms, and availability—while adapting the presentation to each channel’s format and intent. When customers see conflicting details, they lose trust and spend extra effort to resolve the mismatch. Your job is to make the “resolution” happen inside your systems, not inside your customer’s head.
Start with a Single Source of Truth for Facts
Treat product and brand information as two layers.
- Brand layer covers tone, claims, imagery style, and how you describe benefits.
- Product layer covers attributes like size, material, compatibility, SKU, images, and compliance text.
A practical rule: if a detail can be written as a field in a catalog, it belongs in the product layer. If it describes how you talk, it belongs in the brand layer. For example, “water-resistant up to 30 meters” is a product fact; “built for everyday confidence” is brand language.
Define Canonical Fields and Allowed Variations
Consistency fails when teams improvise. Create a canonical list of fields and specify which ones can vary by channel.
- Never vary without a reason: product name, core specs, compatibility, legal disclaimers, return policy text.
- May vary by channel: hero image crop, short description length, call-to-action phrasing, and the order of benefits.
Example: On a product page you might show “Model: A12” and “Battery: 24 hours.” In an email you can shorten to “Up to 24 hours battery” but you should not drop the model if it is required for identification.
Build a Content Contract Between Teams and Channels
A content contract is a shared agreement on what each channel must receive and how it must render it.
Include:
- Field mapping: which catalog fields populate each channel element.
- Formatting rules: units, capitalization, measurement rounding, and whitespace.
- Claim rules: which benefits require proof text and where that proof appears.
- Fallback rules: what happens when a field is missing.
Example fallback: if “compatibility” is empty, the channel should not display a compatibility badge at all. Showing “Compatible with everything” is not consistency; it is a bug with good intentions.
Use Channel-Specific Templates That Pull from the Same Data
Templates keep teams from rewriting the same facts. Each template should reference the same canonical fields.
- Email template: uses short title, one primary image, 3 bullet specs, and a single offer block.
- Paid social template: uses a cropped image, a single benefit line, and a destination URL that lands on the matching product detail.
- Onsite template: uses full specs, structured attributes, and the complete legal text.
Example: If a promotion changes the price, every template must reference the same promotion object so the price, promo label, and expiration date match.
Synchronize Offer, Availability, and Shipping Terms
Product facts alone are not enough. Customers judge consistency by what they can actually buy.
Create a rule set that ties:
- Price and promo label to the same promotion record.
- Availability to inventory status.
- Shipping promise to the same fulfillment logic.
Example: If a channel shows “Free shipping over $50,” the cart and checkout must apply it using the same threshold and eligibility rules. Otherwise, the customer experiences a contradiction.
Validate with Practical QA Checks
Consistency is easiest to verify when you test what customers see.
Run QA in three layers:
- Data QA: field completeness, unit correctness, and legal text presence.
- Rendering QA: template formatting, truncation behavior, and image selection.
- Commerce QA: price, availability, and shipping terms match the checkout outcome.
Example test script: pick 10 SKUs across categories, then verify that the price shown in an ad equals the price shown on the landing page equals the price shown in checkout for the same session.
Mind Map: Consistent Brand and Product Information
Example: One Product, Three Channels, One Set of Facts
A customer sees a running shoe in a paid social ad. The ad displays the correct model name, the same “water-resistant” claim, and the same promo expiration date. The landing page repeats the same core specs and shows the complete legal disclaimer. The email follow-up uses the same product image and the same price logic, but shortens the description to fit the layout. During checkout, the shipping promise and return policy match what was shown earlier. The customer experiences continuity, not a scavenger hunt.
Operationalize Consistency with Ownership and Review
Assign ownership for brand text and product attributes separately, then require a lightweight review when either layer changes. A change to a legal disclaimer should trigger a check across every template that can display it. A change to a product spec should trigger a check across every channel that can show that spec. Consistency becomes a process, not a hope.
6. Search and Commerce Experience Optimization for Cross-Channel Consistency
6.1 Improving Site Search Relevance With Product and Intent Signals
Site search is where “I’m curious” turns into “show me.” Relevance improves when results reflect both what the customer is looking for (intent) and what the catalog can actually satisfy (product signals). The trick is to treat search as a decision system, not a keyword lookup.
Start with Intent Signals That Match Real User Questions
Intent signals should describe the job the customer is trying to do. Build them from observable behavior and query context:
- Query intent: classify queries into buckets such as find a product, compare, learn, replace, find near me, or solve a problem. Example: “waterproof hiking boots” is find a product; “best boots for ankle support” is compare/choose.
- Query modifiers: detect constraints like size, color, material, compatibility, budget, and urgency. Example: “size 10 black” should strongly narrow results even if the base term is vague.
- Session behavior: use prior actions to infer intent. Example: if the user clicked “running shoes” then searched “arch support,” the second query likely refines the first.
- Device and context: mobile searches often need faster narrowing; desktop can support longer comparisons. Example: on mobile, prioritize results with clear availability and fast path to add-to-cart.
A practical rule: if you can’t explain why a result matched the intent bucket, it probably won’t stay relevant when traffic changes.
Add Product Signals That Reflect Purchase Readiness
Product signals answer: “Can this item satisfy the intent right now?” Use signals that are stable and measurable:
- Catalog attributes: brand, category, size range, color variants, material, compatibility fields. Example: “iPhone 15 case MagSafe” should match only products with MagSafe support.
- Availability and fulfillment: in-stock status, shipping speed, store pickup eligibility. Example: “same day delivery” should demote items that cannot meet the promise.
- Price and promotion constraints: current price, promo eligibility, and whether the promotion applies to the exact variant. Example: “under $50” should filter or heavily downrank items above the threshold.
- Quality and trust signals: return rate by category, rating count, and review sentiment summaries. Example: for “replacement filter,” prefer products with strong fit and low return rates.
- Content completeness: whether the product page includes key specs that match the query. Example: “HEPA air purifier CADR” should prefer pages that list CADR clearly.
Keep product signals separate from intent signals in your ranking logic so you can debug relevance without guessing.
Build a Two-Stage Ranking Pipeline
A two-stage approach keeps relevance stable and makes tuning less chaotic:
- Candidate retrieval: use lexical matching plus light semantic expansion (synonyms, spelling fixes, common abbreviations). Example: “sofa bed” should retrieve “convertible sofa” even if the exact phrase differs.
- Re-ranking: apply intent and product signals to reorder the candidate set.
Example re-ranking logic for a find a product query:
- Hard constraints: size/color/compatibility must match.
- Soft boosts: in-stock, fast shipping, strong rating, and strong attribute coverage.
- Intent alignment: match the query’s primary category and variant level.
For a compare query:
- Prefer products with overlapping attributes and clear differentiators.
- Boost items with comparison-friendly content (spec tables, feature bullets).
- Demote items that are out of stock or missing key specs.
Mind Map: Signals and Ranking Flow
Examples That Show the Difference
Example: Compatibility Query
Query: “bosch dishwasher 24 inch rack”
- Intent bucket: replace.
- Hard constraints: match dishwasher brand/model compatibility fields and 24-inch dimension.
- Product boosts: in-stock, strong fit reviews, and product pages listing rack compatibility clearly.
Result: the top items are the correct rack variants, not just any “dishwasher parts.”
Example: Budget Modifier
Query: “wireless earbuds under $80”
- Intent bucket: find a product.
- Hard constraints: current price <= 80 for the exact variant.
- Soft boosts: rating count, battery life spec coverage, and availability.
Result: users don’t waste clicks on items that violate the budget.
Example: Compare Query
Query: “best mattress for back pain firm”
- Intent bucket: compare/choose.
- Candidate retrieval: mattress category plus synonyms for firmness.
- Re-ranking: prefer products with clear firmness ratings, strong review themes for back support, and return-friendly policies.
Result: the list supports decision-making rather than dumping the most popular item.
Debugging and Tuning Without Guesswork
Relevance work fails when teams can’t explain outcomes. Add an internal “why this result” view that reports:
- which intent bucket the query mapped to,
- which constraints passed or failed,
- which product signals contributed most to the final score.
Then run targeted tests with real queries: one set for each intent bucket and one set for common modifiers (size, compatibility, budget). If a modifier query still surfaces mismatched variants, fix attribute mapping before adjusting weights.
When intent and product signals are separated, constrained correctly, and re-ranking is explainable, search becomes predictable in a good way: it behaves like it understands the question, not like it guessed.
6.2 Optimizing Category and Landing Pages for Conversion Paths
Category and landing pages do two jobs at once: they help shoppers decide what to do next, and they reduce the effort required to do it. Conversion paths break when pages force people to hunt for the right product, misunderstand what the page contains, or hit friction before they can act.
Start with Conversion Path Inputs
Before changing layout, confirm the page’s role in the journey. A category page usually supports comparison and filtering, while a landing page supports a specific intent tied to an ad, email, or internal link.
Use three inputs to set the page’s structure:
- Entry intent: what the visitor expected based on the referring message.
- Decision stage: browsing, comparing, or ready to buy.
- Primary action: view product details, add to cart, or start checkout.
Example: If an email promotes “Summer Running Shoes under $120,” the landing page should immediately show relevant products and price range, not a generic shoe category.
Category Page Layout That Matches How People Filter
A strong category page makes filtering feel like narrowing a search, not solving a puzzle.
-
Clear category identity
- Put the category name and a one-sentence description near the top.
- Include a short “what you’ll find” line that mirrors the shopper’s intent. Example: “Men’s trail running shoes built for grip on loose surfaces.”
-
Filters that are usable at a glance
- Prioritize the top 5–8 filters by usage and conversion impact.
- Show filter counts and keep filter labels consistent with product attributes. Example: If “Cushioning” exists as a product attribute, don’t label it “Comfort Level” in one place and “Cushion” in another.
-
Product grid that supports fast comparison
- Use consistent card height, image aspect ratio, and visible key attributes (price, rating, best-seller badge if true).
- Keep the “Add to cart” option aligned with the primary action for that category. Example: For a high-intent category like “Refurbished Laptops,” show price and condition label prominently.
-
Pagination and infinite scroll with predictable behavior
- If using infinite scroll, ensure filters and sorting remain stable.
- Avoid sudden layout shifts that make users lose their place.
Landing Page Structure That Prevents Misdirection
Landing pages should reduce the number of decisions before the first meaningful action.
-
Message match above the fold
- Mirror the referring offer in the headline or hero section.
- Include the key constraint: size range, subscription terms, bundle contents, or shipping window. Example: “Free returns for 30 days” belongs near the offer, not buried in the footer.
-
Offer clarity and scope
- If the offer applies only to certain products, show the qualifying products or a clear selector.
- Avoid “See details” links that require extra clicks before understanding eligibility.
-
Decision support that answers common questions
- Add a compact section for shipping, returns, warranty, and compatibility.
- Use short bullet points rather than long paragraphs.
-
Single primary call to action
- Keep one dominant action button style and placement.
- Secondary actions like “Learn more” should not compete visually.
Mind Map: Page Elements and Their Conversion Jobs
Measurement That Tells You What to Fix First
Optimization without measurement turns into guesswork. Track events that map to the conversion path steps.
For category pages, prioritize:
- Filter interaction rate: users who apply filters.
- Sort usage: indicates whether the default order matches intent.
- Product detail view rate per session: shows whether the grid is compelling and understandable.
For landing pages, prioritize:
- CTA click-through rate: whether the offer and page match.
- Scroll depth to offer details: indicates whether key constraints are found.
- Add to cart rate by product group: reveals if eligibility or assortment is confusing.
Example: Turning a Generic Category Into a Conversion Path
Suppose a category page for “Kitchen Knives” underperforms. The fix sequence:
- Update the top description to specify the shopper’s likely intent, like “Everyday prep knives for daily cooking.”
- Move the most used filters to the top and ensure labels match product attributes.
- On product cards, show blade type and material consistently.
- If the category is used by campaigns, create landing pages for the campaign themes (e.g., “Chef’s Knife Deals”) that show only qualifying products and include return/shipping bullets near the hero.
This approach avoids random redesign. It aligns page elements with the decisions shoppers are trying to make, then verifies the impact with step-level metrics.
6.3 Aligning Onsite Merchandising with Offsite Campaign Messaging
Onsite merchandising and offsite campaigns should feel like the same conversation. The simplest way to achieve that is to treat every campaign as a set of promises, then make sure the onsite experience keeps those promises at each step: landing page, category browsing, product detail, and checkout.
Foundations: What “Alignment” Actually Means
Alignment is not matching colors or slogans. It is matching intent signals and constraints. If an ad says “Free returns,” the onsite product page must show the return policy near the purchase decision. If an email highlights “Under $50,” the onsite recommendations must respect that price band or clearly explain why they do not.
A practical starting point is to define three layers of campaign meaning:
- Message intent: what the customer is trying to do (compare, find a deal, solve a problem).
- Offer constraints: what limits apply (price, eligibility, shipping speed, inventory).
- Product scope: which items are in play (specific SKUs, categories, brands).
When onsite merchandising follows those layers, customers stop re-reading the page to figure out whether the campaign still applies.
Build a Shared “Campaign Contract”
Create a short internal contract for each campaign. It should be readable by both merchandising and media teams.
Include:
- Primary intent (e.g., “starter kit for beginners” or “replacement parts for existing models”).
- Allowed product scope (exact SKUs, category IDs, brand list).
- Offer rules (discount type, minimum spend, membership requirements).
- Inventory and fulfillment rules (what happens when stock runs out).
- Onsite placements required (landing hero, category tiles, PDP modules, cart upsells).
Example: A paid search campaign targets “cordless drill deals.” The contract states that onsite category tiles must prioritize cordless drills with the same discount, and PDP modules must show compatible batteries only if they meet the same promo eligibility.
Map Onsite Surfaces to Offsite Promises
Offsite messaging usually lands customers at a page that is not the final decision point. Merchandising must carry the promise forward.
Use this surface-to-promise mapping:
- Landing page: confirm the offer constraints immediately (price, eligibility, shipping).
- Category page: keep sorting and filtering consistent with the campaign’s intent (deal-first for bargain intent; relevance-first for problem-solving intent).
- Product detail page: reinforce the same product scope and show the same constraints (promo badge, return policy, delivery estimate).
- Cart and checkout: ensure the discount applies as advertised; if it cannot, show the reason before the customer reaches checkout.
If you cannot guarantee the same scope everywhere, you must degrade gracefully. For instance, if a campaign includes a narrow set of SKUs but inventory changes, the category page can show the closest eligible alternatives while the PDP module clearly indicates “similar items” rather than pretending the exact SKU is available.
Mind Map: Alignment Mechanics
Practical Examples You Can Implement
Example 1: “Free Shipping Over $75” Campaign
- Offsite ad: “Free shipping over $75.”
- Onsite landing: show a progress bar toward $75 and list qualifying items.
- Category page: default filter to items that qualify for the threshold.
- PDP: show the same threshold and estimate delivery date.
- Cart: if the cart total is below $75, show the exact items that would push it over.
This prevents the common mismatch where customers click an ad, then discover the cart total doesn’t qualify.
Example 2: “New Arrivals in Running Shoes” Campaign
- Offsite message: emphasizes freshness and model variety.
- Onsite category: sort by “newest” and highlight the same brand set used in the campaign.
- PDP: include a “compare similar new models” module constrained to the same brand set.
- Email follow-up: if sent after browsing, reuse the same model family so the customer sees continuity.
The key is that the onsite experience should keep the same selection logic, not just the same category name.
Advanced Details Without the Mess
Use eligibility-aware merchandising. Recommendations should respect the campaign contract. If the campaign is restricted to a brand or a promo window, the recommendation engine must apply those filters before ranking.
Design fallback logic. When inventory or eligibility changes, define what “close enough” means. For example, if the exact SKU is out of stock, you can show the same model in another color, then the same category with the same discount, and only then general recommendations.
Validate with scenario checks. Test at least these cases: eligible customer, ineligible customer, out-of-stock SKU, and partial cart eligibility. Each scenario should produce a consistent onsite explanation rather than silent failures.
When onsite merchandising mirrors the campaign contract, customers experience fewer contradictions. That’s the whole trick: fewer surprises, clearer choices, and a journey that doesn’t ask people to do extra detective work.
6.4 Enhancing Product Pages with Trust Signals and Decision Support
A product page earns its keep when it reduces uncertainty. Trust signals answer “Can I rely on this?” while decision support answers “Will this fit my situation?” Together, they shorten the path from interest to purchase without forcing visitors to guess.
Trust Signals That Answer Real Questions
Start with the trust questions customers naturally ask:
- Will it work as described? Show proof tied to the claim. If you say “water-resistant,” specify the rating and what it covers.
- Will it arrive and be easy to return? Display delivery estimates and return terms in plain language near the purchase area.
- Is this a safe choice for me? Include warranty coverage, compatibility notes, and any required setup steps.
- Do other people like it for the same reason I’m buying? Use reviews that include relevant context such as skin type, room size, device model, or usage scenario.
A simple rule: each trust element should have a visible “because” behind it. “Free returns” is helpful; “Free returns within 30 days, items must be unused” is better.
Decision Support That Prevents Mismatches
Decision support is not a wall of specs. It is structured help that guides selection.
-
Clarify fit and compatibility
- Add a compatibility checklist (e.g., “Works with iPhone 15 / Android devices with USB-C”).
- If compatibility depends on a setting, show the exact setting name.
-
Make trade-offs explicit
- For performance products, show what changes when you choose a higher tier: battery life, noise level, or coverage area.
- For apparel, show how sizing behaves across body types using measured garment dimensions.
-
Reduce cognitive load
- Put the “top three differences” above the fold for multi-variant products.
- Keep long specs in an expandable section labeled by intent, such as “Technical details” or “Installation requirements.”
-
Support the “I’m not sure” moment
- Include a short quiz or guided selector that ends with a single recommended option and a reason.
- Offer a “compare these two” view that highlights differences customers care about.
Mind Map: Trust Signals and Decision Support
Integrated Layout Blueprint
Place trust signals where they reduce friction:
- Near the primary call to action: delivery, returns, warranty, and key limitations.
- Next to variant selection: compatibility notes and what changes between variants.
- Near reviews: review filters that match the buyer’s intent (size, skin type, room size, device model).
A common failure is scattering trust items across the page. If a customer is about to click “Add to cart,” they should not have to hunt for return terms.
Example: Turning Claims Into Verifiable Blocks
Claim: “All-day comfort.”
Better product-page block:
- Comfort duration: “Up to 12 hours based on internal wear tests.”
- Limits: “Best results with regular breaks; not designed for continuous 24-hour wear.”
- Proof: “Tested on 30 participants; results vary by activity.”
This format keeps the statement honest and gives the visitor a way to judge fit.
Example: Review Context That Helps Selection
Instead of showing only star ratings, add structured review attributes:
- For skincare: skin type, concern (dryness, acne), and whether the reviewer followed the routine.
- For home goods: room size, surface type, and whether the product was used with recommended accessories.
Then let visitors filter by the attribute that matches their situation. A review that says “worked for sensitive skin” is useful; a review that says “great product” is not.
Example: Variant Selection with Decision Support
For a laptop sleeve with sizes, show:
- Variant selector: size options.
- Compatibility line: “Fits laptops up to 13.3 inches measured diagonally.”
- Error-proofing: if a size is out of stock, disable it and explain the next available date.
Even a small amount of guardrails prevents the classic mismatch: buying the wrong size and then blaming the product page.
Quick Checklist for Implementation
- Every trust signal includes a clear “because.”
- Every decision-support element maps to a specific selection risk.
- Placement supports the moment of action, not the moment of browsing.
- Reviews include context and filters that match common buyer questions.
6.5 Measuring Onsite Micro Conversions That Predict Purchase
Onsite micro conversions are small actions that happen before a purchase, such as viewing a size chart, adding a product to a wishlist, or starting checkout. They matter because they give you earlier signals than the final transaction, and they help you diagnose where customers get stuck. The key is to measure micro conversions in a way that is consistent, interpretable, and tied to purchase outcomes.
Start with Purchase-Adjacent Signals
A micro conversion should be meaningfully closer to purchase than a generic page view. Good candidates include:
- Intent actions: search results clicks, product detail views, selecting a variant (size/color), opening shipping or returns information.
- Consideration actions: adding to cart, wishlist saves, comparing products, downloading a spec sheet.
- Commitment actions: initiating checkout, entering shipping details, selecting a payment method.
Example: If your product is apparel, “selecting a size” is more predictive than “scrolling 60% of the page.” Scrolling can happen for many reasons; selecting a size usually means the customer is ready to decide.
Define a Measurement Model That Prevents Confusion
Before you instrument anything, decide how you will connect micro conversions to purchase.
- Choose a conversion window: for example, measure whether a purchase occurs within 7 days of the micro conversion.
- Decide the attribution rule: use “first micro conversion” for simplicity, or “last micro conversion before purchase” if you want the most recent intent.
- Set the unit of analysis: track per session, per user, or per product. For product-level prediction, product-scoped events are usually best.
A practical rule: if the same micro conversion can happen multiple times in one session, you should record both count and first occurrence timestamp. That lets you answer questions like “did they try once or repeatedly?” without guessing.
Instrument Events with Clear Event Semantics
Micro conversion events should have consistent names and required fields. At minimum, include:
- event_name
- user_id or anonymous_id
- session_id
- product_id (when relevant)
- variant_id (when relevant)
- page_context (where the action occurred)
- timestamp
Example: “variant_selected” should include the variant the customer chose. If you only log “variant_selected=true,” you lose the ability to compare predictive strength across sizes, colors, or price points.
Build a Prediction Table That Shows Lift, Not Just Correlation
For each micro conversion, compute:
- Conversion rate to purchase within your window
- Baseline purchase rate for the same segment (e.g., traffic source, device, or category)
- Lift: micro conversion purchase rate minus baseline, or ratio if you prefer
Example: Suppose the baseline purchase rate for mobile visitors in a category is 1.2%. If “initiated checkout” has a 28% purchase rate within 7 days, the lift is large and actionable. If “viewed size chart” has a 1.6% purchase rate, it’s still useful, but you should treat it as a weaker signal.
Mind Map: Micro Conversion Measurement Workflow
Use Segments to Avoid Misleading Signals
A micro conversion can be predictive in one segment and noisy in another. Segment by:
- device (mobile vs desktop)
- traffic source (search vs social)
- category (high-consideration vs low-consideration)
- price band
Example: “Opened shipping info” might be highly predictive for higher-priced items where delivery cost matters, but less predictive for low-cost accessories.
Validate with QA and Sanity Checks
Micro conversion tracking fails in boring ways: duplicate events, missing product IDs, or events firing on the wrong page. Use checks like:
- Event frequency: does “initiate checkout” happen at a plausible rate?
- Field completeness: are product_id and variant_id present when required?
- Funnel consistency: does “payment method selected” only occur after checkout initiation?
A simple sanity test: pick 20 sessions where users initiated checkout and confirm that the micro conversion events appear in the expected order. If the order is scrambled, your prediction math will be too.
Turn Micro Conversions Into Actionable Diagnostics
Once you know which micro conversions predict purchase, you can connect them to onsite changes.
- If “variant_selected” predicts purchase strongly but drops after a UI change, the change likely increased decision friction.
- If “add to cart” predicts purchase but “initiate checkout” does not, the checkout entry step may be confusing or slow.
Example: After a redesign, you notice “returns policy opened” increases, but purchase lift decreases. That pattern often means customers are looking for reassurance because something else is unclear, not because they are closer to buying.
Micro conversions are only useful when they are measured consistently and interpreted against purchase outcomes. When you combine careful event definitions, a clear prediction window, and lift-based analysis, you get signals that are early enough to act on and specific enough to explain why customers hesitate.
7. Paid Media Execution for Coordinated Discovery and Purchase
7.1 Structuring Campaigns by Journey Stage and Customer Intent
A campaign works better when it answers two questions at the same time: where is the customer in the journey, and what are they trying to do right now? “Journey stage” keeps you from treating everyone the same. “Customer intent” keeps you from treating different behaviors as if they were the same.
Journey Stages as Operational Buckets
Use stages that map to observable behaviors, not internal feelings. A practical set for cross-channel commerce journeys:
- Discovery: customer is exploring categories, comparing options, or searching broadly.
- Engagement: customer is evaluating specifics like features, sizes, compatibility, or reviews.
- Consideration: customer is narrowing choices, adding to cart, or starting checkout.
- Purchase: customer completes an order.
- Post-Purchase: customer needs setup, support, replenishment, or proof of value.
Each stage should have a primary conversion goal and a secondary engagement goal. For example, Discovery might optimize for “category page view” and “email signup,” while Consideration optimizes for “product detail view” and “add to cart.”
Customer Intent Signals That Don’t Lie
Intent is best inferred from actions that cost the customer effort. Examples:
- Search intent: query terms like “waterproof hiking boots” or “replacement filter for model X.”
- Browse intent: repeated visits to a category, scrolling through specs, or viewing multiple variants.
- Commercial intent: add-to-cart, shipping method selection, coupon page visits.
- Risk intent: returns policy page views, warranty page views, or customer service contact.
When you structure campaigns, you assign each audience segment to one stage and one intent. If a segment fits multiple, split it. Otherwise, your creative and landing pages will fight each other.
Campaign Architecture That Stays Coherent
A clean structure uses three layers: audience, message, and landing experience.
- Audience: stage + intent + channel fit.
- Message: one job-to-be-done, one proof point, one next step.
- Landing experience: align the page to the message and reduce the number of decisions.
A common mistake is sending Discovery audiences to the same product page used for Purchase audiences. Discovery needs context and comparison; Purchase needs friction removal like delivery estimates and payment options.
Mind Map: Campaign Structure by Stage and Intent
Example: One Product, Multiple Campaigns
Assume a customer is looking at a “smart thermostat.” You run four campaigns that share the same product catalog but differ in audience, message, and landing.
-
Discovery campaign
- Audience: people searching “thermostat for apartment” and browsing category pages.
- Message: “Works with common HVAC setups” plus a simple compatibility check.
- Landing: category hub with “apartment-ready” filters and a short explainer.
-
Engagement campaign
- Audience: visitors who viewed the thermostat’s features and read at least one review.
- Message: “Energy savings you can verify” with a single chart and review highlights.
- Landing: PDP section that surfaces the chart and top pros/cons.
-
Consideration campaign
- Audience: added to cart but didn’t start checkout.
- Message: “Delivery by Thursday” and “easy returns” shown above the fold.
- Landing: cart page with the incentive applied automatically and shipping details.
-
Purchase campaign
- Audience: started checkout but dropped at payment.
- Message: “Payment options and secure checkout” with a brief reassurance line.
- Landing: checkout step with fewer distractions and visible trust badges.
Example: Intent Overrides Stage When Needed
Sometimes intent is stronger than stage. If a user searches “replacement filter for model X,” they are likely in a Purchase-adjacent intent even if they’ve never visited your site. In that case, treat it as Consideration: show the exact match, availability, and compatibility confirmation. The stage label is less important than the job the customer is trying to complete.
Practical Rules for Building the Set
- Keep one primary goal per campaign; secondary goals should support it, not compete.
- Use landing pages that mirror the message’s promise and the audience’s intent.
- Split audiences when intent differs, even if the journey stage label is the same.
- Review campaign performance by stage and intent separately so you can fix the right layer.
A Simple Checklist Before Launch
- Audience: stage + intent mapped to real signals.
- Message: one next step, one proof point, no extra promises.
- Landing: aligned content order and reduced decision points.
- Measurement: success metric matches the stage goal, not just clicks.
When these pieces line up, the campaign stops being a collection of ads and becomes a sequence of decisions the customer can follow without guessing.
7.2 Building Audience Strategies With Frequency and Reach Controls
Audience strategy is the part where you decide who sees your ads, how often they see them, and what “enough” looks like. Frequency and reach controls keep you from paying twice for the same attention and from annoying the same people into ignoring you.
Start with Audience Goals and Exposure Rules
Begin by separating two outcomes: discovery engagement and purchase intent. For discovery, you usually want broader reach with lighter repetition. For purchase intent, you can accept narrower reach with higher repetition because the audience is already closer to action.
Define exposure rules in plain terms:
- Reach goal: the minimum unique people you want to touch in a given period.
- Frequency cap: the maximum number of impressions per person in that period.
- Recency window: how recently someone must have interacted to qualify for higher frequency.
Example: A home-improvement retailer runs a weekend campaign for “kitchen faucets.” For new shoppers, cap at 2 impressions per 7 days. For people who viewed a faucet product page in the last 14 days, allow up to 4 impressions per 7 days.
Build Audience Tiers That Match Intent
Create tiers so your frequency caps are not one-size-fits-all.
- Tier 1: Cold discovery. Broad segments based on contextual signals or broad interests. Frequency should be low.
- Tier 2: Warm consideration. People who engaged with content, searched, or visited relevant categories. Frequency can be moderate.
- Tier 3: Hot purchase intent. Product viewers, cart starters, checkout initiators. Frequency can be higher, but only for a short recency window.
A practical rule: if the audience is smaller and more specific, you can raise frequency without wasting impressions.
Choose a Measurement Window That Matches Buying Cycles
Frequency caps depend on the time window you choose. Use a window that aligns with how long it takes your typical customer to move from seeing to buying.
If your average time-to-purchase is around two weeks, a 7-day frequency cap prevents overexposure early, while a 14-day window helps you understand whether the message is landing.
Example: For a subscription box with a 10–20 day decision cycle, set discovery at 2 impressions per 7 days and warm at 3 impressions per 14 days.
Implement Frequency Controls Without Breaking Reach
Frequency caps can reduce delivery if the audience is too small. To avoid that, use a two-step approach:
- Set caps per tier based on intent.
- Allocate budget across tiers so the system still has enough eligible people.
If Tier 3 is tiny, you may need to lower its cap or expand eligibility (for example, include “category viewers” in addition to “product viewers”). The goal is to keep the campaign from stalling.
Use Creative Rotation to Reduce Perceived Repetition
Frequency caps limit impressions, but they do not address whether the ad feels the same. Rotate creative elements that change the message while staying consistent with the offer.
A simple rotation plan:
- Angle: benefits vs. comparison vs. how-to.
- Format: static vs. short video vs. carousel.
- Product set: swap top sellers with “similar items” for the same intent.
Example: For cart starters, rotate between “free returns,” “delivery timing,” and “best match for your previous views.” Keep the landing page consistent so the user’s next step is clear.
Mind Map: Frequency and Reach Control Logic
Example: A Two-Week Campaign Setup
Assume a campaign period of 14 days.
- Tier 1 Cold discovery: 2 impressions per person per 7 days; target broad reach.
- Tier 2 Warm consideration: 3 impressions per person per 14 days; include category viewers and engaged video viewers.
- Tier 3 Hot purchase intent: 4 impressions per person per 7 days; include product viewers and cart starters from the last 14 days.
To keep delivery healthy, monitor two numbers during the first few days:
- Unique reach delivered by tier (not just total impressions).
- Frequency distribution (how many people are receiving 1, 2, 3+ impressions).
If Tier 3 frequency is capped but unique reach is low, expand eligibility slightly (for example, add “search results page visitors” from the last 14 days) rather than raising the cap.
Common Failure Modes and Fixes
- Cap too high for cold audiences: reach collapses into the same people. Lower Tier 1 frequency and increase creative rotation.
- Cap too low for hot audiences: conversions stall because the message arrives too rarely. Raise Tier 3 frequency only within the recency window.
- Ignoring recency: someone who saw the ad yesterday keeps getting it while a new viewer never sees it. Use recency windows per tier.
Frequency and reach controls work best when they are tied to intent tiers, time windows, and creative variation. When those pieces align, you get consistent delivery without turning your ads into a repetitive background noise.
7.3 Using Creative Testing Plans That Tie to Journey Outcomes
A creative testing plan is only useful if it connects a change you can make (copy, layout, imagery, offer framing) to a journey outcome you can measure (engagement, add-to-cart, purchase, or a meaningful step in between). The trick is to test the smallest set of creative variables that plausibly influence the next decision the customer makes.
Start with Journey Outcomes and Decision Points
Pick one journey stage for the test, then name the decision the customer is making at that stage. For example, in discovery the decision might be “click to learn more,” while in consideration it might be “save or view details,” and in purchase it might be “add to cart or complete checkout.”
Define one primary metric and one guardrail metric. Primary metrics should map to the decision point; guardrails prevent you from “winning” by breaking something else. Example: if the primary metric is click-through rate on a product discovery ad, a guardrail could be downstream add-to-cart rate for the same audience.
Translate Outcomes Into Creative Hypotheses
Write hypotheses in a format that forces clarity: “If we change X in the creative, then Y will improve because Z.” Keep Z grounded in customer behavior. Examples:
- If we show a comparison-style image earlier, then product page views will increase because customers can evaluate differences faster.
- If we reframe the offer as a bundle with a clear price, then add-to-cart will increase because the value is easier to compute.
Avoid vague hypotheses like “better creative.” You want a reason you can test.
Choose Test Units and Constraints
Decide what you will vary and what you will keep constant.
- Test unit: ad creative, landing page hero, email subject line plus preview text, or product recommendation module.
- Constraints: keep audience, targeting rules, and landing page URL stable unless the test is explicitly about landing page experience.
A practical rule: if you change too many elements at once, you’ll learn that “something changed,” not what caused the change.
Build a Testing Matrix That Matches Journey Stage
Use a matrix to ensure each creative element is tested where it matters.
Mind Map: Creative Testing Plan to Journey Outcomes
Design Experiments That Don’t Confuse the Data
Use one of two common designs.
-
Single-variable A/B tests: change one creative element at a time. This is best when you’re still learning what matters.
-
Factorial or controlled multi-variable tests: test two or three variables with enough sample size to estimate their separate effects. This is best when you already know the major drivers and want to refine.
If you run multi-variable tests, document which combinations you included so analysis stays honest.
Example: Discovery Ad Creative Test with a Clear Chain
Goal: improve discovery clicks without harming later engagement.
- Audience: people who viewed a category page but did not click a product.
- Primary metric: click-through rate to the product listing.
- Guardrail: product listing engagement rate (e.g., time on page or scroll depth) within the first session.
Creative hypotheses:
- Variant A: “Top-rated in its category” badge near the headline.
- Variant B: “Compare sizes in one view” with a visual comparison layout.
What stays constant: targeting, budget, landing URL, and the same product set. After the test, you compare lift in CTR and confirm the guardrail didn’t drop.
Example: Email Creative Test That Targets Consideration
Goal: move from browsing to product evaluation.
- Trigger: browse abandonment on a product detail page.
- Primary metric: product page return rate within 24 hours.
- Guardrail: add-to-cart rate from those return sessions.
Creative variables:
- Subject line: “Still thinking about it” vs “Here’s what changes between versions.”
- Body structure: short reminder with one image vs short reminder plus a two-bullet decision aid.
Why this works: the subject line influences whether the email is opened, while the body layout influences whether the customer can decide quickly once they’re back.
Operationalize the Plan with a Simple Checklist
Before launch, confirm:
- The primary metric matches the journey decision.
- The guardrail metric is defined and tracked.
- Only the intended creative variables change.
- Tracking covers the full path from exposure to the next journey step.
- Results are reviewed with a threshold for action, not just “looks better.”
A good creative testing plan is less about creativity and more about discipline: you test a specific idea, measure the right outcome, and keep the rest of the journey steady enough to learn something real.
7.4 Implementing Landing Page and Feed Alignment for Ad to Cart Flow
Landing page and product feed alignment is the part of the ad-to-cart journey where “the promise” meets “the inventory.” When they match, customers spend less time figuring out what they clicked and more time deciding what to buy. When they don’t, you get higher bounce rates, lower add-to-cart rates, and customer support tickets that read like a detective novel.
Core Principle
Treat the ad click as a request for a specific product context. Your landing page must answer that request using the same product identity, pricing rules, availability status, and key attributes that the ad used.
A practical way to think about alignment is to define a single “ad-to-cart contract” with four fields:
- Product identity: SKU, product ID, or canonical URL mapping.
- Offer terms: price, promo code behavior, shipping threshold, and return policy snippet.
- Availability: in-stock status and delivery estimate logic.
- Presentation attributes: size, color, pack size, and any eligibility constraints.
If any field differs, the customer experiences it as a bait-and-switch even when the system is technically correct.
Step 1: Build a Deterministic Mapping from Ad to Product
Start by ensuring every ad unit can be traced to a product feed record.
- For search ads, map the keyword intent to a category or product set, then select a default product for landing.
- For shopping ads, map directly to the feed item using product ID.
- For display and social, include a product identifier in the landing URL so the page can render the exact item.
Example: A shopping ad shows “Trail Runner Socks, Black, Size M” at $12.99. The landing URL includes pid=SR-TS-BLK-M. The page uses pid to pull the exact feed record and renders the same title, price, and variant.
Step 2: Align Landing Page Components to Feed Fields
Landing pages usually fail alignment in predictable places. Use a component checklist tied to feed fields.
- Hero product block: title, image, variant selector defaults, and price.
- Promotion block: discount amount, promo code requirements, and expiration rules.
- Shipping and returns: shipping cost logic and return eligibility.
- Trust signals: warranty, rating, and delivery estimate text that depends on availability.
- CTA button state: enabled only when the feed says the item is purchasable.
Example: If the feed marks the item as “backorder,” the CTA should read “Preorder” or “Notify me,” not “Add to cart.” The page should also avoid showing “Ships today” if delivery logic won’t support it.
Step 3: Prevent Feed Drift with a Single Source of Truth
Alignment breaks when the landing page uses one pricing source and the feed uses another. Keep these rules tight:
- Use the same pricing engine for feed generation and landing rendering.
- Use the same inventory service for feed availability and CTA state.
- Store canonical product identifiers and avoid “best guess” matching by name.
Example: A feed item updates price at 2:00 PM. If the landing page caches price for 24 hours, you’ll see mismatches. Fix by caching identifiers longer than prices, or by expiring price fragments quickly.
Step 4: Handle Variant and Attribute Logic Correctly
Many ad clicks specify a variant (color/size), but landing pages sometimes default to the first variant in the catalog.
- When the ad includes variant parameters, set the landing page variant selector to match.
- When the ad is category-level, choose a default variant using a consistent rule (for example, the most common in the feed for that category).
- Ensure out-of-stock variants are either disabled or clearly labeled.
Example: An ad targets “Black, Size M.” The landing page loads variant M as selected. If M is out of stock but L is available, show L as selectable and keep the CTA disabled for M.
Step 5: Validate the Ad-to-Cart Flow with Test Cases
Create a small test matrix that covers the failure modes you actually see.
- In-stock vs. out-of-stock
- Promo vs. no promo
- Free shipping threshold met vs. not met
- Variant present vs. variant missing
- Price change between feed refresh and page render
Example: Test a promo item where the discount applies only above a quantity threshold. Confirm the landing page shows the correct “from” price and that the cart reflects the same rule.
Mind Map: Landing Page and Feed Alignment
Example: One Product, Three Ad Types
- Shopping ad: URL includes
pidand variant. Landing renders exact item and CTA state. - Category ad: URL includes category ID. Landing shows a curated product list, but the first item’s price and availability must still match feed.
- Retargeting ad: URL includes last viewed product ID. Landing highlights that product and keeps promo logic consistent with the feed.
Quick Implementation Checklist
- Confirm every ad click resolves to a feed item using canonical IDs.
- Ensure landing page fields are sourced from the same feed-derived data model.
- Make CTA and messaging depend on availability and offer rules.
- Preselect variants when the ad specifies them.
- Run a test matrix that includes promo, shipping, and stock edge cases.
7.5 Applying Attribution Aware Budgeting Across Channel Mix
Attribution-aware budgeting means you don’t treat every channel as equally responsible for the final purchase. Instead, you allocate spend using how each channel contributes to the customer’s path, while still respecting what you can measure reliably. The goal is practical: reduce wasted budget on channels that mostly assist without converting, and avoid starving channels that create demand earlier in the journey.
Start with What Attribution Can and Cannot Tell You
First, separate two ideas: credit assignment and decision support. Attribution models assign credit to touchpoints, but they don’t magically reveal causality. Use them as a structured estimate of contribution, then pair them with guardrails.
A simple guardrail is “budget elasticity sanity.” If doubling spend in a channel produces no lift in incremental conversions, attribution credit is not enough to justify more budget. Another guardrail is “coverage sanity.” If a channel’s audience is poorly tracked, its attribution share will be understated, and budgeting based on it will underfund the channel.
Build a Channel Contribution Profile
Create a contribution profile for each channel using three numbers:
- Assisted share: how often the channel appears before conversion.
- Direct share: how often the channel is the last meaningful touch.
- Incremental efficiency: conversion lift per unit spend from experiments or holdouts.
Example: Suppose Search Ads show a high direct share because they capture ready-to-buy intent, while Social Video shows a high assisted share because it appears early. If Social Video has low incremental efficiency in short holdouts, you might keep spend steady but adjust creative and targeting to improve downstream conversion quality.
Convert Contribution Into Budget Allocation
Use a budgeting formula that blends attribution contribution with incremental efficiency. One workable approach is a weighted score:
- Contribution score = (Assisted share × assist weight) + (Direct share × direct weight)
- Efficiency multiplier = normalized incremental efficiency
- Budget weight = Contribution score × Efficiency multiplier
Choose assist and direct weights based on your business reality. If your products have longer consideration cycles, increase assist weight. If purchases are quick and search-heavy, increase direct weight.
Example: With assist weight 0.7 and direct weight 0.3, Social Video might score higher even if it rarely closes. If its efficiency multiplier is 0.9 (slightly below average), it still gets meaningful budget, but not the same as a channel with both high contribution and strong incremental lift.
Account for Overlap and Frequency Effects
Cross-channel paths overlap. Two channels can both appear in the same journey, and attribution will split credit. Budgeting must avoid “double paying” for the same incremental effect.
Practical method: run a channel overlap check using audience overlap and joint-path rates. If Display and Social both dominate the same early touchpoints, treat them as a coordinated bundle rather than independent levers.
Example: If Display and Social together appear in 60% of converting journeys, but only one of them shows incremental lift in experiments, you shift budget toward the lift-driving one and use the other for retargeting only when it improves efficiency.
Use Attribution Aware Guardrails
Guardrails keep budgeting from becoming a math exercise.
- Minimum spend floor: keep a baseline for channels needed for discovery coverage.
- Maximum spend cap: limit channels with high attribution credit but unproven incremental lift.
- Change rate limits: adjust budgets gradually to avoid confusing measurement.
Example: If you cut a discovery channel too aggressively, you may reduce assisted conversions and make later channels look worse. A floor prevents that measurement trap.
Mind Map: Attribution Aware Budgeting Across Channel Mix
Example: Putting It Together in a Monthly Budget Cycle
Assume a monthly budget of $200,000 across Search Ads, Social Video, Display Retargeting, and Email.
- Compute contribution scores from your attribution model.
- Apply efficiency multipliers from the latest holdouts.
- Apply guardrails: keep Social Video at a spend floor for discovery coverage; cap Display Retargeting if incremental lift is weak.
- Adjust budgets by at most 15% from last month to keep measurement stable.
Result: Search Ads receives a strong base because it closes, Social Video maintains meaningful spend because it assists, Display Retargeting is tuned to improve efficiency, and Email is scaled only when it shows incremental lift rather than just last-touch credit.
The key is consistency: attribution guides where credit is likely coming from, experiments confirm what actually changes outcomes, and guardrails prevent measurement artifacts from steering the budget.
8. Email and Messaging Programs That Move Customers Forward
8.1 Designing Lifecycle Flows for Acquisition Engagement and Win Back
Lifecycle flows are automated journeys that react to what a person does (or doesn’t do) after a first touch. The goal is simple: help new customers move from “I’m curious” to “I’m buying,” and help lapsed customers move from “I forgot” to “I’m back.” The trick is to design each flow so it uses the right trigger, sends the right message, and stops at the right time.
Foundational Building Blocks
Start with three decisions that prevent most lifecycle chaos:
- Trigger definition: what exact event starts the flow. Examples: email signup, first product view, first cart, purchase, subscription cancellation, or a period of inactivity.
- State and eligibility: what the person must be to receive a message. Examples: not already purchased the product category, consent granted, not in an active return flow, or not currently in a “do not contact” suppression list.
- Exit criteria: what ends the flow. Examples: purchase completed, preference updated, or a “stop” click.
A practical rule: every message should be explainable as “because of X, we send Y, and we expect Z.” If you can’t state X, you probably don’t have a reliable trigger.
Acquisition Flow Design
Acquisition flows typically cover two moments: the first engagement and the first purchase attempt.
Flow 1: Welcome to First Value
- Trigger: signup or first site registration.
- Message 1 (immediate): confirm expectations and set a small next step. Example: “Here are three bestsellers chosen for your interests” with a single button to a curated landing page.
- Message 2 (24–48 hours): reduce decision effort. Example: a short guide tied to the signup interest, plus a product grid filtered to that interest.
- Message 3 (day 3–5): handle common friction. Example: “Shipping and returns in one place” and a reminder of the top item viewed by similar customers.
- Exit: purchase or preference update.
Flow 2: Browse to Cart Nudge
- Trigger: product page view without cart.
- Message: show the viewed item with one helpful reason to act now, such as “in stock” or “fits your size range,” plus a low-friction path to add-to-cart.
- Suppression: do not send if the person already added to cart or purchased.
- Exit: cart created, purchase, or stop.
A small but important detail: keep the number of calls to action consistent within a flow. If Message 1 asks to “browse,” Message 2 should not suddenly ask to “download a guide” unless that guide is the next logical step.
Win-Back Flow Design
Win-back flows are not “apology emails.” They are structured reminders that respect what the customer already tried.
Flow 3: Post-Purchase Lapse to Reorder
- Trigger: purchase followed by inactivity beyond a reorder window.
- Message 1: reorder reminder tied to the last purchase. Example: “Your usual refill is ready” with the exact SKU and a one-click reorder button.
- Message 2: if reorder isn’t clicked, offer a choice. Example: “Same item or a close match” with two curated options.
- Message 3: address risk. Example: “What customers like about this batch” using a short, factual review summary.
- Exit: reorder purchase or updated preferences.
Flow 4: Non-Purchaser Lapse to Try Again
- Trigger: signup or browse activity with no purchase after a defined period.
- Message 1: remind them what they looked at, but add a practical reason to return. Example: “Still considering? Here’s the size guide and the top-rated variant.”
- Message 2: offer a single incentive only if it’s operationally safe. Example: free shipping threshold reminder if margins allow.
- Message 3: reduce pressure. Example: “No rush—here are the top picks for your interest” with a broad category page.
- Exit: purchase, preference change, or stop.
Mind Map: Lifecycle Flow Logic
Example: End-to-End Flow with Clear Stops
Imagine a customer signs up on 2026-03-31 and views a running shoe within the next day.
- Trigger: signup event starts Welcome Flow.
- Eligibility: consent confirmed; not previously purchased shoes.
- Message 1: curated shoe picks based on interest tag.
- Message 2: if they viewed a specific shoe, swap the generic picks for that shoe and include “in stock” and “returns accepted.”
- Exit: if they add to cart or purchase, the flow stops or transitions to a cart/purchase-specific flow.
- Guardrail: if they unsubscribe, suppress all future lifecycle messages.
Advanced Details That Keep Flows Honest
- State transitions: treat “cart created” and “purchase completed” as state changes, not just events. That prevents duplicate messaging.
- Content binding: bind each message to a single data source. Example: the reorder flow uses last purchase SKU; the browse flow uses last viewed product.
- Suppression correctness: suppression should run before sending, not after. If you only suppress after the fact, you’ll still annoy people.
- Testing within constraints: test subject lines or offer framing, but keep timing and trigger logic stable so you can interpret results.
When acquisition and win-back flows are built from triggers, eligibility, and exits, they become predictable. Predictable is good: it means the customer experience stays consistent, and the team can improve the system without rewriting it every week.
8.2 Setting Trigger Logic for Browse Abandonment and Cart Events
Trigger logic is the rules engine behind “send something because something happened.” For browse abandonment and cart events, the goal is to respond to intent signals without spamming people who are simply taking a break, switching devices, or comparing options.
Foundational Concepts for Trigger Logic
Start with three building blocks: event, eligibility, and timing.
- Event is the customer action you can observe reliably, such as viewing a product page, adding to cart, or starting checkout.
- Eligibility is the set of constraints that prevent irrelevant or duplicate messages, such as consent status, suppression rules, and whether the customer already purchased.
- Timing is the delay and window that determine when the message fires, based on how long people typically need to act.
A practical way to keep this systematic is to write each trigger as: When event X occurs, if eligibility Y is true, then send message Z after timing T.
Browse Abandonment Trigger Logic
Browse abandonment should be treated as “interest without commitment,” not “lost forever.” Use it when a customer shows repeated product interest but does not progress to cart.
Recommended event set
- Product page view with a stable product identifier.
- Optional: category browse or search results view, but only if you can map it to a meaningful intent bucket.
Eligibility checks
- Customer has opted in for email/SMS (or the channel you’re using).
- Customer has not added the same product to cart since the last browse event.
- Customer has not purchased since the browse event.
- Frequency cap is respected (for example, no more than one browse-abandonment message per 24 hours).
- Suppress if the customer is already in an active cart recovery flow.
Timing rules that reduce annoyance
- Fire after a short inactivity delay, such as 30–90 minutes, to account for reading time.
- Add a second chance only if the customer returns and browses again, rather than sending multiple reminders from the first view.
Message content logic
- Include the viewed product(s) and a simple reason to return, like “still available” or “details you may have missed,” based on what you can verify.
- Avoid stacking too many offers; one clear next step is enough.
Cart Event Trigger Logic
Cart events are stronger intent signals, so timing can be tighter and the message can be more direct.
Recommended event set
- Add to cart.
- Cart view.
- Initiate checkout.
- Purchase completion.
Eligibility checks
- Consent and channel availability.
- Suppress if purchase occurred.
- Suppress if the cart is empty or the product is no longer sellable.
- If you use inventory-aware messaging, confirm availability at send time.
Timing rules that match customer behavior
- After add to cart, send a first reminder after a moderate delay (for example, 1–3 hours).
- If checkout is initiated but not completed, send a follow-up after a shorter delay (for example, 30–90 minutes), because the customer already took the “hard part.”
- Stop the sequence immediately on purchase or on cart update that indicates the customer moved on.
Message content logic
- For add-to-cart: show the cart items and a friction reducer like shipping clarity or returns policy summary.
- For checkout initiation: include checkout assistance cues such as “review your shipping address” or “complete payment,” but only if you can support them with real data.
Mind Map: Trigger Logic Components
Example: Browse Abandonment Flow
A customer views Product A at 10:00 AM, does not add it to cart, and does not purchase.
- Event: product page view for Product A.
- Eligibility: opted in, no cart add for Product A, no purchase, frequency cap ok.
- Timing: send at 11:00 AM (within the 30–90 minute band).
- Stop condition: if the customer adds Product A to cart at 10:30 AM, do not send the browse message.
The email shows Product A, includes a short “still available” note if inventory is confirmed, and ends with one action button to return to the product page.
Example: Cart Recovery Flow
A customer adds Product B to cart at 2:10 PM, then starts checkout at 3:00 PM but does not complete purchase.
- Event 1: add to cart.
- Eligibility: consent ok, Product B sellable, no purchase.
- Timing: send at 3:30 PM.
- Event 2: initiate checkout.
- Eligibility: purchase not completed, cart still contains Product B.
- Timing: send at 3:45 PM.
- Stop condition: if purchase completes at 3:50 PM, cancel any remaining messages.
The first message focuses on cart contents and a clear next step. The second message references checkout completion and includes only information you can verify from the cart and checkout state.
Implementation Checklist for Reliable Triggers
- Ensure every trigger references a specific event schema with stable identifiers.
- Centralize suppression rules so browse and cart flows don’t fight each other.
- Validate cart state at send time to avoid messaging about unavailable items.
- Record trigger decisions (fired, suppressed, stopped) so you can debug without guesswork.
8.3 Creating Dynamic Content Blocks for Product and Offer Relevance
Dynamic content blocks let you swap product details and offer terms inside a single email, landing page, or ad unit—based on what you know about the person and what you can fulfill. The goal is simple: the block should feel specific without requiring a full page rebuild for every audience.
Foundational Concepts for Relevance
A dynamic content block has three parts: inputs, rules, and outputs. Inputs are the data you can reliably collect, such as product viewed, category interest, cart contents, location, and consent status. Rules are the decision logic that chooses which product and which offer to show. Outputs are the rendered elements: product image, title, price, promo text, and the call-to-action.
Start with a relevance hierarchy so rules don’t fight each other. A practical order is:
- Exact match: items in cart or recently viewed.
- Category match: items from the same category or brand.
- Intent match: items aligned to the journey stage, like “compare” or “ready to buy.”
- Fallback: best sellers or evergreen bundles.
Designing the Block Schema
Treat each block like a small product card system. Define a schema that can render consistently even when data is missing.
Block fields to standardize
- Product identity: SKU, product URL, image URL, title
- Merchandising: badge (new, best seller), rating, key attributes
- Offer identity: promo code or automatic discount flag, discount amount, expiration
- Compliance: eligibility flags (consent, region restrictions)
- Tracking: event IDs for impressions and clicks
A good schema prevents “half-personalized” experiences where the product changes but the offer doesn’t, or where the offer appears but the product is ineligible.
Building Decision Rules That Stay Understandable
Rules should be readable by humans, not just systems. Use a scoring approach with clear tie-breakers.
Example rule set
- If cart contains eligible items, show those first.
- Else if there are viewed items within the last 7 days, show the top viewed item.
- Else if the user has category interest, show the top-rated item in that category.
- Else show a fallback set.
Then apply offer rules:
- If the selected product is eligible for the promo, render the promo.
- If inventory is low, switch to a “limited availability” message without changing the discount.
- If the user is in a restricted region, remove promo text and show standard pricing.
Mind Map: Dynamic Content Blocks
Example: Email Block for Browse Abandonment
Assume a customer viewed running shoes, added nothing to cart, and left the site. Your email contains one dynamic block with up to two product cards.
Inputs
- Viewed SKU: Running Shoe A
- Category: Running Shoes
- Region: US
- Consent: marketing allowed
- Promo: “10% off running shoes”
- Inventory: A is in stock, B is out of stock
Rules
- Pick Running Shoe A as primary.
- Pick a secondary item from the same category only if in stock.
- Render the promo only if the SKU is eligible.
Outputs
- Card 1: Running Shoe A with 10% off text and “Shop now”
- Card 2: Omit the second card if no eligible in-stock item exists, rather than showing an unavailable product
This avoids the common failure mode where the email looks personalized but the user hits a dead end.
Example: Landing Page Block for Cart Recovery
A cart recovery landing page often needs a block that mirrors the cart while still offering a helpful alternative.
Inputs
- Cart: Hoodie C (eligible), Socks D (out of stock)
- Promo: “Free shipping over $50”
- Location: CA
Rules
- Show Hoodie C as the main product.
- For Socks D, either remove it from the block or replace it with an in-stock substitute from the same category if you have a substitution policy.
- Render free shipping messaging only if the cart total qualifies.
Outputs
- Main card: Hoodie C with correct price and shipping note
- Secondary card: substitute socks only if substitution is allowed and eligible
Guardrails That Prevent Relevance Bugs
- Eligibility checks before rendering: never show promo text for ineligible SKUs.
- Inventory-aware selection: filter out-of-stock products from the candidate set.
- Schema consistency: if a field is missing, hide the element rather than showing “undefined.”
- Suppression rules: don’t show the same product repeatedly within a short window.
Implementation Checklist for Reliable Blocks
- Define the block schema and required fields.
- Write relevance rules in a single priority order.
- Add offer gating tied to SKU eligibility and region.
- Validate with test profiles that cover missing data, out-of-stock, and promo restrictions.
- Confirm tracking fires for impressions and clicks from the block.
When these pieces are in place, dynamic blocks stop being “personalization theater” and become a dependable way to keep product and offer details aligned with what the customer is actually doing.
8.4 Managing Deliverability and Compliance for Reliable Reach
Deliverability is the practical question: will your messages land in the inbox, or get trapped in spam folders and silent blocks? Compliance is the practical question: are you allowed to send, and can you prove it? In cross-channel journeys, these two topics must be handled together, because a perfectly targeted campaign still fails if it can’t legally and technically reach people.
Foundations for Inbox Placement and Legal Permission
Start with two inventories: your sending inventory and your permission inventory.
- Sending inventory lists every sending domain, subdomain, and sending method (ESP, API, SMS gateway, retail media partner). Each method may have different reputation and different compliance controls.
- Permission inventory lists consent status, consent source, consent timestamp, and the exact scope of what the person agreed to receive.
A simple rule prevents most mistakes: if you can’t explain why a recipient should receive a message, you shouldn’t send it. For example, if a customer checked a box for “product updates,” you should not treat that as permission for “promotional discounts” unless the wording covered it.
Authentication Setup That Reduces Spoofing Risk
Inbox providers look for signals that the message is genuinely from you. The core authentication trio is:
- SPF authorizes which servers can send for your domain.
- DKIM signs the message content so receivers can verify integrity.
- DMARC tells receivers what to do when SPF or DKIM fail, and how to report issues.
A concrete example: if your marketing team sends email through an ESP but your transactional system also sends from the same domain, SPF must include both. Otherwise, one system works and the other quietly fails, creating inconsistent inbox placement.
List Hygiene That Protects Reputation
Reputation is built over time, and bad list practices can damage it. Use a hygiene workflow that is easy to audit:
- Validate addresses at capture so obvious typos don’t enter the list.
- Remove hard bounces quickly so you stop sending to invalid mailboxes.
- Handle soft bounces with patience by retrying within a controlled window, then suppressing if they persist.
- Respect engagement signals by re-evaluating inactive segments using your own rules, not guesses.
Example: if “soft bounce” spikes after a campaign, check whether you accidentally targeted a segment that never completed email verification. The fix is usually upstream, not a last-minute suppression tweak.
Consent, Preference, and Unsubscribe Mechanics
Compliance is not just consent at signup; it’s also honoring choices during the journey.
- Unsubscribe must be functional and easy. If you use a link, ensure it routes to a page that confirms the action and updates suppression immediately.
- Preference centers should map to your actual sending logic. If a user selects “no SMS,” your orchestration system must stop SMS triggers, not just hide them in the UI.
- Suppression lists must be shared across campaigns so one opt-out stops all relevant sends.
Example: a customer opts out of marketing email but still receives order confirmations. That’s correct if your system separates transactional and marketing categories and applies suppression only to the marketing category.
Operational Controls for Reliable Reach
Reliability comes from repeatable checks.
- Pre-send checks verify authentication alignment, correct from/reply-to domains, and presence of unsubscribe information.
- Template checks ensure dynamic content doesn’t break rendering or remove required headers.
- Rate and volume controls prevent sudden spikes that can trigger filtering.
A practical workflow: before launch, run a small internal test that includes a real unsubscribe click and a real preference update. If those actions don’t change suppression status in your database, you’ve found the failure before customers do.
Mind Map: Deliverability and Compliance Controls
Example: A Compliance-Safe Launch Checklist
Use a checklist that ties technical and legal requirements to the same send decision.
- Confirm domain authentication passes for the sending method.
- Confirm the recipient is in the correct consent scope for the message type.
- Confirm unsubscribe link and preference actions update suppression immediately.
- Confirm bounce and complaint suppression rules are active for the segment.
- Confirm the campaign uses the correct category so transactional messages remain unaffected.
If you track these items per campaign, you can answer “why did this message reach this person?” without hunting through logs for hours.
Example: Diagnosing a Deliverability Drop Without Guessing
When inbox placement worsens, avoid random changes. Follow a structured sequence:
- Compare bounce and complaint rates to the prior send.
- Check authentication status for the sending domain and method.
- Verify list changes, especially new capture sources.
- Confirm unsubscribe and suppression updates are still working.
Example: if complaints rise but authentication is unchanged, the likely cause is content relevance or targeting scope, not SPF/DKIM. If authentication fails, the likely cause is a sending configuration change. Either way, the checklist keeps you from blaming the wrong layer.
8.5 Measuring Lift With Holdouts and Controlled Experiments
Measuring lift answers a simple question: “How much did the journey change because of what we did?” The tricky part is that customers would have behaved similarly even without the treatment. Holdouts and controlled experiments separate what you caused from what would have happened anyway.
Core Concepts for Lift Measurement
A treatment is the experience you want to evaluate, such as a specific email offer, a paid campaign with a matching landing page, or a triggered product recommendation. A holdout (control) is the same audience experience without the treatment, or with a baseline version.
Lift is the difference in outcomes between treatment and control, usually expressed as an absolute change (percentage points) or a relative change (percent). If treatment converts 4.2% and control converts 3.8%, the absolute lift is 0.4 percentage points.
To keep results interpretable, you need three guardrails:
- Comparable audiences: treatment and holdout should be drawn from the same population at the same time.
- Stable measurement: the outcome window and tracking rules must match across groups.
- One change at a time: if multiple variables shift, you can’t attribute lift to the right cause.
Holdouts That Actually Behave Like Control
Holdouts fail when they receive parts of the treatment indirectly. For example, if you run a paid campaign and also retarget holdouts with the same creative, your “control” is no longer control.
Use these practical rules:
- Random assignment: split eligible users into treatment and holdout using a consistent hashing key (like user ID) so assignment is stable.
- Eligibility gating: only randomize users who meet the same entry criteria, such as “visited product page in last 7 days and opted in.”
- Suppression logic: ensure holdouts are excluded from the treatment channel and from any downstream retargeting that would recreate the same experience.
A concrete example: You trigger an email when a shopper abandons a cart. Randomly assign 10,000 eligible abandoners into treatment and 10,000 into holdout. In the holdout group, do not send the cart-abandon email, and also suppress any “abandoner” audience from the matching paid retargeting.
Controlled Experiments with Clear Outcomes
Define outcomes before you run the test. For cross-channel journeys, choose metrics that reflect the stage you’re changing.
- Discovery engagement: click-through to product pages, time on site, or add-to-wishlist.
- Consideration: product detail views after the first touch, comparison clicks, or return visits.
- Purchase: completed orders, revenue per eligible user, or conversion rate.
Use an outcome window that matches the journey step. If the treatment is an email sent today, measuring purchase over the next 14 days is more consistent than measuring over the next 2 days.
When you measure revenue, be careful: a small number of large orders can dominate. Reporting both conversion rate and revenue per purchaser helps you understand whether lift comes from more buyers or bigger baskets.
Mind Map: Experiment Design and Lift Calculation
Example: Email Offer Test with Holdouts
Suppose you test a cart-abandon email with a free-shipping offer.
- Eligible population: users who abandoned cart and are opted in.
- Randomization: 50/50 split into treatment and holdout.
- Treatment: send the email once with the free-shipping code.
- Control: no email, and suppress the user from the free-shipping retargeting audience.
- Primary outcome: purchase within 14 days.
After the window closes:
- Treatment conversion: 5.1% (510 orders per 10,000)
- Holdout conversion: 4.6% (460 orders per 10,000)
Absolute lift is 0.5 percentage points. Relative lift is 0.5 / 4.6 ≈ 10.9%.
Now check a nuance: if conversion rises but refunds also rise, net revenue may not improve. Reporting both order rate and refund rate prevents a “looks good on the headline metric” mistake.
Advanced Details That Prevent Misleading Lift
- Cross-channel interference: if the treatment changes onsite merchandising that also affects holdouts, you’ve created spillover. Track exposure at the user level and suppress where possible.
- Noncompliance: some users in treatment may not see the content due to deliverability or ad blockers. Measure exposure rate and report it alongside outcomes.
- Multiple tests: if you run many experiments, some will appear positive by chance. Keep a disciplined set of primary metrics per test.
Practical Reporting Checklist
A useful lift report includes:
- Sample sizes for treatment and holdout.
- Primary outcome definition and outcome window.
- Lift in absolute and relative terms.
- Secondary metrics that explain the mechanism (like AOV and refunds).
- Notes on any exposure deviations, such as missing tracking events.
When these pieces line up, holdouts stop being a checkbox and start being a reliable way to decide whether a journey step deserves to scale.
9. Retail Media and Partner Touchpoints for Commerce Growth
9.1 Defining Retail Media Objectives and Measurement Approaches
Retail media works when you can answer two questions with numbers: what you want to happen, and how you’ll know it happened. Objectives should connect to the customer journey stage and to the retailer’s operational reality, like catalog coverage, inventory availability, and site search behavior.
Start with Objective Types That Match Journey Intent
Retail media objectives usually fall into four buckets. Pick one primary objective per campaign, then add supporting metrics.
- Product discovery objectives focus on getting the right shoppers to notice an item. Example: a sponsored product placement for “running shoes” targets shoppers who recently viewed similar categories.
- Consideration objectives focus on driving deeper engagement. Example: a sponsored brand module that sends shoppers to a brand landing page with size guides and comparison charts.
- Purchase objectives focus on conversion outcomes. Example: a sponsored listing optimized for add-to-cart rate during a promotion window.
- Efficiency objectives focus on cost and profitability. Example: controlling spend so the retailer maintains margin while still meeting sales targets.
A practical rule: if your objective is “more sales,” define what kind of sales. Is it incremental units, revenue, margin, or share of category? “Sales” alone is too vague to measure cleanly.
Define Success Metrics with Clear Numerators and Denominators
Measurement becomes easier when each metric has a precise definition.
- Impressions: how often an ad is eligible and shown. Use it to understand reach and frequency.
- Clicks: how often shoppers take the next step. Use click-through rate to spot creative or relevance issues.
- Product detail views: how often shoppers view the item after clicking. This helps separate “curiosity clicks” from real interest.
- Add-to-cart rate: add-to-cart divided by product detail views. This is a strong bridge metric between interest and purchase.
- Conversion rate: purchases divided by sessions or clicks, depending on your tracking model.
- Revenue and margin: revenue per click or per session, and margin per order when you have cost data.
Example: If a sponsored listing gets a high click-through rate but low add-to-cart rate, the problem is likely landing page friction, out-of-stock inventory, price mismatch, or weak product information.
Choose Measurement Approaches That Fit Your Data
Retail media measurement typically uses three layers: baseline reporting, attribution, and incrementality.
- Baseline reporting answers “what happened” without claiming causality. Use it for operational monitoring.
- Attribution answers “which touchpoint is associated with the purchase.” It’s useful for optimization, but it can misattribute when shoppers would have bought anyway.
- Incrementality answers “what changed because of retail media.” This is the most reliable for budget decisions.
A simple way to decide: if the campaign budget is large enough to affect business outcomes, prioritize incrementality. If it’s small or exploratory, baseline plus attribution may be sufficient.
Build a Measurement Plan with Controls and Guardrails
Measurement approaches fail when the test and control aren’t comparable.
- Define the unit of analysis: shopper, session, or order. Pick one and stick to it.
- Set eligibility rules: exclude shoppers who are out of scope, like those who can’t see the ad due to geo or device constraints.
- Control for inventory and price: if the product is out of stock in the test group, you’re measuring supply constraints, not ad impact.
- Use consistent time windows: for example, measure conversions within 7 days of click.
Example: A retailer runs a sponsored listing test for a category. In the test group, the top SKU sells out early. The control group still has stock. The test looks worse, but the cause is inventory, not ad performance.
Mind Map: Objectives and Measurement Flow
Example: Turning Objectives Into a Concrete Measurement Setup
A sponsored product campaign for “wireless earbuds” has a primary objective of purchase efficiency.
- Primary metric: incremental margin per order within 7 days of click.
- Supporting metrics: add-to-cart rate and PDP view rate.
- Approach: incrementality test with a holdout group that is eligible to shop but not shown the ad.
- Guardrails: ensure the same SKUs are in stock and priced similarly across groups during the test window.
If the campaign increases add-to-cart rate but not incremental margin, the likely issue is discounting that erodes margin or a mismatch between the promoted SKU and the shopper’s final purchase.
Measurement Approaches That Stay Actionable
The goal isn’t to collect every metric; it’s to choose a small set that answers the objective. When you can trace each metric back to a decision—pause, reallocate budget, adjust targeting, or fix product detail content—you’ve defined objectives and measurement in a way that teams can actually use.
9.2 Coordinating Sponsored Listings with Onsite Merchandising
Sponsored listings and onsite merchandising should behave like two halves of the same shopping conversation. The goal is not to make ads “match” the site in a superficial way, but to ensure the customer sees consistent product logic, pricing rules, and decision support from click to cart.
Foundational Alignment Principles
Start with three shared inputs that both teams use.
-
Catalog truth: Sponsored listings must draw from the same product attributes that onsite uses for sorting, filtering, and display. If onsite shows “In Stock” based on a specific inventory feed, sponsored listings must use the same feed and the same definition of availability.
-
Offer rules: Promotions, shipping thresholds, and eligibility constraints must be applied consistently. If onsite suppresses a promotion when inventory is below a threshold, sponsored listings should follow the same suppression logic so customers do not click into a disappointment.
-
Intent mapping: Onsite merchandising often reflects browsing intent (compare, learn, choose). Sponsored listings reflect search or browsing intent on a partner surface. Both should map to the same intent categories so the customer gets the right type of help at each step.
A simple example: a customer searches for “running shoes for flat feet.” Onsite merchandising might prioritize supportive models and include a “fit guide” module. Sponsored listings should prioritize the same supportive models and land on pages that include the same fit guidance, not just a generic category page.
Practical Coordination Workflow
Use a repeatable workflow that prevents last-minute mismatches.
Step 1: Define the Merchandising Contract
Create a short “contract” that states what onsite modules will do for each intent category.
- Category landing page: which products appear in the hero grid, which filters are defaulted, and which trust modules appear.
- Product detail page: which badges show, which delivery messaging appears, and which cross-sells are eligible.
- Cart and checkout: which promotions are shown and how shipping is explained.
Sponsored listings must follow the contract by using the same product eligibility and the same messaging rules.
Step 2: Build a Shared Product Eligibility Model
Eligibility is more than “in stock.” Include:
- Price and promotion eligibility
- Brand and category constraints
- Margin or budget constraints if applicable
- Content completeness (images, titles, key attributes)
Example: if onsite hides products with missing size charts, sponsored listings should also avoid those products. Otherwise, the customer clicks and then sees a degraded experience that hurts conversion.
Step 3: Align Ranking Logic with a Clear Hierarchy
Onsite ranking might use a blend of relevance, margin, and popularity. Sponsored listings ranking might use bids and predicted conversion. Coordination means you define a hierarchy:
- Eligibility first
- Then intent fit
- Then merchandising priority
- Then channel-specific optimization
This prevents the common failure mode where sponsored listings repeatedly show products that onsite would never feature for that intent.
Step 4: Synchronize landing experience
A sponsored listing should land on the page that matches the onsite module the customer expects.
- If the listing is for a specific product, land on the product page.
- If the listing is for a set or category theme, land on the category page with the relevant filters pre-applied.
Example: a sponsored listing labeled “Summer Sale: Lightweight Jackets” should land on the jackets category with the “lightweight” filter and the sale eligibility applied, not on the general outerwear page.
Measurement That Distinguishes Coordination from Coincidence
Track outcomes at two levels.
-
Click-to-page quality: measure whether the landing page actually contains the promoted product or the promised filter state. A mismatch is easy to detect and often fixes faster than conversion tuning.
-
Conversion lift by module alignment: compare performance for sessions where sponsored listings and onsite modules are aligned versus sessions where they are not, using holdouts or controlled routing.
Example: if aligned sessions show higher add-to-cart rate, you have evidence that the coordination contract is working, not just that the ad was strong.
Mind Map: Coordinating Sponsored Listings with Onsite Merchandising
Example: One Campaign, Three Onsite Modules
Assume a sponsored campaign targets “workwear boots.” Onsite merchandising for this intent uses three modules: a hero grid, a “size and fit” guide, and a “care and durability” section.
- Sponsored listing eligibility includes only boots with complete size charts.
- The listing uses the same promotion eligibility as the hero grid.
- The landing page includes the size and fit guide and care section because the intent category matches.
If the sponsored listing points to a boot that is eligible but the landing page omits the size guide, the customer loses a key decision step. Fixing that omission is coordination work, not creative work, and it usually improves conversion without changing the ad.
Example: Preventing the Classic Mismatch
A retailer runs sponsored listings for “free shipping over $50.” Onsite shows free shipping only when the cart meets the threshold after discounts. Sponsored listings mistakenly assume pre-discount totals.
The result is predictable: customers click, see the promise, then hit a cart total that does not qualify. The fix is to align the offer rule logic so the sponsored listing and onsite cart both use the same calculation method. When the promise is consistent, the customer’s next action is more likely to be confident and fast.
9.3 Using Partner Data and Feeds While Maintaining Data Governance
Partner data and product feeds can make cross-channel journeys feel “connected” in practice, not just in theory. The trick is to treat every incoming feed as a controlled input: define what it means, validate it, map it to your catalog and customer model, and keep an audit trail of how it was used.
Foundational Concepts for Partner Inputs
Start by separating three things that often get mixed together:
- Partner data: customer or behavioral signals shared by a partner (for example, a retailer marketplace order history or a co-marketing lead list).
- Product feeds: structured catalog data used for merchandising and targeting (for example, price, availability, images, attributes).
- Activation outputs: what you send to channels (for example, audience lists, product recommendations, sponsored placements).
Governance means you can answer, for any activation output, which partner inputs produced it, what transformations were applied, and whether the data was allowed to be used for that purpose.
Data Contracts That Prevent “Surprise Semantics”
Before ingesting anything, create a data contract with the partner. The contract should specify:
- Schema: field names, types, required vs optional fields.
- Meaning: definitions for key fields like product identifiers, event timestamps, and consent status.
- Freshness: how often updates arrive and the maximum acceptable delay.
- Quality expectations: allowed ranges, required attributes, and how missing values should be represented.
A simple example: if a partner feed uses sku while your catalog uses product_id, the contract should state the mapping rule and whether sku is stable over time.
Ingestion Validation and Normalization
Treat ingestion as a pipeline with gates:
- Format checks: file structure, encoding, required columns.
- Identity checks: verify identifiers exist in your reference tables.
- Value checks: price is numeric and non-negative; availability is one of an allowed set.
- Deduplication: prevent repeated updates from creating conflicting records.
- Normalization: convert partner fields into your canonical model.
Example: a partner feed sends sale_price and list_price. If sale_price is missing, your normalization step should either compute it from another field or mark the product as “no promotion data” so downstream logic doesn’t assume a discount exists.
Consent and Purpose Boundaries
Partner customer signals must respect consent and purpose boundaries. In practice, this means:
- Store consent attributes alongside the partner-provided identifier.
- Enforce purpose tags at ingestion time (for example, “allowed for email personalization” vs “allowed only for measurement”).
- Apply suppression rules when consent is withdrawn or when a partner indicates a restricted use.
Concrete example: a partner shares “lead captured” events. Your governance rules might allow using those leads for retargeting ads, but not for personalized email offers. The pipeline should carry that restriction through to activation.
Mapping Partner Feeds to Your Catalog
Product feeds are only useful if they land in the right place. Use a mapping strategy that is both strict and explainable:
- Primary key mapping: match on your canonical product identifier when possible.
- Fallback mapping: if the partner only provides
gtinorbrand + title, define deterministic rules and a confidence threshold. - Conflict handling: if two partner records map to the same product but disagree on price, keep the most recent feed timestamp and log the conflict.
Example: two partner feeds update the same product on different schedules. Your normalization should keep the latest valid update and record which feed source it came from, so merchandising teams can trace “why the price changed.”
Auditability and Lineage
Governance fails when teams can’t trace decisions. Maintain lineage at three levels:
- Record lineage: which partner file or event created each canonical record.
- Transformation lineage: which rules normalized or filtered it.
- Activation lineage: which canonical records were used to build an audience or product set.
A practical habit: store a “feed run id” with every downstream dataset. When something looks wrong, you can pinpoint the exact ingestion run and its validation outcomes.
Mind Map: Partner Data Governance Flow
Example: Marketplace Feed with Controlled Activation
Imagine a marketplace partner provides a daily product feed and a weekly customer purchase summary. Your process could look like this:
- Ingest the daily feed, validate price and availability, map products to your catalog, and store lineage with the feed run id.
- Ingest the weekly purchase summary, attach consent/purpose tags, and suppress any identifiers marked as restricted.
- Build a retargeting product set from the canonical catalog records, only for customers whose purpose tags allow that use.
- Log the activation build: which feed run ids and which customer identifiers were included, plus the validation status.
The result is boring in the best way: when a customer sees an offer that doesn’t match their last purchase, you can trace whether the issue came from mapping, timing, or consent boundaries—without guessing.
9.4 Creating Co-Branded Experiences Across Marketplace and Brand Sites
Co-branded experiences let customers move between a marketplace listing and a brand site without feeling like they changed stores. The goal is simple: keep the product story, trust signals, and purchase steps consistent while still honoring each site’s role.
Foundational Principles for Co-Branded Consistency
Start with three anchors that should look and behave the same across both environments.
-
Single product truth: The same SKU should show the same title, images, attributes, and key policies (returns, shipping, warranty). If the marketplace feed says “ships in 2–3 days” but the brand site says “ships in 5–7,” customers will treat it as a different offer.
-
Single decision path: The customer should know what happens next. If the marketplace flow ends with “Proceed to checkout,” the brand site should not suddenly require account creation before showing shipping options.
-
Single trust language: Use the same wording for returns windows, delivery estimates, and customer support contact method. Small differences add up, especially when the customer is comparing options.
Designing the Experience Contract
Treat the marketplace and brand site as two halves of one checkout conversation. Define an “experience contract” that both teams follow.
- Entry context: Capture where the customer came from (marketplace listing, category page, sponsored placement) and carry that context into the brand site.
- Offer context: Preserve price, promotion label, and eligibility rules. If a discount is marketplace-funded, show the same label and the same expiration logic.
- Identity context: Decide what identity signals can be shared. If you cannot share login state, at least preserve email capture intent and cart contents.
- Policy context: Map marketplace policies to brand policies with a clear rule set. When policies differ, show the correct one for the specific seller and fulfillment method.
A practical example: a customer clicks a marketplace listing for “TrailRunner 2.0” and lands on the brand site. The brand page should display the same price and “Free returns within 30 days” text, and the cart should already contain the TrailRunner 2.0 variant the customer selected.
Mind Map: Co-Branded Experience Blueprint
Implementing Marketplace-to-Brand Navigation
Use a consistent handoff pattern.
-
Deep link with parameters: Pass the marketplace listing identifier, selected variant, and promotion code. On the brand site, use those values to fetch the exact product configuration.
-
Preload the cart: The brand site should render the cart-ready state immediately. If inventory is unavailable, show a clear alternative that still matches the marketplace selection (for example, closest size) rather than a generic “out of stock.”
-
Keep the same step order: If the marketplace checkout shows shipping before payment, the brand site should follow that order. Customers interpret step order as process quality.
-
Align delivery estimates: Use the same fulfillment logic for the estimate shown on both sites. If the brand site uses a different carrier model, you’ll need a mapping layer so the estimate displayed matches the marketplace promise.
Example: Co-Branded Product Page and Cart
- Marketplace listing: “TrailRunner 2.0, size 9, 20% off with code SPRING20, ships in 2–3 days.”
- Brand site landing: The product page loads with size 9 selected, shows the same “20% off” label, and displays “Ships in 2–3 days” using the same fulfillment method.
- Cart: The cart shows the discount line item with the same wording as the marketplace. The shipping selector offers the same delivery windows and the same return policy summary.
If the customer changes the size on the brand site, the system should re-check eligibility for the promotion and update the shipping estimate using the same rules that the marketplace would apply.
Governance and Quality Checks That Prevent Drift
Co-branded experiences fail quietly when teams update feeds, policies, or UI components at different speeds.
- Feed parity checks: Validate that the brand site’s product attributes match the marketplace feed for title, images, and key specs.
- Policy mapping tests: Run test cases for returns and warranty text for each seller and fulfillment type.
- Regression scenarios: Include at least one path per major promotion type, one path for out-of-stock handling, and one path for shipping estimate display.
A simple QA checklist for every release: “Can a customer land from a marketplace listing, see the same offer and policy, and reach the same checkout step order without re-entering critical information?” If the answer is no, fix the contract—not the customer.
9.5 Operationalizing Campaign Launches with Catalog and Inventory Sync
A campaign launch fails in predictable ways: the ad points to the wrong product, the landing page shows an out-of-stock item, or the offer in the email doesn’t match the price at checkout. Catalog and inventory sync is the boring part that prevents those failures. The goal is simple: every touchpoint in the campaign reads the same product truth at the same time.
Core Concepts for Launch Readiness
Start with three inputs that must agree:
- Catalog attributes: product ID, title, images, variant structure, category, and eligibility flags (for example, “sellable online”).
- Inventory signals: available quantity, backorder status, lead time, and store/warehouse scope.
- Offer rules: promo price, discount type, start and end times, and any exclusions.
Operationalizing the launch means building a repeatable sequence that (1) prepares the data, (2) validates it, and (3) activates channels only when the data passes checks.
Step-by-Step Launch Workflow
-
Freeze the campaign scope
Define the exact product set for the campaign: SKUs, variants, and any “substitute” logic for near-identical items. Example: a “running shoes” campaign includes SKU A (men’s 10) and SKU B (men’s 10 wide), but excludes clearance variants. -
Sync catalog first, then inventory
Catalog changes affect mapping and page rendering. Inventory changes affect availability and messaging. Run catalog sync, confirm product pages and feed entries render correctly, then sync inventory. -
Apply eligibility and gating rules
Not every catalog item should be campaign-visible. Example: a product may be in the catalog but marked “not for online sale.” Gate it out before activation so ads and emails never reference it. -
Reconcile offer rules with product variants
Offers often attach to a parent product but must resolve to specific variants. Example: “20% off” applies to all sizes except “size 14.” Your sync process should compute the final sellable variant list and the final price per variant. -
Validate before activation
Use a launch checklist that compares three views for each SKU: feed record, landing page rendering, and checkout price. Example checks:- The ad URL resolves to the same product ID as the feed.
- The landing page shows “In stock” only when inventory says available.
- The displayed price equals the checkout price for the selected variant.
-
Activate channels with consistent timing
Activate paid media, email, and onsite modules in a controlled order. Example: turn on onsite merchandising first so the landing experience is ready, then enable ads, then send emails. -
Monitor and correct during the launch window
Inventory can change quickly. Set alerts for mismatches such as “ad clicks to out-of-stock” or “email price differs from checkout.” When triggered, pause the affected SKU set rather than stopping the entire campaign.
Mind Map: Catalog and Inventory Sync for Launch
Example: A Coordinated Launch for a Limited-Time Offer
Assume a campaign runs from 2026-03-28 to 2026-04-10 and targets three SKUs with two sizes each. Your sync output should produce a “launch-ready” table per SKU-variant:
- Variant A1: eligible, inventory available, promo price computed, landing page shows correct price.
- Variant A2: eligible, inventory available, promo price computed, but different image used on landing.
- Variant B1: eligible, inventory backorder, landing page shows “Ships in 3–5 days,” email subject line includes the backorder-safe wording.
- Variant B2: not eligible due to exclusion, removed from feed and email list.
If Variant B2 still appears in an ad feed, your validation step catches the mismatch because the feed record won’t match the launch-ready SKU-variant list.
Practical Remediation Rules
When something breaks, handle it surgically:
- Mismatch in price: disable the affected SKU-variant in feeds and onsite modules; keep other variants live.
- Out-of-stock after activation: swap to a substitute SKU if your scope includes it; otherwise pause the SKU-variant.
- Catalog rendering issue: block activation for the affected product ID until the landing page resolves correctly.
Operationalizing launches is less about one-time perfection and more about consistent, checkable alignment between product data, availability, and the offers shown everywhere customers can click.
10. Measurement and Attribution for Cross-Channel Journey Decisions
10.1 Selecting Metrics That Reflect Discovery Engagement and Purchase
Cross-channel journeys fail when teams measure the wrong thing at the wrong time. A metric set should answer three questions in order: did the customer notice, did they engage with intent, and did they purchase. If you can’t map each metric to one of those questions, it’s usually just a number wearing a trench coat.
Core Metric Principles
Start with a simple rule: every metric must have a clear numerator, denominator, and time window.
- Discovery engagement metrics should describe meaningful exposure and interaction, not just delivery. For example, “impressions” alone rarely indicate interest.
- Intent engagement metrics should reflect progress toward a purchase decision, such as product views, add-to-cart, or search actions.
- Purchase metrics should represent completed transactions and revenue outcomes, with returns and cancellations handled consistently.
Use consistent attribution windows across channels so that “click-to-purchase” doesn’t mean different things in different reports.
Discovery Engagement Metrics
Discovery engagement is about whether the customer encountered the right message and took a first step.
- Reach to engaged rate: engaged sessions ÷ reached users. Example: if 100,000 users were exposed to a display campaign and 6,000 sessions included a meaningful on-site action (like viewing a product category page), the rate is 6%.
- View-through engagement rate: sessions with a defined action within the view-through window ÷ exposed users. Example: after a video ad, count sessions that include at least one product page view within 7 days.
- Landing page engagement rate: engaged sessions ÷ landing sessions. Define “engaged” as time on page plus a minimum scroll depth or a second page view, so you don’t reward passive reading.
Keep these metrics channel-specific but definition-consistent. “Engaged session” should mean the same behavior across paid social, email landing pages, and partner referrals.
Intent Engagement Metrics
Intent engagement bridges discovery and purchase by capturing decision signals.
- Product page view rate: product detail views ÷ engaged sessions. Example: if 2,000 engaged sessions produce 800 product page views, the rate is 40%.
- Search-to-product rate: product views after search ÷ searches. Example: if 10,000 searches lead to 2,500 product page views, the rate is 25%.
- Add-to-cart rate: carts ÷ product page views. Example: 800 product views leading to 160 carts equals 20%.
- Cart-to-checkout rate: checkouts ÷ carts. This helps separate “curious browsing” from “ready to buy.”
These metrics are most useful when you segment by entry path. A customer who arrives via a comparison article should not be judged by the same add-to-cart rate as someone who arrives from a retargeting ad showing a specific SKU.
Purchase Metrics
Purchase metrics should include both volume and value.
- Conversion rate: orders ÷ sessions or orders ÷ engaged sessions, depending on your funnel stage.
- Revenue per engaged session: revenue ÷ engaged sessions. Example: if a campaign generates $50,000 from 25,000 engaged sessions, revenue per engaged session is $2.
- AOV and mix: average order value and the share of high-margin categories. Example: two channels can have the same conversion rate while one drives more accessories that raise margin.
- Return-adjusted purchase rate: completed orders net of returns within a defined period. This prevents “good conversion” from being a temporary mirage.
Metric Selection by Journey Stage
Pick a minimal set per stage so reporting stays actionable.
- Discovery stage: reach to engaged rate, landing page engagement rate.
- Consideration stage: product page view rate, add-to-cart rate.
- Decision stage: cart-to-checkout rate, conversion rate.
- Outcome stage: revenue per engaged session, return-adjusted purchase rate.
If you measure all of them everywhere, you’ll end up debating definitions instead of improving experiences.
Mind Map: Metric Set from Discovery to Purchase
Example Metric Definitions That Don’t Drift
To keep metrics from quietly changing between teams, define them once and reuse them.
- Engaged session: at least 2 page views OR 60 seconds on site OR a product page view.
- View-through window: 7 days for video and display; 1 day for email if your email frequency is high.
- Purchase window: 30 days from first touch for cross-channel reporting.
Example: if a customer sees a display ad on 2026-03-31, clicks nothing, then purchases on 2026-04-10, it counts as view-through engagement and purchase within the 30-day purchase window.
Advanced Details Without the Mess
- Use denominators that match the stage: discovery metrics should use reached users or landing sessions, not all site sessions.
- Separate volume from efficiency: track both total orders and conversion efficiency (conversion rate or revenue per engaged session).
- Report by entry path: compare like with like. A “search entry” cohort should be evaluated with search-to-product and add-to-cart metrics, not only with overall conversion.
- Handle duplicates carefully: when a user engages on multiple channels, ensure your journey-level metrics count the customer once per journey, not once per touch.
A good metric set makes it obvious where the journey breaks: notice, intent, or purchase. When you can point to the break with definitions that hold up under scrutiny, you’re ready to optimize.
10.2 Implementing Event Tracking for Click View and Conversion Journeys
Event tracking is the difference between “we think it worked” and “we can see what happened.” For click, view, and conversion journeys, the goal is simple: record the smallest set of events that explain the path from attention to purchase, then connect those events to the right user, product, and session.
Core Concepts for Click View and Conversion Journeys
Start with three event types that map to customer intent.
- Click events capture deliberate action. Example: a user clicks a product tile from an ad.
- View events capture exposure. Example: a user lands on a product page and scrolls enough to see the price.
- Conversion events capture outcomes. Example: checkout completion or add-to-cart followed by purchase.
Each event needs consistent identifiers so you can stitch journeys together:
- User identity: a stable user ID when available, otherwise an anonymous ID.
- Session identity: a session ID to group actions.
- Attribution context: campaign, ad group, creative, and placement from the click.
- Commerce context: product ID, category ID, and cart/order IDs.
A practical rule: if you cannot answer “which product and which campaign?” from a single event record, you will end up guessing later.
Event Taxonomy and Naming That Prevents Chaos
Use a naming convention that encodes intent and object. Keep it consistent across web, app, and partner feeds.
Example taxonomy:
product_viewedproduct_clickedcategory_viewedadd_to_cartcheckout_startedpurchase_completed
For each event, define a required payload schema. For instance, product_viewed should include product_id, page_type, and referrer_type (search, category, campaign, internal link). purchase_completed should include order_id, revenue, currency, and items or an item_count plus a way to fetch line items.
Instrumentation Plan from Page Loads to Purchase
Begin with the journey skeleton, then add detail.
- Landing and referrer capture: record the first meaningful page view with campaign parameters if present.
- Product discovery capture: record views and clicks on product tiles, search results, and category pages.
- Decision capture: record add-to-cart, checkout start, and payment step entry if you track it.
- Outcome capture: record purchase completion with order identifiers.
Example flow for a typical paid-to-purchase journey:
- A user clicks an ad for “Running Shoes.”
- The landing page loads and records
landing_viewedplus campaign context. - The user clicks a product tile and records
product_clickedand thenproduct_viewed. - The user adds to cart and records
add_to_cartwithcart_id. - The user completes checkout and records
purchase_completedwithorder_id.
Data Quality Checks That Keep Reports Honest
Event tracking fails quietly when payloads drift. Add checks at ingestion time:
- Schema validation: reject or quarantine events missing required fields.
- Deduplication rules: prevent double-counting when the same action fires twice.
- Timestamp sanity: ensure event timestamps are within a reasonable window of session start.
- ID consistency: verify that
cart_idandorder_idlink correctly across events.
A simple dedupe example: if purchase_completed arrives twice with the same order_id, keep one record.
Mind Map: the Tracking Model
Example Event Payloads and How They Connect
Below are compact payload examples showing the minimum fields needed for stitching.
{
  "event_name": "product_clicked",
  "event_time": "2026-03-15T10:22:31Z",
  "user_id": "u_1842",
  "anonymous_id": "a_9f2c",
  "session_id": "s_77aa",
  "campaign": {
    "campaign_id": "c_301",
    "ad_group_id": "ag_12",
    "creative_id": "cr_88",
    "placement": "search_top"
  },
  "product_id": "sku_9012",
  "page_type": "search_results"
}
{
  "event_name": "purchase_completed",
  "event_time": "2026-03-15T10:29:05Z",
  "user_id": "u_1842",
  "session_id": "s_77aa",
  "order_id": "ord_554433",
  "cart_id": "cart_2211",
  "currency": "USD",
  "revenue": 129.99,
  "items": [{"product_id": "sku_9012", "qty": 1}]
}
The key connection is session_id plus the campaign context captured earlier. If you only store campaign parameters on the click event and never carry them forward to the session, your conversion attribution becomes a guessing game.
Common Failure Modes and Fixes
- View events fire too early: fix by triggering
product_viewedafter the product becomes visible or after a meaningful scroll threshold. - Clicks without product IDs: fix by ensuring tile click handlers always pass
product_id. - Purchase events missing order IDs: fix by generating
purchase_completedfrom the order confirmation source of truth, not from a client-side redirect. - Session breaks: fix by using a consistent session ID stored in a first-party cookie or app storage and refreshed on a defined inactivity window.
When these pieces are in place, you can build reliable click-to-view and view-to-conversion funnels without inflating numbers or losing the story of how customers moved from one touchpoint to the next.
10.3 Using Attribution Models with Clear Assumptions and Constraints
Attribution answers a simple question: which touchpoints deserve credit for a purchase. The tricky part is that every model makes choices about what “credit” means, and those choices must be stated as assumptions and enforced as constraints.
Start with the Credit Question and the Unit of Analysis
Choose the unit you are attributing. Most teams use the purchase as the unit, but you can also attribute to add-to-cart, lead submission, or first product view. Then decide whether credit is assigned to a single conversion event or to a session-level outcome. A practical starting point is: “For each purchase, distribute 100% of credit across the touchpoints that occurred within the attribution window.”
Example: A customer sees a paid search ad on Monday, browses category pages on Tuesday, receives an email on Wednesday, and purchases on Thursday. If the unit is “purchase,” the model assigns credit across those touchpoints that fall within the chosen window.
Define Assumptions Explicitly
Write down assumptions in plain language so stakeholders can challenge them.
- Attribution window assumption: how far back touchpoints can count. Common windows are 7, 14, or 30 days. If your sales cycle is often longer, a short window will systematically under-credit early discovery.
- Touchpoint inclusion assumption: which events qualify. For instance, do you include organic search, direct traffic, retail media impressions without clicks, or only tracked clicks?
- Channel independence assumption: whether you assume touchpoints contribute independently or that some touchpoints are substitutes.
- Identity assumption: whether you attribute across devices and browsers using a resolved customer identity.
Example: If you only track clicks, then a “view-only” social impression will never receive credit. That’s not a model flaw; it’s an inclusion assumption.
Set Constraints to Prevent Misleading Outputs
Constraints keep the model from producing numbers that look precise but are based on shaky inputs.
- Minimum data constraint: don’t report attribution shares for segments with too few conversions.
- Coverage constraint: track the percentage of conversions that have a complete touchpoint path. If coverage is 60%, attribution shares for the remaining 40% are effectively guesses.
- Channel taxonomy constraint: ensure channel definitions are consistent across systems. If “Email” sometimes includes SMS, you’ll mix behaviors.
- Deduplication constraint: prevent double-counting when multiple events represent the same touchpoint (e.g., multiple page views after a single ad click).
Compare Model Families by What They Assume
Attribution models differ mainly in how they treat time and sequence.
- Last-touch assumes the final touchpoint before purchase is the primary driver.
- First-touch assumes the initial touchpoint is the primary driver.
- Linear assumes equal contribution across all included touchpoints.
- Time-decay assumes more recent touchpoints matter more.
- Position-based assumes early and late touchpoints matter more than middle ones.
Example: If a customer typically needs two visits before buying, last-touch will over-credit the second visit and under-credit the first. Time-decay may still help, but only if your window matches the typical decision cycle.
Use a Mind Map to Keep Assumptions and Constraints Connected
Attribution Models Mind Map
Work Through a Concrete Example with Clear Assumptions
Assume:
- Attribution unit: purchase
- Window: 14 days
- Inclusion: tracked clicks and email sends that led to a click
- Identity: cross-device resolved for 80% of users
- Constraint: only report for segments with at least 200 purchases
Touchpoints for one purchase:
- Day -10: paid search click
- Day -6: category page visit from organic search
- Day -3: email click
- Day -1: retail media click
Under linear, each included touchpoint gets 25% credit, but note the organic visit is excluded because it wasn’t a qualifying included event. Under time-decay, the email click (Day -3) and retail media click (Day -1) receive more weight than the paid search click (Day -10). Under position-based, first and last touchpoints get higher weights, which can be useful when you know discovery and conversion moments are distinct.
The key is that the model’s numbers are only interpretable relative to your stated assumptions and enforced constraints.
Validate with Sanity Checks That Match Real Behavior
Before using attribution to change budgets, run checks that catch obvious mismatches.
- If a channel is credited heavily but has near-zero click-through and near-zero conversion rate, review inclusion rules and deduplication.
- If credit shifts dramatically when you change the attribution window by a few days, confirm the sales cycle length and event timing.
- If email receives credit but its click share is stable while credit share swings, investigate whether email clicks are being double-counted or whether other channels are missing paths.
Attribution is not a truth machine. It’s a consistent accounting method. When assumptions and constraints are explicit, the output becomes a usable input for decisions rather than a misleading scorecard.
10.4 Running Incrementality Tests for Channel and Campaign Validation
Incrementality tests answer a simple question: if you run a channel or campaign, how much of the resulting sales would not have happened anyway? The trick is separating what you caused from what would have happened due to seasonality, brand momentum, or other marketing activity. Done well, incrementality turns “it seemed to work” into evidence you can act on.
Core Concepts and Test Logic
Start with three building blocks.
- Treatment: the audience or geo that receives the channel/campaign.
- Control: a comparable audience/geo that does not receive it.
- Counterfactual: what the treatment group would have done without the treatment.
If your control group is truly comparable, the difference in outcomes estimates incrementality.
Outcomes That Matter
Pick an outcome that matches the decision you’re validating. For cross-channel commerce journeys, common choices include:
- Purchase conversion rate (orders per visitor)
- Revenue per exposed user (revenue divided by users who were eligible)
- Incremental orders (orders in treatment minus orders in control)
Use the same outcome definition for both groups, including the same time window after exposure.
Time Windows and Exposure Definitions
A test can fail quietly if the measurement window doesn’t match the customer’s decision cycle. For example, if your campaign is a weekend promo, measuring only 24 hours may miss delayed purchases. A practical approach is to define a window aligned to your typical path to purchase, then keep it consistent across tests.
Test Designs That Work in Practice
Geo Experiments
You hold out entire geographies from a campaign. This is often easier than audience-level holdouts when targeting is complex.
Example: A retailer runs a paid search campaign only in 60% of regions. The remaining 40% receive no campaign ads. Compare revenue per eligible visitor in both groups over the same period.
Audience Holdouts
You exclude a portion of the target audience from the treatment while keeping everything else similar.
Example: For an email offer, you send to 90% of eligible subscribers and hold out 10%. You then compare orders from the held-out group during the measurement window.
Multi-Channel Interference Controls
Cross-channel journeys create interference: customers in control may still see other marketing. You can’t eliminate that, but you can reduce bias by:
- Using randomization at the right level (geo or user) so other factors are balanced.
- Ensuring the control group is not systematically different in baseline behavior.
- Running tests when other major campaigns are stable or accounted for.
Mind Map: Incrementality Test Workflow
Baseline Checks That Prevent False Confidence
Before you look at results, verify that treatment and control were comparable.
- Pre-period alignment: compare baseline purchase rates in the weeks before exposure.
- Traffic and eligibility parity: confirm both groups had similar eligible user counts.
- Delivery parity: ensure the holdout truly received no treatment (or quantify leakage).
If baseline purchase rates differ materially, your incrementality estimate may be biased. In that case, tighten eligibility rules or switch to a geo design.
Analysis and Decision Rules
Estimating Incrementality
A straightforward estimate is:
- Incremental orders = Orders(treatment) − Orders(control)
- Incremental revenue = Revenue(treatment) − Revenue(control)
Use per-eligible-user metrics when group sizes differ.
Confidence and Practical Significance
Statistical confidence tells you whether the difference is likely real. Practical significance tells you whether it’s large enough to matter for budget decisions.
Example: A campaign shows +0.2% conversion lift with a tight confidence interval, but the incremental revenue is too small to justify scaling. You can still learn something: maybe the campaign is efficient but limited by inventory, or maybe it’s only effective for a narrow segment.
Guardrails
Watch for unintended effects that distort the interpretation:
- Cannibalization: treatment may shift purchases earlier or from other campaigns.
- Fraud or bot traffic: can inflate outcomes in one group.
- Operational issues: broken landing pages in treatment can make the channel look worse than it is.
Example: Channel Validation with a Holdout
A brand runs display ads to drive product page visits and purchases.
- Treatment: 50% of eligible visitors in selected markets see display ads.
- Control: the other 50% are excluded from display targeting.
- Measurement window: 14 days after first eligibility.
- Primary outcome: revenue per eligible visitor.
After the test:
- Treatment revenue per eligible visitor: $18.40
- Control revenue per eligible visitor: $17.65
- Incremental revenue per eligible visitor: $0.75
If the test also shows stable baseline behavior and no delivery leakage, you can confidently attribute the $0.75 to the display channel for this setup.
Mind Map: Common Failure Modes
Practical Checklist for Channel and Campaign Validation
- Randomize at the correct level (user or geo).
- Define eligibility, exposure date, and measurement window before launch.
- Confirm holdout enforcement and quantify leakage if it occurs.
- Validate baseline parity using pre-period metrics.
- Use per-eligible-user outcomes and keep definitions identical.
- Apply both statistical confidence and decision thresholds.
- Document assumptions so the next test doesn’t repeat the same mistakes.
10.5 Reporting Dashboards That Translate Data Into Actionable Changes
Dashboards fail when they show numbers but not decisions. The goal here is simple: every view should answer a question someone can act on today, with enough context to avoid “looks good” meetings.
Start with Decision Questions
Begin by listing the decisions the dashboard must support. For cross-channel commerce journeys, common decision questions include: Which segment is stalling between discovery and product view? Which channel is driving clicks that do not convert? Which offer is underperforming for a specific intent group? Each question becomes a dashboard section, and each section gets a clear owner.
Example: A team notices that paid social drives traffic, but conversion rate drops. The decision question is not “What happened?” It is “Should we change creative, landing page, or audience targeting for prospecting traffic?” The dashboard must separate these causes using the metrics and filters it provides.
Use a Metric Ladder from Behavior to Purchase
A reporting dashboard should move in a ladder: exposure → engagement → intent → purchase. This prevents the classic trap of optimizing the wrong layer.
- Exposure: impressions, reach, ad views, email sends
- Engagement: clicks, product page views, video plays, email opens
- Intent: add to cart, search usage, wishlist adds, checkout starts
- Purchase: orders, revenue, margin, repeat purchase
Example: If add-to-cart is flat but product views rise, the issue likely sits in product page clarity, pricing presentation, or shipping friction. If add-to-cart rises but purchases do not, the checkout experience or payment failures become the focus.
Build Dashboards with Three Layers
Keep the interface predictable by separating layers.
- Overview: what changed since the last comparable period
- Diagnostics: where the change came from
- Actions: what to do next and who should do it
Example layout:
- Overview shows conversion rate and revenue per visitor by channel and journey stage.
- Diagnostics breaks down by device, campaign, landing page template, and segment.
- Actions lists recommended next steps tied to thresholds, such as “Pause audience X if click-to-cart falls below 2.0% for two consecutive days.”
Define Thresholds and Guardrails
Actionable dashboards use rules that reduce debate. Thresholds should be based on historical baselines and operational constraints.
Guardrails prevent “fixing” one metric by harming another. For instance, a discount might raise orders but reduce margin. A dashboard should show both so the team can choose tradeoffs intentionally.
Example guardrail:
- If revenue per visitor increases but gross margin percentage decreases by more than 1.5 points, flag the change for review.
Make Segmentation Operational
Segmentation should reflect how teams actually target and personalize.
Use dimensions that map to execution:
- Journey stage: discovery, consideration, intent, purchase
- Intent signals: search terms, category depth, product comparisons
- Customer status: new vs returning, loyalty tier, prior purchase recency
- Experience context: device, geo, logged-in state
Example: Instead of “high spenders,” use “customers who viewed 3+ SKUs in the last 7 days but did not add to cart.” That segment directly informs what the next message should contain.
Include Attribution with Clear Boundaries
Attribution is useful only when the dashboard states what it does and does not claim. Use consistent windows and document assumptions inside the dashboard notes.
Example boundary:
- “Last-click revenue” is shown for quick comparisons, while “assisted conversion rate” is used to understand discovery influence. The dashboard should not mix them in the same decision without labeling.
Mind Map: Dashboard to Decision Flow
Example: One Dashboard, Three Outcomes
Assume the dashboard is reviewed every Tuesday for the prior week ending on two months ago. It shows three issues.
-
Paid Search: impressions and clicks are stable, but checkout starts drop on mobile.
- Diagnostics: payment failure rate rises on one checkout step.
- Action: route mobile traffic to an alternate checkout variant and notify the engineering owner.
-
Email: opens rise, but add-to-cart does not.
- Diagnostics: product recommendations in the email do not match the viewed category.
- Action: update the recommendation rule to use last viewed category for 7 days.
-
Retail Media: product page views rise, purchases do not.
- Diagnostics: landing pages show out-of-stock messaging for the promoted SKUs.
- Action: sync inventory feed and exclude unavailable SKUs from the next run.
Each outcome ties a metric change to a likely mechanism and a concrete next step.
Operationalize the Dashboard with Ownership
Finally, dashboards need accountability. Assign an owner per section, define escalation paths for threshold breaches, and ensure the “Actions” layer includes the exact filter settings used to identify the affected segment. When the dashboard can reproduce the diagnosis, teams spend less time re-explaining and more time fixing.
11. Experimentation and Optimization for Journey Performance
11.1 Building Experiment Backlogs with Journey Impact Hypotheses
An experiment backlog is a prioritized list of test ideas tied to specific journey outcomes. The trick is to keep ideas small enough to test, but meaningful enough to change decisions. Start with hypotheses that connect a customer behavior to a measurable outcome, then rank them by expected impact, confidence, and effort.
Step 1: Define the Journey Outcome You Will Improve
Pick one outcome per backlog cycle, such as “increase add-to-cart rate for high-intent visitors” or “reduce time to first purchase for returning browsers.” If you try to fix everything at once, your results will be noisy and your team will argue about what “success” even meant.
Example: For a cross-channel journey, you might target “increase conversion from product-page view to checkout” because it is downstream of discovery engagement and directly tied to purchase.
Step 2: Identify the Friction Points That Block the Outcome
Use existing signals to find where customers stall. Common friction points include:
- Product information gaps (customers can’t answer “Is this right for me?”)
- Offer mismatch (discounts appear but don’t apply to the viewed item)
- Navigation friction (users can’t find size, color, or delivery details)
- Trust gaps (returns, shipping, and warranty info are hard to locate)
Example: If analytics show many product-page views but few add-to-cart events, inspect product page sections, variant selection behavior, and shipping/returns visibility.
Step 3: Write Hypotheses That Are Testable and Specific
A good hypothesis has four parts: audience, action, mechanism, and metric.
- Audience: who you will test (e.g., “visitors who viewed a product page within the last session”)
- Action: what changes (e.g., “move delivery date and returns summary above the fold”)
- Mechanism: why it should work (e.g., “reduces uncertainty at the moment of decision”)
- Metric: what you will measure (e.g., “add-to-cart rate and checkout start rate”)
Example hypothesis: “For visitors who view a product page, showing delivery date and returns summary above the fold will increase add-to-cart rate because it answers the two most common purchase questions before variant selection.”
Step 4: Convert Hypotheses Into Experiment Candidates
Each hypothesis should map to one experiment candidate with clear boundaries:
- One primary change per test (to avoid “which part worked?”)
- One primary metric per test (to avoid “we improved something, but not what we care about”)
- A defined audience and traffic allocation rule
Example candidates:
- Variant A: delivery date and returns summary moved above the fold
- Variant B: same content, but delivery date emphasized with a compact icon
Step 5: Build a Backlog with a Simple Scoring Model
Use a lightweight scoring approach so prioritization is explainable.
A practical scoring rubric (1–5 each):
- Expected impact: how much the metric could move
- Confidence: how well data supports the mechanism
- Effort: engineering, creative, and operational cost
- Measurement feasibility: whether tracking can isolate the effect
Example: A content move that requires only template changes scores high on effort, but may score medium on confidence if evidence is indirect.
Step 6: Add Measurement Guardrails
Every experiment should include what you will not break. Guardrails prevent “winning” on the primary metric while harming the journey.
Example guardrails:
- If testing product-page changes, monitor bounce rate and checkout error rate
- If testing an offer banner, monitor coupon redemption and customer service contact rate
Step 7: Package Backlog Items for Fast Team Alignment
Each backlog entry should fit on one page:
- Hypothesis statement
- Target audience definition
- Primary and secondary metrics
- Proposed change description
- Risks and guardrails
- Dependencies (catalog feed, creative approvals, tracking)
Example backlog entry (condensed):
- Hypothesis: delivery and returns above fold increases add-to-cart
- Audience: product-page viewers with variant selection started
- Primary metric: add-to-cart rate
- Secondary metrics: checkout start rate, product-page bounce
- Guardrails: checkout error rate, returns initiation rate
- Dependencies: template update, event tracking validation
Step 8: Keep the Backlog Fresh Without Constant Rework
Run a short intake cadence. New ideas enter as hypotheses, not half-built experiments. When evidence changes, update confidence scores rather than rewriting everything.
Example workflow: weekly intake of 5–10 ideas, scoring within 48 hours, and selecting 2–3 candidates for design and measurement planning. This keeps momentum while preserving clarity.
A well-built backlog turns “we should test something” into a queue of decisions. Each item explains what will change, why it should matter, and how you will know it worked—without forcing the team to guess after the results arrive.
11.2 Designing a B Tests and Multivariate Tests for Cross-Channel Assets
Designing A/B Tests and Multivariate Tests for Cross-Channel Assets
Cross-channel testing works best when you treat each asset as a small decision point: a creative, a landing page element, an offer, or a targeting rule. A/B tests answer one question at a time; multivariate tests answer multiple questions at once, but only when you can control the combinatorics.
Start with a Clear Decision Question
Write a single decision question for the test. Examples:
- “Does Creative B increase product-page clicks compared with Creative A for people who viewed category pages?”
- “Which combination of headline, image, and offer improves add-to-cart rate for email recipients who abandoned carts?”
Then define the primary metric and the guardrail metric. Primary metrics should reflect the step you’re trying to improve (click-through, add-to-cart, checkout start). Guardrails prevent “better clicks, worse revenue” outcomes (refund rate, conversion to purchase, or customer support contacts).
Choose the Right Test Type
Use A/B tests when you can isolate one change and you want a clean read.
- Example: Email subject line A vs subject line B, with the same body, same product block, and same send time.
Use multivariate tests when you need to understand interactions among multiple elements.
- Example: Paid social landing page with two headlines, two hero images, and two offer blocks. The test can reveal whether the offer works better with one headline than the other.
A practical rule: if you’re not sure which elements interact, start with A/B tests. Multivariate tests are like group projects; they’re useful, but only if you assign clear roles.
Define Variants and Keep Them Comparable
For each element, define variants that differ in one meaningful way.
- Creative variant: different value proposition, not a random mix of unrelated visuals and copy.
- Landing page variant: same layout and load behavior, different headline and hero image.
Ensure variants are comparable in size and formatting so performance differences aren’t caused by layout shifts.
Control Exposure Across Channels
Cross-channel tests fail when the same person sees multiple variants in conflicting ways. Decide whether you will:
- Test within a channel only (simpler), or
- Test across channels with consistent assignment (harder).
For within-channel testing, keep the audience split isolated. For cross-channel assignment, use a single experiment ID so the same user receives a consistent variant across touchpoints.
Mind Map: Test Design Logic
Build A/B Tests with Operational Discipline
- Segment the audience by intent signals. Example: “Viewed product page but did not add to cart” for a landing page A/B.
- Randomize assignment at the right level. If you’re testing email subject lines, randomize per recipient. If you’re testing landing pages, randomize per session.
- Track the full funnel. Example events: ad click → landing view → product view → add-to-cart.
- Run long enough to cover day-of-week effects. If you launch on 2026-03-15, keep the test window consistent across the same weekdays.
Build Multivariate Tests Without Creating a Combinatorics Monster
Start by limiting the number of elements and variants.
- Example setup: 3 elements with 2 variants each → 2×2×2 = 8 combinations.
If you add a fourth element with 2 variants, combinations double to 16. That often forces longer run times or smaller confidence.
Use factorial thinking:
- If you only care about the offer, don’t include unrelated elements.
- If you suspect interaction between headline and offer, include those two elements and keep the third element fixed.
Example: Multivariate Landing Page for Cart Abandoners
Elements and variants:
- Headline: “Finish Your Order” vs “Your Items Are Waiting”
- Hero image: cart view vs product collage
- Offer block: free shipping vs 10% off
Assignment:
- Randomize per session for cart abandoners.
- Keep the rest of the page identical (same layout, same product list logic).
Metrics:
- Primary: add-to-cart rate after landing
- Guardrail: checkout start rate (to avoid “quick clicks, no intent”)
Interpretation:
- If “Finish Your Order + Free Shipping” wins, roll out that combination.
- If headline alone shows no effect but offer does, you can simplify future tests to focus on the offer.
Analyze with Clear Rules
Predefine how you’ll interpret results:
- Use confidence intervals or statistical significance thresholds consistently.
- Check whether results hold across key segments (new vs returning, mobile vs desktop) without overfitting.
- Watch guardrails first; a winning variant that damages checkout start is not a win.
Document Decisions So the Next Test Starts Faster
Record: audience definition, variants, assignment method, primary and guardrail metrics, and the exact decision rule. The goal is repeatability, not mystery. When the next test begins, you should be able to explain why you chose these variants in one paragraph and why you trust the outcome in two.
11.3 Controlling Variables Across Creative Landing and Offer Elements
When you run experiments across creative, landing pages, and offers, the biggest risk is accidental coupling: changing too many things at once so you can’t tell what caused the result. Controlling variables means you design changes so each test isolates a single decision point, while everything else stays stable.
Start with a simple rule: one experiment, one primary lever. The primary lever is the element you want to learn about, such as headline style, product imagery density, checkout incentive type, or shipping messaging. Everything else should be held constant through shared templates, locked content blocks, and consistent audience targeting.
Variable Inventory and Locking
Create an inventory of every element that can vary between variants. For a typical journey step, that includes:
- Creative: image, video, headline, subheadline, CTA text, CTA color, and layout.
- Landing page: hero section, above-the-fold text, product grid order, trust elements, FAQ presence, and form fields.
- Offer: discount amount, discount type (percent vs. fixed), eligibility rules, minimum spend, shipping terms, and expiration window.
- Experience mechanics: page speed settings, personalization logic, and recommendation algorithm version.
Then lock the non-primary elements. For example, if you test offer framing, keep the creative and landing layout identical by using the same landing template and swapping only the offer module. If you test creative, keep the offer module identical, including eligibility and expiration.
A practical way to enforce this is to treat each element as a “slot.” Slot A is the headline, Slot B is the hero image, Slot C is the offer module. Your experiment only changes one slot; the rest are copied from a single source-of-truth configuration.
Mind Map: Variable Control Workflow
Designing Variants Without Accidental Changes
Consider a common mistake: testing “10% off” versus “Free shipping” while also changing the headline and the product grid. If conversion changes, you won’t know whether it was the offer, the creative, or the merchandising order.
Instead, do this:
- Variant A: Creative and landing layout fixed; Offer module shows “10% off” with the same eligibility and expiration.
- Variant B: Creative and landing layout fixed; Offer module shows “Free shipping” with the same eligibility and expiration.
Even small offer details can change behavior. “Free shipping over $50” is not the same as “Free shipping today.” Keep the eligibility threshold and the time window identical across variants unless they are the primary lever.
Example: Offer Framing Test with Locked Landing
You want to test whether “Save 15%” performs better when framed as “Your price is lower today.”
- Primary lever: offer framing language.
- Locked elements: CTA text, hero headline, product grid order, trust badges, and checkout button label.
- Offer module changes only the framing line; the discount calculation stays identical.
Example variant text:
- Variant A: “Save 15% on your order”
- Variant B: “Today’s price is 15% lower”
Both variants include the same fine print: “Applies to eligible items. Ends 2026-03-15.” The date is part of the offer terms, so it must match.
Preventing Hidden Coupling in Tracking and Rendering
Hidden coupling often comes from implementation details:
- If the landing page uses conditional rendering, ensure the condition is tied only to the experiment assignment.
- If the creative triggers different landing redirects, confirm both variants land on the same final URL and template.
- Ensure event tracking is consistent: the same click elements should fire the same events across variants.
A quick QA check is to compare the rendered DOM for non-primary slots. If the hero section changes when you only intended to change the offer module, you’ve found a variable leak.
Validation and Launch Readiness
Before you start collecting results, validate three things:
- Variant integrity: only the primary lever differs.
- Eligibility consistency: offer rules and expiration match.
- Measurement consistency: events map to the same funnel steps.
If any of these fail, fix the configuration rather than “adjusting interpretation.” Interpretation should handle normal noise, not preventable design errors.
Controlling variables is less about perfection and more about discipline. When you can point to exactly one changed decision point, your results become actionable instead of merely interesting.
11.4 Interpreting Results and Documenting Learnings for Reuse
When an experiment ends, the temptation is to declare a winner and move on. The more useful habit is to translate results into decisions: what changed, why it likely changed, what you can reuse, and what you should not assume. This section turns test outcomes into durable knowledge that teams can apply to the next journey.
Interpreting Results with Decision-Grade Clarity
Start by separating three layers of evidence:
- Statistical signal: Did the metric move enough to be unlikely by chance?
- Business signal: Did the move matter in dollars, margin, or meaningful funnel progress?
- Operational signal: Did the change behave consistently across segments, devices, and time windows?
A practical example: suppose a new product-page module increases add-to-cart rate by 6%. If revenue per visitor stays flat, you might have shifted behavior without improving purchase intent. The module could be attracting browsers who add items but do not buy, or it could be increasing cart creation while checkout friction remains. Your documentation should capture both the lift and the “where it went” story.
Next, interpret results through mechanism, not just outcome. Mechanism answers: what user action did the change encourage, and what user action did it discourage? For instance, a revised recommendation layout might increase clicks because it reduces scanning time. But if it also increases returns due to mismatched expectations, the mechanism is incomplete. Mechanism helps you decide whether the learning transfers to other pages or only to the original context.
Finally, check for measurement alignment. If the experiment measured “viewed product” but the journey goal was “purchased,” you need to confirm that the metric chain is intact. A common failure mode is optimizing a proxy that correlates with purchase in one segment but not another.
Building a Reuse-Ready Learning Record
A learning record should be short enough to read during planning, but structured enough to prevent misapplication. Use a consistent template for every test.
Mind Map: Learning Record Structure
Example: Documenting a Landing Page Experiment
Context: Email-to-landing flow for “starter kit” shoppers who clicked a product bundle link.
Hypothesis: Adding a short “what’s included” section above the fold reduces uncertainty and increases checkout starts.
Primary metric: Checkout start rate.
Guardrails: Refund rate within 30 days and unsubscribe rate.
Results: Checkout start rate increased by 4.2% with no meaningful change in refund rate. Unsubscribe rate stayed within the normal range.
Interpretation: The lift likely came from faster comprehension of bundle contents. Because refunds did not rise, the content did not create expectation gaps.
Reuse guidance: Apply the same content pattern to other bundle pages where customers face similar uncertainty. Do not reuse it for single-item pages where the “included” framing adds noise.
This record is reusable because it includes both the “why” and the “where.”
Turning Learnings Into Practical Reuse
Reuse fails when teams copy variants without copying constraints. Your documentation should explicitly list dependencies such as:
- Content inputs: which product attributes were used (e.g., bundle composition, compatibility notes).
- Timing: whether the effect depended on immediate post-click behavior.
- Audience traits: whether the lift concentrated in first-time buyers or returning customers.
A simple rule: if a learning depends on a specific data field or page layout constraint, name it. Otherwise, the next team will guess and waste cycles.
Handling Mixed or Negative Outcomes
Not every test will win. Mixed results still produce useful knowledge if you document the tradeoff.
Example: a new recommendation algorithm increases clicks but decreases purchases. Record both outcomes and interpret the mechanism: clicks may be driven by novelty, while purchase drops due to relevance mismatch. Your reuse guidance might then shift from “use the algorithm everywhere” to “use it only when the catalog has sufficient inventory depth” or “pair it with stronger decision support.”
Quality Checks Before You Publish the Learning
Before storing the record, verify three items:
- Metric chain: the primary metric connects to the journey goal.
- Guardrails: negative side effects are captured, not ignored.
- Transfer boundaries: the record states where the learning applies and where it does not.
If you can’t answer those three questions from the document alone, the learning is not yet reusable. It’s just a result.
11.5 Scaling Winning Changes Across Channels and Markets
Scaling is the part where a good idea stops being a one-off and becomes a repeatable system. The goal is not to copy the same execution everywhere, but to preserve what worked while adapting what must vary by channel, market, and operational reality.
Start with a Reusable “Winning Unit”
A winning unit is the smallest set of decisions that reliably produces the outcome you measured. It includes the audience rule, the offer logic, the creative pattern, the landing experience, and the measurement method.
Example: If a “cart reminder with a size-specific product image” improved conversion in one market, the winning unit is not “send cart reminders.” It is “trigger on cart abandonment after 30 minutes, include the exact SKU image from the cart, show one alternative size with in-stock status, and route to a cart-preserving landing page.”
Capture these elements in a single checklist so teams can apply them consistently.
Separate What Must Stay Fixed from What Can Flex
Scaling fails when teams treat every detail as sacred. Instead, define two lists:
- Fixed elements: the parts tied to the measured lift (trigger timing, offer constraints, message structure, page layout behavior).
- Flexible elements: parts that depend on local norms (language length, payment methods, shipping thresholds, local promotions).
Example: In one market, free shipping at $50 might be the conversion lever. In another, the lever could be “free returns.” Keep the message structure fixed, but swap the value proposition and the threshold.
Build a Channel Translation Layer
Each channel has its own constraints, so scaling requires a translation layer that maps the winning unit into channel-native formats.
Example mapping:
- Display ads: preserve the offer logic and the product selection rule, but compress the creative into a single visual and a short benefit line.
- Email: preserve the same product selection rule, but expand with one supporting sentence and a clear CTA.
- Onsite: preserve the same recommendation logic, but express it through placement and UI hierarchy rather than copy length.
This prevents “same idea, different outcome” caused by accidental changes to the decision logic.
Create a Market Rollout Plan with Guardrails
A rollout plan should specify order, scope, and stop conditions. Start with markets that share key assumptions: similar product assortment depth, comparable delivery timelines, and similar customer behavior patterns.
Guardrails keep teams from scaling blindly:
- Minimum data volume before declaring success
- Maximum allowed change to fixed elements
- Required checks for inventory, pricing, and content accuracy
Example: If the winning unit depends on in-stock alternatives, the rollout must include a pre-flight test that verifies the alternative SKU exists and is purchasable in each market.
Use a Standard Experiment Template for Every Scale Step
Even when something “already worked,” scaling can break due to operational differences. Use a consistent experiment template so results are comparable.
Example template fields:
- Hypothesis tied to the winning unit
- Audience definition and exclusions
- Fixed element list and flexible element list
- Primary metric and a secondary “sanity metric”
- Duration and holdout method
Sanity metric example: If conversion improves but refunds spike, you need to know whether the lift is real or just a different kind of friction.
Mind Map: Scaling Winning Changes
Example: From One Market to Three Channels
Suppose a “bundle suggestion” improved purchase rate in Market A using a specific recommendation rule. Scaling step-by-step:
- Lock the winning unit: recommendation rule, bundle composition constraints, and the landing behavior that preserves cart context.
- Translate by channel:
- Email shows the bundle image and one-line explanation.
- Paid social uses the same bundle image but a shorter benefit line.
- Onsite uses the bundle module placement and UI hierarchy.
- Adapt flexible elements: localize the explanation sentence and swap the delivery promise to match local policy.
- Roll out with guardrails: verify bundle SKUs are in stock and priced correctly in each market.
- Run a standard experiment: compare against a holdout that receives the existing bundle logic, not the new one.
If the lift holds across channels and markets, the winning unit graduates into the default playbook. If it doesn’t, the checklist tells you exactly which fixed element changed in practice.
Operationalize the Playbook Without Making It Bureaucratic
Scaling is easier when teams can execute without asking permission for every detail. Documentation should be short but precise: the winning unit checklist, the fixed/flexible lists, the channel translation rules, and the rollout guardrails.
A practical rule: if someone can’t implement the change from the checklist alone, the system isn’t ready to scale. If they can, you’ve turned a good result into a repeatable process.
12. Operating Cross-Channel Journeys with People Process and Technology
12.1 Defining Roles for Marketing Commerce Analytics and Experience Teams
Cross-channel journeys fail most often for a boring reason: the work is shared, but the ownership is fuzzy. This section defines roles so each decision has a responsible team, each metric has a steward, and each customer experience change has a clear path from idea to launch.
Core Principle: One Outcome, One Owner
Start by choosing a small set of journey outcomes such as “product discovery to product page view,” “cart to checkout,” and “first purchase to repeat.” For each outcome, assign a single owner who can approve changes to measurement logic, content rules, and activation behavior. Other teams contribute, but the owner is accountable for the final call.
Team Responsibilities by Work Type
Think in work types rather than job titles. The same person may cover multiple work types in smaller organizations, but the responsibilities should still be explicit.
Marketing Team Experience and Content Ownership
The experience team owns customer-facing behavior: landing pages, email templates, on-site modules, and messaging tone. They translate journey intent into concrete touchpoint requirements.
Example: If the journey step is “browse high-intent categories,” the experience owner specifies what the customer sees after a category visit—such as a curated module with top sellers, a short value statement, and a clear next action. They also define suppression rules like “do not show the welcome offer if the customer already purchased.”
Commerce Analytics Measurement and Attribution Stewardship
The analytics team owns event definitions, tracking coverage, and metric calculations. They ensure that “view,” “engagement,” and “conversion” mean the same thing across channels.
Example: When email click-through is used to estimate interest, analytics verifies that the click event fires consistently across devices and that the downstream conversion event is not delayed or duplicated. If it is, they adjust the pipeline so the journey dashboard reflects reality.
Commerce Operations Catalog Inventory and Fulfillment Alignment
Operations ensures the journey can actually deliver what it promises. They own product data quality, inventory availability, and promotion eligibility logic.
Example: If a journey rule says “show in-stock items,” operations provides the inventory feed rules and defines what happens when inventory is stale. The experience team then uses that behavior in the UI, such as showing “limited availability” or swapping to alternates.
A Practical RACI for Common Decisions
Use a lightweight RACI so teams don’t argue about who decides after the fact.
| Decision | Responsible | Accountable | Consulted | Informed |
|---|---|---|---|---|
| Journey entry criteria | Analytics | Analytics | Experience | Marketing |
| Offer eligibility rules | Operations | Operations | Analytics | Experience |
| Creative and message requirements | Experience | Experience | Marketing | Analytics |
| Metric definitions for dashboards | Analytics | Analytics | Experience | Operations |
| Launch readiness checklist | Experience | Experience | Operations, Analytics | Marketing |
Mind Map: Role Map for Journey Execution
Operating Cadence That Prevents Role Confusion
Roles work only if the cadence matches the work.
- Weekly: Review journey performance by outcome owner. Analytics presents metric deltas; experience proposes touchpoint changes; operations confirms data readiness.
- Biweekly: Run a “tracking and eligibility” checkpoint. Analytics validates event coverage; operations validates catalog and inventory logic; experience confirms UI behavior matches rules.
- Per launch: Use a single readiness checklist owned by experience. It includes measurement QA, eligibility tests, and a rollback path.
Example: From Idea to Launch Without Hand-Off Chaos
A team wants to improve the step “cart abandonment to return purchase.”
- Experience proposes a two-message sequence: a reminder with cart contents and a second message that highlights shipping clarity.
- Analytics defines the entry event (cart created), the exit event (purchase), and the suppression rule (no messages after checkout).
- Operations confirms that cart contents can be rehydrated from product IDs and that shipping messaging aligns with current policy.
- The outcome owner approves the change set and signs off on the dashboard so results are interpretable.
When roles are defined this way, the journey becomes a system: experience decides what the customer sees, analytics ensures the measurement is trustworthy, and operations ensures the promised products and offers are real. The rest is just execution.
12.2 Creating Operating Cadences for Planning Launch and Optimization
Operating cadences turn “we should improve the journey” into a repeatable system. The goal is simple: decisions happen at the right time, with the right inputs, and with clear owners. A cadence also prevents the common failure mode where teams optimize in isolation—one group changes creative, another changes targeting, and nobody can explain why performance moved.
Cadence Principles That Keep Work Coherent
Start with three rules.
First, separate planning from execution. Planning decides what will run and why; execution runs it and reports what happened.
Second, align cadence frequency to decision speed. If a decision affects budgets or audience eligibility, it needs a weekly rhythm. If it affects page content or offer copy, it can move faster.
Third, standardize inputs. Every meeting should consume the same core artifacts: performance snapshot, experiment results, inventory or catalog status, and any tracking changes.
The Core Cadence Loop
A practical loop has four recurring moments: weekly planning, daily execution checks, biweekly optimization reviews, and monthly governance.
Weekly planning focuses on what changes next. It uses last week’s results and current constraints to choose a small set of actions.
Daily execution checks catch issues early: broken feeds, stalled approvals, missing product availability, or tracking gaps.
Biweekly optimization reviews decide whether to scale, pause, or iterate on active tests and live journeys.
Monthly governance audits data quality, consent handling, and measurement integrity, then updates the journey backlog.
Weekly Planning Meeting Structure
Keep the agenda tight and outcome-based.
- Journey scorecard review: compare discovery engagement and purchase outcomes by channel and segment.
- Constraint check: inventory, catalog completeness, creative availability, and any consent or preference changes.
- Backlog triage: rank proposed changes by expected impact and effort.
- Decision log: record what will change, who owns it, and when it will be live.
Example: A retailer sees high click-through on social but low add-to-cart. The team confirms product availability is consistent across the catalog and landing pages, then selects one action: update product page messaging to match the ad’s promise for the top two categories. The decision log includes the exact categories, the owner, and the launch date.
Daily Execution Checks That Prevent “Silent Failures”
Daily checks should be short and mechanical.
- Tracking health: event volume and schema validation.
- Feed freshness: product and price updates within the expected window.
- Eligibility sanity: confirm audience rules are still correct after any audience or consent updates.
- Creative delivery: verify that the right assets are serving for the intended segments.
Example: Email sends stop for a segment because preference flags changed. A daily check catches the drop in eligible recipients before the weekly report makes it look like “engagement declined.”
Biweekly Optimization Reviews for Tests and Iterations
Optimization reviews should treat experiments as first-class work.
- Review test status: running, paused, completed.
- Confirm measurement alignment: the primary metric matches the journey stage.
- Decide next action: scale winner, adjust variables, or stop.
Example: A browse-abandonment email test changes both subject line and offer type. The team learns the offer type drove the lift, so the next iteration keeps the winning offer and only tests subject line again. This keeps learning cumulative instead of resetting every cycle.
Monthly Governance for Data and Process Integrity
Monthly governance is where you prevent slow drift.
- Data quality audit: missing attributes, inconsistent product identifiers, and event duplication.
- Consent and preference review: confirm suppression rules match policy.
- Measurement integrity: verify attribution assumptions and dashboard definitions.
- Backlog refresh: retire stale ideas and re-rank based on what the system can measure reliably.
Example: A dashboard shows purchase lift, but the team discovers a tracking change caused a mismatch between “view” and “product detail” events. Governance corrects the definitions and reprocesses reporting so future decisions are based on consistent signals.
Mind Map: Operating Cadences
Operating Cadences Mind Map
A Simple Cadence Timeline Example
Assume a launch window starting 2026-03-15.
- 2026-03-14: daily checks confirm feed and tracking health.
- 2026-03-15: weekly planning locks the action list and owners.
- 2026-03-16 to 2026-03-17: execution checks watch for eligibility and creative issues.
- 2026-03-28: biweekly review evaluates early results and decides whether to scale or adjust.
- 2026-04-15: monthly governance audits measurement definitions and data quality.
This cadence keeps the system stable: small changes ship frequently, learning compounds, and measurement stays trustworthy enough to act on.
12.3 Managing Technology Integrations for Activation and Measurement
Cross-channel journeys fail in two places: data doesn’t arrive where it’s needed, and measurement can’t explain what happened. Technology integrations are the bridge between those two problems. This section treats integrations as a system with clear inputs, transformations, and outputs, then shows how to keep activation and measurement aligned.
Integration Foundations for Activation and Measurement
Start by listing the integration “contracts” you need. An activation contract answers: what audience or event should trigger what action, in which channel, with what payload. A measurement contract answers: what events must be captured, with what identifiers, and how they map to outcomes.
A practical way to define contracts is to standardize three identifiers across systems: a customer identity key, a session or device key, and an order or transaction key. For example, when a shopper views a product on your site, you want the same product identifier to appear in the ad platform event, the email personalization logic, and the purchase record. If one system uses SKU and another uses product ID, define a mapping table once and reuse it everywhere.
Designing the Event Flow End to End
Activation usually needs fewer events than measurement, but both must share the same event vocabulary. Define an event schema that includes:
- Event name and version
- Required fields (customer key, product key, timestamp, channel context)
- Optional fields (campaign ID, placement, referrer)
- Data types and allowed values
Example: “Product Viewed” should include product key, page type, and whether the view came from search or category. That single detail helps you later decide whether the follow-up should be a recommendation email or a search retargeting ad.
Then design the flow in stages:
- Capture: web, app, and server-side events are collected.
- Normalize: events are transformed into the shared schema.
- Enrich: events are joined with catalog attributes and consent status.
- Route: events are sent to activation endpoints and measurement stores.
- Reconcile: identifiers are checked for completeness and consistency.
Building Integration Mind Maps for System Clarity
Managing Identifier Mapping Without Breaking Everything
Identifier mapping is where integrations quietly drift. Use a single source of truth for mappings and treat it like production code. For example, if your product catalog changes from “legacy_sku” to “sku_v2,” you need a deterministic translation so that a “Product Viewed” event still matches the correct item in recommendation logic.
For customer identity, decide how you handle anonymous users. A common approach is to store a temporary device/session key until identity resolution occurs. When the customer later signs in, you link the session key to the customer key and re-emit or reconcile events so measurement doesn’t split the journey into two identities.
Enrichment and Consent as First-Class Integration Steps
Consent and preferences should not be an afterthought bolted onto activation. If a user opts out of marketing emails, your activation integration should prevent email sends at the routing stage, not at the sending stage. That keeps measurement honest too: you can still record “Product Viewed” for onsite and search relevance, while excluding marketing outcomes that were never allowed.
Example: A user views a stroller, then subscribes to updates but later changes preferences to “no promotions.” Your enrichment step should attach a “promotion_allowed=false” flag to the event stream so downstream systems can suppress discount offers while still allowing informational content.
Activation Endpoint Integration Patterns
Activation endpoints differ, but the integration pattern stays consistent: transform, validate, then send.
- Transform: convert your internal audience or event into the endpoint’s expected format.
- Validate: check required fields and schema version.
- Send: push to the endpoint with idempotency keys.
Idempotency matters because retries happen. If a “Cart Abandoned” trigger is sent twice, your email system might send two messages unless you deduplicate using a trigger ID plus customer key.
Measurement Integration Patterns That Stay Auditable
Measurement needs traceability. Every event should carry a journey ID and, where relevant, a campaign ID. When a click leads to purchase, the purchase record should reference the originating identifiers so you can compute funnel metrics without guessing.
Use a reconciliation step that compares counts across systems. Example: if your onsite logs show 10,000 “Add to Cart” events and your measurement store shows 9,400, you need to know whether the gap is due to missing identifiers, schema mismatches, or consent filtering.
Operational Controls for Reliability
Integrations require routine checks, not heroics. Set up:
- Monitoring: event throughput, schema validation failures, and endpoint response codes
- Alerts: sudden drops in key events or spikes in missing identifiers
- Backfills: controlled reprocessing when schemas change
- Release discipline: versioned deployments with rollback
Example: When you update the event schema version for “Product Viewed,” run a parallel validation pipeline for a small percentage of traffic. If required fields fail validation, stop the rollout before activation and measurement diverge.
Example Integration Flow
Example:
    flowchart LR
  A[Web App Event Capture] --> B[Event Normalization]
  B --> C[Enrichment Catalog + Consent]
  C --> D1[Activation Routing]
  C --> D2[Measurement Routing]
  D1 --> E[Ad Email SMS Endpoints]
  D2 --> F[Event Store and Funnel Tables]
  E --> G[Click View Signals]
  G --> F
  F --> H[Dashboards and Attribution Datasets]
Practical Checklist for Integration Readiness
Before you turn on a new integration, verify:
- Event schema versions are consistent across capture, enrichment, and routing.
- Identifier mappings exist for customer, product, and transaction keys.
- Activation payloads include the fields required to render offers correctly.
- Measurement events include journey and campaign identifiers.
- Deduplication rules exist for triggers and conversions.
- Monitoring covers both data quality and endpoint delivery.
When these items are true, activation and measurement stop arguing with each other. The journey becomes a single story told across systems, not a collection of disconnected logs.
12.4 Handling Catalog Content and Inventory Operations at Scale
Catalog content and inventory operations are the unglamorous engine behind cross-channel journeys. If product data is inconsistent or inventory is wrong, every downstream experience—search results, recommendations, ads, email, and checkout—starts behaving like it’s guessing. The goal at scale is simple: keep product information accurate, keep stock signals timely, and make both usable by every channel without manual heroics.
Core Data Objects and Their Responsibilities
Start by separating what the business knows from what the system can fulfill.
- Product master: stable attributes such as brand, title, description, images, size/variant structure, and compliance fields.
- Offer and pricing: sellable packaging of a product with price, promotion rules, and eligibility.
- Inventory: quantities by location, availability windows, and fulfillment constraints.
- Channel mapping: how each channel consumes the above, including required fields and formatting.
A practical rule: product master changes should not require inventory recalculation, and inventory updates should not require rewriting descriptions. This separation reduces blast radius when something goes wrong.
Data Quality Controls That Actually Prevent Breakage
At scale, “quality” means predictable validation and clear ownership.
- Field completeness checks: enforce minimum required fields per channel. Example: if a channel requires a primary image and a short description, block publishing when either is missing.
- Normalization rules: standardize units, sizes, and attribute values. Example: convert “5.5 in” and “13.97 cm” into a consistent unit system so filters behave the same across channels.
- Variant integrity: ensure each variant has a unique identifier and maps to the correct option values. Example: if “Color: Black” and “Color: Ink” both exist, decide whether they are the same value or separate ones—then enforce it.
- Content governance: define who can edit what. Example: marketing can update long descriptions, but only merchandising can change attribute taxonomy.
Inventory Modeling for Real-World Fulfillment
Inventory is rarely a single number. Model it so channels can make correct decisions.
- Availability by fulfillment method: ship-from-warehouse vs. store pickup vs. same-day delivery.
- Backorder and lead time: if an item can be ordered before it ships, expose the expected ship window rather than pretending it’s in stock.
- Safety stock and cutoffs: prevent overselling when inventory is near depletion.
Example: A customer sees “Pickup today” on a product page. That label must be derived from the pickup-location inventory plus cutoff rules. If you only sync total inventory, the label will be wrong even when the system is technically “up to date.”
Publishing Workflows That Keep Channels Synchronized
You need a repeatable pipeline from edits to live experiences.
- Staging: changes land in a controlled environment with validation.
- Approval gates: content edits pass review for regulated fields and brand compliance.
- Publishing: only validated records move to the live catalog.
- Propagation: channels receive updates in a defined order, typically product master first, then offers, then inventory.
Example: If you publish inventory first, a channel might show “In stock” for a product whose image or title is still outdated. Ordering prevents that mismatch.
Operational Cadence and Monitoring
Inventory and catalog operations fail quietly unless you measure them.
- Freshness SLAs: define acceptable delay for inventory updates by channel. Example: store pickup availability must update within 15 minutes; email recommendations can tolerate longer.
- Error budgets: track how often publishing is blocked by validation failures.
- Reconciliation jobs: periodically compare source-of-truth inventory against what channels received.
When monitoring flags an issue, the response should be procedural, not improvisational. Example: if variant mapping errors spike, pause publishing for affected categories, fix taxonomy mapping, then resume with a backfill.
Mind Map: Catalog and Inventory Operations at Scale
Example Workflow for a Large Catalog Change
Imagine a retailer adds a new size option across thousands of SKUs.
- Step 1: update the product master taxonomy for the size option and validate variant integrity.
- Step 2: publish the updated product master to staging and run channel field completeness checks.
- Step 3: publish offers so pricing eligibility matches the new variants.
- Step 4: propagate inventory last, using fulfillment-method availability rules.
- Step 5: monitor for mismatched variant IDs and missing images in the first publishing window.
This sequence prevents the classic failure mode: customers see the new size in one place but not another, or they can select it but checkout fails because the offer mapping wasn’t updated.
Example: Handling Inventory for Store Pickup
A store pickup label should be computed from:
- pickup-location inventory quantity
- store cutoff time
- item handling constraints (for example, oversized items)
- backorder policy
If any input is missing, default to a conservative display such as “Check availability” rather than showing “Pickup today.” That choice reduces customer frustration and support tickets, and it keeps the system honest when data is incomplete.
Operational Checklist for Scale
- Separate product master, offers, and inventory responsibilities.
- Enforce channel-specific validation before publishing.
- Model inventory by fulfillment method and constraints.
- Publish in a safe order and monitor freshness.
- Use reconciliation to catch silent drift between sources and channels.
When these pieces work together, cross-channel journeys stop relying on luck and start behaving like a system.
12.5 Building Documentation Templates for Journey Governance and Compliance
Cross-channel journeys fail in predictable ways: teams interpret the same event differently, approvals happen in the wrong order, and compliance requirements get treated like a last-minute checklist. Documentation templates prevent that by making decisions explicit, repeatable, and auditable.
Governance Principles That Templates Must Enforce
Start with three rules your templates should reflect.
- One source of truth per artifact. A journey definition lives in one place; event definitions live in another; consent rules live in a consent register. Templates should include “owner” and “last reviewed” fields so nobody has to guess.
- Traceability from intent to execution. Every message and recommendation should trace back to a journey goal, a trigger, and an eligibility rule.
- Compliance as structured inputs. Instead of “comply with laws,” templates capture jurisdiction, consent basis, retention limits, and suppression logic.
Template Set Overview
Use a small set of templates that cover the full lifecycle.
- Journey Charter Template for purpose, scope, KPIs, and stakeholders.
- Touchpoint Specification Template for channel-by-channel execution details.
- Event and Data Dictionary Template for naming, schemas, and validation.
- Eligibility and Suppression Template for consent, exclusions, and frequency caps.
- Content and Offer Approval Template for review steps and evidence.
- Measurement Plan Template for events, attribution assumptions, and QA checks.
- Compliance Checklist Template for jurisdictional requirements and audit trails.
Journey Charter Template
A charter prevents “we thought it meant the same thing” problems.
Include:
- Journey name and version (e.g., “Welcome Series v3”).
- Business objective and customer problem statement.
- In scope channels and out of scope channels.
- Entry criteria and exit criteria.
- Primary KPIs (one conversion metric plus one engagement metric).
- Stakeholders with roles: owner, approver, implementer, analyst.
- Review cadence and effective date (example: 2026-03-15).
Example snippet (plain text fields):
- Entry criteria: “Customer adds item to cart but does not purchase within 24 hours.”
- Exit criteria: “Purchase completed or customer unsubscribes.”
- KPI: “Incremental first purchase rate” and “Email click-through rate.”
Touchpoint Specification Template
This template turns the charter into operational steps.
For each touchpoint, capture:
- Channel and format (email, SMS, onsite module, paid social).
- Trigger (event name and required properties).
- Eligibility reference (link to the eligibility template section).
- Content inputs (product IDs, copy variant, offer rules).
- Personalization rules stated as business logic, not prose.
- Fallback behavior when data is missing.
Example personalization rule:
- If product category is “running shoes,” show “size guide” content block; otherwise show “returns policy” block.
Event and Data Dictionary Template
This is where teams stop arguing about what “view” means.
Require:
- Event name and event purpose.
- Schema: required fields, data types, allowed values.
- Identity fields: customer ID, device ID, session ID.
- Timing rules: when the event fires and deduplication logic.
- Validation checks: missing fields, impossible timestamps, out-of-range values.
Example event definition:
- Event:
product_viewed - Required fields:
customer_id,product_id,page_type,timestamp - Deduplication: one event per product per session per 30 minutes.
Eligibility and Suppression Template
Compliance and customer experience meet here.
Include:
- Consent basis per channel and jurisdiction.
- Suppression rules: unsubscribed, opted out of marketing, recent complaint flag.
- Frequency caps per journey and per channel.
- Holdout rules for measurement (if used) with explicit exclusions.
Example suppression rule:
- If
marketing_opt_out=true, do not send any email touchpoints in this journey, but allow onsite personalization.
Content and Offer Approval Template
Approvals should record evidence, not vibes.
Capture:
- Asset list: subject lines, creative variants, landing page URLs.
- Regulatory constraints: claims allowed, required disclaimers.
- Offer constraints: inventory availability, price validity window.
- Approval steps with timestamps and approver IDs.
Measurement Plan Template
Measurement must match the journey’s real behavior.
Include:
- Event list and mapping to KPIs.
- QA checks: event volume thresholds, schema conformance, bot filtering.
- Attribution assumptions stated plainly.
- Reporting cadence and what triggers a change.
Compliance Checklist Template
Keep it structured so audits are boring.
Include:
- Jurisdictions covered.
- Data retention limits for identifiers and event logs.
- Access controls for sensitive fields.
- Audit trail requirements: who changed eligibility rules and when.
Mind Map: Documentation Governance Flow
Mind Map: Artifact Traceability
Mind Map: Traceability Chain
Journey Objective
-> Charter Entry Exit
-> Touchpoint Trigger
-> Event Definition
-> Eligibility Rules
-> Content Inputs
-> Approval Evidence
-> Measurement Events
-> Reporting and QA
Example Documentation Package Layout
Treat the package like a folder with clear filenames.
01_charter_v3.md02_touchpoints_v3.md03_event_dictionary.md04_eligibility_suppression.md05_content_approval.md06_measurement_plan.md07_compliance_checklist.md
Each file should state its owner, version, and effective date, and should reference the exact sections it depends on. When a team changes one rule, they update the dependent artifacts and record the reason in the approval template.