Air Cargo Logistics and Aviation Supply Chain Management
1. Foundations of Air Cargo Logistics and Supply Chain Roles
1.1 Scope of Air Cargo Operations Across Express, Freight, and Charter
Air cargo operations cover three common service modes—express, freight, and charter—each with different expectations for speed, handling, and commercial control. The scope is easiest to understand by starting with what moves, how it moves, and who controls the process at each step.
What “Air Cargo” Means in Practice
Air cargo is not just “stuff on a plane.” It includes the full chain from pickup to delivery, with airport processes in the middle: acceptance, screening, build up into ULDs or containers, loading, flight movement, offload, break down, and final delivery. The scope also includes the operational rules that make those steps predictable: cutoff times, scan events, exception handling, and documentation checks.
Express Operations
Express operations focus on time certainty and frequent departures. Shipments are typically smaller, higher value, and more sensitive to missed cutoffs. The operational scope emphasizes:
- High-frequency network lanes so missed connections can be recovered by later flights.
- Tight acceptance windows at origin and strict cutoff discipline at airports.
- Sorting and routing automation so packages move quickly from receiving to the correct ULD or flight.
Example: A medical supply shipment is picked up at 14:00, accepted by 15:00, and routed to a hub flight departing at 18:00. If the truck arrives at 15:30, the shipment may still be loaded on the same flight if acceptance rules allow; otherwise it is diverted to the next eligible departure to preserve delivery timing.
Freight Operations
Freight operations cover a broader range of shipment sizes, often with more variability in transit time. The scope emphasizes planning and capacity alignment:
- Consolidation and build up to optimize space and handling efficiency.
- Lane and schedule management where fewer departures may mean less flexibility.
- Clear responsibility boundaries between shippers, forwarders, airlines, and ground handlers.
Example: A manufacturer ships 12 pallets to a regional hub. The forwarder consolidates inventory from multiple sites, aiming to build a ULD-ready load by the airport cutoff. If one pallet is missing documents, the rest of the shipment may still move, but the missing pallet becomes an exception that must be resolved without delaying the entire ULD.
Charter Operations
Charter operations are scope-heavy on control. Instead of relying on scheduled capacity, the customer or operator arranges aircraft availability and flight execution. The scope typically includes:
- Aircraft and route control with defined operational responsibilities.
- Special handling requirements where cargo characteristics or timing demand custom procedures.
- Contracted turnaround and ground handling that may differ from standard airport processes.
Example: A relief organization needs a specific aircraft type for a remote airfield. The charter scope includes confirming ramp handling capability, securing ULD compatibility, and aligning ground transport at both ends so the aircraft turnaround does not stall.
How the Three Modes Differ at Key Decision Points
The differences show up most clearly in acceptance, capacity, and recovery.
- Acceptance: Express tends to run on narrow windows; freight may allow more planning time; charter can be more flexible but still depends on agreed turnaround.
- Capacity: Express uses frequent scheduled capacity; freight uses planned capacity with consolidation; charter uses contracted aircraft.
- Recovery: Express often recovers via later flights; freight recovers through alternate routings or consolidation changes; charter recovery may involve rerouting or rescheduling the aircraft.
Mind Map: Scope and Responsibilities
Operational Boundaries That Define Scope
A practical way to define scope is to list what each party must do and what triggers handoffs.
- Origin handoff: when the shipment is accepted and becomes eligible for screening and build up.
- Airport handoff: when the cargo is loaded into a ULD/container and becomes part of the airline movement.
- Destination handoff: when the shipment is released for break down and final delivery.
Example: If a shipment fails a documentation check at origin, it may remain in a controlled holding area until corrected. The scope includes that holding process, not just the flight.
Summary of the Scope
Express, freight, and charter all share the same core airport mechanics, but they differ in how strictly time is managed, how capacity is secured, and how exceptions are handled. Understanding those differences turns “air cargo” from a generic label into a set of operational expectations you can plan, measure, and execute.
1.2 Core Supply Chain Actors Including Shippers, Forwarders, Carriers, and Ground Handlers
Air cargo moves fast, but it doesn’t move by magic. It moves because specific actors own specific responsibilities, and those responsibilities connect at clear handoff points: pickup, acceptance, airport build-up, flight, arrival processing, and delivery. When roles are understood, service levels become measurable instead of hopeful.
Shippers
Shippers are the party that initiates the shipment. They decide what to ship, when it must arrive, and how it should be handled. In practice, shippers provide the operational inputs that make everything else possible: accurate description of goods, correct packaging, weight and dimensions, required documents, and any special handling instructions.
A simple example: a medical device distributor needs delivery by 10:00. The shipper confirms temperature requirements, provides the correct product description for customs, and ensures the package can survive airport handling. If the shipper underestimates weight, the shipment may be rejected at acceptance or re-rated, which then cascades into missed cutoffs.
Shippers also choose the service model. They may ship under their own contract with a carrier, or they may outsource planning and execution to a forwarder. Either way, the shipper remains accountable for the correctness of shipment data and the physical readiness of the cargo.
Forwarders
Forwarders coordinate the end-to-end movement, especially when multiple carriers, airports, or modes are involved. Their job is to translate a shipper’s requirements into an executable plan: routing, booking, documentation workflow, and exception handling.
A practical example: a shipment must go from a regional warehouse to an international hub with a same-day connection. The forwarder checks flight schedules, verifies connection feasibility, and aligns warehouse pickup timing with airport cutoff windows. If a flight is delayed, the forwarder manages the decision tree: hold and rebook, reroute via an alternate hub, or adjust delivery expectations.
Forwarders also manage the “paper-to-physical” link. They ensure the right documents accompany the right cargo, and they coordinate with ground handlers and airlines so that scans and status messages match what’s actually loaded.
Carriers
Carriers are the airlines (and sometimes integrators) that provide air transport capacity and operate the flight network. They control aircraft capacity, flight schedules, loading plans, and the operational rules for acceptance and build-up.
From an operational standpoint, carriers enforce cutoff times and acceptance criteria. For example, if a shipment arrives after the airline’s build-up deadline, it may not be loaded on the intended flight even if the forwarder booked it. Carriers also define how shipments are tendered and tracked, including how ULDs are built and how cargo is reconciled.
Carriers therefore convert network design into execution. A well-designed route fails if acceptance and loading discipline are weak, so carriers focus on predictable processes: scan accuracy, ULD integrity, and clear event reporting.
Ground Handlers
Ground handlers perform the physical work at airports and sometimes at off-airport facilities: receiving cargo, staging, screening coordination, ULD build-up support, loading, and unloading. They also manage the interfaces between trucking, warehouses, and airline operations.
A concrete example: a truck arrives with multiple pieces for different flights. The ground handler verifies counts and identifiers, routes cargo to the correct staging area, and ensures it is loaded into the correct ULD. If labels are inconsistent or scan events are missing, the shipment can be “found” later but still miss the flight.
Ground handlers are where time becomes real. A 20-minute delay at the wrong step can turn a same-day delivery into a next-day delivery, even if the flight itself departs on time.
How Roles Connect at Handoffs
Each actor contributes inputs and consumes outputs. The handoffs are the control points where errors become visible.
- Shipper readiness enables acceptance.
- Forwarder planning enables correct routing and documentation flow.
- Carrier rules enable predictable loading and flight execution.
- Ground handling enables physical movement that matches the planned record.
Mind Map: Core Supply Chain Actors and Responsibilities
Example: One Shipment, Four Actors
A shipper tenders a temperature-sensitive shipment to a forwarder with a delivery-by time. The forwarder books the route and schedules pickup to meet airport cutoff. The carrier confirms acceptance rules and loads the shipment into a ULD according to build-up procedures. The ground handler receives the truck, stages the cargo, supports screening, and loads the correct ULD. If any actor’s inputs are off—wrong weight, missing document, late tender, or mismatched scan—the shipment’s status and physical reality diverge, and the delivery timeline becomes unreliable.
Understanding these roles turns air cargo from a chain of tasks into a chain of accountable handoffs.
1.3 Service Level Definitions Including Transit Time, Cutoff Times, and Acceptance Windows
Service levels in air cargo are not just promises; they are operational constraints written in plain language. A good definition ties three things together: transit time (how long the journey should take), cutoff times (when you must stop accepting changes), and acceptance windows (when a shipment is allowed to enter the system). When these are aligned, everyone can make consistent decisions under pressure—especially at the airport.
Transit Time
Transit time is the planned elapsed time from a defined origin point to a defined destination point. In air cargo, the “clock” must be explicit, because different parties often measure different start and end points.
A practical approach is to define transit time using milestone anchors:
- Start anchor: pickup scan at the shipper’s facility, or acceptance scan at the carrier/forwarder, depending on who controls the first handoff.
- End anchor: delivery scan at the consignee, or release scan at the destination warehouse, depending on whether you count customs and last-mile handling.
Example: A shipment is accepted at 10:15. If transit time is defined as “from acceptance scan to delivery scan,” then any customs delay at destination is included. If transit time is defined as “from airport departure to airport arrival,” then customs is excluded and handled under a separate service component.
Transit time definitions should also specify whether they are calendar-based (includes weekends and holidays) or business-hour-based. For time-critical freight, calendar-based definitions are usually easier to audit because they match how carriers schedule flights.
Cutoff Times
Cutoff times are the operational deadlines that protect the plan. They exist because screening, build-up, loading, and documentation processing take real time, and those steps cannot be stretched indefinitely without breaking the network.
A cutoff time should be defined for each decision point, not just one global deadline. Common cutoff types include:
- Acceptance cutoff: latest time the system will accept a shipment for processing.
- Screening cutoff: latest time cargo must be presented for screening so it can be cleared before build-up.
- Build-up cutoff: latest time ULDs or cartons can be staged for loading.
- Loading cutoff: latest time cargo can be loaded onto the aircraft before the final load plan is locked.
Example: A forwarder sets an acceptance cutoff at 14:00 local time. If screening typically takes 45–60 minutes and build-up requires 30 minutes, then a screening cutoff at 13:00 and a build-up cutoff at 12:30 are more realistic than a single 14:00 cutoff for everything. The math is simple: you reserve time for each step, then you stop the clock early enough that the last step still fits.
Cutoff times should also specify the time zone and the facility they apply to. “Cutoff at 18:00” is ambiguous if it could mean the origin warehouse time, the airport time, or the destination time.
Acceptance Windows
An acceptance window defines when a shipment can be physically handed over to the logistics provider. It is the bridge between customer scheduling and internal processing capacity.
Acceptance windows are typically expressed as:
- Earliest acceptance time: when receiving staff and systems are ready.
- Latest acceptance time: aligned to the acceptance cutoff.
- Appointment rules: whether walk-ins are allowed, and how many shipments can be processed per hour.
Example: A warehouse offers a two-hour receiving window from 09:00–11:00. A shipper books a 10:00 appointment. If the shipment arrives at 11:10, it may still be processed, but it is no longer guaranteed to meet the same transit outcome because it risks missing screening or build-up.
Acceptance windows should be tied to capacity assumptions. If a facility can process 120 pieces per hour through screening, then the acceptance window must reflect that throughput, not just staff availability. Otherwise, the system accepts too much and then “solves” the problem with exceptions.
Mind Map: Service Level Definitions
Integrated Example: From Window to Transit Outcome
Consider a lane where the planned transit time is 36 hours from airport departure to airport arrival. The origin facility sets an acceptance window of 08:00–12:00 local time. The acceptance cutoff is 12:00, screening cutoff is 11:00, and build-up cutoff is 10:30.
A shipment arriving at 11:20 is still within the acceptance window and within the screening cutoff, so it has a realistic path to build-up. A shipment arriving at 12:10 misses the acceptance cutoff; even if it is processed later, it is no longer eligible for the same transit-time guarantee because it likely shifts the departure.
This is the core idea: transit time is the target, cutoff times are the guardrails, and acceptance windows are the entry rules. Define them together, and the network behaves like a system instead of a collection of separate promises.
1.4 Documentation and Data Exchange Basics Including AWB, Manifests, and Shipment Status Messages
Air cargo moves fast, but the paperwork and messages are what keep it from moving in the wrong direction. This section explains the three documentation pillars you’ll see repeatedly: the Air Waybill (AWB), the cargo manifest, and shipment status messages. Together, they form a simple chain: identify the shipment, group it for movement, then report what happened.
Air Waybill as the Shipment Identity Record
The AWB is the primary identifier for an air shipment. It links the shipper’s description, the consignee, routing, and the flight plan into one reference number. In practice, teams use the AWB to answer three questions quickly: “What is this?” “Where is it going?” and “Which party is responsible for the next step?”
A useful way to think about the AWB is as a portable label with legal weight. For example, if a package is scanned at warehouse receiving but later found in the wrong ULD, the AWB number is what allows operations to reconcile the physical location against the intended routing.
Key AWB data fields typically include:
- Shipper and consignee names and addresses
- Airport of departure and destination
- Flight routing and service type
- Weight, pieces, and description
- Special handling indicators
- Billing and payment terms
Manifests as the Movement Grouping Record
Where the AWB identifies a shipment, the manifest identifies a load movement. A manifest is produced for a flight and lists the cargo items being carried, often grouped by ULD, container, or cargo type. Ground handlers and airline operations rely on manifests to plan build-up, loading, and reconciliation.
A practical example: during build-up, a warehouse sorts cargo into ULDs. When the ULD is sealed and presented for loading, the manifest provides the “who belongs on this flight” list. If one AWB is missing from the manifest, it’s a red flag that the shipment may be mis-sorted, not yet scanned, or not accepted for that flight.
Manifests also support operational control. If a flight is delayed, the manifest helps determine what can be rebooked together and what must be separated due to handling constraints.
Shipment Status Messages as the Event Timeline
Shipment status messages are the operational heartbeat. They report events such as acceptance, pickup, arrival at an airport, screening completion, build-up, loading, departure, and delivery. These messages are usually triggered by scans or system milestones and are exchanged between parties.
The most important concept is event consistency. If the warehouse sends “accepted” but the airline never receives “loaded,” the shipment appears to stall. That’s not just an information problem; it affects customer updates, exception handling, and claims.
A concrete example: suppose a shipment is scanned as “arrived at destination airport” at 10:15. If the next message “out for delivery” is sent at 10:20 without an intermediate “released from screening,” the receiving team may reject the update because it conflicts with their process. Good message design prevents this by mapping each event to a real control point.
Data Exchange Basics for Reliable Handoffs
Data exchange is the method of moving AWB and event information between systems. In air cargo, you’ll commonly see:
- Shipment-level messages tied to AWB numbers
- Load-level messages tied to ULD or container identifiers
- Event-level messages tied to timestamps and locations
To keep handoffs reliable, teams should align three things: identifiers, timing, and responsibility.
- Identifiers: AWB number for shipment, ULD/container ID for grouping
- Timing: event timestamps should reflect when the control point was completed
- Responsibility: each event should be owned by the party that can verify it
Mind Map: Documentation and Data Exchange Flow
Example: End-to-End Reconciliation Using One AWB
Imagine AWB 123-45678901 is accepted at a warehouse on 2026-03-15, then built into ULD ULD-77A. The warehouse sends an “accepted” status tied to the AWB. During build-up, the manifest for the flight includes AWB 123-45678901 under ULD-77A. At the airport, the airline system receives a “loaded” event for ULD-77A, and the shipment status messages confirm “loaded” for the AWB.
If the manifest lists the AWB but the “loaded” message never arrives, the shipment is likely stuck between build-up and loading, or the scan-to-message mapping failed. If the “loaded” message arrives but the AWB is absent from the manifest, the issue is earlier: the shipment may have been loaded under the wrong ULD or the manifest was generated from incomplete data.
This is why documentation and messages are not separate tasks. The AWB tells you what the shipment is, the manifest tells you where it belongs in the movement, and status messages tell you what actually happened at each control point.
1.5 Practical Workflow Mapping from Pickup Through Airport Handoff to Delivery
A practical air cargo workflow is easiest to manage when you map it as a chain of handoffs, each with a clear “input,” “decision,” and “output.” The goal is not to document every motion; it’s to prevent the common failure modes—missed cutoffs, mismatched counts, unclear responsibility, and data that stops updating at the worst possible moment.
Workflow Map Overview
Think of the journey in five phases:
- Pickup and pre-alert readiness
- Linehaul to the airport
- Airport receiving and build up
- Flight execution and airport-to-airport handoff
- Arrival processing and final delivery
Each phase has a small set of control points where you verify identity (shipment), condition (cargo), and timing (cutoff and acceptance windows).
Phase 1: Pickup and Pre-Alert Readiness
Start with the shipment’s “truth set”: AWB number, shipper and consignee details, piece count, weight, service level, and any special handling requirements. Before the truck leaves, confirm that the pickup scan will be accepted by the carrier or forwarder system. A simple example: if a shipment is booked as 10 pieces but the driver’s manifest lists 9, the mismatch should be caught at pickup, not at the airport where it becomes a reconciliation problem.
Control points:
- Pickup confirmation scan with AWB and piece count
- Document check for required paperwork and labels
- Exception rule: if any required field is missing, hold the shipment and escalate to the responsible party
Phase 2: Linehaul to the Airport
Linehaul is where timing errors multiply. Map the truck’s route to the airport using two time anchors: the warehouse cutoff for acceptance and the airport receiving window. If the truck arrives early, you still need a staging plan; if it arrives late, you need a clear decision tree for rebooking or re-routing.
Control points:
- Yard gate entry scan
- Arrival time capture
- Pre-sort verification against the receiving list
Example: A medical device shipment requires temperature control. If the warehouse uses a staging zone that is not temperature-controlled, the workflow must include a “move to controlled staging” step before the truck is allowed to discharge.
Phase 3: Airport Receiving and Build Up
At the airport, the workflow shifts from “transport” to “build up.” Your map should show how pieces become ULDs (Unit Load Devices) or how they are consolidated for the flight. The key is to define who counts, who records, and what happens when counts don’t match.
Control points:
- Receiving scan at the terminal or warehouse
- Piece count verification and discrepancy handling
- ULD build record creation and seal control if applicable
Decision logic:
- If counts match and labels are correct, proceed to staging for loading
- If counts differ, quarantine the shipment and trigger a reconciliation workflow
- If screening results require action, route to the appropriate hold area
Phase 4: Flight Execution and Airport-to-Airport Handoff
Flight execution is mostly about ensuring that the “last known good state” is preserved. Your map should include event updates: build complete, loaded, departed, and arrival. If a shipment is transferred between facilities, the handoff must include a scan or status update that proves custody.
Control points:
- Load confirmation scan
- Departure event capture
- Arrival event capture and transfer scan
Example: A shipment is loaded onto a connecting flight but the ULD is later found to have a missing seal record. The workflow should route it to a security reconciliation step rather than letting it continue as if nothing happened.
Phase 5: Arrival Processing and Final Delivery
Delivery is not just “out for delivery.” It includes arrival processing, customs clearance (if applicable), final sorting, and proof of delivery. Your map should specify the handoff from airport operations to the last-mile carrier, including the final piece count and delivery address validation.
Control points:
- Arrival scan and release decision
- Clearance completion confirmation where required
- Final sort scan and dispatch scan
- Proof of delivery with recipient confirmation
Example: If the consignee address is incomplete, the workflow should stop at the dispatch stage and trigger an address correction step, preventing a failed delivery attempt that wastes time and creates a new exception.
Mind Map: End-to-End Workflow Control Points
Mind Map: Decision Tree for Exceptions
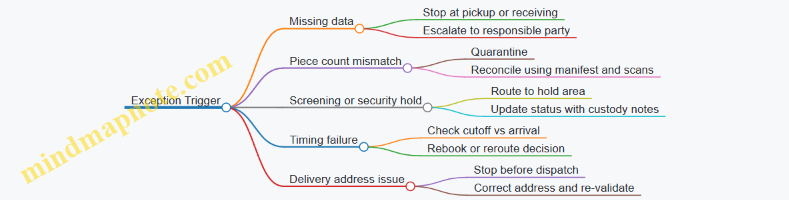
Mini Example: One Shipment Walkthrough
A shipment booked for a same-day connection is picked up on 2026-03-16. At pickup, the driver scans the AWB and confirms 12 pieces. The truck arrives within the receiving window, passes yard entry scanning, and the airport team verifies 12 pieces during receiving. The pieces are built into a ULD with a seal record, then loaded and scanned for departure. At arrival, the shipment is released after clearance confirmation, sorted for the destination route, and dispatched with a final scan. Delivery completes with recipient confirmation and a proof-of-delivery timestamp.
This walkthrough works because every phase ends with a control point that can be checked later: scans, counts, and custody records. When those are consistent, the rest of the workflow becomes straightforward rather than guesswork.
2. Network Design for Time-Critical Freight Flows
2.1 Hub and Spoke Versus Point to Point Network Structures for Air Freight
Air freight networks are basically two ways to move cargo through airports: either you route shipments through one or more central hubs (hub and spoke), or you connect origin to destination directly (point to point). The choice affects transit time, capacity use, cost structure, and how you handle irregular operations like missed connections or late truck arrivals.
Core Concepts and Decision Drivers
Hub and spoke concentrates volume at hub airports so flights can be frequent and capacity can be planned around predictable demand. Point to point spreads volume across many city pairs so you avoid intermediate handling steps.
A practical way to compare them is to look at four decision drivers:
- Connection probability: In hub models, shipments depend on making a connection window. In point-to-point models, they depend on direct flight availability.
- Handling steps: Hub models usually add build-up and break-down at the hub. Point-to-point often reduces intermediate handling.
- Capacity efficiency: Hub models can use aircraft capacity more efficiently by pooling demand. Point-to-point can waste capacity when demand is thin on specific lanes.
- Operational resilience: Hub networks can recover by rerouting via the hub, but a hub disruption can impact many shipments. Point-to-point reduces hub concentration risk but offers fewer reroute options.
Hub and Spoke Structure and How It Works
In a hub and spoke network, cargo from multiple origins is collected into inbound flights, sorted at the hub, and then dispatched on outbound flights to multiple destinations. The hub becomes the place where you trade time for consolidation.
A typical flow looks like this:
- Inbound: Truck drayage brings shipments to the origin airport terminal.
- Build-up: Cargo is screened, accepted, and consolidated into ULDs.
- Inbound flight: ULDs arrive at the hub.
- Break-down and sort: ULDs are opened, shipments are sorted by destination, then re-built into outbound ULDs.
- Outbound flight and delivery: ULDs depart, then are broken down again at the destination airport.
The connection window is the heart of the model. If the hub’s outbound cutoff is 90 minutes after inbound arrival, you need reliable scan events and realistic ground handling time. A shipment that arrives 45 minutes late might miss the connection even if the aircraft still has seats.
Example: One Hub Serving Multiple Destinations
Suppose a pharmaceutical shipper needs daily delivery to three cities: A, B, and C. Demand from the origin city is not large enough to justify three separate daily freighter flights. With a hub at H:
- Inbound from the origin to H runs daily.
- At H, cargo is sorted and loaded onto three outbound flights, one each to A, B, and C.
You gain frequency on each destination lane without running underutilized flights from the origin to each city.
Point to Point Structure and How It Works
Point to point connects origin and destination directly, often using dedicated freighter routes or direct belly capacity on passenger flights. The network is simpler: fewer handoffs, fewer sorting cycles, and fewer opportunities for connection misses.
A typical flow:
- Origin acceptance and ULD build-up
- Direct flight to destination
- Destination break-down and delivery
The tradeoff is that capacity must be justified on each lane. If a lane’s demand drops, you either reduce frequency or accept higher unit costs.
Example: Direct Flight for a High-Priority Shipment
Consider a time-critical shipment of temperature-sensitive components from city X to city Y. If there is a direct evening flight, the shipment can be loaded the same day and delivered next morning. Even if demand is low, the shipper may accept a higher rate because the direct route reduces intermediate handling and avoids connection risk.
Mind Map: Comparing Network Structures
Practical Comparison Using a Simple Scorecard
Use a scorecard to avoid arguing in circles. For each lane, score the following from 1 (weak) to 5 (strong):
- Time reliability: How often do shipments meet the promised transit time?
- Cost efficiency: Does the network use aircraft capacity without frequent empty space?
- Operational flexibility: If a flight is delayed, can you reroute without breaking the service promise?
- Execution complexity: How many handoffs and sorting steps are required?
Hub and spoke usually scores higher on cost efficiency when volumes are pooled, while point to point often scores higher on execution simplicity for high-priority lanes.
Integrated Takeaway for Network Planning
A well-run air cargo network doesn’t treat hub and spoke versus point to point as a religion. It treats them as tools. Hub and spoke is typically the backbone for moving lots of freight through a controlled set of hubs, while point to point is used where direct lanes reduce risk or where demand supports stable direct capacity. The best designs make connection windows realistic, align warehouse and ground handling throughput with flight schedules, and ensure exception handling rules are consistent with the chosen structure.
2.2 Route Planning Using Flight Schedules, Frequency, and Connection Constraints
Route planning in air cargo is mostly about timing math: which flights you can actually catch, how long cargo can wait without breaking service commitments, and what happens when a connection slips. The goal is a plan that is feasible on the ground, not just theoretically fast in a spreadsheet.
Start with Service Commitments and Time Windows
Begin by translating customer promises into operational windows. Define the latest acceptable pickup time, the warehouse cutoff for build-up, and the delivery appointment window at destination. Then convert those into “must arrive by” timestamps at each handoff point: airport acceptance, screening completion, ULD build-up, and final delivery.
Example: A shipper requests “arrive by 12:00 local time.” If the destination airport typically releases cargo to trucking by 10:30 and the last-mile appointment requires arrival by 11:30, you back-calculate an airport delivery target of 10:30. That target becomes the anchor for selecting flights and connection buffers.
Build a Flight Schedule View That Matches Cargo Reality
Flight schedules are not just departure times. For cargo, you need at least four schedule attributes per flight: departure time, arrival time, operating days, and any known variability in ground processes (for example, typical build-up duration or average gate-to-warehouse transfer time). Create a candidate list for each origin-destination lane and include only flights that operate on the required days.
Frequency matters because it changes the probability of meeting cutoffs. A lane with 6 daily departures gives you more options to absorb minor delays than a lane with one departure per day. Treat frequency as a risk reducer, not a speed booster.
Apply Connection Constraints Like a Checklist with Numbers
Connections fail for predictable reasons: missed cutoff, insufficient transfer time, or capacity mismatch between legs. Model connection constraints using three buffers.
- Operational transfer buffer: time needed for offload, screening, and re-sort or re-build. This is not the same as “minimum connection time” used for passengers.
- Documentation and system processing buffer: time for scan events, manifest updates, and customs or security checks when applicable.
- Contingency buffer: extra time to cover typical variability on that airport and time of day.
Then enforce the rule: arrival time + all buffers ≤ next leg departure time.
Example: Leg A arrives at 09:10. Screening and sorting typically take 45 minutes, system processing takes 20 minutes, and you add a 30-minute contingency. Total handling time is 95 minutes, so the cargo can only connect to flights departing at or after 10:45.
Mind Map: Route Planning Using Flight Schedules, Frequency, and Connection Constraints
Choose Itineraries with a Clear Decision Rule
Once you can test feasibility, selection becomes a ranking problem. Use a simple hierarchy to avoid endless debate.
- Feasibility first: only itineraries that meet the must-arrive target.
- Time margin second: prefer the plan with the larger buffer between expected arrival and the next cutoff.
- Frequency third: if two plans are equally feasible, pick the one with more departures on the relevant days.
- Operational simplicity fourth: fewer handoffs usually means fewer scan gaps and fewer reconciliation points.
Example: Two itineraries both meet the 12:00 delivery target. Itinerary A has a 90-minute margin before the final cutoff; itinerary B has a 20-minute margin. Even if itinerary B uses a shorter flight time, itinerary A is safer because it tolerates delays without forcing last-minute reroutes.
Add Backup Options That Match Real Failure Modes
A backup itinerary should not be “any other flight.” It should be the one that remains feasible if the primary plan misses a specific constraint. Define triggers such as:
- If Leg A arrives later than a threshold, switch to a later connection.
- If the next leg is full, reroute via an alternate hub with similar handling steps.
Example: If the primary connection requires a departure at 10:45, set a trigger at 10:00 arrival. If Leg A arrives after 10:00, the cargo likely misses the 10:45 feasibility window, so you pre-assign the next feasible flight that still meets the delivery must-arrive target.
Validate the Plan Against Ground Handoffs
Finally, confirm that the selected itinerary aligns with warehouse and airport execution. Check that the build-up cutoff at origin supports the chosen departure, and that the receiving process at destination can accept the cargo without creating a new delay. A flight plan that ignores build-up timing is like a calendar invite that forgets the commute—technically possible, practically annoying.
When these steps are done in order—commitments, schedule view, connection math, selection rules, backups, and ground validation—you end up with itineraries that are both fast and operationally believable.
2.3 Capacity Modeling for Belly Cargo and Dedicated Freighter Operations
Capacity modeling answers a simple question: how much cargo can move through a network without breaking service commitments. In air cargo, “capacity” is not one number. It is a stack of constraints—space, weight, volume, handling time, and connection logic—plus the reality that not every flight will be available at the moment you need it.
Core Capacity Concepts for Belly and Freighters
Start by separating two modes.
Belly cargo uses space in passenger aircraft. Capacity depends on the passenger schedule, aircraft type, and how much space is reserved for cargo versus mail and other priorities. A key modeling detail is that belly capacity is often variable by flight because aircraft swaps happen and cargo acceptance may be limited by station processes.
Dedicated freighters use aircraft where cargo is the primary payload. Capacity is constrained by aircraft payload limits, ULD configuration, and ramp and build-up throughput. Compared with belly, freighter capacity is usually more stable per flight, but it still varies with load planning decisions and operational constraints.
A practical modeling approach uses three layers: (1) physical capacity per flight, (2) usable capacity after operational rules, and (3) effective capacity after network connections and service policies.
Physical Capacity per Flight
For each flight, compute the maximum cargo that can fit given the aircraft and load plan.
- Volume capacity: total ULD or container volume available for cargo.
- Weight capacity: maximum payload minus any reserved weight for mail or other categories.
- ULD compatibility: not every shipment can use every ULD type; some lanes require specific equipment.
- Mix constraints: dangerous goods, temperature-controlled freight, and priority categories may require segregation or special handling that reduces usable space.
Example: A station receives shipments that fit 18 standard pallets by volume, but the aircraft payload limit allows only 16 pallets at the average weight. Weight becomes the binding constraint, so physical capacity is 16 pallets, not 18.
Usable Capacity After Operational Rules
Physical capacity is rarely fully usable. Apply station and airline rules that reduce throughput.
- Acceptance limits: cutoffs and screening capacity can cap how much can be accepted.
- Build-up and sort time: if the station cannot build ULDs fast enough, late cargo loses the flight.
- ULD availability: if the station lacks enough ULDs, cargo may be delayed even when space exists.
- Priority reservations: some capacity is reserved for specific service products.
Example: A flight has physical capacity for 16 pallets. The station’s screening process can only clear 12 pallets before the cutoff, and 2 pallets are reserved for a higher-priority contract. Usable capacity becomes 10 pallets.
Effective Capacity with Connection Logic
Effective capacity reflects the network. A flight may have unused space, but if it cannot connect to downstream flights within the promised transit time, that space is not “available” for time-critical demand.
Model connections using two ideas:
- Connection windows: minimum and maximum time between arrival and departure for cargo to be transferred.
- Transfer yield: not all cargo that arrives will make the next flight due to handling delays, documentation issues, or re-screening.
Example: Suppose a belly flight arrives with 8 pallets of spare usable capacity. Downstream, only 6 pallets can connect within the required transit time window, and the transfer yield is 90%. Effective capacity for that service becomes 6 × 0.9 = 5.4 pallets.
Modeling Belly Cargo Capacity
Belly modeling needs schedule realism.
- Use flight-by-flight aircraft type rather than assuming a constant configuration.
- Incorporate historical acceptance rates by station and time of day.
- Represent variability with scenarios: normal operations, aircraft swap, and partial screening congestion.
Example: If a route typically carries 6 pallets in belly but one station often rejects late pickups, your model should reduce usable capacity for that station’s inbound window rather than inflating the average.
Modeling Dedicated Freighter Capacity
Freighter modeling focuses on load planning and throughput.
- Convert shipments into ULD build requirements (count, type, weight distribution).
- Apply payload and center-of-gravity constraints if relevant to your planning level.
- Model ramp and build-up throughput: the number of ULDs that can be staged and loaded before departure.
Example: A freighter can carry 30 pallets physically, but the ramp team can only load 24 pallets within the time available. Usable capacity becomes 24, even though the aircraft could carry more.
Building the Capacity Model Step by Step
- Define demand buckets by service level and category (standard, time-critical, DG, temperature-controlled).
- Create flight inventory with aircraft type, scheduled times, and station cutoffs.
- Compute physical capacity per flight and per category.
- Apply usability reductions from acceptance, screening, ULD availability, and reservations.
- Apply connection logic for time-critical services using windows and transfer yield.
- Run allocation: assign demand to flights using priority rules and ensure capacity is not exceeded.
Mind Map: Capacity Modeling Logic
Worked Mini-Example Combining Both Modes
Assume a time-critical product requires a connection within 6 hours.
- Belly flight A: physical 16 pallets, usable 10 pallets after cutoff and reservations.
- Downstream connection yield: 0.85, effective capacity 10 × 0.85 = 8.5 pallets.
- Freighter flight B: physical 28 pallets, usable 22 pallets due to ramp loading throughput.
- Freighter has direct delivery to the destination within the transit requirement, so effective capacity is 22 pallets.
If demand is 20 pallets, allocate 8.5 to belly and 11.5 to freighter. If demand rises to 26 pallets, the model flags the shortfall of 26 − (8.5 + 22) = −4.5 pallets, meaning you must either reroute, adjust service level, or change acceptance timing so cargo can be reassigned to other flights.
This is the point of capacity modeling: it turns operational constraints into a measurable, explainable limit, so decisions about acceptance, routing, and load planning are grounded in the same numbers across belly and freighter operations.
2.4 Service Reliability Engineering Using Buffer Times and Connection Policies
Service reliability in air cargo is mostly about managing uncertainty: flight delays, screening variability, truck dwell time, and the occasional “ULD is missing a label” moment. Buffer times and connection policies are the practical tools that turn uncertainty into predictable service.
Foundational Concepts for Buffers and Connections
A buffer time is extra time intentionally inserted between two process steps so the later step still starts on schedule when earlier steps slip. A connection policy is the rule set that decides whether a shipment should be held for a later flight, transferred to an alternate routing, or released to delivery attempts.
Start with two measurable realities:
- Step variability: how much receiving, screening, build-up, and dispatch times fluctuate.
- Transfer risk: how likely a missed handoff causes a cascade of late events.
A useful mental model is a chain of gates. Each gate has a “latest safe arrival” time. Buffers move the shipment’s arrival window earlier relative to those gates, while connection policies determine what happens when the shipment arrives after the safe time.
Buffer Time Design That Matches Operational Reality
Buffer design should be grounded in event data, not gut feel. For example, if build-up completion at a hub averages 45 minutes with a typical spread of ±25 minutes, a single blanket buffer of 90 minutes across all lanes may be either wasteful or insufficient.
Apply buffers at the right layer:
- Process buffers: between receiving and screening, between screening and staging, and between staging and loading.
- Network buffers: at the connection level between inbound and outbound flights.
- Exception buffers: reserved for known failure modes like document holds or DG rework.
Concrete example: A pharma shipment requires cold-chain handling. If the warehouse can maintain temperature for 6 hours but screening sometimes adds 2 hours, you can set a process buffer that targets screening variability while keeping the total dwell within the cold-chain limit. The buffer is not “more time”; it is “time where the process is uncertain, but the product is still safe.”
Connection Policies That Prevent Cascading Delays
Connection policies should be explicit and operationally testable. Define three thresholds for each connection type:
- Hold window: how long you will wait for a shipment to make the intended outbound.
- Re-route trigger: when you switch to an alternate flight or mode.
- Release rule: when you stop trying to connect and instead move to delivery or local handling.
Example policy for a hub-to-hub transfer:
- If inbound arrives within 60 minutes of the outbound cutoff, hold and attempt the connection.
- If inbound arrives 60–120 minutes late, move to the next available flight with equivalent service level.
- If inbound arrives over 120 minutes late, release to ground distribution for the next delivery attempt.
This avoids a common failure mode: “soft holds” that keep shipments in limbo while staff and space are consumed, then the shipment misses everything anyway.
Combining Buffers and Policies into a Single Reliability Logic
Buffers and policies should work together. Buffers reduce the probability of crossing thresholds; policies define the response when thresholds are crossed.
A practical approach is to compute a connection safety margin:
- Safety margin = (scheduled connection time) − (expected transfer time) − (buffer allocation)
If safety margin is small, the connection policy must be more aggressive in re-routing. If safety margin is large, you can keep hold windows tighter to reduce dwell and handling.
Mind Map: Buffer Times and Connection Policies
Example: Hub Build-Up with a Two-Stage Buffer
Assume a hub has two steps that often vary: screening (variable) and ULD build-up (variable). You can allocate buffers like this:
- Screening buffer: 30 minutes added to the staging readiness target.
- Build-up buffer: 20 minutes added to the loading readiness target.
Connection policy then uses the outbound cutoff:
- If staging readiness is achieved within the first buffer, attempt the intended outbound.
- If staging readiness slips beyond the first buffer but build-up still completes within the second buffer, hold briefly and load if space remains.
- If build-up readiness misses the second buffer, re-route to the next flight rather than consuming loading capacity on a likely miss.
The key is that each buffer has a job: screening buffer protects the staging gate, build-up buffer protects the loading gate. The connection policy decides what to do when gates are missed, instead of pretending gates will never be missed.
Operational Discipline That Makes the Math Work
Reliability engineering fails when the system can’t observe reality. Ensure scan points are consistent with the gates used in buffer and policy logic. If “staging complete” scans happen late, your buffers become guesses.
Also align cutoffs across parties. If the airline cutoff is 18:00 but the ground handler’s internal cutoff is effectively 17:15 due to staffing, your connection policy will be too optimistic. Reliability is a shared schedule, not a solo spreadsheet.
2.5 Example: Network Build for a Multi Airport Regional Distribution Lane
A multi-airport regional lane connects several origin airports to one or more destination airports, while keeping transit time predictable. The goal is not just to move freight, but to make the schedule and the ground flow agree with each other. In this example, a shipper needs time-critical deliveries across a region with three origin airports (O1, O2, O3) and two destination airports (D1, D2). The lane must support both belly cargo and occasional dedicated freighter capacity.
Step 1: Define the Service Promise in Operational Terms
Start with a measurable promise: “Deliver within 24 hours for 95% of shipments.” Convert that into operational milestones: pickup-to-airport, screening and build-up, flight time, connection time, and airport-to-delivery. For instance, if the average flight time from the region is 2.5 hours, then the remaining 21.5 hours must cover ground moves, cutoff buffers, and exception handling.
Example assumptions for the lane:
- Pickup window: 08:00–16:00 local time at each origin.
- Origin cutoff: 18:00 for same-day departures.
- Destination cutoff: 20:00 for same-day delivery attempts.
- Target connection buffer: 90 minutes at the hub airport.
Step 2: Choose the Network Structure and Identify the Hub Logic
A hub-and-spoke structure reduces complexity when flight schedules are uneven. Here, O1 and O2 feed a hub airport H, and O3 feeds H later in the day. D1 and D2 are served from H using two departure waves.
Mind map of the network logic:
Step 3: Build a Candidate Flight and Connection Matrix
List available flights by origin-to-hub and hub-to-destination, then calculate whether each connection meets the buffer requirement. Suppose H has two daily departure waves to D1 and D2:
- Wave A: H → D1 at 22:30
- Wave B: H → D2 at 23:15
For origin feeds:
- O1 has flights to H at 19:00 and 20:30.
- O2 has flights to H at 18:45.
- O3 has flights to H at 21:10.
Connection feasibility example:
- O1 20:30 → H arrives 22:00. With a 90-minute build-up buffer, it can still make Wave A at 22:30, but it will miss Wave B at 23:15 if build-up slips.
- O3 21:10 arrival at H 22:40 cannot make Wave A and only has a realistic chance for Wave B if screening and ULD build-up finish quickly.
This is where “predictable” becomes real: you are choosing which origin shipments are allowed to target which wave.
Step 4: Translate the Network into Cutoff Rules and Build-Up Policies
Cutoffs must match the slowest step, not the fastest one. Create cutoff tiers:
- Tier 1 shipments: must be at origin warehouse by 16:00 to target same-day departure.
- Tier 2 shipments: can arrive by 17:30 for the last feasible flight.
- Tier 3 shipments: only accepted for next-day network routing.
At the hub, define scan-driven control points:
- “Received at hub” scan
- “Screening complete” scan
- “ULD build-up complete” scan
- “Loaded onto aircraft” scan
Example policy: if “Screening complete” is not recorded by 21:30 for Tier 2, the shipment is reallocated to the next wave even if it could technically fit on paper.
Step 5: Add Capacity Logic for Belly and Dedicated Fallback
Belly capacity is variable, so treat it as a baseline and reserve dedicated capacity for specific triggers. For example:
- Baseline: belly on O1→H and O2→H flights.
- Trigger for dedicated: if forecasted volume for a lane exceeds 85% of belly capacity for two consecutive days, allocate a small freighter slot.
Concrete example: If O2→H belly typically supports 18 tons and the forecast is 16 tons, you accept Tier 1 and Tier 2 as planned. If the forecast rises to 20 tons, you move the highest-priority AWBs to dedicated and keep the rest on belly.
Step 6: Create an End-to-End Execution Map with Exception Paths
A network is only useful if exceptions have rules. Define three exception categories:
- Missed origin cutoff
- Missed hub build-up window
- Missed connection at H
Example handling:
- Missed origin cutoff: reroute to the next available flight to H, then target the next wave to D1 or D2 based on remaining time.
- Missed hub build-up: keep the shipment in hub storage and load on the next aircraft to the same destination airport if available.
- Missed connection: if D1 wave is missed, switch to D2 wave and adjust delivery promise accordingly.
Step 7: Validate with a Simple Simulation Using Realistic Timing
Run a small “day-in-the-life” simulation for a representative day. Use conservative ground times:
- Origin drayage: 60–90 minutes
- Screening: 45–75 minutes
- ULD build-up: 60 minutes baseline
- Hub transfer to aircraft: 20–30 minutes
If 95% of Tier 1 shipments still land before the destination cutoff under these assumptions, the network build is operationally sound. If not, tighten origin cutoff tiers or increase the hub build-up buffer.
Step 8: Lock the Lane into a Repeatable Operating Rhythm
Finally, document the lane as a repeatable rhythm: daily forecast intake, cutoff confirmation, ULD planning at origin, hub scan checkpoints, and a short exception review window. The lane works when everyone knows which wave their shipment is targeting, and the paperwork and scans agree with that target.
3. Airport Operations and Ground Handling Coordination
3.1 Airport Cargo Ecosystem Including Terminals, Warehouses, and Handling Agents
An airport cargo ecosystem is the set of physical spaces, people, and handoff rules that turn “a shipment” into “a load on an aircraft.” The ecosystem matters because air cargo is time-sensitive and scan-driven: if one party moves late or records the wrong status, the next party plans around incorrect reality.
Terminals and Cargo Zones
Terminals are where cargo transitions between modes and processes. In most airports, you’ll see distinct cargo zones that reduce cross-traffic and keep screening, storage, and build-up from interfering with each other.
A practical way to think about zones is by function:
- Inbound receiving zone: where trucks arrive, documents are checked, and cargo is staged for screening.
- Screening zone: where security checks occur and results are recorded.
- Storage and staging zone: where cargo waits for build-up, often under time-based rules.
- Build-up zone: where ULDs (Unit Load Devices) or pallets are assembled and prepared for loading.
- Outbound dispatch zone: where ULDs are moved to the aircraft-side area.
Example: A pharma shipment arrives at 09:10. It enters receiving, is scanned, and is either released to staging or held for inspection. If it’s released at 10:05, the warehouse system can still place it into the correct build-up wave; if it’s released at 11:40, it may miss the wave and require a different flight plan.
Warehouses and Throughput Design
Warehouses convert airport space into throughput. Their job is not just storage; it’s controlled flow. Good warehouse design makes the “shortest path” for each movement obvious and repeatable.
Key operational building blocks include:
- Receiving lanes: dedicated lanes for different service types, such as general cargo versus temperature-controlled.
- Staging bays: areas organized by flight, cutoff time, or ULD assignment.
- Pick and consolidate areas: where smaller pieces are consolidated into pallets or ULDs.
- Quality and exception points: controlled locations for damage checks, label verification, and document reconciliation.
A simple throughput rule helps: every warehouse movement should have a reason and a destination. If a handler moves a pallet “just to make space,” the system loses track of intent, and later scans become harder to reconcile.
Example: During peak hours, a warehouse uses flight-wave staging. When a ULD is built for Flight A, the system assigns a staging bay. If the ULD is delayed, the bay becomes a visible exception point rather than a silent backlog.
Handling Agents and the Handoff Chain
Handling agents are the operational glue. They manage the physical tasks—moving, sorting, building, and loading—and they also ensure the right events are recorded so the rest of the network can plan.
A reliable handoff chain typically includes:
- Truck-to-airport acceptance: verifying identity, quantity, and condition.
- Screening release confirmation: ensuring security status is recorded before staging.
- Warehouse scan discipline: scanning at receiving, staging, build-up, and dispatch.
- ULD/pallet integrity checks: confirming labels, seals, and load configuration.
- Aircraft-side loading coordination: aligning with ramp schedules and aircraft readiness.
Example: If a shipment is scanned as “released” but the physical piece is missing, the warehouse may build an incomplete ULD. Later, the airline-side loader discovers the gap at the aircraft. The fix is not just rework; it’s a process correction: tighten reconciliation between screening release and staging scan.
Interfaces and Control Points
The ecosystem runs on interfaces—where one party’s output becomes another party’s input. Control points are where you prevent errors from propagating.
Common control points include:
- Cutoff alignment: receiving and screening must complete early enough to feed build-up waves.
- Exception routing: held cargo, damaged packaging, or document mismatches must be routed to a known workflow.
- Status event consistency: the system should reflect what is physically true at each step.
Putting It Together with One End-to-End Example
Consider a shipment that must depart on a same-day flight. The truck arrives, receiving verifies quantity and condition, and the shipment enters screening. After release, the warehouse system assigns it to the correct staging bay for the build-up wave. Handling agents build the ULD, apply correct labels and seals, and then move the ULD to the outbound dispatch zone. At each step, scans create a chain of custody and a planning record. If any step fails—late screening release, missing piece, or label mismatch—the exception workflow triggers immediately at the control point, not after the aircraft is ready.
This is the ecosystem in practice: terminals provide structured spaces, warehouses provide controlled flow, and handling agents provide disciplined execution—connected by interfaces that keep time-critical cargo from becoming time-confused cargo.
3.2 Build Up and Break Down Processes Including ULD Management and Sorting
Build up and break down are the airport terminal’s way of turning many small shipments into a smaller number of loadable units, then reversing that process at the destination. The goal is simple: the right cargo in the right ULD or container, at the right time, with the right paperwork and scans.
Build Up Foundations Including ULD Readiness
Start with ULD readiness before touching cargo. Verify ULD identity (type, serial number, and ownership), cleanliness condition, and any required accessories such as locks, straps, or nets. A practical habit is to treat ULDs like “moving assets”: if a ULD is missing a serial scan or has a damaged door, it should be quarantined from the build area until resolved.
Next, confirm the build plan. The build plan maps shipments to ULDs based on airline acceptance rules, weight limits, destination sorting requirements, and any special handling constraints. For example, a shipment marked “fragile” should not be placed where it will be crushed by heavier pieces during loading. Even if the system allows it, the physical plan should prevent avoidable damage.
Sorting Logic Before Loading
Sorting is where time is either saved or lost. Use a two-stage approach: coarse sorting first, then fine sorting.
Coarse sorting groups shipments by destination airport and onward flight, using the latest flight schedule and connection rules. Fine sorting then assigns each shipment to a specific ULD or position within a ULD based on constraints such as temperature control, priority handling, and DG segregation requirements.
A concrete example: imagine 120 shipments for the same destination airport but different flight numbers. If you sort only by destination, you may load everything into ULDs for the first flight and then scramble to rework the rest. If you sort by destination and flight, you can build ULDs that match the dispatch sequence.
ULD Build Workflow Including Scan Discipline
A reliable build workflow has clear control points. At minimum, include:
- Inbound receipt scan when cargo enters the build area.
- Sort confirmation when cargo is placed into a staging lane for a specific ULD.
- ULD build scan when cargo is loaded into the ULD.
- Final ULD seal or closure confirmation before the ULD leaves the build zone.
Scan discipline matters because it ties physical movement to system status. If a loader places a piece into the wrong ULD but the scan says otherwise, the error will surface later as a missing shipment at break down—when recovery is slower and more expensive.
Mind Map: Build Up and Break Down Flow
Break Down Foundations Including Verification and Deconsolidation
Break down begins with verification, not unloading. Scan the ULD identity on arrival, check seal status, and inspect for visible damage. If the seal is broken or the ULD is compromised, treat it as an exception lane until reconciliation is complete.
Then deconsolidate in a planned sequence. Sequence matters because it reduces handling time and prevents mixing. A common method is to unload by destination route or delivery zone, scanning each item out of the ULD as it is removed. This creates a clean chain of custody: the system knows what left the ULD and where it was staged.
Sorting at Break Down Including Delivery Staging
After cargo is scanned out, sort it for delivery or onward transport. Use the same two-stage logic: coarse grouping by delivery route, then fine grouping by stop order or appointment window. For example, if a truck has a strict delivery order, staging by stop order prevents last-minute rearranging at the loading dock.
Example: Handling a Misload Without Chaos
Suppose Shipment A is intended for Flight 3 but is accidentally placed into a ULD for Flight 2 during build up. During break down, Shipment A scans out from the Flight 2 ULD and is staged for Flight 2 delivery. The exception process should catch it quickly:
- The system compares shipment’s intended flight with the ULD’s flight assignment.
- Shipment A is flagged at scan-out.
- A handler moves it to the Flight 3 exception lane.
- A supervisor confirms the correct destination and updates the staging plan.
The key is that the error is detected at the moment of deconsolidation, when the cargo is still controlled in the terminal.
Advanced Details Including Stability, Space, and Special Cargo
For stable loading, consider center of gravity and void filling. If a ULD is partially filled, leaving large empty spaces can cause shifting during transport. Use approved void fillers or adjust placement so heavier items support lighter ones.
For special cargo, follow the operational rules that govern placement and access. Temperature-controlled shipments may require separation from non-temperature cargo to avoid cross-contamination. DG shipments require segregation and documentation alignment, and they should be placed so that labels remain visible for inspection.
Practical Control Checklist for Build Up and Break Down
- ULD serials scanned and matched to the build plan
- Sorting lanes aligned to destination and flight
- Receipt, sort, build, and seal scans completed
- Break down starts with ULD identity and seal verification
- Scan-out drives staging and prevents silent misloads
- Exception lanes are used immediately, not after the rush
3.3 Cutoff Management for Acceptance, Screening, and Loading Readiness
Cutoff management is the discipline of deciding when cargo must arrive, be accepted, be screened, and be staged so it can load on the correct flight without last-minute chaos. In air cargo, “on time” is not one moment; it’s a chain of moments. If any link is late—paperwork, screening capacity, ULD readiness, or truck discharge—everything downstream gets slower.
The Cutoff Chain from Receipt to Load
Start with the end: the aircraft departure time and the airline’s load start time. Then work backward to define four operational cutoffs:
- Acceptance cutoff: latest time shipments can be received and validated for shipment integrity.
- Screening cutoff: latest time cargo can enter the screening queue with enough buffer for inspection.
- Staging cutoff: latest time cargo must be placed in the correct build-up area for the flight.
- Loading readiness cutoff: latest time ULDs or pallets must be available at the loading position with documentation complete.
A practical way to avoid gaps is to treat each cutoff as a “handoff contract” between teams. Receiving hands off to screening with scan evidence; screening hands off to staging with clearance status; staging hands off to loading with ULD identity and build-up completeness.
Defining Cutoffs That Match Reality
Cutoffs should be derived from measurable process times, not wishful thinking. Use three inputs:
- Process duration: average and worst-case times for receiving, screening, and build-up.
- Capacity constraints: number of screening lanes, staff shifts, and ULD build-up stations.
- Variability: peak-day effects such as higher document errors or more manual inspections.
Example: A facility processes 120 shipments per hour at peak, but screening lane throughput drops when many shipments require manual inspection. If you set the screening cutoff equal to the acceptance cutoff, you’ll create a backlog that spills into staging. Instead, add a buffer equal to the expected manual inspection share times the average added inspection time.
Acceptance Cutoff Practices That Prevent Downstream Rework
Acceptance is where most preventable delays start. Use a simple validation checklist before a shipment enters the system:
- AWB and piece count match the physical load.
- ULD or pallet identifiers are present when required.
- Commodity and handling instructions are legible and consistent.
- Any required permits or special handling notes are attached.
Example: A shipment arrives with a missing piece count. If you accept it anyway, you may later discover a mismatch during build-up, forcing a re-sort and delaying ULD closure. A better approach is to accept conditionally only if the facility can reconcile within a defined window; otherwise, hold the shipment at receiving and escalate to the shipper/forwarder for correction.
Screening Cutoff Practices That Balance Speed and Compliance
Screening cutoffs must respect both queue time and inspection outcomes. Two operational controls help:
- Queue visibility: track how many shipments are ahead of each screening lane.
- Outcome routing: automatically route cleared cargo to staging and route “hold” cargo to a controlled exception area.
Example: A shipment is scanned at 14:10, but the screening lane is already at capacity and the next available slot is 14:40. If the screening cutoff is 14:30, the shipment should not be allowed to enter the queue for that flight build. Instead, it should be diverted to the next flight or handled as an exception with explicit authorization.
Loading Readiness Cutoff Practices That Protect ULD Integrity
Loading readiness is about “build-up completeness.” Define what complete means for your operation:
- Correct flight assignment.
- Correct ULD/pallet build with secure closure.
- Documentation ready for loading verification.
- Physical location at the loading position.
Example: A ULD is staged at the loading position but the build-up sheet is not finalized. The loading team may still load it, but later reconciliation will fail, causing a mismatch report and potential claims. Treat documentation finalization as part of the readiness cutoff, not an afterthought.
Mind Map: Cutoff Management Logic
Operational Example: One Flight Build with Clear Decisions
Assume a flight departs at 20:00 with a load start at 18:30. The facility sets cutoffs based on measured times:
- Acceptance cutoff: 16:30
- Screening cutoff: 17:30
- Staging cutoff: 18:00
- Loading readiness cutoff: 18:15
At 16:40, a shipment arrives with incomplete handling instructions. Receiving flags it and holds it in a controlled area. By 17:10, the forwarder provides the missing instruction; receiving completes acceptance and scans it into the system. Screening clears it at 17:25, so it still meets the screening cutoff. Staging places it into the correct build-up area by 18:00, and the ULD is closed with documentation finalized by 18:15. The shipment loads without triggering an exception reconciliation.
At 17:45, another shipment arrives and cannot be validated. It misses the acceptance cutoff, so it is not screened for the 20:00 flight. The facility routes it to the next available flight build, preventing a screening backlog that would otherwise push cleared cargo past staging and readiness.
Exception Handling That Keeps the System Honest
When cargo misses a cutoff, the response should be consistent:
- Stop the clock: do not keep processing as if it will load on the current flight.
- Create an explicit exception record: reason, responsible party, and next action.
- Reconcile at the right boundary: compare what was accepted and cleared against what was built and loaded.
This is how cutoff management stays practical: it turns “late” into a controlled decision with traceable evidence, rather than a surprise that shows up during reconciliation.
3.4 Interface Control Between Airlines, Ground Handlers, and Trucking Providers
Interface control is the set of rules and checks that keeps three independent operations aligned: the airline’s build and dispatch plan, the ground handler’s physical handling at the airport, and the trucking provider’s pickup and drayage execution. When it works, each party knows what “ready” means, when it must be true, and how to prove it with scans, documents, and exception handling.
Define the Interface Points and Ownership
Start by listing the handoff points where responsibility changes. Typical points include: truck arrival at the cargo gate, acceptance into the airport facility, ULD build-up completion, screening completion, load acceptance by the airline, and final delivery to the aircraft or to a downstream facility.
For each handoff point, assign three things: (1) the responsible party, (2) the acceptance criteria, and (3) the evidence required. Evidence should be concrete, usually a scan event plus a status message. For example, “ULD accepted for build-up” is not just a verbal confirmation; it is a scan at the staging location and a corresponding status update in the cargo system.
Align Time Windows with Operational Reality
Time windows prevent the classic mismatch: trucking arrives early and waits, or arrives late and misses cutoff. Interface control uses shared cutoff logic built around the slowest step.
A practical approach is to define three times for each lane: truck gate appointment time, facility acceptance cutoff, and airline load acceptance cutoff. If the facility acceptance cutoff is 30 minutes before airline load acceptance, then the trucking provider’s appointment must be scheduled so that late traffic still has a buffer.
Example: A shipment with a 16:00 airline load acceptance cutoff is scheduled for a 14:30 facility acceptance cutoff. The trucking provider is instructed to target gate arrival by 13:45, allowing for gate processing and potential queueing. If the truck arrives at 14:20, the ground handler can still accept and stage it before the 14:30 cutoff.
Standardize Communication Channels and Message Content
Interface control fails when parties communicate in different formats. Use a small set of agreed message types, each with required fields.
Minimum message set:
- Arrival notice: shipment identifiers, truck plate or driver reference, estimated arrival time.
- Acceptance confirmation: scan timestamp, location code, ULD or piece count.
- Exception alert: reason code, affected quantity, required action owner.
- Load confirmation: ULD identifiers and load status.
Keep the content consistent. If one party uses AWB-level identifiers and another uses ULD-level identifiers, define how to map between them. For instance, a single AWB may span multiple ULDs; the acceptance confirmation should include both AWB and ULD references.
Create a Joint Exception Workflow with Clear Triggers
Exceptions are inevitable: missing documents, damaged packaging, screening holds, ULD mix-ups, and late arrivals. Interface control makes exceptions manageable by defining triggers and response steps.
Common triggers and responses:
- Late truck arrival: ground handler checks whether acceptance cutoff can still be met; if not, the handler escalates to airline operations for rebooking or reroute.
- Document mismatch: ground handler holds the shipment in a quarantine zone and notifies the airline documentation desk; trucking is not asked to “fix it on the fly” without a defined resolution path.
- Screening hold: ground handler stops build-up for affected items and updates status so the airline does not assume availability.
A useful rule: every exception must have an owner for the next action and a deadline for that action. Otherwise, the exception becomes a waiting game.
Use Physical Controls That Match the Data Controls
Data controls and physical controls must agree. If the system says a ULD is in staging, the ULD must be physically in staging. Interface control uses location discipline, labeling, and reconciliation.
Controls that work in practice:
- ULD labels with readable identifiers and scan-friendly placement.
- Segregated staging zones with signage for “accepted,” “held,” and “ready for build-up.”
- Reconciliation at shift handover: compare scan counts to physical counts for each zone.
Example: During a peak day, a ground handler performs a mid-shift reconciliation at 10:30. If the system shows 48 ULDs in “accepted staging” but only 46 are physically present, the handler pauses build-up for the missing two and raises an exception before the airline load plan is finalized.
Mind Map of Interface Control
Interface Control Mind Map
Example: One Shipment Through the Interface
On 2026-03-16, a trucking provider delivers two ULDs for a time-critical lane. The arrival notice is sent at 13:20 with estimated gate arrival 13:40. The ground handler accepts the ULDs at 13:48, scans them into “accepted staging,” and sends acceptance confirmations with ULD identifiers and counts. Screening completes at 14:10 with no holds, so the handler moves the ULDs to “ready for build-up.” The airline receives load confirmation at 14:35, matching the agreed load acceptance cutoff.
If one ULD had been held at screening, the ground handler would have sent an exception alert immediately with the ULD identifier and quantity affected, preventing the airline from assuming it was available for the load plan.
Interface control is essentially disciplined coordination: define handoffs, align time, standardize messages, and make exceptions actionable. The result is fewer surprises at the gate and fewer last-minute changes at the aircraft.
3.5 Practical Checklist for On Time Loading and Dispatch Execution
On time loading is a chain reaction: if one step slips, the next step has to compensate, and eventually the aircraft schedule stops caring about your good intentions. This checklist is designed to be used in sequence, with short pauses for verification.
1) Pre-Shift Setup and Shared Expectations
- Confirm the flight list and the build-up plan for the next loading window, including any last-minute schedule changes.
- Align on the cutoff times for acceptance, screening completion, and ULD or pallet staging. Use the same cutoff definitions across airline, handler, and trucking parties.
- Assign one person as the “timekeeper” who tracks remaining minutes to each cutoff and triggers escalation when thresholds are crossed.
- Verify system readiness: scanning devices, label printers, and the status feed used for shipment events.
Example: If the acceptance cutoff is 60 minutes before scheduled departure, and screening completion is 45 minutes before, then a shipment accepted at T-55 must still clear screening by T-45. The checklist forces you to check that arithmetic early.
2) Cargo Intake Control Before It Becomes a Problem
- Check that each shipment has a valid airway bill or equivalent identifier and that the piece count matches the label or manifest.
- Ensure exceptions are separated immediately: missing documents, damaged packaging, incomplete DG paperwork, or mismatched weights.
- Stage cargo by flight and priority, not by arrival time. Priority should reflect service level commitments, not who arrived first.
- Perform a quick “scan-to-location” verification for the first wave of arrivals so you don’t discover later that everything is sitting in the wrong zone.
Example: A forwarder delivers 12 pallets for two flights. If you stage by arrival time, the first flight might look full while the second flight quietly starves. Staging by flight prevents that silent imbalance.
3) Screening and Build-Up Readiness
- Confirm screening completion status for each flight’s cargo before moving to final staging.
- Verify ULD availability and condition: correct type, secure locks, and readiness for build-up.
- Run a build-up sanity check: total weight and count per ULD should match the planned load list.
- Ensure segregation rules are followed for regulated cargo and that any special handling instructions are visible at the work point.
Example: If a ULD is planned for 2,000 kg but the actual scanned weight totals 2,150 kg, you catch it before the aircraft load plan is finalized.
4) Final Staging and Loading Execution
- Use a “last 30 minutes” rule: only cargo with confirmed screening completion and correct flight assignment enters the final staging lane.
- Confirm that ULDs or pallets are labeled correctly and match the load list identifiers.
- Conduct a physical reconciliation at the staging boundary: count ULDs/pallets per flight and compare to the system.
- Coordinate with the aircraft-side team on the loading sequence so the first items loaded are the ones that must be available for downstream handling.
Example: If the aircraft-side team starts with the wrong ULD sequence, the aircraft may still depart on time, but your downstream sort plan becomes a mess.
5) Dispatch Handoff and Proof of Completion
- Capture final scan events for each ULD/pallet and ensure the event timestamps align with the cutoff expectations.
- Confirm that the dispatch release includes all required documents and that any exceptions are logged with resolution owners.
- Perform a short “close-out” reconciliation: what was planned vs. what was actually loaded, including any rework or re-stow.
- Notify stakeholders of exceptions immediately, not after the aircraft is pushed back.
Example: If one pallet is held due to a document mismatch, you need to record the hold reason and the replacement plan so the airline and trucking partners can adjust.
6) Escalation Triggers That Actually Help
- Trigger escalation when remaining time drops below the buffer needed for scanning completion or when reconciliation differences exceed a predefined threshold.
- Escalate by category: documentation, screening, ULD readiness, or load list mismatch. Each category has a different fix.
Mind Map: On Time Loading and Dispatch Execution
Quick Run Example for One Flight
- T-90: Confirm build-up plan, cutoff times, and system readiness.
- T-70: Intake wave arrives; scan-to-location verification passes; exceptions separated.
- T-50: Screening completion confirmed for all cargo intended for final staging.
- T-35: Final staging lane accepts only confirmed cargo; ULD labels verified.
- T-20: Physical reconciliation matches system; aircraft-side sequence confirmed.
- T-10: Final scans captured; dispatch release completed; any exception logged with an owner.
This checklist works because it forces verification at the moments when errors are cheapest to fix: before staging, before load list finalization, and before dispatch proof is considered complete.
4. Aviation Warehousing for Air Cargo Throughput
4.1 Warehouse Layout Planning for High Velocity Cargo Including Zoning and Flow Paths
High-velocity air cargo warehouses are basically timed systems: items move fast, scans must happen at the right moments, and the layout has to prevent “traffic jams with paperwork.” Zoning and flow paths are the two levers that make this work.
Zoning Principles for Throughput and Control
Start with a simple rule: every zone should have a clear purpose and a clear boundary. If a forklift can enter a zone without a reason, the layout will eventually create reasons.
- Inbound receiving zone: where trucks arrive, documents are checked, and cargo is staged for screening or build up. Keep this near the dock so receiving doesn’t become a long walk for people or a long drive for carts.
- Screening and inspection zone: where cargo waits for security checks. This zone needs controlled access and enough buffer space to absorb short delays.
- Build up zone: where ULDs (Unit Load Devices) or containers are assembled. Place it close to both screening and outbound staging so cargo doesn’t travel twice.
- Outbound staging zone: where ULDs are queued for loading. This should be aligned with loading bays to reduce last-minute shuffling.
- Quarantine and exception zone: where held shipments go when something doesn’t match (missing documents, damage, DG issues). Make it physically distinct so exceptions don’t quietly mix into normal flow.
A practical example: if your inbound dock is on the east side, put receiving and staging on the east, build up in the center, and outbound staging on the west. That creates a one-direction “river” rather than a “lake” where items drift.
Flow Paths That Match Operational Reality
Flow paths should reflect how work actually happens: inbound checks, security processing, sorting/build up, then outbound loading. Design for one-way movement where possible.
- Primary flow path: Truck dock → receiving → screening/inspection → sorting/build up → outbound staging → loading.
- Secondary flow path: Returns, rework, and exceptions → quarantine/exception zone → resolution area → back to the correct stage.
Use physical cues to enforce flow. Floor markings, signage, and lane widths matter because people will follow what is easiest to follow. If you have narrow aisles, you’ll get “creative shortcuts” that break scan discipline.
Layout Decisions That Reduce Cross-Traffic
Cross-traffic is the enemy of time-critical operations. It happens when inbound forklifts, outbound carts, and exception handling share the same corridors.
To reduce it:
- Separate dock-side and airside movement with dedicated lanes.
- Place exception handling off the main corridor so a held shipment doesn’t block the path to loading.
- Use staging buffers sized for your cutoff cadence. If your outbound cutoff is every 30 minutes, your outbound staging should hold at least one cutoff’s worth of ULDs without forcing them into the main aisle.
A concrete rule of thumb: if a worker must walk around a pallet to reach the next scan point, the layout is already costing you minutes.
Scan Point Placement for Reliable Event Capture
Your layout should support scan points that represent real milestones. Put scan points where cargo changes state:
- After receiving verification
- After screening completion
- After sorting/build up confirmation
- Before loading release
Avoid placing scan points in dead-end areas. If a scan point is at the end of a lane, people will try to “save time” by skipping the scan and doing it later—later is where accuracy goes to retire.
Mind Map: Zoning and Flow Path Design
Example: Layout for a Two-Cutoff Day
Assume two outbound cutoffs: 14:00 and 18:00. You can plan zoning and buffers like this:
- Outbound staging holds one cutoff’s ULD volume plus a small safety buffer.
- Build up sits between screening and outbound staging so cargo doesn’t cross the warehouse twice.
- Exception zone is near receiving but separated from the main corridor, so held items don’t block inbound staging.
If the 14:00 cutoff is missed due to a screening backlog, the layout still helps: cargo remains in screening buffer rather than spilling into build up or outbound aisles.
Quick Validation Checklist
Before finalizing the layout, test it with a “walk the shipment” exercise:
- Can a shipment move from dock to loading without reversing direction?
- Are exception routes physically distinct from normal flow?
- Do scan points sit where the cargo state truly changes?
- Are aisles wide enough to avoid forklift lane conflicts?
- Can outbound staging absorb one cutoff without blocking loading lanes?
When these answers are yes, the warehouse stops being a maze and starts being a timed process—one that behaves the same way on busy days and on ordinary ones.
4.2 Receiving, Staging, and Dispatch Operations with Scan Driven Control Points
Receiving, staging, and dispatch are the warehouse version of flight control: you do not “hope” cargo moves correctly—you verify it at specific moments. Scan-driven control points turn those moments into measurable events, so the operation can recover quickly when reality disagrees with the plan.
Receiving Operations with Scan Driven Entry Checks
Start with a clean boundary between what arrives and what is allowed into the controlled flow. At the receiving dock, scan the shipment identifier (typically AWB or house AWB) and the physical unit identifier (ULD ID, container number, or pallet tag). This creates a link between paperwork and the physical object.
Next, perform three lightweight validations:
- Quantity check: confirm the number of pieces or the ULD count matches the inbound manifest.
- Condition check: look for obvious damage, seal integrity issues, or temperature-control failures.
- Routing check: verify the destination lane, service type, and required handling (e.g., priority, DG, or cold chain).
A practical example: a forwarder delivers two pallets for the same AWB. The first pallet scans cleanly and matches the expected piece count. The second pallet scans but shows a different piece count than the manifest. Instead of letting it drift into staging, the system flags the mismatch immediately, so the receiver can reconcile before the pallet is mixed with others.
Staging Operations with Controlled Movement Paths
Staging is where time gets spent or saved. The goal is to prevent “temporary” mixing from becoming permanent confusion.
Use scan-driven control points to enforce movement rules:
- Putaway confirmation: when cargo is moved from receiving to a staging zone, scan the location and the unit ID.
- Zone readiness: staging zones should have clear rules for what belongs where. For example, “build-up ready” vs. “awaiting clearance” vs. “exception hold.”
- Pre-dispatch staging: just before build-up or loading, scan again to confirm the unit is still in the correct zone and not accidentally displaced.
A simple example: a shipment requires a specific ULD build-up. If the pallet is scanned into the wrong staging zone, the dispatch team sees it during pre-dispatch staging and can correct it before the build-up window closes.
Dispatch Operations with Build Up and Loading Verification
Dispatch is not one action; it is a sequence of verifications that mirrors airline acceptance. The scan points should align with operational handoffs:
- Build-up start: scan the ULD/container ID and the cargo identifiers being loaded into it.
- Build-up completion: scan the completed ULD/container ID to confirm it is ready for airport transfer.
- Airport transfer handoff: scan the ULD/container ID at the transfer point to confirm custody change.
- Loading confirmation: scan at the aircraft loading interface or gate process step, depending on the facility workflow.
Example: during peak volume, a ULD is built correctly but is staged for transfer with the wrong ULD tag. The build-up completion scan records the correct cargo-to-ULD relationship, while the transfer handoff scan reveals the mismatch between the physical tag and the system record. The team can correct the tag before the ULD leaves the facility.
Exception Handling with Fast, Focused Scan Rules
Exceptions should be treated like traffic incidents: you slow down the minimum necessary area and route around the problem.
Common exceptions and scan-driven responses:
- Missing scan: if a unit is not scanned into a required zone within the defined time window, it triggers an investigation task.
- Seal discrepancy: if seal status fails condition check, the unit moves to an exception hold zone and requires a second verification scan.
- Misrouted destination: if destination codes do not match the dispatch plan, the unit is quarantined and re-labeled before it re-enters staging.
A concrete scenario: a pallet arrives with the correct AWB but the wrong destination airport code on the label. The receiving scan flags the routing mismatch. The pallet is held in “label verification” staging until the label is corrected and a re-scan confirms the new routing.
Mind Map: Scan Driven Control Points Across the Flow
Operational Rhythm with Clear Roles and Timing
To keep scans meaningful, assign responsibility at each control point. Receivers own dock scans and validations. Staging operators own location scans and zone compliance. Dispatch operators own build-up and loading confirmations.
Use a simple timing rhythm based on your facility’s cutoff schedule. For example, if the dispatch window closes at 18:30, you can set internal targets such as “all receiving putaway scans completed by 16:30” and “pre-dispatch staging scans completed by 17:45.” The exact times depend on your throughput, but the principle stays the same: scans create a timeline, and the timeline prevents last-minute surprises.
Example: End-to-End Scan Flow for One Shipment
A shipment arrives at 14:10. Dock scan records AWB 123 and ULD U1. Quantity and condition checks pass. The system allows putaway. At 14:25, the staging operator scans U1 into Zone B. At 16:05, pre-dispatch staging confirms U1 is still in Zone B. At 16:20, build-up start scans U1 and the cargo identifiers being loaded. At 16:40, build-up completion scans U1 as ready. At 17:00, transfer handoff scans U1 at the airport transfer point. At 17:25, loading confirmation scans U1 at the aircraft interface. If any scan step fails, the system routes the unit to the correct exception path instead of letting it continue.
4.3 Storage Strategies for Temperature Sensitive and Time Sensitive Freight
Temperature sensitive and time sensitive freight share one trait: the clock is physical. Temperature drifts with time, and time drifts with operational friction. Storage strategy is therefore not just “where it sits,” but how the facility controls exposure, movement, and verification.
Foundational Principles for Controlled Storage
Start with two baselines: acceptable temperature range and maximum allowable time out of control. For example, a pharmaceutical shipment might require 2–8°C and may allow only 30 minutes above that range before it must be quarantined. A time sensitive shipment like chilled food may tolerate brief handling delays, but the total time from receiving to dispatch must stay within a defined window.
From these baselines, define three storage zones:
- Controlled temperature zone for items that must remain within range.
- Short dwell staging zone for items awaiting screening, labeling, or ULD build up, with strict time limits.
- Quarantine or exception zone for anything that breaks rules, such as a temperature excursion, missing paperwork, or damaged packaging.
A practical rule: if you cannot measure it, you cannot manage it. That means calibrated temperature probes, functioning data loggers, and scan events that timestamp when items enter and leave each zone.
Temperature Sensitive Storage Design
Temperature control is a system, not a single refrigerator. Build it around airflow, insulation, and operational discipline.
Airflow and location. Place pallets so air can circulate without being blocked by dense stacking. Keep “warm doors” away from high-value cold storage lanes. For instance, if your cold room has a loading door on one side, store the most sensitive SKUs on the opposite side to reduce temperature swings during frequent door openings.
Buffer capacity. Maintain a buffer for inbound surges. If you receive 40 pallets at once and your cold room can hold only 30, you will create uncontrolled dwell. A simple mitigation is to pre-allocate staging space that is also temperature controlled, even if it is smaller.
Packaging compatibility. Storage conditions must match packaging. A shipment in gel packs may be fine in a staging area for 60 minutes, while a shipment requiring active refrigeration cannot. Train receiving staff to read the handling instructions on the outer packaging and match them to the correct zone.
Verification cadence. Use a two-step verification: immediate checks at receiving and periodic checks during storage. Example: at receiving, confirm the data logger is present and scan the shipment into the cold zone; then verify logger readings at a defined interval before build up.
Time Sensitive Storage Design
Time sensitive freight needs fast access and minimal handling. The goal is to reduce “touch time,” not just “storage time.”
Flow-through layout. Arrange storage so that the shortest path exists from receiving to staging to dispatch. If your facility uses ULDs, store items by ULD build up sequence rather than by generic location. For example, if ULD 12 is loaded first for a 22:00 cutoff, stage those cartons closest to the build up line.
Pick and move discipline. Avoid re-handling by using clear labeling and scan points. A common failure mode is “temporary” placement that becomes permanent. Counter it with a rule: anything not scanned into its next step within a set time is moved to exception.
Dwell time limits. Define maximum dwell per step. For chilled food, you might allow 20 minutes in staging before it must be transferred to the build up area. For documents and screening, allow only the time required for the process, not the time people hope it will take.
Integrated Storage Controls for Both Types
When both constraints apply, treat temperature excursions as time events and time events as temperature risks.
Mind Map: Storage Control Logic
Example: Receiving to Dispatch for Chilled and Time Critical Cargo
A facility receives a mixed shipment: chilled food requiring 2–8°C and a time critical component requiring dispatch within 4 hours of receiving.
- Receiving scan and classification. Staff scan each carton and apply a zone assignment based on handling instructions.
- Controlled temperature placement. Chilled cartons go into the cold zone immediately. Time critical cartons go into the short dwell staging zone with a visible “dispatch by” label.
- Staging time enforcement. After 20 minutes, any carton still in staging is moved to exception for review. This prevents “almost ready” items from quietly exceeding their allowable window.
- Build up sequencing. During ULD build up, chilled cartons are staged by ULD load order to avoid repeated door openings and extra movement.
- Exception handling. If a logger indicates a temperature excursion, the shipment is quarantined and the clock stops for normal dispatch. The team then performs a documented decision on whether it can be released.
Advanced Details That Prevent Common Failures
Zone boundary clarity. Use physical cues and signage so staff can distinguish staging from exception. If the boundary is ambiguous, people will choose the path that feels fastest, not the one that is compliant.
Scan integrity. Ensure scans occur at zone entry and exit, not only at receiving and dispatch. Missing intermediate scans make it impossible to prove dwell time.
Exception throughput. Quarantine areas must not become storage by accident. Set a target processing time for exceptions so they do not consume controlled capacity.
Training with scenarios. Teach staff using realistic receiving scenarios: partial pallets, missing labels, and mixed packaging instructions. The best training is the kind that ends with “here is what you do next,” not “here is what could happen.”
4.4 ULD and Container Handling in Warehousing Including Build Up Support
ULDs (Unit Load Devices) are the “containers for containers” in air cargo. They let warehouses and airlines move freight as a single handling unit, which reduces manual handling, speeds loading, and improves traceability. In practice, build up is where warehouse operations turn loose pieces into ULD-ready loads that match airline and airport requirements.
ULD Fundamentals and Handling Objectives
A ULD can be a container or a pallet system, typically designed to fit aircraft holds and to be secured with standardized locks or fittings. The warehouse’s handling objectives are straightforward: keep the cargo intact and protected, maintain correct identification, and ensure the ULD is built to the airline’s loading plan.
Start with three basics:
- Correct ULD type and size: A pallet that fits one aircraft may not fit another. Warehouses should map ULD dimensions and aircraft compatibility to avoid last-minute swaps.
- Accurate ULD identification: Every ULD has a unique identifier. If scans and labels don’t match, the build can look correct while the shipment becomes untraceable.
- Load integrity: Weight distribution, stacking limits, and securing methods prevent damage during ground movement and flight vibration.
Build Up Workflow from Receiving to ULD Release
Build up usually follows a controlled sequence. The goal is to prevent “almost built” ULDs from leaving the staging area.
Step 1: Receiving and disposition
- Receive pieces with shipment identifiers and verify quantity and condition.
- Route items to staging zones based on destination flight, priority, and any special handling needs.
Step 2: ULD assignment and planning
- Assign each shipment piece to a specific ULD based on the airline build plan.
- Confirm whether the ULD is already available or needs to be requested.
Step 3: Consolidation and packing
- Build the ULD using approved packing methods: correct orientation, cushioning, and segregation where required.
- Keep a simple rule: if it can shift, it needs restraint.
Step 4: Securing and closure
- Apply locks, straps, nets, or other securing methods required for the ULD type.
- Record closure status so the airline can trust the unit’s integrity.
Step 5: Verification and release
- Perform a final check: ULD ID, contents list, weights (if required), and scan confirmation.
- Release the ULD to the build-up staging area with a clear “ready for loading” status.
A practical example: a warehouse receives 12 cartons for the same destination but two are fragile. Instead of mixing them randomly, the team stages fragile cartons in a dedicated zone, builds them into the ULD with cushioning and restraint, and verifies the ULD contents list before release. The result is fewer damage claims and fewer “where is it?” questions at the aircraft door.
ULD Compatibility, Weight, and Balance
Warehouses often focus on total weight, but aircraft loading cares about how weight sits in the hold. Build up should therefore include:
- Weight limits per ULD: Follow airline and aircraft constraints.
- Center-of-gravity awareness: Place heavier items lower and toward the center when possible.
- Stacking discipline: Respect maximum stacking heights and avoid compressing cartons that can deform.
Example: if two shipments have the same destination and both fit the ULD, but one shipment’s cartons are heavier, placing the heavier cartons at the bottom reduces shifting and makes securing more effective.
Scanning, Labeling, and Traceability Controls
Traceability is not a “nice to have”; it’s the mechanism that makes build up auditable.
Use a consistent control set:
- Inbound scan for each piece or shipment line.
- ULD build scan when items are placed into the ULD.
- Final scan for ULD closure and release.
If a piece fails scan verification, stop the build for that ULD. A common failure mode is continuing after a mismatch because “it’s probably fine.” In air cargo, “probably” is how you get misloads.
Mind Map: ULD and Build Up Handling
Example: Building a ULD for a Time-Critical Flight
Assume a flight cutoff requires ULDs to be ready by 18:30 on 2026-03-16. The warehouse plan assigns two ULDs for the same flight.
- The team stages all pieces for ULD A in one zone and ULD B in another.
- During build up, they scan each piece into the correct ULD, then apply restraint for cartons that could shift.
- Before release, they compare the ULD contents list against the scan log and confirm closure status.
If ULD A is missing one carton, the team does not “finish anyway.” Instead, they hold ULD A in a controlled status, build ULD B, and escalate the missing carton immediately. This keeps the loading team from discovering the gap at the aircraft door.
Advanced Details Without the Chaos
As operations scale, the main complexity is not building the ULD; it’s keeping the build consistent across people, shifts, and exceptions. The best practice is to standardize what “ready” means: the ULD ID is correct, the contents list matches scans, the securing method is applied, and the unit is released only after verification.
When those controls are in place, ULD handling becomes a repeatable process rather than a series of one-off decisions. That’s how warehouses support time-critical networks without turning every build into a fire drill.
4.5 Example: Warehouse Operating Model for Peak Day Volume with Staffing Plans
A peak-day operating model turns “we expect a lot of freight” into a repeatable plan for receiving, sorting, staging, and dispatch. The goal is simple: keep cargo moving through the warehouse without creating queues that later become missed cutoffs.
Peak Day Assumptions and Service Targets
Start with a small set of assumptions that drive everything else:
- Volume: 1,200 ULD equivalents arriving and 1,050 leaving.
- Inbound window: 06:00–12:00 local time.
- Outbound cutoff: 16:30 for same-day airport acceptance.
- Throughput constraint: sort lanes and build-up positions are the bottleneck.
- Service target: 98% of inbound shipments scanned into the system within 30 minutes of arrival.
Example: if 1,200 ULD equivalents arrive over 6 hours, that’s 200 per hour. If your receiving line can scan 90 per hour, you must either add a receiving lane, pre-stage paperwork, or shift some work to a later step.
Process Flow from Dock to Dispatch
Use a linear flow with clear handoffs:
- Receiving and verification: dock check, seal verification, scan-in, exception tagging.
- Staging: move to the correct sort zone based on destination and flight.
- Sorting and build-up: consolidate by ULD plan, prepare for loading.
- Quality checks: spot checks for ULD integrity, label accuracy, and temperature controls.
- Dispatch release: scan-out, ULD manifest confirmation, handover to ground transport.
Each step needs a “done” definition. For receiving, “done” means scan-in completed and any exception recorded with a reason code.
Capacity Math That Drives Staffing
Convert work into time and then into headcount.
- Receiving: average 4 minutes per ULD equivalent including scan and verification.
- Staging move: average 2 minutes of forklift/runner time per ULD equivalent.
- Sort/build-up: average 6 minutes per ULD equivalent at a build position.
If sort/build-up is 6 minutes each, one position handles 10 ULD equivalents per hour. For 1,050 outbound equivalents leaving by 16:30, assume 10 hours of active work (06:00–16:00) for simplicity: 1,050 / 10 = 105 per hour. You need about 11 build positions (105 / 10). Add 15% slack for rework and exceptions: 13 positions.
Staffing follows the equipment. If you have 13 build positions, you schedule enough operators to cover breaks and peak surges.
Staffing Plan with Roles and Coverage
A practical staffing plan uses role clusters so cross-training helps when volume spikes.
Core roles
- Receiving clerks (scan-in and exception tagging)
- Dock runners (paperwork and movement support)
- Sort/build operators (ULD build-up and consolidation)
- Quality checker (spot checks and label verification)
- Dispatch coordinator (release scans and manifest confirmation)
Example staffing for a 06:00–18:00 peak day
- Receiving clerks: 4 early shift, 2 late shift
- Dock runners: 3 early shift, 2 late shift
- Sort/build operators: 13 positions covered by 16 operators (to cover breaks and rework)
- Quality checker: 1 throughout, plus 1 backup during the 10:00–14:00 surge
- Dispatch coordinator: 1 early, 1 late
Why the extra operators? Because exceptions create “hidden minutes.” A single mislabel can consume 20–30 minutes across receiving, staging, and quality.
Exception Handling Without Breaking the Flow
Peak days fail when exceptions stall the main line. Use a separate lane:
- Exception lane: staffed by 1–2 people who can resolve common issues (missing labels, incorrect destination codes, ULD mismatch).
- Escalation rule: if an exception can’t be resolved within 20 minutes, it moves to a controlled hold area with a clear owner.
Example: if 5% of 1,200 inbound equivalents become exceptions (60 units), and resolution averages 15 minutes, you need enough exception capacity to avoid a backlog. A two-person exception lane can handle roughly 8–10 units per hour each, depending on complexity.
Mind Map: Peak Day Warehouse Operating Model
Example Daily Execution Rhythm
Run the day with short control loops:
- 06:00–08:00: receiving ramp-up, verify scan accuracy, confirm ULD plan.
- 08:00–12:00: focus on staging throughput; keep receiving moving even if quality checks are spot-based.
- 12:00–16:30: shift labor toward build-up and dispatch release; exception lane stays active.
- After cutoff: clear remaining units to the next acceptance window and reconcile scan counts.
This model works because it ties staffing to measurable time per unit, isolates exceptions so they don’t clog the main flow, and uses a consistent handoff definition at every step.
5. Transportation Planning for International Cargo Distribution
5.1 Multimodal Integration Including Truck Rail and Feeder Air Links
Multimodal integration in air cargo means treating the airport as one node in a longer transport chain, not as the start and end of the story. A shipment that arrives at the airport late is already “lost time,” even if the flight connection is perfect. So the goal is to coordinate pickup, inland transport, airport access, and feeder air links so that each handoff happens within the receiving window of the next step.
Foundational Concepts for Multimodal Coordination
Start with three time concepts that drive everything else. First is the inland transit time, including realistic buffer for traffic, yard congestion, and loading delays. Second is the airport cutoff time, which is the last moment cargo can be accepted for screening and build up. Third is the dwell time at each interface, such as time spent at a truck terminal before transfer to an airside warehouse.
A practical way to think about the chain is as a sequence of “gates.” Each gate has an acceptance rule: the truck must arrive by a specific appointment, the cargo must be scanned before it can be staged, and the feeder flight must have space for the ULD or container. If any gate is missed, the shipment either waits (increasing dwell) or is rerouted (increasing handling and risk of misalignment).
Designing the Inland Legs Truck and Rail
Truck legs are usually the most flexible for pickup and airport drayage. They work best when the shipment is time-critical but the origin is not far from the airport. A common pattern is a same-day pickup, then drayage to the cargo terminal with an appointment window that matches screening capacity.
Rail legs are typically used when volumes are steady and distances are long enough to justify fixed schedules. Rail integration is less about “speed” and more about reliability of arrival at an interchange point. For example, a manufacturer ships daily pallets to a rail terminal. The rail leg delivers to a regional air cargo hub early enough for truck transfer to the airport warehouse, where build up occurs for the evening feeder flight.
To integrate truck and rail, define a single inland plan that includes both the transport mode and the handoff location. If rail arrives at 06:00 but the truck terminal only starts receiving at 07:30, the rail advantage disappears. The fix is operational: align interchange receiving hours, yard staffing, and scan points so the cargo can move without sitting in a queue.
Feeder Air Links as the Bridge Between Regions
Feeder air links connect regional airports to mainline hubs. They are sensitive to load planning because feeder aircraft have limited capacity and tighter connection windows. Integration means matching inland arrival patterns to feeder departure times.
A useful example is a medical supply shipment that must reach a smaller destination airport. The shipment is picked up in the morning, moved by truck to a regional hub, consolidated into ULDs, and then flown on a feeder flight to the destination airport. The critical detail is that the consolidation step must finish before the feeder build up cutoff. If the inland leg is late, the shipment may miss the feeder and then require an additional overnight handling cycle.
Handoff Control Points Scans Appointments and ULD Discipline
Multimodal integration succeeds when handoffs are measurable. Use scan-driven control points at: pickup confirmation, arrival at interchange, arrival at airport terminal, staging completion, and load confirmation. Appointments should be tied to these control points, not just to the truck driver’s arrival.
ULD discipline matters because it reduces rework. If pallets are broken into multiple ULDs at the wrong time, you create extra handling and increase the chance of misplacement. A simple rule is to keep the ULD structure consistent from the point where consolidation begins until the point where the ULD is loaded onto the aircraft.
Example End-to-End Flow for a Time-Critical Shipment
Consider a shipment from a logistics park to an international hub with a feeder connection.
- Pickup at 08:00 with a planned inland transit of 2 hours by truck.
- Arrival at a rail interchange at 10:15, where the cargo is transferred to a rail service departing at 10:30.
- Rail arrival at 14:00 at the regional hub interchange.
- Truck transfer to the airport warehouse by 14:30, with staging scans completed by 15:30.
- Consolidation into ULDs and build up completion by 16:30.
- Feeder flight departure at 17:30, ensuring the shipment is loaded before the feeder cutoff.
Every step has a “why”: the rail departure is chosen to avoid interchange dwell, the warehouse staging scan is chosen to protect screening capacity, and the feeder build up completion time is chosen to prevent missed loading.
Mind Map: Multimodal Integration Truck Rail and Feeder Air
Practical Checklist for Implementation
Define one integrated schedule that includes inland arrival, airport appointment, staging completion, and feeder departure. Then verify that each handoff has a measurable event: a scan, a timestamp, or a load confirmation. Finally, test the plan with a realistic exception path, such as a 45-minute inland delay, to confirm that the shipment still fits within the airport and feeder gate windows.
5.2 Lane Management for Cross Border Moves Including Pickup to Airport Drayage
Cross-border lane management is the discipline of making one shipment behave predictably across multiple handoffs: pickup, border processing, airport access, and drayage to the cargo terminal. The goal is not just speed; it is repeatable timing under real constraints like appointment windows, inspection queues, and documentation checks.
Lane Foundations and Service Boundaries
Start by defining the lane as a set of measurable boundaries. A lane typically includes: origin pickup area, inland transport route, border crossing point, pre-arrival processing responsibilities, airport gate entry, and delivery to the cargo facility. For each boundary, set a service expectation and a control point.
Example: A shipment picked up at 08:00 must arrive at the airport gate by 11:00 to meet a 12:00 cutoff for build-up. If border processing slips, the lane should still have a defined “recovery window” that triggers escalation or rerouting rather than silent lateness.
Mapping the End-to-End Flow
Build a flow map that lists every event that can change timing. Use event names that match how systems record them, such as “Pickup Confirmed,” “Border Arrival,” “Customs Release,” “Airport Gate Entry,” and “Terminal Delivery.” Then assign an owner for each event: shipper, forwarder, carrier, ground handler, or customs broker.
A practical way to avoid gaps is to write down what must be true for the next step to start. For instance, drayage dispatch cannot be scheduled until customs release is confirmed or until a documented exception process is approved.
Appointment Windows and Cutoff Logic
Cross-border lanes often fail at the edges: the last mile to the airport and the first minutes at the terminal. Manage this with a cutoff logic that converts operational requirements into dispatch rules.
Example: If the terminal requires ULD acceptance by 13:00 and gate entry must occur 60 minutes earlier for screening and yard movement, then the drayage truck must depart the border area with enough buffer to absorb a typical inspection delay. The buffer is not a guess; it is derived from historical dwell time and the lane’s documented variability.
Border Processing Responsibilities and Document Readiness
Lane management depends on document readiness at pickup, not at the border. Create a “document completeness gate” before the truck leaves the origin. This gate checks that the shipment has the minimum required fields for customs processing, including correct commodity description, value, country of origin, and any permits.
Example: If a regulated product requires an import license, the lane should treat “license present and valid” as a dispatch prerequisite. Otherwise, the shipment may be physically moving while legally stuck, which is a classic way to create late arrivals without obvious operational errors.
Drayage Planning for Airport Access
Airport drayage adds constraints beyond road transport: gate rules, security screening, yard routing, and terminal receiving capacity. Plan drayage as a sequence: truck appointment, gate entry, screening, staging, and delivery to the build-up area.
Example: Two shipments with the same flight connection can still have different terminal outcomes if one arrives during a peak receiving slot. Lane management should therefore include terminal capacity assumptions and a rule for how to prioritize deliveries when capacity is tight.
Mind Map: Cross Border Lane Management
Cross Border Lane Management Mind Map
Example: One Lane, Two Outcomes
Consider a lane from an origin city to an airport in another country with a single border crossing.
Outcome A: Smooth flow
- Pickup confirmed at 08:10.
- Document completeness gate passes.
- Border arrival at 10:05.
- Customs release confirmed at 10:40.
- Drayage departs border at 11:00.
- Airport gate entry at 11:50.
- Terminal delivery at 12:20.
Outcome B: Border delay with controlled recovery
- Pickup confirmed at 08:10.
- Document completeness gate passes.
- Border arrival at 10:05.
- Customs release delayed until 11:05.
- Lane recovery window allows drayage dispatch at 11:20.
- Airport gate entry at 12:25.
- Terminal delivery at 12:55.
- Shipment is still accepted, but the lane flags the event for corrective action.
The difference is not luck; it is the presence of explicit start conditions, buffer logic, and escalation rules tied to event timing.
Operational Checklist for Pickup to Airport Drayage
- Confirm pickup time and vehicle availability.
- Run document completeness gate before departure.
- Schedule border and airport steps with explicit start conditions.
- Set dispatch triggers tied to customs release status.
- Plan drayage with gate entry buffers and terminal receiving capacity.
- Record event timestamps consistently for later lane tuning.
When these elements are managed together, the lane becomes a controlled system rather than a chain of hope—still human, still variable, but measurable and manageable.
5.3 Appointment Scheduling for Airport Access and Warehouse Inbound Windows
Appointment scheduling for airport access and warehouse inbound windows is the practical bridge between “we have a truck” and “we have a loaded ULD on the aircraft.” It coordinates time, capacity, and accountability across drayage, security screening, receiving, and build-up. Done well, it reduces queueing, prevents missed cutoffs, and keeps the warehouse from becoming a parking lot with scanners.
Foundational Concepts for Appointment Windows
Start with three definitions that prevent most misunderstandings:
- Inbound window: the time range a carrier is allowed to arrive at a warehouse gate for receiving.
- Airport access window: the time range a driver is authorized to enter an airport cargo area.
- Operational cutoff: the latest time cargo must be accepted into the warehouse flow so it can be built up and dispatched.
A simple rule of thumb: inbound windows must end early enough to allow receiving, screening handoffs, and ULD/container build-up. If the cutoff is 16:00, an inbound window ending at 15:30 is often safer than one ending at 16:00, because receiving rarely finishes exactly on time.
Designing the Scheduling Logic
Scheduling is not just assigning times; it is matching demand to constrained resources.
- Gate capacity: how many trucks can be processed per hour, including document checks and any security steps.
- Receiving capacity: how many shipments can be scanned, staged, and released to sort/build lanes per hour.
- Screening and exception paths: how long it takes when a shipment is held for inspection or requires manual verification.
To keep the system stable, use appointment slots that reflect the slowest common step. For example, if gate processing averages 6 minutes but exceptions average 25 minutes, design slots around the average plus a buffer, and route exceptions to a separate lane.
Building the Appointment Calendar
A workable calendar includes:
- Standard slots for predictable lanes (e.g., same-day drayage from a city warehouse).
- Priority slots for time-critical shipments with confirmed documentation.
- Buffer slots for variability such as traffic, driver delays, or partial loads.
Example: A warehouse receives 120 trucks on a peak day. If gate processing supports 10 trucks per hour and the receiving team can handle 9 trucks per hour, schedule 9 trucks per hour for the main window, then add a smaller buffer block of 1 truck per hour for variability. That prevents the receiving team from waiting on gate throughput or vice versa.
Data Requirements and Confirmation Steps
Appointments should be created from shipment data, not from guesswork.
Minimum data fields:
- AWB or shipment reference
- consignee/shipper identifiers
- number of pieces and weight/volume
- ULD or container identifiers when applicable
- commodity type and any regulated status flags
- required service level and the operational cutoff it must meet
Confirmation steps should be explicit:
- Pre-appointment validation: verify documents and shipment readiness before the driver arrives.
- Arrival check-in: confirm driver identity, vehicle details, and appointment reference.
- Receiving scan and acceptance: record arrival time, then accept into the warehouse flow.
- Exception handling: if a shipment is incomplete or held, reassign it to an exception lane with a new time plan.
A practical detail: require drivers to arrive with a printed or offline-accessible appointment reference. When connectivity fails, the gate still needs a way to match the truck to the scheduled slot.
Coordinating Airport Access with Warehouse Inbound Windows
Airport access is often governed by separate rules than warehouse receiving. Align them by mapping the end of the inbound window to the start of receiving.
A common coordination pattern:
- Set the airport access window to start earlier than the warehouse inbound window.
- Allow a short “arrival-to-receiving” buffer for parking, document checks, and staging.
Example: If receiving begins at 09:00 and typically takes 20 minutes from gate entry to dock availability, set airport access authorization from 08:30 to 09:00 for that wave. This avoids the classic failure mode where trucks are authorized to enter at 09:00 but docks are still occupied.
Mind Map: Appointment Scheduling Flow
Example: Same-Day Cross-Border Drayage Wave
On 2026-03-15, a cross-border shipment wave arrives for a 14:00 build-up dispatch cutoff. The warehouse receiving team can accept 8 trucks per hour, and gate processing averages 7 minutes per truck.
- Inbound window: 10:00–12:00
- Airport access window: 09:30–12:00
- Buffer: 11:30–12:00 includes 2 fewer standard slots and 2 buffer slots
If a truck arrives at 11:55, it is still within airport access authorization, but it may miss the receiving window. The system should therefore flag the appointment as “late risk” and route it to a decision point: either accept only if the shipment is already validated and can be scanned immediately, or re-slot it to the next dispatch cycle. This keeps the warehouse from spending time on paperwork that cannot meet the cutoff.
Operational Controls That Keep Appointments Honest
Use three controls to prevent drift:
- Time-stamped acceptance: receiving is not “done” until the scan and acceptance record exist.
- Exception thresholds: if exception volume exceeds a set level, pause new standard appointments and use buffer slots only.
- Clear communication rules: drivers and internal teams need one source of truth for appointment changes, including who approves re-slotting.
When these controls are in place, appointments become a coordination tool rather than a calendar decoration. The result is fewer missed cutoffs, smoother dock operations, and a warehouse flow that stays aligned with the aircraft schedule.
5.4 Routing and Dispatch Execution Using Real Time Traffic and Yard Constraints
Routing and dispatch in air cargo are less about finding the shortest path and more about meeting the right cutoff at the right place, with the right load state. Real-time traffic affects road legs, while yard constraints affect how quickly a shipment can be staged, built into ULDs, and released for loading. The trick is to treat routing and dispatch as one coordinated decision loop, not two separate checklists.
Foundational Inputs for Real Time Decisions
Start with a single “dispatch picture” that combines:
- Shipment requirements: promised delivery time, required airport cutoff, special handling flags, and DG or temperature constraints.
- Pickup and delivery windows: carrier appointment times, warehouse inbound windows, and airline acceptance cutoffs.
- Network state: current flight status, expected arrival times, and connection feasibility for onward moves.
- Road conditions: live traffic, border crossing queues, and known roadworks.
- Yard and terminal state: gate availability, yard dwell limits, ULD readiness, staffing levels, and screening throughput.
A practical way to keep this manageable is to define a small set of dispatch “gates” that must be satisfied in order: gate-in, screening complete, build-up complete, and load release. If any gate slips, the routing decision should change immediately.
Routing Logic That Respects Yard Constraints
Road routing is often optimized for travel time, but air cargo routing must also respect yard capacity. For example, a faster route that arrives when the yard is saturated can cause a longer total delay than a slightly slower route that arrives during an open window.
Use a simple rule set:
- Compute earliest feasible arrival at the airport gate based on live traffic.
- Compare arrival against yard capacity windows for gate-in and staging.
- Apply a buffer for operational variability such as screening queue changes and ULD build-up time.
- Select the route that minimizes missed cutoff risk, not just travel time.
A concrete example: A truck can reach the airport in 55 minutes via Route A, but the yard’s gate-in window for that terminal closes in 45 minutes. Route B takes 70 minutes but aligns with the next gate-in window. Even though Route B is slower, it reduces the chance of missing the cutoff and being forced into a later flight.
Dispatch Execution Loop for Live Operations
Dispatch execution works best as a repeating loop:
- Sense: ingest traffic updates and yard status changes every few minutes.
- Decide: re-evaluate whether the shipment still clears each dispatch gate.
- Act: update pickup instructions, reroute the truck, or adjust appointment timing with the receiving facility.
- Confirm: verify scan events at gate-in and staging so the plan matches reality.
If you only update the plan but don’t confirm with scan events, you end up managing assumptions. A good operational habit is to treat each scan as a checkpoint that either validates the plan or triggers a new decision.
Yard Constraint Modeling That Drivers Can Understand
Yard constraints come in categories that map cleanly to dispatch actions:
- Gate capacity: how many trucks can enter per hour.
- Staging capacity: how much space exists for inbound trailers and pallets.
- ULD build-up throughput: how quickly cargo can be consolidated.
- Screening throughput: how long it takes for clearance to complete.
- Staffing and shift rules: when work stops or slows.
Routing and Dispatch Execution Mind Map
Example: Rerouting Under Yard Saturation
Assume a shipment must be loaded onto a flight departing at 20:30. The airline acceptance cutoff is 19:45, and the terminal requires screening completion by 19:15 to allow build-up.
- Live traffic suggests arrival at the gate at 18:55 via the fastest route.
- Yard status shows gate-in capacity is tight until 19:10, with a backlog of 6 trucks.
- Screening throughput is currently slower due to a temporary staffing reduction.
Dispatch estimates that gate-in will occur around 19:20, which pushes screening completion beyond 19:15. That means the shipment will miss the build-up window.
Action plan:
- Route the truck to a different terminal gate with open capacity.
- Rebook the appointment to match the new gate-in time.
- Notify the warehouse team so staging is prepared for immediate processing.
The result is not “arrive earlier,” but “arrive where the next gate is actually achievable.”
Example: Dispatch with Multiple Shipments on One Truck
When one truck carries multiple shipments, routing must consider the tightest constraint. Suppose Shipment A has a 19:45 airline cutoff, while Shipment B can tolerate a later flight.
If the truck is rerouted to protect Shipment A, Shipment B may arrive later and still be fine. The dispatch decision should therefore:
- prioritize the shipment with the earliest dispatch gate failure point,
- split handling instructions by shipment when the terminal supports it,
- avoid mixing cargo in a way that forces both to wait for the stricter requirement.
A simple operational safeguard is to label handling instructions by shipment within the same trailer so the yard team can stage and release independently.
Operational Controls That Prevent “Plan Drift”
To keep routing and dispatch aligned with reality:
- Use timestamped gate checks: gate-in scan time, screening completion scan time, and build-up release time.
- Define escalation thresholds: for example, if gate-in is projected to slip by more than 10 minutes, reroute or rebook immediately.
- Keep a single source of truth for cutoff times and yard status so different teams don’t work from different versions of the plan.
When these controls are in place, real-time traffic and yard constraints stop being surprises and become inputs to a disciplined decision process.
5.5 Practical Example: End-to-End Distribution Plan for a Cross Border Shipment
A practical plan helps when every handoff has a time window, a responsible party, and a way to prove what happened. Consider a shipment of temperature-controlled medical supplies moving from Frankfurt (Germany) to Zurich (Switzerland) with delivery the next morning.
Shipment Setup and Service Targets
- Cargo: 12 pallets, 1,200 kg total, 2–8°C, shipped under a single air waybill.
- Lane: Frankfurt pickup → airport build-up → flight → Swiss arrival → customs clearance → last-mile delivery.
- Target: Pickup by 08:00 on 2026-03-15, airport cutoff by 11:00, delivery by 09:00 the next day.
To avoid “it should have been scanned” problems, define milestones that can be measured: pickup confirmation, warehouse receipt scan, ULD build-up completion, screening completion, flight departure, arrival scan, customs release, and delivery proof.
Step-by-Step Execution Plan
1) Pickup and Pre-Arrival Readiness
- 08:00–08:30: Truck arrives at shipper dock. Driver verifies seal number and counts pallets against the packing list.
- 08:30: Warehouse receives shipment and performs a temperature check on at least one representative unit.
- 08:45: Warehouse issues a receipt scan and updates the shipment status for the carrier and customs broker.
Easy example: If one pallet is missing, you stop the clock early. You record the discrepancy at receipt, so later scans don’t falsely imply the full load was screened and loaded.
2) Airport Drayage and Build-Up
- 09:30: Truck departs to the cargo terminal with a time-stamped gate-in.
- 10:00–10:45: Terminal sorting places pallets into the correct ULD build plan.
- 10:45: ULD build-up completion scan closes the “cargo is physically present” window.
Key practice: Build-up completion is your anchor event. If the shipment is later missing from the ULD, you can reconcile against that anchor rather than guessing.
3) Screening, Documentation, and Loading Readiness
- 10:45–11:00: Security screening and any manual inspection handling.
- 11:00: Cutoff confirmation that the ULD is cleared for loading.
- 11:15: Airline accepts the ULD for flight loading.
Easy example: If screening flags a label issue, you correct it before cutoff. Correcting after cutoff often turns into “we’ll try to load it later,” which is how next-day delivery slips.
4) Flight Movement and Arrival Control
- Departure: Flight departs as scheduled.
- Arrival: Terminal receives the ULD and records an arrival scan.
- Same day: Customs broker submits pre-arrival data so clearance can start immediately.
Key practice: Pre-arrival data reduces idle time. Even if customs asks for an inspection, you’ve already started the process.
5) Customs Clearance and Release to Delivery
- Customs release: Triggered by clearance status update.
- Post-release staging: Cargo moves to a controlled staging area for last-mile pickup.
- Delivery: Truck delivers to the consignee with proof of temperature and signed delivery.
Easy example: If customs release arrives at 18:00, you still protect the temperature by moving to a refrigerated staging zone immediately after release, not “whenever the driver is free.”
Responsibility Map and Handoff Logic
Mind Map: End-to-End Cross Border Flow
Exception Handling That Actually Fits the Timeline
Define three common exceptions and what to do within the same operational day.
- Missing pallet at receipt: Stop build-up for the affected ULD, reconcile with shipper, and re-plan loading. Do not “assume it’s on the truck.”
- Screening delay: If manual inspection is triggered, re-sequence the ULD build so other cleared cargo can still meet cutoff.
- Customs hold after arrival: Move the ULD to controlled staging, keep temperature logging continuous, and notify the last-mile carrier only after release.
Mind Map: Exception Decision Points
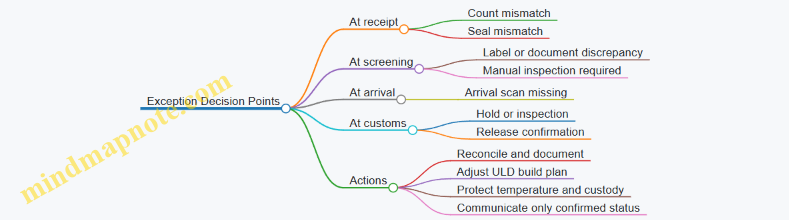
Output Artifacts and What “Done” Means
A complete plan produces tangible outputs:
- A milestone timeline with planned times and responsible parties.
- A scan checklist mapping each milestone to a system event.
- A handoff sheet listing seal number, pallet count, ULD ID(s), and temperature log references.
- A delivery confirmation packet containing signed proof and temperature evidence.
If these artifacts exist, the shipment is not just “handled”; it is verifiably coordinated across borders, with time windows respected and exceptions handled without guesswork.
6. Documentation, Compliance, and Customs Clearance Execution
6.1 Core Trade Documents Including Commercial Invoice Packing List and Certificates
Air cargo moves fast, but the paperwork moves with purpose. For international shipments, the commercial invoice, packing list, and required certificates form a “decision set” for customs, airlines, and downstream handlers. If you treat them as separate documents, you’ll eventually reconcile contradictions at the worst possible time—usually after a cutoff.
Commercial Invoice Foundations
The commercial invoice is the primary source of truth for the transaction. Customs uses it to assess value, classify goods, and determine taxes or duties. Airlines and forwarders use it to confirm shipment description consistency with the airway bill and any declared commodity details.
A practical way to build the invoice is to mirror the shipment’s operational identifiers:
- Shipper and consignee names and addresses must match the airway bill and any importer-of-record details.
- Invoice number and date should be unique and consistent across the document pack.
- Incoterms (for example, “DAP” or “CIF”) explain who pays for which legs; this affects customs value components.
- Currency and payment terms support valuation and can reduce follow-up questions.
- Line-item descriptions should be specific enough for classification without turning into a novel.
Example: A shipment of “lithium-ion batteries” should not be described only as “electronics.” Use a description that aligns with the product and regulatory classification, including capacity or model if applicable.
Packing List Purpose and Structure
The packing list translates the commercial invoice into physical reality: what is packed, how it is packed, and how many pieces exist. Customs may not always require it for valuation, but it is essential for verification, inspection, and warehouse operations.
A strong packing list includes:
- Package count and type (cartons, pallets, ULDs) and dimensions/weight per package.
- Gross and net weights that align with the shipment’s declared weights.
- Marks and numbers that match labels on cartons or pallet build sheets.
- Item-to-package mapping when multiple SKUs share the same shipment.
Example: If 200 cartons contain two SKUs, the packing list should show how many cartons belong to each SKU. Otherwise, an inspector may find “extra” cartons and treat it as a discrepancy.
Certificates and When They Matter
Certificates are not one-size-fits-all. They are required when the goods fall under specific regulatory categories such as food, pharmaceuticals, chemicals, plants, animals, or regulated materials. Even when certificates are not required for every shipment, the document pack should be complete for the goods being shipped.
Common certificate types include:
- Certificates of origin to support preferential tariff treatment.
- Health, phytosanitary, or veterinary certificates for biological or agricultural products.
- Conformity or compliance certificates for regulated product standards.
- Dangerous goods documentation when applicable, which must align with the declared DG details.
Example: A shipment of packaged food may require a health certificate and a certificate of origin. If the invoice lists the importer’s address differently from the certificate, customs may request clarification.
Document Consistency Rules That Prevent Delays
Most delays come from mismatches, not missing documents. Use these consistency checks before submission:
- Description alignment: The wording of goods should match across invoice, packing list, and certificates.
- Quantity alignment: Piece counts, weights, and package numbers must agree.
- Party alignment: Shipper, consignee, and importer-of-record names should be identical or clearly consistent.
- Code alignment: If you use product codes or HS codes, ensure they match the invoice and any certificate references.
A simple operational rule: if a warehouse worker can’t reconcile the packing list to the physical cartons, customs will struggle too.
Mind Map: Document Pack Logic
Example: End-to-End Document Pack for a Mixed SKU Shipment
Assume a shipment of two consumer products in cartons going from a manufacturer to an importer in another country.
- The commercial invoice lists both SKUs as separate line items with quantities and unit values, plus the agreed Incoterms.
- The packing list states total cartons and breaks them down by SKU, including gross weight per carton.
- A certificate of origin is included if the importer claims preferential treatment.
Before dispatch, you verify that:
- the SKU names match exactly between invoice and packing list,
- total carton count equals the sum of cartons by SKU,
- weights on the packing list match the declared weights used for the airway bill.
When these three documents agree, the shipment is easier to clear and easier to handle. When they don’t, everyone spends time doing the same job twice—first on paper, then on the floor.
6.2 Customs Clearance Workflows Including Pre Arrival Processing and Release Steps
Clearance Workflow Foundations
Customs clearance is a sequence of verifications that turns a shipment’s paperwork into permission to move. In air cargo, the sequence must fit tight airport timing, so teams usually run it in two phases: pre-arrival processing and release steps after arrival. The goal is simple: the shipment should reach the right party with the right status, before the physical load becomes a problem.
A practical way to structure the work is by three inputs: (1) shipment identity (AWB, consignee, flight details), (2) legal basis (customs declaration data, trade terms, permits), and (3) physical readiness (ULD/container status, scan events, and location). When any input is missing, the workflow doesn’t fail immediately—it slows down at the first checkpoint.
Pre Arrival Processing Steps
Pre-arrival processing starts once the airline or forwarder has enough data to identify the shipment and route it to the correct customs channel. Teams typically begin with a data quality check, then submit declarations, then prepare for possible holds.
-
Data quality check at the “paper-to-airport” boundary
Confirm that the consignee name and address match the declaration, that the commodity description aligns with the invoice, and that the HS code is consistent across documents. A common easy-to-fix issue is mismatched units of measure, which can cause valuation or classification delays. -
Declaration preparation and submission
Build the declaration using invoice packing list details, shipping marks, and any required permits. If the shipment includes controlled goods, ensure the permit numbers are present before submission. For time-critical lanes, many operators set an internal cutoff like “declaration submitted by 18:00 local time on 2026-03-16” to allow for review cycles. -
Risk screening and channel assignment
Customs may route the shipment to a faster channel or require additional checks. Teams should capture the outcome in the shipment control system so warehouse and ground handling know whether to stage for release or hold. -
Pre-arrival document pack readiness
Prepare a single pack that can be shown quickly if customs asks questions. Include the invoice, packing list, airway bill details, and any certificates. The pack should be consistent with what was declared, not just “available.”
Release Steps After Arrival
Release steps begin once the shipment is physically present and customs has enough information to finalize clearance. The sequence is usually: arrival notification, customs decision, payment or guarantee if required, then physical release and handoff.
-
Arrival notification and matching
The warehouse or airline system receives arrival data and matches it to the AWB and ULD/container. If the match fails, the shipment can’t be released even when the declaration is correct. A quick operational check is to verify that the ULD ID and location are recorded before the first “release request” attempt. -
Customs decision handling
If customs approves, proceed to payment/guarantee steps if applicable. If customs requests inspection, the workflow shifts to controlled staging with clear custody. The key is to prevent the shipment from being moved into general flow while it is still under customs control. -
Payment, guarantee, or duty settlement
Some shipments require duty/tax settlement before release. Teams should confirm who is responsible for payment and ensure the payment reference is linked to the declaration so customs can close the case. -
Release confirmation and operational handoff
Once customs releases the shipment, update status immediately in the operational system. Then coordinate the next move: delivery scheduling, warehouse picking, or transfer to a bonded area. If the status update is late, drivers and warehouse staff may act on outdated information.
Mind Map: End-to-End Customs Clearance Flow
Example: Pre Arrival Success, Release Without Surprises
A shipment of medical devices arrives on a Tuesday flight. The forwarder submits the declaration on 2026-03-16 with HS code and permit numbers already included. Customs assigns a low-risk channel. On arrival, the warehouse matches the AWB to the ULD ID within the first hour, records the location, and requests release. Customs approves, duty settlement is completed by the importer’s agent using the declaration reference, and the shipment is released before the warehouse’s evening dispatch wave. The practical win isn’t speed for speed’s sake—it’s that the release status was updated before staff started picking.
Example: Inspection Hold Managed Cleanly
Another shipment is routed to inspection. Pre-arrival processing is still completed, but the risk outcome is captured in the shipment control system. The warehouse stages the ULD in a controlled area, keeps custody logs, and assigns a single point of contact for customs questions. When inspection completes, release confirmation is recorded immediately, and only then does the shipment re-enter normal warehouse flow. This prevents the classic problem: a “released” label on the paperwork while the physical load is still sitting in the wrong place.
6.3 Compliance Data Requirements Including HS Codes and Country Of Origin
Compliance starts with two fields that look simple on a form but drive many downstream decisions: the HS code and the country of origin. Treat them like the “routing labels” of customs processing—if they’re wrong, everything after them becomes expensive and slow.
Core Concepts and Why They Matter
HS codes classify goods using a standardized tariff nomenclature. They determine which duties, taxes, and regulatory controls apply, and they influence whether a shipment can move without additional checks. Country of origin identifies where the goods were produced or substantially transformed. It affects preferential tariff eligibility, trade restrictions, and sometimes labeling requirements.
A practical way to keep this straight is to separate “what the item is” from “where it comes from.” HS code answers what category the product belongs to. Country of origin answers where the product is considered to have been made.
Data Inputs That Must Be Consistent
To assign an HS code and origin correctly, you need consistent product facts across documents and systems:
- Product description that matches the commercial invoice and packing list.
- Material composition and key specifications such as size, capacity, model, and intended use.
- Manufacturing steps sufficient to determine whether substantial transformation occurred.
- Packaging and form details when they change classification or origin determination.
- Brand and trade name only as supporting context; classification should not rely on marketing language.
If your warehouse scan shows one item description but your invoice uses another, you’ve created a mismatch that customs may treat as a data quality issue.
HS Code Determination Process
HS coding is usually performed at the level required by the destination authority, often using a hierarchy from broad headings to more specific subheadings. A systematic approach reduces guesswork:
- Identify the product’s essential character based on function and design.
- Match key characteristics to the most specific description available.
- Check exclusions and special rules that prevent common misclassification.
- Validate against documentation such as technical sheets and bill of materials.
A simple example: two shipments both described as “plastic parts.” One is a molded component for a specific machine function; the other is generic packaging inserts. The essential character differs, so the HS code may differ even though both are plastic.
Country of Origin Determination Process
Origin depends on the production history. Many regimes use rules based on substantial transformation, where the origin is the country where the goods gained their essential character through manufacturing.
A practical example: a company imports electronic components from Country A, assembles them into a finished device in Country B, and tests the device there. If the assembly in Country B is considered substantial transformation under the applicable rule set, origin becomes Country B. If it’s only basic assembly with no meaningful transformation, origin may remain Country A.
Because origin rules vary by trade agreement and destination, the safest operational habit is to record the manufacturing steps and locations in a way that can be mapped to the relevant rule set.
Mind Map: Compliance Data Flow
Example: End-to-End Data Set for One Shipment
Assume a shipment of “temperature-controlled medical storage units” packed in cartons.
- HS code field: derived from the product’s function as a storage unit with temperature control, not from the word “medical” alone.
- Country of origin field: determined by where the unit’s essential character was created, such as where the refrigeration system was integrated and the finished unit was assembled.
To keep it operationally usable, the data set should also include the supporting fields that justify the two key values:
- Item description used on the invoice
- Material composition summary
- Manufacturing location list
- Technical specification reference
Controls That Prevent Common Errors
Use a lightweight validation checklist before dispatch:
- HS code matches the invoice description at the same level of specificity.
- Origin matches the manufacturing narrative recorded for the product.
- No conflicting country fields exist across documents (for example, “country of shipment” versus “country of origin”).
- Item master updates are synchronized with the invoice generation process.
When a shipment is held for clarification, the fastest resolution usually comes from having a clear trail: which product facts were used, which rule logic was applied, and where the supporting evidence lives.
Case Study: Misclassification from a Description Drift
A forwarder receives an invoice line that says “insulated containers,” while the warehouse system item master describes “vacuum insulated bottles.” The HS code was assigned based on “insulated containers,” but the actual goods are bottles with a specific construction. Customs requests correction because the essential character differs. The fix is not just changing the HS code; it’s aligning the description and specifications across the invoice, packing list, and item master so the next shipment starts with the correct facts.
6.4 Handling Exceptions Including Holds, Inspections, and Missing Document Resolution
Air cargo exceptions usually start with a simple mismatch: what the shipment is supposed to be, what the systems say it is, and what the physical load shows up as. This section gives a practical way to manage three common exception types—holds, inspections, and missing documents—using clear decision points and repeatable communication.
Foundations of Exception Handling in Air Cargo
Exception handling is easiest when you treat it as a loop, not a one-off task. The loop has four steps: detect the exception, confirm the facts, take the permitted action, and close the loop with updated status. For example, a shipment marked “On Hold” in the customs system should trigger a confirmation step with the warehouse scan record and the airline/forwarder status feed. If you skip confirmation, you risk releasing the wrong ULD or sending the wrong document set.
A useful mental model is “control points.” Control points are moments where you can verify identity and eligibility: AWB number, ULD/container ID, piece count, weight, and document set completeness. When a hold or inspection happens, you return to these control points to avoid guessing.
Holds Including Customs Holds and Security Holds
A hold is a restriction placed on a shipment that prevents movement or release until conditions are met. In practice, holds come from different authorities, but the operational response is similar: stop movement, preserve custody, and gather the exact reason.
Start with a hold reason code and the authority name. Then confirm the shipment’s physical location. Example: a ULD is staged in a warehouse “ready for build up” zone, but the system shows a customs hold. The correct action is to move the ULD to a segregated hold area, update internal location records, and prevent it from being built into the next outbound ULD set.
Communication should be short and factual. Send three items to the right party: AWB, current location, and the hold reason. If the hold reason is “documents required,” do not ask for “what documents” in general terms; request the specific missing items listed in the hold notice.
Inspections Including Screening and Physical Examination
Inspections can be triggered by screening results, random selection, or regulatory concern. The key operational challenge is that inspection outcomes can change the allowed handling path.
Use a two-track approach: track the shipment’s operational status and track the inspection workflow status. Operational status answers “where is it and can it move?” Inspection workflow answers “what test happened and what result was recorded?”
Example: a shipment is selected for manual inspection after screening. The warehouse receives a notice, but the airline interface still shows “loaded.” The fix is to reconcile: confirm whether the ULD was actually loaded, then correct the status in the system to match physical reality. If the ULD was already loaded, you need a controlled recovery plan with the ground handler and airline station team to prevent accidental dispatch.
During inspection, preserve chain of custody. Record who accessed the ULD, what was opened, and what was resealed. Even when the inspection is routine, this documentation prevents later disputes about missing pieces or seal integrity.
Missing Document Resolution Including Document Set Completeness
Missing documents are the exception that looks small until it blocks release. Treat document resolution as a checklist tied to shipment eligibility.
First, define the minimum document set for the lane and product category. Then compare the required set against what you actually have in your document repository and what the clearance party has received.
Example: an AWB for a regulated product is missing the certificate of origin. The shipment is otherwise complete, but customs cannot release it. The resolution steps are: (1) confirm the exact missing document name from the notice, (2) verify the document’s validity dates and issuing authority, (3) confirm the document matches the shipment identifiers (shipper, consignee, product description, and quantities), and (4) submit the corrected document set and request a clearance update.
If the document is present but incorrect, handle it as a correction, not a resend. A resend wastes time and can still fail validation.
Mind Map: Exception Workflow and Decision Points
Integrated Example: One Shipment, Three Exceptions
Consider an AWB for time-critical spare parts moving from an origin warehouse to an international hub. Day 1: the shipment is accepted and staged for build up. During cutoff, the customs system flags a hold for missing product classification details.
Action: the warehouse moves the ULD to a hold area, updates location, and sends the hold reason to the clearance coordinator with AWB and ULD ID. Day 1 later: the shipment is released for inspection because the missing details are provided, but it is selected for manual examination.
Action: the team tracks inspection workflow separately from operational status, records seal access and reseal, and reconciles whether the ULD was loaded or still staged. Day 2: inspection reveals a mismatch in piece count versus the manifest, so the shipment remains restricted until the discrepancy is resolved.
Action: the warehouse performs a controlled recount, documents the corrected piece count, and updates the manifest data used for clearance. The final closure includes evidence: hold notice reference, inspection result record, and the corrected count submission.
Practical Closure Criteria for Operational Sign-Off
Close an exception only when three conditions are met: the authority requirement is satisfied, the physical load matches the updated records, and the shipment status reflects the current reality. If any one condition is missing, the next handoff will treat the shipment as still problematic—usually at the worst possible moment, like right before cutoff.
6.5 Example: Document Pack Preparation for a Regulated Product Shipment
A regulated product shipment usually fails for boring reasons: the right forms are present but incomplete, the wrong party signed them, or the data on the forms doesn’t match the shipment identifiers. This example shows a systematic document pack build for an air cargo move that requires customs clearance and regulatory declarations.
Shipment Scenario and Constraints
Assume a shipment of a temperature-controlled pharmaceutical product moving from Amsterdam (AMS) to Chicago (ORD). The shipper requires export declarations, the carrier requires air waybill consistency, and the importer requires customs entry support plus product regulatory documentation. The shipment is scheduled to depart on 2026-03-18, with a warehouse cutoff of 2026-03-18 14:00 local time.
Step 1: Create a Single Source of Truth
Start by locking the identifiers that every document must agree on:
- Air Waybill number (AWB)
- Shipper and consignee legal names and addresses
- Origin and destination airport codes
- Package count and gross weight
- Commodity description and declared value
- Incoterms and payment terms
Example: If the AWB lists 12 cartons but the packing list says 10, customs and warehouse systems will disagree. That mismatch becomes a hold, not a “small correction.”
Step 2: Build the Core Pack for Air and Customs
Create a folder structure that mirrors the workflow:
- 01 Shipment Identifiers
- 02 Commercial Documents
- 03 Regulatory Declarations
- 04 Transport and Handling
- 05 Signatures and Authorizations
Include these documents in the pack, with the exact data mapped to the identifiers:
-
Commercial Invoice
- Must show product description, quantity, unit price, total value, currency, and Incoterms.
- Example: If the invoice uses “Pharma Cold Chain Kit” but the AWB uses “Pharma Kit,” keep the wording consistent across all documents.
-
Packing List
- Must list carton counts, dimensions if required, net and gross weights, and package marks.
- Example: Marks on cartons should match the packing list line items so warehouse scanning can reconcile.
-
Air Waybill Copy
- Must match shipper/consignee, weights, and number of pieces.
- Example: If the AWB is issued with “pieces” but the packing list uses “cartons,” ensure the conversion is explicit and consistent.
-
Export Declaration Support
- Provide the export classification data required by the exporting country.
- Example: The export declaration often depends on the correct commodity code; a wrong code can trigger additional review.
-
Import Entry Support Documents
- Provide the documentation needed for the importer’s customs entry.
- Example: Country of origin and product identifiers must match what the importer will declare.
Step 3: Add Regulatory Documents Without Guesswork
Regulated products typically require additional declarations beyond standard customs paperwork. For this example, include:
- Product regulatory statement or authorization document required by the importing jurisdiction
- Temperature control statement and handling instructions
- Any required licenses or permits, if applicable
Example: If the handling instructions say “2–8°C” but the warehouse label says “15–25°C,” the shipment may still move, but the compliance record becomes inconsistent. That inconsistency is what causes delays during clearance.
Step 4: Validate Consistency Rules Before Printing
Run a checklist that compares fields across documents:
- AWB number appears on invoice, packing list, and any declaration forms
- Shipper and consignee legal names match exactly
- Commodity description is consistent in meaning and level of detail
- Weights and piece counts match across all documents
- Country of origin is identical everywhere it appears
A practical trick: highlight the AWB number and commodity description in each document and confirm they match character-for-character.
Step 5: Signatures, Authorizations, and Version Control
Many holds happen because the pack contains an older version of a form.
- Ensure signatures are present where required
- Confirm signatory names match the legal entity
- Record the document version date
Example: If a regulatory statement was updated after a packaging change, the pack must include the updated version. The warehouse may print labels from the latest data, but customs may receive the older statement.
Step 6: Prepare the Physical and Digital Pack
Print a “front page” summary that lists:
- AWB number
- Total cartons and gross weight
- Commodity description
- Temperature range and handling notes
- Clearance responsibility party
Then attach the full documents behind it. Also store the same pack digitally using the same file naming convention:
- AWB_
_DocPack_v _YYYYMMDD
Mind Map: Document Pack Preparation Flow
Example: Document Pack Contents for This Shipment
Front page summary:
- AWB: 123-45678901
- Total: 12 cartons, 48.0 kg gross
- Commodity: Pharma Cold Chain Kit, temperature 2–8°C
- Origin: Netherlands
- Destination: United States
Back pages in order:
- Commercial Invoice (with AWB and Incoterms)
- Packing List (carton marks and weights)
- Air Waybill Copy
- Export Declaration Support
- Import Entry Support Documents
- Product Regulatory Statement
- Temperature Control and Handling Instructions
- Licenses/Permits if applicable
When this pack is assembled with strict identifier consistency, the shipment moves through the clearance steps with fewer “paper cuts.” The goal isn’t perfection for its own sake; it’s reducing the number of places where two systems can disagree.
7. Dangerous Goods and Regulated Cargo Handling
7.1 Classification and Acceptance Criteria for Dangerous Goods Shipments
Dangerous goods (DG) in air cargo are not “special handling” items by preference; they are regulated by how they behave under transport conditions. Classification is the step where you determine the correct regulatory category, and acceptance criteria are the step where you confirm the shipment is prepared so it can be safely loaded, screened, and carried.
Start with the Right Question
Before you look up anything, confirm what you actually have: the product name, concentration, physical form (liquid, solid, gas), and any hazards stated by the manufacturer. A common failure mode is treating a generic product label as sufficient. In practice, the shipper’s documentation must support the classification with consistent details.
Easy example: A warehouse receives “cleaner, flammable.” If the SDS says it contains 60% isopropanol, that concentration matters for classification and packing group. If the SDS is missing or mismatched to the label, you cannot accept based on the label alone.
Use the SDS as the Classification Backbone
The Safety Data Sheet (SDS) provides hazard statements, composition, and sometimes specific regulatory identifiers. Classification typically follows these checks:
- Identify primary hazards (e.g., flammable liquid, oxidizer, toxic).
- Determine whether the substance matches a specific UN number or a more general category.
- Confirm packing group when applicable (how severe the hazard is).
- Verify any special provisions that change packaging, labeling, or documentation.
Easy example: Two aerosols both say “flammable.” One SDS lists UN 1950 and a packing group; the other lists a different UN number. Treating them as interchangeable is a classification error.
Map Hazards to the Correct Regulatory Class
Air DG rules use classes and divisions (for example, flammable liquids, corrosives, toxic substances). Your goal is to assign the correct class and, when required, the UN number and packing group.
A practical way to avoid gaps is to build a simple decision chain:
- Does the SDS indicate a UN number? If yes, verify it matches the product.
- If no UN number is provided, determine the class and then the appropriate entry.
- Confirm packing group using the SDS hazard severity data.
- Check for special provisions and whether the item is forbidden for air transport.
Easy example: A shipment of batteries might be “non-spillable” or “lithium ion” with specific acceptance rules. The classification must reflect the battery type, not just the word “battery.”
Acceptance Criteria After Classification
Classification tells you what it is; acceptance criteria tell you whether it is ready to move.
Documentation Must Match the Physical Load
Minimum expectations include:
- Correct UN number, proper shipping name, hazard class/division, and packing group.
- Shipper’s DG declaration completed accurately.
- Consistent package counts and net/gross quantities.
- Labels and marks that match the declared DG details.
Easy example: If the declaration says “UN 1170 Ethanol solution,” but the packages are labeled for “UN 1263 Paint,” the mismatch is an acceptance stop. The cargo can’t be “almost right.”
Packaging and Closure Integrity
Acceptance checks include:
- Packaging is approved for the UN entry and packing group.
- Inner packaging is secured to prevent movement.
- Closures are intact and compatible with the contents.
- Absorbent or cushioning is present where required.
Easy example: A small bottle inside a carton that rattles during inspection is a packaging integrity failure. Even if the DG classification is correct, the acceptance criteria are not met.
Labeling, Marking, and Unitization
You must verify:
- DG labels are applied to the outer package as required.
- Orientation arrows and handling marks are present when relevant.
- UN markings and proper shipping name appear where required.
- Unitization (e.g., ULD build-up) does not damage labels or create confusion.
Easy example: If labels are covered by stretch wrap, the screening and handling team may not be able to identify the hazard quickly. Acceptance should require label visibility.
Segregation and Loading Readiness
Even correctly classified DG can be unsafe if loaded incorrectly. Acceptance criteria include:
- Segregation from incompatible goods.
- Correct placement in the aircraft hold plan or warehouse staging area.
- Confirmation that the shipment is ready for build-up at the required cutoff.
Easy example: Oxidizers must be separated from flammables. If the warehouse stages them together “because they’re both DG,” that’s a segregation failure.
Mind Map of Classification to Acceptance
Mind Map: DG Classification and Acceptance
Worked Example from Receipt to Acceptance
A shipper presents 24 cartons of “solvent cleaner” with an SDS dated 2026-03-12. The SDS indicates a flammable liquid with UN 1993 and packing group II.
Acceptance steps:
- Confirm the proper shipping name and UN 1993 match the SDS and the carton labels.
- Check that each carton has the correct flammable liquid label and UN marking.
- Inspect closures and verify there is no leakage or damaged packaging.
- Confirm the DG declaration lists 24 cartons and the same net quantity per carton.
- Stage the shipment in the designated DG area and ensure segregation from oxidizers.
If any one of these fails—especially label/document mismatch—the shipment is not accepted. In air cargo, “close enough” is how you get close to trouble.
7.2 Packaging, Labeling, and Marking Requirements for Aviation Transport
Aviation transport packaging, labeling, and marking are about two things: making the cargo safe to handle and making it easy to identify correctly at every handoff. In practice, the “right” label is the one that survives real life—wet floors, rough handling, and quick sorting—while still matching the shipment documents.
Packaging Foundations for Aviation Handling
Start with packaging that protects the contents and supports the way air cargo is moved: loaded into ULDs or containers, stacked, scanned, and transferred between trucks and aircraft. Use packaging that resists crushing and puncture, with cushioning that prevents movement inside the outer container. For liquids, ensure the primary container is sealed and placed in an absorbent material or secondary containment so leaks do not spread. For fragile items, add corner protection and keep the center of gravity stable so the package does not tip during palletization.
A simple check: if you can shake the package and hear or feel movement, the internal protection is not doing its job. That same movement can also damage labels, which is why packaging and labeling are inseparable.
Labeling Requirements That Enable Correct Sorting
Labels must be visible, durable, and placed where handlers can see them without opening the package. Use a location strategy: put the primary handling label on the largest flat face, and avoid placing it on seams, edges, or areas likely to be covered by straps or shrink wrap. If the shipment is built into ULDs, ensure the package labels remain readable even after build-up and consolidation.
For time-critical operations, label placement also supports scanning workflows. If a label is partially obscured, the scan fails and the shipment may be routed to manual verification, which costs time and increases the chance of misidentification.
Marking Requirements for Aviation Transport
Marking is the information that ties the physical unit to the shipment’s identity and handling rules. At minimum, packages should carry the shipper’s and consignee’s details as required by the shipment process, plus any markings needed for special handling. For regulated cargo, markings must reflect the correct classification and handling instructions.
Use markings that are legible at a glance. Avoid abbreviations that could be interpreted multiple ways. If the shipment includes multiple items in one outer package, ensure the markings still clearly represent the outer unit’s handling requirements rather than only the contents.
Dangerous Goods Marking and Labeling Controls
For dangerous goods, packaging and labeling must align with the cargo’s classification and packing group. The label must match the hazard class and division, and it must be applied to the outer surface where it can be inspected quickly. If a package contains more than one hazard, apply all required labels so handlers do not guess based on partial information.
Also ensure the package is marked with the proper shipping name and other required identifiers. A common operational failure is using a label that looks correct but does not match the document’s declared hazard class. Treat the document as the source of truth, then verify the label against it before the package enters the build-up area.
Temperature Sensitive and Special Handling Markings
For temperature sensitive cargo, markings should specify the required temperature range and handling direction (for example, “Keep Refrigerated” or equivalent handling instructions used in your operation). Place these markings where they will be seen during receiving and staging, not only at the final delivery point.
If the shipment uses insulated packaging, mark the outer unit with any handling constraints relevant to the insulation method, such as “Do Not Freeze” where applicable. The goal is to prevent the cargo from being placed in the wrong environment during short dwell times.
Integrated Mind Map
Mind Map: Packaging, Labeling, and Marking Requirements
Example: Matching Labels to a Documented Shipment
A shipper prepares a carton containing temperature sensitive medical supplies. The shipping documents declare a required storage range of 2–8°C. The carton is packed with gel packs and sealed inside an insulated outer box. The outer box receives a durable label on the largest flat face showing the storage range and handling instruction. Before the carton is staged for build-up, the operator compares the label text to the document fields and confirms the label is not covered by shrink wrap edges or strap placement. During receiving, the label is scanned successfully because it remains unobscured, and the shipment is routed to the correct cold staging area.
Example: Dangerous Goods Label Alignment
A package is declared as a specific dangerous goods hazard class on the shipping documents. The operator applies the corresponding hazard label to the outer surface and marks the proper shipping name and required identifiers. A second check confirms the hazard class on the label matches the document’s declared class. Only after this verification does the package move into the build-up zone, reducing the risk of a mismatch that would trigger holds and manual resolution.
Practical Verification Checklist
Before a package enters the aviation handling flow, verify: the packaging prevents internal movement; labels are visible on a flat face; markings match the shipment documents; dangerous goods labels correspond to the declared hazard class; and special handling instructions are present and readable. This is the unglamorous part that keeps the rest of the network running on time.
7.3 Segregation and Storage Controls Including Quantity Limits and Safety Zones
Segregation and storage controls are the practical layer of dangerous goods and regulated cargo management. Their job is simple: keep incompatible materials apart, keep people and equipment safe, and make sure the warehouse can prove what was where and when. In air cargo operations, this matters because a small handling mistake can become a big operational problem—especially when cargo is moving fast and space is tight.
Foundational Concepts for Safe Segregation
Start with three building blocks.
-
Compatibility: Some materials can be stored near each other; others must not. Compatibility is not a “best effort” decision—use the approved classification and segregation rules from your internal DG/regulated cargo policy.
-
Containment: Packaging and secondary containment prevent leaks from spreading. If a drum fails, the spill should stay within a defined area long enough for response.
-
Control of quantity: Even compatible items can become hazardous if stored in excessive amounts. Quantity limits reduce the severity of a worst-case release.
A useful mental model is: compatibility prevents chemical conflict, containment prevents spread, and quantity limits prevent scale.
Safety Zones and How They Work in Practice
Safety zones are physical and procedural boundaries that define where cargo may be placed. A zone is not just a painted line; it is a set of rules tied to that location.
Common zone types include:
- Dedicated DG zone: Only approved DG/regulated cargo is allowed. Access is restricted and signage is consistent.
- Segregation lanes within the zone: Within the DG zone, incompatible categories are separated into lanes or bays.
- Quarantine or hold area: Used for shipments awaiting inspection, documentation correction, or resolution of screening/security holds.
- General cargo buffer: A controlled distance between DG storage and normal throughput areas.
To make this operationally real, pair each zone with three controls: who can access it, what can be placed there, and what scanning or labeling proves it.
Quantity Limits That Prevent “Too Much of a Good Thing”
Quantity limits are often misunderstood as a paperwork requirement. In reality, they are a storage design parameter.
Example: Suppose you store two compatible flammable liquids in the same bay. If your policy sets a maximum net quantity per bay, exceeding it can invalidate the containment assumptions and emergency response planning. The fix is not “be more careful.” The fix is to split the load across bays or reduce the stored quantity by staging—receiving only what can be processed within the allowed window.
Operationally, quantity limits should be enforced at two points:
- Placement check: Before a pallet or ULD is moved into a zone, the system or checklist confirms the remaining allowable quantity.
- Ongoing monitoring: If receiving continues, the remaining quantity must update based on what was actually placed, not what was planned.
Segregation Rules That Reduce Handling Errors
Segregation rules should be easy to follow under time pressure. That means they must be expressed in warehouse language, not classification theory.
Example: A shipment arrives with a DG label indicating a specific hazard class. Instead of relying on memory, the handler follows a zone mapping rule: “Hazard Class X goes to Bay 3 lane A; Hazard Class Y goes to Bay 3 lane C; never mix lanes A and C.”
This approach reduces errors because it converts compatibility logic into a physical routing decision.
Mind Map: Segregation and Storage Controls
Example Workflow for a Controlled Storage Decision
-
Receive and verify: The shipment is checked for correct labels and documentation. If labels and paperwork disagree, it goes to the quarantine/hold area.
-
Identify hazard category: The handler uses the approved segregation mapping to determine the correct bay and lane.
-
Check quantity remaining: The system or checklist confirms whether the bay can accept the incoming quantity.
-
Place with containment: The pallet/ULD is moved into the lane, using secondary containment where required.
-
Scan and confirm: A scan records the exact location. This creates traceability for audits and for any incident response.
-
Maintain separation during throughput: If general cargo is moving nearby, the buffer zone rules prevent accidental mixing during staging.
Advanced Details That Make Controls Stick
-
Label discipline: Labels on the cargo are necessary, but labels on the location are what prevent mix-ups. Location labels should mirror the segregation mapping so the warehouse “reads” the same way every shift.
-
Exception handling: When a shipment is missing documentation or has damaged packaging, it should not be treated as “normal storage with extra attention.” It belongs in the hold/quarantine zone until the issue is resolved.
-
Reconciliation: At end of shift or after major receiving waves, reconcile what the system says is in each zone with what is physically present. This catches mis-scans and prevents slow drift into unsafe layouts.
Segregation and storage controls work best when they are designed as a system: rules translated into zones, zones enforced through scans and access, and quantity limits treated as a physical constraint rather than a theoretical limit.
7.4 Documentation and Training Requirements for DG Shippers and Handlers
Dangerous goods (DG) move fast, but the paperwork and training must move faster. The goal is simple: the right hazard information must travel with the shipment, and the people touching it must know what that information means in practice.
Foundational Documentation Requirements
Start with the DG data that drives everything else: correct classification, packing group assignment, and the required shipping name. For air cargo, the shipper’s documentation typically includes a DG declaration and the information needed for the airway bill or equivalent transport document. The declaration is not a formality; it is the source of truth for hazard communication.
A practical way to verify completeness is to use a “four checks” routine before tendering:
- Hazard identity: shipping name, UN number, and hazard class/division match the product.
- Packaging correctness: package type and quantity align with the DG classification.
- Marking and labeling: packages show the required labels and orientation markings.
- Operational constraints: any special provisions, segregation needs, or temperature requirements are stated clearly.
Example: A shipper prepares a box labeled with the wrong UN number because the label was reused from a previous shipment. Even if the declaration is correct, the physical mismatch can trigger a hold during acceptance or screening. Training should teach staff to treat labels as part of the shipment’s identity, not decoration.
Training Requirements for Shippers
Shippers need training that connects classification knowledge to day-to-day actions. A good training program covers three layers:
- Regulatory awareness: what makes a material “DG” and how to interpret hazard classes.
- Documentation discipline: how to complete the DG declaration and ensure it matches the packaging.
- Packaging and marking execution: how to select approved packaging, close it correctly, and apply labels without errors.
A useful classroom-to-warehouse bridge is a “document-to-box” exercise. Trainees receive a sample product and a partially completed DG declaration. They must identify missing fields, then demonstrate how the final declaration would map to labels, markings, and package counts.
Training Requirements for Handlers
Handlers include warehouse staff, build-up teams, and acceptance personnel who may not classify the goods but must handle them safely. Their training should focus on operational control points:
- Acceptance checks: verifying that the shipment is marked, labeled, and documented consistently.
- Segregation and placement: understanding where DG can be stored and how to keep incompatible goods apart.
- Handling and ULD practices: preventing damage to packages and ensuring correct placement in unit load devices.
- Exception response: what to do when documentation is missing, labels are damaged, or quantities do not match.
Example: During build-up, a handler notices a torn label that no longer shows the hazard class. The correct response is not “fix it later.” Training should specify the immediate action: stop processing, notify the responsible party, and follow the facility’s exception workflow.
Documentation Control and Recordkeeping
Training only works if documentation control is consistent. Shippers and handlers should maintain records that prove competence and compliance. Typical records include training attendance, assessment results, and periodic refreshment evidence. For operational documents, keep version control for DG procedures and ensure staff use the current templates.
A simple internal control is a “two-person verification” for DG declarations above a defined internal threshold. One person checks classification and paperwork; the second checks the physical package markings and labels against the declaration.
Mind Map: Documentation and Training Flow
Example: End-to-End DG Acceptance and Training Scenario
On 2026-03-15, a warehouse receives a DG shipment for air transport. The shipper’s declaration arrives with the shipment, and the packages carry the required labels.
- Acceptance: staff compare UN number and shipping name on the declaration to the labels on each package.
- Quantity reconciliation: package count on the declaration matches the physical count.
- Segregation: the shipment is placed in the designated DG area according to the facility’s segregation rules.
- Build-up: packages are loaded into the ULD without damaging labels, and the ULD is sealed per procedure.
- Recordkeeping: acceptance scan events and training-compliant sign-off are recorded.
If any step fails—such as a label that is unreadable—trained staff stop the process, escalate using the defined exception path, and document the discrepancy. That is where training becomes measurable: the shipment either proceeds with verified alignment, or it is paused with a controlled response.
7.5 Practical Example: DG Acceptance and Build Up Process with Control Points
A practical DG (dangerous goods) acceptance and build up flow works best when you treat it like a sequence of gates. Each gate has (1) a clear input, (2) a specific check, and (3) an output that either moves the shipment forward or stops it for correction.
Step 1: Pre-Acceptance Screening at Receiving
Start with a quick “paper-to-package” scan before anyone touches the cargo. The receiving clerk verifies that the shipment is declared as DG and that the package markings match the paperwork.
Control point CP1: DG declaration present
- Input: booking or shipment notice
- Check: DG indicator and commodity description exist on the paperwork
- Output: if missing, the shipment is rejected for documentation correction
Example: A shipper submits a pallet labeled “Chemicals.” The DG declaration is absent on the AWB-related paperwork. The pallet is held until the DG section is completed.
Step 2: Classification and Consistency Checks
Next, confirm the classification details are internally consistent. The goal is not to reclassify the product from scratch, but to ensure the declared UN number, proper shipping name, hazard class, packing group, and quantity align.
Control point CP2: UN number and hazard class match
- Input: DG declaration and package labels
- Check: UN number and hazard class on documents match markings on packages
- Output: mismatch triggers a hold for rework
Example: Documents show UN 1170 (Ethanol solutions), but packages are marked UN 1263 (Paint). The shipment is stopped because the hazard profile and packing requirements differ.
Step 3: Packaging, Marking, and Labeling Verification
Now verify the physical readiness. You check packaging integrity, correct orientation, required labels, and any special markings (like limited quantity or lithium battery handling indicators).
Control point CP3: Packaging and labeling complete
- Input: packages and outer cartons
- Check: correct packaging type, intact seals, correct DG labels and marks, no missing orientation arrows
- Output: nonconformance leads to repackaging or refusal
Example: A carton has the right UN number but missing hazard labels on one side. Even if the label exists elsewhere, the missing side can cause misidentification during handling and screening.
Step 4: Quantity and Segregation Planning
DG acceptance is also about how the cargo will be placed. You confirm quantities per package and plan segregation rules so incompatible hazards are not co-located.
Control point CP4: Quantity limits and segregation compatibility
- Input: declared quantities and hazard classes
- Check: total quantity per hazard and compatibility with other loads in the same build-up area
- Output: cargo is assigned to a DG zone and build-up slot
Example: Two shipments arrive for the same flight. One is oxidizing material; the other is flammable liquid. They are placed in separate DG zones rather than “near each other but not touching.”
Step 5: Screening and Security Holds Integration
DG cargo still goes through screening and chain-of-custody controls. The key is to ensure DG holds do not get lost in the general exception process.
Control point CP5: Hold reason recorded and linked
- Input: screening outcome and security status
- Check: if held, the hold reason is coded as DG-related or security-related and linked to the shipment ID
- Output: build-up team sees the exact reason before loading
Example: A shipment is held for inspection. If the hold is recorded only as “manual review,” the build-up team might treat it as a routine delay. With a DG-specific code, the team pauses the build-up until DG documentation is verified.
Step 6: Build Up Preparation with ULD Control
Before loading into ULDs (Unit Load Devices), you confirm the ULD build plan and ensure DG cargo is loaded into the correct ULDs and positions.
Control point CP6: ULD assignment and scan confirmation
- Input: DG zone assignment and ULD plan
- Check: each DG package is scanned to the correct ULD ID and position
- Output: prevents accidental mixing of DG and non-DG cargo
Example: A pallet is scanned to ULD “A12,” but the build plan expects it in “B07.” The scan mismatch stops loading until the pallet is moved to the correct ULD.
Step 7: Final Documentation Check Before Dispatch
Before the ULDs are released to the airline or onward carrier, you verify that the final build-up documentation matches what is physically loaded.
Control point CP7: Final reconciliation
- Input: ULD manifest, package counts, and DG declaration
- Check: package count per DG line item matches the physical count; markings remain visible
- Output: release only after reconciliation
Example: The DG declaration lists 12 packages, but the physical count is 11 because one package was set aside for repackaging. The ULD is not released until the count matches.
Mind Map: DG Acceptance and Build Up Control Flow

Practical Mini-Scenario with Control Points
On 2026-03-15, a forwarder delivers two DG shipments for the same flight. Shipment A is UN 1170 in 20 packages; Shipment B is UN 3082 in 8 packages.
- CP1 passes for both because DG sections are present.
- CP2 fails for Shipment B: one outer carton is marked with a different UN number. The carton is removed and corrected.
- CP3 passes for Shipment A; Shipment B passes after relabeling.
- CP4 assigns Shipment A to the oxidizer-compatible DG zone and Shipment B to a separate zone.
- CP5 shows Shipment A is cleared; Shipment B is temporarily held for inspection, so only Shipment A is built up first.
- CP6 scan confirms ULD placement for Shipment A; Shipment B is loaded only after the hold is cleared.
- CP7 reconciliation confirms package counts match the final ULD manifest before dispatch.
This gate-based approach keeps DG handling predictable: every hold has a reason, every movement has a matchable record, and every release is tied to a reconciliation check.
8. Security, Screening, and Chain of Custody Controls
8.1 Security Roles and Responsibilities Across Shippers Carriers and Facilities
Security in air cargo is a shared job with clear handoffs. When roles are fuzzy, the shipment becomes the “missing person” in the process: everyone assumes someone else checked the right thing at the right time. This section lays out who does what, why it matters, and how to keep responsibilities from slipping between shippers, carriers, and facilities.
Foundational Concepts for Role Clarity
Security responsibility starts with the shipment’s physical and information trail. “Physical trail” means who touched the cargo and when. “information trail” means who recorded the shipment’s status and security actions in the required systems. A practical rule: if an action affects access, inspection, sealing, or custody, it must be both performed and recorded.
Another foundational concept is the boundary between parties. A shipper controls origin packaging and initial custody. A carrier controls acceptance policies and transport execution. A facility controls screening, storage, and controlled access during handling. Each boundary should have a defined acceptance or transfer point with evidence.
Shipper Responsibilities Including Origin Control
Shippers are responsible for preparing cargo so it can be secured and verified. That includes correct labeling, correct documentation, and packaging that supports inspection and sealing. A shipper also controls the first custody window: from pickup at origin until the shipment is accepted by the next party.
Concrete example: a pharmaceutical shipment is picked up from a lab. The shipper seals the outer carton with a tamper-evident seal, records the seal number on the shipping paperwork, and ensures the carton label matches the airway bill details. When the truck arrives at the airport facility, the receiving clerk checks the seal number against the paperwork before moving the shipment into controlled storage.
If a seal is missing or the label doesn’t match, the shipper’s responsibility is to provide accurate resolution information. That might mean reissuing documents, repackaging, or confirming the correct seal number—without guessing.
Carrier Responsibilities Including Acceptance and Transport Execution
Carriers manage the security process during acceptance and movement. Their role includes verifying that shipments meet acceptance requirements, ensuring that required screening or security checks are completed or arranged, and maintaining custody during transport.
Concrete example: a cargo airline accepts ULDs from a ground handler. The carrier confirms ULD identification, checks that seals are intact where applicable, and records the acceptance time. During flight, the carrier’s custody controls prevent unauthorized access to the ULDs. At arrival, the carrier ensures that custody evidence is preserved until the next handoff.
Carriers also coordinate exception handling. If a shipment is flagged for additional inspection or a seal discrepancy is detected, the carrier ensures the shipment is not quietly “absorbed” into normal flow. Instead, it is routed through the defined exception path with documented outcomes.
Facility Responsibilities Including Screening and Controlled Storage
Facilities—airports, cargo terminals, and warehouses—control the security environment where cargo is handled. Their responsibilities include controlled access, screening coordination, secure storage, and reconciliation between physical loads and system records.
Concrete example: a warehouse receives mixed shipments for build-up. Staff move cargo into a screened and controlled zone. Each pallet or container is scanned at entry, staged in a restricted area, and only released to build-up when the system shows it is eligible. After build-up, the facility reconciles what was staged versus what was loaded into ULDs.
Facilities also manage the “gray zone” of time. Dwell time is where mistakes breed: a shipment left in an unlocked staging area becomes a security issue even if it was correct at acceptance. Controlled storage policies should specify who can access areas, how keys or badges are managed, and how access is logged.
Handoff Mechanisms Including Evidence and Reconciliation
Security roles connect through handoff mechanisms. The most important handoff artifacts are: acceptance scans, seal numbers, custody logs, and reconciliation reports.
A simple handoff sequence that works in practice:
- Transfer occurs at a defined point.
- Evidence is captured (scan, seal check, timestamp).
- The receiving party confirms identity and eligibility.
- Any discrepancy triggers an exception workflow.
- Systems are updated so the next party sees the same truth.
Mind Map: Security Roles and Responsibilities
Example: One Shipment Through Three Roles
A time-critical shipment is picked up by a truck from a shipper on 2026-03-15. The shipper seals the package and records the seal number. The truck delivers it to a facility where receiving staff verify the seal and scan the shipment into controlled storage. During build-up, the facility reconciles staged items against the manifest and loads the shipment into a ULD.
At transfer to the carrier, the carrier checks ULD identification and confirms seals are intact. If a seal mismatch appears, the carrier routes the ULD to an exception area and pauses release until the facility and shipper provide documented resolution. When everything matches, the carrier updates the shipment status so the next handoff is based on recorded evidence, not assumptions.
Practical Role Boundaries That Prevent Gaps
Use three boundary questions at every handoff:
- Who verified identity and eligibility at this point?
- What evidence was recorded, and where?
- What happens when evidence doesn’t match?
When these questions have consistent answers across shippers, carriers, and facilities, security becomes a process rather than a collection of good intentions.
8.2 Screening Processes Including X-Ray EDS and Manual Inspection Handling
Screening is the point where “paper says it’s fine” meets “physics says prove it.” In air cargo, the goal is consistent: detect prohibited items, verify declared contents when signals look unusual, and keep legitimate freight moving without turning every shipment into a long pause.
Screening Foundations and Decision Logic
Screening starts with a few inputs that determine how a shipment is treated before any machine sees it. These inputs include shipment type, declared commodity, packaging condition, and the facility’s screening policy. A practical way to think about it is a two-lane decision: one lane for routine cargo that matches expectations, and another lane for cargo that triggers a review.
A facility typically uses a layered approach:
- Pre-screening checks: verify labeling, seals, and documentation consistency.
- Machine screening: X-ray EDS for image-based detection.
- Manual inspection: targeted opening or handling when machine results require it.
- Release and record: update status so downstream parties know what happened.
The key operational rule is simple: manual inspection should be targeted, not random. If you open everything, you create delays and still miss the real issues.
X-Ray EDS Screening Process
X-ray EDS systems generate an image (and sometimes additional signals) that operators interpret using defined criteria. Operators are trained to look for anomalies such as unexpected density patterns, concealed voids, unusual layering, or items that do not match the expected packaging profile.
A systematic flow looks like this:
- Load and position: ULDs, cartons, or pallets are placed to minimize blind spots.
- Scan and image review: the system produces images for operator interpretation.
- Result classification: images are categorized as clear, ambiguous, or alarm.
- Action: clear cargo moves forward; ambiguous or alarm cargo routes to secondary review.
Practical Example
A shipment declares “medical supplies” packed in multiple cartons inside a standard outer box. The X-ray image shows a dense block where the operator expects mixed densities from packaging and product. The result is not an automatic “bad,” but it is a reason to route to secondary review. The facility then checks whether the packaging matches the declared pack style and whether the outer box shows signs of tampering or unusual reinforcement.
Manual Inspection Handling
Manual inspection is a controlled activity with clear boundaries. It should answer specific questions raised by the screening result. Before opening anything, staff confirm the inspection authority, the scope of what may be opened, and the documentation needed to maintain chain of custody.
Step-by-Step Handling
- Secondary review confirmation
- A supervisor or second trained reviewer validates that manual inspection is warranted.
- Preparation
- Set up a workspace, tools, and PPE as required by policy.
- Prepare inspection forms and a way to photograph or record findings if required.
- Chain of custody controls
- Verify seals and record seal numbers.
- Maintain custody of the shipment during the inspection.
- Targeted opening
- Open the minimum number of layers needed to verify the anomaly.
- Verification and resolution
- Compare contents to declaration and packaging expectations.
- If contents are consistent, reseal and release.
- If not consistent, follow the escalation path for holds, reporting, and disposition.
- Repack and reseal
- Repack to restore integrity and ensure labels and seals match records.
- System update
- Record the outcome so tracking and downstream handoffs remain accurate.
Practical Example
A pallet of “electronics accessories” is flagged because the X-ray image suggests a dense inner compartment. During manual inspection, staff open only the top layer and a single inner carton. They find sealed accessory bags plus a small quantity of protective material that explains the density pattern. The shipment is resealed with the correct seal type, and the system is updated to “cleared after inspection,” preventing unnecessary re-checks at later stages.
Handling Exceptions and Reducing Repeat Delays
Repeat delays happen when inspection outcomes are not communicated clearly. To prevent that, facilities standardize how results are recorded: what was inspected, what was found, and whether the shipment is released for normal flow.
Common exception categories include:
- Ambiguous images resolved by targeted checks.
- Documentation mismatches resolved by verifying pack lists and labels.
- Packaging integrity issues resolved by resealing and confirming contents.
- Prohibited or suspicious findings routed to formal hold and escalation.
Mind Map: Screening Workflow and Control Points
Mind Map: Decision Triggers and Actions
Example: End-to-End Mini Scenario
On a busy shift, a ULD arrives with seals intact and labels matching the manifest. The X-ray image shows an area with density inconsistent with the declared “textile rolls.” The operator marks it as ambiguous, routes it to secondary review, and the supervisor authorizes a targeted manual inspection of one compartment. Staff record seal numbers, open only the flagged section, and find tightly rolled fabric plus dense protective padding that explains the image. The ULD is resealed, the inspection outcome is logged, and the ULD returns to normal build-up flow without a second round of checks.
8.3 Chain of Custody Procedures Including Seals Access Control and Audit Trails
Chain of custody is the documented proof that a shipment stayed intact and unaltered from one custody point to the next. In air cargo, that proof matters because cargo moves through multiple hands, locations, and systems—often faster than people can notice a problem. The goal is simple: every custody transfer has a clear “who, when, where, and what seal state” record.
Foundational Custody Points and Handover Rules
Start by defining custody points that match real operational steps, not org charts. Typical custody points include: shipper handoff to carrier or forwarder, acceptance at the warehouse receiving dock, transfer to build-up/sort area, loading to ULD or aircraft, and final delivery to the consignee or last-mile carrier.
For each custody point, define three rules:
- Physical control: who has possession of the cargo and where it is stored.
- Seal state capture: which seals are present, and whether they are intact.
- Evidence logging: what data is recorded and how it links to the shipment identifier (often AWB plus ULD/container ID).
A practical example: a warehouse receives a pallet with two seals on the outer wrap. The receiver records seal numbers at receiving, then again at staging if the pallet is moved to a different controlled area. If the pallet is later built into a ULD, the build-up operator records the seal numbers on the ULD build sheet and confirms they match the receiving record.
Seal Access Control That Matches Real Access
Seals are only useful if access to them is controlled. Treat seal management like inventory with accountability, not like “grab a seal from the drawer.”
Implement these controls:
- Seal custody: assign a seal custodian role and keep seals in a locked, access-controlled cabinet.
- Seal issuance log: record seal number, shipment/ULD assignment, date/time, and the person issuing it.
- Two-person verification for high-risk moves: for regulated or high-value shipments, require two-person checks when applying seals or when breaking seals for inspection.
- Access segregation: ensure the person who issues seals is not the only person who can apply them without oversight.
Example: a forwarder issues seals for ULD build-up. The seal custodian issues seal “AB12345” to the build-up operator, who applies it to the ULD door. If the ULD is later found with a mismatched seal number, the audit trail can immediately identify whether the wrong seal was issued, applied, or recorded.
Audit Trails That Tie Physical Events to System Events
An audit trail is the chain of records that connects physical handling to system events. It should be searchable by shipment and by custody point.
Use a consistent event model:
- Event type: receiving, staging, build-up, loading, delivery, seal break, seal replacement.
- Actor: user ID or badge ID of the person performing the action.
- Timestamp: captured automatically where possible.
- Location: dock, warehouse zone, staging lane, ULD build area, or aircraft loading position.
- Identifiers: AWB, piece count, ULD/container ID, seal numbers.
- Outcome: intact, damaged, missing, replaced, or inspected.
To avoid “paper-only” gaps, require that the physical scan or manual entry is linked to the same shipment identifier used in the operational system. If a seal is broken for inspection, the record must include who authorized it and why, plus the new seal number.
Example: during screening, an inspector requests a seal break to verify contents. The warehouse staff breaks the seal, records the old seal number as “broken,” logs the inspection reference, and applies a new seal. The system shows a seal break event followed by a seal replacement event, both tied to the same AWB and ULD ID.
Handling Exceptions Without Breaking the Chain
Exceptions are inevitable: damaged seals, missing seals, mismatched seal numbers, or cargo found in the wrong location. The chain of custody survives exceptions when the process is disciplined.
Use an exception workflow with three steps:
- Stop and secure: move the shipment to a controlled hold area.
- Document the discrepancy: record what is wrong, including photos if your process uses them.
- Resolve and reconcile: apply a new seal only when authorized, then reconcile system records to match the physical state.
Example: a ULD arrives at loading with seal “CD77890,” but the build sheet lists “CD77891.” The loader does not proceed. The ULD is placed on hold, the seal number is verified, and the discrepancy is traced to the build-up record. If the correct seal is found, the system is corrected; if not, the ULD is resealed under controlled authorization.
Mind Map: Chain of Custody Controls
Mind Map: Seal State Lifecycle
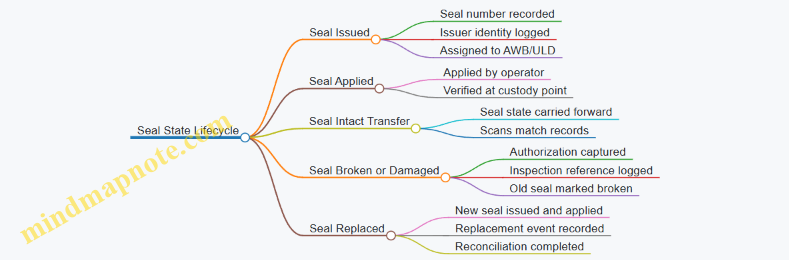
Integrated Example Walkthrough
A shipment arrives at 09:10 on a pallet destined for ULD build-up. The receiver scans the AWB and pallet ID, records seal numbers, and confirms seals are intact. At 10:05 the pallet is moved to staging; the operator scans again and verifies the seal numbers match the receiving record. At 11:20 the pallet is loaded into a ULD; the build-up operator records the ULD ID and confirms the seal numbers on the ULD door. At 12:05 loading begins; the loader scans the ULD ID and checks seal state before dispatch. If a seal is found damaged at 12:07, the ULD is held, the damaged seal number is logged, a new seal is applied under authorization, and the system is updated so the final delivery record reflects the correct seal state.
This approach keeps custody evidence consistent across people, places, and systems. It also makes investigations practical: you can trace a discrepancy to the exact custody point where the chain stopped matching.
8.4 Managing Security Holds and Reconciliation Between Systems and Physical Loads
Security holds are the moment when “the shipment is moving” becomes “the shipment is waiting.” The operational challenge is not only to stop the load safely, but also to keep every system view consistent with what is physically in the building. When systems drift from reality, the next scan, release, or dispatch can be wrong even if everyone is trying their best.
Security Hold Foundations and Triggers
A security hold is typically initiated by a screening result, a document mismatch, or a chain-of-custody discrepancy. The first practical step is to define what triggers a hold in your process map:
- Screening trigger: an item requires manual inspection after X-ray or EDS flags.
- Documentation trigger: AWB details, shipper declarations, or required markings do not match the load record.
- Custody trigger: seal status, ULD identity, or scan sequence suggests the load may not be the same one that was accepted.
Example: A ULD is scanned into the build-up area, but the ULD ID on the manifest differs by one character from the ULD label. The system can’t “guess” which is correct, so the shipment is held until the physical ULD is confirmed.
Immediate Operational Actions During a Hold
Once a hold is raised, the goal is to prevent accidental release and to preserve evidence.
- Stop movement at the boundary: prevent the ULD or piece from entering the next zone (e.g., from staging to build-up, or from build-up to loading).
- Create a physical hold location: mark a specific cage, pallet area, or staging bay with clear signage and access control.
- Record the hold reason and scope: specify whether the hold is for the entire ULD, a subset of pieces, or a specific shipment line.
- Freeze the custody chain: log who touched the load, when, and why. If a seal is broken for inspection, record the seal number before and after.
A small but important detail: if you use ULDs, treat the ULD ID as the “primary key” for physical reconciliation. AWB is critical, but ULD is what the warehouse and loaders actually handle.
Reconciliation Between Systems and Physical Loads
Reconciliation is the methodical comparison of three layers:
- System layer: shipment status, hold flags, and event history.
- Facility layer: scan events, ULD/piece location, and cage assignments.
- Physical layer: what is actually present, with labels, seals, and counts.
Reconciliation Workflow
Use a repeatable sequence so the team can execute it even under time pressure.
- Identify the held unit: ULD ID or piece identifier.
- Pull the system record: confirm which AWB lines are expected in that unit.
- Verify physical identity: check ULD label, piece labels, and seal numbers.
- Count and match: reconcile piece counts against the manifest or build-up list.
- Resolve discrepancies with a decision rule:
- If identity matches but documentation is wrong, correct documents and keep the hold reason updated.
- If identity mismatches, treat as a custody incident: separate the load, escalate, and do not “swap” labels.
- Update systems after physical confirmation: the system should reflect the physical truth, not the other way around.
Example: A cage contains three pallets. The system says two pallets are held for Shipment A and one for Shipment B. A quick physical check shows all three pallets are labeled for Shipment A. The hold for Shipment B is cleared only after the physical pallet for Shipment B is located elsewhere and confirmed.
Mind Map: Security Holds and Reconciliation
Release Controls and Post-Release Checks
Releasing a hold should be controlled and auditable. A practical release checklist includes:
- Authorization: only the designated role can clear the hold.
- Final physical verification: confirm the same ULD/pieces are present and seals are intact if required.
- System event alignment: ensure the release event is recorded after the physical check, not before.
- Location update: the load’s location should move from the hold cage to the next operational zone.
Example: After inspection, the team updates the system to “released” but forgets to move the ULD from the hold cage. The next loader scans the ULD and sees it still in the hold location, causing a second delay. A simple post-release scan at the cage exit prevents this.
Case Example: Multi-Party Hold with Scan Gaps
A shipment arrives at an airport facility. The airline system flags a hold due to a document mismatch. The ground handler scans the ULD into the warehouse, but the warehouse WMS does not receive the hold flag immediately.
Execution that works:
- Warehouse staff place the ULD in the hold cage based on the airline notification.
- They reconcile the ULD ID and piece count against the build-up list.
- They correct the document mismatch using the agreed workflow.
- They update WMS location and status only after the physical verification is complete.
- They confirm the airline system reflects the release with the correct event order.
The key is sequencing: physical truth first, then system truth, then operational movement.
8.5 Example: Security Incident Resolution Workflow for a Held Shipment
A shipment is held after security screening because the seal on a ULD is not consistent with the seal number recorded on the manifest. The goal is to resolve the hold quickly while preserving chain of custody and producing a clean audit trail.
Step 1: Confirm the Hold Details and Scope
Start by capturing the exact reason code from the security system and the physical identifiers involved: AWB number, ULD ID, container number, and the scan timestamps. Then confirm whether the hold applies to the entire ULD or only specific pieces.
Example: A ULD labeled ULD-4821 is held. The system reason says “seal mismatch.” A quick check of the ULD build sheet shows the ULD contains 18 cartons for three AWBs. The hold is for the ULD, not for a single carton.
Step 2: Stabilize Chain of Custody
Assign a single incident coordinator for the case and restrict access to the held area. Record who touches the ULD, when they touch it, and what they do. If seals must be removed or replaced, do it in a controlled process with two-person verification.
Example: The warehouse supervisor and a security officer jointly inspect the ULD. They photograph the seal area, note the seal number found on the ULD, and log the action before any replacement.
Step 3: Verify Data Consistency Across Systems
Compare three sources: (1) the manifest seal number, (2) the ULD build-up record, and (3) the last known scan event that indicates the ULD was released from the prior control point. Look for the most likely mismatch point.
Example: The manifest lists seal “A19-7742.” The build-up record lists “A19-7742” as well. The last release scan from the previous facility occurred at 10:12. The seal found now is “B03-1190.” That suggests the seal changed after the last release scan.
Step 4: Perform a Controlled Physical Inspection
If policy allows, inspect for signs of tampering without unpacking cargo. Check locking mechanisms, ULD integrity, and any evidence of forced access. If the shipment is high-risk or policy requires, escalate to a security-led inspection.
Example: The officer checks the locking bar and finds it intact. No visible damage is present, but the seal number differs. The case proceeds to reconciliation rather than full unpacking.
Step 5: Reconcile and Decide the Resolution Path
Choose one of three paths based on evidence:
- Seal mismatch resolved: seal number can be explained by documented re-sealing at a known control point.
- Seal mismatch not resolved: treat as potential compromise and follow escalation steps.
- Cargo-level verification required: if evidence suggests access, move to piece-level checks.
Example: The coordinator contacts the prior facility and confirms the ULD was re-sealed during a late-stage maintenance procedure on 2026-03-10, and the new seal number was “B03-1190,” but the update message failed to transmit.
Step 6: Execute the Corrective Action
If resolved, update records to reflect the correct seal number and ensure the ULD is released through the proper security workflow. If not resolved, keep the ULD in a secured hold and escalate per governance rules.
Example: Records are corrected: the ULD seal field is updated to “B03-1190,” and the release scan is reissued only after security signs off. The ULD is then moved to the dispatch staging zone under controlled access.
Step 7: Communicate Internally and Externally with Precision
Notify only the parties that need the information: warehouse operations, airline/forwarder operations, and the documentation team. Use consistent language: what happened, what evidence was found, and what action was taken. Avoid guessing.
Example: The operations team receives: “ULD-4821 held for seal mismatch. Physical inspection found no damage. Reconciliation confirmed re-seal at prior facility. ULD released at 14:35.”
Step 8: Close the Case with an Audit-Ready Record
Close the incident by attaching the evidence set: reason code, scan timeline, photos, log entries, inspection notes, and the final resolution decision. Ensure the case status is updated in the security system and that the shipment status reflects the release.
Example: The case file includes the two-person custody log, the photo of the seal area, and the confirmation email from the prior facility. The shipment status changes from “Held” to “Released for Build Up” with the correct timestamp.
Mind Map: Security Incident Resolution Workflow
Example: Mini Timeline for a Seal Mismatch Hold
- 13:05: Security system flags “seal mismatch” for ULD-4821.
- 13:10: Incident coordinator confirms scope and logs custody start.
- 13:20: Two-person inspection and seal-area photos captured.
- 13:35: System reconciliation identifies likely post-release re-seal.
- 13:55: Prior facility confirmation received and recorded.
- 14:35: Security signs off; ULD released and shipment status updated.
This workflow keeps the response systematic: confirm scope, protect custody, reconcile facts, inspect within policy, then communicate and close with evidence that stands up to scrutiny.
9. Time Management, Tracking, and Event Driven Shipment Control
9.1 Shipment Milestones Including Acceptance, Screening, Build Up, and Delivery
Shipment control in air cargo is easiest when you treat it as a sequence of measurable milestones. Each milestone has a clear “done” condition, a responsible party, and a data event that should appear in the tracking record. When those three align, exceptions become easier to diagnose instead of becoming mystery novels.
Acceptance Milestone
Acceptance is the moment the shipment becomes the carrier or handler’s operational responsibility. In practice, acceptance includes identity checks (shipper details, AWB number), physical checks (piece count, gross weight, ULD/container ID if applicable), and condition checks (packaging integrity, seals where required).
Easy example: A pharma shipper arrives at 08:10 with 12 cartons. The warehouse scans the AWB and ULD ID, confirms 12 pieces, and records the gross weight. If the count is 11, the shipment is not “accepted” yet; it is staged as discrepancy pending resolution. This prevents later disputes about who missed the missing carton.
Operational “done” criteria:
- AWB and piece/weight data captured
- Any required labels and documentation verified
- Shipment status updated to reflect acceptance
Screening Milestone
Screening is the checkpoint where security and regulatory requirements are applied. Depending on the facility and cargo type, screening can include automated systems (e.g., X-ray/EDS) and manual inspection. The key is to treat screening as a decision point: pass, hold, or require re-screening.
Easy example: A shipment of consumer electronics is scanned at 09:05. It passes automatically, so the system records “screened.” Another shipment triggers an alert due to dense packaging; it is moved to a manual inspection lane. Until the manual inspection clears, build up should not proceed.
Operational “done” criteria:
- Screening result recorded
- Any holds have a documented reason and owner
- If re-screening is required, the latest result is the one that matters
Build Up Milestone
Build up is the transition from “cargo ready” to “cargo loaded into the aircraft plan.” It includes sorting, ULD build, manifesting, and physical loading readiness. Build up is where timing matters most because it connects warehouse flow to aircraft schedules.
Easy example: A forwarder delivers mixed shipments to the terminal. The handler sorts by destination and flight number, then builds ULDs. If a shipment is accepted and screened but misses the build up window, it may still be physically present yet operationally late. That distinction should show in the event history.
Operational “done” criteria:
- Shipment assigned to a specific flight and ULD/position
- ULD build confirmed and reconciled against the manifest
- Loading readiness confirmed before cutoff
Delivery Milestone
Delivery is the final handoff from airside control to the consignee or last-mile provider. Delivery includes proof of release, confirmation of piece count, and resolution of delivery exceptions such as damaged packaging or missing items.
Easy example: A shipment arrives at the destination warehouse. The driver is given the release after scans confirm the AWB and ULD breakdown. If one carton is damaged, the delivery is still completed with a damage note and a discrepancy record, rather than silently assuming everything is fine.
Operational “done” criteria:
- Release recorded with time and receiving party
- Piece count and condition verified at handoff
- Exception notes captured when something deviates
Integrated Milestone Mind Map
Practical Event Logic for Tracking
A tracking record is most useful when it reflects milestone outcomes, not just activity. For example, “arrived at facility” is informative, but “screening held” explains why build up did not happen. Similarly, “loaded” is less helpful than “built up and assigned to flight,” because it ties the shipment to a specific operational plan.
Easy example: If a shipment shows “accepted” at 08:10, “screened” at 09:05, but never shows “built up,” the likely causes are operational cutoff missed, reconciliation failure, or a late hold. Each cause points to a different fix, so the milestone events should be complete and consistent.
Exception Handling Without Breaking the Chain
When a milestone fails, the system should stop the shipment from progressing as if it succeeded. A hold after screening should prevent build up assignment. A discrepancy at acceptance should prevent “accepted” from being treated as final. A delivery count mismatch should not erase the fact that the shipment was released; it should mark the exception so quality and claims can work with reality.
Easy example: A shipment is accepted with 10 pieces but later discovered to be 9. The acceptance milestone should remain “accepted with discrepancy,” and the build up milestone should reference the corrected count. That way, the delivery milestone can reconcile to what was actually loaded and released.
9.2 Tracking Data Sources Including Scans, Telematics, and Flight Events
Tracking works when every data source answers a specific question. Scans tell you what happened at a location. Telematics tells you where a vehicle is and how it is behaving. Flight events tell you what the aircraft did. When you combine them, you can reconstruct a shipment’s timeline and explain most delays without guessing.
Scans as Ground Truth for Physical Handling
Scans are the most reliable indicator of physical movement because they are tied to a controlled action: a label is read, a ULD is booked, or a package is accepted. Typical scan points include pickup confirmation, warehouse receiving, screening completion, build-up into a ULD, dispatch to the aircraft, and delivery at destination.
A practical example: a shipment arrives at an airport warehouse at 08:10. The receiving scan records that arrival, while the build-up scan records when it was placed into a ULD. If the build-up scan is missing but the receiving scan exists, the issue is likely internal—sorting, documentation, or ULD availability—rather than a carrier flight problem.
To make scans usable, treat them as events with consistent identifiers. Use the same shipment identifier across systems, and ensure scan events include at least the timestamp, location code, and event type. If a scan is performed on a ULD level, map it to the contained shipments so downstream tracking remains shipment-specific.
Telematics for Vehicle Movement and Operational Context
Telematics adds context that scans cannot provide: route progress, dwell time at gates, and whether a truck is stuck in traffic. Data usually comes from GPS devices on trucks, yard tractors, or sometimes container tracking sensors.
A practical example: two shipments show the same “picked up” scan time. One reaches the airport gate quickly; the other arrives late. If telematics shows the second truck spent 45 minutes idling near a border crossing, you can attribute the delay to border queue time rather than warehouse congestion.
Telematics should be normalized into operational events such as “arrived at facility,” “departed facility,” and “in transit.” Because GPS can drift, define rules for event creation, such as requiring a location match for a minimum duration. This prevents false arrivals caused by passing near a geofence.
Flight Events for Aircraft Movement and Connection Logic
Flight events describe the aircraft’s journey: scheduled departure, actual departure, takeoff, arrival, and sometimes gate-in. These events are essential for predicting and validating connection feasibility.
A practical example: a shipment is built into a ULD for Flight A with a connection to Flight B. If Flight A’s actual departure is delayed, the system should flag the connection risk. Flight events provide the factual basis for that decision, while scans confirm whether the ULD was actually ready and loaded before cutoff.
To avoid confusion, separate “aircraft movement” from “cargo readiness.” A flight can depart on time while cargo is late if cutoff was missed or loading was incomplete. That’s why flight events must be paired with build-up and dispatch scans.
Mind Map: Tracking Data Sources and How They Connect
Building an Integrated Timeline Without Gaps
Start by defining a canonical event model: each event has a type, a timestamp, a location, and an identifier. Then map each data source into that model.
- Use scans to anchor the timeline at handling points.
- Use telematics to fill the “between facilities” gaps, especially for drayage and yard movement.
- Use flight events to anchor the “between airports” segment.
When a scan is missing, do not silently assume it happened. Instead, infer cautiously using other evidence. For example, if telematics shows the truck arrived at the airport gate and departed without a delivery scan, the likely failure is at the warehouse interface—label readability, scan device downtime, or a mismatch in identifiers.
Example: Explaining a Missed Cutoff with Evidence
Shipment X has a receiving scan at 07:55 and a build-up scan at 09:20. Flight Y’s cutoff for ULD loading is 09:00, and Flight Y departed at 10:05.
- Scans show the ULD was not ready by cutoff.
- Flight events confirm the aircraft left after the cutoff window.
- Telematics shows the truck arrived at the airport at 08:05, so the delay was not caused by late pickup or drayage.
The operational conclusion is specific: the warehouse process between receiving and build-up missed the cutoff, likely due to sorting backlog or ULD build constraints. That level of clarity is what integrated tracking should produce—one explanation per gap, supported by the right data source.
9.3 Exception Management Using Event Rules and Escalation Paths
Exception management starts with a simple question: “Which event means action, and who acts next?” In air cargo, events are usually scans, flight status changes, screening outcomes, and milestone confirmations. The goal is to convert those events into consistent decisions so the shipment doesn’t rely on someone’s memory or a late phone call.
Foundations of Event Rules
Event rules define three things: the trigger, the condition, and the response. A trigger is an event type such as “Arrived at facility” or “Screening hold.” A condition narrows when the rule applies, for example only for shipments with a specific service level or only when the event occurs before a cutoff time. The response specifies actions like notifying a handler, creating a task for rebooking, or escalating to a control tower.
A practical example: if a shipment is scanned “Inbound truck arrived” but no “Received into WMS” scan appears within 30 minutes, the rule creates an exception ticket for the warehouse team. The condition prevents false alarms by excluding shipments marked “appointment waived” and by checking whether the shipment is already in a known exception state.
Designing Escalation Paths That Match Reality
Escalation paths describe the sequence of responsibility when the first response doesn’t resolve the issue. A good path is short, role-based, and time-bound. For air cargo, typical roles include warehouse operations, airline/handling liaison, customs broker, and customer service.
Use two timers: a “resolve window” and a “handoff window.” The resolve window is how long the first team has to fix the problem. The handoff window is how long before the issue moves to the next role. For instance, a screening hold might require broker action; if the broker hasn’t acknowledged the hold within 45 minutes, escalate to the broker supervisor and simultaneously notify the airline liaison so the build-up plan can adjust.
Building a Rule Set from Milestones
Start with milestones, not systems. Common milestones include pickup acceptance, airport arrival, screening completion, build-up confirmation, flight departure, arrival at destination facility, delivery dispatch, and final delivery confirmation.
Map each milestone to likely exceptions:
- Missing scan events: “No scan after arrival” or “No build-up confirmation.”
- Process holds: screening hold, DG hold, customs hold.
- Operational constraints: missed cutoff, ULD shortage, yard congestion.
- Data mismatches: incorrect AWB number, wrong consignee, inconsistent piece counts.
Each exception type should have a rule cluster. For example, “missed cutoff” rules should include both operational actions (rebook or reroute) and customer communication actions (service impact notification).
Mind Map: Exception Logic
Example: Missed Build-Up Confirmation
Assume a shipment is scheduled for a specific flight. The last confirmed milestone is “Received into WMS.” The rule triggers when “Build-up confirmed” does not arrive by T-60 minutes before scheduled departure.
- Trigger: no build-up confirmation event by the threshold.
- Condition: shipment is still in the “available for build-up” state and not flagged as “awaiting clearance.”
- Response: create a task for the build-up supervisor and notify the airline liaison.
If the build-up supervisor acknowledges the task but doesn’t resolve it within 20 minutes, escalation moves to the control tower. The control tower then decides between two operational paths: hold for the next flight or reroute via an alternate hub. Either decision updates the shipment state so later rules don’t keep firing.
Example: Screening Hold with Clear Ownership
A screening hold event triggers immediately. The rule checks whether the shipment is DG or temperature sensitive.
- Trigger: “Screening hold” event.
- Condition: if DG, require DG-trained handler notification; if temperature sensitive, prioritize staging area assignment.
- Response: create two tasks—one for the broker to start clearance steps and one for the warehouse to move the shipment to the correct hold zone.
Escalation is time-bound: if the broker hasn’t acknowledged the hold within 45 minutes, escalate to broker supervisor. If the warehouse hasn’t completed hold-zone movement within 15 minutes, escalate to warehouse shift lead. This prevents the common failure mode where everyone waits for someone else.
Closing the Loop with Reconciliation
Exception management isn’t complete when the issue is “fixed.” It’s complete when the system reflects reality. Closure requires reconciliation: the shipment state matches the latest milestone, piece counts align with the manifest, and any customer-facing service impact is recorded. When closure is consistent, future rules become more accurate because they stop treating resolved shipments as still “stuck.”
9.4 Service Recovery Execution Including Rebooking and Rerouting Decisions
Service recovery starts when the shipment’s planned path stops matching reality. The goal is not just to “fix” the problem, but to restore a credible delivery promise using the least disruptive option that still meets service level requirements.
Triggering Recovery with Clear Decision Points
Recovery should begin at defined events, not at random moments. Common triggers include missed airport cutoff, flight cancellation, warehouse scan gaps beyond a tolerance window, customs hold, or a ULD build-up failure that prevents loading.
A practical rule: if the next milestone is at risk, recover immediately; if only the final delivery is late but intermediate milestones are intact, recover later with more options. For example, if a shipment misses the build-up window by 20 minutes but is still at the terminal and can be re-sorted for the next departure, you can act quickly without waiting for a full day to pass.
Establishing the Recovery Objective and Constraints
Before choosing rebooking or rerouting, confirm three items:
- Objective: regain on-time delivery, or minimize lateness while preserving integrity (temperature, DG segregation, security seals).
- Constraints: cutoff times, carrier acceptance rules, ULD availability, customs status, and whether the shipment is already screened and released.
- Cost and effort boundaries: ground handling fees, additional drayage, and labor required for re-labeling or re-documenting.
A useful mindset is to treat recovery like a controlled change request. You are not improvising; you are selecting a new plan that still satisfies operational and compliance requirements.
Triage: Sorting Shipments into Recovery Paths
Not every exception deserves the same attention. Triage groups shipments by how reversible the situation is.
- Low effort, high impact: missed scan at a facility that can be corrected with a quick reconciliation.
- Moderate effort: missed flight but still within the same airport’s next scheduled departure.
- High effort: missed connection across countries, requiring rerouting and possibly customs rework.
Example: A time-critical pharma shipment misses the 14:00 cutoff due to a late truck arrival. If it is scanned into the warehouse at 14:10 and the next freighter departs at 16:30, the recovery path is likely re-sorting and rebooking on the same airport lane.
Rebooking Decisions Using a Structured Comparison
Rebooking means changing the planned flight or service while keeping the shipment’s origin and destination intent intact.
Compare options using a simple scorecard:
- Time to next departure (including build-up and loading readiness)
- Connection feasibility (if the shipment needs onward flights)
- Documentation readiness (AWB status, manifests, customs release)
- Handling requirements (temperature control, DG restrictions, ULD compatibility)
- Operational certainty (how likely the option is to actually load)
If two options are close, prefer the one with fewer “unknowns.” For instance, a reroute that requires a new customs submission may look faster on paper but can stall at clearance.
Rerouting Decisions When the Lane Itself Breaks
Rerouting changes the path between origin and destination. This can involve alternate airports, different carriers, or a shift from air to air+ground segments.
Use a lane feasibility checklist:
- Airport capability: does the alternate airport support the required handling and screening throughput?
- Ground access: can drayage providers meet appointment windows and yard constraints?
- ULD and equipment: are compatible ULDs available, or will repacking be required?
- Security and chain of custody: are seals and access controls preserved across handoffs?
Example: A shipment planned for a hub connection is stranded due to a terminal closure. Rerouting to a nearby airport with similar customs processing can preserve the shipment’s screened status and reduce the need for re-screening.
Execution Control with Event-Driven Updates
Once a decision is made, execution must be traceable. The shipment should move through a controlled sequence:
- Update the plan: record the new flight or new route in the system of record.
- Reconfirm acceptance: ensure the carrier or handling agent accepts the revised booking.
- Rebuild the operational steps: re-sort, re-stage, and re-assign ULDs if needed.
- Communicate milestones: send updated status events to stakeholders at the moment of change.
A practical detail: if the shipment is already labeled for a specific flight, ensure the label and manifest logic align with the revised plan before physical movement. Otherwise, you create a “paper-correct but physically wrong” situation that is harder to fix later.
Example Mind Map for Recovery Flow
Mind Map: Service Recovery Execution
Worked Example with Rebooking and Rerouting
On 2026-03-15, a shipment arrives at the airport warehouse after the 13:30 acceptance cutoff. The warehouse scan shows it is in the secure staging area, and screening is already completed.
- Rebooking option: load it on the next departure at 15:10 from the same airport. The scorecard favors this because documentation is already aligned and ULDs are available.
- Rerouting option: if the 15:10 flight is canceled, reroute via a nearby airport with frequent departures. The rerouting checklist confirms ground access appointments are available and the alternate airport can accept the same ULD type.
The execution step is the difference between “decision” and “recovery.” The plan is updated immediately after the flight change, the handling agent confirms acceptance, and milestone events are issued when the shipment is re-staged and loaded.
Outcome Verification and Closure
Recovery is complete only when the shipment’s physical state matches the updated plan. Verify loading, handoff, and the next milestone scan. If any of these are missing, treat it as an execution exception and correct it using the same event-driven approach.
When done well, service recovery becomes a repeatable method: detect early, choose with constraints, execute with traceability, and close with evidence.
9.5 Practical Example: Building a Shipment Control Dashboard with KPI Definitions
A shipment control dashboard is a single screen that answers three questions fast: Where is it in the process, is it on time, and what should the team do next. The trick is to define KPIs that map to operational decisions, then wire each KPI to the exact event that triggers the decision.
Step 1: Define the Process Milestones and the Event Source
Start with a simple milestone model that matches how air cargo actually moves. For each milestone, specify the event type and the system that records it.
- Pickup confirmed: trucker scan or shipper handoff scan in TMS
- Airport acceptance: gate-in scan in WMS or ground handling system
- Screening completed: screening system event or handler scan
- Build up started and completed: ULD build events from warehouse execution
- Loaded on aircraft: airline loading event
- Arrived at destination airport: airline arrival event
- Customs released: customs status event
- Out for delivery: last-mile dispatch scan
- Delivered: proof of delivery scan
This milestone list prevents a common dashboard failure: measuring “activity” (scans happening) instead of measuring “progress” (right scan at the right stage).
Step 2: Choose KPI Definitions That Drive Actions
Use KPIs that can be acted on within the same shift. Each KPI below includes a clear numerator, denominator, and operational meaning.
-
On-Time Acceptance Rate
- Definition: % of shipments accepted by the airport before the agreed acceptance cutoff.
- Numerator: shipments with acceptance timestamp ≤ cutoff time.
- Denominator: shipments scheduled for that cutoff.
- Action: if low, tighten pickup-to-drayage appointment adherence and pre-alert ground handlers.
-
Build Up Completion On Time
- Definition: % of shipments with build-up completion before the airline loading window.
- Numerator: build-up completed timestamp ≤ loading window start.
- Denominator: shipments in the build-up plan.
- Action: if late, rebalance staffing or adjust ULD staging rules.
-
Connection Integrity Rate
- Definition: % of shipments that meet minimum connection time between flights.
- Numerator: transfer event occurs with sufficient buffer.
- Denominator: shipments requiring transfer.
- Action: if low, revise connection policies and prioritize high-risk lanes.
-
Customs Release Lead Time Compliance
- Definition: % of shipments released within the planned customs window.
- Numerator: customs release timestamp within window.
- Denominator: shipments with a customs plan.
- Action: if low, improve document completeness checks before pre-arrival.
-
Delivery Promise Attainment
- Definition: % delivered by the customer promise time.
- Numerator: delivery timestamp ≤ promise time.
- Denominator: shipments with a promise.
- Action: if low, review last-mile appointment scheduling and exception handling.
-
Exception Aging
- Definition: % of shipments with unresolved exceptions beyond defined thresholds.
- Numerator: shipments where exception age > threshold.
- Denominator: shipments with exceptions.
- Action: if aging grows, enforce escalation rules and assign owners.
Step 3: Build the Dashboard Layout with Decision Zones
A practical layout uses three zones: Status, Risk, and Action.
- Status zone shows counts by milestone (e.g., “At screening: 312”).
- Risk zone highlights shipments likely to miss the next cutoff using time remaining.
- Action zone lists the top exceptions with owners and next steps.
Example: If “Build Up Completion On Time” drops for a specific ULD type, the risk zone should filter to that ULD type and the action zone should show shipments missing the build-up start scan.
Step 4: Add a Simple KPI Mind Map
Shipment Control Dashboard Mind Map
Step 5: Example KPI Calculations with One Shipment Set
Assume a cutoff for airport acceptance is 2026-03-15 18:00 (use the agreed cutoff from the lane plan).
- Shipment A: accepted at 17:42 → counts in On-Time Acceptance Rate numerator.
- Shipment B: accepted at 18:09 → counts in denominator but not numerator.
- If 40 shipments were scheduled and 37 were accepted by 18:00, then On-Time Acceptance Rate = 37/40 = 92.5%.
Now connect it to action: if the dashboard shows 92.5% overall but only 80% for one terminal, the action zone should route the issue to terminal-specific drayage appointment compliance rather than changing the whole network plan.
Step 6: Define Data Quality Checks So KPIs Don’t Lie
Two checks keep the dashboard trustworthy.
- Milestone mapping check: every event must map to exactly one milestone; otherwise, you’ll double-count progress.
- Missing event handling: if “Loaded on aircraft” is missing but “Arrived” exists, flag it as a data gap and exclude it from connection KPIs until resolved.
When these checks are in place, the dashboard becomes a control tool rather than a reporting mirror. It tells the team what is happening, what is at risk, and which exceptions need attention now.
10. Information Systems and Data Integration for Air Cargo Operations
10.1 System Landscape Including TMS WMS OMS and Airline Interfaces
Air cargo operations run on a chain of systems that each answer a different question: what to move, where it is, what it should look like on paper, and what the airline will accept. A clean system landscape prevents the classic problem where everyone has “the latest status,” but none of it matches the physical shipment.
Core Systems and Their Responsibilities
TMS (Transportation Management System) plans and executes movement. It decides which truck pickup windows to use, which airport cutoffs apply, and how to allocate capacity across lanes. A practical example: a shipper books 12 pallets for a next-day flight; the TMS checks whether the pickup appointment and drayage time can reach the airport before the airline’s acceptance cutoff.
WMS (Warehouse Management System) runs the building and flow inside facilities. It controls receiving, staging, ULD build-up support, labeling, and dispatch. Example: when inbound pallets arrive, the WMS assigns them to a staging zone based on flight number and priority, then prints ULD labels that match the build plan.
OMS (Order Management System) governs customer-facing commitments and order state. It tracks what the customer asked for, what service level applies, and what exceptions are allowed. Example: if a customer order requires temperature control, the OMS ensures the order cannot move to a non-compliant warehouse zone without a recorded exception.
Together, these systems should share a common shipment identity so that a pallet scan in the warehouse can be traced back to the correct order and the correct transport plan.
Airline Interfaces and Event Feedback
Airlines and their partners provide operational events and acceptance outcomes through interfaces. These typically include: flight schedule references, acceptance confirmations, build-up acceptance, and milestone updates such as “loaded,” “departed,” and “arrived.”
A useful way to think about interfaces is as two directions of truth:
- Outbound from your side: booking details, shipment identifiers, ULD build-up data, and any required handling instructions.
- Inbound to your side: what the airline actually did with the shipment and when.
Example: your WMS dispatches ULDs to the airline with a manifest reference. If the airline interface reports “not accepted” for one ULD, your OMS should mark the related order line as exception, and your TMS should trigger a re-planning workflow rather than waiting for manual investigation.
Data Objects That Must Stay Consistent
Most integration failures come from inconsistent identifiers or mismatched data granularity. The landscape should define the “unit of work” at each layer:
- Order: customer commitment and service attributes.
- Shipment: the logistics unit that moves through the network.
- Piece or pallet: the physical items scanned in the warehouse.
- ULD or container: the airline-facing consolidation unit.
- Flight leg: the transport segment that drives time commitments.
Example: if a piece is scanned into a ULD in the WMS, the OMS should still show the order line as in-progress, and the TMS should show the shipment as tendered to the correct flight leg. If any of these links break, reporting becomes unreliable.
Integration Patterns That Keep Operations Coherent
A stable landscape uses predictable integration patterns rather than ad-hoc file drops.
- Event-driven updates: warehouse scans and airline milestones update shipment state immediately.
- Reference-data synchronization: locations, service codes, and cutoff calendars align across systems.
- Transactional handoffs: when a shipment is tendered, the receiving system confirms acceptance.
Example End-to-End Flow with System Touchpoints
On 2026-03-15, a forwarder creates an order in the OMS for a time-critical shipment. The OMS records the service level and handling requirements. The TMS converts the order into a shipment plan, selecting the airport pickup window and the flight leg that meets the cutoff.
At the warehouse, the WMS receives the pallets, scans each piece, and assigns them to a staging zone tied to the ULD build plan. When build-up is complete, the WMS generates ULD identifiers and dispatches them to the airline interface with the manifest reference.
The airline interface returns acceptance results. If the airline accepts the ULD, the OMS updates the order line to “in transit,” and the TMS marks the shipment as tendered for the correct flight leg. If one ULD is rejected, the OMS flags the exception, and the TMS re-plans the remaining pieces to the next feasible flight while preserving the original service constraints.
This flow works because each system owns the decisions it can reliably make, while shared identifiers and event feedback keep the operational story consistent from dock door to aircraft.
10.2 Data Standards for Shipment Messages Including Status Updates and Manifests
Air cargo moves fast, but the message flow has to be even faster. Data standards are the rules that make “the same shipment” mean the same thing across a shipper system, a forwarder, a warehouse, an airline, and a customs broker. Without shared standards, teams end up reconciling by guesswork—usually at the worst possible moment.
Foundational Concepts for Shipment Message Consistency
A shipment message standard typically defines four things: the message purpose, the required identifiers, the event timing fields, and the payload structure. Purpose prevents confusion between “we received the cargo” and “we loaded it.” Identifiers prevent mixing up similar shipments. Timing fields make event ordering reliable even when scans arrive late. Payload structure ensures that the same data elements appear in the same places.
Start with the identifiers. In air cargo, the Air Waybill number anchors most lifecycle events. For warehouse and handling operations, ULD identifiers (like ULD type and serial) and piece-level references (where available) help connect physical movement to system updates. A good standard also specifies which identifier is authoritative for each event type.
Status Update Message Types and Event Semantics
Status updates should be event-driven, not status-driven. That means each message corresponds to a specific operational event with a clear “what happened” meaning.
Common event categories include:
- Acceptance: cargo received from the shipper or pickup agent.
- Screening: cargo cleared through security screening.
- Build Up: cargo loaded into ULDs and positioned for dispatch.
- Airport Handoff: ULDs transferred to airline custody.
- In Flight: departure and arrival events.
- Break Down: ULDs opened for onward distribution.
- Delivery: cargo released to the consignee or final carrier.
Each event message should carry: the shipment identifier, the event code, the event timestamp, the location code, and the responsible party code. If any of these are missing, downstream systems can still store the message, but they cannot reliably drive workflow.
Manifest Message Structure and Its Role in Planning
Manifests are the “batch view” of what is supposed to move on a flight or through a handling process. A manifest standard typically includes: shipment references, piece or ULD references, routing details, and the carrier flight identifiers.
The key integration point is that manifests must match status updates. If a shipment appears in a manifest but never receives an acceptance or build-up status, the exception logic should be able to flag it as missing. Conversely, if status updates show cargo loaded but the manifest lacks it, the system should treat it as an integrity issue rather than silently accepting the mismatch.
Data Element Standards for Identifiers, Locations, and Time
To keep messages consistent, standards should define formats and allowed values:
- Identifiers: fixed-length rules where applicable, and explicit field names for AWB, ULD, and piece references.
- Locations: standardized airport and facility codes so “JFK” is never mixed with a free-text terminal name.
- Time: a single timestamp standard, including timezone handling rules. A practical rule is to store both the event time and the message creation time, because late-arriving scans are normal.
A simple example: a warehouse scan at 2026-03-12 22:41 local time might be transmitted at 22:49. If the standard only stores “received time,” the event ordering can flip during reconciliation.
Validation Rules and Error Handling
Standards should specify validation behavior. For example:
- Reject messages missing the shipment identifier.
- Accept messages with optional fields missing, but mark them as incomplete.
- Enforce event code validity per lifecycle stage.
Error handling should be deterministic. If an event arrives out of order, the system should store it with its event timestamp and apply ordering rules rather than overwriting history.
Mind Map: Shipment Message Standards
Example Status Update and Manifest Matching
Example 1: Status update for build up
- Shipment: AWB 123-45678901
- Event: BUILD_UP
- ULD: ULD type LD3, serial 9H-AB12
- Location: LAX
- Event time: 2026-03-12 22:41 America/Los_Angeles
- Message time: 2026-03-12 22:49 America/Los_Angeles
Example 2: Manifest line for the same movement
- Flight: UA 100
- Date: 2026-03-12
- Shipment reference: AWB 123-45678901
- ULD reference: LD3 9H-AB12
If the manifest includes the ULD but the build-up status never arrives, the receiving system should flag “manifest present, status missing.” If the build-up status arrives for a ULD not listed on the manifest, it should flag “status present, manifest mismatch.” Either way, the standard enables consistent, explainable exceptions.
Practical Implementation Notes for Message Governance
A workable approach is to treat the standard as a contract: define message schemas, enforce validation at ingestion, and keep a mapping layer for legacy fields. When teams do this, they stop arguing about what a field “means” and start fixing the specific missing or malformed data element that caused the exception.
10.3 Master Data Management Including Customer Product and Location Codes
Master data management (MDM) for air cargo is mostly about preventing “same name, different thing” problems. When customer, product, and location codes are inconsistent across TMS, WMS, airline interfaces, and customs systems, the operational impact shows up as wrong routing, missed screening flags, or shipments that cannot be reconciled. The goal is simple: one agreed meaning per code, used everywhere.
Foundational Concepts and Why Codes Fail
A code is not the data; it is the key that points to data with a defined meaning. For example, a customer code might map to a legal entity, billing terms, and special handling instructions. A product code might map to temperature requirements, DG status, and packaging rules. A location code might map to an airport, warehouse, or delivery point with address and operational constraints.
Codes fail when teams create them independently. Typical failure modes include:
- Duplicate codes for different entities (two “ABC” customers).
- Same code used for different meanings (a location code that sometimes means warehouse and sometimes means airport).
- Format drift (leading zeros dropped in one system).
- Missing mappings (a code exists in one interface but not in another).
MDM addresses these by defining ownership, standards, validation rules, and controlled change.
Customer Codes and Product Codes
Customer master data should capture at least: legal entity identity, shipper/consignee roles, billing party, and any handling constraints that affect acceptance or delivery. In practice, you often need multiple roles for the same company. A manufacturer may be the shipper, while a logistics provider is the billing party.
Product master data should capture: commodity description, packaging type, temperature band, shelf-life handling notes, and regulatory flags such as DG category or special documentation requirements. The key is that the product code must drive operational decisions, not just labels.
Easy example: A pharmaceutical shipment arrives with a product code “PHARMA-2C.” If that code maps to “2–8°C, requires temperature scan at receiving,” then warehouse receiving can enforce the scan and hold logic. If the mapping is missing, the shipment may still move, but the audit trail will be incomplete.
Location Codes for Aviation Warehousing and International Moves
Location codes should represent operationally meaningful places: airport cargo terminals, ULD build-up areas, bonded warehouses, and delivery zones. Each location should include address, time zone, cut-off behavior, and which systems treat it as a screening or custody checkpoint.
Easy example: “LHR-CARGO” might be an airport terminal with screening and build-up rules. “LHR-WH1” might be a bonded warehouse inside the same airport boundary but with different receiving windows. If both share one code, the system cannot correctly determine whether a shipment should be staged for screening or staged for bonded release.
Data Model and Governance Rules
A practical MDM data model uses three layers:
- Code registry: the code and its type (customer, product, location).
- Master record: the attributes that define meaning.
- Mappings: how external codes from customers, airlines, or customs systems map to internal codes.
Governance rules keep the registry clean:
- One owner per code type with approval workflow.
- Validation at entry time: format, length, allowed characters, and mandatory attributes.
- Referential integrity: shipments cannot reference inactive or unmapped codes.
- Change control: versioning for product handling rules so historical shipments remain interpretable.
Mind Map: Master Data Management Scope
Example: From Incoming Order to Correct Warehouse Behavior
Consider an order created by a shipper system that uses external codes: customer “CUST-77,” product “MED-2C,” and location “HEATHROW-TERM.” The integration layer maps these to internal codes: customer “CU-00077,” product “PR-2C-MED,” and location “LOC-LHR-CARGO.”
At receiving, the warehouse system reads PR-2C-MED and enforces:
- Temperature scan at intake.
- Storage zone selection for 2–8°C.
- Mandatory hold if scans are missing.
At dispatch, the system reads LOC-LHR-CARGO and applies:
- Correct receiving window.
- Correct cutoff timing for build-up.
- Correct custody checkpoint for reconciliation.
If the mapping for MED-2C were wrong and pointed to a room-temperature product code, the system might still accept the shipment but would fail the temperature compliance checks later. MDM prevents that by making mappings explicit and validated.
Practical Validation Checklist
Use a short checklist during onboarding and ongoing maintenance:
- Customer code format matches the registry standard.
- Product code has complete handling attributes required by your acceptance rules.
- Location code includes time zone and cutoff behavior.
- All external-to-internal mappings exist for every interface in scope.
- Inactive codes cannot be referenced by new shipments.
- Changes to product handling rules are versioned and tied to effective dates.
A good MDM setup makes the “meaning” of a code stable. That stability is what lets operations run on time without relying on tribal knowledge and spreadsheet heroics.
10.4 Integration Patterns for EDI API and File Based Exchanges
Air cargo operations generate events fast: a truck arrives, a ULD is scanned, a flight departs, a customs hold is raised. Integration patterns decide how those events move between TMS, WMS, airline systems, customs brokers, and ground handlers. The goal is not “more data,” but reliable data at the right time, with clear ownership when something goes wrong.
Start with Message Ownership and Timing
Before choosing EDI, APIs, or files, define three things for each data flow: who creates the message, who validates it, and when it must be true. For example, an AWB status update should be created by the party that can observe the event (often the airline or the facility that performs the scan). Validation should happen at the receiving system boundary, not after the data has already been used to release inventory. Timing matters too: a “loaded” event must arrive before cutoff-based dispatch decisions, while a “delivered” event can arrive later as long as proof-of-delivery is captured.
A practical way to keep this straight is to map flows by milestone. For each milestone, list the required fields, the acceptable delay, and the fallback behavior if the message is late. This prevents the common failure mode where everyone sends “something,” but no one can prove which “something” drives operational decisions.
Choose a Pattern by Operational Criticality
Use three integration patterns as your default toolkit.
-
Request-Response File or EDI: Best when the receiver needs a complete dataset and the sender can package it reliably. Example: sending a daily manifest file for a station’s build-up.
-
Event-Driven API: Best when decisions depend on near-real-time events. Example: pushing “ULD released to airline” immediately after the scan so the warehouse can stop staging that unit.
-
Hybrid Orchestration: Best when you need both bulk synchronization and event accuracy. Example: nightly file reconciliation for completeness, plus API events for speed.
A useful rule: if the receiving process can block on missing data, prefer event-driven APIs. If the receiving process can tolerate a batch window, files or EDI are often simpler and cheaper to operate.
File Based Exchanges with Reconciliation Loops
File-based integration works well for bulk transfers, but it needs reconciliation to avoid silent gaps. A typical pattern is “send, acknowledge, reconcile.”
- Send: export a structured file (CSV, XML, or fixed-width) containing shipment identifiers, ULD IDs, and milestone timestamps.
- Acknowledge: receiver returns a receipt indicator (even if business validation fails).
- Reconcile: sender compares expected records to received acknowledgements and logs exceptions.
Example: A warehouse exports a “received into staging” file each hour. The carrier system acknowledges receipt. At end of day, a reconciliation report compares all AWBs that were scanned in the warehouse against those present in the carrier’s staging ledger. Missing records trigger a manual investigation with the scan logs.
EDI Patterns for Standardized Cargo Messages
EDI is strong when both sides agree on message structure and trading partner rules. The key is to treat EDI as a contract: validate fields, enforce code lists, and handle rejects predictably.
Common EDI integration practices include:
- Schema and code validation before sending, so you don’t generate avoidable rejects.
- Reject handling with a clear reason code and a correction workflow.
- Idempotency using unique keys like AWB + event sequence, so retransmissions don’t create duplicates.
Example: An EDI shipment status message is resent after a temporary outage. The receiver uses the unique event key to update the existing record rather than creating a second status line.
API Patterns for Event Delivery and Operational Control
APIs shine when you need immediate updates and controlled retries. Two patterns cover most needs.
- Push Events: the sender posts an event (e.g., “flight departed”). The receiver stores it and triggers downstream actions.
- Pull Queries: the receiver requests the current state for a given shipment when it needs to recover from missed events.
For both, implement retry logic and deduplication. Use a stable event identifier and store processing results so repeated calls don’t re-run business actions.
Example: A ground handler posts “ULD loaded.” The warehouse system receives it and marks the ULD as no longer available for staging. If the API call is retried, the warehouse checks the event identifier and skips the state change.
Hybrid Integration with Clear Boundaries
Hybrid patterns combine speed and completeness.
- API for events: keep operational systems synchronized.
- Files or EDI for reconciliation: ensure no shipment is missing due to temporary connectivity issues.
Example: Hourly API events update live tracking. At midnight, an EDI daily summary is exchanged. If an AWB appears in the daily summary but not in the event ledger, the reconciliation process flags it for investigation using scan timestamps.
Mind Map: Integration Patterns for EDI API and File Based Exchanges
A Worked Example from Warehouse to Carrier
Assume a facility must stop a ULD from being reassigned once it is loaded onto an aircraft.
- The warehouse posts an API event immediately after the “loaded” scan.
- The carrier acknowledges the event and updates its ULD availability.
- If the API call fails, the warehouse retries using the same event identifier.
- At end of day, a file-based reconciliation compares all loaded scans against the carrier’s ledger.
- Any mismatch becomes an exception ticket with scan time, operator ID, and ULD ID.
This approach keeps the live operation accurate while still proving completeness for reporting and audits. It also makes troubleshooting practical: you can trace failures to either the event pipeline or the reconciliation pipeline without guessing.
10.5 Example: Implementation Plan for Connecting Warehouse Scans to Carrier Status
Connecting warehouse scans to carrier status is less about “sending events” and more about making sure every scan becomes a reliable, traceable milestone in the shipment’s life. The goal is simple: when a shipment is built, screened, loaded, and dispatched, the carrier’s tracking view should reflect the same reality your warehouse operators see on the floor.
Step 1: Define the Event Vocabulary and Ownership
Start by agreeing on a small set of event types that both warehouse and carrier systems can recognize. For example:
- Received at Warehouse (warehouse-owned)
- Staged for Build Up (warehouse-owned)
- Loaded to ULD or Cart (warehouse-owned)
- Handed Over to Carrier (joint or carrier-owned)
- Accepted by Airline (carrier-owned)
Assign an owner to each event type. If the warehouse “owns” the scan, it must also control the conditions under which the scan is allowed. This prevents the classic mismatch where a scan exists but the shipment never actually reached the loading point.
Step 2: Map Identifiers End to End
Warehouse scans are only useful if they can be matched to carrier records. Establish the identifier chain:
- AWB number (primary match)
- ULD ID or container number (for build and load events)
- Shipment line or piece count (for reconciliation)
- Location code (warehouse zone and dock)
Example: If your warehouse uses a barcode label that contains AWB plus a piece sequence, store both the AWB and the piece sequence in the event payload. Then, when the carrier later shows “pieces received,” you can reconcile piece-level counts rather than relying on totals.
Step 3: Choose the Integration Pattern and Data Contract
Use one integration pattern for the whole warehouse-to-carrier flow to reduce operational confusion. A common approach is event push from the warehouse system to a middleware layer, which then transforms and forwards to the carrier interface.
Define a data contract for each event type, including:
- event type
- timestamp with timezone
- AWB
- ULD ID (when relevant)
- location code
- operator or system ID
- quantity fields (pieces, weight, or volume) when applicable
- a unique event ID for deduplication
Example: For “Loaded to ULD,” include ULD ID and the total piece count loaded into that ULD at that moment. If a second scan occurs due to a reprint, the event ID lets the carrier ignore duplicates.
Step 4: Implement Scan Control Rules at the Warehouse
Before integration, make scans “correct by design.” Add control rules such as:
- No “Handed Over” scan without a preceding “Loaded to ULD”
- Only allow ULD load scans when the ULD is in the correct zone
- Require dock appointment match for inbound/outbound handover
Example: If a loader scans “Handed Over” at Dock 3, but the ULD is still in the staging bay, the system should block the scan and show a short reason. Operators should not have to guess which scan is acceptable.
Step 5: Build a Reconciliation Loop for Counts and Timing
Warehouse scans can be accurate yet still disagree with carrier status due to timing differences. Create a reconciliation process that runs daily and also supports near-real-time checks.
Reconciliation checks:
- AWB exists in carrier system
- event sequence is valid (no “Accepted by Airline” without “Handed Over”)
- piece counts match within an agreed tolerance
- ULD IDs match for ULD-based events
Example: If the carrier shows “Accepted” but your warehouse never recorded “Handed Over,” treat it as an exception. Investigate whether the handover happened through a manual process or a different dock.
Step 6: Test with a Controlled Shipment Set
Use a small, representative set of shipments to test the full chain. Include:
- normal flow shipments
- shipments with rework (relabeling, re-staging)
- shipments with partial loads
- shipments that miss a cutoff and are rebooked
Example test scenario: A shipment is built into two ULDs. Your warehouse should emit two “Loaded to ULD” events with different ULD IDs and quantities, then emit a single “Handed Over” event only when both ULDs are physically at the handover point.
Step 7: Monitor Event Delivery and Operational Exceptions
Monitoring should cover both technical delivery and business correctness.
Track:
- message delivery success/failure
- deduplication rate
- average delay between warehouse scan time and carrier status update
- exception counts by event type and location
Example: If “Loaded to ULD” updates are delayed only for one zone, the issue is likely local network connectivity or scanner downtime, not the carrier interface.
Mind Map: Warehouse Scan to Carrier Status Implementation
Step 8: Example Implementation Timeline Using a Fixed Cutoff
Assume a warehouse cutoff on 2026-03-15 for a daily dispatch wave. A practical timeline:
- Week 1: finalize event vocabulary, identifier mapping, and data contract
- Week 2: implement scan control rules and event generation in warehouse systems
- Week 3: build middleware transformation and carrier interface routing
- Week 4: run controlled shipment tests and reconciliation checks
- Cutoff Week: enable monitoring dashboards and exception handling playbooks
Example playbook outcome: If an operator triggers a blocked scan due to missing “Loaded to ULD,” the system logs the reason code. During cutoff week, you review the top reason codes and adjust training or dock signage so the same issue doesn’t repeat.
When these steps are followed, warehouse scans stop being “internal proof” and become a consistent, auditable timeline that the carrier status can reflect without guesswork.
11. Performance Measurement, Quality Assurance, and Continuous Improvement
11.1 KPI Framework Including on Time Performance Damage Rate and Dwell Time
A KPI framework for air cargo needs three things: (1) measures that reflect what customers feel, (2) measures that protect assets and compliance, and (3) measures that reveal where time is being spent. For on time performance, damage rate, and dwell time, the trick is to define the “clock,” the “unit,” and the “boundary” so different teams don’t end up arguing about the same shipment like it’s a courtroom drama.
Foundations for KPI Definitions and Boundaries
Start by defining the milestone set. For on time performance, use a consistent sequence such as: pickup accepted, airport cutoff met, build up completed, departure scan, arrival scan, delivery attempt, and delivery confirmation. Then define the service boundary: for example, “on time delivery” may mean delivery confirmation within the promised window at the destination address, not just arrival at the airport.
For damage rate, define what counts as damage. A practical approach is to measure “damage with claim relevance,” meaning the shipment shows physical damage that triggers a documented exception. Decide whether you count by shipment, by piece, or by ULD. Shipment-level is usually easier for cross-party reporting.
For dwell time, define where the clock starts and stops. Dwell time is not “how long cargo exists,” but “how long it waits at a controlled location.” Typical controlled locations include: inbound staging at the warehouse, security screening queue, ULD build up area, and outbound dispatch yard.
On Time Performance KPI
On time performance should be expressed as a percentage of shipments meeting the promised window. A common formula is:
- On Time Performance (%) = (Shipments delivered within promised window ÷ Total delivered shipments) × 100
To keep it actionable, break it into components: airport cutoff adherence, connection success, and last-mile delivery performance. Example: if 92% of shipments arrive on time but only 85% are delivered within window, the gap is likely in the destination warehouse processing or trucking appointment execution.
Example: A medical device shipment promised delivery by 16:00. It arrives at the destination airport at 10:30, but the warehouse scan is delayed until 13:45 due to missing paperwork. The shipment misses the delivery window, so it counts as not on time. The component KPI would also flag “warehouse processing dwell” as a likely driver.
Damage Rate KPI
Damage rate should be normalized so it doesn’t punish higher-volume lanes. A clean definition is:
- Damage Rate (%) = (Shipments with claim-relevant damage ÷ Total shipments handled) × 100
Track damage by category: ULD handling damage, packaging failure, temperature-related spoilage (if applicable), and loading/transport impact. Example: if damage concentrates in one ULD type, you can focus on pallet/liner selection and build up method rather than blaming “carelessness.”
To avoid misleading conclusions, separate “damage detected” from “damage caused.” If damage is discovered after delivery, you still count it, but you should tag the likely stage using exception codes and scan timing.
Dwell Time KPI
Dwell time is best measured as both an average and a distribution. Averages hide the pain of long-tail delays. Use median dwell time for typical performance and a 90th percentile for stress conditions.
Example: Warehouse inbound dwell time is measured from “arrival scan” to “release to sort.” If the median is 45 minutes but the 90th percentile is 180 minutes, you likely have a queueing issue triggered by peak arrivals, staffing mismatch, or screening backlog.
Mind Map: KPI Framework and How Measures Connect
Integrated Example: Turning KPI Results into One Coherent Story
Imagine a week where on time performance drops from 96% to 90%, damage rate rises from 0.12% to 0.25%, and dwell time at destination staging jumps. The integrated read is: dwell time likely increased due to a screening or receiving bottleneck, which then caused tighter build up schedules and rushed handling, raising damage risk. You confirm this by checking exception codes: if most damaged shipments share the same staging-to-sort dwell window and the same handler shift, the “why” is no longer a guess.
Practical KPI Review Rules
Review KPIs with three guardrails. First, verify the milestone scans used in calculations are complete; missing scans can make a shipment look late or early. Second, require exception codes for any not-on-time or damaged shipment so you can link outcomes to process steps. Third, use dwell time distributions to decide whether the issue is systemic (median shifts) or episodic (tail spikes). When those guardrails are followed, the KPI set stops being a scoreboard and becomes a map of where operations actually slowed down.
11.2 Root Cause Analysis Methods for Missed Cutoffs and Misrouted Cargo
Missed cutoffs and misrouted cargo usually share a simple pattern: the shipment’s “state” in the system diverges from its “state” in the physical world. Root cause analysis (RCA) works best when you treat that divergence as measurable, then trace it back to decisions, handoffs, and data.
Start with the Event Timeline and Define the Failure
Begin by writing a timeline using three clocks: (1) the customer promise time, (2) the operational cutoff time(s), and (3) the actual scan or handoff times. For missed cutoffs, the failure is typically “cargo arrived after the acceptance window” or “cargo was not built into the correct ULD/flight.” For misrouting, the failure is “cargo moved to the wrong lane, facility, or flight.”
Example: A shipment promised delivery by 12:00. The acceptance cutoff at the origin warehouse was 18:00. The last scan before cutoff occurred at 18:12, and the next scan appeared at a different airport sorting facility. That single timeline already suggests two possible root causes: late physical arrival, or early arrival but incorrect staging location.
Use a Structured RCA Approach That Fits Air Cargo Reality
A practical RCA method for air cargo has four steps.
- Confirm the facts: collect AWB, ULD/container IDs, scan events, flight numbers, cutoff schedules, and exception logs.
- Classify the failure mode: missed cutoff vs misroute vs both.
- Trace the decision chain: who decided what, when, and based on which data.
- Validate with evidence: show which assumption breaks when you compare system records to physical handling.
This avoids the common trap of stopping at “people were late” or “systems failed.” Those are symptoms, not causes.
Mind Map: Root Cause Categories
Root Cause Analysis Mind Map
Apply the “5 Whys” Carefully with Evidence
Use 5 Whys, but each “why” must be answerable with a document, scan, or recorded decision.
Example: Misroute to the wrong airport.
- Why 1: Cargo was loaded on the wrong flight. (Evidence: ULD build record)
- Why 2: It was sorted to the wrong outbound lane. (Evidence: sort location scan)
- Why 3: The lane assignment in the system was incorrect. (Evidence: shipment message shows wrong routing)
- Why 4: The routing instruction came from a manual override. (Evidence: exception log)
- Why 5: The override used an outdated lane code. (Evidence: timestamped lane master change)
Notice how the final “why” points to a controllable mechanism: master data governance and override verification.
Use a Fishbone Map to Separate Process, People, Data, and Equipment
For air cargo, a fishbone is most useful when you anchor each bone to a specific handoff.
- Process: Is there a verification step between “staging” and “ULD build”?
- People: Were roles clear during peak volume, or did one person cover two steps?
- Data: Did the system show the correct flight assignment at the moment of sorting?
- Equipment: Did barcode scanners or label printers fail, causing manual entry?
Example: If scanners were offline, manual entry might have introduced a lane code typo. If scanners were online, the issue likely sits in the routing data or the sort rule configuration.
Validate Root Causes with a Counterfactual Check
After proposing a root cause, run a counterfactual: “If this cause were fixed, would the failure still happen?”
Example: Suppose you blame “late truck.” If the cargo arrived at 17:30 (before cutoff) but still missed the cutoff, then late truck cannot be the primary cause. The counterfactual forces you to match cause to observed timing.
Turn Findings into Specific Corrective Actions
Corrective actions should map to the failure mode.
- For missed cutoffs due to late arrival: tighten appointment confirmation and add a pre-cutoff escalation trigger when pickup is late.
- For missed cutoffs due to processing delays: add a scan-driven staging rule that prevents cargo from sitting unbuilt past a threshold.
- For misroutes due to identification issues: require a second verification at ULD build using ULD ID plus AWB.
- For misroutes due to data errors: implement a controlled review for manual overrides and ensure master data changes are versioned.
Example: A facility introduces a “two-scan gate” at ULD build: first scan AWB, then scan ULD ID. If either mismatches the expected build record, the shipment is held for reconciliation. This directly targets the handoff where misroutes enter the physical flow.
Document the RCA Output So It Can Be Used Next Time
A good RCA record includes: the timeline, failure classification, evidence list, root cause statement, and corrective actions with owners and verification steps. Keep it factual and short enough that an operator can read it during a shift without needing a coffee break.
11.3 Quality Control Procedures Including Reconciliation and Audit Sampling
Quality control in air cargo is less about “catching mistakes at the end” and more about proving that the system you built actually matches what physically moved. The core idea is simple: every operational claim—what arrived, what was screened, what was built into ULDs, what left the airport, and what was delivered—must be reconcilable across at least two independent records.
Foundational Concepts for Reconciliation
Start with three definitions that keep teams aligned:
- Event record: a time-stamped system entry (scan, status message, gate movement, delivery confirmation).
- Inventory record: a quantity and location view (ULD contents, warehouse stock, manifest lines).
- Control record: the “who checked what” evidence (exception logs, supervisor sign-off, audit sampling sheets).
A reconciliation is the act of matching event records to inventory records and confirming that control records exist for any mismatches. If you only compare event-to-event, you can still miss a wrong quantity inside a correct-looking timeline.
Reconciliation Workflow That Works in Real Operations
A practical workflow moves in layers so you can stop early when everything is clean:
- Scope the reconciliation: choose a unit of work such as a shift, a flight number, a ULD ID range, or a specific cutoff window. Example: “All ULDs built for Flight XY123 between 18:00 and 19:30.”
- Select the comparison pairs: for each shipment line, compare warehouse dispatch scan vs. airline acceptance scan; compare ULD build list vs. ULD load manifest; compare delivery scan vs. POD confirmation.
- Define match rules: allow exact matches for AWB number and piece count; allow controlled tolerance for timestamps (for example, within 30 minutes) but never for quantities.
- Classify discrepancies:
- Missing record: one system lacks an event.
- Quantity mismatch: piece count differs.
- Wrong association: AWB appears in the wrong ULD or manifest line.
- Timing anomaly: events occur in an impossible order.
- Resolve with evidence: use physical checks (ULD seal verification, label inspection, scale tickets) and system checks (scan logs, operator IDs, handheld device history).
- Close the loop: update the exception log with root cause category and corrective action, then confirm downstream systems are corrected.
A small example: a shipment shows 10 pieces in the warehouse dispatch scan, but the ULD build list shows 9. The resolution is not “adjust the count.” First, verify whether one piece was staged but not scanned, then check whether it was re-labeled or diverted to a different ULD. Only after evidence is found should the inventory record be corrected.
Audit Sampling That Balances Coverage and Effort
Audit sampling should be risk-based, not random for the sake of randomness. Use three inputs:
- Risk factors: dangerous goods, temperature-sensitive items, high-value lanes, new staff, and shipments near cutoffs.
- Process criticality: steps with high impact on service failure such as ULD build, screening release, and delivery confirmation.
- Historical performance: locations or teams with recurring discrepancies.
A simple sampling plan for a weekly audit:
- 70% of samples from high-risk categories.
- 20% from medium-risk categories.
- 10% from low-risk categories to detect “quiet” failures.
Within each category, sample by unit of work rather than by AWB alone. Example: choose 12 ULDs built during the busiest hour, then inspect all shipment lines inside those ULDs for reconciliation completeness.
Mind Map: Reconciliation and Audit Sampling
Example: Reconciliation and Sampling in One Cycle
Assume a warehouse dispatch window for international cargo on 2026-03-15. The team selects a reconciliation scope of “all ULDs built for two outbound flights.” They run match rules that require exact AWB and piece count alignment between dispatch scans and ULD build lists.
During reconciliation, they find two discrepancy types:
- One ULD has a missing acceptance event in the airline system.
- Another ULD has a piece count mismatch on a single AWB.
They then apply audit sampling to validate resolution quality. For the missing acceptance event, the audit checks whether the ULD seal was recorded and whether the handheld scan logs show a successful handover. For the piece count mismatch, the audit verifies whether the physical count matches the corrected inventory record and whether the operator who performed the correction is documented in the control record.
The cycle ends only when both discrepancies are closed with evidence and the reconciliation report shows no unresolved exceptions for the scoped unit of work.
Control Points That Prevent Recurring Failures
To keep reconciliation from becoming a recurring cleanup job, set control points where errors are most likely to originate:
- Before ULD build: confirm label integrity and piece count at staging.
- During ULD build: require scan-by-piece or scan-by-label with operator verification for high-risk shipments.
- At release: reconcile screening release status to the load manifest before dispatch.
- At delivery: ensure POD completeness and match delivery scans to the correct AWB line.
When these control points are enforced, reconciliation becomes faster because the system already behaves like it should. And when it doesn’t, audit sampling gives you a disciplined way to find why—without guessing.
11.4 Process Documentation Including SOPs SLAs and Work Instructions
Process documentation is the practical glue between “what we promise” and “what we do.” In air cargo operations, that glue must survive shift changes, peak days, and the occasional shipment that arrives with the wrong label and the right urgency.
Foundations of Process Documentation
Start with a simple hierarchy: SOPs define the end-to-end process, SLAs define the service commitments and remedies, and Work Instructions define the exact steps for a specific role or station. When these layers are written separately, teams can update one without breaking the others.
A useful rule: if a document can’t be used to train a new operator within a week, it’s probably missing either decision points or acceptance criteria.
Standard Operating Procedures
An SOP should answer five questions: purpose, scope, triggers, roles, and outputs. For example, an SOP for “Build Up Cutoff Management” should specify the trigger (e.g., cutoff time reached or last truck check-in), the roles (warehouse supervisor, loader, security liaison), and the output (ULDs released to ramp with scan confirmation).
Include decision logic. If a shipment misses cutoff, the SOP must state what happens next: quarantine location, exception code, and who authorizes rework or rebooking. This prevents “everyone thought someone else handled it.”
Service Level Agreements
SLAs translate operational reality into measurable commitments. A strong SLA includes: metric definition, measurement method, reporting cadence, and remedies.
Example SLA metrics for air cargo:
- On-time acceptance: percentage of shipments accepted within the agreed pickup-to-check-in window.
- On-time build up: percentage of ULDs released by the ramp cutoff.
- On-time delivery: percentage delivered within the destination window.
To keep measurement honest, define the clock start and stop points. If one team measures from “first scan” and another measures from “truck arrival,” you’ll get two different truths.
Work Instructions
Work Instructions are the “hands-on” layer. They should be role-specific and station-specific, such as “Loader work instruction for ULD build up at Bay 3.” Each instruction should list required tools, step order, scan points, and quality checks.
A good work instruction includes:
- Inputs: what documents or data must be present (AWB, ULD ID, DG flag).
- Steps: numbered actions with scan confirmations.
- Checks: what must be verified before release.
- Exceptions: what to do when something doesn’t match.
Example: “Scan ULD ID before loading” is not enough. Add the acceptance check: the ULD ID must match the manifest line and the build-up plan for that flight.
Integrated Documentation Workflow
Keep SOPs, SLAs, and work instructions aligned through a single process map and a controlled change method.
Process Documentation Mind Map
Example: Build Up and Cutoff Execution
Assume a warehouse commits to on-time build up in the SLA. The SOP defines the process: receive, stage, sort, build ULDs, secure, and release. The work instruction defines the loader’s actions.
Concrete alignment example:
- SLA metric: ULD released by 20:00 local time, measured by “ULD release scan.”
- SOP exception rule: if a shipment is missing from the manifest by 19:30, it goes to “manifest discrepancy” and is not loaded.
- Work instruction step: at 19:25, the loader checks the discrepancy queue; any item without a matching manifest line is scanned to exception and moved to quarantine.
This chain ensures the SLA is measurable, the SOP prevents incorrect loading, and the work instruction makes the prevention repeatable.
Governance and Quality Assurance
Documentation only works if it’s maintained. Use document control with versioning, effective dates, and approval roles. For training, require sign-off tied to competency checks, not just reading.
Audit sampling should verify both compliance and evidence. Compliance asks, “Did they follow the steps?” Evidence asks, “Can we show it through scans, timestamps, and exception codes?”
A practical audit checklist for cutoff execution:
- ULD release scans exist for all released ULDs.
- Exception queue contains only items meeting SOP discrepancy criteria.
- DG and security flags match the work instruction checks.
- Any rework has an authorized exception code.
Example: Work Instruction Template
Work Instruction: Loader ULD Build Up at Bay 3
Version: 3.1 Effective: 2026-03-15

Inputs
1. ULD ID and build-up plan for flight
2. Manifest lines for the ULD

Steps
1. Scan ULD ID at start of build
2. Verify ULD type matches plan
3. For each shipment line
   a. Scan shipment identifier
   b. Confirm manifest match
   c. Load and secure
4. Scan ULD release confirmation

Quality Checks
- No shipment loaded without manifest match
- DG and security flags verified

Exceptions
- If no manifest match: scan to discrepancy queue and quarantine
- If ULD mismatch: stop build and notify supervisor
Closing the Loop
When SOPs, SLAs, and work instructions are written as one system, operators know what to do, supervisors know how to measure it, and auditors know what proof should exist. That’s the difference between documentation that lives on paper and documentation that survives real operations.
11.5 Practical Example: KPI Review Meeting Agenda and Corrective Action Tracking
A KPI review meeting works best when it is treated like a controlled workflow: observe, explain, decide, assign, verify. The goal is not to “talk about numbers,” but to convert each KPI gap into a specific operational change with a measurable outcome.
Meeting Setup and Inputs
Bring a one-page KPI pack plus the operational evidence behind the worst variances. For example, include: on-time departure rate by cutoff window, dwell time by warehouse zone, damage rate by handling step, and exception counts by event type (missed cutoff, security hold, misroute, document hold). If the pack shows a problem, the meeting should already have the likely locations where it happened.
Agenda from Basics to Fixes
-
Open With Scope and Rules
- Confirm the time window (e.g., last business week ending 2024-03-15).
- State the decision rule: every material KPI miss must end with either a corrective action, a documented reason it is not actionable, or a data-quality check.
-
Review KPI Results and Variance Ranking
- Start with the top 3 misses by impact on service level.
- Example: On-time delivery dropped from 96% to 91% on a specific lane. The meeting should immediately note whether the decline is driven by airport handoff delays, warehouse dwell, or last-mile clearance.
-
Explain the “Where” Using Event Evidence
- For each KPI miss, map the variance to event milestones.
- Example: Dwell time increased in Zone B during build-up. Scans show a backlog after ULD staging, while outbound loading scans remained normal. That points to a staging bottleneck rather than a loading capacity issue.
-
Identify the “Why” With Root Cause Checks
- Use a short checklist to avoid vague causes:
- Process: Was the step performed as designed?
- People: Were roles and coverage adequate?
- Equipment: Were scanners, conveyors, or ULD handling tools available?
- Data: Are timestamps consistent and complete?
- Constraints: Did cutoff changes or staffing shifts occur?
- Example: Damage rate rose only for shipments that entered through one receiving bay. That suggests a handling method mismatch at that bay, not a general training issue.
- Use a short checklist to avoid vague causes:
-
Decide Corrective Actions With Clear Ownership
- Each action must include: what changes, who owns it, when it starts, how it will be verified, and what KPI it targets.
- Example: If missed cutoffs are caused by late truck arrivals, assign a dispatcher to tighten appointment confirmation and add a pre-cutoff alert triggered by yard gate scans.
-
Track Actions and Verify Outcomes
- Close the meeting by reviewing the action register and setting verification dates.
- Example: For the Zone B dwell issue, verify next week’s Zone B dwell distribution and the proportion of shipments that reach build-up within the target window.
Mind Map: KPI Review and Corrective Action Flow
Example Action Register and Tracking Logic
Use a simple register so actions do not disappear into meeting notes.
Action Register Example

1) Issue: Missed cutoff on Lane A
   Root cause: Truck arrivals late for pre-alert window
   Action: Confirm appointments 2 hours earlier; trigger alert on gate scan
   Owner: Dispatch lead
   Start: 2024-03-16
   Verify: Cutoff acceptance rate and exception count next week

2) Issue: Zone B dwell increased
   Root cause: ULD staging backlog after receiving
   Action: Rebalance staffing during build-up; add staging capacity check
   Owner: Warehouse supervisor
   Start: 2024-03-16
   Verify: Median Zone B dwell and build-up completion within target

3) Issue: Damage rate spike at receiving bay 2
   Root cause: Handling method mismatch
   Action: Standardize palletization and bay-specific SOP refresh
   Owner: Quality lead
   Start: 2024-03-16
   Verify: Damage rate by receiving bay and audit pass rate
Practical Tips That Keep the Meeting Useful
- If a KPI miss has no event evidence, treat it as a data-quality task first.
- Keep actions small enough to verify within one review cycle.
- Require one measurable verification method per action; “we think it will help” is not a metric.
A well-run KPI meeting ends with fewer surprises next week, because each variance has been converted into a concrete operational change and a verification plan.
12. Contracting, Risk Management, and Operational Governance
12.1 Contract Structures for Carriers Forwarders and Ground Handling Services
Contract Structures for Carriers, Forwarders, and Ground Handling Services
Air cargo contracts are the practical glue between “we will move it” and “we moved it on time, intact, and correctly documented.” The structure you choose determines who owns each risk, who pays when things go wrong, and how quickly disputes can be resolved.
Foundational Contract Roles and Responsibilities
Start by mapping responsibilities to operational moments.
- Shipper: provides accurate commodity data, packaging compliance, and timely tendering.
- Forwarder: coordinates end-to-end movement, manages documentation, and interfaces with carriers and ground handlers.
- Carrier: provides air transport capacity and flight execution, plus airline-specific handling requirements.
- Ground handler: performs airport-side receiving, build up, screening support, loading, and sometimes delivery to the next party.
A useful rule: each operational step should have a single accountable party, even if multiple parties physically touch the cargo.
Contract Types and How They Fit Air Cargo
Most air cargo relationships fall into a few contract patterns.
- Master Service Agreement with Schedules: a stable framework with lane-specific rate and service schedules. This reduces renegotiation every time a lane changes.
- Spot or Transactional Agreements: used for one-off moves, often with simplified terms and tighter acceptance windows.
- Framework with Call-Off Orders: common when volume is steady but shipment timing varies.
For time-critical networks, the master framework should define the “rules of engagement,” while schedules define the “where and when.”
Commercial Terms That Matter in Practice
Contracts become real through the commercial clauses that control money and behavior.
- Rates and Accessorials: define what is included (e.g., standard handling) and what is charged separately (e.g., special storage, rework, extra scans).
- Service Levels: specify measurable outcomes such as acceptance cutoff compliance, build up completion time, and delivery commitment.
- Payment Terms: align invoice timing with scan events or POD milestones to avoid “invoice before proof” disputes.
- Claims and Liability: set procedures for damage, loss, and delay, including evidence requirements and time limits.
A small but important detail: define the unit of measure for performance. “On time” should be tied to a milestone like “loaded by X cutoff” rather than a vague “arrived quickly.”
Operational Terms and Interface Control
Time-critical operations fail at handoffs, so contracts must specify interfaces.
- Cutoff Responsibilities: who confirms cargo is accepted, who updates status, and who bears the cost of missing the cutoff.
- Exception Handling: define who is notified first, what information must be included, and how long the receiving party has to act.
- Documentation Ownership: clarify who validates AWB data, who corrects errors, and how corrections are communicated.
- Scan and Event Requirements: require minimum scan points so both sides can reconcile what happened.
If you want fewer arguments, require both parties to agree on the event list used for reconciliation.
Risk Allocation and Incentives
Risk allocation should match control.
- Carrier risk: flight execution, aircraft availability, and airline handling constraints.
- Ground handler risk: airport-side execution, staging accuracy, and loading readiness.
- Forwarder risk: coordination accuracy, documentation correctness, and tendering discipline.
Incentives can be simple: for example, a bonus for meeting a defined cutoff compliance rate, paired with a credit when the same metric misses due to the responsible party.
Example Contract Clause Set for a Time-Critical Lane
Below is a practical clause structure you can adapt.
1. Service Scope
- Airport handling: receiving, build up, loading support, and scan events.
- Included accessorials: standard ULD handling and routine staging.

2. Performance Milestones
- Acceptance cutoff: cargo accepted by 18:00 local time.
- Build up completion: ULD ready by 19:00 local time.
- Status updates: scan events transmitted within 30 minutes.

3. Exceptions
- If cargo misses cutoff, handler notifies forwarder within 15 minutes.
- Forwarder decides rebooking or reroute within 2 hours of notification.

4. Claims Process
- Damage/loss notice within 7 days of delivery.
- Evidence: scan logs, ULD ID, photos if available.

5. Billing
- Base handling billed per shipment.
- Accessorials billed per occurrence with defined rate card.
Mind Map of Contract Structure and Flow
Mind Map: Contract Structures for Air Cargo Partners
Case Example: One Missed Cutoff, Clear Accountability
A pharmaceutical shipment arrives at the airport at 18:07, after the 18:00 acceptance cutoff.
- The ground handler records the acceptance scan at 18:07 and confirms the ULD ID.
- The handler notifies the forwarder within the contract’s 15-minute exception window.
- The forwarder decides whether to rebook the shipment or route it via the next available flight, and updates the shipper.
- Billing applies a defined credit if the miss is due to handler-side staging delays, but not if the miss is due to shipper tendering late.
The contract prevents “everyone says it was someone else” by tying the decision to documented event timing and responsibility rules.
12.2 SLA Design Including Transit Guarantees Cutoff Responsibilities and Remedies
SLA Design Including Transit Guarantees, Cutoff Responsibilities, and Remedies
A good SLA is a contract that behaves like a checklist: it states what “on time” means, who must do what by when, and what happens when reality disagrees. For air cargo, the tricky part is that transit time is not one event; it’s a chain of handoffs across facilities, systems, and people. The SLA must therefore define measurable milestones and assign responsibilities to each handoff.
Transit Guarantees That Are Actually Measurable
Transit guarantees should be expressed as a service level target tied to specific milestones. A common structure is:
- Origin acceptance milestone: when the shipment is accepted for transport (scan or signed acceptance).
- Airport handoff milestone: when the shipment is delivered to the airline or ground handling build-up area.
- Departure and arrival milestones: when the shipment is loaded and when it is received at destination airport.
- Delivery milestone: when the shipment is delivered to the consignee or the agreed receiving point.
Example: A shipper requests “guaranteed 48-hour delivery.” The SLA should specify whether the clock starts at pickup acceptance, at airport handoff, or at airline acceptance. If the SLA starts at pickup acceptance but the carrier’s responsibility begins at airport handoff, you’ve built a dispute machine.
Cutoff Responsibilities That Prevent Last-Minute Chaos
Cutoff times are where operational reality meets contractual language. The SLA should define:
- Cutoff for acceptance at the origin facility (e.g., “accepted by 16:00 local time”).
- Cutoff for build-up (e.g., “available for loading by 17:00”).
- Cutoff for documentation (e.g., “customs-ready documents by 15:30”).
- Cutoff for exceptions (e.g., “if screening or document review is not cleared by 18:00, the shipment is treated as an exception”).
Example: A forwarder delivers a shipment at 15:55 with complete paperwork, but the facility’s acceptance cutoff is 16:00 and the truck is delayed at the gate. The SLA should state whether the shipment is still eligible for the guarantee if the scan occurs at 16:07. If eligibility depends on scan time, the SLA should say so; if eligibility depends on scheduled appointment time, it should say that too.
Remedies That Match the Failure Mode
Remedies should be proportional and tied to the milestone that failed. Instead of one generic penalty, use a remedy matrix:
- Missed cutoff due to carrier/handler: service credit or refund of a portion of transportation charges.
- Missed transit due to misrouting: stronger credit plus a corrective action obligation.
- Delay due to customs hold: no credit for transit guarantee, but defined handling steps and communication timelines.
- Damage or loss: claims process with documentation requirements and time limits.
Example: If a shipment misses the guarantee because it was not loaded on the intended flight, the remedy can include a rebooking obligation plus a credit. If it misses because customs clearance is delayed after documents were submitted on time, the remedy can focus on proactive status updates and escalation rather than transit refunds.
Responsibility Boundaries That Reduce Disputes
The SLA should clearly separate what the provider controls from what the provider coordinates. A practical way is to define:
- Controlled actions: scanning, build-up readiness, loading, handoff to airline, delivery attempt.
- Coordinated actions: requesting customs clearance, arranging drayage, scheduling appointments.
- External dependencies: border agency decisions, airport congestion beyond defined thresholds, security screening outcomes.
Example: If the SLA says “guaranteed delivery unless the airport is congested,” it must define what “congested” means (e.g., a yard capacity indicator or a documented operational constraint) and who measures it.
Mind Map: SLA Design Elements
Example: SLA Clause Logic for a Single Lane
Consider a lane with a daily flight. The SLA can specify:
- Guarantee: delivery within 48 hours measured from origin acceptance scan to delivery confirmation.
- Cutoffs: acceptance by 16:00, build-up by 17:00, customs-ready documents by 15:30.
- Eligibility: if acceptance scan occurs after 16:00 due to provider-controlled delays, the shipment remains eligible; if the delay is due to shipper-controlled pickup issues, it is not.
- Remedies: if the shipment misses the guarantee due to missed loading, the provider must rebook on the next available flight and issue a service credit; if the miss is due to customs hold after documents were accepted by 15:30, the provider must provide status updates every 6 hours and escalate within 2 business hours of a hold reason being issued.
Operational Evidence Requirements
To keep remedies from turning into arguments, the SLA should list what evidence counts: scan timestamps, flight numbers, ULD build-up records, delivery signatures, and exception reason codes. If the SLA defines eligibility and remedies but not evidence, it’s like setting a meeting time without a location.
Escalation Timelines That Match the Clock
Finally, define escalation steps that align with cutoff and transit windows. For example, if a shipment misses a build-up cutoff by a defined margin, escalation should occur before the next flight decision point. This prevents “we’ll look into it later” from becoming the default response.
12.3 Risk Management for Operational Disruptions Including Weather and Congestion
Operational disruptions in air cargo rarely arrive as a single problem. Weather can slow ground movement and screening, while congestion can delay ramp access and create cascading missed cutoffs. Risk management is the practice of preventing those cascades by controlling uncertainty at each handoff: origin pickup, airport acceptance, build up, flight loading, and final delivery.
Foundational Concepts for Disruption Risk
Start with three building blocks.
- Disruption types: weather (snow, thunderstorms, fog), congestion (airport capacity limits, gate shortages, truck yard backlogs), and operational constraints (staffing gaps, equipment downtime). Each type has different lead times and recovery patterns.
- Impact dimensions: schedule adherence (missed cutoffs), service quality (damage, temperature excursions), and compliance (security holds, screening delays). A shipment can be “on time” yet still fail compliance if documentation processing stalls.
- Control points: places where decisions can change outcomes. Examples include cutoff acceptance rules, staging policies, and rebooking authority.
A useful mental model is: risk is uncertainty plus consequence, and consequence depends on where the shipment is in the process.
Weather Disruption Management
Weather risk management begins with early signals and ends with controlled exceptions.
1. Monitoring and lead-time logic
- Use airport-specific forecasts and operational bulletins to estimate when gates, runways, or screening lines will slow.
- Convert forecasts into operational thresholds. Example: if thunderstorms are predicted within a 3-hour window, tighten acceptance windows for shipments that require immediate build up.
2. Preemptive actions at the right moment
- Staging earlier: move time-critical cargo into a ready-to-build zone before the weather window starts.
- Prioritization rules: define which shipments keep their priority when space tightens. Example: a cold-chain shipment with a short temperature tolerance gets staged first, while a non-perishable shipment waits.
- Communication cadence: inform stakeholders at fixed milestones, not every minute. Example: notify the forwarder at “weather watch,” then again at “acceptance cutoff change.”
3. Exception handling without chaos
When weather causes a missed flight, the goal is to preserve options.
- Keep ULDs and cartons traceable in the system so reallocation is fast.
- Use a decision tree: if the next flight has limited capacity, divert to the nearest hub with available build slots.
Congestion Disruption Management
Congestion is often a capacity mismatch between flows and facilities.
1. Identify bottlenecks by process step
Common bottlenecks include:
- Truck yard dwell time before gate entry
- Screening throughput limits
- Ramp access delays
- ULD build-up capacity
Example: if trucks are waiting 90 minutes at the yard, the risk is not only late delivery to the terminal; it is also missed acceptance scans, which can trigger downstream “unknown status” exceptions.
2. Use capacity-aware cutoff policies
Instead of a single static cutoff, apply a dynamic cutoff based on observed throughput.
- Example: if screening lines are running at 70% capacity, extend the acceptance window for shipments that can be staged without blocking build-up space, while tightening the window for shipments requiring special handling.
3. Yard and staging control
- Create a staging plan that separates “arrived but not screened” from “screened and ready.”
- Assign a small set of staging lanes with clear rules to prevent mixing cargo types and causing rework.
Integrated Mind Map of Disruption Risk Controls
Mind Map: Operational Disruptions in Air Cargo
Practical Example: Weather Plus Congestion in One Day
Assume a hub experiences heavy fog in the morning and ramp congestion after midday. The integrated response looks like this:
- Morning fog watch: the terminal shifts cold-chain shipments into the ready-to-build zone before the fog window, while non-critical shipments follow standard staging.
- Acceptance cutoff adjustment: the cutoff for shipments requiring special screening is shortened, because screening throughput is already reduced; shipments that can be staged without immediate screening are accepted later.
- Midday congestion control: yard lanes are reorganized so trucks with screened cargo enter a faster lane, reducing dwell time and preventing “arrived but not scanned” gaps.
- Rebooking decision: when a flight is canceled, the team uses a pre-defined decision tree to allocate cargo to the next available departure based on ULD readiness and handling constraints.
The key is that each action is tied to a control point and a measurable outcome, so the response is consistent even when conditions change.
Execution Checklist for Disruption Readiness
- Define disruption thresholds for cutoff changes.
- Maintain a prioritization matrix by cargo type and tolerance.
- Ensure ULD and carton traceability at every handoff.
- Pre-assign escalation roles for reroute and rebooking approvals.
- Track three operational metrics during disruption: missed cutoff rate, dwell time at the yard/terminal, and rebooking turnaround time.
12.4 Insurance, Liability, and Claims Handling Workflows
Insurance and liability in air cargo are less about paperwork theater and more about timing, evidence, and clear responsibility boundaries. A good workflow starts before the shipment leaves the origin, because claims are won (or lost) on what you can prove.
Foundational Concepts and Responsibility Boundaries
Liability depends on the legal regime and the contract terms. In practice, teams should confirm three things for every shipment: (1) which liability framework applies, (2) who acts as carrier versus agent in each leg, and (3) what the contract says about notice periods and documentation. A simple internal rule helps: if a party touches the cargo, they must also be able to explain what they did, when they did it, and what condition they received and released it in.
Example: A pharma shipment is accepted at 09:10, scanned into a warehouse at 09:45, built into a ULD at 11:20, and loaded at 12:05. If damage is found at destination, the claim package should connect those timestamps to condition checks at each handoff.
Pre-Shipment Controls That Prevent Claims from Becoming Guesswork
Before dispatch, establish a “claim-ready” baseline:
- Cargo condition evidence: photos at acceptance for high-value or fragile items, plus seal numbers for ULDs or containers.
- Packaging and labeling verification: confirm that packaging matches the product risk and that handling marks are visible.
- Special handling instructions: record temperature ranges, orientation requirements, and any DG restrictions.
- Insurance coverage mapping: align declared value, cargo type, and insured party with the policy structure.
Example: A shipment of lithium batteries is accepted with correct markings, but the outer carton is missing one required label. Even if the cargo arrives intact, the missing label becomes a documentation issue that can complicate coverage decisions.
Incident Detection and Immediate Actions
When an issue is detected, the workflow should be fast and consistent:
- Quarantine the cargo to prevent further handling that could change the damage profile.
- Record the condition with time-stamped photos and a short written description.
- Preserve evidence: keep packaging, seals, ULD integrity indicators, and any tamper signs.
- Notify the right parties using the contract’s notice method and timeline.
Example: At delivery, a customer reports a crushed carton. The receiver takes photos, keeps the carton and inner packaging, and notes the seal status before opening. That single sequence often determines whether the claim is treated as damage in transit versus a packaging failure after delivery.
Claims Intake and Triage Workflow
Claims should be triaged to avoid spending effort on cases that lack evidence or fall outside coverage.
- Claim type classification: damage, loss, delay, or documentation discrepancy.
- Event localization: use scans, flight events, and handoff logs to narrow the likely responsible segment.
- Value and scope validation: confirm declared value, quantity, and whether partial loss applies.
- Coverage checks: verify insured interest, exclusions, and whether required procedures were followed.
Example: A delay claim is submitted after a missed delivery appointment. Triage checks whether the shipment was already delayed due to earlier airport congestion and whether the contract limits delay liability for that lane.
Documentation Package and Evidence Standards
A complete claim package typically includes:
- Air waybill and shipment identifiers
- Proof of value (invoice or declared value record)
- Condition evidence (photos, inspection reports, packaging retention)
- Handoff evidence (scan history, ULD/container numbers, seal numbers)
- Communication log (who was notified, when, and how)
- Corrective actions taken (repack, re-label, reroute, or disposal)
Liability Determination and Resolution
Resolution should be structured, not improvised. The workflow should compare evidence against three questions:
- What happened (damage/loss/delay) and when it most likely occurred.
- Who had control at that time, based on handoffs and operational logs.
- Whether exclusions apply (for example, improper packaging, inadequate labeling, or failure to follow special handling instructions).
Example: A claim for water damage is assessed using warehouse humidity logs, receiving inspection notes, and whether the shipment arrived with intact seals. If seals were intact but the outer carton shows signs of poor packaging, the denial rationale should be specific and tied to the evidence.
Claims Handling Example with a Clear Timeline
Assume a shipment accepted on 2026-03-15 and delivered on 2026-03-17. At delivery, one carton is missing and two cartons show corner dents.
- Delivery day: receiver quarantines cartons, photographs dents, records seal numbers, and notes missing carton count.
- Same day: shipper and forwarder are notified per contract method.
- Within the claim window: claim package includes AWB, invoice value, scan history, ULD/container numbers, and photos of packaging retention.
- Triage outcome: missing carton is treated as loss; dents are treated as damage. Event localization points to a break in ULD build-up controls at the origin facility.
- Resolution: settlement covers the missing quantity and repairable damage scope, with a documented process gap note for future ULD build-up checks.
Operational Learning Without Blame Games
After resolution, record what changed in the process. The goal is to reduce repeat issues by updating the exact control that failed: acceptance photo requirements, seal verification steps, ULD build-up checklists, or notification timing.
Example: If dents repeatedly correlate with late ULD build-up, the fix is not “be more careful.” It is to add a scan-based checkpoint that forces a packaging and corner-protection verification before ULD closure.
12.5 Example: Governance Model for Coordinating Multi Party Time Critical Operations
A time-critical air shipment rarely depends on one team. It depends on a chain of decisions: shipper readiness, pickup execution, airport acceptance, screening, build up, flight loading, transfer, and final delivery. A governance model makes those decisions consistent across parties by defining who decides, when they decide, and what evidence they use.
Governance Foundations
Start with three foundational rules.
-
Single operational owner per lane: For each origin–destination lane, assign one operational owner (often the forwarder or a lead logistics provider). That owner runs the daily rhythm, consolidates exceptions, and coordinates rebooking requests.
-
Event-based control points: Instead of managing “hours,” manage events such as “cargo accepted,” “screening complete,” “build up started,” “ULD loaded,” and “outturn scanned.” Each event has an expected time window and a responsible party.
-
Escalation with thresholds: Define escalation triggers using measurable gaps, not feelings. Example thresholds: cutoff missed by 30 minutes, screening not completed by the agreed window, or mismatch between AWB count and ULD count.
Roles and Decision Rights
A workable governance model separates roles into coordination, execution, and assurance.
- Operational Owner: Owns the exception log, calls cross-party huddles, and approves recovery actions (reroute, rebook, split shipment, or hold-and-release).
- Carrier Operations: Owns flight readiness interfaces, loading priorities, and acceptance constraints.
- Ground Handling: Owns physical flow at the airport, ULD build up, and scan discipline.
- Warehouse Operations: Owns receiving accuracy, staging, and readiness for build up.
- Customs Broker: Owns clearance milestones and document completeness checks.
- Security and Compliance: Owns screening outcomes, chain-of-custody records, and release authorization.
Decision rights should be explicit. For example, the ground handler can stop a build up if scan reconciliation fails, but only the operational owner can authorize a split shipment plan that changes how AWB pieces move.
Operating Rhythm and Artifacts
Governance works because it produces repeatable artifacts.
- Daily Lane Plan: A one-page view listing flights, cutoffs, warehouse inbound windows, and expected ULD build up times.
- Exception Log: A shared table with shipment identifiers, current status, responsible party, root cause category, and next action.
- Recovery Playbook: Pre-agreed actions for common failures such as missed pickup, screening hold, or ULD shortage.
- End-of-Day Reconciliation: A closure step that compares AWB counts, ULD counts, and scan events to prevent “invisible” losses.
Mind Map: Governance Model for Multi Party Coordination
Example Workflow: From Normal Operation to Recovery
Assume a shipment of 12 pallets under 3 ULDs needs to connect through an intermediate hub. The lane plan sets a build up start at 18:00 and a final cutoff for ULD loading at 19:15.
-
Normal execution: Warehouse receives pallets by 16:30, scans each pallet into staging, and confirms ULD build readiness by 17:45. Ground handling starts build up at 18:00 and records ULD seal numbers.
-
First exception: At 18:40, screening completes for 2 ULDs but the third ULD is still in manual inspection. The event-based control point triggers an escalation because screening is 40 minutes beyond the agreed window.
-
Governance response: The operational owner opens the exception log entry and calls a 10-minute huddle with warehouse, ground handling, and security. They confirm whether the delay is due to document mismatch or cargo inspection.
-
Recovery decision: If the inspection is expected to finish within 25 minutes, they keep the ULD in place and adjust the build up sequence for the next flight. If not, they authorize a split: move the two cleared ULDs to the next available departure and hold the third ULD for the following flight.
-
Execution and assurance: Ground handling updates scan events immediately after each ULD is loaded. Customs broker checks whether the held ULD requires additional document correction before release.
-
Closure: End-of-day reconciliation confirms that 12 pallets are accounted for across AWB and ULD scans. Any mismatch becomes a corrective action item with a specific owner and due date.
Control Mechanisms That Prevent “Coordination by Accident”
To keep governance from becoming paperwork, enforce three control mechanisms.
- Scan reconciliation rules: Every build up must reconcile AWB piece counts to ULD counts before loading.
- Escalation paths: Each exception category maps to a specific escalation chain, such as security hold to compliance lead, not to general operations.
- Recovery action constraints: Define what can change without re-approvals. For instance, changing flight departure within the same day may be pre-authorized, while changing destination airport requires operational owner approval.
When these mechanisms are in place, each party still executes their job, but the lane behaves like a single system. The operational owner coordinates decisions, the event windows provide timing discipline, and the artifacts keep everyone aligned without relying on memory or last-minute calls.