Dental Science and Clinical Dentistry Practice
1. Foundations of Dental Anatomy and Oral Histology
1.1 Oral Cavity Anatomy for Clinical Localization and Examination
A good oral exam starts with orientation. You are not memorizing trivia; you are building a map that lets you describe findings precisely, compare visits, and communicate with patients and colleagues without confusion.
The Exam Starts with Landmarks
Begin by locating the major “neighborhoods” of the oral cavity: lips, vestibule, gingiva, teeth, palate, tongue, floor of mouth, and oropharynx. In practice, you move from what is easiest to see to what requires more careful positioning.
- Lips and labial mucosa: note color, texture, and any ulceration or swelling.
- Vestibule: the space between lips/cheeks and teeth/gingiva; it is where many irritation patterns show up.
- Gingiva and alveolar mucosa: the tissue around teeth; it often reflects plaque control and systemic influences.
- Hard and soft palate: the palate is a common site for lesions and a key reference for tongue position.
- Tongue: mobility and surface patterns matter for both normal variation and pathology.
- Floor of mouth: a small area with big diagnostic importance because it contains ducts and sublingual tissues.
- Oropharynx: includes tonsillar pillars and posterior pharyngeal wall; it helps explain sore throat complaints.
A simple rule: if you cannot describe where you are looking, you cannot reliably describe what you see.
Teeth and Gingiva as the Grid
Teeth provide a stable grid for localization. Use tooth numbering consistently and relate soft-tissue findings to specific teeth or interdental spaces.
- Cervical region: where plaque accumulates and where gingival inflammation often begins.
- Interdental papilla: its shape and color help you judge whether inflammation is localized or generalized.
- Gingival margin and sulcus: the margin position and probing findings guide periodontal assessment.
Example: If a patient reports “bleeding when brushing,” you might find erythema and bleeding on probing around the mandibular incisors. The teeth are your anchor points; the gingiva is your evidence.
Tongue Anatomy for Mobility and Surface Assessment
The tongue is not one uniform structure. Clinically, you assess dorsum, lateral borders, ventral surface, and tip.
- Dorsum: papillae create normal texture; lesions may disrupt symmetry or persist after cleaning.
- Lateral borders: often show friction-related changes or lesion patterns that are easy to miss if you only look straight-on.
- Ventral tongue and floor of mouth: the ventral surface is usually smoother; the floor of mouth is where you check for swelling and duct-related issues.
A practical technique: ask the patient to protrude the tongue, then gently guide your view from tip to lateral border to ventral surface. If you only look at the dorsum, you may miss the area that actually explains the complaint.
Palate and Oropharynx as Depth References
The palate helps you orient the exam in three dimensions.
- Hard palate: examine the midline and lateral areas for color changes, nodules, or ulceration.
- Soft palate: observe movement during phonation; asymmetry can be relevant.
- Uvula: position and inflammation can guide whether the issue is localized or diffuse.
- Tonsillar region and posterior pharyngeal wall: check for exudate, erythema, and asymmetry.
Example: A patient with a unilateral sore throat may have a focal tonsillar pillar abnormality. If you only inspect the mouth opening and skip the posterior pharyngeal wall, you may record “normal oral cavity” while the relevant finding sits behind the last molar.
Floor of Mouth and Salivary Duct Localization
The floor of mouth is a compact region with ducts and sublingual tissues. Clinically, you look for:
- Swelling or asymmetry under the tongue**
- Discoloration or ulceration
- Duct openings that may appear inflamed or obstructed
A helpful approach is to compare left and right. If one side looks fuller, you describe it as such and then correlate with symptoms (pain with meals, dry mouth, prior infections).
Vestibule and Mucosa: Where Irritation Leaves Clues
The vestibule and buccal mucosa often show changes from mechanical irritation.
- Buccal mucosa: check along the line where teeth contact the cheek.
- Labial mucosa: examine the inner lip, especially near the commissures.
- Retromolar area: a frequent site for localized inflammation or healing tissue.
Example: A sharp cusp or poorly fitting restoration can create a recurring ulcer at a consistent spot. The anatomy helps you predict where the trauma would land.
Mind Map: Oral Cavity Localization and Examination
Recording Findings Without Getting Lost
When you document, include three elements: location, tissue, and appearance. Location means “where” (e.g., ventral tongue near tooth 33), tissue means “what” (e.g., mucosa vs gingiva), and appearance means “how it looks” (e.g., erythematous, ulcerated, indurated).
Example: Instead of “tongue sore,” record “left lateral tongue mucosa adjacent to molar region with a persistent ulcer-like lesion.” That single sentence tells the reader exactly what to look for next time.
A systematic oral cavity exam is less about seeing everything at once and more about covering every anatomical neighborhood with consistent methods. Once the map is in place, the findings become easier to interpret and easier to trust.
1.2 Tooth Anatomy and Morphology for Diagnosis and Restorative Planning
Tooth anatomy matters because it predicts where disease starts, how it spreads, and what a restoration must resist. Morphology also tells you what you can safely prepare: the same “size” of cavity can be easy in one tooth and risky in another.
Crown Anatomy for Visual Diagnosis
Start with the crown’s landmarks. The incisal edge or occlusal surface shows wear patterns that often mirror opposing contacts. Marginal ridges and cusp tips act like “pressure points” where cracks and caries frequently begin. Developmental grooves and fossae are normal anatomy, but they also collect plaque and moisture; the clinical trick is distinguishing a healthy groove from a lesion that has softened or stained.
Example: On a maxillary first molar, a deep central groove that is shiny and hard to the explorer may be healthy. If the same groove shows roughness, catch on probing, and localized discoloration, it behaves like an early caries site even before a radiograph changes.
Root Anatomy for Risk Assessment
Roots determine access to pulp, stability, and the feasibility of certain procedures. Root shape affects canal curvature and the likelihood of perforation during endodontic work. Root proximity to adjacent teeth and the sinus or mandibular canal influences surgical planning and extraction risk.
Example: A mandibular premolar with a prominent buccal root prominence may look “simple,” but its canal can still curve sharply. Treating it like a straight canal because the crown looks straightforward is how complications happen.
Enamel, Dentin, and Cementum for Material and Preparation Logic
Enamel is the hard outer shell and is the main substrate for bonding in many restorative cases. Dentin is softer, more fluid, and more sensitive; it also contains tubules that influence how adhesives and liners behave. Cementum covers the root and is thinner and more variable than enamel, which matters when margins extend apically.
Practical implication: If you plan a bonded restoration with margins in dentin, you must expect different bonding behavior than enamel. If you plan a restoration with margins in cementum, you must expect even more variability and prioritize margin design that keeps the “unpredictable” substrate to a minimum.
Pulp Chamber and Horns for Depth Control
Pulp morphology changes with age and tooth type. The pulp chamber is larger in younger teeth and shrinks over time due to secondary dentin. Pulp horns are highest on molars and can be close to the occlusal surface, especially in deep grooves or in teeth with less wear.
Example: A deep occlusal lesion in a young patient can reach the pulp faster than the same-looking lesion in an older patient. You manage this by combining clinical depth, tactile feedback, and radiographic context rather than relying on one clue.
Cusp and Fossa Relationships for Occlusal Design
Cusp anatomy is not just shape; it is function. Cusps guide load distribution and influence where cracks propagate. Fossae and marginal ridges help define the occlusal “map” for caries risk and for restorative contact placement.
Example: When restoring a Class I cavity, placing contacts too close to a marginal ridge can concentrate stress and increase marginal breakdown. Placing them in a way that supports cusp inclines and preserves proper clearance helps the restoration survive normal chewing forces.
Root Canal Anatomy for Restorative Support Decisions
Even if you are not doing endodontics, canal anatomy affects how much tooth structure remains after preparation. Teeth with complex canal systems may require more conservative access or different restorative strategies after treatment.
Example: After a root canal, a tooth that has lost significant coronal structure may need a post-and-core only when there is insufficient remaining tooth to retain the core. The decision is structural, not automatic.
Mind Map: Tooth Morphology to Clinical Decisions

Integrated Example Workflow
- Identify the tooth and its typical morphology: molar grooves, cusp inclines, and likely pulp horn proximity.
- Assess surface texture and margins: a smooth, hard groove behaves differently than a softened, rough one.
- Estimate depth using anatomy: deep grooves in young teeth deserve more caution than the same appearance in older teeth.
- Plan margins based on substrate: keep bonded margins where enamel is available; avoid unnecessary extension into cementum.
- Design occlusion to support anatomy: place contacts to preserve cusp support and avoid overloading marginal ridges.
When morphology is treated as a map rather than a trivia list, diagnosis becomes more consistent and restorations become more predictable. The tooth is already telling you where it is vulnerable; your job is to listen with your eyes, your explorer, and your preparation plan.
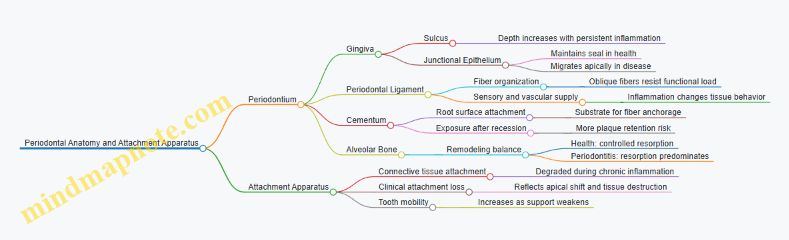
1.3 Periodontal Anatomy and Attachment Apparatus for Disease Understanding
Periodontal health depends on a precise arrangement of tissues that hold teeth in place while tolerating daily mechanical forces and constant microbial challenge. When disease appears, it usually reflects a breakdown in how these tissues resist inflammation, manage biofilm, and maintain attachment.
The Periodontium as a Functional Unit
The periodontium includes the gingiva, periodontal ligament, cementum, and alveolar bone. Think of it as a system with different jobs: the gingiva seals and monitors, the ligament cushions and senses, cementum anchors, and bone provides the structural base. If one component fails, the others often compensate—until the compensation becomes insufficient.
Gingiva and the Seal at the Tooth
The gingiva surrounds the tooth and forms the gingival sulcus, a shallow space that can become a deeper pocket when inflammation persists. The junctional epithelium attaches to the tooth surface and helps maintain a tight boundary between the oral environment and deeper tissues. In health, the sulcus depth is limited and bleeding on probing is typically absent.
A practical example: if a patient brushes lightly around a molar and the sulcus bleeds within a week, the tissue is signaling inflammation. That bleeding is not “just irritation”; it suggests the seal is compromised and the inflammatory environment is changing the local tissue response.
Periodontal Ligament as the Cushion and Sensor
The periodontal ligament (PDL) is a specialized connective tissue between cementum and alveolar bone. It distributes occlusal forces, limits tooth mobility, and contains blood vessels and nerve endings that contribute to proprioception. PDL fibers are not random strings; they are organized into functional groups that resist specific directions of force.
A helpful way to understand disease impact: when inflammation increases, the PDL can lose its normal architecture. The tooth may feel “longer” or more mobile because the supporting tissues are changing, not because the tooth itself grew.
Cementum and Attachment to the Root
Cementum covers the root surface and provides a substrate for fiber attachment. It is thinner than enamel and not as hard as enamel, but it is biologically active and supports the anchoring of periodontal fibers. In disease, cementum can be exposed to inflammatory mediators and bacterial products, which can contribute to attachment loss.
Example: a root surface that becomes exposed after gingival recession may be more vulnerable to plaque accumulation and calculus, increasing the likelihood of ongoing inflammation.
Alveolar Bone and Remodeling Under Load
Alveolar bone surrounds the roots and remodels continuously. In health, bone resists resorption because the balance between bone-forming and bone-resorbing activity is controlled. In periodontitis, inflammation shifts that balance toward resorption, leading to loss of bone height and changes in the bony architecture.
A clinical reasoning example: if radiographs show bone loss that matches the location of deep pockets, the disease is likely driven by local biofilm and inflammation rather than a generalized bone disorder.
Fiber Groups and Why They Matter
Periodontal fibers anchor the tooth to cementum and bone. The main groups include gingival fibers, which help maintain the gingival margin; horizontal fibers, which resist lateral forces; oblique fibers, which resist vertical and tensile forces; and apical fibers, which help stabilize the tooth at the root apex.
When attachment is lost, the fiber system is disrupted. That disruption explains why periodontal pockets can deepen and why tooth mobility can increase: the tooth is losing its engineered suspension.
Attachment Apparatus and Disease Pathways
Attachment loss is the clinical outcome of breakdown in the connective tissue attachment and supporting bone. The junctional epithelium and connective tissue attachment are affected by inflammation, and the deeper tissues respond with tissue destruction when the inflammatory challenge persists.
A systematic way to connect anatomy to clinical findings:
- Biofilm accumulates near the gingival margin.
- Inflammation increases vascular permeability and bleeding.
- The junctional epithelium migrates apically, increasing sulcus depth.
- Connective tissue attachment is degraded, leading to clinical attachment loss.
- Bone resorption follows, visible as radiographic bone loss.
Mind Map: Periodontal Anatomy and Attachment Logic
Putting It Together at Chairside
When you probe and measure, you are not just recording numbers. A deeper pocket often indicates that the junctional epithelium has migrated and the connective tissue attachment has been compromised. When mobility is present, it suggests the PDL and supporting bone are no longer providing the same mechanical stability.
Example: two patients can have the same pocket depth, but different bleeding patterns and radiographic bone levels. The anatomy explains why: inflammation severity and the extent of attachment and bone involvement are not identical across cases.
Key Takeaways
The periodontium is a coordinated system: gingiva seals, PDL cushions and senses, cementum anchors, and bone supports. Periodontitis is best understood as a stepwise failure of this system driven by persistent inflammation, leading to pocket formation, attachment loss, and bone resorption.
1.4 Oral Mucosa Types and Clinical Appearance Patterns
Oral mucosa is not one uniform surface. In clinical practice, you treat it like a map: different regions have different thickness, keratinization, and blood supply, so the same lesion can look different depending on where it sits.
Core Mucosal Regions and What They Look Like
1) Attached Gingiva Attached gingiva is keratinized and tightly bound to underlying tissue. Clinically it tends to look stippled or “orange-peel” textured, with a firm feel on palpation. Because it is keratinized, it often resists minor trauma better than non-keratinized mucosa.
Example: A patient notices a sore spot after brushing. If the discomfort is on attached gingiva and the surface looks intact with only mild erythema, the most likely explanation is irritation rather than a deep ulcer.
2) Alveolar Mucosa Alveolar mucosa is non-keratinized and more movable. It appears smoother and more elastic, and it can show erythema more readily after friction. Because it is less tightly bound, it may blanch or redden quickly with pressure.
Example: A denture flange rubbing the cheek can cause a red patch on alveolar mucosa that improves when the denture is adjusted.
3) Dorsal Tongue The dorsal tongue has specialized keratinized filiform papillae and a different surface texture. It can show coating, fissuring, and normal variations in papilla prominence. Lesions here must be interpreted with the baseline texture in mind.
Example: A “white” area on the dorsal tongue that wipes off partially and leaves mild redness may represent coating rather than a persistent ulcer.
4) Ventral Tongue and Floor of Mouth These areas are non-keratinized and thin, so they often look more translucent. Veins may be visible, and minor trauma can produce noticeable erythema.
Example: A small traumatic ulcer on the ventral tongue can look dramatic because the tissue is thin, even though the underlying process is superficial.
5) Buccal Mucosa and Labial Mucosa These are non-keratinized and commonly exposed to friction. Normal features include linea alba on the buccal mucosa and mild surface variations. Lesions that persist at the same friction point deserve attention.
Example: A cheek bite habit can create a recurring white line or thickened area at the occlusal contact point.
Clinical Appearance Patterns You Should Expect
Color changes
- Erythema often reflects increased blood flow or inflammation. It may be diffuse or localized.
- Pallor can suggest reduced vascularity or systemic factors.
- White changes can be keratinization, hyperparakeratosis, or surface debris. The key is whether it scrapes off.
Surface texture
- Smooth surfaces are typical for non-keratinized mucosa.
- Granular or pebbly surfaces can occur with chronic irritation or inflammatory changes.
- Ulceration changes the surface architecture and usually requires careful characterization.
Ulcer patterns Ulcers are defined by loss of epithelium. Clinically, note the duration, border (well-defined vs diffuse), base (granular, fibrinous, or necrotic), and surrounding erythema. Pain level helps, but it does not replace pattern recognition.
Example: A small, well-circumscribed ulcer with a yellowish base and a red halo after a sharp tooth suggests traumatic ulceration. If it does not resolve after eliminating the trauma, the differential broadens.
Masses and plaques A plaque is a flat, adherent or persistent surface change. A mass implies tissue thickening or a raised lesion. Palpation matters: induration, fixation, and depth change how you interpret the same visible appearance.
Example: A firm, persistent plaque on the lateral tongue that feels thickened under the mucosa is different from a superficial coating.
Systematic Examination Approach
Use a consistent sequence so you do not rely on memory.
- Inspect under good light with the mouth fully opened and tissues gently retracted.
- Compare left and right and match the lesion to the expected mucosal type.
- Assess color, surface, and margins.
- Palpate gently: check tenderness, firmness, and mobility.
- Test whether a white area can be removed with gentle wiping; interpret results cautiously.
- Document size, location, and appearance in a way that supports follow-up.
Mind Map: Oral Mucosa Types and Appearance Patterns
Integrated Examples for Pattern Recognition
Example 1: White area on buccal mucosa A white line at the occlusal contact point with a history of cheek biting fits frictional keratosis. If the area becomes thickened, fixed, or persists beyond the expected irritation pattern, you shift from “irritation” toward “persistent lesion” reasoning.
Example 2: Erythematous patch on alveolar mucosa A red patch matching a denture flange border suggests mechanical irritation. If the patch improves after adjustment, the appearance pattern was consistent with trauma rather than a primary mucosal disease.
Example 3: Ulcer on ventral tongue A small ulcer with a clear traumatic trigger and a shallow base can be explained by localized injury. If it enlarges, develops induration, or fails to resolve, the appearance pattern no longer fits a simple trauma story.
1.5 Salivary Gland Anatomy and Duct Anatomy for Symptom Correlation
Saliva is not just “wetness.” It is a continuous system that depends on gland location, duct routing, and the way saliva changes as it travels. When symptoms show up—dry mouth, swelling, pain with meals, altered taste—the pattern often points back to which gland and which duct segment is involved.
Core Anatomy You Need for Symptom Correlation
Major Salivary Glands and Their Output Patterns
Parotid glands sit anterior to the ear and drain mainly through the parotid duct (Stensen’s duct) into the mouth near the upper second molar. Because the parotid is largely serous, it tends to contribute more watery saliva. Clinically, parotid duct obstruction can produce swelling that is noticeable during salivary stimulation, such as eating.
Submandibular glands lie under the mandible and drain through the submandibular duct (Wharton’s duct) into the floor of the mouth near the lingual frenulum. Their mixed output (serous and mucous) helps explain why some patients describe both dryness and thick secretions. Duct stones here are common enough that meal-related pain plus a tender floor-of-mouth area is a classic clue.
Sublingual glands sit in the floor of the mouth and drain via multiple small ducts into the sublingual fold. Because drainage is distributed, symptoms may be more subtle, but patients can still report localized discomfort or changes in saliva quality.
Duct Anatomy as a Map of Where Problems “Stick”
Ducts are narrow, and narrow spaces are where saliva flow becomes vulnerable. A duct can fail at different levels:
- At the gland outlet: swelling may be more diffuse and gland-centered.
- Within the duct: pain may be triggered by meals, and palpation may reproduce tenderness along a duct course.
- At the duct opening: symptoms may be localized to the mouth floor or cheek region, depending on the gland.
A practical way to think is: symptoms often follow the duct’s geography.
Duct Pathways and Clinical Localization
Parotid Duct Course
Stensen’s duct runs from the parotid gland across the cheek, passing near the masseter muscle, then opens into the oral cavity opposite the upper second molar. If a patient reports swelling near the cheek that worsens with eating, you should consider a parotid duct obstruction. Intraoral inspection may show reduced or altered salivary flow from the papilla near the upper molar region.
Submandibular Duct Course
Wharton’s duct travels from the submandibular gland to the floor of the mouth, then opens near the lingual frenulum. Because the duct is longer and courses through the floor, obstruction can cause pain during meals and tenderness that is reproducible by bimanual palpation of the floor of the mouth. If saliva seems thick or reduced, the submandibular system is a strong suspect.
Sublingual Ducts and the Floor of Mouth
Sublingual glands drain through several small ducts into the sublingual fold. With multiple outlets, complete blockage is less likely, but partial obstruction or inflammation can still change the appearance and feel of saliva. Patients may notice discomfort with tongue movement or localized tenderness in the sublingual area.
How Anatomy Translates into Symptom Patterns
Dry Mouth and Reduced Flow
Dry mouth can arise from reduced secretion, altered composition, or impaired duct flow. If symptoms correlate with meals and there is swelling, duct obstruction becomes more likely than purely systemic causes. If dryness is persistent without meal-related changes, consider broader salivary hypofunction.
Pain with Meals
Meal-related pain fits the physiology: stimulation increases flow, and an obstruction becomes more symptomatic. The gland most likely matches the swelling location—cheek for parotid, floor of mouth for submandibular, sublingual fold for sublingual.
Taste Changes and Thick Secretions
Taste alteration can occur when saliva composition changes or when flow is reduced. Thick, stringy secretions often point toward mucous contribution and slower clearance, which can be seen when duct flow is compromised.
Mind Map: Salivary Gland and Duct Symptom Correlation
Example: Turning Symptoms into Localization
A patient reports swelling on the right cheek that peaks during breakfast and eases later. Intraoral inspection shows less visible saliva emerging near the papilla opposite the upper second molar. The most coherent explanation is a parotid duct flow problem, because the symptom timing matches salivary stimulation and the opening location matches the suspected drainage route.
Example: Floor-of-Mouth Clues
Another patient describes sharp discomfort under the tongue when eating, along with a tender area in the floor of the mouth. The lingual frenulum region shows reduced or delayed salivary flow. This pattern aligns with the submandibular duct pathway: stimulation increases demand, and a duct narrowing or obstruction makes the floor-of-mouth region symptomatic.
Example: Distributed Drainage in the Sublingual Area
A third patient notes mild, localized discomfort along the sublingual fold and occasional thick secretions, without dramatic swelling. Multiple sublingual ducts make complete blockage less likely, so partial flow changes or localized inflammation fit better than a single, fully obstructed duct.
By linking gland location, duct course, and duct opening sites, you can interpret symptoms as a practical map rather than a vague complaint. The anatomy gives you a shortlist; the timing and exam findings narrow it to the most likely pathway.
2. Dental Materials Science for Clinical Decision Making
2.1 Properties of Dental Materials for Strength Bonding and Wear Resistance
Dental materials behave differently under the three jobs you care about most: holding together (strength), sticking reliably (bonding), and surviving chewing (wear resistance). The trick is to match material properties to the forces and moisture conditions in the mouth, then verify the match with technique.
Core Material Properties That Control Clinical Performance
Strength Under Load
Strength is not one number; it is how a material resists different kinds of stress. Compressive strength matters for resisting biting forces, while tensile and flexural strength matter for resisting cracking when a tooth flexes. For example, a thin ceramic on a cusp experiences bending; if the material is strong in compression but weak in tension, it can still fracture.
Bonding and Adhesion Reliability
Bonding depends on surface energy, chemistry, and micromechanical retention. In practice, bonding is only as good as the surface preparation and moisture control. A simple example: if enamel is etched but saliva contaminates the field, the etched pattern can collapse, and the adhesive has less to grab.
Wear Resistance and Surface Stability
Wear resistance is how well a material maintains shape and surface integrity under friction and abrasion. A filling that resists wear can still fail if its surface becomes rough; roughness increases plaque retention and accelerates staining. Think of it like a well-made countertop: it can be strong, but if it scratches easily, it becomes harder to keep clean.
How Material Microstructure Drives These Properties
Filler Content and Particle Size
Many dental composites are “matrix plus filler.” The filler increases stiffness and reduces shrinkage, but particle size and distribution affect polishability and wear. Smaller, well-distributed particles usually polish smoother, which helps reduce surface roughness after finishing.
Polymer Network and Degree of Conversion
For resin-based materials, the polymer network forms as monomers convert to polymer. Higher conversion generally improves strength and reduces water uptake, but it also depends on curing light intensity and exposure time. Example: a deep class II cavity can be under-cured if the increments are too thick, leading to lower hardness and more wear.
Ceramic Structure and Crack Behavior
Ceramics fail through crack initiation and crack propagation. Grain size, crystal phase, and how the material is processed influence how cracks grow. A practical example: a brittle ceramic with poor crack resistance can chip under edge loading, while a material designed for better crack control can better tolerate minor defects.
Bonding Mechanics from Surface Preparation to Interface
Enamel Versus Dentin Bonding
Enamel bonding is typically more predictable because etching creates a stable micro-porous surface. Dentin is more complex due to tubules and fluid movement. Example: two restorations with the same adhesive can perform differently if one is placed on well-isolated enamel margins and the other relies heavily on dentin bonding.
Interface Quality and Failure Modes
Bonded restorations fail in patterns that reveal what went wrong. If you see cohesive failure within the material, the bond may be fine but the material strength was insufficient. If you see adhesive failure at the interface, the problem is usually surface contamination, inadequate etching, or insufficient curing.
Wear Resistance in Real Mouth Conditions
Abrasion, Attrition, and Erosion
Wear comes from multiple sources. Abrasion is from external particles, attrition is from tooth-to-tooth contact, and erosion is chemical dissolution. Example: a patient with frequent acidic drinks may wear composite surfaces faster even if the material is mechanically strong.
Finishing and Polishing as Part of the Material System
Finishing is not cosmetic-only; it changes surface roughness and therefore wear and staining. A restoration finished with coarse burs can start rough, then accumulate plaque and stain, increasing perceived “wear” even when the bulk material is intact.
Mind Map: Properties and Clinical Control
Integrated Example: Choosing and Using a Material for a High-Stress Tooth
Consider a posterior tooth with a large MOD restoration. You want a material system that resists bending forces, bonds reliably to remaining tooth structure, and maintains a smooth surface.
- Strength choice: Use a restorative material with adequate flexural strength and appropriate filler characteristics for posterior load.
- Bonding plan: Prepare enamel margins for predictable bonding, and manage dentin bonding with strict moisture control and correct adhesive steps.
- Wear management: Place in increments to ensure full curing, then finish and polish to reduce roughness.
- Technique check: If the restoration chips at the margin, reassess margin design and curing; if it debonds, reassess isolation and surface preparation.
When you connect these properties to the actual failure modes you observe chairside, material science stops being abstract and becomes a practical checklist.
2.2 Impression Materials and Cast Accuracy for Restorative Fit
A restorative fit starts with a simple question: does the impression capture the tooth and surrounding tissues in the same way the final restoration needs to contact them? Cast accuracy is the bridge between what the clinician records and what the lab fabricates, so every choice—material, technique, tray, and timing—has a measurable effect.
Core Principles of Impression Accuracy
Impression accuracy depends on three linked factors: dimensional stability, surface detail, and removal behavior.
Dimensional stability means the material keeps its shape from the moment it sets until the cast is poured. Surface detail is the ability to reproduce fine margins, especially around gingival crevices. Removal behavior matters because distortion can happen when the material is pulled off under tension or when undercuts are not managed.
A practical way to think about it is to imagine the impression as a mold that must survive two events: setting and pouring. If the material shrinks, stretches, or warps during either event, the cast will inherit the error.
Material Categories and What They Do Best
Common impression materials include elastomeric silicones and polyethers, plus hydrocolloids for specific situations.
Elastomeric addition silicones (often used for crown and bridge) are popular because they are dimensionally stable and provide crisp detail. Polyethers can also be accurate, but they are more sensitive to moisture contamination during setting. Hydrocolloids are less common for fixed restorations because they are more prone to distortion and require quick pouring.
Example: Margin Detail in a Crown Preparation
If a crown margin is placed slightly subgingivally, the impression must record the sulcus area. A material with good flow and stability helps reproduce the margin line. If the material is too viscous or the tray is not seated firmly, the margin may blur, and the lab will fabricate a crown that either overhangs or leaves a gap.
Tray Selection and Seating Control
Tray design influences accuracy because it controls thickness and seating pressure.
A tray that is too small forces the material to be thin in critical areas, increasing the risk of tearing or distortion. A tray that is too large can trap excess material and create uneven thickness. Custom trays can improve fit for full-arch work, while stock trays can work well for many single-unit impressions when properly selected and adjusted.
Seating control is about repeatability. If the tray is seated differently each time, the impression will capture different tissue positions. Even small differences can matter when margins are tight.
Example: One-Unit Impression with a Stock Tray
For a single crown, a stock tray with correct size and stable seating can be enough. The key is to ensure the tray seats fully before the material begins to set, and to avoid rocking movements that can shift the material around the margin.
Managing Moisture and Tissue Conditions
Moisture control is not optional for accurate margins.
Saliva and crevicular fluid can interfere with setting and surface reproduction, particularly for materials that are sensitive to contamination. Tissue displacement techniques help by temporarily moving the gingiva away from the margin, but displacement must be controlled to avoid excessive trauma.
Example: Gingival Crevice Bleeding During Impression
If bleeding continues during impression taking, the margin area may be flooded. The result can be a cast margin that is either too shallow or too deep. A clinician can reduce this by improving isolation, using appropriate retraction, and timing the impression so the material sets while the field is stable.
Timing, Mixing, and Dimensional Stability
Dimensional change can occur if the material is not mixed correctly or if the impression is delayed before pouring.
For two-paste systems, inaccurate mixing ratios can leave unreacted components, affecting set and stability. For putty-wash techniques, the wash must be delivered consistently so that the wash thickness is adequate and uniform.
A good workflow rule is to pour the cast promptly according to the material’s instructions. Delays increase the chance of dimensional drift, especially for materials that are less stable.
Example: Delayed Pour After a Busy Appointment
If an impression is taken and then left for a long time before pouring, the cast may shrink slightly. When the restoration is fabricated, the margin may not seat fully, leading to a visible gap or a tight contact that feels “almost right” but fails on final verification.
Pouring the Cast for Fit
Even a perfect impression can produce a poor cast if the pour is mishandled.
The cast material must be mixed to the correct water-to-powder ratio. Too much water weakens the cast and can increase expansion or distortion. Too little water can prevent proper flow into fine details.
Vibration during pouring helps eliminate voids, but excessive vibration can introduce bubbles or distort the impression if the material is not fully set.
Example: Capturing a Thin Margin Line
If the margin detail is thin and the cast mix is too thick, the plaster or stone may not flow into the margin area. The lab then fabricates a restoration based on incomplete detail, and the final fit suffers even though the impression looked acceptable.
Mind Map: Impression Materials and Cast Accuracy
Quick Clinical Checklist for Reliable Fit
- Choose a material that matches the clinical need for detail and stability.
- Ensure tray size supports uniform material thickness.
- Control moisture and manage tissue displacement without overdoing it.
- Mix and load correctly, then seat consistently before set begins.
- Pour promptly with a correctly mixed cast material and appropriate flow.
When these steps align, the cast becomes a faithful working model, and the restoration has a fair chance to seat with minimal adjustment. That’s the whole point: fewer surprises between impression and final fit.
2.3 Adhesive Systems and Bonding Protocols for Predictable Outcomes
Bonding is a chain of small successes: clean tooth surface, correct etch or primer step, adhesive that wets the substrate, and a restoration that seals well enough to prevent fluid movement. Miss one link and the failure often shows up later as sensitivity, marginal staining, or debonding. The goal is not “strongest possible bond,” but a repeatable protocol that matches the substrate and the material.
Core Adhesive Concepts for Clinical Control
Adhesives fall into two practical jobs. First, they modify the tooth surface so resin can attach. Second, they create a sealed interface that resists water and mechanical stress.
To understand the workflow, think in layers:
- Substrate: enamel, dentin, or a restorative surface.
- Surface conditioning: etching, priming, or both.
- Adhesive layer: resin monomers and solvents that must infiltrate.
- Polymerization: light curing that must reach the interface.
A common reason for inconsistent results is confusion about what the adhesive is actually bonding to. Enamel bonding is usually more predictable because the surface can be etched to create a stable microstructure. Dentin is more variable because it contains tubules, fluid, and a smear layer that can block infiltration if not managed correctly.
Enamel Bonding Protocols That Stay Consistent
For enamel, the predictable approach is controlled etching followed by adhesive application and curing.
Example workflow for an anterior composite restoration
- Isolate with a rubber dam when possible.
- Clean and dry the tooth without over-drying dentin.
- Etch enamel with phosphoric acid for the manufacturer’s recommended time.
- Rinse thoroughly and remove excess water.
- Apply adhesive to enamel and dentin margins.
- Air-thin gently to spread the adhesive.
- Light cure according to the specified curing time and light intensity.
If you see a chalky enamel surface after etching, that’s usually the expected outcome. If it looks glossy or wet, re-check rinsing and drying before adhesive placement.
Dentin Bonding Protocols That Respect Moisture
Dentin bonding depends on managing the smear layer and controlling the wetness so resin can infiltrate.
Key clinical logic
- If the dentin is too wet, solvents and water can interfere with polymerization.
- If it’s too dry, collagen can collapse, reducing infiltration.
Example workflow for a Class V composite
- Remove caries and shape the cavity.
- Clean with water spray and gentle brushing if needed.
- Etch dentin and enamel margins with phosphoric acid only if using an etch-and-rinse system.
- Rinse and blot to achieve a “glistening but not pooling” surface.
- Apply primer/adhesive in thin layers.
- Air-thin to remove excess solvent.
- Cure fully before placing composite.
Thin layers matter because thick adhesive films can trap solvent and reduce conversion at the interface.
Adhesive System Types and When Each Makes Sense
Different adhesive strategies exist, but the clinical decision is straightforward: match the system to the substrate and the restoration plan.
- Etch-and-rinse systems: often used when you want strong enamel conditioning and controlled dentin infiltration.
- Self-etch systems: reduce steps and can be more forgiving when isolation is challenging, but still require correct application and curing.
- Universal adhesives: can be used with or without separate etching depending on the protocol; consistency depends on following the chosen mode.
Example decision point
- If the margin is mostly enamel and you can isolate well, an etch-and-rinse approach can be highly predictable.
- If you’re bonding to a mixed substrate and isolation is limited, a self-etch or universal approach used in the correct mode can reduce technique sensitivity.
Bonding Workflow for Predictable Outcomes
A reliable protocol is less about memorizing steps and more about controlling variables.
-
Isolation and contamination control
- Saliva or blood contamination can disrupt wetting and polymerization.
- If contamination occurs, follow the system’s re-cleaning guidance rather than “hoping it works.”
-
Surface preparation
- Remove caries and old restorations that compromise bonding.
- Avoid aggressive air abrasion on dentin unless the system is designed for it.
-
Conditioning and priming
- Use the correct etch time and rinse method.
- Apply primer/adhesive with adequate coverage, then air-thin.
-
Curing strategy
- Cure each adhesive layer as specified.
- Ensure the light tip is positioned close and that the curing time matches the material instructions.
-
Restoration placement and margin sealing
- Place composite promptly after curing.
- Avoid gaps at the margin; a sealed interface is part of the bonding system.
Mind Map: Adhesive Bonding Variables and Control Points
Common Failure Patterns and Practical Fixes
- Postoperative sensitivity often points to incomplete dentin infiltration, inadequate curing, or contamination.
- Marginal staining can reflect a weak seal at the interface or poor margin adaptation.
- Debonding may result from incorrect conditioning mode, thick adhesive layers, or insufficient curing.
Example troubleshooting mindset If the case used a universal adhesive “with etch,” but the enamel was not actually etched for the correct time, the bond can be inconsistent even if the adhesive was applied neatly. The fix is to align the conditioning step with the chosen protocol, not to add extra adhesive.
Mini Case Study: Bonding a Composite to Mixed Substrate
A patient needs a small Class II composite with margins on enamel and dentin. Isolation is adequate.
- Use a protocol that includes enamel etching for the enamel margins.
- Manage dentin wetness so the surface looks glistening without pooling.
- Apply adhesive in a thin, even film, air-thin, then cure fully.
- Place composite promptly and ensure tight adaptation at the margins.
The result is a bond that is strong where enamel is present and stable where dentin is bonded, because the workflow controls the variables that most often cause interface problems.
2.4 Restorative Materials Selection for Anterior and Posterior Teeth
Core Principles for Choosing Materials
Restorative selection starts with matching material behavior to the tooth’s job description: load-bearing, esthetics, moisture control, and longevity under the patient’s habits. Anterior teeth demand predictable appearance and smooth margins, while posterior teeth demand resistance to fracture, wear, and leakage. The same material can work in both zones, but the reasons differ.
Begin with three questions. First, what is the dominant failure risk: fracture, marginal leakage, secondary caries, or wear? Second, what isolation is realistic in this mouth today: rubber dam, good suction, or “we’ll do our best”? Third, what is the occlusal environment: light contacts in an anterior guidance pattern or heavy lateral forces in a bruxer? If you can’t answer these, the material choice will be guesswork.
Material Categories and What They’re Good At
Composite resins are versatile and esthetic, making them common for anterior restorations and many posterior restorations. Their performance depends heavily on bonding quality and curing technique. Glass ionomer and resin-modified glass ionomer release fluoride and can be useful where moisture control is challenging, but they generally have lower strength and wear resistance than composites.
Ceramics and indirect restorations are chosen when you need superior contour stability and wear resistance, especially for larger posterior defects or when you want to reduce polymerization shrinkage effects. Amalgam is durable and forgiving in isolation-limited situations, but it is less favored for esthetic zones and requires careful margin placement.
Anterior Teeth Selection Logic
Anterior restorations usually fail visibly first: discoloration, rough margins, or marginal gaps that catch plaque. For small to moderate lesions, a bonded composite with a layering approach helps manage translucency and surface texture. Choose a shade system that matches the tooth’s value and chroma, then confirm with a wet shade check because enamel and dentin change appearance when hydrated.
For larger anterior defects, consider whether you can achieve adequate thickness and bonding area. If the remaining tooth structure is thin, a direct composite may be more likely to chip or show marginal breakdown. In those cases, an indirect ceramic or a bonded restoration design can provide better structural support.
Example: A maxillary lateral incisor with a small enamel-dentin lesion and good isolation. A bonded composite is selected because it can blend well, cure predictably, and be finished to a smooth surface that resists staining.
Posterior Teeth Selection Logic
Posterior restorations face higher masticatory forces and abrasive wear. The selection hinges on cavity configuration and occlusal loading. For small to moderate Class I and Class II lesions with good isolation, composite can be reliable when you use proper bonding and incremental placement to reduce shrinkage stress.
For deeper Class II preparations, consider whether you can place and cure increments without trapping voids. If isolation is poor or the cavity is very deep, resin-modified glass ionomer liners or glass ionomer bases may be used to improve fluoride release and reduce sensitivity, while the final occlusal surface remains a stronger restorative material.
When the defect is large, cusp coverage and material stiffness become more important. Indirect onlays or crowns can reduce the risk of fracture and provide better wear behavior than a thin direct restoration.
Example: A mandibular first molar with a deep occlusal caries lesion and limited ability to isolate due to saliva. A glass ionomer base or liner may be used to support the dentin and manage moisture sensitivity, with a composite occlusal layer for strength and polishability.
Decision Mind Map
Mind Map: Restorative Materials Selection
Practical Selection Checklist
Choose the material that best matches the dominant risk. For anterior teeth, prioritize esthetic blending, smooth finishing, and strong bonding to enamel and dentin. For posterior teeth, prioritize wear resistance, shrinkage control, and a restoration design that supports remaining cusps.
Then confirm technique feasibility. If you cannot achieve reliable isolation, plan for a material strategy that tolerates moisture at the dentin interface. If you can isolate well, bonding and incremental curing become the main performance drivers.
Finally, plan finishing from the start. A restoration that looks good at insertion can still fail early if margins are rough or contacts are off. Occlusal adjustment and polishing are not optional extras; they are part of the material system’s behavior.
Integrated Example Scenarios
Example: Anterior Class III abrasion with good enamel margins. Select a bonded composite and use a layering approach to match translucency; finish with a smooth contour to reduce staining risk.
Example: Posterior Class II with moderate depth and good isolation. Select a composite and place in increments; ensure full curing and tight marginal adaptation to reduce leakage.
Example: Posterior deep lesion with isolation difficulty. Use a glass ionomer base or liner to manage dentin moisture and sensitivity, then restore the occlusal surface with a stronger material for wear resistance.
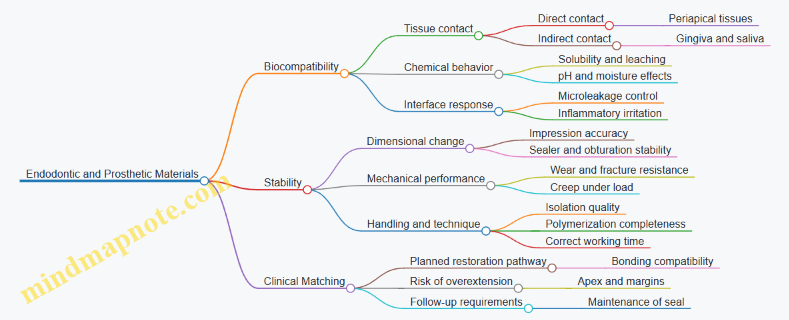
2.5 Endodontic and Prosthetic Materials for Biocompatibility and Stability
Why Biocompatibility and Stability Matter
Biocompatibility is about what a material does to tissues when it contacts blood, dentin, periodontal ligament, or mucosa. Stability is about what the material does after placement: it should resist dissolution, dimensional change, and mechanical failure long enough for the treatment to succeed. In practice, these goals overlap—materials that stay stable usually release fewer unwanted byproducts and maintain a predictable interface.
Core Biocompatibility Principles for Clinical Use
- Tissue contact and exposure time: Endodontic materials often contact periapical tissues directly; prosthetic materials may contact saliva and gingiva indirectly. Longer or more direct contact increases the need for low irritation and controlled solubility.
- Chemical behavior in the mouth: Water, enzymes, and fluctuating pH can degrade materials. A stable material limits leaching and preserves sealing.
- Interface compatibility: Many failures are interface failures, not bulk failures. A material that bonds or adapts well reduces microleakage, bacterial ingress, and inflammatory signaling.
- Mechanical demands: Stability includes resistance to fracture, wear, and creep under occlusal forces.
Endodontic Materials: Biocompatibility with a Sealing Job
Root Canal Sealers
Sealability matters because the canal is not a sterile tube; it is a space where bacteria can persist in dentinal tubules. Sealers should be dimensionally stable and should not provoke excessive periapical inflammation.
- Zinc oxide eugenol sealers: Eugenol can irritate tissues and interfere with some bonding strategies. They can be useful in certain contexts, but clinicians should match the sealer to the planned restorative pathway.
- Resin-based sealers: They aim for good sealing and low solubility, but polymerization and handling matter. Incomplete curing or poor technique can compromise stability.
- Calcium silicate sealers: They are designed to be bioactive and less irritating than older formulations, with a focus on sealing and favorable tissue response.
Easy example: If a tooth will later receive a bonded restoration, choosing a sealer that does not interfere with bonding reduces the chance of a weak adhesive interface.
Gutta-Percha and Obturation Systems
Gutta-percha is inert and dimensionally stable, but the system’s performance depends on the sealer and technique. Overfilling can increase tissue irritation; underfilling can leave space for bacterial survival.
Easy example: When obturation is short of the apex, the sealer may not compensate. When it is long, the sealer and material can be pushed into periapical tissues, increasing irritation.
Prosthetic Materials: Stability Under Saliva, Wear, and Fit Demands
Impression And Fit Materials
A prosthesis fails quietly when the fit is off. Dimensional stability of impression materials supports accurate casts and predictable margins.
- Hydrocolloids: Useful for certain workflows, but they can be sensitive to time and handling.
- Elastomeric materials: Often preferred for their dimensional stability and tear resistance.
Easy example: If an impression is poured late, the cast may shrink or distort, leading to a crown that rocks slightly. That rocking can concentrate stress and accelerate margin breakdown.
Bonding and Cementation Materials
Cements and adhesives must balance two things: they should bond or adapt well, and they should resist dissolution.
- Glass ionomer cements: They can release fluoride and bond chemically to tooth structure, with reasonable biocompatibility for many restorations.
- Resin cements: They can provide strong retention and good sealing when bonding is correct, but they require careful isolation and surface preparation.
- Temporary cements: They should be easy to remove and stable enough to protect the tooth during the interim period.
Easy example: A resin cement placed without adequate isolation can trap moisture, weakening the bond and increasing marginal leakage.
Denture Base and Repair Materials
Denture materials must tolerate repeated wetting and mechanical flexing. Stability includes resistance to warpage and surface roughness, which affects comfort and hygiene.
Mind Map: Biocompatibility and Stability in Endodontics and Prosthetics
Case-Style Integration: Choosing Materials with a Clear Logic
Case Study: A molar is treated endodontically and later restored with a bonded onlay.
- Choose an endodontic sealer that does not compromise bonding.
- Ensure obturation length is controlled to avoid excess material beyond the apex.
- Use an impression and restoration workflow that preserves margin fit.
- Cement the onlay with a material that matches the bonding protocol and isolation conditions.
The common thread is simple: each material choice supports the next step, so the interface stays sealed and the restoration stays stable long enough to do its job.
3. Patient Assessment and Diagnostic Workflow in Dentistry
3.1 Case History Taking for Medical Risk Identification and Consent Readiness
A good dental case history is not a form-filling exercise; it is a risk map. The goal is to identify medical factors that change what you do, how you do it, and what you must explain before treatment. Start with the patient’s current concerns, then connect them to systemic health, medications, allergies, and relevant past events.
Core Principles for Systematic History Taking
Begin with a brief timeline: when the problem started, what changed, and what the patient has already tried. Then transition to medical risk domains that commonly affect dental care: cardiovascular status, bleeding risk, immune status, diabetes control, respiratory conditions, neurologic history, pregnancy status, and history of adverse reactions to anesthesia or medications. Keep the patient’s words when they describe symptoms; translate them into clinical meaning when you document.
Consent readiness depends on two things: adequate information and adequate understanding. Information includes proposed procedures, expected benefits, material risks, and alternatives. Understanding depends on checking comprehension, not just collecting signatures.
Stepwise Workflow from Basics to Risk
- Confirm identity and baseline details: allergies, current medications, and relevant medical diagnoses. If the patient brings a medication list, reconcile it with what they report.
- Update medical changes since the last visit: new diagnoses, recent hospitalizations, new prescriptions, dose changes, and symptom progression.
- Screen for medication and allergy risks: ask about drug allergies, reaction type, and timing. For medications, note anticoagulants, antiplatelets, steroids, immunosuppressants, bisphosphonates or denosumab, and diabetes medications.
- Assess procedural risk factors: bleeding tendency, infection susceptibility, airway or respiratory limitations, and history of fainting or vasovagal episodes.
- Check anesthesia and pain management constraints: prior local anesthetic reactions, opioid sensitivity, and any history of difficult airway or severe asthma.
- Document and verify: read back key items to the patient and confirm accuracy.
- Consent readiness check: confirm what the patient understands about the plan and what they want to know.
Medical Risk Domains with Practical Examples
Cardiovascular conditions: If a patient reports a recent myocardial infarction or unstable angina, you treat it as a timing and stability question. Example: a patient says, “I had a stent placed two months ago and I get chest tightness when I walk fast.” You document the date, symptoms, and current medications, then coordinate with the treating physician before elective procedures that could stress the patient.
Bleeding risk: Ask what they take and why. Example: “I’m on warfarin” is incomplete; you need the dose and whether they have recent INR results. If the patient says they bruised easily after dental work, that is a clue to include in the risk discussion.
Diabetes: Ask about control and symptoms of poor control. Example: “My sugars run high” becomes actionable when you ask how high, whether they have had recent infections, and whether they have hypoglycemia episodes.
Immunosuppression and steroids: Example: a patient on long-term prednisone may have altered stress response. You document dose and duration and consider how it affects procedure planning and postoperative monitoring.
Respiratory conditions: Example: a patient with COPD who reports frequent wheeze needs you to ask about current inhaler use and recent exacerbations, because it affects appointment length and emergency preparedness.
Pregnancy: Example: a patient in the first trimester reports nausea and sensitivity to smells. You document gestational age, complications, and current medications to guide timing and comfort measures.
Consent Readiness Through Understanding Checks
Consent is more than permission; it is shared decision-making with clear boundaries. Use a short, structured check:
- What are we doing? Summarize the procedure in plain language.
- What could go wrong? Mention material risks relevant to the patient’s medical profile.
- What are the alternatives? Include non-procedural options when appropriate.
- What happens if we do nothing? Explain likely outcomes without exaggeration.
- Can you tell me what you understood? Ask the patient to repeat the plan in their own words.
Example: if a patient is on anticoagulants, your consent discussion should reflect bleeding risk in a way that matches their situation, not generic textbook language.
Mind Map for Case History Taking
Documentation That Supports Clinical Decisions
Write in a way that another clinician can act on. Include: the exact medication names and doses, allergy reaction type, dates of key events (like stent placement or last INR), and the patient’s stated understanding of the plan. If you coordinate with a physician, document who you spoke with and what question you asked.
A history that is complete, consistent, and understandable makes consent easier and safer. It also prevents the classic problem of discovering a major risk after the local anesthetic is already on board—an avoidable plot twist.
3.2 Extraoral and Intraoral Examination Techniques for Systematic Findings
A systematic examination prevents the classic “I looked, but I didn’t really look” problem. The goal is to move from broad to specific, record findings consistently, and link observations to likely diagnoses.
Foundational Principles for Systematic Examination
Start with a clear order: extraoral first, then intraoral. Use the same sequence for every patient so your notes stay comparable across visits. Keep lighting and ergonomics stable; if you change your setup mid-exam, you’ll miss details.
Use three recording habits throughout:
- Location: side, quadrant/region, and tooth number when relevant.
- Quality: color, texture, borders, tenderness, mobility, and consistency.
- Impact: symptoms (pain, bleeding, difficulty swallowing), functional limits, and patient-reported triggers.
Extraoral Examination Techniques
Begin with the patient seated upright, then proceed from general appearance to targeted checks.
-
Face symmetry and posture
- Observe at rest for asymmetry, swelling, or altered facial contours.
- Example: A unilateral lower facial fullness with reduced mouth opening suggests a process involving deeper spaces rather than a superficial skin irritation.
-
Skin and soft tissue inspection
- Look for erythema, ulceration, fistula openings, scars, and abnormal pigmentation.
- Example: A small draining opening near the mandible that correlates with a tender tooth points toward a possible odontogenic source.
-
Palpation of lymph nodes
- Palpate submandibular, submental, and cervical nodes using light, then moderate pressure.
- Record size, tenderness, mobility, and whether nodes are discrete or matted.
- Example: Tender, mobile submandibular nodes with recent onset pain often accompany acute inflammation.
-
TMJ and masticatory muscles
- Ask the patient to open and close while you observe deviation and range.
- Palpate masseter, temporalis, and pterygoid region indirectly via functional movements.
- Example: Pain on opening with a reproducible click that worsens with chewing supports a mechanical component rather than a purely dental cause.
-
Neurologic and sensory screening
- Check facial nerve symmetry and basic sensation in relevant distributions when numbness is reported.
- Example: Persistent numbness over a defined area raises concern for sensory involvement and changes urgency.
Intraoral Examination Techniques
Intraoral assessment is where you connect symptoms to tissues and teeth. Use a consistent path: lips and vestibule, mucosa, gingiva, tongue, floor of mouth, palate, oropharynx, then teeth.
-
Lips and labial mucosa
- Inspect for ulcers, fissures, and lesions at common trauma sites.
- Example: A sharp-edged restoration causing a recurrent ulcer on the inner lower lip is a mechanical diagnosis waiting to happen.
-
Buccal mucosa and vestibule
- Look for erythema, white patches, swelling, and tenderness.
- Palpate gently for induration or fluctuance.
- Example: Localized tenderness with a firm area near a molar region can align with an underlying periapical or periodontal process.
-
Gingiva and periodontal tissues
- Observe color, contour, and bleeding tendency.
- Use probing when indicated, and record pocketing patterns rather than single numbers.
- Example: Generalized bleeding with deep pockets suggests active periodontal inflammation rather than isolated gingivitis.
-
Tooth examination with targeted tests
- Inspect restorations, caries risk indicators, wear facets, and tooth fractures.
- Perform percussion and palpation for suspected pulpal/periapical involvement.
- Example: A tooth that is tender to percussion with a localized swelling supports periapical inflammation even if the patient’s pain is intermittent.
-
Tongue and ventral tongue
- Inspect dorsum and borders for coating, fissures, ulcers, and masses.
- Palpate the ventral surface and check mobility and tenderness.
- Example: A unilateral ulcer that bleeds easily and persists despite reduced trauma warrants careful characterization.
-
Floor of mouth and salivary drainage
- Evaluate for swelling, firmness, and ductal openings.
- Ask about meal-related pain or swelling if salivary obstruction is suspected.
- Example: Pain and swelling that worsen during meals can align with duct obstruction rather than a random infection.
-
Palate and oropharynx
- Inspect hard and soft palate for lesions and asymmetry.
- Check tonsillar areas and posterior pharynx when symptoms suggest involvement.
- Example: A unilateral tonsillar asymmetry with referred ear pain can change the differential and the urgency of referral.
-
Occlusion and functional assessment
- Observe how the patient closes and note any deviation, open bite, or slide.
- Example: A shift on closure that reproduces TMJ discomfort helps separate joint-driven pain from tooth-driven pain.
Mind Map: Systematic Examination Flow
Practical Examples That Tie Findings Together
-
Example: Suspected odontogenic swelling
- Extraoral: unilateral facial fullness.
- Intraoral: localized buccal vestibular tenderness near a molar.
- Tooth test: percussion tenderness.
- Interpretation: the pattern supports a tooth-related inflammatory source rather than a generalized mucosal problem.
-
Example: Suspected mechanical TMJ component
- Extraoral: pain on palpation of masseter/temporalis.
- Intraoral: no clear mucosal or tooth cause for the main complaint.
- Function: deviation or reproducible click with opening.
- Interpretation: joint or muscle involvement becomes the leading explanation for the symptom pattern.
A good exam ends with a coherent set of findings, not a list of isolated observations. When you can explain how each observation supports or challenges a working diagnosis, your notes become clinically useful rather than merely complete.
3.3 Vitality Testing and Sensibility Testing for Interpreting Pulp Status
Vitality testing answers one practical question: is the pulp alive and capable of responding? Sensibility testing answers a related but different question: does the tooth respond to a stimulus? In real clinics, the two ideas overlap, but they are not identical, and that distinction matters when you interpret results.
Foundational Concepts for Interpreting Pulp Status
Start with what you can and cannot measure. Vitality testing is about blood supply and tissue health; sensibility testing is about nerve response. A tooth can be non-vital yet still respond briefly to certain stimuli, especially early after injury or when inflammation is patchy. Conversely, a tooth can be vital but fail to respond if the stimulus does not reach the pulp effectively.
To interpret results, you need three anchors: the stimulus method, the response pattern, and the comparison tooth. A “yes” that is delayed, weak, or inconsistent is not the same as a “yes” that is immediate and repeatable. A “no” is not automatically “dead”; it can be a technique problem.
Sensibility Testing Methods and How to Use Them
Cold Testing
Cold testing is commonly used because it is easy to standardize. Use a consistent application time and a controlled source. Apply to the facial surface first, then compare with the contralateral or adjacent tooth. A healthy tooth typically responds quickly and then stops when the stimulus ends.
Example: A maxillary first molar gives a lingering cold sensation for 20–30 seconds, while the adjacent second molar stops immediately. That pattern suggests irreversible pulpitis rather than a simple reversible response.
Heat Testing
Heat testing can help when cold responses are unreliable or when you suspect a different pain mechanism. Heat is often slower to provoke a response, so keep the application brief and consistent. Interpret lingering heat pain similarly to lingering cold pain.
Example: A tooth responds to heat with a delayed, lingering ache but shows no cold response. The combined pattern supports a pulp condition that is not simply reversible.
Electric Pulp Testing
Electric pulp testing measures nerve response through a controlled current. It is sensitive to patient factors like anxiety, thick enamel, and incomplete contact. Use it as a comparative tool, not a standalone verdict.
Example: A patient reports a strong tingling on the control tooth but no response on a suspected tooth. If the suspected tooth is also tender to percussion and shows periapical radiographic changes, the “no response” becomes more meaningful.
Vitality Testing Concepts in Clinical Practice
True vitality testing of blood supply is not routinely performed in everyday general practice. Instead, clinicians infer vitality from sensibility patterns, clinical signs, and radiographic findings. That inference is only valid when testing is done carefully.
A key practical rule: if you get a “no response,” verify that the test was delivered correctly. Check the device, confirm contact, and ensure the tooth is not insulated by restorations or thick dentin. If the tooth is hard to test, consider repeating with a different method.
Interpreting Response Patterns Systematically
Use a structured interpretation rather than a single label.
- Response timing: immediate versus delayed.
- Response duration: stops promptly versus lingers after stimulus.
- Response consistency: repeatable versus variable.
- Stimulus type: cold, heat, or electric.
- Clinical context: spontaneous pain, pain on biting, percussion tenderness, and radiographic findings.
Example: A tooth responds to cold with a brief sensation, has no spontaneous pain, and shows no periapical radiolucency. That combination supports a more reversible or healthy pulp status than a tooth with lingering pain and periapical changes.
Common Pitfalls and How to Avoid Them
- False negatives: poor isolation, inadequate contact, thick enamel, or patient misunderstanding. Fix by repeating with a different method and confirming technique.
- False positives: patient guessing, inconsistent attention, or stimulus spread to adjacent tissues. Fix by using clear instructions and isolating the test area.
- Overreliance on one test: a single “no” without context can mislead. Fix by integrating symptoms and exam findings.
Mind Map: Vitality and Sensibility Interpretation
Case-Style Example for Integrated Reasoning
A patient reports brief cold sensitivity that stops within a few seconds. The tooth tests positive to cold with a prompt, short response. Percussion is normal, and there is no periapical radiolucency. The most consistent interpretation is a pulp status that is likely reversible or healthy, because the response is short-lived and the rest of the exam does not point toward established necrosis.
Now compare that with a tooth that shows no cold response, has lingering heat pain, is tender to percussion, and has a small periapical radiolucency. Even if the electric test is inconsistent, the combined pattern supports a pulp condition that is not simply reversible.
Practical Takeaways for Reliable Testing
Plan testing before you start: choose a control tooth, decide which stimulus you will use first, and set a consistent application time. Record not just “positive” or “negative,” but also timing and duration. When results conflict, treat the conflict as data: it often points to technique issues, mixed pulp inflammation, or the need to integrate symptoms and exam findings rather than forcing a single label.
3.4 Occlusal Assessment and Functional Evaluation for Pain and Wear
Occlusion is not just “how teeth meet.” It is the pattern of forces during chewing, clenching, and parafunctional habits, and it can explain both pain and wear when you connect symptoms to mechanics. The goal of this section is to move from what the patient feels to what the teeth and jaw are doing.
Foundational Concepts for Interpreting Symptoms
Start with the patient’s complaint and map it to likely functional sources.
- Pain timing: Ask whether pain is present on biting, on waking, during chewing, or at rest. Pain on biting often points to localized tooth or periodontal loading; pain on waking can suggest nocturnal clenching or muscle overuse.
- Pain location: Note whether the patient can point to a tooth, a quadrant, the ear/temple area, or the jaw joint region. Tooth-specific pain often correlates with focal occlusal contacts or pulpal/periapical issues; joint or muscle pain correlates more with mandibular movement patterns.
- Wear pattern: Look for generalized flattening, cupping, chipping, or wedge-shaped defects. Wear that matches contact areas supports an occlusal etiology; wear that is widespread with minimal contact correlation can suggest other drivers like diet or bruxism.
A practical rule: if you can’t describe where the forces land, you can’t reliably explain why something hurts or why enamel is disappearing.
Systematic Intraoral Occlusal Assessment
Use a consistent sequence so you don’t “chase” findings.
- Static contact evaluation: With the patient in maximum intercuspation, inspect for high spots and uneven contact distribution.
- Example: A patient reports sharp pain on biting a sandwich. You notice a single posterior tooth that appears to contact earlier and more firmly than neighbors.
- Dynamic movement observation: Ask the patient to perform slow protrusion, right and left excursions, and gentle opening/closing.
- Example: During right excursion, a cusp tip on a molar visibly contacts first and the patient reports discomfort in that direction.
- Wear mapping: Photograph or chart wear and relate it to cusp inclines, incisal edges, and cervical areas.
- Example: Wedge-shaped defects on canines with minimal posterior wear suggest lateral guidance and possible parafunctional contact on those surfaces.
- Rest position and freeway space check: Estimate whether the patient has a reduced freeway space, which can increase the likelihood of tooth contact during rest.
- Example: If the patient’s jaw feels “tight” at rest and you find minimal separation, you consider muscle guarding and frequent clenching.
Functional Evaluation for Jaw Motion and Muscle Contribution
Occlusal problems often show up as movement deviations.
- Mandibular range and symmetry: Measure opening width and observe for deviation or deflection.
- Example: A patient opens with a slight right deviation and reports clicking. You document whether deviation occurs early or later in opening.
- Joint sounds and tenderness: Palpate masseter, temporalis, and lateral pterygoid areas, then assess TMJ tenderness.
- Example: Tender masseter with minimal joint tenderness supports a muscle-driven pain pattern rather than a primary joint disorder.
- Provocation with function: Reproduce symptoms with controlled tasks.
- Example: If chewing on one side reproduces pain, you compare that side’s excursion contacts and wear distribution.
Advanced Details for Localizing Occlusal Contributors
When you suspect occlusion is involved, you need evidence of contact behavior.
- Articulating paper and contact interpretation: Use thin paper to identify contact timing and distribution, then confirm with patient feedback.
- Example: Thick paper shows “lots of marks,” but thin paper reveals a single premature contact that matches the patient’s biting pain.
- Selective contact reasoning: Don’t adjust blindly. Determine whether the contact is coincident with pain, wear, or movement deviation.
- Example: If a high contact sits on a worn cusp that the patient uses during lateral movement, it may be contributing to progressive wear.
- Consider non-occlusal confounders: Pain and wear can coexist with other causes.
- Example: A cervical wedge defect may be abrasion/erosion plus occlusal loading; you record both possibilities rather than forcing one explanation.
Mind Map: Occlusal Assessment for Pain and Wear
Example: Turning Findings into a Coherent Conclusion
A patient reports morning jaw tightness and chipping on upper premolars.
- You find tenderness in masseter and temporalis, with minimal TMJ tenderness.
- Wear is concentrated on the incisal edges and buccal cusps that align with lateral contacts.
- Thin articulating paper shows a consistent premature contact on one premolar during right excursion, and the patient reports discomfort during that movement.
The integrated conclusion is not “occlusion is the only cause,” but rather: the occlusal contact pattern is plausibly reinforcing parafunctional loading, which fits both the pain timing and the localized wear.
Documentation That Makes Future Decisions Easier
Record what you observed in a way that supports treatment planning.
- Chart wear locations and severity.
- Note movement deviations and which direction provokes symptoms.
- Document contact timing findings and the patient’s response.
- Record muscle and TMJ tenderness separately so you can distinguish muscle-driven from joint-driven patterns.
When documentation is specific, you can compare visits and avoid repeating the same assessment from scratch.
3.5 Diagnostic Records Including Radiographs Photographs And Documentation
Diagnostic records turn a “what I see” appointment into a “what I can justify” record. The goal is not to collect everything, but to collect the right things in a consistent order so another clinician could follow your reasoning.
Core Principles of Diagnostic Documentation
Start with a clear baseline: symptoms, findings, and the tests you used. Then record the interpretation and the working diagnosis. Finally, document the plan and what you will reassess. A practical rule is to write so that the chart answers three questions: What was the patient worried about? What did you find? What did you do next?
Patient History Records That Link to Findings
Capture chief complaint in the patient’s words, including onset, triggers, and duration. Record relevant medical history that affects treatment choices, such as anticoagulant use for surgery planning or diabetes control for infection risk. Document dental history that changes the differential diagnosis, like prior root canal treatment, recent restorations, or episodes of swelling.
Example: If a patient reports “sharp pain when biting” and you later find a high restoration and a localized periodontal pocket, the record should connect the symptom pattern to the exam findings and the tests performed.
Clinical Examination Findings with Structured Notes
Use a consistent format for intraoral and extraoral findings. For each tooth or region, note location, severity, and relevant measurements. For periodontal assessment, record probing depths, bleeding on probing, and mobility. For caries suspicion, describe lesion characteristics such as surface texture, cavitation, and proximity to the pulp.
A helpful habit is to separate observations from interpretations. “Mild erythema on buccal mucosa adjacent to tooth 36” is an observation; “consistent with traumatic irritation” is an interpretation that should be supported by the rest of the record.
Radiographs Records That Explain What They Show
Radiographs are not just images; they are evidence with limits. Record which views were taken and why. Note technique factors when relevant, such as patient positioning issues or limited exposure due to gag reflex.
For each radiographic finding, document:
- Tooth or region reference
- Finding type (e.g., periapical radiolucency, interproximal radiopacity, bone level change)
- Approximate size or extent
- Confidence level based on image quality and anatomy overlap
Example: A faint periapical radiolucency near the apex of tooth 21 may be obscured by normal structures. If your confidence is low, write that explicitly and correlate with symptoms and vitality testing.
Photographs Records That Support Monitoring and Communication
Photographs help when color, surface texture, and lesion boundaries matter. Use consistent angles, lighting, and retraction technique. Record what each photo is intended to show, such as:
- Baseline of a suspected mucosal lesion
- Occlusal wear pattern distribution
- Pre- and post-restoration margins
Example: For a suspected non-healing ulcer, include a close-up with a scale reference and a wider view showing location relative to adjacent teeth. This makes follow-up comparisons meaningful.
Documentation Workflow That Prevents Missing Pieces
Use a stepwise workflow so nothing important gets skipped:
- Record symptoms and relevant history.
- Record exam findings and measurements.
- Record tests performed and results.
- Record radiographs and photographs taken with their purpose.
- Write the working diagnosis and differential reasoning.
- Document the treatment plan and reassessment timeline.
This sequence reduces the common problem of having images without a clear clinical question attached to them.
Mind Map: Diagnostic Records Components
Example: Putting It All Together in One Note
A patient reports lingering cold sensitivity on tooth 14. You record the onset and whether pain lingers after stimulus. On exam, you note a deep occlusal restoration with a questionable marginal gap. Vitality testing shows delayed response on cold and normal response on adjacent teeth. You take a bitewing and a periapical radiograph to assess proximity to the pulp and periapical status, documenting image quality and your confidence in any subtle radiolucency. You add a standardized occlusal photo to document restoration margins. Your working diagnosis is reversible pulpitis versus symptomatic irreversible pulpitis, and your plan includes definitive treatment with reassessment criteria tied to symptom resolution.
Quality Checks Before Closing the Chart
Before finishing, verify that every image has a purpose, every measurement has a unit or scale, and every diagnosis has supporting findings. If a finding is uncertain, record why. If a test was not performed, record the reason, such as patient intolerance or limited access. This keeps the record honest and usable.
4. Radiographic Interpretation and Imaging Protocols
4.1 Radiographic Principles for Contrast Resolution and Image Quality
Radiographs are basically a controlled conversation between X-rays and tissues. Contrast resolution is how well that conversation distinguishes small differences in density, while image quality is how reliably you can see and measure what matters for diagnosis.
Foundations of Contrast and Density
Start with the idea that tissues attenuate X-rays differently. Enamel and dentin attenuate more than air, so they appear lighter on film or sensors. Bone and calculus attenuate more than soft tissue, which is why the same tooth can show different structures depending on what lies in the beam path.
Contrast is not one thing; it’s the combined result of:
- Subject contrast: differences in attenuation between tissues.
- Device contrast: how the detector converts X-ray differences into visible shades.
- Geometric contrast: how beam direction and object positioning affect sharpness.
A useful rule: if subject contrast is low (for example, early enamel changes), you must protect device and geometric factors to avoid making the already-subtle differences even harder to see.
Detector and Exposure Factors
Image receptors vary, but the logic stays the same: the detector needs enough signal to separate noise from real differences.
Key exposure concepts:
- kVp changes beam energy and therefore penetration. Higher kVp generally reduces subject contrast but can improve penetration through thicker anatomy.
- mA and exposure time control the number of photons. Too little exposure increases noise; too much can reduce contrast and increase patient dose.
- Filtration removes lower-energy photons that would otherwise increase noise and skin dose.
If you’ve ever seen a radiograph that looks “gray and grainy,” that’s often underexposure plus noise. If it looks washed out with low differentiation, it can be overexposure or inappropriate kVp for the task.
Geometry and Sharpness
Geometric factors determine whether edges look crisp or smeared.
- Source-to-object distance and object-to-receptor distance affect magnification and blur.
- Parallel technique reduces distortion compared with non-parallel placement.
- Sensor or film positioning matters: a small shift can move anatomy into a different overlap pattern.
A practical example: when a bitewing is angled too far, contacts may appear separated or fused, and interproximal lesions can be masked by overlap. The diagnostic question changes even if the patient hasn’t.
Scatter Control and Contrast Preservation
Scatter is stray radiation that reaches the detector after being deflected by tissues. It lowers contrast by adding a “fog” signal.
Scatter control strategies include:
- Collimation to limit the beam size.
- Proper receptor placement to reduce unnecessary tissue volume in the beam.
- Use of grids when appropriate for thicker regions.
If you notice reduced contrast without obvious exposure errors, scatter is a common suspect. Think of it as the radiograph’s version of looking through a slightly dusty window.
Processing and Detector Handling
For digital systems, image appearance depends on both acquisition and processing.
- Consistent exposure helps processing algorithms behave predictably.
- Correct sensor orientation and cleanliness prevent artifacts that mimic pathology.
- Avoid repeated retakes that increase dose and can still fail to improve diagnostic value.
For analog systems, processing chemistry and timing affect density and contrast. For digital, improper calibration or inconsistent settings can shift brightness and contrast, making comparisons across visits unreliable.
Contrast Resolution in Clinical Context
Different diagnostic tasks demand different contrast emphasis.
- Caries detection benefits from high contrast between enamel/dentin and surrounding structures, but early lesions may be close to the noise floor.
- Periapical assessment depends on identifying subtle changes in trabecular pattern and lesion borders.
- Periodontal evaluation relies on consistent angulation and receptor positioning to avoid false bone level changes.
When the clinical goal is subtle detection, prioritize correct exposure, stable positioning, and scatter control over aggressive “enhancement” that can create misleading edges.
Mind Map: Contrast Resolution and Image Quality
Example: Preventing a False Interproximal Finding
A patient has a suspected interproximal lesion. The first bitewing shows a dark area near a contact, but the contact looks distorted and the image is slightly blurred.
A systematic check:
- Receptor placement: confirm the sensor is parallel and centered.
- Angulation: verify the beam direction matches the intended technique.
- Exposure: assess whether the image is underexposed (grainy) or overexposed (washed out).
- Scatter: ensure collimation is tight and the field is not unnecessarily large.
If the repeat radiograph shows the contact overlap corrected and the “lesion” disappears, the original finding was likely an artifact from geometry or scatter rather than a true tissue change.
Example: Choosing Exposure for Thick Posterior Anatomy
In a posterior region with thicker soft tissue, a radiograph may appear too dark and noisy if exposure is insufficient. The fix is not random retaking; it’s adjusting technique so the detector receives enough photons while maintaining usable contrast.
A good workflow:
- Confirm technique parameters match the patient size and region.
- Use appropriate kVp and exposure settings to penetrate without flattening contrast excessively.
- Recheck positioning to avoid repeating errors that exposure cannot correct.
When contrast resolution and image quality are treated as a chain of controllable steps, the radiograph becomes a reliable measurement tool rather than a guess with grayscale.
4.2 Intraoral Radiograph Techniques for Bitewing Periapical and Occlusal Views
Intraoral radiographs are small, quiet documents: they show what your eyes can’t see, but only if you capture them with consistent geometry. The goal is simple—place the receptor, aim the X-ray, and position the patient so the anatomy lands where you expect. When technique is sloppy, interpretation becomes guesswork, and guesswork is expensive.
Foundational Concepts for Image Quality
Receptor placement and patient positioning
Use a receptor size that matches the site. Too large a receptor forces awkward angles and increases distortion. For bitewings, the receptor should sit flat against the palate or tongue side and extend far enough posteriorly to include the full crown height of the teeth being assessed. For periapicals, the receptor must cover the tooth and the adjacent structures you need to evaluate.
Patient positioning matters because the head is a “radiographic protractor.” Ask the patient to stay still, close gently, and avoid swallowing during exposure. If the patient’s tongue pushes the receptor, bitewing images will show blur and incomplete coverage.
Beam direction and the “rule of alignment”
The X-ray beam should be directed so the tooth’s long axis is represented with minimal foreshortening or elongation. If the beam is too vertical, you get foreshortening; if it’s too horizontal, you get elongation and overlapping contacts. A useful mental check is: the beam should enter at a point that corresponds to the target tooth’s crown and exit toward the opposite side without excessive angulation.
Exposure, collimation, and motion
Collimation limits scatter and improves contrast. Short exposure times reduce motion blur—especially in children, anxious patients, and anyone who thinks “one second” is negotiable. If you see ghosting or double edges, retake rather than interpret a smudged map.
Bitewing Technique for Caries and Bone Assessment
Bitewings are designed to show the crowns of posterior teeth and the crestal bone level in the same image. That dual purpose is why bitewings are so efficient.
Step-by-step bitewing approach
- Select the correct receptor and place it so the occlusal surface contacts the receptor edges without rocking.
- Position the receptor to cover the crowns from the distal of one first molar to the distal of the other, depending on your system.
- Direct the beam to the interproximal area between the teeth, not to the center of the receptor.
- Ensure the patient’s head is stable; keep the chin slightly up to reduce superimposition of the cervical spine.
Common bitewing errors and what they look like
- Overlapping contacts: often from incorrect receptor placement or beam misalignment.
- Crestal bone appearing too high or too low: can result from receptor tilt or inconsistent head position.
- Foreshortened crowns: beam too vertical.
Concrete example
A patient with suspected interproximal enamel lesions shows “dark” areas near contact points. If the contacts are overlapping, those dark areas may be artifacts from superimposition. Retake with correct receptor placement and beam direction, then reassess the lesion margins.
Periapical Technique for Root and Periapical Evaluation
Periapicals show the entire tooth from crown to apex, plus surrounding bone. This makes them essential for endodontic assessment, periapical pathology, and trauma evaluation.
Step-by-step periapical approach
- Place the receptor so it is parallel to the tooth’s long axis as much as practical.
- Center the beam on the region of interest, typically the midpoint of the tooth.
- Use the correct horizontal and vertical angulation to avoid distortion of the apex.
- Confirm that the tooth apex is included and not cut off by receptor placement.
Common periapical errors and what they mean
- Apex not visible: receptor too short or positioned too far from the target.
- Elongation: beam too horizontal or receptor not aligned.
- Foreshortening: beam too vertical.
Concrete example
A patient reports lingering discomfort after a filling. The periapical shows an unclear apical outline. If the apex is foreshortened, you may miss subtle periapical radiolucency. Correct technique—full apex inclusion with proper angulation—turns “unclear” into interpretable.
Occlusal Technique for Broad Spatial Context
Occlusal radiographs provide a wider field, useful for assessing impacted teeth, jaw fractures, large lesions, and the relationship of teeth to bone. They are also helpful when intraoral periapicals can’t capture the needed anatomy.
Step-by-step occlusal approach
- Choose the appropriate occlusal receptor size and ensure it sits securely.
- For maxillary occlusals, position the receptor in the palate area and guide the patient to close gently.
- For mandibular occlusals, position the receptor under the tongue with careful patient instruction to avoid gagging.
- Aim the beam so the image is not excessively distorted; keep the head position consistent.
Common occlusal errors
- Patient movement: causes blur across the entire jaw image.
- Poor receptor seating: leads to incomplete coverage or distorted anatomy.
- Inconsistent head position: changes the apparent location of structures.
Concrete example
When evaluating a suspected impacted canine, occlusal images can show whether the crown is positioned palatally or buccally relative to adjacent teeth. If the receptor is not seated correctly, the apparent position may be misleading, so technique quality directly affects clinical decisions.
Mind Map: Intraoral Radiograph Technique Workflow
Technique Checkpoints That Prevent Retakes
Before exposure, verify receptor size, seating, and patient stability. After exposure, check that the target tooth is fully included, contacts are not excessively overlapped, and the apex is visible for periapicals. If any of those fail, retake promptly; a “nearly usable” image is often worse than a clear retake because it invites confident misinterpretation.
4.3 Panoramic Radiography Interpretation for Anatomical Landmarks and Pathology
Panoramic radiography compresses a three-dimensional head into a single image, so interpretation starts with geometry. The image is not a “truth picture”; it is a projection. Your job is to separate normal anatomy from projection artifacts, then decide whether a finding fits a disease pattern.
Foundational Orientation and Image Quality Checks
Begin with quick quality checks before reading pathology. Confirm the patient position: midline alignment, adequate opening, and no excessive tongue thrust. Look for motion blur, poor contrast, and cut-off anatomy. If the mandibular condyles or maxillary sinuses are partially missing, you cannot reliably compare sides.
Next, orient yourself to the projection path. Structures closer to the receptor appear sharper and less distorted than those farther away. This matters when you see asymmetry: some asymmetry is real, some is magnified, and some is just the angle doing its job.
Anatomical Landmarks You Should Expect
Start with landmarks that anchor your mental map.
- Maxillary sinuses: Usually radiolucent with smooth borders. Mucosal thickening can appear as a dome-shaped opacity, while fluid levels are less common but possible. A common pitfall is mistaking normal sinus floor variation for disease.
- Nasal cavity and septum: The nasal septum may look slightly off-center due to projection. Treat mild asymmetry cautiously.
- Mandibular canal: Typically a thin radiolucent line or band running from the posterior mandible toward the premolar region. It can appear darker or lighter depending on exposure and cortical overlap.
- Mental foramen: Often seen near the apices of premolars as a small radiolucency. If you see a “hole” that seems too high or too low, check whether it is actually the canal superimposed.
- Inferior border of mandible: Cortical outline should be continuous. Breaks or irregularities can be pathology, but they can also be caused by positioning or overlap.
- Zygomatic arches and coronoid processes: These can overlap with molar regions. If a radiopaque streak crosses the molars, consider whether it is an arch rather than a lesion.
A practical habit: trace the mandibular canal on both sides. If one side “disappears” abruptly, that can be a real finding, but it can also be an artifact from overlap or exposure.
Interpreting Pathology Patterns Without Guessing
Pathology interpretation is pattern recognition plus correlation with clinical findings.
- Assess location: Is the finding in the maxilla, mandible, sinus, or soft tissue region? Panoramic images blur boundaries, so location is probabilistic.
- Assess border characteristics: Well-defined radiolucencies or radiopacities suggest certain processes; ill-defined changes suggest others. Border sharpness is influenced by exposure and superimposition, so compare with the contralateral side.
- Assess internal structure: Homogeneous radiolucency differs from mixed density. Teeth-related lesions often align with root apices or periodontal spaces.
- Assess effect on adjacent structures: Look for tooth displacement, root resorption, lamina dura changes, or disruption of the mandibular canal.
Common Findings and How They Show Up
Periapical pathology often appears as a radiolucency near the apex of a tooth. Because panoramic projection can shift the apparent apex, confirm with periapical radiographs when the clinical story suggests endodontic or periodontal involvement.
Periodontal bone loss may appear as generalized or localized reduction in bone height. On panoramics, the degree of bone loss can be underestimated or overestimated due to angulation, so use it as a screening tool rather than a measurement tool.
Cysts and benign lesions can present as well-defined radiolucencies. The key is not naming the lesion from the panoramic image alone; the key is recognizing that a discrete lesion exists and whether it threatens nearby structures like the canal.
Impacted teeth show as crowns or roots displaced from their expected positions. Their relationship to adjacent roots and the mandibular canal is clinically important, even when the panoramic image cannot show exact distances.
Mind Map: Landmark-to-Pathology Reasoning
Panoramic Interpretation Mind Map
Example: Mandibular Canal Confusion
A patient has a panoramic image showing a radiolucent area near the premolar region. The clinician initially suspects a lesion. Before concluding, they trace the mandibular canal on both sides. On the “lesion” side, the canal line is present but partially obscured by overlapping roots. The radiolucency matches the canal’s expected course and shape, so the finding is treated as an anatomic projection rather than pathology.
Example: Discrete Lesion Near an Apex
Another patient reports localized pain around a molar. The panoramic image shows a well-defined radiolucency adjacent to the molar’s root apex region. The border is relatively sharp, and the lesion appears to sit where apical pathology would be expected. The clinician correlates with pulp testing and periodontal findings, then orders targeted periapical imaging to confirm extent and refine the diagnosis.
Practical Interpretation Checklist
- Quality first: if positioning is poor, reduce confidence.
- Landmarks second: trace the mandibular canal and identify sinus borders.
- Findings third: describe location, borders, internal density, and effects.
- Correlate fourth: symptoms and tooth status decide what matters.
- Confirm when needed: panoramics screen; targeted images clarify.
4.4 Cone Beam Computed Tomography Use for Endodontic Periodontal and Surgical Planning
Cone Beam Computed Tomography (CBCT) turns a 2D problem into a 3D one. That matters when anatomy overlaps on radiographs, when canals or roots are unusually shaped, or when surgery needs a precise map. The goal is not “more imaging,” but better decisions.
Foundational Principles for CBCT Interpretation
CBCT produces a volume made of voxels, which are small cubes of tissue representation. Smaller voxels can improve detail, but they also increase noise and dose. Field of view (FOV) determines how much anatomy is captured; a larger FOV includes more structures but may reduce resolution for the region of interest.
Voxel size and FOV are the two knobs you should understand before you interpret anything. If the FOV is too small, you may miss a relevant structure. If it is too large, you may dilute detail where you need it most. If the voxel size is too large, fine canal anatomy can look deceptively simple.
Indications for Endodontic Planning
CBCT is most useful in endodontics when conventional radiographs and clinical testing do not explain the findings. Common examples include suspected additional canals, unclear apical anatomy, persistent symptoms after treatment, and evaluation of resorption or fractures.
A practical example: a patient reports lingering discomfort after a root canal. The periapical radiograph shows a single root outline, but the tooth has a history of complex anatomy. CBCT may reveal a second canal that was not treated, or it may show a periapical lesion that is offset buccolingually. That changes the access plan and the prognosis conversation.
When interpreting CBCT for endodontic disease, remember that radiolucency is not a diagnosis by itself. Correlate with pulp sensibility tests, percussion, palpation, periodontal probing, and the tooth’s restoration status. CBCT helps you locate and size anatomy; clinical testing helps you decide what it means.
Indications for Periodontal Planning
Periodontal use focuses on bone morphology and the relationship between defects and tooth anatomy. CBCT can help when probing depths are disproportionate to what 2D imaging shows, when furcation involvement is suspected, or when assessing endo-perio lesions where the source of inflammation is unclear.
Example: a mandibular molar shows deep buccal probing and a radiograph that looks relatively mild. CBCT may reveal a buccal-lingual defect pattern, such as a narrow crater-like defect or a defect that wraps around the root. That affects whether you plan regenerative approaches, how you debride, and what you tell the patient about expected healing.
Interpretation should include attention to cortical plates and the buccal-lingual extent of bone loss. A defect that is “thin” on 2D can be “wide” in 3D, and the treatment plan should match the true geometry.
Indications for Surgical Planning
Surgery includes apical surgery, implant site evaluation, and management of impacted teeth. CBCT is valuable when you need to understand proximity to critical structures, such as the mandibular canal, maxillary sinus, nasal floor, or adjacent roots.
Example: planning apical surgery on an upper premolar. A periapical radiograph suggests the lesion is close to the sinus, but the exact relationship is unclear. CBCT can show whether the lesion is separated by a thin bony plate or whether it is in direct contact. That guides flap design, osteotomy extent, and postoperative expectations.
Acquisition and Quality Control
Before scanning, confirm patient positioning and immobilization. Motion artifacts can turn a careful plan into a guessing game. Use the smallest FOV that covers the clinical question and select voxel size that matches the needed detail.
After acquisition, verify image quality: check for motion, ensure the region of interest is included, and confirm that the slices are not distorted by poor alignment. If the image quality is questionable, interpretation becomes unreliable.
Systematic Reading Workflow
Use a consistent sequence so you do not miss key findings.
- Confirm the target tooth and side using the scout view.
- Review axial slices to locate roots, canals, and lesion position.
- Review sagittal slices to assess buccal-lingual relationships.
- Review coronal slices to evaluate furcations, sinus proximity, and defect spread.
- Assess density and borders of lesions, noting whether margins are corticated or irregular.
- Measure clinically relevant distances to critical structures when surgery is planned.
- Correlate with clinical findings and decide what changes in treatment.
Mind Map: CBCT Use for Endodontic Periodontal and Surgical Planning
Example: Turning CBCT Findings into a Plan
A clinician suspects a missed canal in a maxillary molar. CBCT shows an additional palatal canal with a separate apical terminus. The plan shifts from retreatment focused on the original canal to a full canal search with updated working length strategy. The patient’s informed consent also becomes more precise because the “why” is tied to visible anatomy rather than uncertainty.
Key Takeaways for Safe and Useful CBCT Use
CBCT is a tool for resolving specific uncertainties. Choose scan settings that match the question, read systematically across planes, and always connect imaging findings to clinical tests and treatment consequences.
4.5 Radiation Safety and Exposure Control for Patients and Staff
Radiation safety in dentistry is mostly about doing the right thing in the right order: justify the image, optimize the technique, and protect people from unnecessary exposure. The goal is not “zero radiation,” because imaging can be clinically essential; the goal is clinically useful images with the lowest reasonable dose.
Core Principles for Safe Imaging
Justification means you only take radiographs when they are likely to change diagnosis or treatment. A quick example: if a patient has localized pain and a periapical radiograph would guide whether endodontic treatment is needed, imaging is justified; if the same symptoms are clearly explained by a recent restoration with no suspicion of deeper pathology, you may defer imaging and document the clinical findings instead.
Optimization means adjusting technique so the image is diagnostic without being overexposed. Think of it like seasoning: too little and you can’t taste the information; too much and you waste the meal and annoy everyone.
Protection includes time, distance, and shielding. Staff exposure is reduced by minimizing time near the beam, maximizing distance when possible, and using barriers such as lead aprons and thyroid collars where appropriate.
Patient Preparation and Positioning
Start with patient factors that affect image quality and dose. Remove jewelry and ask patients to hold still; motion blurs images and often leads to retakes, which increases dose. Positioning is not a “nice-to-have.” For bitewings, correct placement reduces repeat exposures and improves detection of interproximal caries.
A practical example: if a bitewing is repeatedly taken with the sensor angled too far, the image may show overlapping contacts and unclear margins. Instead of repeating, recheck sensor placement, align the beam, and confirm the patient’s bite position.
Technique Selection and Exposure Parameters
Choose the imaging type based on the clinical question. Bitewings and periapicals answer localized questions; panoramic imaging provides broader anatomy but is less precise for small lesions. Cone beam computed tomography is reserved for cases where 3D information will directly influence management.
Optimization in 2D imaging includes:
- Use the smallest field size that covers the area of interest.
- Select exposure settings appropriate for the patient’s size and the receptor type.
- Use rectangular collimation when available to reduce scatter.
For digital systems, “brighter” is not automatically “better.” Overexposure can reduce contrast and increase patient dose. Use consistent processing settings and avoid repeatedly adjusting brightness to compensate for poor technique.
Staff Protection and Workflow
A safe workflow prevents accidental exposure and reduces scatter exposure.
- Stand behind barriers during exposures.
- Use remote exposure controls.
- Keep the room clear of unnecessary personnel.
- Confirm that the receptor is correctly positioned before exposure.
If a patient needs assistance holding a receptor, use a protective apron and minimize time in the beam area. Whenever possible, use positioning devices rather than manual holding.
Quality Assurance and Repeat-Rate Control
Repeat exposures are the silent dose multiplier. Track your retake rate and investigate patterns. Common causes include:
- Incorrect receptor placement
- Patient movement
- Poor beam alignment
- Inadequate collimation
A simple example: if retakes spike for posterior bitewings in larger patients, review technique charts for exposure adjustments and confirm that the receptor size and positioning aids match the patient.
Documentation and Communication
Record the reason for imaging, the type of study, and any relevant patient factors affecting technique. When patients ask why you’re taking an image, connect the imaging to the clinical question: “This helps us check the area behind the tooth for signs that explain your symptoms.” Clear communication reduces anxiety and supports informed consent.
Mind Map: Radiation Safety and Exposure Control
Example Workflow for a Common Scenario
A patient reports localized tooth pain. You perform a focused exam and determine that the symptoms could involve pulp or periapical tissues. You justify a periapical radiograph, select receptor placement that covers the target tooth and adjacent structures, and use exposure settings appropriate for the patient’s size. You confirm alignment before exposure, stand behind the barrier, and ensure the patient is stable. After processing, you verify that the image is diagnostic; if it is not, you correct the cause rather than simply retaking with the same flawed setup.
This approach keeps dose tied to clinical value: fewer repeats, better positioning, and consistent technique—so the image earns its place.
5. Diagnosis and Management of Common Caries and Tooth Wear
5.1 Caries Risk Assessment for Identifying Etiology and Preventive Targets
Caries risk assessment is not a single score; it is a structured explanation of why decay is happening in this mouth right now. The goal is to connect observable findings to likely causes, then choose prevention targets that match those causes. If you treat “high risk” as a label, you’ll miss the reason behind it—like changing the lock without checking whether the door is warped.
Step 1: Establish the Etiology Map Using Clinical Evidence
Start with a short list of findings that usually explain caries activity. Each finding should point to a mechanism.
- Active cavitated lesions suggest ongoing demineralization with insufficient protection.
- Noncavitated enamel lesions suggest early disease that can be reversed if risk factors are controlled.
- Missing restorations or recurrent margins suggest plaque retention and failed sealing.
- High plaque accumulation suggests biofilm management gaps.
- Diet pattern (frequency of fermentable carbs) suggests repeated acid attacks.
- Salivary factors (low flow, xerostomia, medications) suggest reduced buffering and clearance.
- Fluoride exposure (toothpaste use, brushing technique, professional fluoride history) suggests inadequate mineral support.
- Socio-behavioral factors (ability to brush effectively, access to care, caregiver support in children) suggest inconsistent daily control.
A practical way to keep this systematic is to separate disease indicators from etiologic drivers. Disease indicators tell you what is happening; etiologic drivers tell you why it is happening.
Step 2: Use a Mind Map to Link Drivers to Preventive Targets
Mind Map: Caries Risk Logic
Step 3: Translate Findings into Specific Preventive Targets
Risk assessment becomes useful when it produces a short, actionable plan. Targets should be measurable in daily life.
-
If there are active lesions or multiple new spots: prioritize arrest and remineralization.
- Example: A patient with two new white-spot lesions near the gingival margin reports brushing once daily. Target: increase to twice daily brushing with fluoride toothpaste and add a fluoride varnish appointment. Also check whether the lesions are near orthodontic brackets or margins that trap plaque.
-
If plaque retention is obvious: prioritize biofilm disruption.
- Example: A teenager with heavy plaque on molar surfaces and food impaction after meals. Target: demonstrate brushing with a timed routine (e.g., 2 minutes) and add interdental cleaning where contacts are tight. The “why” is simple: plaque that stays put keeps acid production going.
-
If diet frequency is the main driver: prioritize reducing exposure time.
- Example: A child who has juice in a bottle during the day. Target: shift to water between meals and limit sweet drinks to mealtimes. The key is frequency—acid attacks happen each time fermentable carbs are consumed.
-
If saliva is reduced: prioritize dry-mouth support and buffering.
- Example: An older adult taking medications with xerostomia and reporting sticky saliva. Target: recommend saliva substitutes or stimulants as appropriate, encourage water with meals, and consider higher-fluoride toothpaste. The “why” is that saliva normally clears acids and helps remineralize.
-
If restoration margins are failing: prioritize repair or replacement with sealing quality.
- Example: A patient with recurrent decay at the edge of a prior composite. Target: evaluate margins clinically and radiographically, then plan repair or replacement with attention to isolation and bonding steps. Prevention here includes fixing the plaque-retentive geometry.
Step 4: Decide the Risk Level Using a Coherent Pattern
Risk level should reflect the overall pattern, not a single factor. For instance, a patient with one noncavitated lesion but excellent fluoride use and good plaque control may be lower risk than someone with multiple lesions plus dry mouth.
A useful rule: the more drivers you can confirm, the more aggressive your preventive targets should be. If you can’t confirm drivers, your plan should include assessment and coaching steps that clarify them.
Step 5: Document Targets and Follow-Up Triggers
Write prevention targets in plain language and link them to findings.
- Example documentation: “White-spot lesions at cervical molars; brushing once daily; add twice-daily fluoride toothpaste, coach technique, schedule fluoride varnish; reassess lesion change in 3–6 months.”
Follow-up should be triggered by whether lesions stabilize, new lesions appear, or symptoms like dry mouth worsen. This keeps the assessment tied to outcomes rather than paperwork.
5.2 Clinical Detection Methods for Enamel and Dentin Lesions
Clinical detection is a mix of pattern recognition and disciplined checking. Enamel and dentin lesions behave differently, so the method you choose should match the tissue you’re trying to identify.
Step 1: Start with a Focused Visual Examination
Begin with clean, dry teeth and good lighting. Plaque and saliva can hide early changes, so drying for a few seconds helps you see surface texture and color differences.
Look for:
- White spot lesions: chalky, opaque areas that often appear near margins or in low-flush zones.
- Brown lesions: darker discoloration that may indicate more advanced mineral loss.
- Surface breakdown: roughness, cavitation, or a “catch” when you gently run a probe across the area.
A practical example: if a patient has orthodontic brackets, check around bracket margins and along gingival contours where cleaning is harder. White spots there are often the first visible sign.
Step 2: Use Tactile Clues Without Over-Testing
A probe is not a detector that “proves” disease; it’s a tool for assessing surface integrity. Use light pressure.
- Enamel: early lesions may feel smooth even when they look chalky.
- Dentin: once cavitation occurs, the surface often feels rough or the probe can enter a defect.
A simple rule: if the probe consistently catches in a localized area, you’re likely dealing with a lesion that has progressed beyond intact enamel.
Step 3: Apply Transillumination for Selective Clues
Transillumination can help identify enamel defects and some proximal changes by highlighting differences in light transmission.
How to use it:
- Darken the room slightly.
- Use a light source and observe the tooth from the opposite side.
Example: a small proximal enamel lesion may appear as a faint shadow line, while a sound surface transmits light more evenly.
Step 4: Consider Stain and Color Cues with Caution
Stains can be misleading because they may reflect diet, tobacco, or plaque retention rather than active mineral loss. Still, staining can help you map lesion extent.
Use staining as a “boundary marker,” not as a diagnosis. If a stained area is smooth and intact, it may not represent cavitation.
Example: a brown groove on an occlusal surface could be a stained fissure with no dentin involvement, or it could reflect an underlying lesion. Your next step should confirm whether the surface is intact.
Step 5: Use Bitewing and Periapical Radiographs to Confirm Dentin Involvement
Radiographs are most helpful for detecting lesions that have reached dentin or are close to it.
Key interpretation points:
- Enamel-only lesions may be subtle or not visible.
- Dentin lesions often show radiolucency that extends beyond the outer enamel boundary.
- Proximal overlap can create false impressions, so compare with adjacent teeth.
Example: if a patient reports sensitivity to a specific tooth and you see a suspicious proximal area clinically, a bitewing can help determine whether the lesion has progressed toward dentin.
Step 6: Add Adjunctive Tests When the Clinical Picture Is Unclear
When visual and tactile findings conflict, adjunctive methods can improve consistency.
Common adjunctive approaches in practice include:
- Laser fluorescence or similar optical devices: useful for trend tracking, but readings should be interpreted alongside visual findings.
- Caries activity indicators: can support decision-making, especially when deciding between monitoring and intervention.
Example: a chalky white spot that looks stable at follow-up may show lower activity readings than a lesion that appears to be changing in texture or extent.
Step 7: Document Findings in a Way That Supports Decisions
Detection is only useful if it leads to a clear next step. Record:
- Tooth number and surface.
- Visual description (color, texture, margin involvement).
- Cavitation status (intact enamel vs rough/cavitated).
- Radiographic findings when available.
- A monitoring or treatment rationale.
A good chart note example: “#26 mesial: opaque white spot, smooth surface, no probe catch; bitewing shows no dentin radiolucency. Monitor with fluoride varnish and hygiene coaching.”
Mind Map: Clinical Detection Workflow for Enamel and Dentin Lesions
Example: Turning Findings into a Decision
A patient shows a chalky area on the buccal cervical region of a premolar.
- Visual: opaque, slightly matte surface.
- Tactile: no roughness, no probe catch.
- Radiograph: no clear dentin involvement.
This pattern supports enamel lesion management with preventive measures and monitoring rather than immediate restoration.
Example: When Dentin Is Likely
A different patient has a brown fissure on a molar.
- Visual: darkened fissure with a widened opening.
- Tactile: probe catches at the margin.
- Radiograph: proximal or occlusal radiolucency consistent with dentin involvement.
Here, the combination of cavitation cues and radiographic support points toward a lesion that has progressed beyond enamel, guiding restorative planning.
5.3 Noninvasive and Minimally Invasive Caries Management Protocols
Caries management starts with a simple question: what is the lesion doing right now? A white-spot lesion that is still active needs different handling than a cavitated lesion that has already lost enamel support. The protocol below keeps the focus on activity control first, then restoration only when needed.
Step 1: Confirm Caries Activity and Severity
Begin with a consistent clinical checklist. Active lesions tend to show chalky opacity, roughness, and sometimes a sticky surface; inactive lesions look more matte and often feel smoother. Use a visual-tactile approach, then support it with bitewing radiographs when appropriate. If the lesion is confined to enamel and there is no cavitation, you can usually aim for remineralization and risk reduction rather than drilling.
Example: A 9-year-old with a chalky white spot on a maxillary molar pit shows no break in the surface. You classify it as non-cavitated enamel caries and prioritize activity control.
Step 2: Identify Drivers of Disease
Caries is rarely a single-tooth problem. Look for the drivers that keep the mouth in a low-pH rhythm: frequent sugar exposure, poor plaque control, inadequate fluoride exposure, and reduced salivary flow. Document the pattern: is it clustered around orthodontic appliances, along gingival margins, or in pits and fissures? That pattern helps you choose the right intervention.
Example: A patient reports sweet drinks throughout the day and has plaque accumulation around a new retainer. The plan targets both frequency and local plaque control.
Step 3: Implement Noninvasive Activity Control
Noninvasive care is the “stop the acid, strengthen the tooth” phase.
-
Fluoride strategy
- Use high-fluoride toothpaste (family-appropriate strength) twice daily.
- For higher-risk patients, consider professionally applied fluoride varnish at intervals that match risk.
- Teach correct brushing technique and spit behavior.
-
Diet and exposure coaching
- Shift from frequent sipping to fewer, planned exposures.
- Replace between-meal sugar with non-cariogenic options when possible.
-
Plaque control and mechanical disruption
- Use a brushing plan that reaches the lesion area.
- For patients with difficulty, consider adjuncts like interdental cleaning aids when indicated.
Example: An adult with multiple active white spots receives varnish and a diet plan that reduces between-meal sugar. At follow-up, the lesion surface becomes smoother and less opaque.
Step 4: Use Minimally Invasive Options When Needed
When the lesion is deeper than enamel or when the surface is compromised, minimally invasive methods aim to arrest disease while preserving tooth structure.
-
Icon infiltration for non-cavitated lesions
- Suitable for lesions with intact or near-intact surfaces.
- The goal is to reduce porosity and limit diffusion of acids and sugars.
-
Sealing active pits and fissures
- For occlusal lesions in pits and fissures, a seal can block substrate access.
- Proper isolation and surface preparation matter more than the brand of sealant.
-
Atraumatic restorative approach for small cavitations
- Remove only unsupported, infected tissue.
- Restore with a material that can be placed with minimal equipment.
Example: A molar shows a small enamel cavitation in a pit. You remove soft, unsupported tissue conservatively and restore with an atraumatic approach rather than a full conventional preparation.
Step 5: Choose a Follow-Up Schedule and Measure Change
Caries control is not “set and forget.” Reassess lesion activity using the same criteria each visit. Track whether the lesion is becoming smoother, less opaque, or stable on radiographs. If activity persists, intensify fluoride exposure and address the driver (diet, plaque, saliva).
Example: A patient treated with infiltration returns in 3–6 months. The lesion no longer appears chalky and does not progress clinically.
Mind Map: Noninvasive and Minimally Invasive Caries Protocol
Practical Decision Flow
If the lesion is non-cavitated enamel, start with fluoride plus driver control, and consider infiltration or sealing based on location and accessibility. If there is small cavitation, use minimally invasive tissue removal and a conservative restoration. If the lesion is active and progressing, revisit the drivers before adding more procedures—because the mouth is still doing the same thing, just with a new filling.
5.4 Restorative Options for Primary Permanent and High Risk Patients
Restorative choices for primary teeth, permanent teeth, and high-caries-risk patients share one goal: match the material and design to the biological problem, not just the cavity size. A good plan starts with caries activity and tissue status, then moves to moisture control, longevity expectations, and follow-up feasibility.
Foundational Decision Steps
- Confirm caries activity and depth: A chalky, soft, or cavitated lesion behaves differently from a hard, arrested one. Depth matters because enamel-only lesions tolerate different materials and bonding demands than dentin lesions.
- Assess moisture control and cooperation: Primary teeth and anxious patients often make isolation harder. If you cannot reliably isolate, choose materials and techniques that tolerate less-than-perfect conditions.
- Estimate risk and adherence: High-risk patients need restorations that resist marginal breakdown and support prevention. If recall is inconsistent, you may prioritize simpler, more durable restorations over complex ones that require perfect technique.
- Select restoration type by tooth and function: Anterior teeth need esthetics and smooth surfaces; molars need wear resistance and strong margins.
Primary Teeth Restorations
Primary teeth often require restorations that are durable, relatively quick, and forgiving. The biggest practical issue is that margins can fail when isolation is poor or when the restoration is too technique-sensitive.
Resin-Based Options
- Resin composite can work well for small to moderate lesions with adequate isolation. Use a bonding protocol appropriate for the system and ensure the cavity is clean and dry enough for reliable adhesion.
- Example: A 6-year-old with a small cavitated lesion on a maxillary incisor. With good access and suction, a bonded composite can restore contour and allow smooth finishing for easier plaque control.
Glass Ionomer and Resin-Modified Glass Ionomer
- Conventional glass ionomer releases fluoride and can be more tolerant of moisture than pure resin systems. It is often suitable when isolation is limited.
- Resin-modified glass ionomer improves handling and early strength while still offering fluoride release.
- Example: A partially erupted molar with limited isolation. A glass ionomer restoration can be placed with less stringent moisture control, reducing the odds of immediate bond failure.
Stainless Steel Crowns
- Stainless steel crowns (SSCs) are a strong option for extensive caries in primary molars, especially when structural loss is significant. They protect remaining tooth structure and reduce the chance of recurrent decay at margins.
- Example: A primary second molar with a large occlusal lesion and undermined enamel. An SSC restores function and buys time while the tooth is still in the arch.
Permanent Teeth Restorations
Permanent teeth allow more options because isolation is often better and the teeth are larger. Still, the same principles apply: match material to cavity location, expected moisture, and margin integrity.
Direct Composite Restorations
- Indications: Small to moderate lesions, accessible margins, and patients who can support good oral hygiene.
- Key technique factors: Proper cavity preparation, bonding steps, incremental placement, and careful finishing to reduce plaque retention.
- Example: A mandibular premolar with a mesio-occlusal lesion. Incremental composite placement helps control polymerization and reduces voids.
Indirect Restorations
- Inlays and onlays can be appropriate when the cavity is too large for predictable direct bonding or when cuspal coverage improves fracture resistance.
- Key technique factors: Accurate impressions, fit verification, and proper cementation.
- Example: A large MOD lesion in a molar with remaining enamel walls but weakened cusps. An onlay can restore cuspal integrity and reduce stress concentration.
High-Risk Patients
High-caries-risk patients need restorations that resist marginal breakdown and support prevention. The restoration is part of a system: diet, fluoride exposure, plaque control, and recall.
Material Selection for High Risk
- Prioritize margin durability: Marginal gaps are where new lesions start. Choose materials and bonding approaches that maintain integrity under functional stress.
- Use fluoride-supporting materials when appropriate: Glass ionomer and resin-modified glass ionomer can be useful when isolation is limited or when you want fluoride release at the margins.
- Avoid overpromising: A technically perfect restoration in a high-risk mouth still needs frequent follow-up and preventive reinforcement.
Design and Technique for High Risk
- Reduce plaque-retentive anatomy: Smooth margins and proper contour matter. A rough surface is like leaving a snack tray for bacteria.
- Consider sealing and interim strategies: When definitive restoration is delayed, interim measures should still aim to reduce bacterial access.
- Plan for maintenance: High-risk patients benefit from shorter recall intervals so early margin issues are caught before they become new cavities.
Mind Map: Restorative Options by Tooth Type and Risk
Practical Example Pathway
A 9-year-old with active dentin caries on a primary molar and inconsistent brushing may need a restoration that tolerates moisture and protects structure. If the lesion is extensive, an SSC is often the most reliable choice. If the lesion is smaller and isolation is achievable, a glass ionomer or resin composite can be selected based on bonding feasibility. For a high-risk permanent molar with a large MOD lesion, consider whether direct composite can provide stable margins and cuspal support; if not, an onlay may reduce the chance of structural failure and recurrent decay at the margins.
Quick Summary of Matching Rules
- Primary molars with extensive caries: SSC often provides the most predictable protection.
- Primary teeth with limited isolation: glass ionomer or resin-modified glass ionomer can reduce technique sensitivity.
- Permanent teeth with accessible margins: direct composite is efficient when bonding conditions are reliable.
- Permanent teeth with large structural loss: onlays or inlays support strength and margin integrity.
- High-risk patients: prioritize margin durability, smooth finishing, and follow-up frequency so the restoration stays part of the prevention plan.
5.5 Tooth Wear Etiology Assessment and Treatment Planning
Tooth wear is the loss of tooth structure from mechanical, chemical, or mixed causes. The key clinical move is to identify the dominant etiology first, because the “best” restoration for one cause can be the wrong fix for another. A patient with heavy grinding may need occlusal stabilization and surface protection, while a patient with frequent reflux may need medical management plus restorative planning.
Foundational Concepts of Wear Patterns
Start with pattern recognition. Attrition tends to concentrate on incisal edges and occlusal surfaces, often matching opposing contact points. Erosion typically shows smoother, more “polished” surfaces with loss of enamel texture, and it may affect facial surfaces in patterns consistent with acid exposure. Abrasion is usually linked to external mechanical action such as aggressive brushing or abrasive dentifrices, and it often creates localized defects near the cervical area.
A practical rule: if the surface looks polished and the margins look “melted,” think chemical contribution. If defects are wedge-like near the gumline, think mechanical abrasion. If wear tracks align with cusp tips and edge-to-edge contacts, think mechanical loading.
Etiology Assessment Workflow
Begin with a structured history, then confirm with exam findings.
- History for mechanical factors: Ask about jaw pain on waking, headaches, clenching during stress, and partner-reported grinding. Review night guard use and whether it fits.
- History for chemical factors: Ask about reflux symptoms, regurgitation, dietary acids (frequent citrus, sports drinks), and occupational acid exposure. Clarify timing: wear that worsens after meals or during the day often points to dietary or reflux-related acid.
- History for abrasive factors: Ask about brushing technique, frequency, gum recession, and dentifrice type. Patients who brush hard “to keep things clean” often have cervical abrasion.
- Medication and medical factors: Identify xerostomia causes and salivary reduction, since saliva buffers acids and supports remineralization.
Next, perform a systematic intraoral exam.
- Chart wear severity using a consistent scoring approach across visits.
- Map wear locations: incisal, occlusal, cusp tips, facial cervical, and posterior contacts.
- Check for dentin exposure and sensitivity.
- Evaluate occlusion: note loss of vertical dimension, altered overjet/overbite, and any shift in mandibular position.
- Assess periodontal status because recession can increase cervical abrasion and reduce enamel coverage.
Mind Map: Etiology to Clinical Findings
Tooth Wear Etiology Assessment Mind Map
Treatment Planning Logic
Treatment planning should follow a sequence: stop the cause where possible, protect vulnerable surfaces, restore function and aesthetics, then maintain.
Reduce the Cause
- Mechanical: If parafunction is suspected, plan occlusal stabilization (often a night guard) and address daytime clenching habits. The goal is to reduce damaging contacts, not to “fix” wear with restorations alone.
- Chemical: For reflux or frequent acid exposure, coordinate with medical care when indicated and provide practical dietary timing guidance. Emphasize saliva support and buffering behaviors.
- Abrasive: Correct brushing technique and consider a less abrasive dentifrice if appropriate. If cervical defects are present, gentle cleaning matters more than “extra scrubbing.”
Protect and Stabilize
Protection is often the difference between a restoration that lasts and one that fails quickly.
- Surface protection: Use desensitizing strategies when dentin is exposed.
- Occlusal scheme: If wear has altered guidance, consider how restorations will recreate stable contacts.
- Vertical dimension considerations: Evaluate whether increasing vertical dimension is necessary and safe. If changes are planned, do it deliberately with provisional testing.
Restore with Etiology in Mind
Restorative choices depend on the dominant wear mechanism.
- Erosion-dominant cases: Prioritize materials and bonding strategies that tolerate a chemically hostile environment, and ensure the cause is controlled.
- Bruxism-dominant cases: Choose restorations that can withstand high contact forces and ensure occlusal protection is in place.
- Abrasion-dominant cases: Address cervical defect geometry and ensure the patient’s cleaning habits are corrected.
Example: Two Patients with Similar Wear, Different Plans
Example 1: Incisal wear with morning jaw fatigue
- Findings: flattened incisal edges, sensitivity on waking, no obvious reflux history.
- Plan: stabilize occlusion with a night guard, provide desensitizing care, then restore with a provisional plan to confirm comfort and contact pattern before finalizing.
Example 2: Smooth facial cervical loss with frequent heartburn
- Findings: polished enamel loss near cervical areas, history of regurgitation after meals.
- Plan: address reflux-related acid exposure, support saliva buffering, correct brushing technique, then restore after the chemical driver is controlled to reduce recurrence.
Advanced Details That Prevent Common Mistakes
- Don’t treat the surface without treating the driver: restorations placed on ongoing acid or heavy grinding often fail at the margins.
- Map contacts, not just defects: occlusal relationships guide how restorations should be shaped.
- Use provisional restorations when the bite is changing: they let you verify comfort, speech, and contact stability before committing.
- Reassess after cause control: sensitivity and surface changes can improve, which affects how much restoration is truly needed.
Maintenance and Follow-Up
Maintenance is not optional in wear management. Schedule follow-up to confirm that protective measures are being used, that sensitivity is controlled, and that occlusal contacts remain stable. Recheck wear scores at intervals so the plan stays aligned with the patient’s real-life habits, not just the initial exam.
6. Diagnosis and Treatment of Pulpal and Periapical Conditions
6.1 Pulpal Pathology Classification for Symptom Based Differentiation
Pulpal pathology is often classified by what the patient feels and what the tooth can still do. The goal of symptom-based differentiation is practical: match symptoms to likely pulp status, then choose tests and treatment that fit that status.
Core Concepts That Tie Symptoms to Pulp Status
Start with two foundational ideas. First, pulp inflammation can be reversible or irreversible depending on whether the tissue can recover after removal of the cause. Second, pain behavior—especially duration and triggers—helps separate inflamed pulp from necrotic pulp.
Reversible pulpitis typically presents with short, stimulus-related pain that settles quickly after the stimulus is removed. Irreversible pulpitis presents with spontaneous pain or lingering pain after the stimulus stops. Necrotic pulp usually produces no response to vitality testing, and symptoms—if present—often relate to periapical inflammation rather than pulp itself.
Symptom Patterns and What They Usually Mean
Stimulus type matters. Cold sensitivity is common in early inflammation because temperature changes can provoke nerve fibers. Heat can also trigger pain, but persistent heat pain often supports irreversible inflammation. Biting pain suggests involvement beyond the pulp, such as periodontal ligament inflammation.
Pain duration matters even more. A quick “twinge” that fades within seconds supports reversible pulpitis. Pain that lingers for a long time after the stimulus is removed supports irreversible pulpitis. Spontaneous pain—pain without a clear trigger—strongly suggests irreversible pulpitis.
Spontaneous pain with lingering character is a key discriminator. If the tooth hurts on its own and the pain persists, the pulp is unlikely to recover.
Vitality Testing as the Symptom Companion
Symptoms guide the test selection, and tests confirm the pulp status. Use at least two modalities when possible.
- Thermal testing helps assess nerve responsiveness. Cold that causes lingering pain supports irreversible pulpitis; cold that causes brief discomfort supports reversible pulpitis.
- Electric pulp testing measures nerve response rather than blood flow. It can be useful, but it may be less reliable in some situations, so interpret it with symptoms.
- Percussion and palpation help distinguish pulp pain from periapical or periodontal ligament involvement. A tooth that is tender to biting or percussion suggests spread of inflammation beyond the pulp.
Classification Framework for Clinical Use
Use a structured approach: symptoms → likely pulp status → expected test behavior → likely next steps.
Reversible Pulpitis
Reversible pulpitis is inflammation without loss of pulp function. Patients often report short pain to cold or sweet that resolves promptly. The tooth usually responds to vitality tests, and percussion is typically normal.
Example: A patient reports cold sensitivity when drinking something iced. The pain stops within a few seconds after the cold stimulus ends. The tooth responds to cold and electric testing, and it is not tender on biting.
Clinical implication: remove the stimulus source (e.g., caries or defective restoration), then restore. The pulp has a chance to settle.
Irreversible Pulpitis
Irreversible pulpitis indicates that the pulp cannot recover. Symptoms often include lingering pain after cold, spontaneous pain, or pain that wakes the patient.
Example: A patient says cold causes sharp pain that continues for several minutes after the cup is removed. The tooth is sensitive to cold and may respond to electric testing, but the pain pattern is persistent.
Clinical implication: irreversible pulpitis often requires definitive pulp treatment rather than simple restoration alone.
Symptomatic Apical Periodontitis
This is periapical inflammation with a necrotic or non-vital pulp. Symptoms may include pain on biting and tenderness to percussion. The tooth may not respond to vitality testing.
Example: A tooth feels “high” and hurts when chewing. Cold testing shows no response. Percussion is tender, and palpation may be uncomfortable.
Clinical implication: treat the source within the canal system if the tooth is restorable, and manage periapical inflammation.
Necrotic Pulp
Necrotic pulp is non-vital tissue. Patients may report no symptoms, or they may report symptoms related to periapical disease.
Example: A patient has a tooth with a deep cavity and no pain, but vitality testing shows no response to cold and electric testing. Percussion is normal.
Clinical implication: absence of pulp response plus clinical context supports necrosis; treatment decisions depend on periapical findings.
Mind Map: Symptom Based Differentiation of Pulpal Pathology
Practical Decision Points That Prevent Common Mix Ups
- Lingering pain after cold is a strong clue for irreversible pulpitis, not reversible pulpitis.
- Biting pain plus no vitality response points toward periapical involvement rather than isolated pulp inflammation.
- Normal percussion with stimulus pain supports pulp-limited pathology, especially early reversible cases.
Mini Case Walkthrough for Integration
A patient reports cold sensitivity that lasts about 10–15 seconds, then stops. The tooth responds to cold and electric testing, and percussion is painless. This pattern fits reversible pulpitis: remove the offending caries or defective margin, restore, and reassess.
If the same patient instead reports pain lasting several minutes after cold is removed, with spontaneous discomfort between meals, the classification shifts to irreversible pulpitis. The tests may still show vitality response, but the symptom duration and spontaneous character drive the treatment direction.
In both scenarios, the classification is not a label for its own sake. It is a map from symptoms to pulp status, and from pulp status to the most sensible next clinical step.
6.2 Periapical Diagnosis Using Symptoms Radiographs and Testing
Periapical diagnosis is the art of matching what the patient feels and what the tissues show. The goal is not to name a condition for its own sake, but to decide whether the pulp is still alive, whether infection has spread beyond the apex, and what treatment pathway fits.
Step 1: Start with Symptom Patterns
Symptoms are clues, not verdicts. Begin by sorting pain into categories: spontaneous, provoked, lingering, and intermittent. A tooth with irreversible pulpitis often responds strongly to thermal or biting and may have lingering pain after the stimulus. A tooth with apical periodontitis may have less dramatic spontaneous pain, but it can be tender to percussion and sometimes shows a clear “pain on tapping” pattern.
A practical example: a patient reports that cold triggers sharp pain that fades quickly, but heat makes it worse and the pain lingers for several minutes. That pattern leans toward pulpal inflammation with possible progression. Another example: the patient says, “It doesn’t hurt unless I bite,” and the pain is localized to one tooth. That often points toward apical involvement, especially if the tooth is nonvital on testing.
Step 2: Use Radiographs to Confirm Location and Extent
Radiographs translate anatomy into evidence. Periapical radiolucency is a common sign of apical pathology, but it is not always present early. Early apical inflammation can exist without visible bone change, so a normal radiograph does not automatically mean “no problem.”
When interpreting, check three things systematically:
- Root and apex anatomy: confirm the tooth is correctly identified and the apex is fully captured.
- Periapical bone changes: look for loss of lamina dura, widening of the periodontal ligament space, and radiolucency shape.
- Quality and limitations: ensure angulation is adequate; overlapping roots can hide lesions.
Example: a periapical radiograph shows a widened periodontal ligament space around the apex without a clear radiolucency. If the tooth is nonvital and percussion is tender, you can reasonably suspect apical periodontitis in an early stage.
Step 3: Perform Sensibility and Vitality Testing with Logic
Sensibility testing measures nerve response, not tissue health directly. Still, it is useful when interpreted alongside symptoms and radiographs.
Use a structured approach:
- Baseline and comparison: test adjacent teeth first to calibrate the patient’s responses.
- Stimulus type: cold and heat can help differentiate reversible from irreversible pulpal conditions.
- Timing: record whether pain stops immediately or lingers after the stimulus.
- Percussion and palpation: these assess the periodontal ligament and periapical tissues.
Example: cold test elicits no response, heat also shows no response, and the tooth is tender to percussion. If radiographs show periapical bone changes, the diagnosis strongly supports apical periodontitis. If radiographs are normal, the combination still supports apical involvement, just possibly earlier or less extensive.
Step 4: Integrate Findings into a Diagnostic Matrix
A diagnosis becomes reliable when findings agree across domains: symptoms, vitality, and radiographic signs.
Mind Map: Periapical Diagnosis Integration
Step 5: Use Differential Diagnosis to Avoid Common Traps
Several conditions can mimic each other. A key trap is assuming that pain always means pulp disease. Periodontal inflammation, cracked teeth, and sinus tract patterns can confuse the picture.
A simple differential workflow:
- If the tooth is vital on testing but symptoms suggest apical pain, re-check technique, consider periodontal causes, and evaluate for fracture or occlusal trauma.
- If the tooth is nonvital but radiographs are normal, consider early apical disease and rely on percussion tenderness and symptom history.
- If findings conflict, repeat testing after stabilizing factors like recent analgesic use and ensure the correct tooth is being tested.
Step 6: Document Findings in a Way That Supports Treatment
Good documentation prevents diagnostic drift. Record:
- Stimulus type, tooth tested, and response timing.
- Percussion and palpation results with side-to-side comparison.
- Radiographic observations using consistent language.
- A brief integration statement that links symptoms, testing, and imaging.
Example documentation phrasing: “Tooth nonresponsive to cold and heat. Percussion tender compared to adjacent teeth. Periapical radiograph shows loss of lamina dura and widened periodontal ligament space at the apex.” This makes the diagnostic reasoning visible and defensible.
Step 7: Apply the Diagnosis to the Clinical Plan
Once pulpal status and apical status are established, the plan follows logically. Nonvital teeth with apical signs typically require endodontic treatment rather than restorative-only approaches. If the diagnosis suggests early apical involvement with minimal radiographic change, treatment decisions still rely on the full pattern rather than waiting for radiographs to catch up.
Case Example: A patient reports biting pain on tooth #30. Cold test is negative, percussion is tender, and radiograph shows slight widening of the periodontal ligament space without a clear radiolucency. The integrated diagnosis supports apical periodontitis with early bone involvement, guiding endodontic management rather than simple observation.
6.3 Endodontic Access Preparation and Working Length Determination
Access Preparation Principles
Endodontic access is the controlled opening of the pulp chamber so instruments can reach the canal system with straight, predictable paths. The goal is not to “find the canal fast,” but to create a shape that supports cleaning, shaping, and obturation without unnecessary dentin removal.
Start with orientation. Use tooth anatomy to predict where the pulp chamber sits: in general, it trends toward the center of the crown, but it shifts with age, restorations, and wear. A practical habit is to confirm landmarks before cutting—cusp tips, developmental grooves, and existing restorations guide where the chamber roof is likely to be.
Next, remove dentin in a staged way. Begin with a conservative entry, then expand until you can see the chamber floor and canal orifices. If you feel resistance that doesn’t match the expected anatomy, stop and reassess rather than forcing the bur. For example, in a mandibular molar, a common error is over-enlarging the furcation area while still missing the mesial canals; the access may look “big,” but it is misdirected.
Use illumination and magnification to reduce guesswork. When the chamber roof is removed, the pulp chamber should appear as a continuous space rather than scattered “holes.” Canal orifices often have distinct color and texture differences, and they may be partially hidden by calcifications or dentin shelves.
Finally, manage dentin shelves and undercuts. A well-prepared access allows instruments to enter without binding. If a file catches at the chamber entrance, that is usually a geometry problem at the access, not a canal problem.
Working Length Determination Foundations
Working length is the distance from a reference point on the tooth to the point where instrumentation should stop. It is determined to avoid two extremes: under-instrumentation leaves infected tissue behind, while over-instrumentation risks damaging periapical tissues.
Choose a stable coronal reference point. Common choices include the cusp tip, incisal edge, or a flat surface created by access. The reference point must be reproducible so measurements remain consistent across visits.
Understand the anatomy of the apical region. The apical foramen is not the same as the radiographic apex, and the apical constriction is not the same as the foramen. That mismatch explains why “one size fits all” radiographic rules fail.
Methods and Integration
Working length is best determined by combining methods rather than relying on a single clue.
Radiographic Method
Take a radiograph with a file placed into the canal. Interpret it as an estimate, not a verdict. The file tip should be positioned short of the radiographic apex, because the radiographic apex is a projection of complex anatomy.
A concrete example: if a file appears to end exactly at the apex on the image, it may still be too long in three dimensions. The safer approach is to position the file slightly short, then confirm with an electronic method.
Electronic Apex Locator Method
Electronic apex locators measure canal conditions and estimate proximity to the apical constriction. They work best when the canal is properly prepared for measurement and when the reference and file are connected correctly.
Before trusting the reading, verify the setup. Ensure the lip clip is secure, the file is conductive, and the canal is not excessively dry. A canal that is too dry or too wet can distort readings.
Combined Approach
Use radiographs to confirm orientation and electronic readings to refine the endpoint. If the two methods disagree, treat the discrepancy as information. Recheck canal patency, file position, and measurement technique before adjusting the length.
Step-by-Step Workflow
- Establish access and visibility so canal orifices can be located without forcing instruments.
- Create a glide path with small files to negotiate curvature and reduce the risk of ledging.
- Determine the reference point and record it clearly.
- Estimate initial length using radiographs to place a file near the expected apical area.
- Confirm with electronic apex locator and adjust to a consistent endpoint.
- Recheck with radiograph if the canal anatomy is complex, the tooth is heavily calcified, or the electronic reading is unstable.
- Document working length for each canal and ensure it matches the instrument size and glide path used.
Mind Map: Access Preparation and Working Length Determination
Example: Mandibular Molar with Calcification
A mandibular first molar with heavy calcification often hides canal orifices behind dentin shelves. After access, you may see a chamber floor but not the canals. Use small instruments to negotiate a glide path rather than enlarging blindly. Once a small file enters the canal and moves smoothly, take an initial radiograph to confirm direction. Then connect the apex locator and confirm the reading with correct setup and canal moisture. If the electronic reading suggests a shorter endpoint than the radiograph implies, recheck file position and patency before adjusting. When both methods align, record working length for each canal and proceed with instrumentation using that documented endpoint.
Common Errors and How to Avoid Them
- Access that looks adequate but isn’t functional: instruments bind at the chamber entrance. Fix access geometry before continuing.
- Treating the radiographic apex as the endpoint: it is a projection. Use short-of-apex positioning and confirm with an apex locator.
- Unstable electronic readings: often due to setup issues or canal moisture extremes. Correct the measurement conditions and confirm again.
- Skipping a glide path: curvature becomes a ledge-making machine. Create patency with small files first.
Working length and access are linked. A precise working length depends on an access that allows instruments to travel where you intend, and a well-prepared access depends on knowing where the apical endpoint should be. When both are handled systematically, the rest of endodontic treatment becomes far more predictable.
6.4 Root Canal Instrumentation Irrigation and Obturation Principles
Core Goals of Instrumentation
Instrumentation shapes the canal so irrigants can reach the full length and obturation materials can fill the prepared space. The practical target is not “perfect straightening,” but consistent cleaning and shaping while preserving the original canal path. A useful mental model is: shape for access, clean for chemistry, fill for sealing.
Working Length and Glide Path Foundations
Working length is established so instruments and irrigants operate within the intended apical zone. Before shaping, create a glide path with small, flexible files to reduce transportation and ledge formation. For example, if a canal is narrow and the first file binds at mid-root, forcing a larger file usually creates an artificial step; using a smaller file to negotiate the canal first keeps the path smoother.
Shaping Strategy and Apical Control
Shaping typically follows a crown-down approach: remove coronal interferences early so instruments can progress with less friction. Apical control means tapering toward the apex without over-enlarging. Over-instrumentation can push debris and irrigant beyond the apex, while under-instrumentation leaves untouched walls and biofilm. A simple check is to confirm that the final instrument reaches working length without excessive force and that the canal walls show progressive enlargement rather than abrupt changes.
Instrument Design and Motion Choices
Different file designs manage debris and cutting differently. Hand files rely on controlled tactile feedback; rotary systems rely on consistent motion and torque limits. In practice, the “best” motion is the one that matches the canal anatomy and the clinician’s control. If a rotary file repeatedly stops short of working length, the issue is often inadequate glide path, excessive curvature, or insufficient coronal preflaring—not a reason to push harder.
Irrigation Principles for Cleaning Chemistry
Irrigation removes debris, dissolves tissue remnants, and reduces microbial load. Mechanical instrumentation alone cannot contact all canal surfaces, especially in fins, isthmuses, and irregularities. Irrigant selection and delivery matter.
Sodium hypochlorite is the workhorse for organic tissue dissolution. EDTA helps remove inorganic smear layer, improving sealer adaptation. Final rinse often combines these concepts: hypochlorite for tissue, EDTA for smear layer, then a rinse to manage chemical interactions.
Irrigation Delivery and Contact Time
Irrigant must reach the working length region without causing excessive extrusion. Use a needle or activation system that stays short of the apex by a safe margin, then allow contact time. For example, if you only “spray and move on,” you may remove debris superficially but leave biofilm in untouched recesses. A practical rhythm is: deliver irrigant, allow brief dwell, then recirculate with gentle activation.
Smear Layer Management and Sealer Fit
Smear layer is a thin layer of dentin debris created during instrumentation. If it remains thick, it can reduce sealer penetration into dentinal tubules. EDTA irrigation after shaping can improve wettability and adaptation. The key is timing and sequence: EDTA is not a substitute for hypochlorite, and prolonged exposure can affect dentin properties.
Debris Removal and Canal Patency
Maintaining canal patency helps prevent apical blockage by debris. A small file can be used to confirm patency during shaping, especially after larger instruments. For a concrete example, if a canal suddenly stops progressing after a rotary sequence, patency checks can reveal whether debris has accumulated at the apical constriction.
Activation Methods for Better Irrigant Penetration
Activation increases irrigant movement and helps it reach areas that instrumentation misses. Options include sonic or ultrasonic activation, or agitation with appropriate devices. The principle is the same: create fluid dynamics without aggressive apical pressure. If activation causes pain, swelling, or persistent bleeding, stop and reassess apical control and irrigant volume.
Obturation Principles for Sealing and Stability
Obturation fills the prepared canal space to reduce leakage. The two main components are a core material and a sealer. The goal is a dense fill with minimal voids, while avoiding extrusion beyond the apex.
Gutta-percha is commonly used as the core. Sealers fill microscopic irregularities and improve adaptation. Techniques include lateral condensation and warm vertical compaction. Warm techniques can better adapt to canal irregularities, but they require careful control to prevent overextension.
Apical Seal and Quality Checks
A good apical seal depends on correct working length, adequate apical preparation, and sealer placement. Quality checks include radiographic verification of fill length and homogeneity. If the fill is short of working length, the apical seal may be incomplete; if it extends beyond, extrusion can irritate periapical tissues.
Mind Map: Instrumentation Irrigation and Obturation Workflow
Example: Narrow Curved Canal with Limited Progress
A clinician negotiates a narrow, curved canal using a small glide path file to working length. During shaping, they use crown-down preparation to reduce coronal resistance and avoid forcing rotary files. Irrigation is delivered to near working length with a safe margin, followed by brief activation to improve penetration. After EDTA removes smear layer, the canal is dried and obturated with a technique that adapts to curvature while maintaining apical control. The final radiograph shows fill length consistent with working length and minimal voids.
Example: Managing Smear Layer and Sealer Adaptation
After instrumentation, the clinician performs an EDTA rinse to address smear layer. They then complete a final hypochlorite rinse and a neutralizing rinse as appropriate to avoid chemical interference. During obturation, the sealer is placed to coat canal walls, and the core is compacted to reduce voids. The result is improved sealer adaptation, which supports the apical seal.
Practical Summary of the Principles
Instrumentation shapes for access and apical control, irrigation cleans with chemistry and fluid movement, and obturation seals with correct length and adaptation. When any step fails—like poor working length, inadequate glide path, insufficient irrigant contact, or uncontrolled obturation—quality drops in predictable ways.
6.5 Post Treatment Follow Up and Complication Management
Post-treatment follow-up is where endodontic success becomes measurable. The goal is not just “no pain,” but stable healing, predictable function, and early detection of problems that may not announce themselves immediately.
Follow Up Timing and What to Look For
A practical follow-up schedule starts with the first check after the procedure and then moves to longer intervals. Early visits focus on symptoms and immediate healing; later visits focus on radiographic stability and functional outcomes.
- First 24 to 72 hours: confirm pain trend, swelling status, and ability to chew. A mild, short-lived ache can be normal, but worsening pain or new swelling is not.
- 1 to 2 weeks: assess soft tissue response, check the quality of the coronal seal, and confirm that any temporary restoration is intact.
- 6 to 12 months: evaluate symptom resolution and compare radiographs for lesion stability or reduction.
- 12 months and beyond: continue monitoring when healing is slow or when baseline lesions were extensive.
What you document at each visit matters as much as what you find. Record pain score, tenderness to percussion, mobility, sinus tract presence, and restoration integrity. If you used a temporary seal, note whether it stayed sealed; coronal leakage is a common reason for “mysterious” failure.
Complication Categories and Clinical Reasoning
Complications after root canal treatment usually fall into a few buckets. Grouping them helps you choose the right response instead of treating symptoms in isolation.
- Postoperative flare: pain that increases after treatment, often within the first day or two. It may be associated with instrumentation irritation or extrusion of debris.
- Persistent infection or incomplete disinfection: ongoing symptoms, persistent radiographic changes, or a draining sinus.
- Coronal leakage: recurrent symptoms after a period of stability, especially if the temporary restoration fails.
- Procedural mishaps: separated instrument, ledge, perforation, or inadequate obturation.
- Non-endodontic causes: periodontal disease, cracked tooth, occlusal trauma, or temporomandibular discomfort that mimics endodontic pain.
A key reasoning step is to re-check the basics before escalating. Confirm the tooth is the pain source with targeted tests, review the restoration status, and compare current findings to the pre-treatment baseline.
Managing Common Postoperative Problems
Postoperative flare
- Reassess the pain pattern: is it improving, stable, or worsening?
- Check for swelling and evaluate drainage. If there is no systemic involvement and the tooth is stable, conservative management is often appropriate.
- Ensure the coronal seal is intact. Even a small gap can turn a short flare into a longer problem.
Persistent symptoms
- Repeat clinical testing and percussion sensitivity.
- Verify obturation quality and coronal restoration. If the access seal is compromised, fix that first.
- If symptoms persist beyond the expected window, consider whether retreatment is needed or whether the diagnosis should be revised.
Sinus tract or draining lesion
- Confirm whether the tract is connected to the treated tooth.
- If the tract persists, it suggests ongoing pathology. Management typically focuses on restoring disinfection and sealing, not just symptom control.
When to Escalate Care
Escalation is not a punishment; it’s a decision based on risk. Consider referral or advanced intervention when you see any of the following:
- Progressive swelling, fever, or signs of spreading infection.
- Persistent severe pain that does not follow the expected improvement pattern.
- Evidence of procedural complications that limit cleaning or sealing.
- Radiographic findings that worsen or fail to stabilize.
- Unclear diagnosis after repeat testing.
Documentation That Prevents Confusion
Good records reduce guesswork. Include:
- Baseline symptoms and test results.
- Restoration type and whether it was temporary or definitive.
- Follow-up symptom changes and objective findings.
- Radiograph comparison notes, including which views were used.
If you document “patient reports better” without specifying what improved, you lose the ability to interpret future changes. A simple structure—symptoms, tests, restoration status, radiographic comparison—keeps the chart readable.
Mind Map: Post Treatment Follow Up and Complication Management
Example: Interpreting a Follow Up Visit
A patient returns two days after obturation with increased sensitivity to biting. There is no swelling, no fever, and the temporary restoration is intact. Percussion is mildly tender, and the tooth responds to the same sensibility pattern as before treatment. The pain is trending upward but not accompanied by systemic signs.
Reasoning: this fits a short postoperative flare rather than a spreading infection. The immediate action is to confirm the seal, manage symptoms, and schedule a close reassessment. If pain worsens or swelling appears, the plan shifts toward urgent evaluation and possible intervention.
Example: Suspecting Coronal Leakage
At a one-month follow-up, the patient reports that symptoms returned after a period of improvement. The temporary restoration shows marginal breakdown and food impaction. Percussion tenderness is present, and radiographs show no improvement compared with baseline.
Reasoning: the restoration failure provides a clear pathway for reinfection. The first step is to restore a reliable coronal seal, then reassess symptoms and objective findings. If symptoms persist after sealing, retreatment decisions become more justified.
Example: Distinguishing Non-Endodontic Pain
A patient reports persistent discomfort after treatment. Testing shows no significant change in sensibility, and percussion tenderness is stronger than biting pain. Periodontal probing reveals deep pockets near the treated tooth, and mobility is slightly increased.
Reasoning: the pain pattern aligns more with periodontal involvement than ongoing pulpal pathology. Management focuses on periodontal stabilization and reassessment rather than assuming endodontic failure.
Post-treatment follow-up is a structured loop: observe symptoms, verify the seal, confirm the diagnosis, and compare objective findings over time. Complication management becomes clearer when each decision is tied to a specific category and a specific clinical sign.
7. Diagnosis and Management of Periodontal Diseases
7.1 Periodontal Examination Including Probing Bleeding and Mobility
A periodontal exam is a structured way to answer one question: is the supporting tissue healthy, inflamed, or damaged—and how much? The exam starts with consistent measurements, then interprets them using bleeding and mobility as functional signals.
Core Goals of the Examination
First, you map inflammation by measuring probing depths and recording bleeding on probing. Second, you estimate attachment loss by combining probing depth with recession. Third, you evaluate mobility to understand whether the tooth is stable or compromised by loss of periodontal support. A good exam produces a chart that can be compared across visits without guessing.
Preparation and Patient Positioning
Before probing, review the patient’s comfort needs and explain what will happen in plain terms. Seat the patient so the occlusal plane is roughly parallel to the floor for predictable probe angles. Use good lighting and dry the teeth briefly so you can see the gingival margin and avoid mistaking pooled saliva for bleeding.
Probing Technique for Reliable Depths
Use a calibrated periodontal probe. Place the probe parallel to the tooth’s long axis and gently insert until you feel resistance at the base of the sulcus or pocket. Record the depth to the nearest millimeter at predetermined sites, typically six per tooth. Keep the force consistent; too much pressure can artificially increase depth and provoke bleeding.
Example: If a molar shows 6 mm at the mesiobuccal site and 3 mm at the distobuccal site, you record both values rather than averaging. The pattern matters because it often reflects localized plaque retention or anatomical differences.
Bleeding on Probing for Inflammation Mapping
Bleeding on probing (BOP) indicates that the junctional tissues are inflamed and vascular. After probing, wait about 10–30 seconds before recording whether bleeding occurs at each site. Record BOP as present or absent, and note if bleeding is delayed or profuse.
Example: A site with a 4 mm probing depth but positive BOP can represent active inflammation, even if the depth is not large. Conversely, a 6 mm site without BOP may still reflect past disease, but it suggests less current inflammatory activity.
Mobility Assessment for Functional Support
Mobility is assessed after probing and visual inspection to avoid confusing probe pressure with tooth movement. Use two instruments or gloved fingers to apply gentle buccolingual pressure, then assess horizontal and vertical movement.
Record mobility using a simple scale:
- Grade 0: no detectable movement
- Grade 1: slight horizontal movement
- Grade 2: moderate horizontal movement
- Grade 3: severe movement, often with vertical component
Example: A tooth with Grade 2 mobility and deep pockets around it is more likely to have significant loss of supporting tissue than a tooth with similar pocket depths but Grade 0 mobility.
Integrating Probing Depth, Recession, Bleeding, and Mobility
Probing depth alone does not tell you whether the attachment has been lost; recession changes the interpretation. Attachment level is estimated by combining depth and recession. Bleeding helps you judge current inflammation, while mobility helps you judge functional compromise.
Example:
- Site A: 5 mm depth, 2 mm recession, BOP positive → attachment loss likely present, inflammation active.
- Site B: 5 mm depth, 0 mm recession, BOP negative → could be a deep sulcus or less active disease; mobility and radiographs help decide.
Common Pitfalls and How to Avoid Them
- Inconsistent probe angle: If you probe too obliquely, depths become unreliable.
- Skipping BOP timing: Recording immediately after probing can miss delayed bleeding.
- Confusing trauma with disease: Food impaction or recent brushing trauma can cause localized bleeding; correlate with plaque control and tissue appearance.
- Overcalling mobility: Excess force can create artificial movement; use controlled pressure.
Mind Map: Periodontal Examination Signals
Practical Mini-Workflow for Each Tooth
- Inspect gingival margin and plaque presence.
- Probe six sites and record depth.
- Record BOP after a short wait.
- Assess mobility with gentle controlled pressure.
- Review the tooth as a unit: depth pattern, BOP status, recession, and mobility together.
Example: A tooth with localized 7 mm pockets, BOP positive at those sites, and Grade 2 mobility is a clear priority for periodontal management because the exam suggests both active inflammation and compromised support.
7.2 Periodontitis Staging and Grading for Treatment Planning
Periodontitis staging and grading translate exam findings into a treatment plan that makes sense for both the mouth you see today and the risk profile you infer from the patient’s history. Staging answers “how much has been lost and how complex is the case?” Grading answers “how fast and how likely is progression?” Together, they guide how aggressive therapy should be, how carefully you must monitor, and what outcomes are realistic.
Core Concepts for Staging
Staging is built on three pillars: extent of disease, complexity of management, and tooth loss attributable to periodontitis.
- Extent of disease is assessed using clinical attachment loss (CAL) across sites. A practical approach is to identify the most affected teeth and confirm whether attachment loss is localized or more widespread.
- Complexity of management considers factors that make treatment harder, such as deep pockets, furcation involvement, and the presence of intrabony defects.
- Tooth loss attributable to periodontitis helps confirm that the disease is not just “present,” but has already affected the dentition.
Example: A patient with CAL mostly around molars, deep pockets, and a few furcation involvements is likely to have a more complex local management plan than someone with similar CAL confined to anterior teeth.
Core Concepts for Grading
Grading focuses on the likelihood of progression and the expected impact on the patient over time. It uses three main inputs: direct evidence of progression, risk factors, and systemic modifiers.
- Direct evidence includes patterns such as rapid attachment loss or bone loss over time when prior records exist.
- Risk factors include smoking, poor glycemic control in diabetes, and other factors that increase susceptibility.
- Systemic modifiers include conditions that may alter immune response or healing, which can change how you interpret the same periodontal findings.
Example: Two patients may have similar pocket depths today, but the one with a history of rapid loss and heavy smoking typically warrants closer monitoring and a more structured maintenance plan.
How Clinical Data Feed into Staging and Grading
A systematic workflow prevents “guessing with confidence.”
- Confirm the periodontal diagnosis using probing depths, CAL, bleeding on probing, and radiographic bone levels.
- Identify the worst sites and map CAL distribution. Worst sites often drive staging because they reflect the maximum extent of attachment loss.
- Assess complexity features such as furcations and intrabony defects. These influence whether non-surgical therapy alone is likely to be sufficient.
- Review history for progression clues. If prior charts exist, compare CAL or bone levels over time.
- Assign grade by combining progression evidence with risk factors and systemic modifiers.
Mind Map: Staging and Grading Logic
Treatment Planning Implications You Can Use Immediately
Once stage and grade are assigned, they shape practical decisions.
- Higher stage generally means more extensive disease and/or greater complexity, so you plan for thorough debridement, careful re-evaluation, and a realistic pathway for surgical or regenerative options when indicated.
- Higher grade generally means greater risk of progression, so you plan for tighter maintenance intervals and more consistent monitoring of high-risk sites.
Example: If a patient is Stage III with Grade C, you would not treat it like a “one-and-done” cleaning. You would plan a structured re-evaluation after initial therapy, identify sites that remain deep or bleed, and schedule maintenance with enough frequency to catch changes early.
Mini Case Example with Integrated Reasoning
A 48-year-old non-smoker reports gum bleeding and has CAL of 5–6 mm in multiple molar sites. Radiographs show bone loss consistent with periodontitis. Furcation involvement is present in one molar, and there is moderate tooth loss attributable to periodontitis.
- Staging reasoning: Multiple sites with significant CAL plus furcation involvement increases complexity, and tooth loss attributable to periodontitis supports a higher stage.
- Grading reasoning: If prior records show slow change and there are no major systemic modifiers, the grade may be lower than a patient with similar CAL but documented rapid progression.
The key is that the stage and grade are not separate homework assignments. They are a single clinical story: how far the disease has gone, and how likely it is to keep going without a plan that matches the risk.
7.3 Scaling and Root Planing Protocols for Biofilm and Calculus Removal
Scaling and root planing are not “scrubbing until it looks clean.” They are controlled removal of biofilm and mineralized deposits to reduce inflammation and create a surface that tissues can reattach to. The goal is to disrupt the plaque–calculus complex while preserving tooth structure and respecting the root’s anatomy.
Foundational Concepts for What You Are Removing
Biofilm is organized microbial growth embedded in a matrix. It forms quickly, adheres strongly, and is harder to remove once it matures. Calculus is mineralized plaque that locks biofilm in place; it also creates rough surfaces that help new plaque stick.
A useful mental model is a two-step problem: (1) remove the biofilm layer, (2) remove the mineralized deposits that shelter it. If calculus remains, biofilm returns faster and inflammation tends to persist.
Pre-Procedure Setup and Patient Readiness
Start with a periodontal exam that guides where you will work. Record probing depths, bleeding on probing, and furcation involvement if present. Confirm contraindications for instrumentation intensity, such as acute infection with systemic involvement.
Explain the plan in plain terms: you will remove deposits below the gumline and smooth the root surface enough to reduce irritation. Use local anesthesia when indicated; discomfort makes patients tense and reduces instrument control.
Instrument Selection and Basic Handling
Choose instruments based on deposit location and access. Ultrasonic tips are efficient for supragingival and many subgingival deposits, while hand instruments provide precision in tight areas and around anatomy.
Key handling principles:
- Maintain light-to-moderate pressure; heavy force increases root surface damage.
- Use controlled angulation to keep the working end engaged.
- Keep strokes short and deliberate; long strokes lose tactile feedback.
A practical example: if you see a thick band of calculus at the mesiobuccal line angle, start with an ultrasonic approach to reduce bulk, then switch to a hand scaler to refine the surface where the ultrasonic tip can’t fully adapt.
Scaling Protocol for Biofilm and Calculus Removal
Scaling is the removal of deposits from tooth surfaces, including subgingival areas. Work systematically by quadrants or sextants to avoid missed areas.
- Establish access and visibility using retraction and suction. Good access is not optional; it determines how accurately you can place the instrument.
- Remove supragingival deposits first to reduce contamination during subgingival work.
- Enter the sulcus with the instrument while maintaining the correct tip orientation. Aim to detach deposits from the tooth, not to “dig” into tissue.
- Use overlapping strokes that cover the entire root surface segment. If you only treat the deepest point, you leave adjacent deposits that continue to drive bleeding.
Example for clarity: In a 6 mm pocket with bleeding on probing, you may find calculus concentrated near the base. Scaling should still cover the full pocket wall region you can access, because biofilm is not confined to the deepest millimeter.
Root Planing Protocol for Surface Refinement
Root planing is selective removal of cementum and dentin surface irregularities to eliminate residual calculus and biofilm and to smooth the root surface.
The “how much” question matters. Root planing is not a full resurfacing. It is a controlled refinement aimed at removing contaminated cementum and irregularities.
Systematic approach:
- Identify the target surface: focus on areas with residual deposits after scaling and on zones that remain rough on tactile assessment.
- Use controlled strokes with minimal pressure, keeping the working end in contact with the root surface.
- Stop when the surface is adequately smooth. Over-instrumentation increases sensitivity and can compromise root integrity.
A helpful example: If a root feels “catchy” with a probe after scaling, planing may be needed. If the surface is smooth and deposits are gone, further planing risks unnecessary tissue irritation.
Managing Common Clinical Challenges
Bleeding and limited visibility: Use suction and consider staged instrumentation. Persistent heavy bleeding can reduce your ability to see calculus; treat deposits in manageable segments.
Furcations and complex anatomy: Use smaller working ends and adapt strokes to the anatomy. In furcations, the objective is deposit removal and surface smoothing where access allows, not complete instrumentation of every recess.
Instrument chatter and loss of control: Recheck angulation, reduce pressure, and shorten stroke length. Chatter often signals the tip is not stable against the root surface.
Verification and Documentation
After instrumentation, reassess with probing and a careful visual check. Bleeding on probing often decreases when deposits are removed, but it may take time to fully settle.
Document:
- Areas treated and instrumentation method used
- Baseline and post-treatment findings where available
- Patient tolerance and any complications
A simple verification example: if probing depths reduce by 1–2 mm at follow-up and bleeding decreases, it supports that deposits were effectively removed and inflammation was reduced.
Mind Map: Scaling and Root Planing Workflow
Mind Map: What “Adequate” Looks Like

Practical Example Case Flow
A patient with generalized 5–7 mm pockets and bleeding on probing receives quadrant-based instrumentation. You start with supragingival scaling, then move subgingivally with ultrasonic reduction of heavy calculus. You finish with hand instruments to refine rough areas and smooth residual deposits. You recheck probing and bleeding after treatment, document treated surfaces, and schedule follow-up to confirm response.
This approach keeps the work systematic: remove deposits first, refine the root surface where needed, verify the result, and avoid turning a targeted procedure into an aggressive one.
7.4 Periodontal Maintenance Scheduling for Long Term Disease Control
Long-term periodontal control is less about “more visits” and more about matching recall intervals to how active the disease is and how well the patient can keep biofilm under control. A maintenance schedule is a clinical plan with a built-in feedback loop: you treat, you reassess, and you adjust.
Foundations of Maintenance Interval Selection
Start with the current periodontal status, not the last treatment date. Key inputs include probing depth distribution, bleeding on probing, presence of residual pockets, furcation involvement, tooth mobility, and the patient’s plaque control performance. A simple rule of thumb helps: if inflammation is still present or pockets remain, the schedule should be tighter; if sites are stable and bleeding is absent, intervals can be extended.
Example: A patient with generalized probing depths of 4–5 mm, no bleeding, and no residual pockets after therapy can often begin with a moderate recall interval. Another patient with multiple 6–7 mm sites that still bleed on probing needs earlier maintenance to prevent slow, quiet progression.
Maintenance Goals and What Each Visit Must Achieve
Every maintenance appointment should have three outcomes: (1) confirm stability, (2) remove biofilm and calculus effectively, and (3) correct the behaviors that allowed disease to persist. If a visit only includes polishing and a quick look, it may feel complete while missing the main work.
During maintenance, re-measure selected sites rather than re-checking everything blindly. Use the same probing method and approximate probing force each time. Consistency matters because small measurement changes can be real or just technique variation.
Stepwise Scheduling Workflow
- Baseline after Active Therapy: Reassess after healing, typically once tissues have stabilized. Identify residual pockets and bleeding patterns.
- Assign an Initial Recall Interval: Choose a starting interval based on disease activity and patient factors.
- Define a Monitoring Set: Select index teeth and representative sites, including any previously deep or bleeding areas.
- Perform Maintenance Treatment: Biofilm removal, targeted debridement, and reinforcement of home care.
- Adjust After Each Reassessment: If bleeding persists or depths increase, shorten the interval and intensify site-specific care.
Example: If a patient’s maintenance visit shows bleeding returning in the same molar area, the schedule should tighten and the clinician should check for local retention factors such as overhangs, calculus re-accumulation, or inadequate access for the patient.
Patient Factors That Change the Schedule
Some patients need shorter intervals because the disease is harder to control. Common modifiers include smoking, diabetes with poor glycemic control, history of rapid progression, limited manual dexterity, and inconsistent attendance. Medication effects can also influence inflammation and gingival response, so the schedule should reflect observed clinical behavior.
Example: Two patients both have probing depths around 5 mm. The patient who smokes and shows frequent bleeding on probing will usually require a shorter interval than the non-smoker with stable findings.
Site-Specific Maintenance and Targeted Debridement
Not all sites behave the same. Maintenance should include targeted instrumentation for sites that show bleeding, increased probing depths, or calculus retention. Furcation areas and deep narrow pockets often need careful technique and may benefit from more frequent local attention.
Example: A patient with stable anterior sites but persistent bleeding around mandibular molars may be scheduled for a standard recall interval overall, while receiving extra debridement time and more frequent re-checks for those molar sites.
Documentation That Makes Scheduling Work
Maintenance scheduling fails when records are vague. Document probing depths at the monitoring sites, bleeding status, presence of calculus, and any changes in tooth mobility. Record what was done during the visit and what home-care adjustments were agreed upon.
A practical approach is to create a “maintenance snapshot” each visit: stable or not, and why. That snapshot guides the next interval decision.
Mind Map: Maintenance Scheduling Logic
Example: Adjusting the Interval After a Maintenance Visit
A patient returns at the planned interval. The clinician finds bleeding on probing at two previously deep sites and probing depths increased by 1–2 mm. The next step is not just “come sooner next time,” but also to identify why: inadequate plaque control at those sites, calculus retention, or a restorative factor that traps biofilm. The schedule is shortened, targeted debridement is performed, and the patient receives specific technique coaching for the affected areas. At the next reassessment, the clinician checks whether bleeding has resolved and whether depths have stabilized.
Practical Boundaries for Consistency
Even when intervals change, the monitoring set should remain consistent so the clinician can interpret trends. If the monitoring sites keep changing, the schedule becomes a guessing game. Stability is a pattern, not a single visit.
A good maintenance schedule is therefore a structured loop: measure carefully, treat precisely, document clearly, and adjust based on what the tissues are actually doing.
7.5 Periodontal Surgery Indications and Preoperative Assessment
Periodontal surgery is not a “bigger version” of scaling and root planing. It’s a targeted way to access diseased root surfaces, reshape tissues, and create conditions that are easier to clean. The key question is always practical: will surgery improve access, reduce pockets, or correct anatomy in a way that non-surgical therapy cannot.
Indications for Periodontal Surgery
Surgery is commonly considered when inflammation persists after good-quality non-surgical therapy and when the anatomy makes cleaning difficult. Examples help keep the logic grounded.
- Persistent deep pockets with access limitations. If probing depths remain high in areas where calculus and biofilm are hard to reach, surgery may allow direct debridement. Example: a molar with a narrow, deep buccal defect where repeated instrumentation leaves bleeding and probing depths unchanged.
- Infrabony defects that can be treated. When there is a contained defect around a tooth, procedures such as regenerative approaches may be appropriate. Example: a two-wall defect on a mandibular premolar where radiographs and probing suggest a true bony component loss rather than a flat surface.
- Gingival architecture problems that hinder maintenance. When tissue contours create persistent plaque retention, recontouring or flap procedures can improve hygiene. Example: a deep, irregular vestibule-like pocket around an anterior tooth that traps food and plaque.
- Furcation involvement requiring access or resection planning. Surgical access can support furcation debridement, and in selected cases, resective strategies may be considered. Example: a mandibular molar with a Class II furcation where thorough cleaning is not achievable without improved access.
- Recession with predictable coverage goals. Some surgical procedures aim to reduce recession and improve root coverage. Example: a localized recession defect with adequate keratinized tissue and a stable tooth.
A useful rule of thumb: if the main barrier is “we can’t reach it,” surgery may help. If the main barrier is “the patient can’t maintain it,” surgery alone won’t fix the problem.
Preoperative Assessment Foundations
Before choosing a procedure, the clinician confirms that the diagnosis is correct and that the patient can support healing.
- Re-evaluate after therapy. Measure probing depths, bleeding on probing, and plaque control after non-surgical treatment. Example: if bleeding resolves but probing remains deep, the focus shifts to anatomy and defect morphology rather than ongoing inflammation.
- Confirm defect morphology. Use probing measurements, clinical anatomy, and radiographs to estimate the number of walls and the depth of the defect. Example: a narrow, deep defect suggests different planning than a broad, shallow one.
- Assess tooth prognosis and mobility. Surgery should not be used to “save” teeth that are unlikely to function long-term. Example: severe mobility with advanced furcation involvement may require a different plan than a stable tooth with a localized defect.
- Evaluate occlusion and trauma from occlusion. Identify whether traumatic forces are contributing to mobility or discomfort. Example: a tooth with increased mobility and a clear occlusal interference may need occlusal adjustment as part of the overall plan.
- Check systemic and medication factors. Diabetes control, smoking status, and medications that affect healing influence risk. Example: a patient with uncontrolled diabetes may have delayed healing, so the plan may require stabilization first.
- Plan for patient ability to maintain results. Review oral hygiene technique and plaque levels. Example: if plaque scores remain high at the re-evaluation visit, the surgical plan should be paired with targeted hygiene coaching.
Risk Assessment and Consent Content
Preoperative assessment includes practical risk thinking. Healing complications are not rare, but they are manageable when anticipated.
- Smoking and wound healing risk. Discuss how smoking can impair healing and increase the chance of poorer outcomes.
- Anatomical constraints. Consider furcation proximity, root proximity, and tissue thickness. Example: thin biotype may require more careful flap design to reduce recession.
- Esthetic zone considerations. If surgery involves anterior tissues, tissue stability and recession risk must be explicitly addressed.
- Postoperative care feasibility. Confirm the patient can follow instructions and attend follow-up. Example: if the patient cannot return for suture removal or reassessment, the plan may need adjustment.
Consent should cover the procedure goal, expected healing timeline, possible complications, and what “success” means in measurable terms such as reduced probing depths and improved bleeding control.
Mind Map: Indications and Preoperative Assessment
Example Workflow for a Surgical Candidate
A patient returns after scaling and root planing. Probing depths remain 7–8 mm at a localized buccal site, bleeding is present, and plaque scores are moderate. The clinician repeats measurements, confirms a contained defect on radiographs, and checks mobility and occlusion. The patient reports smoking and inconsistent brushing at home. The plan becomes two-part: reinforce hygiene and smoking cessation counseling, then schedule surgery aimed at improved access and defect management. The consent discussion includes the goal of reduced bleeding and pocket depth, the possibility of delayed healing, and the need for follow-up visits.
This approach keeps the decision grounded: surgery is chosen because the clinical problem is specific, and preoperative assessment ensures the patient and the site are ready for healing.
8. Diagnosis and Clinical Management of Oral Mucosal and Soft Tissue Conditions
8.1 Oral Mucosal Examination Techniques for Lesion Characterization
Oral mucosal examination is a structured way to answer three questions: what is it, where is it, and how does it behave. “Where” matters because the mouth is not one uniform surface; the same appearance can mean different things depending on whether it sits on keratinized gingiva, mobile buccal mucosa, the ventral tongue, or the soft palate.
Foundational Setup and Patient Positioning
Start with good lighting and a stable patient position. Use a mouth mirror to create controlled traction: gently retract the cheek or lift the tongue so the mucosa is stretched rather than folded. Folded tissue can hide subtle color changes and make normal texture look abnormal.
Ask the patient to point to the area of concern first, then confirm your own findings. Pain location is useful, but pain alone is not a diagnosis; a lesion can be painless and still clinically significant.
Systematic Visual Survey
Use a consistent sequence every time. A practical order is: lips, labial mucosa, buccal mucosa, vestibules, gingiva, tongue (dorsal, lateral, ventral), floor of mouth, palate, oropharynx, and then the tonsillar pillars and posterior pharyngeal wall.
Characterize each finding using a small set of descriptors: color, surface texture, borders, size, shape, and surface features (ulceration, plaque, verrucous surface, or vesicles). If you only remember one thing, remember this: borders and surface texture often separate “irritation” from “lesion.”
Palpation and Tissue Behavior
After visual inspection, palpate. Use a gloved finger or cotton-tipped applicator to assess firmness, tenderness, mobility, and whether the lesion blanches. Blanching can suggest vascular changes; non-blanching redness can indicate deeper inflammation.
For ulcers, note whether the base is soft or indurated and whether the surrounding tissue feels thickened. Induration is a key clinical clue because it implies tissue change beyond a superficial irritation.
Lesion Characterization Framework
A simple framework keeps you from getting lost in details.
- Morphology: macule, patch, plaque, papule, nodule, vesicle, ulcer, exophytic growth.
- Surface: smooth, granular, keratotic, sloughing, crusted, or fissured.
- Margins: well-defined vs ill-defined; regular vs irregular.
- Consistency: soft, rubbery, firm, or hard.
- Symptoms: pain, burning, dysphagia, bleeding, or paresthesia.
- Behavior: does it bleed on contact, does it wipe off, does it persist.
Example: A white patch that wipes off leaving erythema suggests a removable process; a white patch that does not wipe off and has a firm feel deserves more careful attention.
Documentation That Actually Helps
Record the lesion’s location precisely (for example, “right lateral tongue, near the molar region” rather than “tongue”). Measure size in two dimensions, and describe color using neutral terms like erythematous, leukoplakic, or mixed. Photographing can support follow-up, but the written description should stand on its own.
Mind Map: Oral Mucosal Examination for Lesion Characterization
Practical Examples to Anchor the Process
Example 1: Traumatic Ulcer vs Persistent Ulcer A traumatic ulcer often follows a clear mechanical factor such as a sharp cusp. It may have a shallow base and surrounding tissue that feels less thickened. If the ulcer persists after eliminating the trauma source and appropriate healing time, the exam should shift toward a lesion-focused approach: check margins, palpate for induration, and reassess the entire field for additional findings.
Example 2: Leukoplakia-Like Appearance A leukoplakia-like lesion can be homogeneous (uniform) or non-homogeneous (speckled, irregular, or mixed). Homogeneous lesions may be less concerning clinically than non-homogeneous ones, but both require characterization: surface texture, ability to wipe, and palpation findings guide how urgently you escalate evaluation.
Example 3: Erythematous Area with Blanching An erythematous patch that blanches with pressure may reflect a vascular or superficial inflammatory component. If it does not blanch and the tissue feels firm or thickened, the exam should not stop at “redness”; it should include border assessment and induration checks.
Common Pitfalls and How to Avoid Them
Don’t rely on a single descriptor. A lesion that looks small can feel firm, and a lesion that looks dramatic can be superficial and tender without induration. Also avoid “spot checking”; a lesion can be accompanied by satellite changes nearby, and missing them can distort your overall characterization.
A good oral mucosal exam ends with a coherent summary: location, morphology, surface features, border quality, palpation findings, and whether the lesion behaves like a removable or superficial process versus a persistent tissue change.
8.2 Common Ulcerative And Inflammatory Conditions And Their Clinical Workups
Ulcerative and inflammatory oral lesions share a useful clinical pattern: they often start with a symptom, then show a visible change, then create a predictable set of differential diagnoses based on location, duration, and associated findings. A good workup keeps you from treating the wrong cause with the right-looking plan.
Foundational Concepts for Clinical Workups
Start with three anchors: timeline, distribution, and pain behavior.
- Timeline: Ask when it began, whether it is recurring, and whether it follows trauma (biting, sharp cusp, new appliance).
- Distribution: Note whether lesions are localized to one site or widespread across keratinized mucosa, non-keratinized mucosa, gingiva, palate, or tongue.
- Pain behavior: Determine if pain is mild and burning, severe and throbbing, or minimal with extensive tissue change. Pain intensity helps, but it never replaces exam findings.
Then add system context: fever, malaise, recent antibiotics, immunosuppression, new medications, smoking changes, and recent viral symptoms. Many ulcerative conditions are “local,” but the mouth is also a reliable reporter of systemic issues.
Core Examination Steps
- General inspection: Check facial swelling, lymph nodes, and mouth opening. If the patient can’t open comfortably, you may need to prioritize infection control and referral pathways.
- Mucosal mapping: Use a systematic sweep. Record exact location, size, shape, border, base color, and whether the lesion is ulcerated, eroded, or pseudomembranous.
- Palpation: Assess induration at the margins. A firm, fixed edge changes the differential.
- Bleeding and discharge: Note spontaneous bleeding, contact bleeding, and any exudate.
- Dental and occlusal triggers: Look for sharp edges, fractured restorations, ill-fitting dentures, and occlusal trauma.
- Basic tests: Consider swabs for suspected viral or bacterial causes when it will change management. For suspected immune-mediated disease, document with photos and consider biopsy when indicated.
Mind Map: Ulcerative and Inflammatory Lesions Workup
Common Conditions and How to Work Them Up
Traumatic Ulcers
Traumatic ulcers are often single, at a site that matches a mechanical trigger. The workup is straightforward: identify the irritant, document the lesion, and remove the cause. Example: a patient reports a sore on the buccal mucosa that started after a new crown. You find a sharp margin and a lesion with an erythematous halo. After smoothing the margin and advising soft diet for a few days, the ulcer should improve.
Aphthous Ulcers
Aphthous ulcers are typically painful, with a shallow ulcer base and a surrounding erythematous rim. They often recur and may be associated with stress, minor trauma, or nutritional factors. The workup focuses on ruling out mimics: check for multiple lesions, measure size, and ask about frequency. Example: three small ulcers on the non-keratinized mucosa after a week of poor sleep. You document size and number, review triggers, and provide symptomatic care while monitoring healing.
Herpetic Gingivostomatitis
Herpetic lesions often come with systemic symptoms and gingival involvement. Look for diffuse gingival erythema, multiple small ulcers, and possible crusting on the lips. The workup includes assessing hydration, fever history, and ability to swallow. Example: a child with fever and painful gums, with ulcers on the gingiva and buccal mucosa. You prioritize supportive care and consider antiviral treatment when appropriate to the clinical scenario.
Candidiasis-Associated Inflammation
Candidiasis can appear as erythematous areas or removable plaques, sometimes after antibiotics or inhaled steroids. The workup includes checking denture use, recent medication history, and whether plaques wipe off leaving erythema. Example: an adult with burning and a removable white coating on the palate after using an inhaler without rinsing. You confirm by gentle scraping and treat the underlying risk factor.
Medication-Related Ulceration
Some medications can cause oral ulceration or mucosal changes. The workup is history-led: list recent drugs, note timing, and examine for widespread mucosal involvement. Example: a patient started a new medication two weeks ago and now has multiple ulcers with minimal trauma explanation. You document distribution and coordinate with the prescriber for risk-balanced management.
Advanced Details That Prevent Misses
Red flags: persistent ulceration beyond an expected healing window, indurated margins, unexplained weight loss, unilateral bleeding, or a lesion that does not match trauma. If any are present, the workup shifts toward biopsy or urgent referral rather than repeated symptomatic treatment.
Distinguishing ulcer vs erosion: ulcers breach the epithelium and often leave a crater; erosions are more superficial. This matters when tracking response to treatment.
Follow-up timing: plan a reassessment interval based on the suspected cause. A traumatic ulcer should show improvement after the irritant is removed; an aphthous ulcer should reduce in size and pain over days.
Case Example: Putting It Together
A patient presents with a painful ulcer on the lateral tongue. History reveals it started after biting the area during chewing. Exam shows a single ulcer with mild surrounding erythema and no induration. You smooth a sharp cusp, advise soft foods, and record baseline size and photo documentation. At follow-up, the ulcer is smaller and less tender, supporting a traumatic etiology and avoiding unnecessary escalation.
8.3 Infectious Lesions Including Fungal and Viral Presentations
Infectious oral lesions are usually diagnosed by combining three streams of information: the patient’s symptoms, the lesion’s appearance and distribution, and the patient’s risk factors. The goal is not to memorize names, but to sort patterns quickly enough to choose safe, effective next steps.
Foundational Concepts for Clinical Sorting
Start with the basics of transmission and host response. Fungal infections often follow changes in the mouth’s environment, such as reduced saliva, recent antibiotics, inhaled corticosteroids, diabetes, or denture wear. Viral infections tend to flare with triggers like stress, fever, immune shifts, or local irritation, and they often recur in the same general location.
Next, separate lesions by morphology. Ulcers, plaques, vesicles, and pseudomembranes behave differently under observation. Also note whether the lesion is localized or widespread, unilateral or bilateral, and whether it is painful, burning, or asymptomatic.
A practical rule: if the lesion looks like it could be infectious, treat the diagnosis as provisional until you confirm with history, exam, and—when needed—testing.
Fungal Presentations and How They Behave
Oral candidiasis commonly presents as white plaques that may wipe off, leaving erythematous tissue. If plaques are thick and adherent, gentle removal may be difficult and pain may increase. Burning or altered taste can occur even when the lesion looks mild.
Common clinical patterns include:
- Pseudomembranous candidiasis: creamy white plaques, often wipeable.
- Erythematous candidiasis: red, sore areas, sometimes on the palate or tongue.
- Angular cheilitis: fissures at the mouth corners, frequently linked to saliva pooling and denture fit.
Denture-related candidiasis is a classic example. A patient reports soreness under a maxillary denture. Exam shows erythema on the denture-bearing mucosa. The integrated approach is to check denture hygiene, fit, and wear schedule, then address the oral environment rather than treating only the visible redness.
Risk-factor questions that change management include recent antibiotic use, inhaled steroid technique, dry mouth symptoms, diabetes control, and smoking.
Viral Presentations and How They Spread Locally
Herpes simplex virus in the mouth often appears as grouped vesicles that rupture into shallow ulcers. The ulcers can be preceded by tingling or burning. Pain is usually significant, and lesions may recur at similar sites.
Primary infection can be more extensive and may include gingivostomatitis with fever and swollen gums. Reactivation tends to be more localized, often on keratinized mucosa such as the hard palate or attached gingiva.
Varicella-zoster virus can present as unilateral lesions following a dermatomal distribution. In the oral cavity, this may involve the palate or one side of the mouth, and pain can precede visible lesions.
A useful clinical example: a patient reports a one-sided burning sensation on the palate, then develops clustered ulcers on that same side. The clinician should document the distribution carefully and consider whether the pattern fits a viral reactivation rather than a traumatic ulcer.
Systematic Examination and Documentation
Use a consistent sequence:
- History: onset, pain level, prior episodes, fever, recent antibiotics, denture use, inhaler use, diabetes symptoms, and immunosuppression.
- Visual inspection: color, borders, surface texture, and whether lesions wipe off.
- Palpation: tenderness, induration, and whether surrounding tissue is inflamed.
- Distribution mapping: record exact location and symmetry.
- Photo documentation: helpful for tracking response, especially for recurrent viral lesions.
When lesions are atypical, persistent beyond expected healing time, or not responding to initial therapy, escalate to appropriate diagnostic steps such as targeted swabs or biopsy, guided by clinical judgment.
Treatment Logic and Safe Procedure Choices
For suspected fungal lesions, management typically includes addressing predisposing factors and using antifungal therapy when indicated. For denture-related cases, cleaning protocols and denture assessment are part of the plan, not an afterthought.
For suspected viral lesions, timing matters. Early recognition of herpes-like patterns supports timely antiviral consideration, especially in primary infections or severe cases. Supportive care focuses on hydration, pain control, and preventing secondary trauma from sharp edges or poor-fitting appliances.
In both fungal and viral cases, avoid unnecessary debridement. If you must remove adherent material, do it gently and document what you find.
Mind Map: Infectious Lesions in the Oral Cavity
Example: Putting It Together with One Patient
A patient presents with sore mouth corners and mild redness under a denture. They recently used antibiotics for a respiratory infection. Exam shows fissuring at the commissures and erythema where the denture contacts the mucosa. The integrated reasoning is straightforward: the distribution matches denture-bearing tissue and saliva pooling, the history supports an environmental shift, and the morphology fits a fungal pathway. The plan combines denture hygiene and fit review with antifungal management and supportive care for comfort.
Example: Viral Pattern with Clear Distribution
Another patient reports tingling on one side of the palate, then develops clustered shallow ulcers. They have had similar episodes before. The clinician records unilateral distribution and grouped ulcer morphology, then considers a viral diagnosis rather than a traumatic ulcer. The management emphasizes timely antiviral consideration when appropriate and pain control while avoiding unnecessary mechanical irritation.
Clinical Red Flags That Change the Workup
If a lesion is indurated, bleeds easily without friction, persists without improvement, or shows an unusual pattern for the suspected infection, escalate evaluation. Infectious lesions can mimic other conditions, so the safest approach is to match the diagnosis to the full pattern, not just the most obvious feature.
8.4 Salivary Gland Disorders and Management Pathways
Salivary glands keep the mouth comfortable by producing saliva that buffers acids, supports chewing, and helps control microbial balance. When flow drops or gland tissue changes, patients often notice dry mouth, altered taste, burning sensations, difficulty swallowing, and a higher rate of cavities. The clinical goal is to identify the cause of reduced secretion or gland dysfunction, then match treatment to the mechanism rather than treating symptoms alone.
Foundational Concepts for Clinical Reasoning
Saliva comes from three major pairs of glands: parotid, submandibular, and sublingual. Each has a different duct system and typical disease patterns. Parotid disorders often present with swelling near the ear and may be associated with viral or obstructive causes. Submandibular issues frequently relate to duct stones because the duct anatomy and saliva composition make precipitation more likely. Sublingual problems are less common but can be involved in obstructive or inflammatory conditions.
Salivary flow can be reduced by obstruction, inflammation, autoimmune destruction, medication effects, or systemic dehydration. A key clinical distinction is whether the patient’s symptoms fluctuate with meals. Pain and swelling that worsen during eating strongly suggest duct obstruction, because saliva production increases when chewing starts, raising pressure behind the blockage.
Assessment and Diagnostic Workflow
Start with history focused on onset, triggers, and associated symptoms. Ask about meal-related swelling, dry mouth severity, taste changes, dental caries progression, eye dryness, joint pains, and fatigue. Medication review matters because many drugs reduce salivary output by affecting autonomic pathways or causing anticholinergic effects.
Examination should include inspection and palpation of gland areas and evaluation of oral mucosa for dryness, thickened secretions, and dental wear patterns. If a duct opening can be seen, gentle expression may reveal mucus, pus, or a visible stone. Document whether swelling is unilateral or bilateral, tender or firm, and whether it is fixed or mobile.
Basic tests often include salivary flow assessment, imaging when obstruction or structural disease is suspected, and blood tests when autoimmune disease is plausible. Ultrasound is useful for detecting duct stones and gland enlargement, while CT or MRI can help characterize masses or complicated anatomy. If infection is suspected, prioritize culture when appropriate and treat promptly.
Obstructive Disorders and Management Pathways
Duct obstruction is commonly due to sialolithiasis. Patients typically report intermittent swelling and pain, often under the jaw for submandibular stones. Management begins with hydration, warm compresses, gland massage, and sialogogues such as sugar-free sour lozenges to stimulate flow. Analgesia supports comfort while the duct clears.
If symptoms persist or imaging confirms a stone that is unlikely to pass, referral for endoscopic or surgical removal may be needed. Antibiotics are not automatic for obstruction; they are reserved for evidence of bacterial infection such as fever, purulent discharge, or rapidly worsening tenderness.
Example: A patient reports right-sided swelling that peaks during lunch and settles afterward. Examination shows reduced salivary pooling on that side and a firm area along the duct. Ultrasound confirms a submandibular duct stone. The plan includes hydration, warm compresses, massage, and sour lozenges, with follow-up imaging if symptoms do not resolve.
Inflammatory and Infectious Conditions
Acute bacterial sialadenitis often presents with painful swelling, erythema, and sometimes purulent saliva. Risk increases with dehydration, poor oral intake, and reduced saliva from medications. Treatment includes hydration, warm compresses, massage, analgesia, and antibiotics when bacterial infection is likely. If abscess is suspected, drainage becomes necessary.
Chronic sialadenitis can show recurrent swelling with less dramatic systemic symptoms. Management emphasizes maintaining salivary flow, addressing contributing factors like dehydration and medication effects, and using imaging to exclude stones or structural lesions.
Example: A patient with dry mouth from multiple medications develops tender parotid swelling and foul-tasting saliva. The clinician starts hydration and warm compresses, expresses thick secretions, and prescribes antibiotics due to purulence and localized inflammation. Follow-up focuses on symptom resolution and reviewing medication contributors.
Autoimmune and Systemic Causes
Autoimmune salivary gland dysfunction is a major cause of persistent xerostomia. Sjögren’s syndrome is the classic example, often accompanied by dry eyes and systemic symptoms. In these cases, the gland tissue gradually loses function, so management targets symptom control and prevention of complications.
Treatment pathways include saliva substitutes, topical fluoride strategies, meticulous oral hygiene, and caries risk management. Systemic therapy may be coordinated with medical care when autoimmune activity is confirmed. Dental management should be proactive because reduced saliva accelerates demineralization.
Example: A patient reports long-standing dry mouth and gritty eyes, with increasing root caries. Examination shows dry mucosa and reduced salivary pooling. The dental plan includes high-fluoride toothpaste, frequent preventive visits, and saliva substitutes, while medical referral supports diagnostic confirmation and systemic management.
Neoplastic Considerations and Referral Triggers
Any persistent, enlarging gland mass requires careful evaluation. Red flags include firm or fixed masses, progressive unilateral swelling, facial nerve symptoms, unexplained weight loss, and lymphadenopathy. Imaging and specialist referral are appropriate because the differential includes benign tumors, malignant tumors, and other structural lesions.
Management in dental settings focuses on timely referral and maintaining comfort while awaiting diagnosis. Avoid repeated aggressive attempts to express secretions from a suspected mass; it can delay appropriate workup.
Practical Management Pathways for Common Presentations
Use a symptom-to-cause approach:
- Meal-related pain and swelling → consider duct obstruction; start conservative measures and image.
- Fever, pus, rapidly worsening tenderness → consider acute bacterial sialadenitis; treat infection and assess for abscess.
- Persistent dryness with systemic dryness symptoms → consider autoimmune dysfunction; manage caries risk and coordinate medical evaluation.
- Persistent unilateral mass → consider neoplasm or structural disease; image and refer.
Mind Map: Salivary Gland Disorders and Management
Integrated Dental Management for Prevention and Comfort
Regardless of cause, reduced saliva increases risk for caries, mucosal irritation, and candidal overgrowth. Dental management should include high-fluoride regimens, tailored recall intervals based on caries activity, and patient-specific home-care instructions that account for dexterity and motivation. When dryness is prominent, consider saliva substitutes and strategies to reduce irritants such as alcohol-containing mouthwashes.
Example: A patient with obstructive episodes and baseline dryness is given a plan that combines conservative obstruction care during flare-ups with ongoing preventive dentistry. The clinician schedules shorter recall intervals during high-risk periods and adjusts fluoride intensity based on observed lesion activity.
Summary of the Pathway Logic
Effective management starts with pattern recognition: meal-related symptoms point toward obstruction, systemic dryness points toward functional loss, and rapid painful swelling points toward infection. After identifying the likely mechanism, treatment becomes straightforward: restore or stimulate flow when possible, treat infection when present, control caries risk when saliva is chronically reduced, and refer promptly when a persistent mass suggests structural disease.
8.5 Benign Lesions and Referral Criteria for Biopsy and Specialist Care
Benign oral lesions are common, but “benign” does not mean “ignore it.” The clinical goal is to sort lesions into categories that match the right level of investigation: reassurance with monitoring, targeted treatment, or biopsy and specialist referral. A systematic approach prevents both under-treatment and unnecessary procedures.
Foundational Concepts for Benign Lesion Assessment
Start with the lesion’s behavior. Benign lesions typically grow slowly, remain localized, and do not cause progressive functional loss. Still, behavior is not the only clue; appearance and patient context matter.
Key foundational elements to record:
- Location and boundaries: keratinized gingiva vs buccal mucosa vs tongue; well-demarcated vs diffuse.
- Surface characteristics: ulcerated, pebbly, verrucous, smooth, or crusted.
- Color and texture: white, red, mixed, or pigmented; firm vs soft on palpation.
- Consistency and mobility: does it feel fixed to deeper tissues?
- Symptoms: pain, tenderness, bleeding, or numbness.
- Duration and change: stable for years differs from a lesion that changed over weeks.
A helpful clinical habit is to ask, “What would make this lesion less benign?” That question naturally leads to the referral criteria.
Bedside Reasoning for Common Benign Patterns
Some benign lesions have recognizable patterns that guide management.
- Irritation fibroma: often firm, smooth, and linked to a chronic trauma source such as a sharp tooth edge. Example: a cheek lesion that repeatedly gets bitten at the same spot; after smoothing the edge, the lesion should shrink over weeks.
- Mucocele: usually a fluctuant, bluish lesion on the lower lip from minor salivary gland trauma. Example: a child with a recurrent lower-lip swelling after lip biting; it may resolve, but persistent lesions warrant excision or biopsy.
- Oral lichen planus: can present as reticular white striae with erythematous areas. Example: a patient with bilateral buccal lesions and burning with spicy foods; management focuses on symptom control and careful monitoring.
- Candidiasis-related plaques: often wipeable white patches. Example: a denture wearer with sore mouth and removable plaques; improvement after antifungal therapy supports a non-neoplastic cause.
These examples show the logic: if the lesion fits a benign pattern and responds to a reasonable intervention, the probability of benignity increases. If it does not, the plan should change.
Referral Criteria for Biopsy and Specialist Care
Biopsy is indicated when the risk of missing a significant diagnosis outweighs the burden of the procedure. Referral to an oral medicine specialist, oral surgeon, or ENT may be appropriate depending on lesion location and complexity.
Use the following criteria as a checklist:
-
Non-healing ulcer or lesion
- Any ulcer that does not resolve within an expected healing window after removing local irritants.
- Example: a tongue ulcer that persists after smoothing a fractured cusp and improving oral hygiene.
-
Progressive change
- Increasing size, induration, or development of fixation to deeper tissues.
- Example: a previously soft lesion becoming firm and tethered.
-
Unexplained bleeding or spontaneous pain
- Especially when pain is persistent and not explained by trauma.
-
Induration, firmness, or fixation on palpation
- Benign lesions can be firm, but fixation raises concern.
-
Suspicious pigmentation
- Irregular borders, variegated colors, or rapid change.
- Example: a patch that darkens over months without a clear cause.
-
Verrucous or exophytic growth with persistent behavior
- Example: a wart-like lesion that keeps enlarging despite eliminating trauma.
-
High-risk patient context
- History of head and neck cancer, heavy tobacco use, or immunosuppression.
- Example: a stable-appearing lesion in a high-risk patient still deserves a lower threshold for biopsy.
-
Lesions where diagnosis is uncertain
- If two clinicians would reasonably disagree on the category, biopsy is often the cleanest path.
Biopsy Planning and Practical Referral Steps
Once the decision is made, the quality of the biopsy matters.
- Choose the most representative area: avoid only ulcer edges if the center is more diagnostic.
- Document the lesion first: size in three dimensions, photo if your clinic protocol allows, and palpation findings.
- Remove local irritants when appropriate: but do not delay biopsy when criteria are met.
- Communicate clinical reasoning: include duration, symptoms, and what was tried.
A good biopsy request form reads like a short story with facts: location, appearance, palpation, duration, and why it meets referral criteria.
Mind Map: Benign Lesions and Referral Criteria
Example: Turning a “Maybe” Into a Clear Plan
A 52-year-old patient reports a unilateral buccal lesion present for 10 weeks. It began after a sharp tooth edge was noticed. On exam it is smooth, firm, and well-demarcated, but it has not shrunk after the edge was smoothed. It is not ulcerated, and palpation shows no fixation.
Reasoning: the trauma link supports benignity, but the lack of improvement after eliminating the irritant moves the case toward biopsy consideration. The next step is to refer for biopsy rather than extend reassurance, because the lesion’s behavior is the deciding factor.
Example: When Pigmentation Requires Action
A patient has a pigmented patch on the lower gingiva that looks uniform at first glance. Over two months it becomes darker with slightly irregular borders. There is no clear trauma source.
Reasoning: even if the lesion could be benign, the change in pigmentation and border irregularity meet referral criteria. Biopsy is the appropriate next step because clinical appearance alone is not enough to confirm benignity.
Summary of the Integrated Approach
Benign lesions are best managed with a structured assessment, pattern recognition, and a clear threshold for biopsy. When a lesion behaves like it should improve after local factors are corrected, monitoring or conservative treatment is reasonable. When it does not, or when red flags appear, biopsy and specialist care are the practical, evidence-aligned response.
9. Orthodontic Considerations in General Practice
9.1 Occlusion Assessment for Malocclusion Identification and Referral
Occlusion assessment in general practice is less about memorizing “perfect” teeth and more about answering three practical questions: What is the patient’s bite doing? Why does it matter clinically? What can be managed in-house versus referred?
Foundational Concepts for Clinical Observation
Start with the patient’s habitual bite, then compare it to what the teeth can do when guided. Habitual occlusion shows what the patient actually tolerates; guided occlusion shows what the teeth and jaw structures allow.
Key terms to observe:
- Centric relation: a jaw position used for consistent records; it helps separate tooth position problems from jaw position problems.
- Maximum intercuspation: where the teeth “lock” together most tightly.
- Overjet and overbite: horizontal and vertical overlap that influence trauma risk and restorative planning.
- Crossbite: a mismatch in buccal-lingual tooth relationships, often linked to functional shifts.
A simple clinical habit: before measuring, watch the patient close. If the jaw shifts mid-close, you are likely seeing a functional deviation rather than a purely dental mismatch.
Systematic Intraoral Assessment
Tooth Relationships
Assess alignment and contact patterns in three planes:
- Sagittal: overjet, Class I/II/III tendencies.
- Vertical: overbite depth, open bite tendencies.
- Transverse: crossbite presence and laterality.
Example: A patient with a deep overbite who reports food trapping between upper and lower incisors may have both vertical overlap and contact timing issues. That combination affects hygiene access and may change how you plan restorations.
Functional Movements
Ask for controlled movements and observe:
- Protrusion: does the anterior guidance look smooth or does it “jump”?
- Lateral excursions: does the working side show stable contacts while the non-working side separates?
- Opening and closing: is there deviation, clicking, or restricted movement?
Example: If lateral movement causes immediate discomfort and you see a slide from maximum intercuspation, the occlusion may be contributing to muscle guarding. That is a good reason to refer for a more detailed temporomandibular and occlusal evaluation.
Signs of Occlusal Trauma
Look for consequences, not just causes:
- Fremitus or tooth mobility patterns that correlate with heavy contacts
- Worn edges or fractures consistent with parafunction
- Gingival recession near high-contact areas
Example: A mandibular incisor with localized recession and a history of “biting hard on that tooth” suggests a targeted contact problem. Even if you cannot correct the occlusion fully, you can document the pattern and guide referral.
Measuring and Documenting for Referral Decisions
Use consistent documentation so the referral clinician can act quickly.
- Record overjet/overbite with a simple ruler method.
- Note crossbite laterality and whether it is dental or functional (does it correct when guided?).
- Photograph key views and mark areas of suspected heavy contact.
- Document symptoms: pain, headaches, jaw fatigue, clicking, and chewing difficulty.
A useful rule: if the patient’s symptoms and the occlusal findings point in the same direction, referral becomes more justified.
Mind Map: Occlusion Assessment Workflow
Referral Triggers and Practical Examples
Refer when the occlusion seems to be driving symptoms or when complexity exceeds routine correction.
- Functional shift with symptoms: deviation during closure plus jaw fatigue or pain.
- Suspected TMJ involvement: clicking with restricted movement or consistent pain during movements.
- Complex crossbite: especially if it does not correct with guidance, suggesting skeletal or functional components.
- Severe discrepancy affecting restorations: when planned restorative work would be undermined by unstable contacts.
Example: A patient with a unilateral posterior crossbite and a history of chewing on one side may have a functional adaptation. If you also find asymmetric wear and muscle tenderness, referral for orthodontic and occlusal assessment is more efficient than repeated restorative attempts.
Quick Clinical Checklist for the Chair
- Watch closure for mid-close shift.
- Check overjet, overbite, and crossbite laterality.
- Observe protrusion and lateral movements for smoothness and contact behavior.
- Look for trauma signs: wear, recession, mobility, fremitus.
- Record symptoms and correlate them with the occlusal pattern.
- Decide: manage locally, monitor, or refer with clear documentation.
9.2 Space Management Principles for Mixed Dentition Planning
Space management in mixed dentition is the art of keeping the mouth’s “real estate” from being quietly re-zoned by eruption. The goal is not to force teeth into place, but to guide eruption so that the permanent teeth have a reasonable chance to fit with stable alignment and acceptable function.
Core Concepts and Starting Assumptions
Begin with a clear baseline: which teeth are present, which are erupting, and what space is available. Mixed dentition planning typically focuses on the period from eruption of the first permanent molars through eruption of the canines and premolars. Two ideas guide most decisions.
First, space is a measurable quantity. You can estimate how much space the permanent teeth will need and compare it with how much space is available in the arch. Second, space changes over time. Teeth drift, molars can tip, and canines may erupt in a way that either preserves or consumes space.
A practical example: if a child has early loss of a primary molar, the neighboring teeth may drift toward the gap. That drift can reduce the available space before the premolars even begin to erupt, making later correction harder.
Assessing Space and Predicting Needs
Space assessment usually combines clinical findings with charting and measurements. Common measurements include arch length, tooth size estimates, and the relationship between primary and permanent teeth.
A systematic workflow helps avoid “measurement drift.”
- Confirm eruption stage and tooth status. Missing teeth, retained primary teeth, and delayed eruption all affect space.
- Measure available space at the relevant stage. For example, measure the distance between the mesial surfaces of the first permanent molars when premolars are expected to erupt.
- Estimate required space for the permanent teeth. Tooth size estimation can be based on standard methods and the child’s existing dentition.
- Identify the likely cause of discrepancy. Crowding can come from tooth size, arch form, or premature loss of primary teeth.
Concrete example: a child with mild crowding and no history of early tooth loss may have a tooth-size discrepancy rather than a space-loss problem. That changes the treatment approach.
Choosing the Right Strategy for the Right Problem
Space management strategies generally fall into three buckets: preserve space, gain space, or redirect eruption.
Preserve space is used when space is at risk, often after early loss of primary teeth or when molars are vulnerable to mesial drift. The simplest example is a space maintainer after premature loss of a primary molar. If the first permanent molar tips forward, the premolar may erupt ectopically.
Gain space is considered when there is a true shortage. This may involve expanding the arch, reducing tooth size, or using orthodontic mechanics. In mixed dentition, expansion is often limited by the child’s growth pattern and the stability of the result.
Redirect eruption is used when teeth are erupting in a way that can be guided. For instance, if a canine is erupting too far labially, a plan may aim to improve the eruption path rather than only “making room” after the fact.
A helpful rule of thumb: if the problem is primarily space loss from drifting, preserve space first. If the problem is tooth-size excess relative to arch length, gain space or adjust arch form. If the problem is eruption path, redirect eruption.
Timing and Growth Considerations
Timing matters because mixed dentition is a moving target. The same discrepancy can look different six months later as molars erupt and canines begin their journey.
A systematic approach is to plan around eruption milestones. For example, if the first permanent molars have erupted and are stable, space preservation may be more straightforward. If molars are still erupting or tipping, the plan may need to address molar position first.
Growth also influences arch dimensions. A child who is still in active growth may respond differently to expansion than a child closer to the end of growth. Clinically, you want to avoid overcorrecting based on a single appointment’s measurements.
Common Clinical Scenarios and Integrated Examples
Scenario 1: Premature loss of a primary molar. A child loses a primary second molar early. The first permanent molar tends to drift mesially, reducing space for the premolar. A space maintainer can preserve the arch length until the premolar erupts. The key is to match the maintainer type to the amount of space loss risk and the child’s eruption timing.
Scenario 2: Crowding with no early tooth loss. A child shows crowding when canines are about to erupt. If measurements suggest a tooth-size discrepancy, the plan may include controlled expansion or selective space creation. The clinician also checks whether the arch form is narrow, because expansion without addressing arch form can lead to unstable alignment.
Scenario 3: Ectopic eruption risk. A canine appears positioned to erupt toward the palate or labially. The plan focuses on guiding eruption and ensuring that primary teeth and adjacent structures are not blocking the path. Space is managed, but the eruption route is treated as a primary variable.
Mind Map: Space Management Principles for Mixed Dentition Planning
Practical Takeaways for Clinicians
Treat space management as a cause-and-effect problem. Measure first, then decide whether the issue is drifting, size mismatch, or eruption path. Finally, revisit the plan as eruption changes the situation; mixed dentition is not a one-time calculation, it’s a sequence.
9.3 Interceptive Orthodontic Procedures in Appropriate Cases
Interceptive orthodontics aims to reduce future complexity by correcting problems early, but only when the timing and diagnosis make sense. The key idea is simple: treat the cause you can identify now, not the one you hope will appear later.
Foundational Concepts for Selecting Appropriate Cases
Start with a clear problem statement. In general practice, the most useful interceptive targets are those linked to a functional issue or a predictable growth pattern. Examples include anterior crossbite from a jaw shift, posterior crossbite from transverse deficiency, and certain space problems in mixed dentition.
Next, confirm that the patient is actually in the right growth window. A child who is too young may not cooperate for appliances, and a child who is too old may have missed the period when skeletal changes are most feasible. Practical timing is guided by eruption stage, facial growth stage, and whether the problem is dental-only or involves jaw relationships.
Finally, set measurable goals. “Improve alignment” is vague. Better goals are specific: normalize overjet to a safe range, correct a crossbite so the bite closes without deflection, or create space for eruption of a permanent tooth.
Diagnostic Workflow That Prevents Guesswork
Begin with a systematic exam: facial symmetry and profile, intraoral occlusion in centric relation and habitual bite, and functional movements. Then document mixed dentition status, including which teeth are erupted and which are likely to erupt next.
Use records to separate dental from skeletal contributions. If a posterior crossbite corrects when the mandible is guided, the issue may be primarily dental or functional. If it persists, transverse skeletal involvement becomes more likely.
Space analysis should be practical. Estimate available space using arch length and compare it to expected tooth size. If a discrepancy is small, monitoring may be enough. If it is large and linked to delayed eruption or crowding, interception may be justified.
Common Interceptive Procedures and When They Fit
Posterior Crossbite Correction
A unilateral posterior crossbite often benefits from early correction to avoid asymmetric function. A removable or fixed expansion approach can be chosen based on age, cooperation, and severity. For a simple example, a 7-year-old with a single-tooth crossbite can be managed with a removable appliance that tips the affected teeth into a corrected position while monitoring for eruption changes.
Anterior Crossbite Correction
If an anterior crossbite is due to a tooth position, selective adjustment and a removable appliance can help. If it is due to a functional shift, guiding the mandible into a more stable position and maintaining that correction is the goal. A practical example is a child with a “chin-forward” closure: correct the crossbite and reassess whether the shift disappears when the bite is guided.
Space Management in Mixed Dentition
Space problems are common, but interception is not automatic. If a primary molar is lost early, the adjacent teeth may drift, reducing space for the permanent premolar. In that case, a space maintainer can preserve the arch length. Example: after premature loss of a primary molar, a band-and-loop or similar maintainer can prevent mesial drift until the permanent successor erupts.
Habit Management That Affects Occlusion
Thumb sucking and tongue thrust can influence anterior open bite and overjet. The interceptive goal is to reduce the habit’s effect on tooth position. A clear example is a child with persistent anterior open bite and a visible tongue posture during swallowing; addressing the habit and using an appliance that discourages the harmful tongue posture can support spontaneous improvement.
Advanced Details for Safe Execution
Appliance choice should match the problem’s scale. Small tooth-position issues often respond to removable appliances and selective adjustments. Transverse skeletal issues may require more robust expansion strategies, typically under specialist guidance.
Monitor frequently enough to catch relapse early. If an appliance is used to correct a crossbite, reassess bite closure after adjustments and after new teeth erupt. For space maintenance, check fit and eruption progress; a poorly fitting maintainer can become an obstacle.
Be realistic about compliance. Removable appliances depend on wear time. If the family cannot reliably manage wear, the “best” appliance becomes the one that can be maintained with the least daily burden.
Mind Map: Interceptive Orthodontic Procedures in Appropriate Cases
Example Scenarios That Tie It Together
Scenario 1: Posterior Crossbite With Unilateral Deflection A child shows a unilateral posterior crossbite and the bite shifts on closure. The clinician guides the mandible and observes whether the crossbite corrects. If it corrects with guidance, the plan focuses on restoring stable closure and monitoring eruption, rather than assuming a purely skeletal problem.
Scenario 2: Premature Primary Molar Loss A primary molar is lost early, and the adjacent teeth begin to drift. Space analysis shows a meaningful reduction in available space. A space maintainer is placed to preserve the arch until the permanent premolar erupts.
Scenario 3: Anterior Open Bite With Tongue Thrust The child has an anterior open bite and a consistent tongue posture during swallowing. The interceptive plan targets the functional pattern and supports tooth position changes while tracking whether the bite closes as the habit reduces.
9.4 Managing Oral Habits and Their Clinical Impact
Oral habits are learned patterns that place repeated forces or create persistent contact between teeth, soft tissues, and oral fluids. In practice, the key is to treat habits as a cause of findings, not just a label. A patient may present with chipped incisors, gingival recession, or chronic cheek biting, and the habit is often the missing link.
Foundational Concepts for Habit Recognition
Start with what you can observe and what you can verify. Ask about timing and triggers: “Does it happen during studying, stress, or while watching TV?” Then look for physical clues that match the pattern.
Common habit categories include:
- Mechanical habits: thumb sucking, nail biting, pen chewing.
- Functional habits: bruxism, clenching, tongue thrust.
- Soft-tissue habits: cheek or lip biting, chronic irritation from rubbing.
- Oral fluid habits: mouth breathing and persistent open-mouth posture.
A useful clinical rule is to connect the habit to the tissue it affects. Thumb sucking typically impacts anterior overjet and palatal tissues; cheek biting often leaves a line of trauma near the occlusal plane.
Clinical Impact Pathways
Habits affect the mouth through three main pathways: force, pressure, and friction.
- Force and tooth wear: Bruxism and clenching can produce enamel loss, cracked restorations, and sensitivity. The pattern matters: generalized wear suggests clenching; localized wear can suggest a specific contact habit.
- Pressure and tooth movement: Tongue thrust and thumb sucking can alter eruption paths and create open bites or increased overjet.
- Friction and soft-tissue injury: Cheek biting and lip biting can cause ulceration, hyperkeratosis, and secondary infection risk.
When you document, include both the habit history and the matching clinical signs. That pairing prevents the common mistake of treating the symptom while ignoring the cause.
Assessment Workflow in General Practice
Use a structured approach so the habit doesn’t get lost in the appointment.
- History: frequency, duration, triggers, and whether the patient is aware.
- Observation: ask the patient to demonstrate when safe, and watch for compensatory movements.
- Intraoral exam: look for wear facets, recession patterns, mucosal trauma, and tooth position changes.
- Occlusal evaluation: check for premature contacts and parafunctional wear patterns.
- Risk mapping: identify which teeth and tissues are most vulnerable.
A practical example: a patient reports “I grind at night.” On exam you find worn cusps on mandibular molars and fractured composite margins on maxillary premolars. That alignment supports a bruxism-related mechanism rather than isolated restoration failure.
Mind Map: Habit Types and Clinical Clues
Management Principles with Concrete Examples
Management works best when it is specific to the habit mechanism.
1. Reduce harmful contact
- For clenching and bruxism, a protective occlusal appliance can reduce tooth-to-tooth trauma. Pair it with advice on daytime awareness if the patient is also clenching while awake.
- Example: a patient with worn canines and fractured margins reports clenching during meetings. You recommend a brief “jaw check” routine and provide a night guard plan. At follow-up, you reassess wear progression and restoration integrity.
2. Protect vulnerable tissues
- For cheek biting, smooth sharp edges from restorations or malpositioned teeth can reduce the trigger point. If the biting is driven by occlusal interference, correcting the occlusal contact can help.
- Example: a patient shows a consistent buccal mucosal ulcer near a specific molar. After adjusting an overcontoured restoration and verifying occlusal contact, the ulcer resolves and recurs less often.
3. Address triggers and behaviors
- For nail or pen biting, focus on replacing the behavior with a competing action the patient can do during the trigger moment.
- Example: during studying, the patient bites a pen cap. You suggest keeping a stress ball or chewing-safe gum only if appropriate, then document whether the biting frequency decreases.
4. Monitor and document response
- Habits often improve gradually. Set a measurable target such as reduced frequency, reduced mucosal trauma episodes, or stabilization of wear.
- Example: for tongue thrust, you track changes in anterior bite relationship and mucosal pressure marks over time, alongside any referral needs if the pattern is persistent.
When to Escalate
Escalate when the habit causes progressive tissue damage, when there is uncertainty about the diagnosis, or when soft-tissue lesions persist beyond expected healing. In those cases, the goal is not to “blame the habit,” but to ensure the mouth is protected while the underlying pattern is clarified.
9.5 Retention and Follow Up Planning After Orthodontic Interventions
Retention is the part of orthodontics where you stop moving teeth and start keeping them where you put them. Teeth and supporting tissues have memory: they try to return toward their pre-treatment positions. Your job is to counter that tendency with a plan that matches the patient’s risk, compliance, and biology.
Foundational Principles of Retention
Retention begins at the end of active treatment. The moment braces or aligners come off, the periodontal ligament and gingival fibers start reorganizing. If retention is delayed, inconsistent, or poorly designed, relapse often shows up first as small changes in alignment, then as bite shifts.
A useful way to think about retention is in three layers:
- Mechanical stability: the retainer’s ability to resist tooth movement.
- Biologic stability: how stable the periodontal and occlusal environment is.
- Behavioral stability: whether the patient wears the retainer as instructed.
Risk Stratification for Retention Planning
Not every case needs the same intensity. Consider these factors when choosing retention type and schedule:
- Initial severity: larger crowding or greater bite correction often needs longer retention.
- Tooth movement type: rotations and significant incisor retraction can relapse more.
- Age and growth: younger patients may still change due to growth patterns.
- Periodontal status: inflammation and poor plaque control reduce stability.
- Compliance history: if wear was inconsistent during active treatment, plan for simpler, more forgiving retention.
Example: A teen who wore aligners inconsistently during treatment may do better with a fixed lower retainer plus a removable upper retainer, rather than relying on full-time removable wear.
Retainer Options and How to Choose
Common retention designs include:
- Removable retainers: typically vacuum-formed or Hawley-style. They are removable for cleaning and allow controlled wear schedules.
- Fixed retainers: bonded wire across anterior teeth, usually lower incisors. They provide continuous support but require careful hygiene.
Selection should be practical. Removable retainers are easier to monitor and adjust, but they depend on wear time. Fixed retainers are harder to forget, but they can accumulate plaque if the patient’s cleaning routine is weak.
Example: After correcting mild crowding in a motivated adult, a removable retainer with a structured wear schedule may be sufficient. After resolving moderate crowding with rotations, adding a fixed retainer can reduce the chance of early relapse.
Follow Up Schedule and What to Check
A systematic follow-up plan helps you catch relapse early and correct it before it becomes “normal.” A typical sequence:
- First review: within 1–3 weeks after debonding to confirm fit, comfort, and speech adaptation.
- Early stability checks: at about 3 months and 6 months to evaluate alignment and bite.
- Longer-term reviews: at 12 months, then annually if stable.
At each visit, check:
- Retainer fit and integrity: cracks, wire deformation, bond failures.
- Tooth alignment: any new crowding, spacing, or rotations.
- Occlusion: bite changes, contact shifts, and any increase in overjet/overbite.
- Gingival health: especially around fixed retainers.
- Patient wear behavior: ask directly and non-judgmentally.
Example: If a patient reports “I wore it most days,” and you see slight incisor crowding, the issue may be wear time rather than retainer design. Adjust the schedule and reinforce cleaning, then recheck in a shorter interval.
Mind Map: Retention Planning Workflow
Managing Common Problems Without Guesswork
Bond failure with fixed retainers: Treat it as a time-sensitive issue. A broken bond can allow localized movement quickly. Replace or repair promptly and review cleaning technique.
Removable retainer not worn enough: Instead of repeating instructions, connect the schedule to what you see. If alignment drift is present, the retainer is not doing its job. Shorten the gap between follow-ups and set a realistic wear routine.
Speech or comfort issues: Early discomfort is common, but persistent pain or ulceration needs adjustment. A retainer that fits poorly can reduce wear time, which then increases relapse risk.
Example: Putting It All Together in a Plan
A patient finishes active treatment with mild anterior crowding correction. You assess good periodontal health, stable bite, and strong compliance during active therapy. You prescribe a removable retainer for the first months with a structured reduction schedule, plus a review at 1–3 weeks for fit and at 3 and 6 months for alignment checks. At the 6-month visit, you confirm stable incisors and healthy gingiva, then shift to longer-interval monitoring.
If the same patient had shown inconsistent wear during active treatment, you would likely increase retention support by adding a fixed lower retainer and keeping the removable retainer schedule more conservative, because the limiting factor would be behavior rather than design.
Retention is not a single device choice. It is a loop: plan based on risk, monitor based on time, and adjust based on what the teeth and tissues are actually doing.
10. Prosthodontic Procedures and Restorative Rehabilitation
10.1 Treatment Planning for Fixed and Removable Prostheses
Treatment planning for prostheses is basically a chain of decisions: what needs replacing, what the mouth can support, what the patient can maintain, and what the clinician can deliver reliably. The goal is not just to choose a crown, bridge, or denture, but to build a plan that survives real life—chewing, saliva changes, hygiene habits, and the occasional “I forgot my appointment” moment.
Foundational Assessment Before Choosing Prosthesis Type
Start with a complete diagnostic record: medical history, intraoral exam, periodontal status, occlusion, existing restorations, and radiographs. Then add functional information: how the patient bites, where they experience discomfort, and whether parafunction is present. A prosthesis that looks fine but overloads a compromised tooth is like a well-made chair on a wobbly floor.
Key foundational questions:
- What is missing and why? Replacement strategy differs for caries-driven loss versus periodontal-driven loss.
- What tissues remain healthy enough to support? Periodontal stability and mucosal health matter for both fixed and removable options.
- What is the patient’s ability to maintain the plan? If hygiene is difficult, design must reduce plaque retention and simplify cleaning.
- What are the occlusal forces and habits? Bruxism and clenching influence material choice, connector design, and occlusal scheme.
Fixed Prostheses Planning Logic
Fixed prostheses include crowns, bridges, and implant-supported restorations. The planning logic is to preserve tooth structure where possible, ensure stable abutments, and create a restoration that can be cleaned.
Abutment Selection and Tooth Preparation Strategy
For tooth-supported crowns and bridges, evaluate:
- Remaining tooth structure and ferrule potential for crowns.
- Periodontal support and mobility.
- Endodontic status and risk of fracture.
- Occlusal load distribution through the planned design.
Example: A patient with a fractured molar and mild mobility may still be a candidate for a crown, but a bridge spanning multiple compromised teeth may be a poor match because the prosthesis can “splint” poorly and mask worsening periodontal conditions.
Bridge Design and Pontic Considerations
Bridge planning includes connector size, pontic type, and hygiene access. A hygienic pontic design helps manage plaque at the tissue interface.
Example: For a patient with limited dexterity, choosing a pontic that allows easier cleaning can reduce inflammation around the pontic site.
Removable Prostheses Planning Logic
Removable prostheses include complete dentures, partial dentures, and overdentures. The planning logic is to match the prosthesis to the supporting tissues and to control movement.
Support, Retention, and Stability
For partial dentures, plan based on:
- Kennedy classification and remaining tooth distribution.
- Rest seat and clasp design to control tipping and rotation.
- Major connector selection to distribute forces.
For complete dentures, plan based on:
- Residual ridge form and mucosal resilience.
- Vertical dimension and occlusion to support function.
- Border molding and impression accuracy for seal and stability.
Example: A patient with a shallow mandibular ridge may struggle with retention. Planning may shift toward an overdenture concept or a design that improves stability rather than relying on a denture that will rock.
Tissue Health and Patient Comfort
Removable prostheses require careful attention to pressure distribution. Overpressure areas lead to sore spots, which then lead to poor wear and poor adaptation.
Example: If the patient reports repeated sore areas at the same spot, the plan should include adjustment and, if needed, remaking key impression components rather than simply “telling them to tough it out.”
Occlusion and Prosthesis Integration
Occlusion planning connects the prosthesis to the patient’s bite. Decide whether the occlusal scheme should be balanced, mutually protected, or adjusted based on stability and parafunction risk. Then verify contacts during try-in and after cementation or denture insertion.
Example: If a crown is placed with heavy contacts on the working side in a bruxer, the risk of chipping and discomfort increases. Light, even contacts and appropriate material selection reduce that risk.
Mind Map: Treatment Planning Pathway
Practical Example: Choosing Between Fixed and Removable
A patient has missing molars and mild periodontal disease. Radiographs show adequate bone support around remaining teeth, but hygiene is inconsistent.
- Fixed option reasoning: A short bridge could restore function, but it depends on abutment stability and the ability to clean around pontics.
- Removable option reasoning: A partial denture can be designed to distribute forces and may be easier to clean if the patient can manage insertion and removal.
The final decision should reflect both clinical feasibility and maintenance reality. If the patient cannot reliably clean around a bridge, a removable design with good hygiene access may be the more predictable plan.
Documentation and Communication That Prevent Mistakes
Document the rationale: why a specific design was chosen, what risks were identified, and what the patient was told about maintenance and follow-up. Clear communication reduces misunderstandings and helps the patient participate in the plan—because prostheses are a team sport, even when the team is just one patient and one clinician.
10.2 Tooth Preparation Principles for Crowns and Bridges
Tooth preparation is the part of crown and bridge work that turns “a tooth that exists” into “a tooth that can be restored predictably.” The goal is simple: create a shape that supports the restoration, protects the tooth, and leaves enough space for material thickness and cement.
Core Goals of Preparation
A crown needs uniform support and controlled margins. For bridges, each abutment must be prepared so the connector design can work without forcing the bite or stressing the periodontium. In practice, you balance four constraints: (1) preservation of tooth structure, (2) adequate reduction for restorative material, (3) margin placement that is clean and stable, and (4) a finish line that helps the lab reproduce the margin accurately.
Assessing the Tooth Before You Touch It
Start with the clinical reality. Evaluate remaining tooth structure, existing restorations, caries extent, fracture risk, and occlusal scheme. A tooth with a large MOD restoration may need different reduction and margin strategy than a sound tooth with intact walls. Also check for undercuts and irregularities; if you ignore them, you may end up with a restoration that seats only when you “persuade” it.
Determining Reduction and Material Space
Reduction is not a single number; it depends on material type and location. Occlusal reduction must provide space for the functional surface. Axial reduction must allow the restoration to wrap without creating a bulky contour. Proximal reduction must preserve contact relationships while preventing overhangs. A practical rule is to reduce to the planned thickness while maintaining smooth, continuous surfaces that guide the path of insertion.
Margin Design and Placement
Margins are where the restoration meets the tooth, and they control both fit and long-term seal. A shoulder margin provides a clear ledge for many ceramic systems, while chamfer margins can be efficient where tissue conditions allow. Margin placement should be at or slightly below the gingival margin when needed for esthetics or caries coverage, but not so deep that impression accuracy and tissue management become a constant battle.
If you place a margin on inflamed tissue, you are asking the impression to capture a moving target. If you place it too far into sound tissue, you may create unnecessary trauma. The best margin is the one you can prepare cleanly and finish without tearing or overextending.
Creating a Path of Insertion
A crown should seat with a consistent direction. Preparation should avoid sharp internal angles that trap the restoration and prevent full seating. Smooth internal surfaces reduce stress concentrations and help the lab fabricate a restoration that fits without forcing.
For bridges, path of insertion matters even more because multiple abutments must seat together. If one abutment is prepared with a different insertion path, the bridge may seat partially, leaving a gap that invites cement washout and recurrent disease.
Axial Wall Form and Resistance Features
Axial walls should converge slightly toward the occlusal, but not so much that retention becomes weak. For teeth with limited remaining structure, you may need additional resistance features such as a more defined finish line and careful internal contouring. Avoid creating retention grooves unless you truly need them; grooves can complicate seating and increase the risk of stress at the tooth-restoration interface.
Occlusal and Proximal Considerations
Occlusal reduction must respect functional anatomy. For example, if you reduce too little on a cusp, you may end up with a restoration that is too thick and interferes in occlusion. If you reduce too much, you may weaken the tooth and increase the chance of fracture.
Proximally, the goal is to maintain proper contact while allowing the restoration to be contoured. Over-reduction can lead to open contacts, while under-reduction can create tight contacts that trap plaque.
Finish Lines and Surface Quality
Finish lines should be crisp and continuous. A rough finish line can translate into a poor margin fit, which is where bacteria and fluids love to set up housekeeping. Use appropriate finishing burs and avoid gouges. The last pass should refine the margin and smooth internal surfaces without rounding away the finish line.
Cement Space and Internal Clearance
Internal clearance is planned space for cement. Too little space can prevent seating; too much space can reduce retention and increase the chance of marginal leakage. In practice, internal clearance is achieved by controlling reduction depth and maintaining consistent wall thickness.
Mind Map: Tooth Preparation Principles for Crowns and Bridges
Example: Preparing a Tooth for a Crown
A molar with an old MOD restoration needs occlusal and axial reduction while keeping the margin accessible. You remove defective restoration material, then establish a finish line that is continuous and clean. You reduce occlusally to create space for the occlusal surface, then reduce axially to maintain smooth convergence. Finally, you refine the internal surfaces so the crown seats without rocking. If the crown rocks during trial, the issue is usually internal interference or an inconsistent insertion path, not “a little more cement.”
Example: Preparing Abutments for a Three-Unit Bridge
Two premolars and a molar serve as abutments. You confirm that each abutment can accept the bridge with the same insertion direction. If one abutment has a different convergence angle, the bridge may seat on one side first. You adjust axial contours and internal geometry so all abutments seat together, then ensure margins are prepared to be captured accurately. The bridge should seat fully with no visible gaps at the margins before final cementation.
10.3 Impression Taking and Bite Registration for Prosthesis Accuracy
Prosthesis accuracy starts before the tray touches teeth. The goal is simple: capture the prepared tooth and its supporting tissues clearly, then record the jaw relationship so the lab can build the restoration to the patient’s bite rather than to an average.
Foundational Principles for Accurate Impressions
A good impression balances three things: detail, stability, and fit. Detail means fine margins and surface texture are reproduced. Stability means the impression does not distort while setting or during removal. Fit means the cast matches the mouth without surprises.
Begin with a controlled field. Dry teeth and retract soft tissue so the margin is visible and not smeared. If the margin is subgingival, use retraction that is firm enough to expose the finish line but gentle enough to avoid excessive trauma. A margin that looks “mostly there” often becomes a margin that leaks.
Impression Materials and Technique Selection
Choose the material based on the preparation and the patient. Elastomeric materials are common because they reproduce detail and tolerate minor movement. For fixed prostheses, the priority is margin clarity and minimal distortion.
Use a tray that supports the material without flexing. A tray that bows slightly can turn a crisp margin into a blurry one. Apply adhesive only as directed for the specific material; too much can create bubbles, too little can cause delamination.
Step by Step Impression Taking for Fixed Prostheses
- Verify the preparation: margins should be clean, smooth, and free of debris. If you can’t see the finish line, the impression can’t either.
- Retract and isolate: manage saliva and gingival fluid. Even a small amount of moisture can affect surface detail.
- Load the tray correctly: avoid overfilling. Excess material can distort when it is pushed into the sulcus and then pulled back.
- Seat and hold: seat the tray with steady pressure and maintain it until set. Movement during setting is the most common cause of distortion.
- Remove with a planned path: remove along the path that minimizes flexing. If you feel resistance, stop and reassess rather than forcing it.
Margin Capture and Common Failure Modes
If margins appear rounded or incomplete on the cast, suspect one of these: inadequate retraction, insufficient isolation, tray movement during set, or a preparation that still has rough edges. If the impression tears at the margin, the material may be too thin in that area or the tray may be under-supported.
A practical check is to inspect the impression immediately. Look for voids around the margin area and ensure the finish line region is continuous.
Bite Registration Fundamentals for Prosthesis Accuracy
Bite registration records the vertical dimension and the jaw relationship. It prevents the lab from guessing how the patient closes, which is especially important for crowns, bridges, and occlusal adjustments.
Start by confirming that the patient can close comfortably into the intended position. If there is pain or significant instability, address that first; a bite record made during discomfort is a record of discomfort.
Choosing the Bite Registration Method
Use a method that matches the clinical situation.
- Centric relation records: helpful when you need a consistent jaw relationship independent of tooth contact.
- Interocclusal records in maximum intercuspation: useful when the existing bite is stable and the goal is to reproduce it.
Material choice matters. The record should be rigid enough to hold shape and thin enough to avoid altering the bite. If the record is too thick, it can create a new occlusal stop that the patient never actually uses.
Step by Step Bite Registration
- Seat the record material: place it evenly so it does not rock.
- Guide closure: ask the patient to close gently into the target position. Avoid “chewing” the record.
- Check for even contact: the record should show uniform contact without obvious high spots.
- Confirm stability: once set, remove carefully and inspect for tears or voids.
If the record shows a clear distortion, remake it. A bad bite record is like a misprinted address: the lab can still build something, but it won’t arrive where it should.
Mind Map: Impression Taking and Bite Registration
Example: Crown Preparation with Subgingival Margin
A patient has a subgingival finish line. After cleaning the margin, you retract to expose the finish line and isolate the area. You load the tray without overfilling, seat it firmly, and hold it motionless until set. On inspection, the impression shows a continuous margin line with no voids.
For the bite record, you choose maximum intercuspation because the patient’s bite is stable and comfortable. You place a thin, even interocclusal material layer, guide closure gently, and confirm the record does not rock. The lab receives a cast with a crisp margin and a bite record that reproduces the patient’s closure.
Example: Bridge Case with Multiple Preparations
With several abutments, stability becomes more important. You ensure each margin is visible and free of debris, then take an impression that captures all finish lines without tearing. For the bite record, you prioritize a consistent jaw relationship so the lab can align pontics and occlusion accurately. After removal, you inspect the record for uniform contact and remake it if you see distortion.
Quality Checklist Before Sending to the Lab
- Finish lines are visible and clean.
- Impression shows continuous margins with no voids.
- No tearing occurred near critical margins.
- Bite record is thin, stable, and shows even contact.
- Patient closure was comfortable and guided into the intended position.
10.4 Provisional Restorations for Function and Tissue Management
Provisional restorations are temporary by name and practical by design: they protect prepared teeth, shape the bite, and guide soft tissue healing while you wait for the definitive restoration. A good provisional is not just “something to wear”; it is a controlled test of occlusion, contact points, and gingival response.
Foundational Goals for Provisional Design
Start with three goals that drive every decision. First, protect the tooth from thermal and mechanical insult. For example, after a crown preparation, a patient who bites on a cold spoon should not feel sharp sensitivity because dentin is exposed.
Second, manage the gingiva. Provisional margins should be placed to avoid trapping plaque and to encourage a stable emergence profile. If the provisional margin is overextended into the sulcus, you often see persistent bleeding on probing.
Third, maintain function. The provisional should restore guidance and allow normal chewing without creating high spots. A simple check is to ask the patient to bite on cotton rolls in different areas; if one spot consistently displaces the provisional or causes discomfort, you adjust before cementation of the final restoration.
Material and Fabrication Choices
Provisional materials vary in hardness, polishability, and wear. Choose based on how long the provisional must last and how much occlusal load the patient has.
- For short-term needs, chairside acrylic or composite provisional approaches can be fast and adjustable.
- For longer spans, more durable provisional materials reduce fracture risk and help maintain occlusal stability.
A practical rule: if the provisional will be in a high-stress area (e.g., a molar with parafunction), prioritize strength and margin integrity over maximum speed.
Margin Placement and Soft Tissue Control
Margin location should follow the preparation finish line and the planned final contour. Keep margins cleanable and avoid creating ledges. When you need a subgingival margin for the final restoration, the provisional should still allow tissue to settle without chronic irritation.
Example: after lengthening a clinical crown, a provisional that is slightly overcontoured can press on the gingiva during healing. You may see redness and swelling within days. The fix is not “wait and hope”; it is to recontour the provisional and verify that the margin is not impinging.
Occlusion Setup for Comfort and Stability
Occlusion is where provisional restorations either earn their keep or cause unnecessary trouble. Establish contacts that support chewing while avoiding traumatic loading.
- Confirm vertical dimension and centric relation. If the provisional is too high, the patient may report a “high tooth” sensation.
- Check excursive movements. Ensure that lateral and protrusive contacts do not force the provisional into a slide that stresses the prepared tooth.
- Verify contact distribution. A single heavy contact can cause mobility or discomfort even if the rest of the bite feels fine.
Example: a patient with a new anterior crown reports mild soreness when biting on the edge of a sandwich. After adjustment, you find the provisional has a premature contact during protrusion. Removing that interference often resolves symptoms quickly.
Contour, Contacts, and Plaque Management
Provisional contour should mimic the intended final anatomy so the patient can clean effectively. Overbulking creates food traps and inflamed tissue.
- Create smooth transitions at the cervical area.
- Ensure proximal contacts are present but not overly tight.
- Polish to a surface that resists plaque accumulation.
Example: if a provisional bridge leaves an open contact, the patient may notice food packing and bleeding. Tightening the contact and refining embrasure form can improve both comfort and tissue response.
Tissue Healing Monitoring and Adjustment Workflow
Treat provisional follow-up as part of the procedure, not an optional extra. Reassess within the first week for patients with gingival concerns or complex preparations.
A systematic workflow helps:
- Inspect margins for plaque retention and overhangs.
- Evaluate gingival color, contour, and bleeding tendency.
- Recheck occlusion after any adjustment.
- Confirm patient comfort during function.
If you adjust the provisional, re-polish any modified areas to reduce roughness that can irritate tissue.
Mind Map: Provisional Restorations for Function and Tissue Management
Example: Provisional Crown Adjustment in a Stepwise Way
A patient receives a provisional crown after a full-coverage preparation. They report mild discomfort when biting.
- Check occlusion in centric: identify and relieve any premature contact.
- Check excursive movements: remove interferences that occur during protrusion or lateral movement.
- Inspect margins: confirm there is no overhang trapping plaque.
- Recontour if needed: if gingiva is irritated, refine the cervical contour.
- Polish: smooth any adjusted areas to reduce surface roughness.
After these steps, the patient should feel stable comfort during chewing, and the gingiva should show less bleeding rather than ongoing irritation.
10.5 Denture Fabrication and Adjustment for Comfort and Stability
Core Goals and Foundational Principles
A complete denture should feel stable during speaking and chewing, distribute forces evenly, and seal well enough to reduce food and air leakage. Stability comes from correct border extension, accurate fit on the supporting tissues, and a denture base that matches the patient’s anatomy. Comfort comes from avoiding pressure points, controlling thickness, and ensuring the occlusion does not create tipping forces.
Start with the patient’s mouth as the “map.” Record the ridge shape, mucosal resilience, and existing undercuts. Then translate that map into impressions, casts, and a trial denture that can be evaluated before final processing. If you skip evaluation steps, you end up adjusting after the denture is already locked in plastic—like trying to fix a flat tire after you’ve already driven to the next town.
Impression and Cast Workflow
Impressions must capture the functional border and the tissue surface accurately. Use the correct tray design and border molding technique for the denture type. For example, in a maxillary denture, the palate often provides broad support, so a crisp palatal seal matters. In a mandibular denture, the ridge is narrower and the tongue and cheeks influence borders, so functional extension and muscle control are critical.
When pouring casts, ensure the base of the cast is stable and the ridge detail is sharp. A common practical check is to compare the cast ridge contours with the clinical ridge feel; if they disagree, the denture will not sit where you think it will.
Jaw Relations and Occlusion Setup
Jaw relation records determine vertical dimension and centric relation. Vertical dimension affects facial comfort and muscle strain; too high can feel “tall” and lead to soreness, too low can reduce stability and alter speech. Centric relation should be repeatable and independent of tooth contact patterns.
To set teeth, consider phonetics, esthetics, and function. For stability, the occlusal scheme should support balanced contacts during excursions when indicated. A simple example: if a patient reports the denture rocks when they move their jaw side to side, the occlusion may be creating a tipping contact rather than a controlled slide.
Trial Denture Evaluation Before Processing
A trial denture is where you earn your final outcome. Evaluate three things systematically: fit, borders, and occlusion.
- Fit: Seat the trial denture and check for rocking. If it rocks, do not jump to tooth changes; address the base fit first.
- Borders: Confirm that the denture edges are properly extended and not impinging. Ask the patient to perform functional movements such as opening, smiling, and protruding; observe whether borders lift or pinch.
- Occlusion: Check centric contacts, then verify excursions. Use small adjustments and re-check, because occlusion changes can alter how the denture seats.
Processing and Post-Processing Checks
After processing, verify that the denture base has not distorted. Even small changes can shift pressure distribution. Inspect the intaglio surface for bubbles or voids and ensure the tissue surface is smooth and evenly adapted.
Before final adjustments, confirm that the denture is seated fully. A denture that is not fully seated will “hide” the real problem and make adjustments seem random.
Adjustment for Comfort and Stability
Adjustments should be targeted, not cosmetic. Use pressure-indicating paste or a similar method to locate high spots, then relieve them conservatively. Focus on areas that cause pain, blanching, or sore spots.
A practical sequence helps:
- Stability first: If the denture lifts at the borders, correct border extension or relieve interference that prevents seating.
- Pressure points next: Relieve localized sore areas.
- Occlusion last: Refine contacts after the denture seats correctly.
For mandibular dentures, pay special attention to the lingual flange and the posterior border area. If the patient complains of food trapping or the denture feels like it “slides,” the issue is often border seal and occlusal support rather than tooth shape alone.
Maintenance and Follow-Up Integration
Comfort improves with adaptation, but soreness should not be ignored. Schedule follow-ups to reassess fit, sore areas, and occlusion after the patient has used the denture in daily life. Reinforce hygiene and advise on how to manage sore spots: remove the denture if pain persists, then return for adjustment rather than repeatedly grinding at home.
Mind Map: Denture Fabrication and Adjustment Logic
Example: Systematic Fix for a “Rocking” Denture
A patient reports that the lower denture rocks when chewing. First, confirm full seating by asking them to place the denture and gently press into position; if it does not seat consistently, check for border interference or base fit problems. Next, use pressure paste to identify sore or high areas; relieve those points and re-check seating. Only after the denture seats well, evaluate occlusion: if the denture tips during lateral movement, adjust contacts to reduce tipping and restore controlled support.
Example: Improving Seal Without Changing Teeth
A patient notices air leakage and food trapping near the posterior border. Instead of immediately altering tooth arrangement, verify posterior border extension and functional border molding. Check whether the denture edge lifts during opening or tongue movement. If the border is too short or impinging, correct the border area and re-evaluate seal before making occlusal changes.
11. Dental Surgery and Emergency Management in Clinical Practice
11.1 Local Anesthesia Techniques and Complication Prevention
Local anesthesia is less about “numbing” and more about controlling sensation in a predictable zone while keeping the patient safe and comfortable. The foundation is a good plan: identify the tooth and tissues involved, choose the smallest effective dose, and use technique steps that reduce trauma and accidental intravascular injection.
Core Concepts That Drive Technique
Start with anatomy and target selection. If you need pulpal anesthesia for a mandibular molar, you typically aim for nerve block coverage rather than superficial infiltration. If the goal is gingival anesthesia for a small area, infiltration may be enough. Next, confirm contraindications and risk factors: uncontrolled bleeding disorders, allergy history, severe hepatic impairment for certain agents, and prior adverse reactions. Then verify consent and expectations by explaining what “pressure” and “stretch” feel like versus pain.
Stepwise Local Anesthesia Workflow
- Prepare the patient and equipment. Use topical anesthetic when appropriate, check cartridge integrity, and ensure the needle is suitable for the route.
- Position and access. Stable head and mirror visibility reduce awkward needle angles, which reduces tissue trauma.
- Aspiration and slow deposition. Aspirate before depositing and inject slowly to reduce the risk of intravascular delivery and to improve comfort.
- Use correct depth and direction. Advance to the intended plane, then deposit incrementally.
- Allow onset time. Waiting is not wasted time; it prevents repeat dosing that increases risk.
Technique Choices with Practical Examples
Example: Maxillary posterior tooth extraction. For many maxillary teeth, infiltration around the apex can provide reliable anesthesia because the cortical bone is thinner. If the patient reports lingering sensation during elevation, reassess whether the target tooth is correct and whether additional buccal infiltration is needed rather than immediately switching to a larger block.
Example: Mandibular molar restorative procedure. Mandibular molars often require a nerve block for predictable pulpal anesthesia. If the patient still feels sharp pain, consider incomplete block coverage, accessory innervation, or an incorrect tooth selection. A supplemental injection to the buccal tissues may be safer than repeated full-dose attempts.
Complication Prevention: The Big Four
Pain and Tissue Trauma
Pain during injection usually comes from rapid deposition, incorrect plane, or needle movement in tissue. Prevent it by using slow injection, minimizing needle redirection, and depositing incrementally. If a patient is anxious, a calm pace and clear communication often reduce involuntary movement, which prevents needle “chasing.”
Local Anesthetic Systemic Toxicity
This is uncommon but serious. Prevention starts with dose awareness and aspiration. Use the lowest effective amount, avoid stacking multiple high-dose injections, and document total volumes. If symptoms occur, stop injection immediately and manage according to emergency protocols.
Nerve Injury and Persistent Numbness
Most nerve injuries are related to trauma or excessive force. Prevent them by respecting anatomical planes, avoiding repeated passes through the same tissue track, and allowing adequate onset time before adding more anesthetic.
Hematoma and Vascular Complications
Hematoma risk rises with vascular proximity and aggressive technique. Aspiration, slow injection, and correct needle placement reduce risk. For patients with bleeding risk, adjust technique and dosing and ensure appropriate medical coordination.
Mind Map: Local Anesthesia and Complication Prevention
Advanced Details That Still Stay Practical
When anesthesia seems inadequate, resist the urge to “fix it fast.” First, confirm the procedure matches the intended target. Second, check whether the onset window has passed. Third, consider whether the patient’s sensation is sharp versus pressure; sharp pain often signals incomplete pulpal coverage. Finally, if you add anesthetic, do it with a clear rationale and conservative dosing rather than repeating the same injection pattern.
Quick Self-Check Before You Inject
- Is the target tooth and tissue clearly identified?
- Is the chosen technique appropriate for the anatomy?
- Have I calculated total dose and avoided unnecessary repeats?
- Will I aspirate and inject slowly?
- Do I have a plan for what I’ll do if anesthesia is incomplete?
That checklist turns “technique” into a repeatable process, and repeatable processes are where complications get less room to move.
11.2 Tooth Extraction Planning Including Surgical Risk Assessment
Tooth extraction planning starts with a simple goal: remove the tooth with the least harm to surrounding tissues and the most predictable healing. The “surgical risk assessment” part is how you get there without relying on luck.
Foundational Assessment Before You Touch Instruments
Begin with a focused history and exam. Confirm the chief complaint, prior dental treatment, and any history of difficult extractions. Ask about bleeding problems, anticoagulant use, uncontrolled diabetes, smoking, immunosuppression, and allergies to local anesthetics or antibiotics. Then match the history to the clinical findings: tooth condition, periodontal status, mobility, tenderness, swelling, and sinus tract presence.
Next, evaluate the extraction site. Look at root morphology clues such as curvature, divergence, and proximity to anatomical structures. Check mouth opening, jaw mobility, and the patient’s ability to tolerate positioning. If the patient has limited opening, plan for access and consider whether a surgical approach or referral is safer.
Imaging and Anatomy Mapping
Radiographs guide risk assessment more than they guide guesswork. Use periapical radiographs to assess root length, periapical pathology, and bone levels. For posterior teeth or suspected complex roots, consider additional views to clarify anatomy.
Identify key structures relevant to the tooth’s location. For maxillary teeth, consider the proximity of the maxillary sinus and the risk of oroantral communication. For mandibular teeth, consider the mandibular canal and the mental foramen region. For third molars, assess angulation and relationship to adjacent roots.
Risk Categories and What They Mean Clinically
Think in categories that change your plan.
- Bleeding risk: Anticoagulants and bleeding disorders can increase intraoperative and postoperative bleeding. The plan may involve timing, local hemostasis strategies, and careful monitoring.
- Infection risk: Acute infection can worsen swelling and access. You may need to manage infection first, choose incision and drainage strategies when appropriate, and plan follow-up.
- Anatomical risk: Close proximity to nerves or sinus changes your technique and consent discussion.
- Mechanical risk: Fractured roots, ankylosis, or severe curvature increases the chance of retained fragments or prolonged surgery.
- Patient tolerance risk: Limited opening, gag reflex, anxiety, or inability to sit still affects anesthesia choice and procedural pacing.
Consent and Planning That Matches the Risk
Informed consent should reflect the actual risks for that specific tooth and patient. Explain the likely steps: anesthesia, incision if needed, sectioning, elevation, and removal. Then cover site-specific risks such as dry socket, infection, retained root fragments, nerve disturbance, sinus communication, and the possibility of additional procedures.
A useful planning habit is to write down your “if-then” pathway. For example: if the root fractures during elevation, then you will assess whether retrieval is feasible without excessive trauma and decide whether to leave a small fragment with a clear follow-up plan.
Surgical Approach Selection
Choose between simple extraction and surgical extraction based on access, bone coverage, and root anatomy. If the tooth is intact with adequate mobility and favorable anatomy, a simple approach may be sufficient. If the tooth is broken, impacted, or ankylosed, surgical extraction with sectioning may reduce force and preserve bone.
Plan your flap only when it improves access or reduces trauma. A flap is not a default; it’s a tool. For example, a small buccal flap can help visualize a curved root tip, while excessive flap design can increase postoperative discomfort and delayed healing.
Hemostasis and Tissue Handling
Risk assessment includes how you will control bleeding. Use atraumatic technique, maintain tissue integrity, and avoid excessive curettage unless indicated. If you anticipate bleeding risk, plan for local measures such as pressure, appropriate suturing, and clear postoperative instructions.
Tissue handling matters for healing. Gentle elevation, controlled bone removal when necessary, and irrigation during bone work reduce heat and tissue injury.
Example Scenarios with Integrated Decisions
Example: Mandibular molar with periapical radiolucency and moderate mobility
- Risk focus: infection and mechanical factors.
- Plan: confirm systemic status, assess swelling and trismus, use sectioning if roots are divergent, and ensure thorough socket debridement only as clinically indicated.
- Consent emphasis: dry socket risk and the possibility of retained root fragments if root separation occurs.
Example: Maxillary premolar with history of sinus involvement
- Risk focus: anatomical risk for oroantral communication.
- Plan: confirm radiographic proximity, use controlled elevation, and be ready with a hemostatic closure strategy if communication occurs.
- Consent emphasis: sinus communication and the need for follow-up if symptoms develop.
Mind Map: Tooth Extraction Planning and Surgical Risk Assessment
Practical Checklist for the Day of Extraction
Before anesthesia, confirm the tooth, review imaging, and state the extraction type you planned. During the procedure, reassess tissue resistance and bleeding control rather than pushing through difficulty. After removal, inspect for completeness, irrigate the socket as appropriate, and document findings that affect healing and follow-up.
11.3 Management of Postoperative Bleeding Pain and Swelling
Postoperative bleeding, pain, and swelling are common after extractions and other minor oral surgeries. The goal is not to eliminate all symptoms instantly, but to control them predictably, recognize when they are not behaving normally, and document what was done.
Foundational Concepts for What You See
Bleeding is usually either primary (immediate) or secondary (after a delay). Primary bleeding often reflects incomplete clot formation or mechanical disruption. Secondary bleeding is frequently related to clot dislodgement, infection, or systemic factors such as anticoagulant use.
Pain is expected to peak and then settle as inflammation resolves. Swelling follows a similar pattern but can lag behind pain because tissue fluid shifts take time. A useful clinical mental model is: bleeding affects clot stability, pain reflects inflammatory signaling, and swelling reflects fluid and tissue response.
Immediate Bleeding Control and Clot Protection
Start with the basics: confirm the procedure site, check for ongoing active bleeding, and assess whether the patient is swallowing blood. Ask about timing, anticoagulant or antiplatelet medications, and whether the patient has been rinsing, smoking, or using a straw.
For active oozing, apply firm pressure with gauze for a set interval. If bleeding continues, replace gauze and reassess rather than repeatedly “checking” the site, which breaks clot formation. If the patient is stable but bleeding is persistent, consider additional local measures such as hemostatic agents placed directly into the socket or surgical site.
Example: A patient calls 30 minutes after an extraction saying the gauze is “soaked.” You instruct them to remove the old gauze, place fresh gauze directly over the site, and bite firmly for 20 minutes without talking or checking. If bleeding resumes immediately after the interval, you arrange an in-person review.
Pain Management with a Stepwise Plan
Pain control should match the expected intensity and the patient’s medical profile. Begin with non-opioid analgesia when appropriate, using dosing schedules that maintain consistent coverage rather than waiting until pain is severe. Review contraindications such as NSAID sensitivity, renal disease, active peptic ulcer disease, and drug interactions.
Explain that pain that is improving day by day is reassuring, while pain that escalates after an initial improvement can suggest complications like dry socket. Encourage simple measures that reduce discomfort: rest, head elevation, and avoiding irritants.
Example: After a molar extraction, a patient reports “sharp pain” on day two that is worse than day one. You ask whether they stopped rinsing early, whether they can see an empty socket, and whether odor or taste is present. You then evaluate for dry socket and manage accordingly rather than simply increasing analgesics.
Swelling Assessment and Practical Support
Swelling is assessed by timing, location, and progression. Mild swelling that peaks within the first 24–48 hours and then gradually decreases is typical. Swelling that rapidly expands, causes difficulty swallowing, or is accompanied by fever or malaise requires urgent evaluation.
Supportive care includes cold compresses in the early period, then transition to warm compresses if the patient is past the initial inflammatory phase and symptoms are improving. Maintain hydration and soft foods to reduce trauma to the surgical area.
Example: A patient reports facial puffiness on the evening of surgery that is slightly worse the next morning but not painful beyond expected levels. You document the baseline, advise continued supportive care, and schedule follow-up, because the pattern fits typical postoperative inflammation.
When to Escalate and How to Document
Escalation is warranted for uncontrolled bleeding, signs of spreading infection, airway or swallowing compromise, severe trismus, persistent fever, or pain that is disproportionate to the procedure and not responding to standard measures.
Documentation should include: onset time of symptoms, medications taken, clot status if visible, patient-reported triggers (rinsing, smoking, trauma), vital signs when relevant, and the exact interventions provided.
Mind Map: Postoperative Bleeding Pain and Swelling Management
Integrated Clinical Example from Start to Finish
A patient undergoes a surgical extraction in the afternoon. They call at 1 a.m. reporting mild oozing and discomfort. You confirm they have not rinsed aggressively, instruct firm gauze pressure for 20 minutes, and provide a scheduled analgesic plan based on their medical history. The next day they report swelling that is slightly worse but improving overall, with no fever. You document the symptom timeline, reinforce supportive care, and arrange a review to ensure clot stability and symptom resolution.
Practical Takeaways for Consistent Outcomes
Control bleeding by protecting clot formation. Treat pain with a structured plan that accounts for medical risk. Interpret swelling by timing and trend, not just size. Escalate when symptoms break the expected pattern, and record the story clearly so the next clinician can pick up where you left off.
11.4 Management of Common Dental Emergencies Including Trauma and Abscess
Dental emergencies usually share two traits: they escalate quickly, and they test whether the clinician can think in steps. The goal is not to “fix everything now,” but to stabilize the patient, relieve the immediate problem, and set a safe plan for definitive care.
Foundational Triage and Safety Checks
Start with a rapid safety screen. Confirm the patient’s ability to maintain an airway, assess breathing and circulation, and look for signs of systemic involvement such as fever, malaise, trismus with spreading swelling, dysphagia, or difficulty speaking. If any red flags appear, treat it as an urgent medical situation alongside dental management.
Next, identify the chief complaint and time course. A toothache that started yesterday and is localized is handled differently than swelling that is spreading across fascial spaces. Ask about allergies, current medications (especially anticoagulants and immunosuppressants), pregnancy status, and prior reactions to anesthetics or antibiotics.
Pain control is part of triage. For many dental emergencies, a well-chosen analgesic plan reduces suffering while you work. For example, a patient with a painful abscess often cannot sleep; addressing pain improves cooperation for examination and treatment.
Trauma: Soft Tissue, Teeth, and Occlusion
Trauma management begins with what you can see and what you can’t. Examine lips, cheeks, tongue, and floor of mouth for lacerations and hematoma. Check for restricted tongue movement, which can signal deeper involvement.
For tooth injuries, record the tooth number, mobility, displacement, fracture pattern, and occlusal changes. A simple example: a child with an avulsed primary tooth should not be replanted, but a permanent tooth avulsion in an adult requires immediate action. For avulsion, time matters, so you should ask when the tooth came out and whether it was stored in milk/saline or kept dry.
If a tooth is displaced, avoid forcing it into place unless you have a clear indication and appropriate stabilization plan. Assess occlusion: if the tooth is contacting first, it may worsen pain and periodontal injury. A practical approach is to document the bite relationship and splint only when indicated.
Abscess: From Local Infection to Space Involvement
An abscess is usually a localized infection with a pathway for spread. Begin with a focused history: spontaneous pain, swelling onset, prior dental treatment, and whether the patient reports fever or difficulty swallowing. Then examine for fluctuance, sinus tract presence, and the extent of swelling.
A key clinical distinction is localized versus spreading infection. Localized swelling around a tooth may respond to drainage and definitive treatment. Spreading swelling, especially with trismus or systemic symptoms, requires urgent escalation and may need hospital-level management.
Consider a concrete scenario: a patient with a tender tooth, localized buccal swelling, and no fever can often be managed with drainage and treatment of the source. Another patient with swelling under the jaw, muffled voice, and limited mouth opening needs immediate escalation because the infection may be involving deeper spaces.
Examination Steps That Prevent Misses
Use a systematic sequence:
- Inspect and palpate the involved area and adjacent spaces.
- Assess lymph nodes and temperature.
- Test the involved tooth’s sensibility when appropriate, but don’t let testing delay drainage when obvious fluctuant swelling is present.
- Evaluate occlusion and periodontal status.
- Take radiographs when they will change management. For trauma, radiographs help identify root fractures and alveolar involvement.
If you suspect an abscess, look for a “drainable” focus. Fluctuance is a helpful sign, but absence of fluctuation does not rule out infection. In those cases, you may still need incision and drainage if the clinical picture supports it.
Treatment Principles for Drainage and Source Control
Source control means addressing the cause, not just the swelling. For endodontic abscesses, drainage plus definitive endodontic treatment is often the pathway. For periodontal abscesses, periodontal therapy and drainage may be required.
Incision and drainage should be planned with anatomy in mind. Choose a dependent site, avoid major vessels and nerves, and ensure adequate access. A simple example: buccal vestibular swelling may be drained through the most fluctuant area, while swelling that is more lingual requires extra caution due to the floor-of-mouth anatomy.
After drainage, reassess. If swelling decreases and pain improves, you have evidence that you addressed the problem pathway.
Antibiotics: When They Help and When They Don’t
Antibiotics are not automatic for every abscess. They are most useful when there are systemic signs, spreading cellulitis, immunocompromise, or when drainage and definitive care are delayed.
A practical rule of thumb: if the patient looks systemically unwell or the infection is extending beyond the immediate local area, antibiotics plus urgent escalation are appropriate. If the infection is localized and you can drain and treat the source promptly, antibiotics may be unnecessary.
Follow-Up and Documentation That Actually Matters
Document the findings that drove decisions: location and extent of swelling, presence of trismus, temperature, airway symptoms, tooth status, and whether drainage was performed. Record the analgesic plan and any antibiotic rationale.
Set clear follow-up instructions. For example, a patient discharged after drainage should have a short-interval review to confirm improvement and ensure definitive treatment is scheduled. If symptoms worsen—especially swallowing difficulty, increasing swelling, or persistent fever—reassessment must be immediate.
Mind Map: Emergency Management Pathway
Example: Trauma with Displacement and Pain
A patient reports a knocked tooth and pain on biting. You examine for soft tissue injury, record displacement direction, and check occlusion to see if the tooth contacts first. If the tooth is displaced and occlusion is traumatizing it, you stabilize appropriately and plan definitive management based on radiographic assessment of root and alveolar status.
Example: Localized Abscess Without Systemic Signs
A patient has a tender tooth, localized buccal swelling, and no fever. You confirm the extent of swelling, assess trismus, and obtain radiographs if they guide source control. If drainage is indicated, you perform incision and drainage at the most dependent, safe site and arrange definitive treatment for the causative tooth, using antibiotics only if systemic or spreading features emerge.
11.5 Antibiotic Use and Analgesic Prescribing for Dental Conditions
Antibiotics are for infections, not for pain. Pain is a symptom; infection is a cause that may involve spreading bacteria, tissue necrosis, or systemic involvement. Analgesics treat the symptom while you address the source—such as drainage, debridement, restoration, or extraction—because medication alone rarely fixes the problem.
Core Principles for Antibiotic Use
Start with a quick infection screen: Is there swelling that is expanding, pus, fever, malaise, trismus, lymphadenopathy, or difficulty swallowing or breathing? If the answer is “no,” antibiotics are usually unnecessary for localized dental pain, including many cases of irreversible pulpitis or uncomplicated apical periodontitis.
Next, identify the likely source. A tooth with necrotic pulp often needs endodontic treatment or extraction; periodontal infection may require scaling and root planing; an abscess needs drainage when feasible. Antibiotics are an add-on when the infection is beyond the tooth’s local boundaries or when definitive treatment is delayed.
Finally, choose the narrowest effective option, at the correct dose and duration, and reassess. If symptoms improve after source control, you stop when the course is complete rather than extending “just in case.”
Analgesic Prescribing That Actually Works
Pain control is most effective when you use a stepwise approach. Many dental pain cases respond well to combining an NSAID with acetaminophen, because they act through different pathways. If NSAIDs are contraindicated, acetaminophen becomes the backbone.
A practical example: a patient with a symptomatic apical abscess awaiting drainage reports moderate throbbing pain. You prescribe an NSAID plus acetaminophen with clear maximum daily limits. You also provide a plan for reassessment after the procedure, because analgesic needs often drop once drainage and definitive treatment occur.
Avoid “stacking” multiple NSAIDs together. If pain persists despite appropriate dosing, reassess the diagnosis and whether the source has been addressed.
Antibiotic Selection Logic for Common Dental Presentations
Use antibiotics when there are signs of spreading infection, systemic involvement, or high-risk host factors. Localized swelling without systemic signs may still be treated with drainage and definitive dental care alone.
Example pathways:
- Localized dental abscess with no fever and no spreading cellulitis: prioritize drainage and definitive treatment; consider antibiotics only if treatment is delayed or the patient is high risk.
- Facial swelling with trismus or regional lymph node tenderness: antibiotics are more likely indicated alongside urgent dental management.
- Fever, malaise, or difficulty swallowing: treat as urgent; antibiotics plus immediate referral or emergency management.
Mind Map: Antibiotic and Analgesic Decision Flow
Dosing Safety and Patient-Specific Constraints
Before prescribing, confirm allergies (especially penicillin), current medications, pregnancy status, renal or hepatic impairment, and history of gastrointestinal intolerance. NSAIDs require caution in patients with kidney disease, active peptic ulcer disease, or certain bleeding risks. Acetaminophen requires attention to total daily dose from all sources.
Example: a patient taking combination cold medication may unknowingly exceed acetaminophen limits. You prevent this by asking what they have already taken and by writing the maximum daily amount clearly.
Clear Example Prescribing Plan for a Typical Scenario
A patient presents with a mandibular swelling, mild fever, and limited mouth opening. You document vital signs, assess airway risk, and arrange urgent drainage or definitive dental care. You prescribe an antibiotic appropriate for dental infections and an analgesic regimen that controls pain while treatment proceeds. You provide instructions to return immediately if swelling worsens, swallowing becomes difficult, or fever persists.
Documentation and Reassessment
Record the clinical findings that justified antibiotics: the presence of spreading cellulitis, systemic symptoms, or inability to achieve timely source control. Document the analgesic plan, including maximum doses and contraindications. Reassess within the expected window for improvement; if there is no response, revisit the diagnosis, consider complications, and ensure the source has been addressed.
Antibiotics and analgesics are tools, not substitutes. When you pair symptom control with correct infection management and definitive dental treatment, patients usually feel better for the right reasons—starting with the cause, not just the discomfort.
12. Dental Clinic Operations and Quality Management
12.1 Infection Prevention and Control Protocols for Daily Clinical Workflow
Infection prevention in a dental clinic is less about one heroic moment and more about a chain of small, timed actions. The goal is to stop contamination from moving between patients, staff, instruments, and surfaces. A good daily workflow makes the “clean-to-dirty” direction obvious, so people don’t have to rely on memory under pressure.
Core Principles That Drive the Workflow
Start with standard precautions: treat every patient as potentially infectious. This means using barriers when contact with blood, saliva, or mucous membranes is possible, and cleaning and disinfecting surfaces that are touched during care. Hand hygiene is the anchor; it happens before gloves, after glove removal, and whenever hands are visibly soiled.
Next comes instrument handling. Items are grouped by intended use: critical items contact sterile tissue or the bloodstream, semicritical items contact mucosa, and noncritical items contact intact skin. The workflow must match the category, because “wiping” is not a substitute for sterilization.
Finally, manage the environment. Surfaces are not all equal: high-touch areas near the operatory need more frequent disinfection than low-touch areas. If you can touch it while wearing contaminated gloves, it belongs in the high-touch category.
Daily Setup Before the First Patient
Begin with a clean start. Don fresh barriers for items that will be handled during treatment, such as chair controls covers if your clinic uses them. Verify that sterilization and disinfection supplies are ready: wrapped packs are dated, chemical indicators are present, and instrument cassettes are organized so staff can avoid rummaging.
Prepare a “clean zone” for sterile supplies and a “dirty zone” for used items. Keep these zones separated on the tray and counter. If the zones are on the same surface, contamination will eventually win.
During Treatment a Clean-to-Dirty Pattern
Use a consistent sequence: open sterile items in the clean zone, move them into the operatory, and keep used instruments moving toward the dirty zone. Avoid reaching across the field with gloved hands. If you need something from the clean zone, remove gloves first, perform hand hygiene, and then re-enter.
Manage aerosols and splatter with practical steps. Use high-volume suction during procedures that generate spray, and keep the patient’s protective barriers in place. Wear eye protection and a mask that fits well; fogging is not a personality flaw, it’s a fit problem.
Instrument Processing Immediately After Use
When a procedure ends, treat instruments as contaminated from the moment they leave the patient. Do not let them sit on the counter. Transport them to the reprocessing area in a way that prevents leaks and protects staff.
For critical and semicritical items, the pathway is: cleaning first, then disinfection as required, then sterilization for critical items. Cleaning removes debris; disinfecting alone does not reliably remove organic material. If you skip cleaning, sterilization becomes a “maybe,” not a “yes.”
Surface Disinfection with Clear Timing
Disinfect surfaces that are likely to be contaminated during the procedure. Use an appropriate disinfectant with the correct contact time. The contact time matters because quick wiping without dwell time can leave microorganisms behind.
A simple rule helps: after the procedure, remove visible debris, then disinfect. If your clinic uses barriers on chair surfaces, replace barriers between patients and disinfect any uncovered areas.
Hand Hygiene and Glove Use Without Confusion
Gloves reduce risk but do not replace hand hygiene. Gloves can have micro-tears, and hands can become contaminated during glove removal. Perform hand hygiene after removing gloves and before touching clean supplies.
If gloves become torn or heavily soiled, change them immediately. Continuing with compromised gloves is like continuing a filling with missing enamel—technically possible, clinically unhelpful.
Waste Segregation and Sharps Safety
Sharps go into puncture-resistant containers immediately after use. Do not recap needles unless your clinic’s policy explicitly requires it and the technique is safe and consistent. Dispose of contaminated disposables in the correct waste stream.
Keep sharps containers within reach of the operatory so staff do not carry sharps across the clinic. Distance turns a routine task into a risk.
End-of-Day Closure That Prevents Tomorrow’s Problems
At the end of the day, clean and disinfect reusable equipment surfaces that were not fully covered by barriers. Reprocess instruments according to your validated schedule, and ensure sterilization records are complete.
Restock supplies, but do not mix “clean” and “used” packaging. Wipe down high-touch areas in the reception and treatment areas. Then document what happened: any sterilization failures, missing indicators, or unusual events must be recorded so the next day starts with facts, not guesses.
Mind Map: Daily Infection Prevention Workflow
Example: A Typical Operatory Turnover
A patient’s procedure ends. The clinician removes gross debris from the tray, then disinfects the high-touch surfaces near the chair with the product’s required contact time. Used instruments are placed into the designated transport container without lingering on the counter. Gloves come off, hand hygiene is performed, and only then are clean supplies opened for the next patient.
Example: Instrument Category Matching
A hand instrument used to scale and remove calculus is a critical or semicritical item depending on contact with tissue and whether it contacts blood or mucosa. If it contacts mucosa or is considered critical for your clinic’s classification, it must be cleaned and sterilized. If it only contacts intact skin, it follows the noncritical pathway, which still includes cleaning and appropriate disinfection. The workflow stays consistent because the category decides the endpoint, not the clinician’s mood.
12.2 Sterilization and Instrument Reprocessing Including Validation Practices
Sterilization is the last step in a chain that starts with cleaning. If soil remains on an instrument, heat and chemicals can’t reliably reach the surfaces that matter, and sterilization becomes a confident guess instead of a controlled process.
Core Principles of Reprocessing
Reprocessing follows a consistent logic: decontaminate, clean, inspect, package, sterilize, store, and document. Each step protects the next one.
- Decontaminate immediately: Instruments should be handled to minimize drying of blood and saliva. A wet transport approach reduces the effort needed later.
- Clean thoroughly: Cleaning removes organic material and biofilm. Use the correct method for the instrument type, and avoid soaking that doesn’t include cleaning action.
- Inspect before sterilization: Look for residue, corrosion, and damage. A clean-looking instrument can still have hidden debris in hinges, serrations, and lumens.
- Package correctly: Packaging must allow steam penetration (for steam sterilization) and maintain sterility until use.
- Sterilize under validated conditions: Time, temperature, and pressure must match the load type and cycle parameters.
- Store and track: Sterile items should be stored to prevent moisture and contamination, with clear labeling and rotation.
- Document everything: Records connect the patient care timeline to the sterilization cycle.
Cleaning and Preparation for Reliable Sterilization
Cleaning is where most failures begin. For example, consider a set of extraction forceps with box joints. If the joints are not brushed and flushed, residue can remain in the crevice. Even if the outside looks spotless, the inside can block steam contact.
Use a practical workflow:
- Disassemble when possible (e.g., multi-part instruments).
- Brush and flush using appropriate tools for the instrument design.
- Use enzymatic or detergent cleaning when indicated by the facility protocol.
- Rinse completely to remove detergent film.
- Dry to prevent dilution of sterilant and to support packaging integrity.
Packaging and Load Management
Packaging is not just wrapping. It controls airflow and steam contact.
- Do not overload: Dense packs slow penetration.
- Keep items separated: Instruments should not press against each other in a way that prevents steam access.
- Use correct indicators: Chemical indicators confirm exposure, not sterility.
- Seal and label properly: Labels should include cycle identifiers and expiry or event-based use rules.
A simple example: If you place multiple trays tightly stacked, the bottom tray may receive less effective steam exposure. The same instruments in a properly spaced arrangement sterilize more consistently.
Sterilization Cycles and What They Control
Different instruments require different sterilization methods. In most dental clinics, steam sterilization is common for compatible instruments.
- Steam sterilization: Relies on saturated steam contact. It works best when packaging and load configuration allow steam to reach all surfaces.
- Dry heat or chemical methods: Used when steam is not suitable, following facility protocols.
Cycle selection should be based on instrument material, packaging, and manufacturer instructions. If a clinic uses a single cycle for everything, it will eventually pay for the shortcut.
Validation Practices That Prove the Process
Validation answers: “Does this system achieve sterility under real conditions?” It has multiple layers.
Process Indicators and Their Limits
- Mechanical records: Track cycle parameters like time and temperature.
- Chemical indicators: Confirm exposure to the sterilization conditions.
- Biological indicators: Confirm microbial kill performance.
A key nuance: chemical indicators can turn “pass” even when a load is poorly arranged. Biological indicators are the reality check, especially when troubleshooting.
Routine Monitoring Schedule
A systematic validation approach typically includes:
- Daily start-up checks for the sterilizer (per facility protocol).
- Weekly or load-frequency biological indicator testing for each sterilizer and cycle type.
- Spore testing after maintenance or repairs.
- Routine verification of packaging integrity and indicator placement.
Indicator Placement Example
Place biological indicators in the most challenging location of a load: the area least likely to receive steam contact. For a tray, that often means the center or deepest point, depending on the load configuration. If you always place indicators near the door, you may test the easiest spot and miss the problem.
Mind Map: Sterilization and Instrument Reprocessing Validation
Troubleshooting with Validation Logic
If biological indicators fail, the response should be structured:
- Quarantine the affected loads from the suspect cycle window.
- Review mechanical records for time, temperature, and pressure deviations.
- Check cleaning and packaging for issues that could prevent steam contact.
- Verify indicator placement and load configuration.
- Repeat testing after corrective actions.
A practical example: If a clinic changes packaging suppliers and the new material holds moisture longer, steam penetration and drying can be affected. Validation testing will reveal the mismatch, and the clinic can adjust packaging or cycle parameters according to protocol.
Documentation That Supports Patient Care
Sterilization records should be easy to audit. Include:
- Sterilizer identifier
- Cycle type and parameters
- Date and time
- Load or tray identifiers
- Chemical indicator results
- Biological indicator results and lot numbers
- Any deviations and corrective actions
When documentation is consistent, it becomes straightforward to trace which instruments were processed together and under what validated conditions. That’s not just paperwork; it’s operational safety with a paper trail.
12.3 Patient Scheduling Documentation and Recall Systems for Continuity of Care
Scheduling is where clinical intent becomes calendar reality. Documentation is what keeps that intent consistent when patients, clinicians, and time all change. A good system reduces missed appointments, prevents “we forgot to follow up,” and makes the next visit feel like it belongs to the same care plan.
Foundational Principles for Continuity
Start with a single source of truth: the appointment record must reflect the clinical plan, not just the time slot. Every scheduled visit should have a purpose, such as “periodontal maintenance with probing and bleeding assessment” or “crown prep with shade selection.” When the purpose is explicit, the team can prepare instruments, materials, and documentation before the patient arrives.
Next, define who owns what. The front desk typically owns scheduling accuracy and patient communication. The clinical team owns visit readiness, including required tests, forms, and imaging. The clinician owns clinical documentation that supports recall decisions.
Finally, treat recall as a clinical decision, not a default interval. A patient’s risk level, treatment completion status, and any active conditions determine recall timing and type.
Scheduling Documentation That Holds Up Under Pressure
Record the minimum set of details that prevent confusion later:
- Visit type and clinical purpose: what will be done and why.
- Provider assignment: who will perform the care.
- Required prerequisites: e.g., fasting status, prior radiographs needed, or consent forms.
- Preparation notes: e.g., “bring periodontal charting” or “confirm allergy status.”
- Special considerations: mobility issues, interpreter needs, anxiety management plan.
A practical example: a patient booked for “check-up” after a recent root canal. If the appointment purpose is recorded as “post-op evaluation with vitality testing and periapical radiograph review,” the clinician will know to check symptoms and decide whether imaging is needed, rather than defaulting to a generic exam.
Recall Systems That Match Clinical Reality
Recall should be structured around three questions: What is the patient being recalled for? When is it clinically appropriate? Who will act if the patient misses the visit?
Use recall categories that map to care pathways:
- Preventive recall: routine exams and hygiene visits.
- Maintenance recall: periodontal maintenance with defined measurements.
- Post-treatment recall: follow-up after procedures, including symptom checks and healing assessment.
- Active condition recall: closer intervals for ongoing issues, such as uncontrolled caries risk or persistent inflammation.
Document the recall rationale in the chart. For example, after periodontal therapy, record the staging/grade context, baseline probing findings, and the maintenance interval chosen. That way, if the patient changes clinicians, the next provider can continue the plan without guessing.
Mind Map: Scheduling and Recall Workflow
Example: Turning a Treatment Plan into a Recall Schedule
A patient completes scaling and root planing and receives a maintenance interval of 3 months due to bleeding on probing and high risk factors. The chart notes: baseline probing depths, bleeding pattern, and the chosen interval. The scheduler books a “periodontal maintenance with probing and bleeding assessment” appointment and sets recall for the next maintenance cycle after that visit.
If the patient misses the appointment, the system should trigger a defined response: attempt contact, document the outcome, and schedule the earliest clinically appropriate slot. The key is that the missed-visit action is not left to memory.
Advanced Details Without Making It Complicated
- Link recall to outcomes: if a patient’s condition improves or worsens, update the recall category and interval at the visit, not months later.
- Standardize templates: use consistent wording for visit purposes so the team can interpret them quickly.
- Track appointment outcomes: record cancellations, no-shows, and reschedules with reasons when available, since these patterns help refine scheduling practices.
- Ensure imaging continuity: when radiographs are needed for a recall visit, document what is required so the imaging plan is not reinvented each time.
A slightly playful rule of thumb: if someone else read the appointment note, they should be able to prepare correctly without asking, “Wait, what are we doing today?”
12.4 Practice Management for Supplies Billing and Treatment Documentation
Practice management for supplies, billing, and documentation is where clinical care meets paperwork reality. Done well, it reduces missing items, prevents billing denials, and makes chart review faster for everyone—especially the next clinician who inherits the case.
Core Principles for Supplies and Billing
Start with a simple rule: what you document should explain what you did, and what you billed should match what you documented. If a supply was used, the chart should support why it was used. If a procedure was performed, the billing entry should reflect the procedure code and the clinical details that justify it.
A second rule is consistency. Use the same terminology across the chart, the treatment plan, and the billing notes. For example, if you write “occlusal composite restoration” in the chart, avoid billing it as something else without a clear reason.
Supplies Workflow That Prevents Chaos
Supplies management has three checkpoints: ordering, dispensing, and reconciliation.
- Ordering: Set reorder points based on historical usage and lead times. Track high-variance items separately, such as specialty materials used only for certain procedures.
- Dispensing: Use a standardized way to record what was taken from inventory. If your system supports lot numbers, record them for items that require traceability.
- Reconciliation: Compare what was dispensed to what was used in completed appointments. If your numbers drift, investigate whether the issue is documentation, theft, waste, or incorrect counts.
Example: Composite Resin and Consumables
A patient needs a Class II composite. The chart notes isolation with rubber dam, etching, bonding, and incremental placement. In the supplies log, record the composite shade, bonding system, etchant, bonding applicators, and any disposable tips used. When billing, ensure the restoration code corresponds to the tooth and surface(s) described in the chart.
Treatment Documentation That Supports Billing
Documentation should answer four questions: who, what, why, and how.
- Who: Patient identifiers, date, clinician, and any assistants involved.
- What: The procedure performed, tooth numbers, surfaces, and materials used when relevant.
- Why: The clinical findings that justify the procedure, such as caries extent, symptoms, probing depths, or radiographic findings.
- How: Key steps that distinguish one procedure from another, such as whether caries removal was staged, whether a pulp test was performed, or whether a restoration was bonded.
Keep the chart structured. Use consistent headings or templates so the billing reviewer can find the justification quickly.
Example: Periodontal Scaling and Root Planing
If you bill scaling and root planing, the chart should include periodontal measurements, the areas treated, and the rationale. For instance, note probing depths and bleeding on probing in the involved sextants, then document that root planing was performed after scaling. If you only scaled, don’t bill root planing.
Billing Documentation Links to Clinical Records
Billing entries should be traceable to chart entries. A practical approach is to ensure each billed item has a matching chart anchor:
- Procedure note: describes what was done.
- Treatment plan: lists planned services.
- Clinical findings: supports medical necessity.
- Materials and supplies: supports any supply charges.
If your system allows, use modifiers and documentation flags only when the chart supports them. For example, if a code requires a specific circumstance, the chart must state that circumstance clearly.
Mind Map: Supplies, Billing, and Documentation Connections
Quality Checks That Catch Errors Early
A short pre-billing review prevents most problems. Confirm that:
- The tooth numbers and surfaces match the billed code.
- The chart includes the clinical findings that justify the service.
- Supplies used are consistent with the procedure and materials documented.
- Dates and clinician identifiers are correct.
Then do a post-billing review on denials and adjustments. Categorize the reason (missing documentation, mismatch of code to chart, incorrect tooth/surface, or missing modifiers). Fix the underlying workflow, not just the entry.
Example: Missing Tooth Number
If a restoration note says “upper molar” but the billing requires a specific tooth number, the claim can be rejected or corrected. The fix is not to “be more careful once,” but to enforce a template field that requires tooth number entry before the note can be finalized.
Practical Documentation Habits for Busy Days
Use brief, specific statements rather than long narratives. “Etched enamel and dentin, applied bonding, placed composite in increments, finished and polished” is more useful than “restoration completed.” For supplies, record what matters for traceability and billing accuracy, not every micro-step.
Finally, keep the treatment plan aligned with what you actually did. If the plan changes mid-appointment, document the reason and the revised service so billing and chart remain in sync.
12.5 Clinical Quality Assurance Including Chart Audits and Adverse Event Review
Clinical quality assurance is the part of practice management that turns “we think we did it right” into “we can show we did it right.” It focuses on the records: what was assessed, what was decided, what was done, and what the outcome was. When the chart is complete and consistent, continuity of care improves and errors become easier to spot.
Chart Audits with Clear Standards
A chart audit should start with a short checklist tied to your clinic’s workflow. Keep the checklist stable for a set period so you can measure change rather than chase moving targets. A practical audit covers four domains: documentation quality, clinical appropriateness, communication, and follow-up.
Documentation quality means the chart contains the essentials without gaps: chief complaint, relevant history, exam findings, diagnosis, treatment plan, consent, procedures performed, materials used when relevant, and post-op instructions. For example, a patient with tooth pain should have a documented vitality test method and result, not just “pain present.”
Clinical appropriateness checks whether the chosen treatment matches the findings. If radiographs show periapical radiolucency and symptoms align with apical pathology, the record should reflect that reasoning. If the plan changes, the chart should say why, such as altered symptoms, patient preference, or updated imaging.
Communication includes how risks and alternatives were discussed and what the patient understood. A simple example: if you recommend extraction due to non-restorable prognosis, the chart should note the discussion of options and the patient’s decision.
Follow-up confirms that the next step is scheduled and that the patient knows what to watch for. For a crown prep, the chart should include the temporary restoration plan and timing for delivery.
Audit Sampling and Scoring
Audit every chart if you can; if you cannot, sample consistently. Use a defined sampling method such as random selection or targeted selection of higher-risk visits (for example, patients with multiple comorbidities, complex restorations, or urgent appointments). Record the number audited, the sampling method, and the audit period.
Score items as met, partially met, or not met. “Partially met” is useful because it points to fixable documentation habits, like missing radiograph dates or incomplete treatment rationale. Track trends by domain rather than only overall score. A clinic can improve quickly when it knows whether the problem is mostly consent documentation, missing test results, or inconsistent recall scheduling.
Adverse Event Review That Improves Systems
An adverse event review is not a blame exercise; it is a structured look at how the event happened and how to prevent recurrence. Start by defining what counts as an adverse event in your clinic: medication reactions, unexpected complications, procedural errors, lost specimens, or significant delays that affect outcomes.
Use a consistent sequence: identify, describe, analyze, correct, verify.
- Identify: confirm the event and capture the timeline.
- Describe: summarize what was done, what was documented, and what the patient experienced.
- Analyze: look for contributing factors such as unclear roles, missing pre-procedure checks, incomplete imaging, or unclear post-op instructions.
- Correct: implement a specific change, like adding a mandatory pre-procedure checklist item for medication allergies.
- Verify: confirm the change works by auditing charts after implementation.
A concrete example: if a patient reports severe post-op pain after an extraction and the chart lacks the analgesic plan, the review may reveal that the prescription step is not consistently completed in the workflow. The correction could be a required “pain management documented” field before closing the visit.
Mind Map: Chart Audits and Adverse Event Review
Turning Findings into Practical Changes
After each audit cycle, convert results into a small set of actions. Good actions are specific enough to implement and measurable enough to verify. If consent documentation is frequently incomplete, create a short consent template that prompts for key risks relevant to the procedure. If vitality testing is missing, standardize the way results are recorded, such as “test type” plus “response.”
For adverse events, focus on the step where the system failed. If the event involved a missed allergy, the fix should strengthen the pre-visit verification process, not just remind staff to “be careful.” Then verify the fix by checking subsequent charts for the corrected documentation element.
Closing the Loop with Staff Feedback
Quality improves when feedback is timely and specific. Share audit results as patterns, not personal judgments. For example, “radiograph dates are missing in 18% of cases” is actionable, while “someone forgot” is not. End each review with a clear next audit date and the exact items that will be checked, so the clinic can see improvement rather than hope for it.