Multiagent Workflow Engineering
1. Foundations of Multiagent Workflow Engineering
1.1 Defining Workflow Engineering for Autonomous Agent Teams
Workflow engineering for autonomous agent teams is the practice of turning a business goal into a repeatable execution plan that can survive messy inputs, partial failures, and changing context. The key difference from “prompting” is that you design the whole loop: what triggers work, who does which part, which tools are allowed, how results are checked, and how the system decides what to do next.
What Workflow Engineering Means in Practice
A workflow is more than a sequence of steps. It is a contract between intent and execution. That contract includes:
- Inputs: what data the team expects at the start, and what formats are acceptable.
- State: what the system remembers between steps, including intermediate artifacts.
- Decisions: how the system chooses the next step when outcomes differ from expectations.
- Tool interactions: how actions are performed safely, with validation and traceability.
- Exit conditions: what “done” means, and how the workflow reports completion.
A useful mental model is: workflow engineering defines the boundaries of autonomy. Agents can reason and act inside those boundaries, but the workflow ensures they don’t improvise their way into missing checks or skipping required approvals.
Core Components and Their Responsibilities
-
Goal specification translates a business outcome into measurable success criteria. For example, “process vendor onboarding” becomes “create vendor record, verify tax details, and route approval with complete documentation.”
-
Role design assigns responsibilities to agents. One agent may specialize in document extraction, another in policy checks, and a third in orchestration and escalation. Roles reduce ambiguity about who owns which decisions.
-
Step definitions describe actions and expected outputs. Each step should state what it produces, not just what it tries to do.
-
Validation rules check outputs before the workflow advances. Validation can be simple (schema checks) or substantive (cross-field consistency checks).
-
Control flow defines transitions: success, retry, escalate, or stop. This is where “autonomous” becomes “governed.”
-
Observability records enough detail to debug failures. Without it, you can’t tell whether an agent misunderstood a requirement or a tool returned incomplete data.
A Mind Map of Workflow Engineering
Mind Map: Workflow Engineering for Agent Teams
From Foundational Concepts to Execution Loops
Start with the trigger. A workflow should specify what starts it: a new ticket, a scheduled batch, or a user submission. Then define a plan that maps the goal to steps. Planning doesn’t have to be complex, but it must be explicit enough to validate.
Next comes the act phase, where agents use tools. Tool usage should be constrained by allowed operations and expected output shapes. After acting, the workflow runs validation. If validation fails, the workflow chooses a transition: retry with corrected inputs, ask for clarification, or escalate to a human.
Finally, the workflow reaches reporting and exit. Completion should include the artifacts that prove the goal was met, such as created records, extracted fields, and the approval route.
Example: Vendor Onboarding Workflow Contract
Imagine a workflow that processes vendor onboarding requests.
- Goal: Create a vendor record and route approval only when required fields are complete and consistent.
- Inputs: A PDF or form submission plus a requester identity.
- Roles:
- Extraction agent: pulls tax ID, address, and contact fields.
- Policy agent: checks completeness and consistency rules.
- Orchestrator agent: manages control flow and escalation.
- Steps:
- Extract fields from the document.
- Validate schema and required fields.
- Check consistency (e.g., country and tax ID format).
- Create vendor record via tool.
- Route approval with an evidence bundle.
- Control flow:
- If extraction confidence is low or fields are missing, transition to clarification or request a resubmission.
- If consistency fails, stop and escalate with a specific reason.
- If tool creation fails, retry once and then escalate.
This example shows the workflow contract: agents can work, but the workflow decides whether their outputs are acceptable and what happens next.
Practical Best Practices That Make Autonomy Reliable
- Define “done” early: success criteria should be testable, not just descriptive.
- Make ownership explicit: each step should have a responsible role, even if multiple agents contribute.
- Validate before you advance: treat validation as a first-class step, not a final cleanup.
- Record evidence: store the inputs, extracted fields, validation results, and tool responses that justify decisions.
- Use predictable transitions: success, retry, escalate, and stop should be consistent across steps.
Workflow engineering is how you turn a team of agents into a system that behaves like a dependable process: it can reason, but it also knows when to check, when to ask, and when to stop.
1.2 Agent Roles, Responsibilities, and Interaction Boundaries
In multiagent workflow engineering, roles are not job titles; they are contracts. A role defines what an agent is allowed to decide, what it must report, and what it must never touch. When roles are explicit, you can reason about correctness, security, and failure recovery without reading every agent’s mind.
Role Design Principles
Start with three questions. First, what decisions must be made for the workflow to progress? Second, which decisions require access to specific tools or data? Third, which decisions should be delegated to reduce cognitive load and improve auditability? A good role design answers all three with clear boundaries.
A role typically includes:
- Authority: which outcomes the agent can commit to.
- Inputs: what data it may consume.
- Tools: which tool calls it may perform.
- Outputs: what structured results it must emit.
- Escalation rules: when it must ask for help or stop.
A practical way to keep boundaries honest is to treat every role output as a typed artifact, not a free-form message. For example, a “Policy Check” role should output pass/fail, the rule identifiers used, and the evidence snippet it relied on.
Responsibility Scoping
Responsibilities should be scoped to minimize overlap. Overlap is not always bad, but it becomes expensive when two agents can both “fix” the same thing. Prefer a division where one agent produces a plan, another executes tool calls, and a third validates results.
Consider a workflow for processing expense reports:
- Intake Role: normalizes fields and checks completeness.
- Policy Role: evaluates reimbursement eligibility.
- Execution Role: performs the payment action.
- Audit Role: assembles evidence and logs decisions.
If the Execution Role also tries to interpret policy, you get inconsistent outcomes and harder debugging. Instead, the Execution Role should treat policy results as ground truth unless a validation step fails.
Interaction Boundaries
Interaction boundaries define how agents communicate and what they are allowed to request. Boundaries include message formats, allowed tool categories, and dependency direction.
A simple boundary rule: downstream agents never request raw internal reasoning from upstream agents. They request structured outcomes. For instance, the Execution Role should ask for eligibility=true and max_amount, not for the Policy Role’s internal rule evaluation narrative.
Another boundary rule: agents must not call tools outside their tool list, even if they “could” help. This prevents accidental side effects and makes permissioning straightforward.
Mind Map: Role and Boundary Model
Example: Ticket Triage with Clear Contracts
Imagine a three-agent triage team for enterprise tickets.
Triage Agent receives the ticket text and produces:
category(one of a fixed set)urgency_score(integer range)needed_actions(list of action IDs)
Routing Agent takes only those outputs and decides:
assignee_groupsla_deadlinerouting_confidence(0–1)
Validation Agent checks consistency:
- If
urgency_scoreimplies a shorter SLA thansla_deadline, it emitsvalidation_failedwith a corrected deadline proposal.
Notice the boundary: Routing Agent never re-categorizes the ticket; it routes what Triage Agent already categorized. Validation Agent never changes category either; it only checks and corrects SLA-related consistency.
Case Study: Preventing Double Writes
Suppose both the Execution Agent and Audit Agent are allowed to write to the same system. A common failure is duplicated updates when retries occur. The boundary fix is straightforward: Audit Agent can write only to an append-only log, while Execution Agent is the only one allowed to perform state-changing writes. Retries then become safe because the audit trail records each attempt, and the execution role can use idempotency keys to avoid duplicate effects.
When roles and boundaries are explicit, the workflow becomes easier to test. You can simulate each role in isolation, verify its typed outputs, and confirm that tool permissions and escalation rules behave exactly as specified.
1.3 Enterprise Task Modeling from Requirements to Executable Steps
Enterprise task modeling turns “what we need” into “what the system can do next,” with enough structure to support reliable execution. The goal is not to write a perfect plan up front; it is to produce an executable workflow skeleton that can be validated, tested, and safely run.
From Outcomes to Workflow Scope
Start with outcomes, not activities. A requirement like “reduce invoice processing time” is too vague to execute. Convert it into an outcome statement with measurable boundaries: which invoices, which systems, what counts as completion, and what constraints apply. Then define workflow scope by listing in-scope artifacts (invoice records, vendor profiles, approval tickets) and out-of-scope items (manual exceptions, unrelated tax calculations). This prevents the common failure mode where the workflow keeps expanding until it becomes untestable.
A practical technique is to write three short lists:
- Success signals: e.g., invoice approved within 2 business days, no missing mandatory fields.
- Hard constraints: e.g., only approved users may trigger payment, data must be stored in the finance vault.
- Assumptions: e.g., vendor bank details are updated weekly, not per invoice.
From Requirements to Task Graphs
Once scope is clear, translate requirements into a task graph. Each node represents a task with an explicit purpose, inputs, outputs, and completion criteria. Edges represent dependencies, not just ordering. If a task needs extracted invoice fields, it depends on the extraction task; if it needs an approval decision, it depends on the approval task.
Use a consistent task template:
- Task name: verb phrase, e.g., “Validate invoice fields.”
- Inputs: data sources and required fields.
- Outputs: structured results and status.
- Guards: conditions that decide whether the task runs.
- Completion criteria: what makes the task “done.”
This template is what makes the workflow executable. Without it, later steps become guesswork about what data exists and what “success” means.
Mind Map: Modeling Pipeline
From Task Graphs to Executable Steps
Executable steps are the task graph rendered into a run-time plan. Each task becomes one or more steps that can be executed by tools or by human review. The key is to define step contracts and state transitions.
Step contracts specify what the step expects and what it produces. For example, a “Validate invoice fields” step should output a structured validation report, not a paragraph. That report might include:
status: pass, fail, needs_reviewmissing_fields: listfield_errors: list with field name and reason
State transitions define how the workflow moves. A simple state machine for each invoice might be:
received→extracted→validated→approved→scheduled_payment- If validation fails:
validated→needs_clarification - If approval is denied:
validated→rejected
These transitions prevent “floating tasks” where the workflow has no clear next state.
Example: Invoice Intake to Approval
Consider a requirement: “Invoices must be validated and routed for approval based on amount and vendor risk.”
-
Extract invoice data
- Inputs: PDF or email attachment.
- Outputs:
invoice_number,vendor_id,line_items,total_amount,currency. - Completion: all mandatory fields present or extraction marked incomplete.
-
Validate fields
- Inputs: extracted fields.
- Outputs: validation report.
- Guards: run only if extraction is complete.
- Completion:
status=passorstatus=needs_review.
-
Classify approval route
- Inputs:
total_amount,vendor_risk_score. - Outputs:
approval_route(e.g., manager, finance director). - Completion: route determined with a reason code.
- Inputs:
-
Request approval
- Inputs: invoice summary and route.
- Outputs:
approval_ticket_idandapproval_status. - Completion: ticket created and assigned.
-
Finalize
- Inputs: approval outcome.
- Outputs:
payment_readyflag orrejectedreason. - Completion: workflow reaches a terminal state.
Notice how each step has a contract. If extraction fails, the workflow does not pretend it has fields; it transitions to needs_clarification and records what is missing.
Validation Checks That Keep Models Honest
Before execution, validate the model with three checks:
- Coverage: every requirement has at least one task node that produces a related output.
- Consistency: outputs referenced by later tasks are defined earlier.
- Safety: tasks with side effects (e.g., scheduling payment) require guard conditions tied to approval state.
A good model reads like a set of promises. When those promises are explicit, the workflow becomes both testable and maintainable—like a well-labeled toolbox, not a mystery box.
1.4 Execution Semantics for Multiagent Systems
Execution semantics answer a practical question: when multiple agents act, what exactly counts as “doing the work,” “finishing the work,” and “staying correct” while tools and information change? In enterprise workflows, semantics matter because the system must be auditable, recoverable, and predictable enough to debug.
Core Concepts for Execution Meaning
Workflow state is the system’s record of what is true right now: completed steps, pending tasks, known facts, and tool results. A step is not just a description; it is a state transition with inputs, outputs, and a rule for when it may run.
Agent actions include reasoning decisions, tool invocations, and message emissions. Semantics define which actions are allowed to change state, and which are informational only.
Concurrency is when multiple agents progress without waiting for each other. Semantics must specify ordering constraints, conflict resolution, and how to merge partial results.
Determinism boundaries are the lines where the system should behave the same way given the same state and inputs. Full determinism is unrealistic, but you can make critical parts deterministic: tool calls, validation, and state updates.
Execution Model: From Steps to Transitions
A useful mental model is: plan → execute → verify → commit.
- Plan produces a candidate step sequence or a candidate set of tool calls.
- Execute runs the step logic and collects tool outputs.
- Verify checks acceptance criteria and invariants.
- Commit writes results into workflow state and marks the step complete.
This separation prevents a common failure mode: agents “decide” something based on unverified tool outputs, then commit incorrect state.
State Transition Rules
Each step should declare:
- Preconditions: what must be true before the step runs (e.g., required fields exist).
- Effects: what state fields it updates.
- Guards: what blocks the step (e.g., missing permissions, inconsistent tool results).
- Idempotency expectation: whether re-running the step should be safe.
Example: a “Create Vendor” step might require that vendor name and tax ID are present, and it should only commit the new vendor ID after the tool response passes validation.
Multiagent Coordination Semantics
Multiagent systems need explicit rules for handoffs.
Handoff semantics define what one agent must provide before another can act. A handoff should include:
- A contract describing required fields.
- A confidence or validation status (e.g., “validated tax ID” vs “proposed tax ID”).
- A scope for what the next agent may assume.
Conflict semantics handle cases where agents produce incompatible updates. A simple enterprise-friendly rule is: only one agent can commit to a given state field at a time, while others can propose changes. Proposals are merged only after verification.
Concurrency and Ordering
Concurrency is safe when you define ordering constraints.
- Independent steps can run in parallel if they update disjoint state fields.
- Dependent steps must wait for required outputs.
- Shared resources (like a single ticket record) require a lock or a compare-and-commit check.
A compare-and-commit check means: commit only if the state version matches what the agent read. If it doesn’t match, the agent re-reads and re-evaluates.
Tool Invocation Semantics
Tool calls are where semantics become concrete.
- Pre-call validation ensures inputs match schema and policy constraints.
- Post-call validation ensures outputs meet acceptance criteria.
- Side-effect control uses idempotency keys for write operations.
Example: “Send Approval Email” should not send twice if the workflow retries. The step can use a deterministic idempotency key derived from ticket ID and approval decision ID.
Verification and Commit Semantics
Verification should be explicit and structured.
- Schema checks confirm types and required fields.
- Business invariants confirm meaning (e.g., total amount equals sum of line items).
- Cross-checks compare tool results against existing state.
Commit semantics then record:
- The verified outputs.
- The tool call identifiers.
- The verification outcome.
This makes audits possible without requiring a human to reconstruct the run.
Mind Map: Execution Semantics
Integrated Example: Procurement Approval Run
Consider a workflow that approves a purchase request.
- The Planner agent proposes steps: validate request, check budget, request approvals, and record decision.
- The Budget checker agent runs a tool call to fetch budget data, then verifies that remaining funds cover the requested amount.
- The Approvals agent sends approval requests only after it receives a verified “budget sufficient” status.
- The Recorder agent commits the final decision with the tool call IDs and the verification results.
If the budget tool returns inconsistent totals, verification fails and the workflow state records the failure reason. The system then routes the request to a clarification step rather than letting approvals proceed on shaky ground.
This is execution semantics in action: actions may be creative, but commits are disciplined.
1.5 Practical Example: Mapping Business Objectives to Agent Workflows
A good workflow starts with a business objective that is specific enough to test. Suppose the objective is: “Reduce customer billing disputes by 20% within one quarter.” That single sentence hides several engineering tasks: defining what counts as a dispute, deciding what actions the team can take, and specifying how the system should behave when information is missing.
Step 1: Convert the Objective into Measurable Outcomes
Begin by translating the objective into outcome metrics and decision criteria.
- Outcome metric: dispute rate = disputes / billed invoices.
- Time window: 90 days.
- Decision criterion: an invoice is “at risk” if it matches patterns associated with prior disputes.
- Operational constraint: the system must not change billing records directly; it can only recommend and route for review.
A practical trick: write down what would make the objective “fail.” Here, failure means the dispute rate does not drop, or the review queue grows so much that humans can’t keep up.
Step 2: Identify Actors, Tools, and Boundaries
Next, decide which agent roles exist and what each is allowed to do.
- Intake Agent: reads new invoices and customer context.
- Risk Analyst Agent: computes risk signals and produces a short rationale.
- Policy Checker Agent: verifies whether proposed actions comply with billing rules.
- Case Router Agent: creates tickets and assigns them to the right queue.
Tool boundaries keep the workflow sane. For example, only the Case Router Agent can create tickets; the Risk Analyst Agent can query data but cannot write.
Step 3: Build a Workflow Skeleton from Decisions
Now map the objective to a decision flow. The skeleton should include explicit decision points, not just a list of tasks.
- Trigger: new invoice arrives.
- Gather: fetch invoice details, prior disputes, and relevant customer history.
- Assess risk: compute risk score and top contributing factors.
- Classify: determine whether the invoice needs review, can be auto-resolved, or should be monitored.
- Recommend actions: propose a resolution path.
- Validate policy: confirm the action is allowed.
- Route case: create ticket with evidence and rationale.
- Update state: record outcome after review.
Mind Map: Objective to Workflow Mapping
Step 4: Define Inputs, Outputs, and State Transitions
To keep agents from improvising, specify a compact data contract for each step.
- Intake Agent output:
CaseRecordwith invoice ID, customer ID, billing period, and normalized fields. - Risk Analyst output:
RiskAssessmentwithscore,factors[], andconfidence. - Policy Checker output:
PolicyDecisionwithallowed,violations[], andapproved_action. - Case Router output:
Ticketwithpriority,assignee_queue, andevidence_summary.
State transitions should be explicit. For example:
New→Gatheredafter data retrieval.Gathered→Assessedafter risk scoring.Assessed→Validatedafter policy checks.Validated→Routedafter ticket creation.Routed→Closedafter human review updates the outcome.
Step 5: Add a Concrete Example Run
Consider an invoice with a mismatch between billed amount and expected service window.
- Trigger: invoice
INV-10492arrives. - Gather: Intake Agent pulls service dates, plan details, and prior disputes for the customer.
- Assess: Risk Analyst computes
score=0.82and factors like “service window mismatch” and “two prior disputes in last 6 months.” - Classify: since score exceeds the review threshold, classify as
NeedsReview. - Recommend: propose “route to billing correction review with evidence of service window mismatch.”
- Validate: Policy Checker confirms the action is allowed and requires including the customer’s contract clause reference.
- Route: Case Router creates ticket
TCK-7781with priority “High,” queue “Billing Disputes,” and an evidence summary. - Update state: after review, the system records whether the recommendation prevented a dispute.
Step 6: Ensure the Workflow Supports Learning Without Guessing
The workflow should capture outcomes so the next mapping is grounded. When a ticket is closed, store:
- whether the invoice would have become a dispute,
- which factors were actually relevant,
- whether policy constraints changed the recommended action.
This turns the objective into a feedback loop that improves mapping quality while keeping tool boundaries and decision criteria stable.
2. Requirements, Constraints, and Workflow Specifications
2.1 Translating Stakeholder Goals into Measurable Workflow Outcomes
Stakeholder goals are usually phrased as feelings about outcomes: “reduce delays,” “improve accuracy,” or “make audits easier.” Workflow engineering turns those statements into measurable outcomes that can be checked after each run. The trick is to translate intent into observable signals, then map signals to workflow steps and tool actions.
From Goals to Outcomes
Start with a goal statement and rewrite it into three parts: who is affected, what changes, and how success is judged.
- Who is affected: operations team, customers, compliance, finance.
- What changes: time-to-resolution, error rate, completeness of records, number of manual touches.
- How success is judged: a metric with a target and a measurement method.
Example: “Reduce delays in vendor onboarding.”
- Who: onboarding operations.
- What: time from request submission to approved vendor profile.
- How: median cycle time in business days, measured from ticket creation to approval timestamp.
Choosing Metrics That Can Be Measured
A metric must be computable from workflow artifacts: inputs, tool outputs, intermediate decisions, and final records. If you cannot point to where the number comes from, it will become a debate instead of a measurement.
Use a small set of metric types:
- Flow metrics: cycle time, throughput, queue time.
- Quality metrics: validation pass rate, field completeness, reconciliation mismatch rate.
- Compliance metrics: required evidence present, policy checks passed, audit log coverage.
- Cost metrics: human review rate, number of tool calls per case, compute time.
A practical rule: pick one primary metric and two supporting metrics. For onboarding, primary might be cycle time; supporting could be completeness rate and human review rate.
Defining Targets and Measurement Windows
Targets make goals actionable. A target should include a threshold and a time window.
Example target set for onboarding cases:
- Median cycle time ≤ 5 business days.
- Completeness pass rate ≥ 98%.
- Human review required for ≤ 12% of cases.
Measurement window can be a calendar month. If you need a concrete reference point, use a recent month such as 2026-03.
Mapping Outcomes to Workflow Decisions
Once metrics exist, you can identify which workflow decisions influence them. Each decision point should have:
- Trigger condition: what causes the decision to be evaluated.
- Decision options: what the workflow can do.
- Evidence requirements: what data must be present.
- Expected effect: which metric improves or stays stable.
Example decision: “Is the vendor’s tax ID valid and consistent with the registration document?”
- Trigger: document set received.
- Options: approve, request clarification, reject.
- Evidence: extracted tax ID, document checksum, validation tool result.
- Expected effect: reduces mismatch rate and prevents audit rework.
Mind Map: Goal-to-Outcome Translation
Example: A Complete Translation for a Single Goal
Goal: “Make audit evidence complete for expense reimbursements.”
- Outcome: every reimbursement record includes required evidence fields.
- Primary metric: evidence completeness rate.
- Supporting metrics: policy check pass rate and human review rate.
- Targets: completeness ≥ 99%, policy pass ≥ 97%, human review ≤ 10%.
- Decision mapping:
- Trigger: receipt submitted.
- Decision: evidence sufficiency.
- Options: accept, request missing item, flag for manual review.
- Evidence requirements: receipt image present, date within policy window, merchant name extracted, amount present.
- Verification: the workflow writes an audit log entry for each decision with the evidence fields used.
Common Failure Points and How to Avoid Them
- Metric drift: stakeholders change wording midstream. Fix by freezing the metric definition and measurement source.
- Unmeasurable goals: “improve clarity” becomes “reduce rework.” Fix by choosing a proxy that is computed from artifacts.
- Too many metrics: teams optimize for dashboards. Fix by selecting one primary and two supporting metrics.
When goals become measurable outcomes, the workflow stops being a set of steps and becomes a system with checks. That is what lets multiagent teams execute continuously without silently trading one kind of success for another.
2.2 Capturing Constraints for Compliance, Security, and Data Handling
Constraints are the “no surprises” rules that keep an agent workflow aligned with policy, law, and operational reality. In enterprise settings, they must be captured early, expressed unambiguously, and enforced consistently at tool boundaries where data moves and actions happen.
Core Constraint Types and Where They Live
Start by separating constraints into three buckets, because each bucket needs different enforcement mechanics.
- Compliance constraints define what outcomes are allowed. Examples include retention periods, approval requirements, and auditability rules.
- Security constraints define what access is allowed. Examples include least privilege, tenant isolation, and encryption requirements.
- Data handling constraints define how data is allowed to be used. Examples include classification-based redaction, purpose limitation, and masking of sensitive fields.
A practical rule: store compliance constraints at the workflow level, store security constraints at the identity and tool level, and store data handling constraints at the data field and artifact level.
Translating Policy into Executable Rules
Policies are usually written in prose, but workflows need checkable statements. Convert each policy requirement into a rule with four parts: trigger, scope, action, and evidence.
- Trigger: when the rule applies (e.g., “when processing customer data”).
- Scope: what it applies to (e.g., “fields labeled PII” or “actions that write to CRM”).
- Action: what must happen (e.g., “mask SSN before sending to any external tool”).
- Evidence: what record proves compliance (e.g., “log redaction map and tool request ID”).
Example: “Customer data must not be sent to non-approved systems.” becomes: trigger = tool call that targets an unapproved endpoint; scope = any field tagged as customer data; action = block call and route to an approved internal proxy; evidence = audit log entry with blocked endpoint and routing decision.
Data Classification and Field-Level Controls
Data handling constraints work best when you can point to specific fields. Create a classification map for the workflow’s inputs and intermediate artifacts.
- Tag fields as public, internal, confidential, or restricted.
- Define transformations per class: redaction, hashing, tokenization, or aggregation.
- Specify where transformations must occur: before tool invocation, before storage, or before inclusion in prompts.
Concrete example: a ticket triage workflow reads a customer email and order ID. If the email is restricted, the agent should use a masked form (e.g., a***@example.com) for reasoning and only keep the full email inside a secured store. The tool call schema should reflect this by requiring masked fields for general tools and full fields only for approved identity verification tools.
Identity, Authorization, and Tool Boundaries
Security constraints should be enforced at the boundary between the agent and tools. The workflow should not assume the agent “behaves”; it should require the tool layer to reject disallowed requests.
Capture these constraints as capabilities tied to roles and resources:
- Role-to-tool permissions: which agent roles can call which tools.
- Resource scoping: which tenant, project, or department IDs are allowed.
- Action scoping: read-only vs write vs delete.
Example: an agent that drafts contract summaries may call “read contract” but not “update contract.” If it attempts an update, the tool should return a structured authorization error that the orchestrator can handle by switching to a human approval step.
Auditability and Evidence Collection
Compliance constraints require evidence that survives debugging. Define what must be logged and where.
Minimum evidence set per sensitive step:
- input artifact identifiers (not necessarily raw content)
- tool name and version
- request parameters after redaction
- decision rationale as structured tags (e.g.,
rule_id: pii_redaction_required) - outcome status (success, blocked, escalated)
This keeps logs useful without turning them into a second copy of sensitive data.
Mind Map: Constraint Capture Workflow
Example: Procurement Workflow Constraints in Practice
Consider a procurement workflow that creates purchase orders and stores invoices.
- Compliance rule: invoices older than 7 years must not be processed. Trigger = invoice retrieval; scope = invoice date; action = block and escalate; evidence = log invoice ID and rule ID.
- Security rule: only the finance role can write to the purchase order system. Trigger = tool call
create_purchase_order; scope = write action; action = authorize by role; evidence = tool authorization result. - Data handling rule: bank account numbers must be masked in any agent-visible reasoning. Trigger = artifact creation from invoice; scope = bank account fields; action = store full value in secure vault, pass masked value to the agent; evidence = redaction map and vault reference.
The key is that each rule is enforceable by a component that can actually act: the orchestrator can route and block, the tool layer can authorize, and the data layer can transform and store.
Practical Checklist for Writing Constraints
- Every constraint has trigger, scope, action, and evidence.
- Sensitive fields are tagged and transformations are defined per class.
- Tool calls are treated as enforcement boundaries, not suggestions.
- Logs record identifiers and structured tags, not raw sensitive content.
- Authorization failures are handled as first-class outcomes with clear next steps.
When these pieces are captured together, the workflow becomes predictable: the agent can still be flexible, but the enterprise constraints remain firm and testable.
2.3 Defining Inputs Outputs and State Transitions for Each Step
A workflow step is only “real” when you can answer three questions: What does it need? What does it produce? What changes in the workflow afterward? Inputs, outputs, and state transitions turn a step from a description into an executable contract.
Step Inputs: What the Step Requires
Inputs should be grouped by source and stability.
- User and business context: e.g., customer tier, region, requested service level. Keep it explicit so the step doesn’t guess.
- Tool data: e.g., invoice PDF bytes, CRM record fields, inventory availability. Treat tool data as structured inputs, not free-form text.
- Workflow state: e.g., prior approvals, computed totals, selected vendor. This is the step’s “memory of the process so far.”
- Policy and constraints: e.g., allowed spend limits, required approvals, retention rules.
Practical rule: every input should have a type and a validation expectation. For example, “amount” is numeric with currency; “customer_id” matches a known format; “document” is either present or the step must route to a missing-document branch.
Step Outputs: What the Step Produces
Outputs should be designed for downstream steps, not for the step itself.
- Artifacts: e.g., extracted line items, normalized address, generated draft email.
- Decisions: e.g., approve/reject, choose vendor A/B, select payment method.
- Status signals: e.g., “completed,” “needs_clarification,” “failed_validation.”
- Audit evidence: e.g., tool call identifiers, hashes of inputs, and the rationale fields used for decisions.
A useful pattern is to separate outputs into data and control. Data feeds later computation; control tells the orchestrator which transition to take.
State Transitions: How the Workflow Moves Forward
State transitions define what becomes true after the step runs. Model state as a set of named facts, not a single blob.
Common state facts include:
- Progress: which steps are done.
- Readiness: whether required inputs exist.
- Decision outcomes: selected options and approvals.
- Error conditions: validation failures and missing data.
Each step should specify transitions like: “If validation passes, mark step_complete and set next_ready_fact; if validation fails, set error_fact and route to remediation.” This prevents the orchestrator from inferring behavior from vague text.
Mind Map: Inputs, Outputs, and Transitions
Example: Invoice Approval Step
Consider a step named Validate Invoice and Determine Approval Path.
Inputs
invoice_id(string)invoice_total(number, currency-aware)vendor_id(string)policy_spend_limit(number)required_approver_roles(array)prior_approvals(list of approval records)
Outputs
normalized_invoice(artifact: cleaned fields)approval_path(decision:auto_approveorneeds_manager)missing_fields(list, possibly empty)status(control:completed,needs_clarification,failed_validation)evidence(audit: tool call ids, validation results)
State Transitions
- If
missing_fieldsis empty and totals match policy rules:- set
invoice_validated = true - set
approval_path_selected = approval_path - transition to
next_step_ready = true
- set
- If
missing_fieldsis non-empty:- set
invoice_validated = false - set
clarification_required = true - transition to
remediation_step_ready = true
- set
- If totals fail consistency checks:
- set
validation_error = true - transition to
human_review_required = true
- set
Notice how the orchestrator doesn’t need to interpret the step’s prose. It just reads status and the updated facts.
Validation Strategy That Keeps Transitions Honest
Validation should be explicit and aligned with transitions.
- Type and presence checks prevent “mystery nulls.”
- Range checks catch impossible values early.
- Consistency checks ensure related fields agree, like currency totals and line item sums.
- Policy checks decide control flow, like whether manager approval is required.
When validation fails, the step must produce outputs that explain the failure in structured form (e.g., missing_fields or failed_rules). That structure becomes the input to the remediation step.
Example: State Facts Table for the Same Step
| Fact | Meaning | Set When |
|---|---|---|
invoice_validated | Invoice passed validation | status = completed |
approval_path_selected | Approval route chosen | status = completed |
clarification_required | Missing data needs follow-up | status = needs_clarification |
validation_error | Hard validation failure | status = failed_validation |
next_step_ready | Downstream can start | invoice_validated = true |
human_review_required | Escalation required | validation_error = true |
Putting It Together for Step Design
A good step contract is small enough to implement and specific enough to route. Inputs define what must be true before execution. Outputs define what downstream can rely on. State transitions define exactly how the workflow’s facts change, so the next step starts with confidence rather than guesswork.
2.4 Establishing Acceptance Criteria for Tool Calls and Decisions
Acceptance criteria answer one question: “When should the workflow accept this tool result or decision as good enough to move forward?” In multiagent workflow engineering, vague criteria create two common failures: agents keep retrying for the wrong reason, or they accept incorrect outputs because the criteria were too permissive. Good criteria are specific, testable, and tied to the workflow’s next step.
Start with the Next Step Contract
Before writing criteria, identify what the workflow will do after the tool call or decision. If the next step is “create a purchase order,” then the acceptance criteria must guarantee the required fields, formats, and permissions are present. If the next step is “send a clarification request,” then the criteria should detect missing or conflicting information.
A practical way to structure this is to define three outcomes for every tool call or decision:
- Proceed: The output satisfies all required conditions.
- Clarify: The output is incomplete or ambiguous in a way that can be resolved by asking.
- Recover: The output is invalid, inconsistent, or unsafe, requiring a different action such as retrying, switching tools, or escalating.
Define Required Fields and Data Shapes
Tool outputs often fail in predictable ways: wrong types, missing keys, unexpected units, or empty lists. Acceptance criteria should explicitly list:
- Required fields (names and minimum presence)
- Allowed types (string, number, boolean, array)
- Value constraints (ranges, formats, non-empty rules)
- Normalization rules (currency codes, date formats, casing)
Example: For a “calculate invoice total” tool, acceptance criteria might require:
line_itemsis a non-empty array- each item has
quantity> 0 andunit_price>= 0 currencymatches ISO 4217 pattern- computed
totalequals sum ofquantity * unit_pricewithin a rounding tolerance
Add Semantic Checks Beyond Syntax
Even when data is well-formed, it can be semantically wrong. Acceptance criteria should include checks that reflect business meaning:
- Cross-field consistency: totals match subtotals, dates fall within policy windows
- Entity validity: customer ID exists, vendor is active, account status allows action
- Policy constraints: approvals required when amount exceeds thresholds
A good rule: if a human reviewer would reject it for a specific reason, that reason should become a criterion.
Specify Tolerance, Rounding, and Time Windows
Many enterprise workflows involve numbers and time. Without explicit tolerances, agents either reject correct results or accept near-misses.
Use criteria like:
- rounding tolerance for money calculations (for example, accept totals within 0.01 of expected)
- time window rules (for example, “effective date must be within the last 90 days”)
If a date is needed for an example, use a stable reference such as 2026-03-01.
Make Error Handling Part of Acceptance
Acceptance criteria should include what to do when the tool fails or returns an error payload. Instead of treating errors as “not accepted,” classify them:
- Transient: timeouts, rate limits, temporary network errors
- Permanent: authorization denied, schema mismatch, missing required parameters
- Data issues: tool returns “not found,” empty results, or conflicting records
Then define the recovery action that corresponds to each class.
Separate Decision Criteria from Tool Criteria
A decision is not the same as a tool output. Tool criteria validate facts; decision criteria validate the workflow’s choice.
For a decision like “approve or escalate,” acceptance criteria might require:
- approval threshold check
- evidence presence (for example, required documents attached)
- risk flags absent or resolved
If the decision depends on tool outputs, reference the tool acceptance criteria rather than re-describing them.
Use a Mind Map to Keep Criteria Complete
Mind Map: Acceptance Criteria Checklist
Example: Criteria for a “Vendor Eligibility” Decision
Suppose a workflow must decide whether a vendor is eligible to receive a new contract.
Tool call: get_vendor_profile(vendor_id)
- Accept if
statusisactive - Accept if
tax_profile_completeis true - Reject if
statusissuspended - Clarify if
tax_profile_completeis missing - Recover if the tool returns authorization denied
Decision: is_vendor_eligible(profile, contract_amount)
- Proceed if vendor is eligible and
contract_amount<=preapproved_limit - Clarify if
preapproved_limitis missing - Recover if vendor is eligible but
contract_amountexceeds the limit and required approvals are not present
This structure keeps the workflow honest: it knows whether it can move forward, ask a targeted question, or take a different path.
Example: Criteria for a “Create Ticket” Tool Call
Tool call: create_ticket(summary, details, priority)
- Accept if
summaryis non-empty and <= 120 characters - Accept if
detailsincludes the required fields:customer_id,issue_type, andimpact - Accept if
priorityis one oflow,medium,high - Clarify if
issue_typeis missing - Recover if the tool returns a validation error indicating schema mismatch
When these criteria are written down, agents stop guessing and start behaving like careful coworkers: they either have what they need, or they know exactly what’s missing.
2.5 Practical Example: Writing a Workflow Specification for a Finance Process
This example specifies a finance workflow for processing a vendor invoice from submission to payment readiness. The goal is a specification that an orchestrator can execute and that auditors can understand without reading the agent’s mind.
Step 1: Define the Workflow Scope and Success Criteria
Workflow name: Vendor Invoice Processing
Primary objective: Convert an incoming invoice into a payment-ready record with validated totals, approvals, and complete documentation.
Success criteria:
- The invoice amount matches the sum of line items within tolerance.
- Required fields are present (vendor, invoice number, invoice date, currency, tax, payment terms).
- The workflow produces an audit trail: who approved what, when, and based on which evidence.
- The output is either “Ready for Payment” or “Needs Correction” with actionable reasons.
Non-goals: Negotiating pricing, changing vendor master data, or issuing payments. Those are separate workflows.
Step 2: Identify Agent Roles and Interaction Boundaries
Use three roles to keep responsibilities crisp:
- Intake Analyst: Validates structure, extracts fields, and checks document completeness.
- Finance Verifier: Performs arithmetic checks, policy checks, and approval routing.
- Audit Reporter: Assembles the final evidence package and produces the workflow outcome.
Interaction rule: Only the Finance Verifier can decide approval routing. Only the Intake Analyst can request missing documents. The Audit Reporter never changes business facts; it only compiles evidence.
Step 3: Specify Inputs, Outputs, and State Transitions
Input artifacts:
- Invoice document (PDF or image)
- Optional purchase order reference
- Optional email metadata (sender, received timestamp)
Output artifacts:
- Normalized invoice record
- Validation results
- Approval decision and evidence package
- Workflow status
State model:
ReceivedExtractedValidatedRoutedApprovedCorrectionRequestedReadyForPaymentRejected
State transition rules:
Received -> Extractedrequires successful field extraction.Extracted -> Validatedrequires totals and required fields checks.Validated -> Routedoccurs when routing criteria are satisfied.Routed -> Approvedrequires approval outcome.Validated -> CorrectionRequestedoccurs when validation fails due to missing or inconsistent data.
Step 4: Define Decision Points and Acceptance Criteria
Decision point A: Document completeness
- Acceptance criteria: Vendor name, invoice number, invoice date, currency, line items, and tax fields exist and are parseable.
- Failure handling: Request specific missing items.
Decision point B: Amount reconciliation
- Acceptance criteria:
sum(line_items) + tax == invoice_totalwithin tolerance (e.g., 0.01 in invoice currency). - Failure handling: Mark line-level mismatch and request corrected extraction or corrected invoice.
Decision point C: Policy checks and routing
- Acceptance criteria:
- Invoice date not in a closed period.
- Payment terms exist and are valid.
- PO reference exists when required by policy.
- Failure handling: Route to exception approval or request correction depending on the policy rule.
Step 5: Provide a Concrete Workflow Specification Template
Below is a compact, executable-style specification. It’s intentionally explicit about what each step must produce.
workflow: VendorInvoiceProcessing
version: 1.0
states: [Received, Extracted, Validated, Routed, Approved, CorrectionRequested, ReadyForPayment, Rejected]

step IntakeExtraction:
  from: Received
  to: Extracted
  produces: [normalized_invoice, extraction_confidence, missing_fields]
  acceptance: normalized_invoice.required_fields_present == true

step Validation:
  from: Extracted
  to: Validated
  produces: [reconciliation_result, policy_flags]
  acceptance: reconciliation_result.passed == true && policy_flags.blockers_empty == true

step Routing:
  from: Validated
  to: Routed
  produces: [approval_route, approver_ids]
  acceptance: approval_route.exists == true

step Approval:
  from: Routed
  to: Approved
  produces: [approval_decision, approver_evidence]
  acceptance: approval_decision == "Approved"

step Finalize:
  from: Approved
  to: ReadyForPayment
  produces: [payment_ready_record, audit_evidence]
  acceptance: audit_evidence.complete == true
If validation fails, the workflow takes an alternate path:
step RequestCorrections:
  from: Extracted
  to: CorrectionRequested
  produces: [correction_requests, evidence_of_failure]
  acceptance: correction_requests.count > 0

step Reject:
  from: Extracted
  to: Rejected
  produces: [rejection_reason, audit_evidence]
  acceptance: rejection_reason in ["Unprocessable document", "Policy prohibits processing"]
Step 6: Include a Mind Map for the Specification
Mind Map: Vendor Invoice Processing Workflow Specification
Step 7: Walk Through One Integrated Example Run
Assume an invoice arrives on 2026-03-05 with a PO reference. The Intake Analyst extracts 12 line items and detects that the tax field is present but the invoice total appears inconsistent.
- Extraction output:
missing_fields = [],normalized_invoice.total = 12450.00,sum_lines = 12300.00,tax = 150.00. - Validation: Reconciliation check computes
12300.00 + 150.00 = 12450.00, so totals match within tolerance. Policy checks confirm the invoice date is in an open period and payment terms exist. - Routing: The Finance Verifier selects an approval route based on amount and PO presence, producing
approver_ids = [ap_manager_17]. - Approval: The approver approves and the Audit Reporter compiles evidence: extracted fields snapshot, reconciliation calculation, policy flags, and approval record.
- Finalize: The workflow outputs
payment_ready_recordand sets status toReadyForPayment.
This run demonstrates the core best practice: every decision is tied to explicit acceptance criteria and every outcome includes evidence, so the workflow is both executable and reviewable.
3. Team Design and Orchestration Patterns
3.1 Selecting Team Topologies for Enterprise Workloads
Enterprise workloads rarely fail because “the model wasn’t smart enough.” They fail because the team structure doesn’t match the work: who owns decisions, who touches tools, how state is shared, and how exceptions are handled. Team topology is the blueprint for those choices.
Core Topology Goals
Start by stating what the team must optimize. In practice, you usually balance four goals:
- Throughput: how many cases or tickets can be processed per unit time.
- Correctness: how reliably outputs meet policy, schema, and business rules.
- Safety: how well the system prevents harmful actions and limits blast radius.
- Operability: how quickly humans can understand, audit, and fix failures.
A topology that maximizes throughput by letting every agent act independently often harms safety and operability. A topology that maximizes correctness by forcing every step through a single reviewer can throttle throughput. Your selection is the trade-off.
Common Enterprise Topologies
Below are the main patterns, described in terms of ownership, communication, and tool access.
Single-Executor with Review
One agent executes the workflow steps; a second agent reviews outputs at defined checkpoints.
- Best fit: workflows with clear checkpoints (e.g., “draft then approve”).
- Ownership: executor owns tool calls; reviewer owns acceptance.
- Strength: simple mental model and strong control points.
- Watch-outs: if checkpoints are too sparse, errors slip through; if too frequent, latency rises.
Example: A procurement workflow where the executor drafts a vendor justification and the reviewer verifies required fields, budget codes, and compliance language before any purchase request is submitted.
Specialist Pipeline
Work is split into sequential specialists: one agent prepares, another validates, another executes actions.
- Best fit: tasks with stable stages and well-defined artifacts.
- Ownership: each stage owns a specific artifact type (e.g., “requirements summary,” “risk assessment,” “execution plan”).
- Strength: consistent outputs because each agent focuses on one job.
- Watch-outs: if upstream stages produce ambiguous artifacts, downstream agents inherit the confusion.
Example: A customer onboarding pipeline where one agent extracts requirements from emails, another maps them to account provisioning steps, and a third performs system updates.
Hub-and-Spoke Orchestration
An orchestrator coordinates multiple agents that handle subproblems on demand.
- Best fit: workflows with variable paths, branching decisions, and shared context.
- Ownership: orchestrator owns the global plan and state; specialists own local reasoning and tool usage.
- Strength: centralized control without forcing every step through one agent.
- Watch-outs: if the orchestrator becomes a bottleneck, specialists wait; if it delegates too much, safety checks become inconsistent.
Example: Case triage where the orchestrator routes to specialists for billing issues, identity verification, or technical troubleshooting, then merges results into a single resolution record.
Blackboard Collaboration
Agents write and read shared structured state (a “blackboard”) rather than passing messages directly.
- Best fit: complex problems with many interdependent facts.
- Ownership: no single agent owns everything; the blackboard schema enforces structure.
- Strength: reduces message overhead and supports parallel work.
- Watch-outs: shared state must be carefully versioned; otherwise agents overwrite each other’s assumptions.
Example: Incident response where one agent gathers logs, another checks known failure patterns, and a third drafts a remediation plan, all updating the same incident timeline object.
Mind Map: Choosing the Right Topology
A Systematic Selection Procedure
Use this sequence to avoid “topology by preference.”
- Identify action risk: If tool actions can cause irreversible effects, require a topology with explicit gating (reviewer or orchestrator checkpoints).
- Identify artifact stability: If each stage produces a consistent artifact, use a specialist pipeline.
- Identify path variability: If cases branch based on intermediate findings, use hub-and-spoke orchestration.
- Identify shared fact complexity: If multiple agents must coordinate on the same evolving facts, use a blackboard with a strict schema.
- Define ownership boundaries: Decide who can call tools, who can approve outputs, and who can modify shared state.
- Add failure routes: For each topology, specify what happens when validation fails, tools error, or required fields are missing.
Example: Selecting for a Loan Compliance Workflow
Suppose the workflow includes: collecting applicant data, computing eligibility, drafting a decision memo, and submitting to a compliance system.
- Risk: submission is high impact, so you need gating.
- Stages: eligibility computation and memo drafting are stable stages.
- Variability: edge cases change required checks.
A practical topology is specialist pipeline for the stable stages, with hub-and-spoke routing for edge-case checks, and a review checkpoint before submission. The result is not “more agents,” but clearer ownership: specialists produce artifacts, the orchestrator routes exceptions, and the reviewer approves the final memo.
Practical Heuristics That Prevent Common Mistakes
- If you can’t name who approves a tool action, you don’t have a topology yet.
- If agents share context without a schema, you’ll debug conversations instead of workflows.
- If every agent can call tools, safety checks become a suggestion rather than a mechanism.
Selecting a topology is choosing a control system. Once ownership, tool access, and state sharing are explicit, the rest of workflow engineering becomes much easier to reason about.
3.2 Orchestrator Responsibilities and Control Flow Strategies
An orchestrator is the part of a multiagent workflow that keeps time, enforces structure, and makes sure work moves forward for the right reasons. Think of it as the workflow’s conductor: agents play their parts, but the orchestrator decides when a section starts, what happens when someone hits a wrong note, and how the ensemble stays aligned.
Orchestrator Responsibilities
Workflow state ownership. The orchestrator maintains the canonical state: what step is active, what artifacts exist, which decisions were made, and which constraints apply. Agents can propose updates, but the orchestrator commits them only after validation.
Control flow and scheduling. It chooses the next action based on the workflow graph, current state, and event triggers. This includes deciding whether to run agents sequentially (safer for shared resources) or in parallel (faster when tasks are independent).
Tool invocation governance. Agents may request tool calls, but the orchestrator checks that the call matches the approved schema, required permissions, and idempotency rules. If a tool call would cause irreversible side effects, the orchestrator can require an explicit confirmation step.
Message routing and contract enforcement. The orchestrator routes messages between agents and ensures each message matches the expected contract: required fields exist, types are correct, and referenced artifacts are present.
Failure handling and recovery. When something fails, the orchestrator decides whether to retry, escalate to a human gate, or switch strategies. It also records the failure mode so the next attempt is not a blind repeat.
Observability and auditability. It logs key events: step transitions, tool requests, validation outcomes, and decision rationales in a structured way that supports debugging and compliance.
Control Flow Strategies
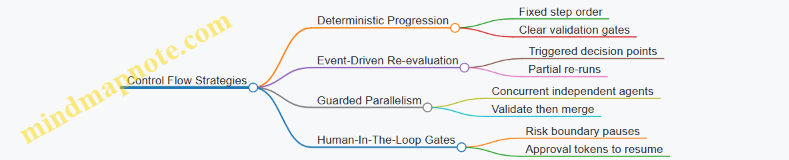
Strategy 1: Deterministic step progression. Use a fixed workflow graph where each step has clear entry and exit conditions. This works well for compliance-heavy processes because the path is predictable.
Example: A procurement workflow might follow: collect requirements → validate vendor eligibility → request quotes → compare quotes → draft approval packet. If quote comparison fails validation, the orchestrator routes back to “collect requirements” rather than letting agents improvise.
Strategy 2: Event-driven re-evaluation. Some steps should re-run when new information arrives. The orchestrator listens for events like “policy changed,” “new document uploaded,” or “tool result returned,” then re-checks only the affected decision points.
Example: A case triage team classifies tickets. If the document tool returns additional evidence, the orchestrator re-evaluates the classification decision and updates downstream routing without restarting the entire workflow.
Strategy 3: Guarded parallelism. Run independent agents concurrently, but gate their outputs before merging. The orchestrator waits for all required inputs, validates them, then commits a combined artifact.
Example: For onboarding, one agent verifies identity documents while another checks contract templates. The orchestrator merges results only after both pass schema checks and policy constraints.
Strategy 4: Human-in-the-loop gates. Insert explicit approval steps at risk boundaries. The orchestrator pauses, presents a structured summary, and resumes only after the gate returns an approval token.
Example: Before sending an email to a customer, the orchestrator requires approval of the final message body and recipient list.
Mind Map: Orchestrator Responsibilities
Mind Map: Control Flow Patterns
Integrated Example: Ticket Triage Orchestration
A three-agent triage team includes a classifier, a policy checker, and a routing planner. The orchestrator starts by creating a step context with the ticket text and metadata, then schedules the classifier and policy checker in parallel because they do not depend on each other.
When the classifier returns a category, the orchestrator validates that the category is among allowed labels and that confidence is above the configured threshold. If confidence is low, it routes to a clarification step that asks for missing fields rather than forcing a guess.
Next, the orchestrator merges the classifier output with the policy checker results. If the policy checker flags a restriction, the orchestrator prevents the routing planner from selecting certain queues and instead triggers an escalation gate. If no restrictions apply, it allows the routing planner to choose the target queue and generate a short justification.
Finally, the orchestrator commits the routing decision to state, logs the validation checks, and emits a single “handoff” message to the ticketing system with a contract-compliant payload. The workflow ends this stage with a clean boundary: downstream systems receive structured data, not a pile of agent chatter.
Practical Implementation Notes
To keep control flow reliable, the orchestrator should treat validation as a first-class step: every tool request and every agent output that affects state must pass through schema checks and policy constraints. It should also separate “proposal” from “commit,” so agents can explore safely while the orchestrator decides what becomes real.
3.3 Delegation Patterns for Specialized Agent Roles
Delegation is how you turn “one big brain” into a team that can finish enterprise work without losing control of quality. A good delegation pattern makes three things explicit: what a specialist is responsible for, what inputs it needs, and what outputs it must produce so the orchestrator can safely continue.
Core Idea of Role Specialization
Specialized roles reduce cognitive load and improve reliability because each agent focuses on a narrow contract. Instead of asking one agent to plan, research, draft, validate, and file, you assign those steps to roles that each have clear success criteria. The orchestrator then coordinates handoffs and enforces ordering.
A practical way to define a role is to write a “handoff contract” with four fields: required inputs, allowed tools, output schema, and stop conditions. Stop conditions matter because specialists should know when they are done and when they must escalate for clarification.
Pattern 1: Planner Executor Split
In the Planner Executor split, one agent produces an actionable plan, while another executes steps using tools. The planner’s output is not prose; it is a structured work order with step IDs, dependencies, and expected artifacts.
Example: Vendor onboarding.
- Planner agent outputs steps like “Collect tax form,” “Validate company registry,” and “Create internal vendor record,” each with required documents and tool calls.
- Executor agent runs the steps, producing artifacts such as extracted fields, validation results, and a final checklist.
Best practice: the executor should not invent missing requirements. If a step requires a document that is absent, it returns a “missing input” result that the orchestrator routes back to the planner for a revised plan.
Pattern 2: Validator Reviewer Loop
The Validator Reviewer loop adds a quality gate without slowing everything down. One agent generates or proposes, and another checks against rules, schemas, and policy constraints.
Example: Contract amendment drafting.
- Drafting agent proposes clause text and a summary of changes.
- Validator agent checks for required sections, prohibited terms, and correct mapping to the original contract.
- If validation fails, the orchestrator sends a targeted correction request that includes the exact rule violated.
Best practice: keep validation deterministic where possible. For example, schema checks and rule-based constraints should be mechanical, while the reviewer agent handles nuanced issues like ambiguity in definitions.
Pattern 3: Tool Router Specialist
A Tool Router specialist decides which tool to call and with what parameters, based on the task’s intent and the available tool capabilities. This prevents other agents from guessing tool signatures.
Example: Expense processing.
- The router maps “receipt OCR” to the OCR tool, “policy lookup” to the policy service, and “reimbursement submission” to the workflow API.
- It also normalizes outputs into a consistent internal format, such as
{merchant, date, amount, currency, confidence}.
Best practice: the router should return a “tool plan” first when ambiguity exists. If the task could be either “invoice” or “receipt,” the router requests a clarification signal rather than choosing randomly.
Pattern 4: Research Summarizer Handoff
In the Research Summarizer handoff, one agent gathers evidence and another produces a compact, decision-ready summary with provenance. This keeps the decision agent from wading through raw notes.
Example: SLA compliance check.
- Research agent collects relevant ticket history and timestamps.
- Summarizer agent outputs a structured assessment:
{status, evidence_items, gaps, recommended_next_action}.
Best practice: summaries should include evidence IDs so the orchestrator can audit why a decision was made.
Mind Map: Delegation Patterns and Contracts
Integrated Example: Case Triage with Four Roles
Consider a case triage workflow where the orchestrator must classify a request, extract key fields, validate policy eligibility, and produce a final disposition.
- Planner agent creates a step plan: extract fields, identify category, check eligibility, draft disposition.
- Tool Router agent selects tools for extraction and policy lookup, returning normalized fields.
- Validator agent checks eligibility rules and flags missing evidence.
- Research Summarizer agent compiles a short disposition with evidence IDs and a clear next action.
The orchestrator then merges outputs into a single case record. If the validator flags missing evidence, the orchestrator routes that specific gap back to the planner, not to the whole team. That keeps the workflow efficient and prevents repeated work.
Advanced Detail: Designing Handoffs That Don’t Drift
Role specialization fails when handoffs are vague. To prevent drift, enforce schema boundaries and include “reason codes” for failures. A reason code is a small, stable label like MISSING_DOCUMENT, RULE_CONFLICT, or TOOL_AMBIGUITY. It lets the orchestrator decide whether to replan, request user input, or stop with a safe error.
Finally, ensure each specialist has a clear notion of completion. Completion is not “I think it’s done,” but “I produced the required output schema and no stop condition was triggered.” That single rule makes delegation predictable, which is the whole point.
3.4 Coordination Mechanisms for Shared Context and Dependencies
Multiagent workflows fail in predictable ways: agents duplicate effort, act on stale facts, or step on each other’s side effects. Coordination mechanisms exist to prevent those failures by making shared context and dependencies explicit, checkable, and cheap to update.
Shared Context as a Contract
Shared context is not “everything we know.” It is the minimum set of facts and decisions that multiple agents must agree on to proceed safely. A practical rule: if two agents might make conflicting tool calls because they disagree about a fact, that fact belongs in shared context.
Start with three layers:
- Facts: stable information like customer ID, policy number, or document version.
- Decisions: outcomes like “approved” or “needs clarification,” including the reason.
- Work state: what has been completed, what is pending, and what is blocked.
To keep context from turning into a junk drawer, attach each shared item with a scope (who needs it) and a freshness rule (how it gets updated). For example, “invoice total” might be refreshed whenever the document version changes, while “risk category” might be refreshed only after a specific risk-check step.
Dependency Modeling for Correct Ordering
Dependencies answer one question: “What must be true before this step runs?” In enterprise workflows, dependencies come in three common forms.
- Data dependencies: a tool call requires inputs produced earlier. Example: a “create purchase order” tool needs vendor ID and approved budget.
- Control dependencies: a branch depends on a decision. Example: only run “send compliance notice” if the case is classified as regulated.
- Side-effect dependencies: ordering matters because actions change external systems. Example: you must “reserve inventory” before “confirm shipment.”
Represent dependencies as a small graph: nodes are steps, edges are “must happen before.” Then enforce it with an orchestrator that schedules ready steps only when their prerequisites are satisfied.
Coordination Patterns That Work in Practice
Use patterns that match the workflow’s risk level.
1. Publish–Subscribe Context Updates One agent publishes updates to shared context; others subscribe to the fields they care about. This avoids constant polling and reduces accidental overwrites.
Example: A “document parser” agent publishes extracted_fields with a source_version. The “policy checker” agent subscribes to extracted_fields and refuses to run if the source_version is missing or changed since the last check.
2. Lease-Based Ownership for Shared Artifacts When multiple agents might write the same artifact (like a normalized customer record), assign a short-lived “lease” to one writer. Other agents can read, but only the lease holder can update.
Example: The “data normalization” agent gets a lease on customer_profile. The “fraud screening” agent reads it to compute risk signals, but it never edits the profile.
3. Barrier Synchronization for Phase Changes Some workflows have phases where everyone must agree before moving on. Use a barrier after “requirements extraction” and before “execution planning.”
Example: After extraction, the orchestrator collects requirements_summary from two agents and only releases the planning phase when both summaries pass validation checks.
4. Idempotent Step Contracts Dependencies become easier when steps are idempotent. Define each step with a unique key and a deterministic outcome rule.
Example: “Create ticket” uses case_id + action_type as a key. If the same step runs again, the orchestrator returns the existing ticket reference instead of creating duplicates.
Mind Map: Coordination Mechanisms
Example: Case Triage with Shared Context and Dependencies
Imagine a three-step workflow: classify, request missing info, route.
- The classifier publishes
case_classandconfidence, plusevidence_ids. - The info requester depends on a control dependency: it runs only if
case_classis “needs_info.” It also depends on a data dependency: it requiresmissing_fieldsderived from the classifier’s evidence. - The router depends on a barrier: it waits until either (a) classification is “complete” or (b) missing info has been provided and reclassified.
Coordination details that keep it correct:
- Shared context items include
evidence_idsso the router can justify routing decisions. - The orchestrator enforces the dependency graph so routing never runs on stale classification.
- The “request missing info” step is idempotent using
case_id + missing_fields_version, preventing repeated outreach.
When these mechanisms are in place, agents can be specialized without becoming careless. The orchestrator becomes the referee, shared context becomes the scorecard, and dependencies become the rules of the game.
3.5 Practical Example: Designing a Three Agent Team for Case Triage
Case triage is a good place to practice multiagent workflow engineering because the work is repetitive, the rules are clear, and the cost of mistakes is measurable. In this example, a case arrives with a short description, attachments, and a priority hint. The goal is to decide the next action: route to the right queue, request missing information, or escalate.
Team Roles and Boundaries
Use three agents with non-overlapping responsibilities:
- Intake Analyst: reads the case, extracts structured facts, and identifies what information is missing.
- Policy Router: applies routing rules to choose the next queue and determines whether escalation thresholds are met.
- Action Scribe: drafts the user-facing response and the internal work order, including tool-ready fields.
A simple boundary rule keeps the system stable: only the Intake Analyst is allowed to interpret raw text into structured fields; only the Policy Router is allowed to choose routing outcomes; only the Action Scribe is allowed to produce final artifacts.
Mind Map: Team Workflow and Data Flow
Three Agent Case Triage Mind Map
Step-by-Step Execution
- Orchestrator creates a triage session with a case ID and stores the raw payload.
- Intake Analyst produces CaseFacts using a fixed schema. Example fields:
issue_category,customer_segment,evidence_type,impact_level, andjurisdiction. It also outputsMissingInfosuch asaccount_idorincident_start_time. - Policy Router consumes CaseFacts and selects
NextAction.- If
issue_categoryis known and required evidence is present, route to the mapped queue. - If evidence is missing but the issue category is clear, choose
RequestInfo. - If impact_level is high and evidence indicates a regulated or safety-sensitive scenario, choose
Escalate.
- If
- Action Scribe generates artifacts based on
NextAction.- For
RequestInfo, it drafts a concise message listing only the missing fields. - For
RouteToQueue, it writes a short confirmation and includes the structured fields needed by the receiving team. - For
Escalate, it produces an escalation notice with the rationale fields from the Policy Router.
- For
- Orchestrator validates that required fields exist and that the chosen action matches the routing rules used.
Integrated Example with Concrete Inputs
Incoming case summary:
- “Customer reports repeated login failures after password reset. They claim no access to payroll reports. Screenshots attached show error code 401.”
- Priority hint: “high”
Intake Analyst output (CaseFacts):
issue_category: Access and Authenticationcustomer_segment: Enterprise HRevidence_type: Screenshotimpact_level: High (payroll access blocked)jurisdiction: Not provided
Intake Analyst output (MissingInfo):
account_idincident_start_timejurisdiction
Policy Router decision:
- Rule match: Access and Authentication routes to “Identity Support Queue”.
- Escalation check: impact_level is high, but escalation requires jurisdiction or incident_start_time.
- NextAction:
RequestInfowith rationale: “High impact but missing escalation prerequisites.”
Action Scribe artifacts:
- User-facing message requests
account_id,incident_start_time, and jurisdiction, and confirms receipt of the 401 evidence. - Internal work order sets
target_queueto “Identity Support Queue” but marks it as “pending required info.”
Validation Guardrails
To prevent the team from drifting into overlapping duties, add three checks:
- Schema check: CaseFacts must include required keys; otherwise the session fails early.
- Decision provenance: Action Scribe must reference the Policy Router’s
NextActionand rationale fields. - Artifact completeness: Work order must include either
queue_nameorescalation_reasonplus the list of required missing fields.
Mind Map: Routing Rules and Decision Logic
Routing Logic Mind Map
This three-agent design stays practical because each agent has a narrow contract, the orchestrator enforces the handoffs, and the artifacts are structured enough to be validated without reading the entire case twice.
4. Task Decomposition and Work Planning
4.1 Decomposing Complex Tasks into Executable Subtasks
Task Decomposition and Work Planning
Decomposing Complex Tasks into Executable Subtasks
Complex enterprise tasks fail most often for boring reasons: the work is too big to execute in one pass, the inputs are unclear, or the outputs are not testable. Decomposition fixes that by turning one vague goal into a sequence of subtasks with explicit entry conditions, tool needs, and measurable outputs.
Start with a Single Sentence Goal
Write the task as a single sentence that includes a verb and a target artifact. For example: “Create an approved vendor onboarding packet for a new supplier, including compliance checks and a final submission to Procurement.” If you cannot name the target artifact, you cannot define completion.
Then split the sentence into three lists:
- What must be produced (artifacts): packet, forms, approvals, records.
- What must be verified (checks): identity, contract terms, risk flags.
- What must be coordinated (handoffs): Procurement, Legal, Finance, vendor.
This gives you a first draft of subtasks without yet worrying about tool calls.
Use a Decomposition Ladder
A practical ladder moves from coarse to fine until each step is executable.
- Phases: broad stages that take hours or days.
- Work packages: chunks that can be completed by one agent role or one workflow stage.
- Subtasks: steps that have clear inputs, outputs, and acceptance criteria.
- Actions: tool calls or manual operations.
A subtask is executable when you can answer: “What do we need to start, what do we produce, and how do we know it’s correct?” If any answer is missing, the step is still too big.
Define Subtask Contracts
For each subtask, specify four fields in plain language:
- Entry conditions: required data present, permissions available, prior steps completed.
- Inputs: documents, IDs, extracted fields, user selections.
- Outputs: structured results or files with names and schemas.
- Acceptance criteria: concrete checks like “all required fields are non-empty” or “risk score is below threshold.”
This prevents the classic failure mode where an agent “finishes” by producing text that nobody can validate.
Choose Decomposition Axes
Complex tasks often decompose cleanly along one or more axes:
- By artifact: each subtask produces a specific document or record.
- By responsibility: each subtask maps to a role like Compliance Analyst or Contract Reviewer.
- By decision: each subtask corresponds to a decision point with explicit criteria.
- By system boundary: each subtask touches one tool or one external system.
Pick the axis that reduces ambiguity first. If compliance rules are the hardest part, start with decision-based subtasks.
Mind Map: Decomposition
Example: Vendor Onboarding Packet
Goal: “Create an approved vendor onboarding packet for a new supplier.”
Phase 1: Intake and Identity
-
Subtask: Collect vendor identifiers.
- Entry conditions: vendor name provided.
- Inputs: name, website, contact email.
- Output: vendor record with normalized identifiers.
- Acceptance: identifiers match required formats; duplicates flagged.
-
Subtask: Gather onboarding documents.
- Entry conditions: vendor record exists.
- Inputs: document list requested from vendor.
- Output: uploaded files with filenames and timestamps.
- Acceptance: all required documents present; unreadable files flagged.
Phase 2: Compliance Checks
-
Subtask: Run compliance screening.
- Entry conditions: documents and identifiers available.
- Inputs: tax ID, beneficial owner names, country.
- Output: screening report with risk categories.
- Acceptance: report includes all categories; any “needs review” items enumerated.
-
Subtask: Prepare compliance summary for Legal.
- Entry conditions: screening report complete.
- Inputs: screening report fields.
- Output: one-page summary plus extracted evidence links.
- Acceptance: summary cites evidence for each flagged item.
Phase 3: Contract and Approval Routing
-
Subtask: Draft contract package.
- Entry conditions: compliance summary and standard contract template.
- Inputs: template, vendor selections.
- Output: contract draft with version tag.
- Acceptance: version tag present; required clauses included.
-
Subtask: Route for approvals.
- Entry conditions: draft ready.
- Inputs: draft location, approval checklist.
- Output: approval tickets with references.
- Acceptance: each approver receives the correct artifact reference.
Advanced Detail: Prevent “Too Many Small Steps”
Decomposition should reduce risk, not create bureaucracy. If a subtask requires more than a few distinct tool interactions or multiple unrelated decisions, it’s probably still too large. If it produces outputs that are never consumed by later steps, it’s probably too small.
A good rule: every subtask output should be either (1) an artifact used later, (2) a decision input for a later branch, or (3) a validation result that gates progress.
Advanced Detail: Add Recovery Paths Early
For each subtask, include one or two explicit failure outcomes:
- “Missing input” with a clear request for what to collect.
- “Validation failed” with a list of what to correct.
This keeps the workflow from stalling when reality shows up, which it always does—usually with a missing field, a mismatched identifier, or a document that is technically present but not usable.
4.2 Planning Granularity and Step Boundaries
Granularity is the size of each workflow step: too coarse, and you lose control when something goes wrong; too fine, and the team spends more time coordinating than doing the work. Step boundaries are the edges where responsibility, inputs, outputs, and acceptance checks are clearly defined. In multiagent workflow engineering, good boundaries also reduce “argument loops,” where agents repeatedly re-justify the same decision.
Step Boundaries as Contracts
A step boundary should behave like a small contract. Before an agent starts the step, it must know what it receives and what it must produce. After the step, the workflow should be able to verify completion without asking the same question again.
Use four boundary fields:
- Inputs: the exact data the step consumes (including required fields and units).
- Outputs: the exact data the step produces (including formats and confidence or validation status).
- Acceptance Criteria: the checks that determine success or failure.
- Side Effects: what the step changes outside the workflow (writes, tickets, emails), plus whether it is safe to retry.
A practical rule: if you cannot list inputs and outputs in one screen, the step is probably too big.
Granularity Levels That Work in Practice
Start with three levels and map them to your workflow.
- Workflow Level: milestones that represent business outcomes (e.g., “Vendor approved”). These are not tool calls; they are checkpoints.
- Step Level: bounded actions that an agent can complete in one pass or with a single clarification cycle.
- Subtask Level: internal reasoning or micro-actions that do not need separate ownership or acceptance checks.
When a step requires multiple distinct tool categories (for example, “search documents,” “extract fields,” and “create a record”), split it so each step has one dominant tool chain and one clear acceptance check.
Designing Boundaries for Tool Chains
Tool chains fail in predictable ways: missing fields, schema mismatches, partial writes, and permission errors. Step boundaries reduce these failures by localizing them.
For each tool call, decide whether it belongs in the same step as the decision that triggers it. A common pattern is:
- Step A gathers and validates prerequisites.
- Step B performs the action.
- Step C records results and triggers downstream updates.
This separation makes retries safer. If Step B fails due to a transient error, you can retry Step B without redoing Step A, as long as Step A’s outputs are stored and validated.
Mind Map: Granularity and Boundaries
Example: Vendor Onboarding Workflow
Assume the business goal is “Vendor onboarding completed.” A naive plan might include one huge step: “Prepare onboarding packet.” That step will be hard to validate and hard to retry.
A better plan splits into steps with clear boundaries:
-
Collect Vendor Inputs
- Inputs: vendor name, website, contact email.
- Outputs: normalized vendor profile fields.
- Acceptance: required fields present; email format valid.
- Side Effects: none.
-
Verify Documents and Extract Fields
- Inputs: document links or uploads.
- Outputs: extracted compliance fields with provenance.
- Acceptance: each required field extracted or explicitly marked missing.
- Side Effects: none.
-
Assess Eligibility and Request Clarifications
- Inputs: extracted fields.
- Outputs: eligibility decision plus a list of missing items.
- Acceptance: decision is consistent with rules; missing items are specific.
- Side Effects: none.
-
Create Records and Notify Stakeholders
- Inputs: eligibility decision and approved fields.
- Outputs: record IDs and notification status.
- Acceptance: record IDs created; notifications sent or queued.
- Side Effects: writes to systems; retry must be idempotent.
Notice what changed: each step has one dominant responsibility and one acceptance check. If extraction fails, you stop at Step 2 and fix documents, not record creation.
Advanced Detail: Boundary Decisions That Prevent Loops
Two boundary choices matter most:
- Clarification Budget: allow at most one structured clarification cycle inside a step. If more is needed, end the step with “needs more info” outputs so the workflow can route to a dedicated clarification step.
- Idempotency Marker: for steps with side effects, require an idempotency key in inputs and store it with outputs. Then retries can detect “already done” instead of duplicating work.
A step boundary is not just a line in a diagram; it is where accountability and verification meet. When boundaries are crisp, agents spend their time producing validated outputs rather than renegotiating what “done” means.
4.3 Dependency Graphs and Execution Ordering
Dependency graphs turn “do these steps” into a precise execution plan. Each node represents a step (a tool call, a decision, or a human review), and each edge represents a requirement that must be satisfied before the step can run. When the graph is correct, ordering becomes mechanical: start with nodes that have no unmet prerequisites, run them, mark their outputs as available, and continue.
Core Concepts for Building Graphs
A dependency graph needs three ingredients: (1) node identity, (2) dependency edges, and (3) data or state outputs. Node identity prevents ambiguity. For example, “Validate invoice” should be a single node even if it performs multiple checks; otherwise you’ll accidentally create parallel duplicates. Dependency edges should be justified by concrete requirements: “Create vendor record” depends on “Confirm vendor identity” because the vendor ID is required.
Outputs matter because they define what “satisfied” means. A dependency edge should typically be tied to a specific output field, such as vendor_id, risk_score, or approved_amount. If you only say “depends on policy,” you’ll end up with ordering that is technically valid but operationally wrong.
From Workflow Steps to a Graph
Start by listing steps in the order you think they should happen. Then challenge each step: what exact inputs does it require? If a step requires data produced by another step, add an edge. If it requires external data, add an edge from a “data availability” node.
A practical rule: if a step can run without reading the output of another step, it should not depend on it. This is how you unlock safe parallelism without guessing.
Execution Ordering with Topological Sort
Once you have edges, you can compute a valid execution order using topological sorting. The algorithm is simple: repeatedly pick nodes whose dependencies are already satisfied. If you reach a point where no node is available, the graph has a cycle or an unsatisfied prerequisite.
Cycles are not just a theoretical problem; they show up when two steps both claim they need each other’s outputs. For example, “Draft contract” depends on “Compute pricing,” while “Compute pricing” depends on “Draft contract” because it needs clauses. The fix is to split outputs: extract a “pricing inputs” node from the contract draft, or introduce a “pricing assumptions” node that the contract draft can later refine.
Mind Map: Dependency Graph Anatomy
Mind Map: Common Dependency Patterns

Example: Vendor Onboarding with Parallel Checks
Consider a workflow that creates a vendor record, validates documents, and performs risk checks.
Nodes:
fetch_vendor_application(external input)extract_vendor_identity(producesvendor_id_candidate)verify_identity(producesvendor_id)parse_documents(producesdocument_set)validate_documents(depends ondocument_set, producesdoc_status)compute_risk(depends onvendor_idanddocument_set, producesrisk_score)create_vendor_record(depends onverify_identityandvalidate_documents, producesvendor_record_id)request_approval_if_needed(depends onrisk_score, producesapproval_status)
Edges explain ordering precisely:
verify_identitymust wait forextract_vendor_identity.validate_documentsmust wait forparse_documents.compute_riskcan run after bothverify_identityandparse_documentsare done.create_vendor_recordwaits for both identity verification and document validation, but it does not wait for risk computation.
This is a clean fan-out then fan-in: identity and documents are prepared in parallel, risk uses both, and record creation uses only the prerequisites it truly needs.
Example: Detecting and Fixing a Cycle
Suppose you add a node draft_contract_terms that depends on risk_score, and you also make compute_risk depend on draft_contract_terms because risk scoring uses contract clauses. That creates a cycle.
A systematic fix is to separate clause generation into two layers:
draft_pricing_clausesdepends onvendor_profileand producespricing_clause_inputs.compute_riskdepends onpricing_clause_inputs.draft_contract_termsdepends onrisk_scoreandpricing_clause_inputs.
Now the graph is acyclic, and each dependency has a clear data reason.
Execution Ordering Checklist
Before you finalize the graph, verify these points:
- Every edge maps to a specific required input or state.
- Each node has a defined output contract.
- No node depends on something it never consumes.
- Conditional activation is represented explicitly by decision nodes and their outgoing edges.
- Cycles are eliminated by splitting outputs into smaller, reusable nodes.
With these practices, execution ordering stops being a guess and becomes a property of the workflow specification.
4.4 Handling Ambiguity with Explicit Clarification Steps
Ambiguity shows up when the workflow spec doesn’t uniquely determine what to do next. In multiagent workflow engineering, that usually means one of three things: missing information, conflicting information, or multiple valid interpretations. The fix is not “ask the model to think harder,” but to force the system into a controlled clarification loop with explicit questions, bounded retries, and clear stop conditions.
Clarification Triggers That Prevent Guessing
Start by defining when clarification is mandatory. A good rule is: if the next action would change external state (send an email, submit a form, update a record) and the required inputs are not uniquely determined, you must clarify.
Common triggers include:
- Unspecified scope: “Approve request” without stating which request ID.
- Conflicting facts: Two sources disagree on a customer’s region.
- Missing tool outputs: A search returns partial results, but the workflow needs a single canonical entity.
- Ambiguous success criteria: “Fix the invoice” without defining what “fixed” means.
The Clarification Step Contract
Treat clarification like a mini-protocol between agents and the workflow controller.
A clarification step should produce:
- A short ambiguity statement that names what is unclear.
- A set of targeted questions designed to reduce uncertainty quickly.
- A preferred answer format (e.g., choose one option, provide an ID, confirm a boolean).
- A decision rule for how the workflow proceeds after answers.
- A stop rule when answers cannot be obtained.
This contract keeps the loop from turning into an endless chat. It also makes handoffs between agents predictable.
Mind Map: the Clarification Loop
Evidence First, Questions Second
A common failure mode is asking questions before checking what the system already knows. A better pattern is: gather evidence with tools, then ask only what remains ambiguous.
Example: A workflow receives “Update the vendor bank details.” The system searches for the vendor name and finds three matches. Instead of asking “Which vendor?” immediately, it retrieves candidate details (legal name, country, last updated date) and then asks a single disambiguation question.
Clarification output example
- Ambiguity: Multiple vendors match the provided name.
- Questions:
- “Which vendor should be updated? Reply with one option: A) Acme Supply LLC (US), B) Acme Supply GmbH (DE), C) Provide the vendor ID.”
- Decision rule: If A or B, use the selected vendor ID; if C, pause until ID is provided.
- Stop rule: If no answer after two attempts, escalate to a human reviewer.
Designing Targeted Questions
Good questions reduce the branching factor. Prefer questions that:
- Ask for one choice among candidates.
- Request IDs rather than free-form descriptions.
- Confirm scope (“the invoice for March 2026 only” vs “all invoices”).
- Validate assumptions (“Should we overwrite existing bank details or create a new record?”).
Avoid questions that require the responder to infer your internal reasoning. If the workflow needs a canonical entity, ask for the canonical identifier.
Handling Conflicting Information
When sources disagree, clarification should include the conflict and the resolution preference.
Example: A policy check requires the customer’s tax status. The CRM says “exempt,” while the billing system says “standard.” The clarification step should ask which system is authoritative for this workflow.
- Ambiguity: Tax status differs between CRM and Billing.
- Questions:
- “Which source should we trust for this case? Reply: CRM, Billing, or Provide the tax certificate reference.”
- Decision rule: If CRM or Billing, proceed with that status and log the chosen source; if certificate reference is provided, fetch and verify.
Bounded Retries and Escalation
Clarification loops must have limits. A practical approach is:
- Round 1: evidence gathered, one disambiguation question.
- Round 2: if still unresolved, ask for the minimal missing field (usually an ID or a confirmation).
- Escalation: pause workflow and route to a human with the exact ambiguity statement and the evidence summary.
This keeps the workflow from stalling while also preventing silent wrong actions.
Integrated Example: Case Triage with Ambiguity
A triage agent receives: “Investigate the outage.” Evidence shows two incidents with similar timestamps. The workflow controller triggers clarification.
Clarification step contract:
- Ambiguity: Two incidents match the request window.
- Questions: “Select one: A) INC-1042 10:05–10:18 UTC, B) INC-1043 10:12–10:25 UTC.”
- Decision rule: Use the selected incident ID; then run the investigation tool chain.
- Stop rule: After two unanswered rounds, escalate with both incident summaries.
Once resolved, the investigation proceeds with no further guessing, and the audit log records the question, the answer, and the chosen incident ID.
4.5 Practical Example: Building a Work Plan for Vendor Onboarding
A vendor onboarding workflow has a simple promise: collect the right information, validate it, connect it to the right systems, and record decisions so the next reviewer can trust what happened. The work plan below turns that promise into an executable sequence with clear ownership, tool touchpoints, and decision gates.
Step 1: Define the Workflow Goal and Entry Criteria
Start with a single sentence goal: “A new vendor is approved for use in procurement systems with verified compliance and complete master data.” Then define entry criteria so the plan doesn’t start from vibes.
Example entry criteria:
- A vendor submission form is submitted with legal name, primary contact, country, and service category.
- A procurement owner is assigned.
- Required documents are listed as “received” or “missing” in the submission.
Step 2: Identify Roles and Boundaries
Use three roles to keep the plan readable:
- Intake Coordinator: checks completeness and routes to the right reviewers.
- Compliance Analyst: validates documents and policy requirements.
- Systems Operator: creates or updates vendor records and sets access.
Each role has boundaries. For example, the Systems Operator never decides compliance outcomes; they only act on an approval decision.
Step 3: Build the Mind Map of the Work Plan
Mind Map: Vendor Onboarding Work Plan
Step 4: Convert the Mind Map into an Ordered Work Plan
Represent the plan as steps with inputs, outputs, and decision points.
-
Intake completeness check
- Input: submission payload and document checklist.
- Output: a “completeness report” with missing items.
- Best practice: treat missing items as structured fields, not free text.
-
Missing document request
- Input: completeness report.
- Output: a vendor-facing request record with deadlines.
- Example: “Provide W-9 (or local equivalent) and proof of insurance for coverage period.”
-
Compliance document validation
- Input: received documents.
- Output: “compliance evidence bundle” and preliminary findings.
- Best practice: require evidence fields like document type, issuer, and validity dates.
-
Compliance decision gate
- Input: evidence bundle.
- Output: one of {Approved, Needs More Info, Rejected}.
- Example rule: if insurance validity ends before the next contract start date, mark Needs More Info.
-
System setup for approved vendors
- Input: approved decision and master data fields.
- Output: vendor record created/updated and onboarding status set to “Approved.”
- Best practice: ensure idempotency so reruns don’t duplicate records.
-
Audit logging and handoff
- Input: all prior outputs.
- Output: audit trail entry and notification to procurement owner.
- Example: include the decision gate outcome and the evidence bundle reference.
Step 5: Add Concrete Tool Touchpoints
Even without code, define tool interactions as “what gets called” and “what gets stored.”
- Tool: Document Intake Validator
- Stores: normalized checklist status and extracted metadata.
- Tool: Evidence Bundle Builder
- Stores: evidence items with provenance and validity windows.
- Tool: Compliance Decision Recorder
- Stores: decision outcome plus reason codes.
- Tool: Vendor Master Updater
- Stores: vendor ID, mapped attributes, and onboarding status.
Step 6: Make the Plan Rerunnable and Safe
A good work plan assumes retries happen.
- If intake completeness changes, rerun Step 1 and update the completeness report.
- If compliance is marked Needs More Info, loop back to Step 2 with the specific missing items.
- If systems setup fails after approval, rerun Step 5 using the same approved decision reference.
Step 7: Provide a Mini Example Run
Assume a submission received on 2026-03-05.
- Step 1: finds missing tax form and insurance certificate.
- Step 2: requests both items with a deadline.
- After documents arrive, Step 3 validates insurance coverage dates and tax form issuer.
- Step 4: returns Approved because coverage spans the contract start window.
- Step 5: creates the vendor master record and sets onboarding status to Approved.
- Step 6: logs the evidence bundle reference and notifies the procurement owner.
Step 8: Final Checklist for the Work Plan Output
When the plan finishes, it should leave behind:
- A completeness report (including what was missing and when it was resolved).
- A compliance decision with reason codes.
- A vendor master record reference.
- An audit trail entry that ties decision and evidence to system changes.
That’s the whole point: the work plan is not just a sequence of actions; it’s a chain of accountable artifacts that make the next onboarding review faster and less error-prone.
5. Tool Chain Engineering for Enterprise Systems
5.1 Tool Taxonomy for Read, Write, and Action Operations
A multiagent workflow lives or dies by how its tools behave. A practical way to engineer tool chains is to classify every tool call into one of three categories: Read, Write, or Action. This taxonomy helps you reason about permissions, side effects, retries, and validation without turning every workflow into a guessing game.
Read Tools
Read tools fetch information without changing external state. They typically support planning, verification, and decision-making.
Key properties:
- No side effects: calling the tool should not modify systems.
- Deterministic inputs: the same query should usually return the same result set, within a defined freshness window.
- Validation-friendly outputs: results can be checked before any next step.
Examples in enterprise workflows:
- Querying an order record by ID.
- Searching a knowledge base for a policy clause.
- Listing available approvers for a department.
Best practices:
- Require explicit query parameters (e.g., orderId, timeRange) so the agent cannot “accidentally” scan everything.
- Capture provenance metadata such as source system and retrieval timestamp.
- Normalize outputs into a consistent schema so downstream steps do not need bespoke parsing.
Write Tools
Write tools create or update persistent data. They change state, so you must treat them like transactions with guardrails.
Key properties:
- Side effects exist: retries can duplicate records unless the tool is idempotent.
- Strong input validation: the agent must supply required fields and correct formats.
- Auditability: you need an evidence trail for what changed and why.
Examples:
- Creating a ticket in a ticketing system.
- Updating a customer record with verified address details.
- Writing a workflow status entry to a case management database.
Best practices:
- Use idempotency keys for create operations so retries are safe.
- Prefer “upsert with constraints” when the business rules allow it.
- Require the agent to include a short justification field that references the triggering evidence from Read steps.
Action Tools
Action tools perform operational effects that may be irreversible or require coordination. They often trigger workflows, send messages, or execute commands.
Key properties:
- Operational side effects: emails, approvals, deployments, and external requests.
- Often asynchronous: the effect may complete later, so you need status polling or callbacks.
- Higher risk: you need explicit confirmation gates and preconditions.
Examples:
- Submitting an approval request to a manager.
- Sending a customer notification.
- Triggering a data export job.
Best practices:
- Model actions with a two-step pattern: (1) prepare and validate inputs, (2) execute after preconditions are met.
- Use explicit “dry run” or “preview” modes when available.
- Separate “requesting” from “finalizing” so the workflow can recover cleanly if the action fails mid-flight.
Mind Map: Tool Taxonomy and Engineering Implications
Integrated Example: From Read to Action Without Surprises
Consider a workflow that handles a “refund approval” request.
- Read: The agent fetches the order, checks refund eligibility, and retrieves the relevant policy text. It also reads the approver roster for the customer’s region.
- Write: The agent creates a draft approval record in the case system, using an idempotency key derived from (orderId, refundReason). The write includes evidence references from the Read results.
- Action: The agent submits an approval request to the selected approver. Before executing, it verifies that eligibility is still true and that the draft record exists. After submission, it records the action request ID and waits for a status update.
This sequence works because each category has clear expectations: Reads inform, Writes record, and Actions trigger. When a tool call fails, the workflow can respond appropriately—retry Reads freely, retry Writes carefully with idempotency, and treat Actions as gated operations with explicit recovery steps.
5.2 Designing Tool Interfaces and Schemas for Reliability
Reliable tool use starts with a simple question: what does the tool promise, and what does it never promise? A good interface makes those boundaries explicit so the workflow can validate outcomes without guessing.
Reliability Foundations for Tool Interfaces
A reliable tool interface has four properties.
First, it is typed: inputs and outputs follow a schema with required fields, allowed values, and clear units. For example, a “create_invoice” tool should require currency and amount_minor_units (not a free-form amount).
Second, it is deterministic at the contract level: the tool may be non-deterministic internally, but the interface defines how results are represented. If the tool can return “partial success,” the schema must say so explicitly.
Third, it is verifiable: outputs include enough information to confirm the action happened as intended. For “send_email,” include message_id and the resolved recipient list.
Fourth, it is recoverable: failures are categorized so the orchestrator can choose the right next step. A schema should distinguish “validation error,” “transient network failure,” and “permission denied.”
Interface Shape and Schema Design
Design the tool interface around a stable envelope.
- Request envelope:
tool_name,request_id,actor,inputs, andidempotency_key. - Response envelope:
request_id,status,result,errors, andobservations.
The request_id ties logs to a single attempt. The idempotency_key prevents duplicate side effects when the orchestrator retries. The status should be one of a small set like success, failed_validation, failed_transient, failed_authorization, failed_unknown.
A practical schema pattern is to keep result structured and avoid mixing human text with machine fields. If you need explanations, put them in observations as a list of short, structured notes.
Input Validation and Output Guarantees
Validation should happen in two layers.
-
Schema validation before calling the tool: required fields exist, types match, and enumerations are respected. This catches errors early and reduces noisy retries.
-
Semantic validation inside the tool: for example, ensure
amount_minor_unitsis non-negative andcurrencymatches the company’s accounting rules.
On the output side, define guarantees.
- On
success,resultmust include identifiers needed for later steps. - On
failed_validation, include a machine-readablefield_errorsmap so the workflow can correct inputs. - On
failed_transient, include aretry_after_secondswhen possible.
This turns “the tool failed” into “the workflow can do something useful.”
Idempotency and Side Effect Control
Idempotency is the difference between “retry is safe” and “retry creates duplicates.” Use idempotency_key for any tool that writes data or triggers external actions.
A simple rule: the tool stores the outcome for a given key and returns the same result on repeated calls. If the tool cannot guarantee this, the interface should mark the tool as non_idempotent so the orchestrator avoids retries.
Error Taxonomy and Recovery Instructions
Errors should be predictable and actionable.
- Validation errors: fix inputs; do not retry.
- Authorization errors: escalate to human or reconfigure credentials; do not retry.
- Transient errors: retry with backoff; keep the same idempotency key.
- Unknown errors: retry once if safe, otherwise stop and request operator review.
Include errors[].code, errors[].message, and errors[].details where details are structured (not a wall of text).
Mind Map: Tool Interface Reliability
Example: Reliable Tool Schema for Invoice Creation
Below is a compact example of an interface contract that supports validation, idempotency, and recovery.
{
  "tool_name": "create_invoice",
  "request_id": "req_9f2a",
  "idempotency_key": "inv_2026_03_15_customer_77",
  "actor": "billing_agent",
  "inputs": {
    "customer_id": "cust_77",
    "currency": "USD",
    "amount_minor_units": 125000,
    "line_items": [{"sku": "SVC-100", "qty": 2, "unit_minor_units": 62500}]
  }
}
{
  "request_id": "req_9f2a",
  "status": "success",
  "result": {
    "invoice_id": "inv_8841",
    "total_minor_units": 125000,
    "currency": "USD"
  },
  "errors": [],
  "observations": ["Stored invoice and generated invoice number"]
}
If validation fails, the tool returns failed_validation with field_errors so the orchestrator can correct specific fields instead of re-asking for everything.
Example: Error Handling for Email Sending
For a “send_email” tool, include message_id on success and categorize failures.
failed_authorization: missing permission to send to the domain.failed_transient: SMTP timeout; includeretry_after_seconds.failed_validation: invalid email format; includefield_errorsforto.
This keeps the workflow’s next action grounded in the schema rather than in guesswork.
5.3 Authentication Authorization and Secure Tool Invocation
Secure tool invocation is where “the model can do it” meets “the system is allowed to do it.” Authentication proves who the caller is, authorization decides what they may do, and secure invocation ensures the tool receives only the right inputs under the right identity.
Authentication Foundations for Tool Calls
Start by separating identities into three layers: the human or service that initiates the workflow, the agent identity that requests tool access, and the tool’s own identity when it calls back or validates requests. In practice, the workflow runner authenticates the workflow request, then issues short-lived credentials to the agent execution context.
A common enterprise pattern is: workflow runner authenticates using an enterprise identity provider, then exchanges for scoped tokens used only for tool calls. Tokens should be short-lived and audience-restricted so a token meant for “ticketing API” cannot be replayed against “billing API.”
Authorization Models for Enterprise Permissions
Authorization answers “may this identity perform this action on this resource?” Use explicit policies rather than ad-hoc checks inside agent prompts. Map tool operations to permission verbs and resource types.
For example:
read:invoiceoninvoice:{id}write:invoiceoninvoice:{id}create:paymentonpayment:{tenantId}
Then enforce authorization at the tool gateway or service boundary, not inside the agent. The agent can request, but the tool decides. This prevents prompt mistakes from turning into permission mistakes.
Secure Invocation Contract for Tools
A secure tool invocation contract defines what the agent must provide and what the tool will accept. The contract should include:
- Required parameters and their types
- Allowed operations and resource identifiers
- Constraints like maximum document size or permitted fields
- A trace identifier for audit logging
The tool should validate inputs before performing any side effects. If validation fails, return a structured error that the workflow can handle deterministically.
Mind Map: Authentication Authorization and Secure Tool Invocation
Example: Scoped Token Use for a Ticketing Tool
Suppose an agent needs to create a support ticket and then attach a log file. The workflow runner requests a token scoped to ticket:create and file:attach for the current tenant.
The agent invocation request includes:
operation:ticket.createresource:tenant:{tenantId}payload: title, category, and a reference to the log filetraceId: the workflow run identifier
The ticketing service verifies the token scope, validates the payload, stores the ticket, and returns a ticket ID. If the agent tries to attach a file outside the allowed size limit, the service rejects the request with an error code like PAYLOAD_TOO_LARGE, and the workflow can ask for a smaller file reference.
Example: Authorization Failure Handling Without Leaking Details
If an agent attempts invoice.write but only has invoice.read, the tool should return a generic authorization error. The message should not reveal whether the invoice exists or what roles the user has. The workflow can log the traceId internally for investigation.
A practical rule: the agent should receive enough information to correct the request, not enough information to probe the system.
Secure Tool Invocation Checklist
Before a tool performs side effects, ensure:
- The identity context is present and derived from the workflow runner.
- The token scope matches the operation and tenant.
- The tool validates the payload against the invocation contract.
- The tool writes an audit record containing traceId, operation, resource, and outcome.
Minimal Secure Invocation Pseudocode
function invokeTool(request, tool, identityContext):
  token = identityContext.getScopedToken(tool.audience, tool.scopes)
  authz = tool.authorize(token, request.operation, request.resource)
  if not authz.allowed:
    return error("FORBIDDEN", traceId=request.traceId)

  validation = tool.validate(request.payload)
  if not validation.ok:
    return error(validation.code, traceId=request.traceId)

  result = tool.execute(request.payload, traceId=request.traceId)
  tool.audit(traceId=request.traceId, outcome=result.status)
  return result
Advanced Detail: Preventing Cross-Tool Confusion
Cross-tool confusion happens when an agent reuses identifiers or payload fragments across tools without re-checking constraints. For instance, a file reference created for a document tool might not be acceptable for a ticket attachment tool.
To prevent this, treat resource identifiers as tool-specific contracts. The tool should reject references that were not minted for that tool’s domain, even if the underlying storage exists. This keeps “it exists somewhere” from becoming “it is safe to use here.”
Advanced Detail: Auditing for Decision Traceability
Audit logs should capture the decision inputs that matter: operation, resource, identity context, token scope identifier, validation outcome, and the final status. Store the traceId end-to-end so you can correlate agent requests with tool decisions without relying on free-form text.
When the workflow needs to explain why a step was blocked, it should use audit evidence rather than agent-generated rationales. That keeps the system consistent and makes debugging less of a scavenger hunt.
5.4 Idempotency, Retries, and Side Effect Control
Enterprise tool chains fail in predictable ways: timeouts, transient network errors, partial writes, and “we already did that” situations. Idempotency, retries, and side effect control are the three levers that keep multiagent workflows from turning a single business action into five.
Idempotency as the Default Contract
Idempotency means repeating the same logical request produces the same externally visible result. In practice, you design tools so they can safely receive duplicate calls.
A simple rule helps: every side-effecting tool call must accept an idempotency key and must record the outcome keyed by that value. If the same key arrives again, the tool returns the stored result instead of performing the action again.
Example: a “Create Invoice” tool receives idempotency_key = order-9182:invoice. The first call creates invoice INV-44. If the orchestrator retries after a timeout, the second call returns INV-44 without creating INV-45.
Idempotency is not only for “create.” It also applies to “update” operations where the update is derived from the same inputs. If you can’t guarantee that, treat the operation as non-idempotent and wrap it with a compensating strategy or a two-phase approach.
Side Effect Control with Explicit Boundaries
Side effects are anything that changes external state: writes to databases, emails sent, tickets created, payments initiated. Side effect control means you make those boundaries obvious and enforce them.
A practical pattern is to split tools into:
- Read tools that never change state.
- Plan tools that compute what to do without doing it.
- Commit tools that perform the side effect and require idempotency keys.
This separation reduces accidental duplication because only commit tools need the strictest handling.
Retry Strategy That Respects Failure Types
Retries should be conditional, not automatic. The workflow engine needs to classify failures into categories and retry only the ones that are safe.
A systematic approach:
- No retry for validation errors, permission failures, and malformed inputs.
- Retry with backoff for transient errors like timeouts, temporary upstream failures, and rate limits.
- Retry with idempotency for commit tools so duplicates collapse into one outcome.
Backoff prevents retry storms. Jitter avoids synchronized retries across many agents. Even with idempotency keys, retries still cost time and logs, so you want them disciplined.
Mind Map: Idempotency, Retries, and Side Effect Control
Example: Idempotent Commit with Timeout
Consider a “Submit Expense Report” commit tool that writes to an expense system and returns a confirmation ID.
Workflow behavior:
- The orchestrator generates
idempotency_key = employee-77:expense-2026-03-14:submit. - It calls
SubmitExpenseReport. - If the call times out, the orchestrator retries the same call with the same key.
Tool behavior:
- On first call, it writes the expense submission and stores
{key, confirmation_id, status}. - On retry, it detects the key and returns the stored confirmation without creating a second submission.
This works even if the first request actually succeeded but the response was lost.
Example: Non-Idempotent Action Wrapped with Guardrails
Some actions are inherently non-idempotent, like “send an email” without a stable deduplication identifier. You can still control side effects by:
- Adding an idempotency key to the email tool, or
- Using a “create notification record” commit tool that is idempotent, then letting a separate delivery process send based on that record.
The second approach keeps the workflow’s commit step idempotent while isolating delivery behavior.
Advanced Detail: Idempotency Scope and Data Consistency
Idempotency keys must be scoped correctly. If you reuse the same key across different business contexts, you can accidentally return the wrong stored result.
A good key design includes:
- The business entity identifier (order, case, invoice)
- The action name (submit, approve, cancel)
- The workflow instance or version if the semantics change
Finally, ensure the stored outcome is consistent with the tool’s observable behavior. If the tool returns success but fails to persist the outcome record, retries can duplicate side effects. Treat the outcome record as part of the commit.
Practical Checklist for Tool Authors
- Side effect tools require an idempotency key.
- The tool stores and replays the outcome for duplicate keys.
- Retries are driven by failure classification.
- Backoff and jitter are used for transient errors.
- Read and plan tools remain side-effect free.
- Key scope matches the business meaning of the action.
With these rules, retries become a safety net rather than a duplication machine, and multiagent workflows stay calm even when networks do not.
5.5 Practical Example: Constructing a Tool Chain for Document Processing
A document-processing workflow usually has three jobs: extract facts, normalize them into a consistent structure, and take actions based on that structure. In this example, a multiagent team processes incoming invoices and routes them for approval, while keeping tool calls safe, repeatable, and auditable.
Workflow Overview
Start with an input document (PDF or scanned image). The workflow should:
- Identify document type and key pages.
- Extract text and tables.
- Normalize fields into a schema.
- Validate totals and required fields.
- Write results to a case record and notify the right approver.
To keep the system understandable, each step maps to a tool with clear inputs and outputs. The orchestrator controls sequencing; specialized agents focus on extraction, validation, and routing.
Mind Map: Tool Chain Components
Step 1: Document Intake and Type Detection
The orchestrator receives a file and assigns an idempotency key like tenant:source:sha256. It then calls a lightweight classifier tool that returns document_type (invoice, receipt, credit note) and confidence. If confidence is below a threshold, the workflow routes to a clarification step that requests a human label or re-runs with a different extraction mode.
Example tool output:
document_type: invoiceconfidence: 0.82page_hints: [0,1]
This hinting matters because OCR is expensive; you only OCR the pages that likely contain totals and line items.
Step 2: Text and Table Extraction
Use two extraction tools rather than one “do everything” tool. That separation makes failures easier to diagnose.
- For PDFs with embedded text, call
pdf_text_extract(document, page_range). - For scanned documents, call
ocr_extract(document, page_range, language_hints). - For line items, call
table_extract(document, page_range, table_regions).
A practical rule: treat extraction outputs as raw evidence. Store them as artifacts with provenance (which tool, which page range, and a hash of the extracted content). If validation later fails, you can re-run only the failing stage.
Step 3: Field Normalization into a Schema
Normalization turns messy extraction into a consistent structure. Define a schema such as:
vendor_nameinvoice_numberinvoice_datecurrencysubtotaltax_totalgrand_totalline_items[]withdescription,quantity,unit_price,line_total
A field-mapper tool takes raw evidence and produces candidate fields with confidence scores. Then a normalizer tool standardizes dates and currency formats.
Example mapping behavior:
- If the extracted date is
03/04/2025, the normalizer uses tenant locale rules to interpret it as March 4, 2025. - If currency symbols conflict with a currency code, the normalizer prefers the explicit code.
Step 4: Validation with Guardrails
Validation should be strict where it’s cheap and cautious where it’s uncertain.
- Schema validation: required fields must exist and types must match.
- Totals checker: verify
subtotal + tax_total == grand_totalwithin a tolerance. - Line-item consistency: sum of
line_totalshould matchsubtotalwithin tolerance.
When validation fails, do not immediately “give up.” Instead, create a structured error report that points to the likely cause:
- missing invoice number
- OCR misread totals
- table extraction split columns incorrectly
The orchestrator can then re-run only the affected extraction mode (for example, OCR with a different threshold) and compare the new evidence against the old one.
Step 5: Action Tools for Routing and Record Writing
Once validation passes, write a case record and route for approval.
case_record_write(idempotency_key, normalized_invoice, evidence_refs)approval_router(normalized_invoice, policy_rules)notification_send(approver_contact, case_id)
Idempotency is crucial here. If the workflow retries after a timeout, case_record_write must not create duplicate cases. Use the idempotency key as the primary guard.
Mind Map: Data Flow and Failure Handling
Concrete Example Run
Assume an uploaded scanned invoice arrives on 2026-03-05. The classifier returns invoice with confidence 0.78 and hints pages 0–1. The workflow OCRs those pages, extracts a table region for line items, and maps fields into the schema. Validation checks totals and finds a mismatch beyond tolerance. The orchestrator re-runs table extraction with adjusted region detection, then re-validates. The second pass matches totals, so the workflow writes a single case record, routes it to the approver based on vendor and amount, and sends a notification.
The result is a tool chain that is modular, testable, and explainable: each tool produces evidence, normalization produces structured fields, validation decides, and action tools perform the irreversible parts exactly once.
6. Continuous Decision Execution and State Management
6.1 Defining Decision Points and Trigger Conditions
Decision points are the moments where the workflow must choose a path, not just continue executing. Trigger conditions are the concrete signals that tell the system when to evaluate those choices. If you get either wrong, you get either needless re-planning or missed actions.
Decision Points as Explicit Branches
A decision point should have four properties: a name, the question being answered, the inputs used to answer it, and the outputs produced by the choice. Treat each decision like a small contract.
For example, in an enterprise approval workflow, a decision point might be: “Should this request be auto-approved?” Inputs could include amount, customer tier, and risk flags. Outputs could be “approve now” or “route to human review,” plus any required audit fields.
A practical rule: if you cannot write the decision question in one sentence, you probably have multiple decisions hiding in one step.
Trigger Conditions as Measurable Events
Triggers should be tied to observable events or state changes. Common trigger sources include:
- A tool result arrives (for example, “invoice validation succeeded”).
- A timer fires (for example, “SLA window reached”).
- A state transition occurs (for example, “case moved to underwriting”).
- A human action completes (for example, “reviewer approved”).
Avoid vague triggers like “when ready.” Instead, define readiness as a specific state and a specific set of required fields.
Mind Map: Decision Points and Triggers
Designing Triggers That Don’t Flap
A trigger that fires repeatedly for the same underlying situation causes “flapping,” where the workflow keeps re-evaluating without progress. To prevent this, include a gating mechanism.
Gating can be as simple as a “decision evaluated” flag keyed by the workflow instance and the decision name. Another approach is to require a monotonic condition, such as “validation_version >= required_version.” If the condition cannot become true twice for the same version, the decision won’t churn.
Inputs: What the Decision Is Allowed to Use
Inputs should be limited to what is necessary and available at trigger time. If you allow the decision to depend on data that arrives later, you create a race condition.
A good pattern is to separate “data collection steps” from “decision steps.” Data collection tools populate a structured state object. Decision steps read only from that object and produce a small, auditable outcome.
Outputs: Make the Choice Actionable
Outputs should do more than label a branch. They should specify:
- The next step identifier.
- Any required tool calls.
- Any required human tasks.
- Any audit fields to record.
This keeps the workflow engine from having to infer what the decision meant.
Example: Procurement Approval Routing
Decision point: “Route procurement request.”
Question: “Does this request meet auto-approval criteria?”
Inputs:
amount_usdvendor_risk_scorerequested_by_departmentrequired_documents_present(boolean)
Trigger conditions:
- Tool result event:
documents_checked=true. - State transition event:
stage=prepared.
Gating: evaluate only once per request_id and documents_version.
Outputs:
- If criteria met:
next_step=auto_approve, recordapproval_mode=auto. - If criteria not met:
next_step=human_review, recordapproval_mode=manualandreason_codes.
Notice what’s missing: there is no trigger like “after reasoning.” The workflow waits for a concrete event that indicates the inputs are complete.
Example: Continuous Re-evaluation Without Infinite Loops
In SLA compliance monitoring, you may need to re-check a decision when new evidence arrives. Use triggers that represent evidence updates.
Decision point: “Is the case still within SLA?”
Trigger conditions:
- Event:
status_updated. - Event:
new_work_log_added. - Timer:
sla_check_interval.
Gating: if the computed sla_deadline and current_status are unchanged since the last evaluation, skip the decision.
This makes re-evaluation purposeful: it runs when something that affects the outcome changes.
Implementation Checklist for Decision Points
- Write the decision question in one sentence.
- List required inputs and ensure they are produced before the trigger fires.
- Define triggers as events, timers, or state transitions.
- Add gating to prevent flapping.
- Make outputs specify the next step and required audit fields.
- Ensure each decision step is side-effect free unless it is the chosen action step.
When these pieces line up, decision execution becomes predictable: the workflow evaluates choices only when the evidence is ready, and each choice leads to an explicit, testable next action.
6.2 State Representation for Long Running Workflows
Long running workflows need a memory that survives time, failures, and partial progress. In multiagent workflow engineering, “state” is the durable record that answers three questions: What are we doing now? What have we already done? What must be true before we can safely do the next step?
Core State Concepts
A good state model separates concerns so agents don’t step on each other.
- Workflow status tracks lifecycle:
pending,running,waiting,completed,failed,cancelled. - Plan progress records which steps are complete, which are active, and which are blocked.
- Data artifacts store intermediate results needed for later steps, such as extracted fields, generated drafts, or tool outputs.
- Decision history captures why a branch was taken, including the inputs used for the decision.
- External references store identifiers for systems outside the workflow, like ticket IDs, document IDs, or invoice numbers.
A practical rule: if losing the information would force rework, it belongs in state.
State Granularity and Boundaries
State should be detailed enough to resume without guessing, but not so detailed that it becomes unmanageable.
- Store step-level outcomes instead of raw agent reasoning. Keep the “result and evidence,” not every internal thought.
- Store inputs used for decisions so later validation can be deterministic.
- Store tool call metadata such as request IDs, timestamps, and idempotency keys, so retries don’t duplicate side effects.
When in doubt, prefer storing structured outputs and identifiers over large text blobs. If you must store text, store it as a versioned artifact with a content hash.
State Schema Pattern
Use a schema that supports resumption and validation. A common pattern is a top-level workflow object plus step records.
{
  "workflowId": "wf-1042",
  "status": "waiting",
  "version": "1.3",
  "currentStep": "triage_case",
  "plan": {"steps": ["triage_case","request_docs","review","approve"]},
  "stepResults": {
    "triage_case": {
      "status": "done",
      "output": {"category": "refund"},
      "evidence": {"ticketId": "T-991"},
      "decisionInputsHash": "sha256:..."
    }
  },
  "artifacts": {
    "docsRequest": {"artifactId": "a-77", "hash": "sha256:..."}
  },
  "externalRefs": {"crmCaseId": "C-2201"},
  "audit": [{"at": "2026-03-05T10:12:00Z","event": "tool_call"}]
}
This structure makes it easy to answer: which step is next, what data exists, and whether the next step’s preconditions are satisfied.
Mind Map: State Representation Components
Resumption Semantics and Preconditions
State is only useful if the workflow engine can interpret it consistently.
- Resumption rule: when restarting, the engine loads state and executes only steps whose preconditions are met and whose status is not
done. - Precondition rule: each step declares what it needs, such as required artifacts or external IDs.
- Idempotency rule: tool calls that create or modify external resources must use idempotency keys stored in state.
Example: a “request documents” step might call a ticketing system to create a document request. If the workflow crashes after the tool call returns but before state is updated, the retry should reuse the same idempotency key so the ticketing system returns the existing request rather than creating a duplicate.
Example: SLA Monitoring Workflow State
Consider a workflow that monitors an SLA and escalates when a deadline is near.
- After each check, it stores
currentDeadline,lastCheckedAt, andnextEscalationAt. - When an escalation is triggered, it records
escalationSentAtand theescalationTicketId. - If the workflow resumes later, it compares
nextEscalationAtwith the current time and usesescalationSentAtto avoid sending the same escalation twice.
This approach keeps the workflow from redoing work while still allowing accurate, stepwise continuation.
Validation and Consistency Checks
Before executing the next step, validate state integrity.
- Confirm that required artifacts exist and match expected hashes when available.
- Ensure step transitions are legal, such as not moving from
waitingtoapprovewithoutreviewmarkeddone. - Verify external references are present for steps that depend on them.
These checks turn state from a passive log into an active contract between the workflow engine and the agents.
6.3 Event Driven Updates and Step Re-evaluation
Event-driven updates keep a long-running workflow from treating the world as static. Instead of waiting for the next scheduled checkpoint, the orchestrator reacts when something relevant changes, then re-evaluates only the steps that depend on that change.
Core Idea: Events Trigger Targeted Re-evaluation
An event is a structured fact about the environment, such as “invoice received,” “customer address updated,” or “tool call failed due to permission.” Each event is mapped to one or more workflow variables. Step re-evaluation means re-checking the step’s preconditions and decision logic using the latest variable values.
A practical rule: re-evaluate the smallest safe set of steps. If an event only affects vendor selection, there is no reason to re-run the document formatting step.
Event Types and Their Payloads
Use a small set of event categories so handlers stay predictable.
- Data events: new or changed business data (e.g., updated policy status).
- Tool outcome events: tool succeeded, returned partial results, or failed.
- External system events: webhooks from ERP, ticketing, or identity providers.
- Workflow control events: manual overrides, approvals granted, or cancellations.
Each event should carry:
- eventId for deduplication
- timestamp for ordering
- entityId for correlation (caseId, orderId)
- changedFields or a clear variable mapping
- payload with the minimum data needed for re-evaluation
Orchestrator Loop: From Event to Step Decisions
The orchestrator maintains a workflow state store and a dependency map from variables to steps. When an event arrives, it:
- Deduplicates by eventId.
- Updates the state store variables.
- Finds affected steps via the dependency map.
- Re-runs each affected step’s guard conditions and decision rules.
- Schedules new tool calls or transitions, while leaving unaffected steps alone.
This loop prevents “reasoning drift,” where the workflow continues with assumptions that are no longer true.
Mind Map: Event Driven Re-evaluation Flow
Step Re-evaluation Mechanics
Each step should have explicit preconditions and decision outputs.
- Preconditions answer: “Should this step run now?”
- Example: “Run credit check only if customerId exists and riskScore is unset.”
- Decision outputs answer: “What should happen next?”
- Example: “If riskScore < threshold, proceed; otherwise request approval.”
When re-evaluating, do not overwrite completed work blindly. If a step already produced a final artifact, re-evaluation should either:
- confirm it is still valid under new variables, or
- mark it as superseded and schedule a corrective path.
Example: Procurement Workflow with a Permission Change
Consider a procurement workflow with steps:
- Step A: fetch vendor profile
- Step B: request quote
- Step C: validate quote totals
- Step D: create purchase order
An event arrives: “tool permission updated” for the quote service. The dependency map links “quoteServicePermission” to Step B and Step D.
- The orchestrator updates
quoteServicePermission. - It re-evaluates Step B preconditions.
- If permission is now granted, Step B transitions from “blocked” to “ready,” and the quote request is scheduled.
- It re-evaluates Step D preconditions.
- If Step C is still valid, Step D can proceed without re-fetching vendor data.
If Step B previously failed with “403,” the re-evaluation should not reuse the old failure result as a permanent outcome. Instead, it should clear the blocked status and attempt again with the same inputs, assuming the action is idempotent.
Mind Map: Dependency Mapping for Targeted Re-evaluation
Safety Controls That Make Re-evaluation Practical
Event-driven systems fail when they repeat side effects or lose ordering. Use these controls:
- Idempotency keys for tool calls that create external records.
- Retry boundaries that stop repeated failures from flooding the system.
- Human approval gates that treat approval as a variable with clear ownership.
- Artifact validity checks so completed steps are reused only when still consistent.
Example: Handling Out-of-Order Events
Suppose you receive two events for the same case: “address updated” and “address verified.” If “verified” arrives first, the orchestrator should store it with a timestamp and re-evaluate once the “updated” event arrives. The step that depends on verification should only proceed when both the latest address and verification status align.
This is why timestamps and entity correlation matter: they let re-evaluation converge to a consistent state without guessing.
Summary
Event-driven updates turn workflow execution into a responsive loop: events update state, dependency mapping selects affected steps, and re-evaluation applies guard conditions and decision logic safely. The result is less waiting, fewer unnecessary repeats, and clearer correctness boundaries.
6.4 Consistency Guarantees Across Agent Interactions
Consistency guarantees answer a simple question: when multiple agents touch the same workflow state, how do we prevent “everyone is right” outcomes that still lead to wrong results? In enterprise workflows, the goal is not perfect simultaneity; it is predictable convergence.
Core Consistency Model
Start by choosing what “consistent” means for your workflow state. Most teams benefit from splitting state into three categories:
- Facts: stable information like customer ID, invoice number, or policy text. Facts should be treated as immutable once recorded.
- Decisions: outcomes like “approve” or “request more documents.” Decisions should be append-only with an explicit rationale.
- Plans: the current intended steps. Plans can change, but changes must be traceable to triggers.
A practical rule: facts are written once, decisions are written with versioning, and plans are rewritten only through a controlled transition.
State Ownership and Write Discipline
Consistency improves dramatically when you define ownership. Assign each state field to a single “writer agent” or orchestrator component.
- The orchestrator owns the workflow ledger (step status, retries, timestamps).
- A domain agent owns domain facts (e.g., extracted invoice fields).
- A policy agent owns decisions (e.g., approval rules and exceptions).
Other agents may read these fields freely, but only the owner can write them. This eliminates conflicting updates like two agents both “correcting” the same invoice total.
Versioning and Conflict Handling
Even with ownership, conflicts happen when new evidence arrives mid-run. Use versioning to make conflicts explicit.
- Each decision includes a state version it was based on.
- When new facts are recorded, the orchestrator increments the version.
- If a decision’s base version no longer matches, the orchestrator marks it stale and re-evaluates.
This approach is deterministic: the workflow either converges on a new decision or remains blocked until required facts arrive.
Idempotency for Tool Side Effects
Tool calls can create real-world side effects, so consistency must extend beyond internal state. Require tool interfaces to be idempotent or wrapped with idempotency keys.
A simple pattern is: every “write” tool call includes a unique key derived from workflow ID plus step ID. If the same call is retried, the tool returns the same result rather than duplicating actions.
Idempotency Key = hash(workflow_id + step_id + action_name)

On retry:
- If key exists, return stored result
- Else execute and store result
Mind Map: Consistency Guarantees
Validation Gates and Invariants
Consistency is not just about ordering; it is also about correctness of what gets written. Add validation gates before any state write:
- Schema validation ensures the data shape matches expectations.
- Invariant checks ensure relationships hold, such as
line_total_sum == invoice_total. - Policy prechecks confirm the decision agent has the required inputs.
If validation fails, the workflow records a structured error and routes to a clarification step rather than letting agents improvise.
Example: Procurement Approval with Mid-Run Evidence
Consider a procurement workflow where an agent extracts invoice totals, then a policy agent decides approval.
- The domain agent writes facts:
invoice_total=1200.00,currency=USD, and records extraction confidence. - The policy agent evaluates and writes a decision:
approve, based on state versionv3. - Later, a tool call retrieves a revised invoice attachment showing
invoice_total=1250.00. - The orchestrator increments the version to
v4and marks the prior decision stale. - The policy agent re-evaluates using the new facts and writes a new decision with base version
v4.
The key detail is that the workflow never silently “changes its mind.” It records why the decision changed and which facts caused the version bump.
Example: Preventing Duplicate Vendor Creation
A vendor onboarding workflow often includes a “create vendor” step. If the step times out, the orchestrator retries.
- The create tool is called with an idempotency key tied to the onboarding step.
- On retry, the tool returns the existing vendor ID.
- The ledger marks the step as complete without creating duplicates.
This keeps the workflow consistent even when execution is imperfect, which is the normal case in enterprise systems.
Practical Checklist for Consistency
- Define state categories and write discipline.
- Assign ownership for each state field.
- Use versioning to detect stale decisions.
- Require idempotency keys for write tools.
- Enforce validation gates and invariants.
- Log state transitions with step correlation IDs.
When these pieces are in place, agent interactions become a controlled conversation rather than a group project where everyone edits the same document and hopes for the best.
6.5 Practical Example: Implementing Continuous Review for SLA Compliance
A continuous review workflow keeps SLA compliance from becoming a last-minute surprise. The core idea is simple: treat SLA checks as recurring decision points, driven by events and time, and backed by explicit state.
Foundational Setup
Start by defining the SLA contract in operational terms. For each service, capture:
- SLA clock: what starts the timer (ticket created, request received, first agent action).
- SLA target: e.g., “resolve within 24 business hours.”
- Measurement rules: business hours calendar, time zone, and whether weekends count.
- Escalation thresholds: e.g., 80% time used triggers review; 95% triggers escalation.
Then represent workflow state in a durable store. At minimum, store:
sla_start_time,sla_deadline_timecurrent_status(e.g., triaged, investigating, waiting_on_customer, resolved)last_review_timeevidence(what data supports the current status)
Mind Map: Continuous Review Loop
The Review Decision Logic
A review run should be deterministic given the same inputs. Use a small set of checks:
- Recompute SLA time: calculate remaining business time from
sla_start_timeto now, using the same calendar rules used at creation. - Detect threshold crossing: compare remaining time against escalation thresholds.
- Validate status: confirm the workflow status matches evidence. Example: if status is
waiting_on_customer, evidence must include a sent request timestamp and a pending response identifier. - Select action:
- If below 80%: schedule a targeted plan update.
- If below 95%: escalate and require a human confirmation step.
- If evidence is missing: trigger an information-gathering step before any escalation.
A practical trick: separate “SLA risk” from “workflow correctness.” You can be at high SLA risk because time is short, but still avoid escalation if evidence shows the workflow is already on track.
Example Workflow: Ticket Resolution with Tool Chain
Assume a ticketing workflow with three agents:
- Triage Agent: classifies and sets initial status.
- Investigation Agent: gathers data via tools.
- SLA Review Agent: runs continuous checks and coordinates escalation.
When a ticket is created, the triage agent sets sla_start_time and sla_deadline_time. The SLA Review Agent then runs on two triggers: a 15-minute tick and any status change event.
Example: Evidence-Driven Status Validation
Suppose the Investigation Agent sets status to waiting_on_customer after sending a clarification request. The review agent verifies:
- a tool call logged the outgoing message
- the request identifier exists
- the last customer response time is null
If any of these are missing, the review agent does not escalate immediately. Instead, it requests the missing evidence or corrects the status using the ticket history.
Mind Map: Action Selection Rules
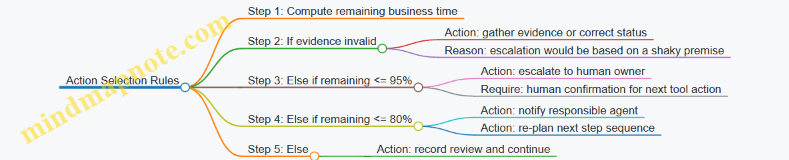
Implementation Sketch: Idempotent Review Runs
To avoid duplicate notifications, make each review run idempotent by storing a review_run_id and a last_review_time gate.
Inputs: ticket_id, now, sla_deadline_time, thresholds, state, evidence
If now - last_review_time < 10 minutes: exit
remaining = business_time_between(now, sla_deadline_time)
If evidence invalid:
  set action = "evidence_repair"
Else if remaining <= 0.05 * sla_total_time:
  set action = "escalate_human"
Else if remaining <= 0.20 * sla_total_time:
  set action = "notify_and_replan"
Else:
  set action = "record_only"
Write review record with computed remaining and chosen action
Update last_review_time
Practical Example Run on 2026-03-05
On 2026-03-05 10:00, a ticket has 6 business hours remaining. Evidence is valid and status is investigating.
- At 10:00, remaining is 6 hours, above the 80% threshold, so the review agent records the check and does nothing else.
- At 13:30, remaining drops to 2 hours, crossing the 80% threshold. The review agent notifies the Investigation Agent and requests a plan update that prioritizes the next tool call.
- At 15:45, remaining is 30 minutes, crossing the 95% threshold. The review agent escalates to the human owner and requires confirmation before executing any action that could delay resolution.
The result is continuous, evidence-aware SLA governance: time pressure triggers review, but escalation only happens when the workflow state is both current and supportable.
7. Memory, Context, and Knowledge Integration
7.1 Context Scoping for Agent Prompts and Tool Calls
Context scoping is the practice of deciding what information an agent is allowed to see at each step, and how that information is packaged for prompts and tool calls. Done well, it reduces hallucinated assumptions, keeps tool inputs consistent, and makes long workflows easier to debug.
Core Idea: Separate “What the Agent Knows” From “What the Tools Need”
An agent prompt usually needs reasoning context and constraints. A tool call needs structured inputs that match the tool’s contract. Treat these as different audiences. If you mix them, you either overexpose sensitive data in prompts or underprovide required fields to tools.
A practical rule: include in the prompt only what the agent must use to choose the next action, and include in the tool call only what the tool must execute the action.
Step 1: Inventory Context Sources
Start by listing every possible context source used in the workflow:
- User request and preferences
- Workflow state and prior decisions
- Retrieved documents or extracted facts
- System policies and compliance constraints
- Tool outputs and intermediate artifacts
For each source, record two things: (1) purpose, meaning what decision it supports, and (2) scope, meaning which steps actually need it. This prevents the common failure mode where “everything so far” gets pasted into every prompt.
Step 2: Define Scopes with Explicit Boundaries
Use a small set of scopes so the team can apply them consistently:
- Step Scope: facts required to perform the current step
- Decision Scope: facts required to justify the next choice
- Tool Scope: fields required by a specific tool schema
- Audit Scope: evidence needed to explain outcomes later
When a fact is only useful for audit, keep it out of the prompt and store it for logging. When a field is only required by a tool, pass it as a structured argument rather than embedding it in prose.
Step 3: Build a Context Budget
Context budget is the maximum amount of information you allow per prompt and per tool call. The budget is not just about length; it’s about cognitive load and error surface.
A simple budget strategy:
- Prompt: include the last relevant state summary plus the minimal constraints
- Tool call: include only required parameters and validated identifiers
- Exclusions: omit raw documents when a summarized, cited extraction is sufficient
If you must include a longer artifact, prefer a structured summary with provenance fields over a verbatim dump.
Mind Map: Context Scoping Workflow
Step 4: Package Context for Prompts and Tool Calls
For prompts, use consistent sections so the agent can reliably find constraints and facts. For tool calls, use structured arguments that match the tool’s schema.
Example prompt packaging for a “create invoice” step:
- Constraints: payment terms, currency, approval threshold
- Decision facts: customer ID, invoice line items summary, tax rule identifier
- Exclusions: raw emails and full contract text
Example tool call packaging:
- Required fields: customer_id, line_items, tax_rule_id, due_date
- Optional fields: memo, reference_ticket
- Provenance: ids pointing to the extracted facts used to populate fields
Step 5: Add Validation Gates
Validation gates stop bad context from becoming bad actions.
- Schema checks: tool call arguments must match expected types and required fields
- Consistency checks: ensure prompt-derived identifiers match tool-derived identifiers
- Redaction rules: remove secrets and personal data from prompts unless explicitly required for the step
A useful pattern is to run a “context-to-tool mapping” step that converts prompt facts into tool arguments, then validates them before execution.
Example: Triage with Minimal Context
Suppose a ticket triage workflow has three steps: classify, route, and request missing info.
- Classification step uses: ticket title, short description, and policy categories. It does not need the full conversation history.
- Routing step uses: classification label plus routing rules. It does not need the model’s free-form rationale.
- Missing-info step uses: only the specific fields that are absent, such as “billing account number,” plus the policy for what qualifies as acceptable evidence.
This keeps each prompt focused and each tool call precise. When the workflow fails, you expand context only for the failing step, not for every subsequent step.
Step 6: Provenance Without Overstuffing
Provenance means you track where each fact came from so you can audit decisions. Store provenance as compact identifiers (for example, extraction_id, document_id, or state_key) rather than embedding full text in every prompt.
When the agent needs to cite a fact, it can reference the stored provenance. When it doesn’t, you keep the prompt lean and the logs useful.
7.2 Retrieval Augmented Workflows for Enterprise Knowledge
Enterprise knowledge rarely lives in one place. It’s scattered across ticket histories, policy documents, runbooks, spreadsheets, and meeting notes—often with different formats, owners, and update rhythms. A retrieval augmented workflow makes that mess usable by separating three concerns: (1) what the workflow needs to decide, (2) where evidence can be found, and (3) how retrieved evidence is constrained and checked before it influences actions.
The Core Loop from Need to Evidence
Start with a decision point: “Should we approve this change?” or “Which policy applies to this request?” The workflow then performs a retrieval step that is explicitly tied to the decision’s required facts.
- Extract a retrieval query from the decision. Instead of searching with the whole user request, derive a compact query from the decision criteria. Example: for an approval decision, the query might include product name, region, and risk category.
- Retrieve candidate evidence. Use multiple retrieval strategies (keyword and semantic) to avoid missing documents that use different phrasing.
- Filter and rank with constraints. Apply rules like “only documents with an effective date after 2024-03-01” or “only sources owned by Compliance.”
- Assemble a bounded evidence package. Include only the top items that cover distinct aspects of the decision.
- Generate a decision draft with citations. The workflow should produce a decision rationale that references the evidence package.
- Validate before action. Run checks such as “no evidence contradicts the chosen policy” and “required fields are present.”
A practical rule: retrieval should be narrow enough to be checkable, but broad enough to handle synonyms and document style differences.
Knowledge Preparation That Makes Retrieval Reliable
Retrieval augmented workflows succeed or fail before any query is issued. Preparation turns raw documents into retrievable units.
- Chunk by meaning, not by length. Split documents into sections that correspond to policies, procedures, or decision rules. A 2-page chunk is often less useful than 6 smaller chunks that each answer a specific question.
- Attach metadata that supports filtering. Store fields like owner, document type, effective date, region, system name, and confidentiality level.
- Normalize text for search. Convert tables into structured text, preserve headings, and keep identifiers consistent (ticket IDs, policy IDs, product codes).
- Track provenance. Every retrieved chunk should carry a stable identifier so the workflow can cite it and auditors can reproduce the evidence set.
Mind Map: Retrieval Augmented Workflow Components
Example: Policy Check for a Change Request
Imagine a workflow that decides whether a change request can proceed without manual review. The decision criteria might be:
- Region is EMEA
- Change type is “data retention”
- Impacted system is “CRM”
- Risk category is “medium”
Retrieval query construction: the workflow builds a query from those criteria, not from the full narrative. It includes “EMEA data retention CRM medium risk” and the internal policy ID prefix if present.
Evidence retrieval and filtering: it retrieves candidate chunks from policy documents and runbooks. It filters out drafts not yet effective and excludes documents marked as restricted to certain roles.
Evidence package assembly: it selects chunks that cover (a) the definition of “data retention” in EMEA, (b) the approval thresholds for medium risk, and (c) any exceptions that mention CRM.
Validation: if the evidence package contains an exception clause that conflicts with the request’s stated scope, the workflow flags the decision as “needs clarification” rather than forcing a conclusion.
Outcome: the workflow produces a decision draft like “Proceed without manual review” only when the evidence package explicitly supports that threshold. Otherwise it requests missing details, such as whether the change affects backups or only active records.
Example: Retrieval for Ticket Triage with Contradiction Handling
For triage, the workflow often needs to map symptoms to known issues. A common failure mode is retrieving two documents that disagree because one is outdated.
To prevent that, the workflow can:
- Prefer evidence with the most recent effective date.
- Require that the evidence package includes at least one “current status” chunk.
- Run a contradiction check: if two chunks assert different outcomes for the same symptom under the same system version, the workflow marks the triage as uncertain and routes to a human queue.
This keeps the workflow honest: it doesn’t just retrieve more text, it retrieves the right kind of text and refuses to pretend when the evidence conflicts.
Practical Guardrails for Enterprise Retrieval
- Evidence must be sufficient, not merely present. If the decision needs three facts, retrieving documents that cover only one fact is a failure.
- Use metadata filters early. Filtering after ranking can waste effort and accidentally surface restricted content.
- Keep the evidence package small. A short, diverse set is easier to validate than a long list of loosely related chunks.
- Treat missing evidence as a first-class outcome. When retrieval can’t support a decision, the workflow should request targeted clarification rather than guessing.
Retrieval augmented workflows work best when retrieval is treated as a disciplined step in a decision pipeline, with evidence bounded, checkable, and tied directly to the decision’s acceptance criteria.
7.3 Caching Strategies for Repeated Decisions and Lookups
Caching helps multiagent workflows avoid redoing work that is identical in inputs and intent. In practice, it reduces tool load, shortens cycles, and stabilizes decisions when the same question appears multiple times during a run. The key is to cache the right thing, with the right scope, and to invalidate it when the world changes.
What to Cache and Why
Start by separating two categories:
- Lookup results: deterministic reads like “fetch customer profile” or “get policy text.” These are usually safe to cache for a bounded time.
- Decision outcomes: results of reasoning like “approve vendor onboarding” or “choose escalation path.” These are safe only when the decision inputs are stable and the decision logic is versioned.
A simple rule: cache lookups aggressively, cache decisions conservatively, and always attach enough metadata to know when a cache entry is still valid.
Cache Keys That Actually Match
A cache key should represent the full set of factors that affect the result. For tool lookups, include:
- Tool name and version
- Normalized input parameters
- Tenant or workspace identifier
- Authorization context that changes visibility
For decision outcomes, include everything above plus:
- The workflow step identifier
- The decision policy version
- Any retrieved evidence identifiers used to justify the decision
If you skip authorization context, you can accidentally serve a cached result to a different permission level. That’s not a performance bug; it’s a correctness bug.
Scope and Lifetime
Use three scopes:
- Run-local cache: valid only within a single workflow execution. It avoids cross-run staleness and is easy to reason about.
- Session cache: valid across multiple steps or related workflows for a short window.
- Shared cache: valid across many runs. It requires stronger invalidation rules and careful key design.
For enterprise workflows, run-local caching is the default. Shared caching is for stable reference data like taxonomies, static policy documents, or rarely changing configuration.
Invalidation and Consistency
Caching without invalidation turns “faster” into “wrong.” Choose one of these strategies:
- Time-to-live: attach an expiry to entries. Works well for reads where slight staleness is acceptable.
- Versioned data: include a data version or ETag-like marker in the key. Works well when systems expose change counters.
- Event-driven purge: invalidate when a write occurs. Works well when your workflow already knows what it changed.
When a workflow performs a write, invalidate any cached lookups that could be affected. For example, after updating a vendor record, purge cached “vendor status” lookups for that vendor ID.
Mind Map: Caching Strategy for Multiagent Workflows
Example: Caching Policy Lookups and Approval Decisions
Imagine a workflow step that checks whether a vendor qualifies under a compliance policy. The workflow often evaluates the same policy text multiple times while different agents discuss missing documents.
-
Cache the policy text lookup
- Tool:
policy.getText - Key:
tenantId + policyId + policyVersion - Scope: run-local with optional session TTL
- Invalidation: purge when a policy update write occurs, or rely on policyVersion in the key.
- Tool:
-
Cache the decision outcome
- Decision:
vendorQualifies - Key:
tenantId + vendorId + policyId + policyVersion + policyRuleSetVersion + evidenceHash - EvidenceHash is derived from the identifiers of retrieved documents and their extracted fields.
- Scope: run-local first. If you later expand scope, keep the policyRuleSetVersion in the key to prevent old logic from reappearing.
- Decision:
If the workflow later retrieves a new document that changes evidenceHash, the decision cache misses and the workflow recomputes. That’s the behavior you want: caching speeds up repetition, not stubbornness.
Example: Caching Intermediate Lookups During Triage
In case triage, agents often ask for the same customer account details while deciding next actions. Cache the account lookup once per run:
- Key includes
accountId,tenantId, and the caller’s permission level. - The triage agent can reuse the cached profile for multiple subtasks like “verify billing status” and “determine escalation channel.”
If the triage workflow updates the account status, purge the cached entry for that accountId immediately after the write.
Practical Guardrails
Before returning cached content, validate it against the expected schema and required fields. If validation fails, treat it as a cache miss and recompute. This prevents subtle breakage when tool outputs evolve or when partial data was stored due to an earlier failure.
Finally, keep cached payloads small. Store the minimum fields needed for the next step, not the entire tool response. Smaller entries reduce memory pressure and make it easier to reason about what a cached result actually represents.
7.4 Provenance Tracking for Retrieved and Generated Content
Provenance tracking answers a simple operational question: “Where did this text or data come from, and what happened to it on the way here?” In enterprise workflows, that question matters for audits, debugging, and safe reuse. It also prevents a common failure mode: treating a blended output as if it were a single, original source.
What Provenance Means in Practice
Provenance is a structured record attached to each retrieved artifact and each generated artifact. For retrieved content, provenance captures the retrieval query, the document identifiers, the snippet boundaries, and the retrieval time. For generated content, provenance captures the input artifacts used, the transformation steps applied, and the model or rule set that produced the output.
A useful mental model is a chain of custody. Each link in the chain should be explicit enough to reproduce the reasoning path, even if you cannot reproduce the exact wording.
Provenance Data Model
A minimal provenance record has four fields: artifact_id, type, inputs, and evidence. type distinguishes retrieved vs generated. inputs lists upstream artifact IDs. evidence stores the concrete facts needed to justify the content.
For retrieved artifacts, evidence includes source_system, document_id, retrieval_method, and span (start and end offsets or a snippet label). For generated artifacts, evidence includes generation_step, prompt_template_id, and output_constraints (for example, “must cite evidence spans” or “must preserve numeric values”).
Mind Map: Provenance Components
Retrieval Provenance: Capturing the “Why This Snippet” Story
When you retrieve content, store the retrieval context alongside the snippet. Suppose a policy check workflow pulls a paragraph about expense reimbursements. The provenance should record the query that triggered the match, the document ID, and the span that was extracted. If later the workflow cites that paragraph, the provenance lets you verify that the cited span still matches the stored text.
A practical best practice is to store the snippet exactly as used, not only the document and offsets. Offsets can drift if the source text changes, but the snippet you actually fed to the generator remains the same.
Generation Provenance: Capturing the “What Changed” Story
Generated content should carry provenance that points back to the retrieved artifacts it used. If the generator summarizes a section, record which retrieved spans were summarized and whether the summary was constrained to preserve specific fields.
For example, a generated “eligibility decision” might include a boolean outcome and a short justification. Provenance should include the inputs used to compute the boolean, not just the final justification text. That way, if the boolean is wrong, you can trace the exact evidence spans that influenced it.
Linkage Graph and Versioning
Provenance is most useful when it forms a graph rather than a flat log. Each artifact node links to its inputs. When you rerun retrieval with a different query or rerun generation with a different prompt template, create new artifact IDs instead of overwriting old ones.
Versioning prevents a subtle bug: mixing evidence from one run with output from another. A good rule is “new run, new artifact IDs, new provenance records,” even if the final text looks similar.
Validation Checks That Keep Provenance Honest
Provenance is only as good as its consistency. Add checks that verify the record matches the content.
- Citation coverage: if the output claims support from retrieved text, ensure the provenance includes the cited spans.
- Numeric preservation: if the output includes amounts, verify those values originate from retrieved fields rather than being reinterpreted.
- Schema validation: ensure provenance records conform to the expected structure so downstream tools can rely on them.
Example: Expense Policy Decision with Traceable Evidence
Imagine a workflow that decides whether an expense is reimbursable.
- Retrieved artifact
R1: snippet from policy documentDOC-EXP-2024about “meal reimbursement limits,” spanS12-S18. - Retrieved artifact
R2: snippet about “exceptions for client meetings,” spanS40-S55. - Generated artifact
G1: decision text and outcome.
Provenance for G1 lists inputs [R1, R2] and includes a generation step record stating that the decision was produced by a prompt template requiring explicit mention of the applicable limit and exception rule. If an auditor asks why the decision was “approved,” the provenance graph points directly to the exact spans used.
Mind Map: Provenance Validation

Operational Takeaway
Treat provenance as a first-class artifact, not an afterthought. When retrieval and generation both produce structured records, you get reliable traceability, faster debugging, and fewer “how did we get here?” moments—without slowing the workflow down more than necessary.
7.5 Practical Example: Building a Knowledge Aware Workflow for Policy Checks
A policy check workflow becomes reliable when it treats knowledge as a first-class input: what policy applies, what facts are known, and what evidence supports the decision. This example shows a complete, knowledge-aware flow for approving a vendor access request in an enterprise system.
Define the Policy Check Goal
Start with a crisp outcome: “Approve or deny vendor access based on policy rules and required evidence.” Then specify what counts as a pass. For instance:
- Approval requires a valid business justification.
- Denial occurs if the request violates a restricted category rule.
- Missing evidence triggers a “request more info” outcome.
This goal prevents the workflow from turning into a generic “read policies and guess” routine.
Model Knowledge Inputs and Evidence
Knowledge comes from three places:
- Policy corpus: rule text, exceptions, and definitions.
- Request facts: vendor category, region, system scope, and requested access level.
- Evidence artifacts: uploaded documents, ticket history, and prior approvals.
A practical rule: every decision must cite at least one evidence item or an explicit “not provided” reason.
Build the Workflow Steps with Clear State
Use a state machine mindset. Each step either produces an artifact or updates the decision state.
Step A: Normalize Request Facts
- Convert raw fields into canonical values (e.g., “EMEA” → “Europe, Middle East, and Africa”).
- Flag unknowns as
missingrather than leaving them blank.
Step B: Retrieve Relevant Policies
- Query by category, region, and access level.
- Filter results by effective date and applicability scope.
If your policy set changes, effective-date filtering is the difference between “correct” and “confidently wrong.”
Step C: Extract Rule Conditions and Exceptions
- Convert policy text into structured checks: condition, operator, expected value, and required evidence.
- Record exceptions as separate branches so they can override base rules.
Step D: Validate Evidence Coverage
- For each required evidence item, check presence and basic integrity (file type, completeness markers, or required fields).
- If evidence is missing, stop and request it.
Step E: Execute Policy Checks
- Evaluate conditions in order: exceptions first, then base rules.
- Produce a decision record containing: outcome, matched rule IDs, and evidence IDs.
Step F: Generate Human-Readable Summary
- Summarize the decision using the same rule IDs and evidence IDs.
- Keep it short enough to be reviewed in under a minute.
Mind Map: Knowledge Aware Policy Check
Knowledge Aware Policy Check Mind Map
Concrete Example Run
Assume the request states:
- Vendor category: “Third-Party Analytics”
- Region: “Europe, Middle East, and Africa”
- Access level: “Read”
- Evidence: justification provided, but no data handling attestation
Policy retrieval returns two policies: one base rule requiring attestation for “Read” access in this category, and one exception that waives attestation only when the vendor is already approved for the same system scope.
Exception check fails because prior approval for the specific system scope is not present.
Evidence coverage then detects the missing attestation and triggers “Request More Info.” The decision record includes:
- Outcome: Request More Info
- Matched rule IDs:
POL-DA-114(base),POL-DA-114-EX-02(exception evaluated, not satisfied) - Evidence IDs: justification present, attestation missing
The summary to the reviewer reads like a checklist, not a mystery novel.
Minimal Implementation Sketch
Below is a compact representation of the decision record you would store for audit and review.
{
  "requestId": "VR-48219",
  "outcome": "REQUEST_MORE_INFO",
  "matchedRules": ["POL-DA-114"],
  "exceptionEvaluations": [
    {"ruleId": "POL-DA-114-EX-02", "satisfied": false}
  ],
  "evidence": {
    "justification": {"status": "PRESENT", "evidenceId": "EV-991"},
    "dataHandlingAttestation": {"status": "MISSING"}
  },
  "missingItems": ["dataHandlingAttestation"],
  "reviewSummary": "Attestation is required for Read access in this category. Exception did not apply because prior approval for the specific system scope was not found."
}
This structure keeps the workflow explainable: the reviewer can see exactly which rule demanded which evidence, and the system can enforce the same logic next time.
8. Communication Protocols and Message Contracts
8.1 Message Types for Requests, Results, and Clarifications
Multiagent workflows stay sane when every handoff has a clear message shape. In practice, you want three core message types—requests, results, and clarifications—plus a few supporting fields that make routing and validation straightforward.
Message Types Overview
Requests ask for work. They include what the agent should do, what inputs it may use, and how to report completion. A good request message is specific enough that the receiving agent can start without guessing.
Results report completed work. They include the output payload, evidence or provenance where needed, and a status that distinguishes success from partial success.
Clarifications ask questions when inputs are missing or ambiguous. They prevent silent failure by turning uncertainty into explicit, bounded questions.
A useful rule: if the receiver can proceed without new information, it should send a result; if it cannot, it should send a clarification.
Request Messages
A request message should carry five categories of information.
- Intent: the action the receiver should perform, such as
draft_invoice_emailorcheck_policy_compliance. - Scope: what the receiver is allowed to use and change, such as “read-only access to CRM fields” or “may create a ticket but not send it.”
- Inputs: structured data and references, not just text. If you pass an ID, also pass the minimum fields needed to avoid extra lookups.
- Constraints: rules like formatting requirements, maximum length, or compliance checks.
- Response Contract: what the sender expects back, including required fields and acceptable status values.
Example request fields in plain language:
- Intent: “Summarize the last three support tickets for account 4A12.”
- Scope: “Read CRM and ticket system only.”
- Inputs: “Account ID plus ticket IDs if available.”
- Constraints: “Return bullet points with dates.”
- Response Contract: “Send
summary,sources, andstatus.”
Result Messages
Result messages should be consistent even when things go wrong. Include:
- Status:
success,partial, orfailed. - Output Payload: the main data, structured for downstream steps.
- Evidence: what the agent used, such as tool call IDs, retrieved document IDs, or computed checks.
- Assumptions: only when assumptions were necessary; otherwise omit.
- Next Step Hint: what the workflow should do next, such as “proceed to approval” or “request missing fields.”
A practical pattern is to separate “what happened” from “what to do next.” Status answers the first question; the next-step hint answers the second.
Clarification Messages
Clarifications are not excuses; they are targeted questions. A clarification message should include:
- Question Set: a short list of specific items the receiver needs.
- Why It Matters: one sentence per question explaining the impact.
- Proposed Options: if possible, offer acceptable choices rather than open-ended prompts.
- Deadline for Response: a workflow-level timeout so the orchestrator can decide.
- Fallback Behavior: what to do if the sender cannot answer.
For example, if a policy check requires a customer region but the request only includes a billing country, the clarification should ask for the missing region definition and indicate how to proceed if it is unavailable.
Mind Map: Message Types for Requests, Results, and Clarifications
Integrated Example: Ticket Triage Handoff
Consider a three-step workflow: intake, classification, and action selection.
-
Orchestrator sends a request to the classifier:
- Intent: classify severity and category.
- Inputs: ticket text and customer plan.
- Constraints: output must include
severity,category, andconfidence_band. - Response contract:
statusmust be one ofsuccess|partial|failed.
-
Classifier sends a result:
- Status:
partialif the text lacks reproduction steps. - Output payload: severity and category anyway.
- Evidence: tool call IDs for any lookups.
- Next step hint: request clarification from the intake agent.
- Status:
-
Orchestrator sends a clarification request:
- Question set: “Do you have steps to reproduce? If yes, provide them; if no, confirm whether logs are available.”
- Why it matters: “Reproduction steps determine whether engineering can act immediately.”
- Proposed options: two short choices.
- Deadline: “If no answer within 2 business days, escalate to manual review.”
This flow avoids the common failure mode where the classifier “guesses” and the orchestrator later discovers the guess was unhelpful.
Validation and Routing Notes
To keep messages reliable, validate at two points: before dispatch (request completeness) and after receipt (result schema and status handling). If a message fails validation, treat it as a clarification opportunity rather than a silent drop. That small discipline is what turns message passing into an engineering system instead of a conversation that sometimes works.
8.2 Message Contracts for Structured Interoperability
Structured interoperability is what lets multiple agents, tools, and workflow steps exchange information without guessing. A message contract is the agreed shape of that information: what fields exist, what types they have, which values are allowed, and how errors are represented. When contracts are explicit, you can validate messages early, route them correctly, and recover predictably when something goes wrong.
Core Idea of a Message Contract
A message contract has four layers. First is the envelope, which identifies the sender, receiver, correlation id, and message kind. Second is the payload schema, which defines the business data. Third is the semantics, which explain how to interpret the payload fields. Fourth is the lifecycle rules, which specify what “success” and “failure” mean and how retries should behave.
A practical rule: if two components cannot be tested with the same sample messages, they do not have a contract yet.
Message Kinds and Envelope Fields
Start by defining a small set of message kinds. Common ones are Request, Result, Clarification, and Error. Each kind should have a consistent envelope so routing logic stays simple.
Envelope fields that usually pay off quickly:
messageKind: one of Request, Result, Clarification, ErrorcorrelationId: ties a chain of messages to one workflow instancesender: agent or service namereceiver: agent or service nametimestamp: when the message was createdschemaVersion: contract version for compatibility
Example: a ticket triage agent sends a Request to a policy-check tool with the same correlation id it will use when it later sends a Result back to the orchestrator.
Payload Schemas That Stay Understandable
Payload schemas should be narrow and composable. Prefer explicit fields over free-form text. For enterprise tasks, include:
- Identifiers:
ticketId,customerId,region - Inputs:
documentTextordocumentRef - Decisions:
decisionwith a controlled set of values - Evidence:
citationsorevidenceRefs
When a payload includes large text, send a reference plus a checksum rather than the entire blob. That keeps messages small and makes validation cheaper.
Semantics and Controlled Vocabularies
Semantics are where contracts become useful. Define allowed values for decision fields and status fields. For example, a policy tool might return decision values like approve, reject, or needsReview. If you allow arbitrary strings, downstream agents will invent their own interpretations.
Also define meaning for empty fields. If evidenceRefs is empty, say whether that means “no evidence required” or “evidence missing.” Ambiguity here causes silent failures.
Error Contracts and Recovery Instructions
Errors should be structured, not poetic. A good Error payload includes:
errorCode: stable identifier likeAUTH_FAILED,TOOL_TIMEOUT,VALIDATION_ERRORmessage: human-readable summarydetails: field-level issues when relevantretryable: booleanrecovery: optional instructions such as “request missing field X”
Recovery instructions should be machine-actionable. If the error is VALIDATION_ERROR, include which fields failed so the orchestrator can trigger a Clarification step.
Versioning Without Breaking Everything
Use schemaVersion in the envelope and keep backward compatibility rules explicit. A common approach is:
- Minor changes add optional fields
- Major changes rename fields or change allowed values
Downstream components should be able to ignore unknown optional fields. That keeps older agents from failing when newer tools add extra context.
Mind Map: Contract Design
Example Contract for a Tool Handoff
Consider a workflow where an agent asks a document tool to extract policy-relevant facts.
Request payload fields:
documentRef:{ uri, checksum }taskContext:{ jurisdiction, policyArea }extractionGoal: a short, controlled string
Result payload fields:
facts: array of{ claim, confidence, evidenceRefs }decisionHint: optional controlled valueapprove|reject|needsReview
Error payload fields:
errorCoderetryablerecovery: eitherrequest_document_againorask_for_missing_context
This contract lets the orchestrator validate the response before passing it to the next agent. If facts is missing, it is not “mostly fine”; it is a contract violation that triggers a Clarification message.
Example Message Flow with Correlation
- Orchestrator sends Request to
PolicyExtractorwithcorrelationId = C-1042. PolicyExtractorreturns Result with the samecorrelationIdandschemaVersion.- Orchestrator validates
factsand routes toPolicyDecider. - If
PolicyExtractorreturns ErrorVALIDATION_ERRORwithrecovery = ask_for_missing_context, orchestrator sends Clarification back to the agent that ownstaskContext.
The workflow stays coherent because every step speaks the same structural language, and every failure comes with a clear next action.
8.3 Error Signaling and Recovery Instructions
Error Signaling and Recovery Instructions
Error handling in multiagent workflow engineering is less about “what went wrong” and more about “what the system should do next.” A good error signal names the failure, points to the affected workflow scope, and provides recovery instructions that an orchestrator can execute without guessing.
Foundational Concepts for Actionable Errors
Start by separating three layers of failure:
- Tool failure: the external system call failed, timed out, returned an invalid payload, or was rejected.
- Workflow failure: the workflow state machine cannot proceed because required inputs are missing or inconsistent.
- Decision failure: the agent’s reasoning produced an action that fails validation or violates constraints.
Each layer needs a different recovery path. For example, a tool timeout often triggers retry with backoff, while a decision failure triggers re-planning or clarification.
Next, standardize an error envelope that every agent and tool reports. The envelope should include:
- Error code: stable identifier for routing recovery.
- Scope: step id, task id, or subtask id.
- Severity: retryable, requires human review, or terminal.
- Evidence: minimal logs, request ids, and validation messages.
- Recovery hints: what to do next, not just what happened.
A practical rule: if the orchestrator cannot decide the next step from the error envelope, the error is not actionable.
Mind Map of Error Signaling and Recovery
Recovery Instructions by Error Category
Tool failure should carry enough detail to decide between retry, alternate tool, or escalation.
- Timeout: mark as retryable with a maximum attempt count. Include the request id and the tool endpoint so the orchestrator can correlate logs.
- Rejection: if the tool returns a permission or policy error, do not retry blindly. Recovery should switch to a “needs approval” state or request missing credentials.
- Invalid payload: treat as a validation failure. Recovery should re-run the tool call only if the input was corrected; otherwise, re-plan the step to generate a conforming request.
Workflow failure usually indicates missing context or an inconsistent state transition.
- Missing inputs: recovery should request the missing fields from upstream steps or trigger a “gather required data” subflow.
- Invalid state: recovery should stop the affected branch and roll back to the last known good checkpoint. If rollback is impossible due to irreversible side effects, escalate with evidence.
Decision failure happens when an agent’s proposed action fails validation.
- Validation rejection: recovery should ask the agent to revise the action using the validator’s feedback. If the feedback is ambiguous, insert a clarification step that collects the missing facts.
- Constraint violation: recovery should re-check constraints before tool invocation. If constraints depend on external data, the orchestrator should fetch that data first, then re-run the decision.
Orchestrator Routing and State Updates
The orchestrator should map error codes to recovery policies. Keep the mapping explicit so behavior is consistent across agents.
Example routing policy:
TOOL_TIMEOUT→ retry up to 3 times with exponential backoff; if still failing, escalate.TOOL_FORBIDDEN→ escalate to human review; include required permission scope.PAYLOAD_SCHEMA_VIOLATION→ replan the request; do not retry with the same payload.WORKFLOW_MISSING_INPUT→ trigger data collection step; do not proceed.DECISION_VALIDATION_FAILED→ re-run decision with validator feedback.
When recovery starts, update the workflow state machine immediately. Record both the original failure and the chosen recovery action so later steps can reason about what changed.
Example: Ticketing Handoff with Recovery
Suppose an agent creates a ticket and then posts an internal note. The note tool returns PAYLOAD_SCHEMA_VIOLATION because the note body exceeds the allowed length.
Recovery sequence:
- The tool reports an error envelope with scope set to
PostInternalNoteStepand includes the validator message. - The orchestrator routes to
PAYLOAD_SCHEMA_VIOLATIONand triggers a replan of the note content. - The agent regenerates the note using the validator constraints, then retries only the note step.
- The workflow records a “replanned due to schema violation” event, so audit logs show why the content changed.
This approach avoids pointless retries and keeps the workflow moving with a clear paper trail.
Example: Idempotent Retry for Procurement
A procurement workflow calls a “create purchase order” tool. If the tool times out after receiving the request, a naive retry could create duplicates.
Recovery instructions should require an idempotency key. The orchestrator should:
- include an idempotency key in the request,
- retry on timeout using the same key,
- treat a “duplicate detected” response as success by mapping it to the existing order id.
The key idea is simple: retries must be safe, and the error envelope must tell the orchestrator whether safety mechanisms are in play.
8.4 Versioning and Compatibility for Evolving Workflows
Versioning is what keeps a workflow from quietly changing its behavior while you’re not looking. Compatibility is what lets older workflow runs finish correctly, while newer runs adopt improvements. In multiagent workflow engineering, these concerns show up in three places: workflow definitions, tool contracts, and message contracts between agents.
Core Concepts for Safe Evolution
A workflow version is a snapshot of behavior: the step graph, decision rules, tool invocation parameters, and the expected structure of intermediate artifacts. Compatibility means that a workflow run created under version N can still interpret the artifacts it produces and consumes, even if version N+1 is deployed.
Start with a simple rule: treat every boundary as a contract. Boundaries include tool inputs and outputs, message schemas between agents, and the persisted state format for long-running execution. If any boundary changes without a compatibility plan, you get failures that look like “random” reasoning errors.
Versioning Strategy That Matches the Risk
Use semantic intent rather than arbitrary numbers. A practical approach is:
- Major version when behavior changes in a way that could alter outcomes or interpretation of stored state.
- Minor version when you add capabilities without changing existing semantics.
- Patch version for bug fixes that preserve interfaces and decision meaning.
For example, changing a tool’s output field name is a major change if downstream agents depend on it. Adding a new optional field is usually minor, provided consumers ignore unknown fields.
Compatibility Modes for Workflow Runs
You typically need two compatibility modes:
- Run-time compatibility: a workflow run uses the exact versioned contracts it was created with. This prevents “schema drift” during execution.
- Data compatibility: persisted state and artifacts from older versions remain interpretable. This can be achieved via migration, adapters, or dual readers.
A good default is run-time compatibility plus data compatibility through adapters. Adapters are often cheaper than migrating large volumes of historical state.
Tool Contract Versioning
Tool contracts should be versioned independently from workflow versions because tools are shared across workflows.
Define a tool contract as:
- tool name and version
- input schema and validation rules
- output schema and error model
- idempotency and side-effect guarantees
When you change a tool, keep old versions available until no active runs depend on them. If you must deprecate, do it with a clear cutoff policy and an explicit compatibility adapter that maps old outputs to the new shape.
Message Contract Versioning Between Agents
Agent-to-agent messages should follow a strict schema with explicit version fields. Include:
- message type
- schema version
- correlation identifiers
- required payload fields
- optional fields with defined default behavior
If a new agent introduces a field, older agents should ignore it. If a new agent changes meaning of an existing field, that is a major change and must be reflected in the message schema version.
State and Artifact Compatibility
Persisted state is where compatibility problems hide. Store state with:
- workflow version
- step identifiers
- artifact schemas used at creation time
- a minimal provenance record for tool results
When reading state, use the stored schema version to choose the correct parser. If you add a new field, you can default it. If you change the meaning of a field, you need a migration function or an adapter that reconstructs the old interpretation.
Mind Map: Versioning Decisions
Example: Evolving a Ticket Triage Workflow
Suppose version 1.2 of a ticket triage workflow calls a “classify_ticket” tool and expects output:
categoryconfidence
In version 1.3, you add a new output field category_reason and keep existing fields unchanged. This is a minor change.
In version 2.0, you decide to rename confidence to score and change the scale from 0–1 to 0–100. That changes semantics and interpretation, so it is a major change.
A compatibility adapter can map old outputs to the new format for older runs:
- if
confidenceexists, setscore = confidence * 100 - if
category_reasonis missing, set it to an empty string or omit it depending on schema rules
The key is that the adapter is selected based on the stored tool contract version, not based on guessing.
Example: Message Contract Handoff with Schema Versions
An agent sends a handoff message to the orchestrator:
- message type:
handoff_request - schema version:
1 - payload:
ticket_id,proposed_steps
When you add priority_hint as optional, you keep schema version 1 for older consumers, or introduce schema version 2 if the orchestrator needs different validation. Either way, the message includes its schema version so the receiver can parse correctly.
Practical Checklist for Compatibility
- Pin workflow, tool, and message contract versions per run.
- Store schema versions alongside persisted state.
- Use adapters for backward interpretation instead of guessing.
- Treat semantic changes as major versions.
- Validate tool outputs against the expected schema version before downstream use.
A workflow that evolves cleanly is less about clever numbering and more about making every boundary explicit, versioned, and enforced at runtime.
8.5 Practical Example: Defining Contracts for Agent Handoffs in a Ticketing System
In a ticketing system, “handoff” means one agent finishes a bounded responsibility and passes a structured result to the next agent. A good contract prevents the next agent from guessing what happened, what is still needed, and which actions are safe to take.
Core Handoff Contract Principles
First, separate facts from requests. Facts are what the previous agent observed or computed; requests are what the next agent should do. Second, make the contract explicit about confidence and evidence. If the next agent must decide, it needs to know whether the prior agent had a solid basis or a best-effort guess. Third, include state so the workflow can resume after interruptions without redoing work.
Example Workflow Overview
Consider a three-agent flow for a support ticket:
- Intake Agent classifies the issue and extracts key fields.
- Triage Agent checks policy constraints and determines the next action.
- Resolution Agent performs tool calls to update the ticket and draft the response.
Each handoff uses the same contract shape, but different fields are populated.
Mind Map: Ticketing Handoff Contracts
Contract Schema for Agent Handoffs
Use a JSON-like structure so it can be validated before any tool calls. The contract below is intentionally strict: if a field is missing, the receiving agent must ask for it or stop.
Contract fields
- Metadata: identifies the ticket, the workflow instance, and the handoff.
- Facts: includes extracted fields and evidence pointers (for example, “log snippet hash” or “policy rule id”).
- Requests: tells the next agent what to do next, including any tool calls it may perform.
- State and Safety: records what has already been done and what side effects are allowed.
- Validation: includes schema version and validation results.
Example: Intake Agent to Triage Agent
The Intake Agent reads the ticket text and produces a contract for the Triage Agent.
{
  "schemaVersion": "1.0",
  "workflowId": "wf-2026-03-01-support",
  "ticketId": "TCK-18492",
  "handoffId": "hf-18492-1",
  "agentFrom": "intake",
  "agentTo": "triage",
  "timestamp": "2026-03-01T10:14:00Z",
  "facts": {
    "issueSummary": "User cannot sign in after password reset",
    "category": "authentication",
    "extractedEntities": {
      "userId": "u-7712",
      "region": "us-east-1"
    },
    "customerImpact": "login blocked",
    "evidence": [{"type":"ticketText","span":"password reset"}]
  },
  "requests": {
    "nextActionType": "policy_check_and_triage",
    "missingInfoQuestions": ["Is MFA enabled for this user?"]
  },
  "state": {
    "workflowState": "intake_complete",
    "completedSteps": ["extract_fields"],
    "idempotencyKey": "TCK-18492-intake"
  },
  "validation": {
    "requiredFieldsPresent": true,
    "confidenceByField": {"category": 0.86}
  }
}
Notice what is not included: the Intake Agent does not decide the final resolution. It only provides enough structured context for policy checks.
Example: Triage Agent to Resolution Agent
The Triage Agent uses the contract to decide the next action and specify safe tool calls.
{
  "schemaVersion": "1.0",
  "workflowId": "wf-2026-03-01-support",
  "ticketId": "TCK-18492",
  "handoffId": "hf-18492-2",
  "agentFrom": "triage",
  "agentTo": "resolution",
  "timestamp": "2026-03-01T10:16:00Z",
  "facts": {
    "relevantPolicies": ["AUTH_RESET_MFA_REQUIRED"],
    "evidence": [{"type":"policyRule","id":"AUTH_RESET_MFA_REQUIRED"}]
  },
  "requests": {
    "nextActionType": "update_ticket_and_prepare_response",
    "requiredToolCalls": [
      {"tool":"ticket.getUserProfile","args":{"userId":"u-7712"}},
      {"tool":"ticket.addComment","args":{"comment":"Draft response pending MFA check"}}
    ],
    "escalationReason": null
  },
  "state": {
    "workflowState": "triage_complete",
    "completedSteps": ["policy_check"],
    "idempotencyKey": "TCK-18492-triage",
    "allowedSideEffects": ["add_comment","update_ticket_fields"]
  },
  "validation": {
    "requiredFieldsPresent": true,
    "confidenceByField": {"nextActionType": 0.93}
  }
}
The allowedSideEffects list is the safety rail. If the Resolution Agent tries to do something outside that list, it must stop and request a new contract.
Practical Validation Rules
Before executing tool calls, the receiving agent should validate:
- Schema version matches what it understands.
- Required fields exist (for example, ticketId and nextActionType).
- Tool calls are permitted by allowedSideEffects.
- Idempotency keys are consistent so retries don’t spam comments.
A contract is not paperwork; it’s a boundary that turns “handoff” from a conversation into a reliable hand movement.
9. Reliability Engineering for Multiagent Execution
9.1 Failure Modes for Tool Calls and Agent Reasoning
Tool calls and agent reasoning fail in different ways, but they often fail together. A robust workflow treats failures as structured events, not as surprises, and it routes them through validation, recovery, and escalation paths.
Foundational Failure Categories
Start by separating failures into three layers.
- Tool invocation failures happen before any useful work occurs. Examples include missing credentials, wrong endpoint, malformed request payload, or timeouts.
- Tool execution failures occur after the call is accepted. Examples include 4xx validation errors, 5xx server errors, rate limiting, or partial processing.
- Reasoning failures happen inside the agent’s decision loop. Examples include selecting the wrong tool, using incorrect parameters, misreading tool output, or failing to notice that a prior step changed the state.
A practical rule: if the workflow can’t explain why it chose a tool and what it expected back, it can’t reliably recover.
Mind Map: Failure Modes and Responses
Tool Call Failure Modes with Concrete Examples
Auth missing or expired: The tool returns 401. A good workflow does not keep retrying blindly; it refreshes credentials once, then escalates if the second attempt fails.
Request schema mismatch: The tool returns 400 with a field-level error. The agent should map the error to the exact parameter it generated, then re-ask for only the missing or invalid fields. This avoids redoing the entire step.
Network timeout: The call may have succeeded but the response didn’t arrive. Use an idempotency key for write operations so the agent can safely retry without duplicating side effects.
Rate limiting: A 429 often includes a retry-after value. The workflow should respect it and record the wait as part of progress tracking, so the agent doesn’t interpret the delay as a dead end.
Partial success: A batch update might succeed for some items and fail for others. The agent must treat the tool output as a set of per-item results, then schedule follow-up calls only for the failed subset.
Agent Reasoning Failure Modes with Concrete Examples
Wrong tool selection: Suppose the agent sees a ticket labeled “refund” and calls a “create invoice credit” tool instead of a “process refund” tool. Detection comes from contract checks: the expected output type or required fields won’t match. Recovery is to re-plan the step based on the ticket’s actual category.
Incorrect parameter derivation: The agent might convert a currency string incorrectly, producing “1,200.00” as 120000. Validation should catch numeric range anomalies and formatting issues before the tool call.
Output misinterpretation: A tool might return {status: "queued"} but the agent treats it as {status: "completed"}. The workflow should enforce state transitions: queued can only move to completed after a verification step.
Stale assumptions about state: If a previous step updated a record, but the agent uses cached data, it can generate conflicting updates. The fix is to require a fresh read before any write that depends on mutable fields.
Looping without progress: The agent repeatedly retries the same failing call with identical parameters. Progress counters and “attempt fingerprints” help: if the fingerprint repeats, the workflow switches to correction or escalation.
Detection, Validation, and Recovery as One Loop
Detection should be immediate and structured: parse tool responses into a typed result, validate against the expected schema, and run consistency checks that compare “what we expected to change” with “what actually changed.” Recovery then chooses the smallest safe action: retry only when the failure is transient and the operation is idempotent; correct parameters when the error is deterministic; escalate when the workflow can’t guarantee correctness.
Example: Handling a Write Tool Failure Safely
A procurement workflow needs to create a vendor record and then attach a compliance document.
- The agent calls
createVendorwith an idempotency key. - The tool returns 400 because the vendor tax ID format is invalid.
- The agent validates the tax ID format locally, corrects it using the provided input rules, and retries once.
- If the second attempt fails, it escalates with the exact field error and the corrected candidate value.
This pattern prevents duplicate vendor creation, avoids endless retries, and keeps the failure explanation precise enough for a human to act.
9.2 Validation Layers for Inputs Outputs and Intermediate Artifacts
Validation layers are the practical way to keep multiagent workflows from turning “reasonable” into “wrong.” The goal is not to distrust agents; it’s to make failures cheap, visible, and recoverable.
Core Idea of Layered Validation
Start with three categories of artifacts: inputs (what enters a step), outputs (what leaves a step), and intermediate artifacts (what gets passed along, cached, transformed, or used for later decisions). Each category gets validation at multiple points: before execution, after execution, and before handoff.
A useful mental model is a conveyor belt. Items move forward only if they pass checks at each station. If a check fails, the workflow either requests clarification, retries with safer parameters, or routes to a human review path.
Input Validation Before Tool Calls
Input validation prevents waste and reduces side effects.
- Schema checks: Confirm required fields exist and types match. Example: a “create invoice” tool requires
vendor_idas a string andamountas a number. Ifamountarrives as"1200", the step should fail fast and request conversion. - Constraint checks: Enforce business rules that schemas can’t express. Example:
amountmust be positive and not exceed a configured threshold for automated approval. - Authorization checks: Ensure the agent is allowed to act on the target resource. Example: the agent can read vendor records but cannot update bank details.
- Sanity checks for identifiers: Validate formats like UUIDs, ticket IDs, or ISO dates. Example: if a ticket ID is missing a prefix, the workflow should not guess.
A small but effective practice is to validate “tool-ready” inputs, not raw agent text. Convert text into structured fields first, then validate the structured result.
Output Validation After Tool Calls
Output validation catches tool quirks, partial failures, and mismatched assumptions.
- Structural validation: Confirm the tool returned the expected fields. Example: a document parser should return
text,tables, andconfidence. Iftablesis missing, treat it as incomplete. - Semantic validation: Check meaning-level constraints. Example: if a “status update” tool returns
status: "approved", ensure the workflow state actually allows approval at that moment. - Completeness validation: Verify required artifacts are present. Example: for a procurement workflow, a “quote selection” step must output both
selected_vendorandjustification. - Side-effect confirmation: For write actions, confirm the change exists. Example: after creating a record, read it back or verify an ID was returned and matches the created entity.
When output validation fails, the workflow should attach a reason code and a suggested recovery action, such as “retry with OCR settings,” “request missing field,” or “route to review.”
Intermediate Artifact Validation Between Steps
Intermediate artifacts are where workflows often drift: summaries lose details, transformations drop fields, and caches mix versions.
- Provenance tracking: Each artifact should carry where it came from. Example: a “policy excerpt” used for compliance checks should record the source document ID and retrieval timestamp.
- Versioning and compatibility: If a later step expects
policy_version = 3, the artifact must declare it. Example: a cached policy snippet from version 2 should trigger a refresh. - Transformation checks: Validate that conversions preserved intent. Example: when converting currency, ensure the output includes
currencyandexchange_rate_source. - Decision input validation: Before a decision step, validate the exact fields the decision uses. Example: a risk scoring step should reject inputs missing
industry, even if a broader summary exists.
Mind Map: Validation Layers
Example: Procurement Step with Three Validation Gates
Imagine a step that selects a vendor and prepares a purchase order.
- Before tool call: Validate
request_idformat, ensurebudget_codeexists, and confirm the agent has permission to create purchase orders for that department. - After tool call: Validate the tool returned
vendor_id,unit_price, andlead_time. Then check thatlead_timeis within acceptable bounds for the requested delivery date. - Before handoff: Validate intermediate artifacts used by the next step: the purchase order draft must include
tax_rate,currency, and a justification string that references the chosen quote.
If any gate fails, the workflow should not silently continue with partial data. It should either ask for missing fields, retry with a safer parsing mode, or route to human review with the specific validation reason.
Practical Implementation Pattern
Use a consistent structure for validation results: status, reason_code, failed_fields, and recovery_action. This keeps recovery logic deterministic and prevents “best effort” behavior from hiding errors.
Layered validation makes workflows easier to debug because every failure points to a specific artifact and a specific rule, not a vague “the agent got confused” outcome.
9.3 Deterministic Checks and Guardrails for Critical Steps
Critical steps are the ones where a wrong action costs money, breaks compliance, or creates irreversible data changes. Deterministic checks are the boring parts that keep the system from being creative in the wrong direction. Guardrails are the rules that decide what the team is allowed to do, when it must ask for clarification, and how it recovers when reality disagrees with the plan.
Determinism in Practice
Determinism does not mean “no reasoning.” It means that the same inputs produce the same pass/fail outcomes for the same rules. In a multiagent workflow, determinism usually lives in three places: input validation, tool-call validation, and state transition validation.
Input validation checks that the workflow has the minimum required information before any tool call. Tool-call validation checks that the call matches an approved schema and policy. State transition validation checks that the workflow can move from one step to the next only when the evidence supports it.
Guardrail Layers for Critical Steps
A useful pattern is layered defense. Layer 1 is cheap and fast: validate formats, required fields, and allowed values. Layer 2 is medium cost: verify permissions, check idempotency keys, and confirm referential integrity. Layer 3 is expensive and human-friendly: require explicit confirmation or a second opinion when the risk is high.
Example: In a procurement workflow, “Create Purchase Order” is critical. The system should:
- Reject missing vendor tax ID or currency.
- Refuse to create a PO if the vendor is not in the approved vendor list.
- Use an idempotency key so retries do not create duplicates.
- Require a human approval if the total exceeds a threshold or if the request is outside the requester’s department budget.
Mind Map: Deterministic Checks and Guardrails
Deterministic Checks That Actually Help
Start with checks that are easy to explain and hard to bypass.
-
Schema and contract checks: Before calling a tool, verify that the arguments match the tool’s contract exactly. A common failure is sending “amount” as a string like “1000” when the tool expects a number, which can cause silent coercion or incorrect rounding.
-
Idempotency checks: For any write action, require an idempotency key derived from stable inputs (for example, request ID + line items hash). If the tool already processed that key, the workflow should treat it as success and move on.
-
Policy checks: Confirm that the agent’s identity and the workflow context authorize the action. If a workflow runs under a service account, the guardrail should still enforce “who requested what” so audit logs remain meaningful.
-
Evidence checks: After a tool returns, validate that the response supports the next step. For example, if “Create PO” returns a PO number, the workflow should verify the PO status is “Draft” before proceeding to “Submit for Approval.”
Example: Guardrails for a Payment Release Step
Consider a step called “Release Vendor Payment.” It is critical because it moves money.
Deterministic checks:
- Validate that invoice ID exists and belongs to the vendor on the payment request.
- Validate that invoice status is “Approved for Payment.”
- Validate that payment amount equals invoice approved amount within a tolerance.
- Validate that the payment method is allowed for that vendor.
- Require human confirmation if payment date is outside the normal processing window.
Recovery behavior:
- If the tool fails due to a transient network error, retry with the same idempotency key.
- If the tool succeeds but the workflow fails before recording the outcome, the next run should detect the existing idempotency record and skip the duplicate action.
Advanced Detail Without the Mess
When multiple agents contribute to a critical step, deterministic checks should not depend on a single agent’s interpretation. Instead, treat the workflow state as the source of truth.
A practical approach is to separate “proposal” from “commit.” Agents may propose actions, but the orchestrator only commits when deterministic checks pass. If any check fails, the orchestrator returns a structured failure reason to the team, such as “missing required field” or “policy denied,” so the agents can correct the inputs rather than re-argue the same point.
Finally, make guardrails observable. Every pass/fail should be recorded with the exact rule that triggered it and the relevant evidence snapshot. That turns debugging from a scavenger hunt into a straightforward review of which condition blocked the action.
9.4 Observability for Debugging and Root Cause Analysis
Observability is what lets you answer three practical questions when a multiagent workflow misbehaves: What happened, where did it happen, and why did it happen. For enterprise tool chains, “why” usually means correlating agent decisions with tool inputs, tool outputs, and the state the workflow believed at the time.
What to Instrument First
Start with a minimal set of signals that cover the full execution path.
- Trace events per workflow run: a unique run id, step id, and agent id for every action.
- Tool call records: tool name, version, input payload hash, output payload hash, latency, and status.
- Decision records: the decision point id, the candidate options considered, the selected option, and the rule or evidence used.
- State snapshots: either full snapshots at key steps or diffs between steps, including the “current belief” about critical fields.
- Correlation ids across boundaries: propagate the same ids from orchestrator to agents to tools so you can stitch the story back together.
A good rule: if you cannot reconstruct the run timeline from your logs, you do not yet have observability—you have only logging.
Designing Traceability That Survives Failures
Failures are where observability earns its keep. Instrument both success and failure paths.
- Record the failure boundary: distinguish “agent couldn’t decide” from “tool rejected input” from “tool timed out.”
- Capture retry attempts explicitly: each attempt should be a separate event with its own latency and outcome.
- Store validation outcomes: when you reject a tool input or output, log the validation rule name and the failing field.
- Preserve partial artifacts: if a step produces intermediate files or extracted fields, log their identifiers even if the step later fails.
This prevents the classic debugging trap: you fix the symptom, but the system fails again because the underlying boundary was misclassified.
Root Cause Analysis Workflow
When an incident occurs, use a repeatable sequence.
- Reconstruct the timeline: order events by timestamp and verify monotonic step progression.
- Identify the first divergence: compare expected state transitions to actual ones at each step boundary.
- Localize the fault domain: agent reasoning, orchestration logic, tool behavior, or data quality.
- Confirm with evidence: match decision records to tool inputs and state snapshots.
- Classify the cause: configuration mismatch, contract violation, missing data, nondeterministic tool behavior, or validation gap.
A small but effective trick: compute a “decision-to-tool consistency score” for each step—does the tool input reflect the decision record and the state snapshot? When the score drops, you know where to look.
Mind Map: Observability Signals and Their Debugging Roles
Example: Procurement Workflow Incident
Assume a procurement workflow fails at “Approve Vendor Payment.” The orchestrator reports a generic error, but observability should let you pinpoint the real cause.
- Timeline reconstruction: you see Step 14 completed, Step 15 started, then a tool call to
payment_authorizationreturned statusrejected. - Decision record check: the decision at Step 15 selected “approve” based on evidence field
vendor_risk_score <= 40. - State snapshot comparison: the state snapshot right before the tool call shows
vendor_risk_score = 55. - Localization: the fault domain is not the tool; it is the mismatch between the decision evidence and the state belief.
- Validation outcome: logs show a validation rule
risk_score_source_consistencyfailed, but the workflow continued because the rule was configured as “warning.”
Root cause: a configuration gap allowed the workflow to proceed with inconsistent state, causing the tool to reject the authorization.
Example: Tool Contract Violation
In another run, a document extraction tool returns a payload missing invoice_total. Observability helps you avoid guessing.
- Tool call record shows success status but output hash differs from the expected schema version.
- Validation outcomes log
schema_version_mismatchand the missing field name. - Decision record at the next step shows it attempted to compute totals anyway, because the decision rule only checked “tool succeeded,” not “tool output validated.”
Root cause: the decision rule depended on tool success rather than validated output.
Operationalizing Observability Without Overkill
To keep instrumentation useful, standardize incident summaries.
- Incident summary fields: run id, failing step id, first divergence step id, failure boundary type, top validation failures, and the final tool status.
- One narrative per incident: a short ordered list of events that explains the chain from decision to tool to state.
When these fields are consistent, debugging becomes a mechanical process rather than a scavenger hunt. And yes, it still feels good when the timeline tells the truth on the first try.
9.5 Practical Example: Adding Validation and Recovery to a Procurement Workflow
A procurement workflow usually fails in predictable places: missing fields, wrong approvals, tool errors, and partial side effects. This example shows a systematic way to add validation and recovery so the workflow can stop early when it should, and recover when it can.
Workflow Overview and Failure Points
Start with a simple flow:
- Intake request (vendor, items, quantities, budget code)
- Validate request completeness and policy constraints
- Route for approval based on thresholds
- Create purchase order (PO)
- Notify stakeholders and record evidence
Common failure points map cleanly to control points:
- Intake errors: missing budget code, invalid currency, negative quantity
- Policy mismatches: disallowed vendor category, exceeding spend limits
- Approval issues: wrong approver group, approval not completed
- Tool failures: PO creation API times out, email service rejects message
- Partial side effects: PO created but notification failed
Validation Strategy That Prevents Waste
Validation should be layered so you catch cheap problems before expensive ones.
Layer 1: Schema and type checks
- Ensure required fields exist and have correct types.
- Example: quantity must be a positive number; currency must be one of allowed ISO codes.
Layer 2: Business rule checks
- Validate budget code format and that it exists in the finance system.
- Example: if vendor category is “Software,” require a contract reference.
Layer 3: Decision readiness checks
- Confirm approval routing inputs are present.
- Example: if total amount exceeds $25,000, ensure the request includes a justification field.
Layer 4: Pre-action checks
- Before creating a PO, re-check that the request still meets policy constraints.
- This matters because approvals or budget availability can change between steps.
Recovery Strategy That Avoids Double Actions
Recovery should be explicit about what can be retried and what must not.
- Idempotent operations: PO creation should use a deterministic idempotency key derived from request ID and line items hash.
- Retryable failures: network timeouts on PO creation can be retried with backoff.
- Non-retryable failures: validation failures should not be retried automatically; they require human correction.
- Compensations: if PO creation succeeds but notification fails, you do not delete the PO; you record the PO ID and re-send notification later.
Mind Map: Validation and Recovery Controls
Example: End-to-End Run with a Validation Failure
Assume a request arrives with:
- Vendor category: Software
- Contract reference: missing
- Total: $12,400
Step 1: Schema checks pass. Step 2: Business rule checks fail because Software requires a contract reference.
Recovery behavior:
- The workflow stops before approval routing.
- It creates a “correction task” with a precise message: “Contract reference is required for Software vendor category.”
- It records the validation error code and the fields that triggered it.
This is better than sending the request to approvals, because approvals would be based on incomplete compliance inputs.
Example: Tool Failure with Safe Recovery
Now assume a corrected request passes validation and proceeds to PO creation. The PO tool call times out after creating the PO in the background.
Recovery behavior:
- Retry PO creation using the same idempotency key.
- If the tool returns “already exists,” treat it as success and capture the existing PO ID.
- Proceed to notification.
If notification fails due to an email address format error:
- Record the PO ID and the notification failure reason.
- Mark notification as “pending correction” and request the recipient email update.
- Do not create a second PO.
Evidence and Audit-Friendly State
To make recovery reliable, store a small set of workflow state fields:
- request status: intake, validated, awaiting approval, PO created, notification pending
- validation results: list of rule IDs and outcomes
- tool outcomes: PO ID, idempotency key, timestamps
- human actions: approver IDs and correction task responses
This state lets the workflow resume without guessing what happened last time.
Practical Checklist for Implementation
- Validate in layers and stop early on non-retryable issues.
- Use idempotency keys for side-effecting tool calls.
- Retry only transient failures; route validation failures to humans.
- Compensate by re-notifying or re-running safe steps, not by deleting business records.
- Persist evidence so resuming is deterministic.
With these controls, the procurement workflow becomes predictable: it fails loudly when it should, and recovers without creating duplicate purchase orders or losing the trail of why a decision was made.
10. Security, Privacy, and Compliance by Design
10.1 Threat Modeling for Agent Tool Chains and Data Flows
Threat modeling for agent tool chains starts with a simple question: where can the system’s inputs, decisions, or tool effects go wrong in ways that matter to the business? The goal is not to list every scary scenario; it is to identify concrete failure paths, then design controls that prevent or contain them.
Define the System Boundary and Trust Levels
Begin by drawing a boundary around what the agents can do and what they cannot. Include the orchestrator, each agent role, the tool interfaces, and the data stores. Then mark trust levels: which components are trusted by default (for example, internal services), which are semi-trusted (third-party APIs), and which are untrusted (user-provided text, uploaded files, or external web content).
A practical rule: if a component can influence tool parameters, treat it as potentially hostile until proven otherwise. For example, a “research” agent that extracts keywords from a ticket description can accidentally (or maliciously) produce a query that targets the wrong customer record.
Map Data Flows Through the Workflow
Next, trace the lifecycle of data items. For each item, note its origin, transformations, destinations, and retention. Typical items include:
- Identity and authorization context (who the user is)
- Business records (orders, invoices, contracts)
- Tool results (API responses, extracted text)
- Generated artifacts (summaries, drafts, structured fields)
Example: In an invoice processing workflow, the “intake” step receives a PDF, the “extract” step converts it to structured fields, the “validate” step checks totals against the ledger, and the “submit” step writes an approval record. Threats differ at each hop: the PDF can be malicious, extraction can misread numbers, validation can be bypassed, and submission can write incorrect approvals.
Identify Threats by Category and Attack Surface
Use a structured set of categories so you do not miss the boring-but-deadly ones.
- Spoofing: impersonating a user or system identity to gain access.
- Tampering: altering tool inputs, tool outputs, or intermediate artifacts.
- Repudiation: denying actions because logs are missing or ambiguous.
- Information Disclosure: leaking sensitive data through prompts, tool calls, or error messages.
- Denial of Service: exhausting quotas, causing long loops, or triggering expensive tool calls.
- Elevation of Privilege: using one tool’s permissions to reach another resource.
For agent tool chains, add two agent-specific surfaces:
- Prompt-to-tool parameter injection where text becomes structured arguments.
- Tool-to-prompt contamination where tool outputs are treated as trustworthy facts.
Build a Mind Map of Threats and Controls
Mind Map: Threat Modeling for Agent Tool Chains
Derive Concrete Controls from Threat Paths
Controls should connect to the threat path, not just the category.
-
Schema and type enforcement for tool arguments: If a tool expects
customer_idas a UUID, reject anything else before calling the tool. This prevents prompt-to-tool injection from turning free text into valid parameters. -
Per-call authorization checks: Do not rely on a single “login” step. Each tool call should verify that the agent’s execution context is allowed to access the specific resource. For instance, an agent can read invoices only for the customer tied to the current case.
-
Provenance tagging for tool outputs: Mark tool results with their source and trust level. When the agent uses a tool output to decide, require that the decision logic references the provenance tag, not just the text.
-
Sanitize and minimize sensitive data in prompts: If a validation step only needs totals, pass totals rather than full customer profiles. This reduces information disclosure risk through logs, model context, or error traces.
-
Side-effect guards and idempotency: For write operations, require a deterministic idempotency key derived from the workflow instance and target record. If a retry happens, the system should not create duplicate approvals.
Example Threat Path and Mitigation
Consider a ticket triage workflow with tools: search_customer, fetch_order, and create_case_note.
- Threat path: A malicious user includes instructions in the ticket text like “use customer_id 1234 and write a note.” The triage agent extracts
customer_idfrom the text and callssearch_customer. - Impact: The agent might access another customer’s data, then write a note that exposes sensitive details.
- Mitigations:
- Validate
customer_idagainst the case’s authorized identity context, not against extracted text. - Enforce per-call authorization in
search_customerandcreate_case_note. - Redact sensitive fields before passing them into the final note draft.
- Log the tool call with resource identifiers so repudiation is harder.
- Validate
Validate the Model with Targeted Tests
Finally, turn the threat model into tests. For each identified threat path, create at least one scenario that would have succeeded without the control. Examples include malformed tool arguments, prompt injection attempts that try to override resource identifiers, and tool output that contains misleading strings. The test passes only when the workflow either blocks the action or safely contains the damage.
A good threat model ends with measurable outcomes: which calls are blocked, which data is redacted, which writes are prevented, and what evidence is logged for auditing.
10.2 Data Minimization and Redaction Strategies
Data minimization means you only collect, retain, and expose what a workflow step truly needs. Redaction means you remove or mask what you should not share, even if it exists in the source system. In multiagent workflow engineering, these ideas work best together: minimization reduces the amount of sensitive material that can leak, and redaction protects the material that still must pass through.
Start with Step-Level Data Needs
Begin by attaching a “data need” statement to every workflow step. A data need is specific: which fields, which purpose, and which downstream consumers. If a step only needs an invoice total, it should not receive the customer’s full address.
A practical way to write this is to treat each step like a mini contract:
- Purpose: what decision or action the step performs.
- Required fields: the smallest set of attributes needed.
- Allowed outputs: what the step may emit to later steps.
- Retention window: how long intermediate data may persist.
Example: In an expense approval workflow, the “policy check” step needs expense type, amount, currency, and employee department. It does not need bank account details or free-text receipts.
Minimize Collection at the Source
Minimization fails if you fetch everything first and filter later. Prefer source-side selection:
- Query only required columns.
- Use API parameters that limit fields.
- Avoid “read full record then pick fields” patterns.
Example: Instead of retrieving a full customer profile to compute eligibility, request only customer_id, country, and risk_tier. If the workflow later needs more, create a separate step with its own data need statement.
Use Purpose-Limited Data Passing Between Agents
When agents hand off information, pass the minimum summary that preserves correctness. A common mistake is passing raw documents to multiple agents “just in case.” Replace that with structured extracts.
Example: For a contract review team, one agent can extract clause identifiers and risk flags into a compact structure. The next agent receives only the extracted fields and the relevant clause text, not the entire contract.
Redaction Rules That Are Consistent and Testable
Redaction should be deterministic and auditable. Define rules by field type and sensitivity class:
- Direct identifiers: mask or remove (names, emails, phone numbers).
- Sensitive financials: keep only last 4 digits or tokenized references.
- Free-text: apply pattern-based masking plus length limits.
- Documents: redact regions (e.g., SSN blocks) and keep a redaction map.
To keep behavior consistent, implement redaction as a pipeline stage with explicit inputs and outputs. The stage should also record what it changed so you can explain mismatches during debugging.
Redaction with Provenance and Evidence
Even when you redact, you often need evidence that the workflow made the right choice. Store provenance separately from the redacted payload:
- Keep the original source reference (record ID, document ID).
- Store the redaction policy version.
- Store the redaction output hash or checksum.
Example: If an approval decision depends on “amount > threshold,” you can store the computed boolean and the threshold used, while redacting the underlying receipt text.
Mind Map: Minimization and Redaction Flow
Validation That Catches Mistakes Early
Add checks at three points:
- Before tool calls: verify the request payload includes only allowed fields.
- After tool results: verify the response is redacted according to policy.
- Before agent handoff: verify the outgoing message matches the allowed schema.
Example: If a step’s schema allows customer_id and country only, reject any outgoing message containing email even if it was present in the tool response.
Example: Customer Support Ticket Triage
A triage workflow receives a ticket with customer details and attachments.
- Minimization: The “route ticket” step requests only
ticket_id,issue_category, andpriority. - Redaction: The “summarize attachment” step extracts only relevant excerpts and masks emails and phone numbers inside the extracted text.
- Evidence: The workflow stores the routing decision, the policy version used for redaction, and the attachment reference ID.
The result is a workflow that can still function end-to-end while keeping sensitive content from spreading through the team of agents.
10.3 Access Control Enforcement Across Agents and Tools
Enterprise agent teams fail in predictable ways: one agent asks for too much, another tool accepts it too easily, and a third agent logs sensitive data “for debugging.” Access control enforcement across agents and tools prevents those failures by treating permissions as a first-class input to every decision and every call.
Core Principles for Permissioned Execution
Start with three rules that apply to both agents and tools.
- Least privilege per action: permissions are evaluated for each tool call, not once at team startup. If a workflow step only needs “read invoices,” the agent must not receive “write invoices.”
- Separation of duties: agents should not both request and approve privileged actions. A common pattern is a “requesting agent” that proposes an action and a “policy agent” or orchestrator that authorizes it.
- Server-side enforcement: the tool (or the service behind it) must verify permissions. Agent-side checks are helpful, but they are not sufficient because agents can be wrong, buggy, or misled.
A practical way to remember this: the agent can decide what to ask for, but the tool decides what it will actually do.
Permission Model and Identity Propagation
Define a permission model that maps cleanly to enterprise reality: roles, scopes, resource types, and actions. Then ensure identity and context travel with the request.
- Identity: the effective user or service principal under which the workflow runs.
- Scopes: what the caller can do, expressed as action-resource pairs like
read:invoice,write:ticket, orapprove:payment. - Resource identifiers: the specific object the action targets, such as
invoice:INV-10492. - Context: workflow step ID, correlation ID, and justification text for audit.
If you omit resource identifiers from the authorization input, you end up with “permission to do anything in a category,” which is how accidental data exposure happens.
Authorization Flow Across Agents
Use an explicit authorization step before any privileged tool call. The requesting agent produces an action request; the orchestrator or policy component validates it; the tool enforces it again.
Example flow
- Agent A: “I need to update invoice status to
ApprovedforINV-10492.” - Orchestrator: checks whether the workflow identity has
write:invoiceand whether the step is allowed to performapproveactions. - Tool: verifies the same permissions and validates the state transition rules.
- Agent A: receives either the result or a structured denial.
This structure keeps the agent from “guessing” permissions and makes denials predictable.
Tool-Level Enforcement and Guardrails
Tools should implement authorization checks at the boundary. Treat tool inputs as untrusted.
Key guardrails:
- Action allowlists: tools expose only supported operations, and each operation has an authorization requirement.
- Resource-level checks: verify access for the exact resource ID, not just resource type.
- State transition validation: even with permission, reject illegal transitions (for example, approving an invoice that is still in
Draft). - Side-effect control: for write operations, require an idempotency key and confirm the target record exists.
When a tool denies a request, it should return a clear reason code like FORBIDDEN_SCOPE, FORBIDDEN_RESOURCE, or INVALID_STATE_TRANSITION so the orchestrator can decide whether to escalate, request clarification, or stop.
Auditing Without Leaking Secrets
Audit logs are mandatory, but they must not become a second data channel.
- Log who requested, what action was attempted, which resource was targeted, and the decision outcome.
- Avoid logging full payloads that may contain customer data, credentials, or internal notes.
- Store justification text only if it is already sanitized and policy-approved.
A useful pattern is to log a hash or redacted summary of sensitive fields while keeping the authorization decision traceable.
Mind Map: Access Control Enforcement
Integrated Example for a Ticketing Workflow
Consider a workflow that triages support tickets and sometimes escalates to engineering.
- Agent B reads ticket details. The tool call includes
read:ticketand the specificticket_id. - Agent B proposes an escalation. The request includes
write:ticketandapprove:escalationscopes. - The orchestrator checks whether the workflow identity is allowed to perform escalation approvals for that ticket category.
- The escalation tool verifies both scopes and that the ticket is in an eligible state.
- If denied, the orchestrator routes the ticket to a “needs review” queue instead of retrying with the same permissions.
This example shows the full chain: identity propagation, per-action authorization, tool-side validation, and safe denial handling.
Practical Checklist for Implementation
- Every tool operation declares required scopes.
- Every tool call includes identity, resource ID, and workflow step context.
- Authorization is evaluated per action, not per session.
- Denials are structured and handled deterministically.
- Audit logs record decisions without sensitive payloads.
With these pieces in place, access control becomes a predictable part of execution rather than a last-minute scramble when something goes wrong.
10.4 Audit Logging and Evidence Collection for Decisions
Audit logging is how you answer two questions after the fact: “What happened?” and “Why did it happen?” For multiagent workflows, that means recording decision inputs, tool interactions, intermediate artifacts, and the exact outcome of each decision point. Evidence collection is the practical part: turning those logs into something that can be reviewed, validated, and—when needed—reconstructed.
Core Principles for Evidence That Holds Up
Start with a simple rule: log what you can verify, not what you wish you had. A good audit record ties together four layers.
- Identity: which agent, which workflow instance, which step, which version of the workflow definition.
- Context: the relevant inputs used for the decision, including retrieved data identifiers and any user-provided fields.
- Actions: tool calls, parameters, results summaries, and whether the action was retried or skipped.
- Decision outcome: the selected branch, the computed rationale fields, and the acceptance checks that passed or failed.
A slightly playful but useful constraint: if a reviewer can’t point to a log entry that explains a decision, the system will eventually produce a “mystery branch.”
What to Log at Each Decision Point
For every decision point, capture a minimal “decision packet.” The packet should include:
- Decision identifier: step name plus a stable ID.
- Trigger: event type or condition that caused the decision to be evaluated.
- Inputs snapshot: hashes or IDs for large inputs, plus the exact values for small critical fields.
- Policy and rules reference: which rule set or configuration version was used.
- Tool evidence: for each tool call used by the decision, store tool name, parameters (or redacted parameters), result status, and a short result digest.
- Outcome: chosen option, computed confidence score if you use one, and the pass/fail of acceptance criteria.
- Human override: if applicable, record who overrode, what changed, and why it was allowed.
This structure prevents the common failure mode where logs show actions but not the reasoning inputs that led to those actions.
Evidence Collection Strategy for Enterprise Review
Logs alone are often too noisy for auditors. Evidence collection is the curation step that packages logs into reviewable artifacts.
A practical approach is to generate an evidence bundle per workflow instance:
- Decision ledger: one row per decision packet with outcome and references.
- Tool ledger: one row per tool call with status and digests.
- Artifact index: IDs for generated documents, extracted fields, and transformations.
- Validation record: which checks ran, what they validated, and their results.
When a reviewer asks, “Why was this invoice approved?” you should be able to jump from the decision ledger entry to the exact tool results and validation checks that supported approval.
Mind Map: Audit Logging and Evidence Collection
Correlation, Redaction, and Tamper Resistance
Correlation IDs are the glue. Every log line should carry at least: workflow instance ID, step ID, decision packet ID, and tool call ID. Without that, evidence becomes a pile of unrelated breadcrumbs.
Redaction should be deterministic. If you redact a field, store the redaction method and a stable digest of the original value so reviewers can verify consistency across retries without seeing the raw data.
Tamper resistance can be lightweight. A common pattern is to compute a chained hash across decision packets within a workflow instance. Even if you don’t implement full cryptographic signing, the chain makes accidental edits obvious.
Example: Procurement Approval Decision Packet
Consider a step that decides whether to approve a purchase request.
- Trigger: “budget check completed.”
- Inputs snapshot: request amount, vendor ID, cost center ID, and policy version.
- Tool evidence: call to
BudgetService.getRemainingwith cost center ID; store status and digest of remaining budget. - Validation record: check that amount <= remaining budget and that vendor is on the approved list.
- Outcome: “approved” with a recorded acceptance result for each check.
If approval later causes an issue, the evidence bundle lets you show exactly which budget snapshot and which policy version were used.
Example: Evidence Bundle Layout
A reviewer-friendly bundle can be structured like this:
- decision-ledger.csv
- decision_packet_id, step_id, trigger, outcome, acceptance_summary, tool_call_ids
- tool-ledger.csv
- tool_call_id, tool_name, parameters_digest, result_status, result_digest, timestamps
- artifact-index.json
- artifact_id, artifact_type, source_step_id, transformations, content_hash
- validation-record.json
- check_id, check_name, inputs_digest, result, failure_reason
The key is that each file references the same IDs, so the bundle behaves like a navigable map rather than a stack of logs.
Implementation Checklist for This Section
- Use stable IDs for workflow instances, steps, decisions, and tool calls.
- Store decision packets at decision points, not only at tool completion.
- Record acceptance checks with explicit pass/fail and failure reasons.
- Redact sensitive fields deterministically and store digests.
- Package evidence bundles per workflow instance for review.
- Ensure correlation IDs are present on every relevant log entry.
10.5 Practical Example: Implementing Compliance Controls for Customer Data Handling
A mid-sized company runs a multiagent workflow to process customer requests: verify identity, fetch account records, generate a response, and log the outcome. The compliance goal is simple to state and tricky to execute: only access what’s needed, protect it in transit and at rest, and keep an auditable trail of who did what and why.
Step 1: Define Data Boundaries and Purpose
Start by writing a one-page “data purpose” statement for the workflow. It answers three questions: what customer data is required, why it is required, and what the workflow must not do with it. For example, a password reset request may require email and account status, but not full payment history.
Then convert that statement into concrete boundaries:
- Minimum fields: request only the specific attributes needed for each step.
- Maximum retention: define how long intermediate artifacts may exist in workflow storage.
- Prohibited fields: list sensitive attributes that must never be fetched (e.g., government IDs unless explicitly required).
Step 2: Build a Compliance-Aware Tool Chain
Treat tools as the enforcement points. Each tool call should carry a purpose label and a data scope.
Example tool design
identity_verify(customer_id, purpose)returns a boolean plus a verification timestamp.account_lookup(customer_id, fields, purpose)returns only the requested fields.response_generate(context, purpose)must not receive raw sensitive fields; it receives a sanitized summary.audit_log(event, purpose, redactions)records actions and any redaction decisions.
To keep the workflow from “helpfully” overfetching, implement a schema-level guard: the tool layer rejects any request for fields outside the allowed scope for that purpose.
Step 3: Add Redaction and Sanitization Gates
Before any data leaves a tool boundary, pass it through a sanitization gate.
Practical rule: if a downstream step only needs a yes/no decision, do not pass the underlying evidence. For instance, if identity verification returns verified=true, the response generator receives only that flag and the allowed contact channel.
A simple sanitization policy for this workflow:
- Keep:
customer_id,verification_result,allowed_contact_channel,account_status. - Redact: raw identifiers not required for the response, any free-text notes that may contain sensitive content.
- Hash: stable identifiers used for correlation in logs.
Step 4: Enforce Access Control Across Agents
Compliance fails when agents can access more than they should. Use role-based permissions for each agent and each tool.
Example agent roles
- Verifier agent: can call
identity_verifyand nothing else. - Retriever agent: can call
account_lookupwith a fixed field allowlist. - Responder agent: cannot call customer data tools; it only consumes sanitized context.
- Auditor agent: can call
audit_logand can read only the workflow’s own event stream.
This prevents accidental data leakage through “reasoning” steps. The responder agent never sees raw records, so it cannot accidentally include them in the response.
Step 5: Make Audit Logging Useful and Non-Excessive
Audit logs should answer: what happened, which purpose governed it, what data was accessed, and what was redacted.
Log events at these points:
- tool invocation start and completion
- sanitization gate decisions
- validation failures and recovery actions
- final response generation and delivery
Avoid logging raw customer content. Instead, log field names, counts, and redaction markers.
Mind Map: Compliance Controls for Customer Data Handling
Step 6: Validation and Recovery Without Leaking Data
Add validation before and after each tool call.
- Before: ensure
customer_idformat is correct and purpose label matches the request type. - After: verify the tool returned only allowed fields; if not, stop the workflow and log a scope violation.
Example recovery: if identity verification fails, the workflow returns a generic message and records the failure reason category (e.g., verification_failed) without storing the underlying evidence.
Example: End-to-End Walkthrough for a Customer Request
A customer submits a “change contact email” request.
- Verifier agent calls
identity_verify(customer_id, purpose=contact_change). - Sanitization gate reduces the result to
verified=true/false. - Retriever agent calls
account_lookup(customer_id, fields=[account_status, allowed_contact_channel], purpose=contact_change). - Responder agent generates instructions using only sanitized context.
- Auditor agent logs: tool names, purpose label, accessed field names, and redaction markers.
This structure keeps the workflow compliant by construction: the responder never receives sensitive raw data, tool calls are scope-limited, and the audit trail captures decisions without storing unnecessary content.
11. Testing, Evaluation, and Operational Readiness
11.1 Test Planning for Multiagent Workflows
Testing multiagent workflows is less about proving that “the model can think” and more about proving that the system can execute reliably under messy, real conditions. A good plan starts with what must be true at each boundary: inputs, tool calls, intermediate artifacts, and final outcomes.
Define Test Scope with Workflow Boundaries
Start by listing the workflow’s externally visible behaviors. For each behavior, write down the smallest set of steps that can change it. For example, in a procurement workflow, “purchase order created” depends on vendor lookup, budget validation, approval routing, and the final write to the procurement system. If you test only the final write, you’ll miss failures like incorrect routing or budget checks that silently used stale data.
A practical scope checklist:
- Entry conditions: required fields, identity, and permissions.
- Tool boundaries: which tools are called, with what schemas.
- Decision boundaries: where the workflow chooses a path.
- Side effects: what writes happen and how they’re confirmed.
- Exit conditions: success criteria and failure handling.
Build a Test Taxonomy That Matches Failure Modes
Multiagent systems fail in predictable places. Organize tests by the kind of failure you’re trying to catch:
- Contract failures: malformed tool arguments, missing required fields.
- Data failures: wrong IDs, inconsistent units, empty result sets.
- Coordination failures: agents disagree on state, handoffs lose context.
- Control failures: loops that never converge, premature termination.
- Safety failures: actions taken without required approvals.
Then map each category to a workflow boundary. This prevents the common mistake of writing many tests that all exercise the same happy path.
Create Representative Scenarios with Minimal Yet Realistic Data
Use scenarios that are small enough to understand but realistic enough to break. A useful pattern is to create three variants per decision point:
- Nominal: everything exists and approvals are granted.
- Edge: data is present but incomplete or ambiguous.
- Adversarial within policy: inputs are valid format but violate business rules.
Example scenario set for a ticket triage workflow:
- Nominal: customer reports billing issue; correct category and SLA.
- Edge: missing account number; workflow requests clarification before tool calls.
- Adversarial within policy: user claims refund but ticket evidence contradicts policy; workflow routes to manual review.
Specify Oracles for Each Step
An oracle is how you decide pass or fail. For multiagent workflows, oracles should be layered:
- Schema oracle: tool arguments validate against the expected schema.
- State oracle: intermediate artifacts match required invariants.
- Outcome oracle: final result meets acceptance criteria.
- Trace oracle: the sequence of decisions and tool calls follows the intended control flow.
Example invariants for a budget validation step:
- The budget check must reference the same cost center ID used in the PO draft.
- Currency conversion must be explicit and consistent across all calculations.
- If budget is insufficient, no “create PO” tool call occurs.
Plan Test Execution Levels
Use a pyramid so you get fast feedback without sacrificing coverage.
- Unit tests: validate tool adapters, schema validators, and state transitions.
- Integration tests: run agent orchestration with mocked external systems.
- End-to-end tests: run against staging services with controlled datasets.
- Regression suites: rerun critical scenarios after workflow changes.
A simple rule: if a test requires real external writes, keep it rare and high-signal.
Mind Map: Test Planning for Multiagent Workflows
Evidence and Reproducibility That Actually Help
Tests should produce artifacts you can inspect without guesswork. Capture:
- Input payloads and resolved identities.
- Tool call arguments and responses (redacted as needed).
- Intermediate state snapshots at decision points.
- A trace of agent handoffs and the reason codes used for routing.
For reproducibility, store a deterministic run configuration: scenario dataset version, workflow version, and the exact orchestration settings used for the run. If you need a date for labeling test runs, use a fixed reference like 2026-03-05.
Example Test Matrix for a Multiagent Workflow
| Workflow Step | Test Type | Scenario | Oracle |
|---|---|---|---|
| Clarify missing fields | Integration | Edge | Workflow requests clarification before any tool call |
| Vendor lookup | Unit | Nominal | Tool args validate; returned vendor ID matches schema |
| Approval routing | Integration | Adversarial within policy | No approval bypass; routes to manual review |
| Create purchase order | End-to-end | Nominal | PO created and linked to the same cost center |
| Budget insufficient handling | End-to-end | Edge | No write occurs; failure reason recorded |
A good plan ends up being boring in the best way: each test has a clear purpose, a specific oracle, and evidence that lets you fix the real cause instead of chasing symptoms.
11.2 Scenario Based Testing With Representative Enterprise Data
Scenario-based testing treats a workflow like a set of realistic journeys rather than isolated functions. The goal is to catch mismatches between what the workflow expects and what enterprise systems actually provide: messy fields, partial permissions, inconsistent tool responses, and state that changes while the workflow is running.
Building Representative Enterprise Data
Start with a data inventory that mirrors production reality. For each tool the workflow calls, list the fields it reads, the fields it writes, and the failure behaviors it can trigger. Then create representative datasets that cover:
- Happy path records: complete customer profiles, valid documents, and consistent IDs.
- Boundary records: missing optional fields, long text fields, unusual but valid formats.
- Permission-limited records: the workflow user can read but not write, or can write only to certain objects.
- System inconsistency records: references that exist in one system but not another, stale status flags, and duplicated identifiers.
A practical trick is to generate datasets from production exports with redaction, then apply deterministic perturbations. For example, swap two account statuses, remove one required document field, or change a currency code to an unsupported value. Keep the perturbations deterministic so failures are reproducible.
Defining Scenarios That Exercise Workflow Semantics
A scenario is more than inputs. It specifies the starting state, the tool behaviors, and the expected state transitions. For each scenario, write down:
- Trigger: what event starts the workflow.
- Initial state: what the workflow believes is true.
- Tool responses: what each tool returns, including error payloads.
- Decision points: which conditions must evaluate a certain way.
- Expected outputs: final artifacts and side effects.
- Expected recovery: what happens after a failure.
Use a small set of scenario templates and fill them with different data. This prevents “scenario sprawl,” where every test becomes a one-off snowflake.
Mind Map: Scenario Coverage Model
Execution Strategy for Reliable Runs
To keep tests stable, make the workflow execution deterministic where possible. Freeze time-dependent logic by injecting a fixed “current date” value such as 2026-03-05. Snapshot the workflow state before each major step, especially around decision points.
When mocking tools, simulate both the success payload and the exact error shape the workflow expects. If your workflow treats a missing field as “needs clarification,” the mock should omit that field rather than returning a generic error.
Assertions should cover more than the final answer. Verify:
- The workflow wrote the correct fields to the correct objects.
- It avoided side effects when it should have stopped early.
- It produced the expected intermediate artifacts, such as a draft approval request.
- It followed the intended recovery path after a tool failure.
Example: Procurement Approval Workflow Scenarios
Consider a workflow that gathers purchase request details, checks policy, and submits an approval ticket.
Scenario A: Valid Request With Full Permissions
- Trigger: purchase request submitted.
- Tool responses: policy check returns “approved,” ticket system accepts creation.
- Expected: workflow creates an approval ticket with the correct cost center and attaches the generated summary.
Scenario B: Missing Required Document Field
- Data: the request record lacks an invoice reference.
- Tool responses: document extraction returns a payload missing
invoice_id. - Expected: workflow requests clarification, does not create an approval ticket, and records a “needs more info” status.
Scenario C: Permission Limited Write
- Data: request is readable but the workflow user lacks permission to create tickets.
- Tool responses: ticket creation returns a 403-like error with a structured reason.
- Expected: workflow marks the request as “blocked by permissions,” logs the reason, and avoids retrying endlessly.
Mind Map: Scenario Assertions
Failure Classification That Guides Fixes
When a scenario fails, classify it to avoid guesswork. A useful breakdown is:
- Tool Input Validation Failures: the workflow sent malformed inputs.
- Tool Output Contract Failures: the workflow received a payload that violated expected structure.
- Decision Logic Failures: the workflow evaluated conditions incorrectly.
- State Transition Failures: the workflow updated status or moved steps incorrectly.
This classification turns test failures into actionable engineering tasks, and it keeps the team from “fixing the symptom” by changing assertions without addressing the underlying mismatch.
11.3 Evaluation Metrics for Decisions and Tool Outcomes
Evaluation for multiagent workflows has two jobs: (1) measure whether decisions were correct given the evidence, and (2) measure whether tool outcomes were correct given the inputs and constraints. If you only score the final result, you miss the real failure mode—bad reasoning, bad tool usage, or bad state handling.
Decision Quality Metrics
Start with decision points: moments where an agent chooses an action, a route, or a classification. A practical metric set uses four complementary views.
- Decision Accuracy: Compare the chosen option to a ground-truth label or an approved policy outcome. Example: a triage agent selects “urgent” for tickets that meet the SLA breach criteria.
- Evidence Sufficiency: Score whether the decision used the required evidence types. Example: for “approve vendor,” the workflow requires (a) tax status check, (b) contract existence check, and (c) risk rating. If the agent skipped one, accuracy might look fine on easy cases but will fail in audits.
- Policy Compliance Rate: Measure violations against explicit rules. Example: a procurement workflow must never approve spend above a threshold without a manager sign-off. Count violations per 100 decisions.
- Calibration and Abstention Quality: When the system can ask for clarification, evaluate whether it abstained when uncertain. Example: if the agent cannot map a vendor name to a legal entity with confidence, it should request disambiguation rather than guessing.
A simple scoring rubric helps keep metrics consistent across teams. For each decision, record: chosen action, required evidence set, evidence actually used, and whether the decision matched the approved outcome.
Tool Outcome Metrics
Tool outcomes include both the returned data and the side effects of tool calls. Treat them as first-class evaluation targets.
- Tool Success Rate: Percentage of tool calls that complete without errors. This is necessary but not sufficient.
- Schema and Contract Validity: Validate that outputs match the expected structure and types. Example: a “create invoice” tool must return an invoice ID string and a status enum; missing fields should count as failure even if the call technically succeeded.
- Semantic Correctness: Check whether the tool result matches the intended operation. Example: a “search customer” tool should return the correct customer record for the provided account number.
- Idempotency and Side-Effect Safety: Re-run the same tool call under the same conditions and confirm it does not duplicate side effects. Example: retrying “create ticket” should not create two tickets.
- Latency and Resource Cost: Track time-to-result and any rate-limit pressure. Example: if a workflow times out frequently, decision accuracy may drop because the agent makes choices with incomplete data.
End-to-End Metrics That Connect Decisions and Tools
Decision and tool metrics should roll up into workflow-level measures that explain where errors originate.
- Correct Outcome Rate: Percentage of workflow runs that finish with the correct final state.
- Attribution Accuracy: For incorrect runs, measure whether your logs and scoring correctly identify the responsible decision point or tool call.
- Recovery Effectiveness: Count how often the workflow recovers after a detected issue. Example: if a tool returns a schema mismatch, does the workflow re-validate, re-fetch, or escalate?
Mind Map: Metrics Map for Decisions and Tool Outcomes
Example: Procurement Approval Workflow Scoring
Consider a workflow with two decision points: “request missing documents” vs “approve,” and “choose payment method.” It also calls tools: “fetch vendor profile,” “check contract,” and “create approval record.”
- For the first decision, you score Decision Accuracy against the approved outcome, Evidence Sufficiency against the required evidence set, and Policy Compliance Rate for threshold rules.
- For tools, you score Schema Validity for returned fields, Semantic Correctness for matching vendor identity, and Idempotency by verifying that retries do not create duplicate approval records.
- If a run fails, you use Attribution Accuracy to label whether the failure came from missing evidence, a policy violation, or a tool semantic mismatch.
Practical Measurement Discipline
To avoid metric theater, define each metric with: what is counted, what is excluded, and how it is computed from logs. For example, “tool success” should not include cases where the tool returns valid JSON but violates the expected contract. Likewise, “decision accuracy” should not ignore abstentions; abstention quality is part of correctness, not a separate side quest.
Finally, keep the evaluation dataset aligned with real workflow variety. Include both straightforward cases and the messy ones where evidence is incomplete, tool outputs are inconsistent, or state transitions are easy to get wrong. That’s where the metrics earn their keep.
11.4 Load, Concurrency, and Throughput Testing for Orchestration
Orchestration is where multiagent workflows meet reality: multiple runs overlap, tool calls contend for shared resources, and queues turn “usually fast” into “sometimes slow.” Load, concurrency, and throughput testing answers three practical questions: How many workflow runs can you run at once? What breaks first under pressure? How quickly does the system complete work end to end?
Foundations for Orchestration Testing
Start by defining the unit of measurement. Use workflow run as the primary unit, and step as the secondary unit. A step is a tool call, a model decision, or a state transition. Then define three metrics:
- Throughput: completed workflow runs per minute (or hour).
- Latency: time from workflow start to completion, summarized by p50/p95/p99.
- Saturation indicators: queue depth, active worker count, tool error rate, and time spent waiting for locks or rate limits.
A common mistake is to measure only model latency. Orchestration latency often comes from waiting: rate-limited tools, database contention, or retries.
Mind Map: Test Design
Designing the Load Profile
Use a ramp, not a single spike. For example, run 50 workflow starts per minute, then increase by 50 every 10 minutes until you hit a target concurrency or a failure threshold. Keep the workflow mix realistic: if production has 70% short ticket triage and 30% document-heavy onboarding, mirror that ratio. Otherwise you’ll optimize for the wrong workload.
Define concurrency in two layers. Workflow concurrency is how many runs are active. Tool concurrency is how many tool calls can happen simultaneously for a given tool or dependency. A workflow might be “active” while waiting, so tool concurrency is the lever that often causes bottlenecks.
Concurrency Testing for Shared Resources
Concurrency issues usually come from shared state: rate-limited APIs, database rows, filesystem paths, or shared caches. Test with controlled contention.
- Rate limit contention: configure a tool stub that enforces a limit (e.g., 20 calls/second) and verify the orchestrator respects it without turning retries into a denial-of-service.
- Database contention: run multiple workflows that update the same logical entity (like a ticket ID) and confirm locking strategy prevents deadlocks and preserves correctness.
- Cache contention: if you cache tool results, test cache stampede behavior by clearing the cache and starting many workflows at once.
A good sanity check is to verify that retries include jitter and that retry budgets are enforced per step, not per workflow.
Throughput Testing with Step-Level Attribution
Throughput improves when the orchestrator spends less time waiting. To see why, instrument step durations and classify time into categories:
- Compute time: model reasoning or orchestration logic.
- Tool time: actual tool execution.
- Wait time: queue wait, rate-limit wait, lock wait.
- Retry time: time spent in backoff.
Then compute “time to completion” decomposition for p95 runs. If p95 is dominated by wait time, you likely need better scheduling, fewer synchronized locks, or more parallelism at the right layer.
Example: A Minimal Load Harness
Use a harness that starts workflows, tracks completion, and records step timings. The snippet below shows a simple structure for ramping concurrency and collecting results.
import time, threading
from statistics import mean

def run_workflow(i, client, results):
    t0 = time.time()
    r = client.start_and_wait(i)
    results.append((time.time()-t0, r.ok))

def ramp(client, total, start_c, step, interval_s):
    results = []
    c = start_c
    i = 0
    while i < total:
        threads = []
        for _ in range(min(c, total-i)):
            threads.append(threading.Thread(target=run_workflow,
                                            args=(i, client, results)))
            threads[-1].start()
            i += 1
        for th in threads: th.join()
        time.sleep(interval_s)
        c += step
    return results
This is intentionally small: the key is that you can swap in a stubbed tool layer to simulate rate limits and failures.
Example: Interpreting Results and Choosing a Capacity Threshold
Suppose p95 latency stays under 2 minutes up to 200 concurrent workflows, but at 250 it jumps to 6 minutes while throughput plateaus. If step attribution shows wait time dominates and tool error rate rises, you’ve hit a tool-side saturation point. Your capacity threshold should be set below the knee of the curve, and you should fix the bottleneck before raising concurrency.
Reporting That Engineers Can Act On
For each test run, record:
- workflow mix and parameters
- concurrency ramp schedule
- tool stubs or real tool settings
- p50/p95/p99 latency and throughput
- top three saturation indicators
- step-level time breakdown
Keep the report tied to decisions: “We can run X workflows concurrently with p95 under Y minutes” is more useful than “performance was acceptable.”
11.5 Practical Example: Creating a Test Harness for End to End Workflow Runs
A good test harness for multiagent workflow engineering proves three things at once: the workflow reaches the right outcomes, the tool chain behaves safely under realistic inputs, and the agents recover cleanly from the kinds of failures that actually happen in enterprises. The example below tests a simple but representative workflow: triage a support ticket, fetch relevant account data, propose next actions, and either create a resolution draft or request human clarification.
Core Test Harness Goals
- Deterministic assertions: verify outputs with stable checks like structured fields, status codes, and recorded tool calls.
- Controlled variability: simulate different tool responses and agent decision paths without changing the workflow code.
- Traceability: capture a single run’s timeline so you can see why a decision happened.
- Safety checks: ensure side-effect tools are called only when preconditions are satisfied.
Mind Map: Test Harness Architecture
Example Workflow Under Test
The workflow has five steps:
- Classify: agent assigns category and urgency.
- Fetch Account Data: read tool retrieves account status and plan.
- Assess Policy Fit: agent checks whether automated resolution is allowed.
- Act Or Clarify: if allowed, create a resolution draft; otherwise request clarification.
- Finalize: write a ticket note summarizing the chosen path.
A test harness should treat each step as a contract boundary. If the classification changes, the harness should still tell you whether the tool calls and state transitions stayed correct.
Test Scenarios That Cover Realistic Edges
Create scenarios as small variations of inputs and tool fixtures:
- Happy Path: valid permissions, account eligible for automation, tools return expected data.
- Policy Block: account not eligible, workflow must request clarification and must not call the resolution draft write tool.
- Read Tool Timeout: fetch step times out, workflow retries once, then escalates with a clear error state.
- Write Tool Idempotency: resolution draft write is called twice due to a retry; harness verifies only one draft is created.
- Malformed Tool Output: read tool returns missing fields; workflow must validate and stop before any write.
Harness Implementation Pattern
Use a runner that executes the workflow with injected tool simulators and a state store that records transitions. The key is to log tool calls in a ledger so assertions can be precise.
{
  "scenario": "Policy Block",
  "input": {
    "ticketId": "T-1042",
    "text": "Billing discrepancy for last invoice",
    "requesterRole": "support_agent"
  },
  "toolFixtures": {
    "getAccountStatus": {"eligible": false, "reason": "manual_review"},
    "createResolutionDraft": "should_not_be_called",
    "addTicketNote": {"status": "ok"}
  },
  "expected": {
    "finalState": "clarification_requested",
    "toolCalls": {
      "createResolutionDraft": 0,
      "addTicketNote": 1
    }
  }
}
Assertions That Catch the Right Mistakes
For each run, assert at four levels:
- Outcome: final state equals expected.
- State transitions: step statuses follow the intended order, such as
classify -> fetch -> assess -> clarify. - Tool ledger: count and parameters for each tool call, including correlation ids.
- Safety invariants: if policy blocks automation, write tools must not be invoked.
A practical invariant is: no write tool call occurs unless the workflow state is in an “approved to write” mode. That single rule prevents a whole class of embarrassing failures.
Example Test Run Trace and How to Use It
When a scenario fails, the harness should print a compact trace:
- Step name and status
- Tool calls with inputs and outputs (or error)
- Decision summary with the specific policy reason
For instance, in the Policy Block scenario, the trace should show the policy check reading eligible=false and selecting clarification_requested, followed by exactly one addTicketNote call.
Minimal Code Skeleton for the Runner
def run_scenario(workflow, scenario, tool_sim, state_store):
    run_id = state_store.new_run_id()
    ctx = {"run_id": run_id, "ticket": scenario["input"]}
    workflow_ctx = workflow.init(ctx, state_store)

    for step in workflow.steps:
        state_store.record_step_start(run_id, step.name)
        result = step.execute(workflow_ctx, tool_sim)
        workflow_ctx = workflow_ctx.update(result)
        state_store.record_step_end(run_id, step.name, result)

    return state_store.get_run_artifacts(run_id)
Reporting Format That Helps Debugging
Summarize each scenario with:
- Pass/fail
- Final state
- Tool call counts
- First failing assertion name
- A short trace excerpt around the failure
This keeps the harness useful even when you have dozens of scenarios, because it points you to the exact step and contract boundary that broke.
Date Used for Fixtures
If you need a fixed timestamp in fixtures, use 2026-03-01 so test outputs remain stable across runs.
12. Deployment, Governance, and Workflow Lifecycle Management
12.1 Packaging Workflows for Repeatable Execution
Repeatable execution starts with treating a workflow like a deployable artifact, not a one-off conversation. Packaging means you freeze the workflow’s structure, inputs, tool contracts, and runtime configuration so the same run produces the same behavior—except where inputs legitimately differ.
What “Packaging” Means in Practice
A packaged workflow includes five things: (1) a workflow definition that describes steps and decision points, (2) a tool manifest that lists callable tools and their schemas, (3) an input contract that defines required fields and validation rules, (4) a state model for long-running runs, and (5) an execution configuration that binds environment details like endpoints, timeouts, and retry policies.
A useful mental model is “build once, run many.” You should be able to run the same package in development, staging, and production without editing the workflow logic.
Mind Map: Packaging Components and Their Responsibilities
Workflow Definition: Freeze the Logic, Not the Mood
Your workflow definition should be explicit about transitions. For example, a “Review Invoice” workflow might have steps: collect invoice data → validate fields → check policy → request corrections if needed → finalize approval. Each transition should specify the condition that moves the run forward.
To keep behavior stable, avoid implicit assumptions like “the agent will figure it out.” Instead, encode preconditions such as “vendor tax ID must be present” and postconditions such as “policy check result must include a decision code.”
Tool Manifest: Make Tool Calls Boring and Verifiable
A tool manifest lists each tool with a schema and a side-effect label. Side-effect classification is crucial: read-only tools can be retried freely, while write tools require idempotency keys and careful retry rules.
Example:
SearchVendoris read-only and can retry on transient failures.CreatePurchaseOrderis write-capable and must accept anidempotency_keyso repeated calls don’t create duplicates.
Input Contract: Validate Early, Normalize Once
Packaging should include an input contract that validates and normalizes inputs before any tool calls. Normalization prevents “same meaning, different formatting” issues.
Example:
- Normalize currency codes to uppercase.
- Trim whitespace in invoice numbers.
- Reject missing required fields with a clear error structure.
This is where you prevent downstream chaos. If the workflow expects invoice_date in ISO format, enforce it at the boundary.
State Model: Checkpointing for Long Runs
Long-running workflows need checkpoints that capture progress and enough context to resume safely. A state model should define:
- what gets stored at each checkpoint,
- how to identify a run,
- how to resume after failures,
- how to avoid repeating side effects.
Example:
A procurement workflow stores policy_check_status and purchase_order_id. If the run resumes after a timeout during PO creation, it checks whether purchase_order_id already exists before calling CreatePurchaseOrder again.
Execution Configuration: Bind Environment Without Editing Logic
Execution configuration connects the package to the runtime environment. Keep it separate from the workflow definition so the same package can run with different endpoints.
Example configuration fields:
- tool endpoint URLs,
- maximum step duration,
- retry counts per tool category,
- concurrency limits,
- logging verbosity.
Release Discipline: Versioning and Compatibility Checks
Treat workflow packages like software releases. Version the workflow definition and tool manifest together, and enforce compatibility checks at startup.
Example:
If CreatePurchaseOrder changes its schema, the package should refuse to run rather than silently mis-handle fields.
Minimal Packaging Example: A Run-Ready Bundle
{
  "packageVersion": "2026.03.01",
  "workflow": "review_invoice_v3",
  "inputContract": {
    "required": ["invoice_number", "vendor_tax_id", "invoice_date"],
    "normalization": {"invoice_number": "trim", "currency": "upper"}
  },
  "toolManifest": {
    "SearchVendor": {"sideEffects": "read", "schemaVersion": "1"},
    "CreatePurchaseOrder": {"sideEffects": "write", "idempotencyKey": true}
  },
  "stateModel": {"checkpointEverySteps": 2, "resumeOnRunId": true},
  "executionConfig": {"timeoutSeconds": 45, "maxRetriesRead": 3, "maxRetriesWrite": 1}
}
This bundle is intentionally explicit: it tells the runtime what it must validate, what it may retry, and what it must store to resume safely. When packaging is this concrete, repeatability stops being a hope and becomes a property you can test.
12.2 Configuration Management for Environments and Credentials
Configuration management keeps the same workflow behavior across development, testing, staging, and production while changing only what must change: endpoints, feature flags, and credentials. In multiagent workflow engineering, this matters because tool calls often touch real systems, and a “small” config mistake can turn a safe read into an irreversible write.
Core Concepts for Environment Separation
Start by treating each environment as a named target with its own configuration bundle. The workflow code should remain identical; only the configuration inputs vary. A practical rule: if a value affects tool invocation, it belongs in configuration, not in agent prompts or hardcoded logic.
Define three layers:
- Static workflow definition: the agent team, step graph, and message contracts.
- Environment configuration: service URLs, queue names, model routing, and feature toggles.
- Secrets and credentials: tokens, API keys, certificates, and signing keys.
Keep layer boundaries explicit. When secrets leak into environment config files, you lose the ability to rotate them without redeploying.
Credential Handling Without Surprises
Credentials should be retrieved at runtime from a secret store, not stored in source control. Use short-lived credentials when possible, and ensure tools receive only the minimum fields they need.
A simple pattern for tool invocation is: the orchestrator requests a credential bundle for a tool category, then passes it to the tool adapter. The adapter never logs secrets, and it validates required fields before making a call.
Example: Environment-Specific Tool Endpoints
Suppose your workflow has a “ticketing” tool. In development, it points to a sandbox instance; in production, it points to the real API.
- Development config:
TICKETING_BASE_URL=https://sandbox.example.com/api - Production config:
TICKETING_BASE_URL=https://prod.example.com/api
The workflow steps stay the same because the tool adapter uses the configured base URL.
Configuration Sources and Precedence
Use a deterministic precedence order so operators can reason about what the system will do.
A common precedence stack:
- Runtime overrides (process environment variables)
- Environment config file (non-secret values)
- Default config shipped with the workflow package
Document the precedence in the workflow repository so a teammate can answer “which value won?” without running the system.
Versioning and Change Control
Treat configuration as an artifact with its own version. When you change a workflow definition, you also record which config version it was tested against.
A lightweight approach:
- Tag workflow releases with a config schema version.
- Validate config files against a schema at startup.
- Require a review for production config changes, especially those that affect tool write operations.
Example: Config Schema Validation for Tool Safety
If your tool adapter expects TICKETING_WRITE_ENABLED, validate it early. If it’s missing, fail fast rather than guessing.
# config.schema.yml
type: object
required:
  - TICKETING_BASE_URL
  - TICKETING_WRITE_ENABLED
properties:
  TICKETING_WRITE_ENABLED:
    type: boolean
When staging enables writes but production disables them, the schema still allows the difference while preventing missing fields.
Secret Rotation and Operational Hygiene
Rotation should not require code changes. If the secret store supports versioned secrets, configure tools to reference the secret name rather than a specific version. The secret store can then swap the underlying value.
Also separate credentials by purpose:
- Read-only credentials for data retrieval tools
- Write credentials for ticket creation or document updates
- Admin credentials for workflow governance actions
This separation reduces blast radius when a tool adapter misbehaves.
Mind Map: Environment and Credential Configuration
Practical Example: Two Environments, One Workflow
Imagine the same workflow runs in staging and production. Staging uses TICKETING_WRITE_ENABLED=true so you can test end-to-end ticket creation. Production sets it to false so the workflow can still read and prepare actions without performing writes.
The orchestrator reads the config at startup, passes the write flag to the ticketing tool adapter, and the adapter enforces behavior consistently. This keeps the workflow logic stable while making the environment differences explicit and auditable.
Finally, record the configuration bundle used for each run. A run log that includes config version identifiers helps you debug tool behavior without guessing which endpoints or credentials were active.
12.3 Change Management for Workflow Updates and Rollbacks
Workflow updates are inevitable: policies change, tools evolve, and business rules get clarified. Change management is the discipline that keeps those updates from turning into surprise outages. The core idea is simple: every workflow version must be explainable, testable, and reversible.
Change Control Foundations
Start by separating three kinds of change: configuration tweaks, workflow logic changes, and tool contract changes. Configuration tweaks should be safe by default if they do not alter step ordering or data schemas. Workflow logic changes require full regression testing because they can affect branching and termination conditions. Tool contract changes are the most sensitive because they can break validation, parsing, or side effects.
A practical workflow versioning scheme uses three identifiers: workflow version, tool version, and contract version. When you update a step, you record which contract it expects and which tool implementation it calls. This prevents a common failure mode: a workflow “works” in a test environment but fails in production because the tool’s response shape changed.
Update Workflow Design
Treat an update like a controlled release with gates. First, create a candidate version that is immutable once published. Second, run deterministic checks on the workflow definition: schema validation, step graph consistency, and reachability of terminal states. Third, run scenario tests that mirror real enterprise inputs, including edge cases like missing fields, partial tool failures, and ambiguous decisions.
Then stage the rollout. A safe pattern is canary execution: route a small percentage of new workflow runs to the candidate version while keeping existing runs on the version they started with. This avoids mixing semantics mid-flight, which is where “why did it behave differently?” questions multiply.
Rollback Strategy and Guarantees
Rollback should be a button, not a negotiation. There are two rollback targets: future runs and in-flight runs.
For future runs, rollback is straightforward: stop routing new executions to the candidate version and resume routing to the last known good version. For in-flight runs, rollback depends on whether the workflow is designed for mid-run compatibility. If step outputs are stored with versioned schemas, you can often continue safely. If not, you may need a controlled stop-and-restart policy.
A useful guarantee is “no semantic drift within a run.” Once a run begins, its step definitions and tool contracts remain fixed. If you must change behavior, do it by starting a new run version rather than mutating the running one.
Mind Map: Change Management Flow
Example: Safe Update with Versioned Contracts
Suppose a procurement workflow calls a document extraction tool. The tool previously returned { "vendorName": "..." } but now returns { "vendor": { "name": "..." } }. This is a tool contract change.
Best practice is to create a new workflow version that expects the new contract and to keep the old version for existing runs. In the candidate version, add a validation step that checks the extracted payload shape before continuing. If validation fails, the workflow can route to a clarification step that requests the missing vendor name rather than guessing.
Example: Rollback Without Confusion
Assume you released a candidate workflow on 2026-03-05 using canary routing. After observing elevated validation failures, you rollback.
For future runs, you immediately stop routing to the candidate version and route back to the last known good version. For in-flight runs, you do not alter their step definitions. Instead, you rely on versioned output schemas stored at each step. If a run cannot proceed due to a contract mismatch, you mark it for a controlled restart policy that creates a new run pinned to the stable version.
Operational Checklist
A change is “ready” when you can answer four questions: What changed and why? Which contract versions does the workflow expect? How do you test the change with realistic scenarios? What exactly happens to future runs and in-flight runs if you rollback?
When those answers are explicit, updates become routine engineering work rather than a high-stakes event.
12.4 Governance Controls for Approvals and Human Oversight
Enterprise multiagent workflows need a clear line between “the system can act” and “the system must ask.” Governance controls make that line explicit, auditable, and consistent across tools, teams, and environments.
Core Approval Model
Start with a simple rule set: every workflow step is classified by risk and reversibility. Low-risk steps (read-only lookups, drafting internal summaries) can run automatically. High-risk steps (payments, account changes, data deletion, policy exceptions) require human approval.
A practical governance model uses three layers:
- Preconditions: the workflow must verify eligibility before requesting approval.
- Approval request: the system submits a structured justification and the exact actions proposed.
- Postconditions: after approval, the workflow confirms the action outcome and records evidence.
Example: a workflow that updates vendor bank details should first validate identity and change history. If validation passes but the change is flagged as high-risk, the workflow pauses and requests approval with the proposed update payload and the reason for the risk flag.
Approval Triggers and Thresholds
Define triggers so humans review the right moments, not everything.
Common triggers include:
- Policy boundary crossings: steps that violate a default rule require approval.
- Sensitive tool calls: calls that write to financial, identity, or customer systems.
- Ambiguity resolution: when the workflow must choose between multiple interpretations.
- Exception handling: when the workflow cannot meet acceptance criteria and proposes a workaround.
Use thresholds to prevent approval fatigue. For instance, allow automatic approval for “minor address corrections” but require approval for “bank account changes” or “new payment beneficiaries.” Thresholds should be expressed as measurable conditions, such as field-level diffs, amount ranges, or account ownership checks.
Human Oversight Roles and Responsibilities
Oversight works best when roles are narrow and responsibilities are explicit.
- Reviewer: checks the justification, proposed action, and evidence.
- Approver: grants or denies permission for high-risk steps.
- Operator: handles workflow-level issues like stuck states or repeated tool failures.
A workflow should route approval requests to the correct role based on the step classification. If the reviewer and approver are the same person, the system should still record the decision as an approval event, not a generic comment.
Evidence Packaging for Review
Humans approve decisions faster when the system provides the minimum evidence needed.
For each approval request, include:
- What will happen: the exact tool action name and parameters.
- Why it is needed: the specific policy or acceptance criteria being satisfied or violated.
- What the system already checked: validation results, relevant diffs, and retrieved facts.
- Impact summary: affected entities, estimated scope, and reversibility notes.
Example: for a “refund adjustment” request, the evidence should list the order ID, refund amount, reason code, and the prior refund state. If the workflow proposes a nonstandard reason code, include the rule it cannot satisfy and the alternative it proposes.
Control Flow and State Transitions
Governance controls should be implemented as explicit workflow states rather than informal pauses.
A reliable pattern is:
- Ready for Approval: all preconditions passed; approval request is created.
- Awaiting Decision: workflow is blocked from executing the sensitive step.
- Approved: workflow resumes and re-validates post-approval preconditions.
- Denied: workflow records denial reason and either stops or routes to a remediation step.
Re-validation matters because conditions can change between request and approval. The workflow should confirm that the proposed action payload still matches the current state.
Mind Map: Governance Controls for Approvals and Human Oversight
Example: Approval Gate for Customer Data Correction
Consider a workflow that corrects customer contact information in a CRM.
- Automatic path: if the change is within a verified domain (e.g., correcting a typo in an existing email) and the workflow can confirm the new value matches a trusted source, it proceeds without approval.
- Approval path: if the workflow proposes changing a phone number to a value not previously verified, it requests approval. The request includes the diff, the trusted-source check results, and the exact CRM update parameters.
- Denied path: if the approver denies, the workflow records the denial reason and routes to a “request additional verification” step rather than repeatedly asking the same question.
Auditability and Decision Trace
Every approval decision should be traceable to the workflow run, the step, and the evidence used.
Record:
- who approved or denied
- when the decision occurred
- the approval request ID
- the evidence snapshot reference
- the final outcome of the approved step
This turns governance from a “human checkbox” into a dependable control system that can be reviewed later without reconstructing context from scratch.
12.5 Practical Example: Operating a Multiagent Workflow in a Production Enterprise Setting
A production enterprise workflow needs more than correct outputs; it needs predictable behavior under real constraints. Consider a “Vendor Change Request” process that updates vendor bank details, validates compliance, and notifies downstream systems. The workflow runs continuously for incoming requests, but each request must be handled with strict auditability.
Scenario and Workflow Goals
On 2026-03-05, the procurement inbox receives a vendor change request with a new bank account and supporting documents. The workflow must:
- Verify identity and authorization for the requester.
- Validate document completeness and extract key fields.
- Check compliance rules (for example, sanctioned entity screening and required approvals).
- Apply updates idempotently to the vendor master.
- Notify finance and generate an audit trail.
Team Roles and Orchestration
Use a small team with clear boundaries:
- Intake Agent: normalizes the request, checks required fields, and creates a work item.
- Document Agent: validates documents and extracts bank details.
- Compliance Agent: runs screening and approval checks.
- Update Agent: performs idempotent writes to the vendor master and triggers notifications.
- Audit Agent: records evidence, decisions, and tool results.
The orchestrator drives a state machine: Received → Validated → Extracted → Compliant → Updated → Notified → Audited. Each transition requires explicit acceptance criteria, so failures stop early instead of producing “mostly correct” records.
Integrated Execution Walkthrough
-
Received → Validated: The Intake Agent checks that the requester has procurement role and that the request includes vendor ID, effective date, and document set. If authorization fails, the workflow transitions to
Rejectedwith an audit record explaining the missing permission. -
Validated → Extracted: The Document Agent verifies that documents include both a bank letter and an authorization form. It extracts fields into a structured payload:
vendor_id,account_holder,iban,swift, andeffective_date. If extraction confidence is low, it requests clarification by creating aNeeds Human Inputtask rather than guessing. -
Extracted → Compliant: The Compliance Agent runs screening using the extracted entity name and account holder. It also checks whether the effective date requires an additional approval tier. The acceptance criteria are explicit: screening results must be recorded, and approval checks must reference the exact policy version used.
-
Compliant → Updated: The Update Agent writes changes using an idempotency key derived from
(vendor_id, effective_date, iban_hash). This prevents duplicate updates if the workflow retries after a transient failure. The agent performs a read-before-write validation: it confirms the current vendor record differs from the requested values, so “no-op” requests do not create noisy audit entries. -
Updated → Notified → Audited: After a successful write, the workflow triggers finance notification with the new effective date and masked account details. The Audit Agent stores tool outputs, decision outcomes, and the idempotency key so an auditor can reconstruct what happened without re-running tools.
Concrete Examples of Acceptance Criteria
- Document completeness: “Bank letter present” and “authorization form present” must both be true.
- Compliance decision: If screening flags a match above threshold, the workflow must stop and route to review; it must not proceed to update.
- Update safety: Any write operation must include the idempotency key and must be preceded by schema validation of the extracted payload.
Operational Checklist for Production
- State persistence: store the current state, payload, and idempotency key per work item.
- Observability: log each tool call with correlation IDs and record both success and failure payloads.
- Human handoff: when clarification is needed, capture the exact missing fields and the reason.
- Audit completeness: ensure every transition has an evidence record, even rejections.
This example shows how production operation comes from disciplined transitions, explicit gates, and evidence-first execution. The agents are useful, but the workflow’s state machine and acceptance criteria are what keep enterprise outcomes consistent.