Game Economy Design, Virtual Currency, and Monetization Essentials
1. Foundations of Game Economy Design
1.1 Defining Economic Systems in Games and Their Player-Facing Outcomes
An economic system in a game is the set of rules that determines how value moves: what players can earn, what they can spend, what gets removed from circulation, and what changes hands between players or between play sessions. “Value” here is not just money; it is anything the game treats as scarce, measurable, and decision-relevant—coins, crafting materials, energy, time-based tickets, reputation, or even inventory space.
What Counts as “Economic”
A system is economic when it creates tradeoffs. If two actions always give identical outcomes, there is no economy—just a menu. If different actions produce different bundles, and players must choose among them, you have the beginnings of an economy.
A useful way to separate concepts is to track four things:
- Currencies: units players hold or spend.
- Goods: items or services produced or bought using currencies.
- Progression: long-term growth that changes what players can do.
- Constraints: limits like caps, cooldowns, inventory size, or energy that shape behavior.
Player-Facing Outcomes
Players experience the economy through outcomes, not spreadsheets. These outcomes usually fall into five categories.
-
Opportunity: how often players can take meaningful actions.
- Example: If a daily quest grants 10 tickets and a boss costs 8 tickets, players can attempt the boss twice with some planning.
-
Cost: what players must give up to get something.
- Example: Upgrading a weapon costs 200 scrap and 5 cores. Even if scrap is easy to earn, the cores become the real bottleneck.
-
Uncertainty: whether rewards are predictable.
- Example: A crafting recipe always yields the target item versus a loot chest that rolls rarity. The second creates a different kind of planning and frustration.
-
Speed: how quickly progress happens.
- Example: If a new player can reach level 10 in one evening, early spending decisions feel different than if it takes a week.
-
Fairness: whether outcomes feel consistent with effort and expectations.
- Example: If two players complete the same raid but one receives a rare drop and the other does not, fairness depends on whether the system provides protection like pity counters or alternative paths.
The Core Loop: Earn, Spend, Remove
Most game economies can be described as a loop.
- Earn: players gain currencies or goods through play.
- Spend: players convert currencies into upgrades, items, or access.
- Remove: the game deletes some value via sinks, durability loss, crafting consumption, or fees.
If you skip removal, currencies accumulate and prices stop meaning anything. If you remove too aggressively, players feel starved and stop experimenting.
Mind Map: Economic System to Player Experience
Example: Two Economies, Same Content, Different Feel
Consider a crafting system that produces a “legendary” item.
- Economy A: Players earn scrap frequently, but cores are rare. Crafting consumes both. Outcomes are mostly shaped by core availability.
- Economy B: Scrap is rare, cores are common, and the legendary requires only scrap. Players experience the economy as a grind for scrap rather than a bottleneck for cores.
Both can be balanced, but they teach different lessons. Economy A encourages planning around a specific scarce resource. Economy B encourages time investment and inventory management. The player-facing outcome is different even though the crafting UI looks similar.
A Practical Definition You Can Use in Design Reviews
When you define an economic system, state it as a chain of cause and effect:
- What players earn (and from where).
- What players spend (and what it changes).
- What gets removed (and why that matters).
- What players can choose between (and how choices differ).
- How uncertainty is handled (and how players recover).
If you can answer those five points clearly, you have an economic system definition that translates directly into player outcomes—no hand-waving required.
1.2 Mapping Currency Flows Between Sinks Sources and Transfers
Currency flow mapping answers a simple question: where does value enter the economy, where does it leave, and what moves it around. When you can trace every unit from earn to spend to conversion, you can tune balance without guessing.
Core Vocabulary for Flow Mapping
A source is any action that creates currency units (quests, daily rewards, loot drops, refunds, and some conversion outcomes). A sink is any action that removes currency units (upgrades, crafting costs, entry fees, rerolls, and taxes like auction listing fees). A transfer moves currency between players or between inventories without changing the total supply (trading, gifting, auctions, escrow releases, and marketplace purchases where one player pays another).
A useful extra term is retention loop: the cycle that repeatedly takes players from earning to spending. Mapping flows makes it clear whether the loop is healthy or whether players hoard because sinks are too expensive or too rare.
Step 1: Build a Currency Inventory Model
Start with a list of every currency type and where it can live. For each currency, define:
- Ledger scope: player wallet, guild bank, match instance, or item stack.
- Unit identity: is it fungible (same unit everywhere) or tied to an item (non-fungible token)?
- Allowed transitions: which systems can earn, spend, or transfer it.
Example: “Gold” exists in a player wallet. “Tickets” exist in a match entry inventory and are consumed when the match starts. “Gems” can be converted to Gold but not vice versa.
Step 2: Draw the Flow Graph at the System Level
Represent each system as a node and each currency movement as a directed edge. Label edges with the rule that triggers the movement and the direction of value.
Step 3: Validate Conservation and Accounting Rules
For each currency, you want two checks.
-
Conservation of total supply for transfers: if Gold moves from Player A to Player B, total Gold across all players should not change.
-
Net supply change for sources and sinks: total supply increases by sources and decreases by sinks. Conversions count as a source for the target currency and a sink for the source currency.
Example: If 100 Gems convert into 1,000 Gold, then Gems are sunk by 100 and Gold is sourced by 1,000. If your UI shows “You gained 1,000 Gold,” you still need the Gems deduction to be accounted for in the ledger.
Step 4: Include Constraints and Edge Cases
Flows are rarely pure. Add rules to edges:
- Eligibility: only players above a level can spend.
- Caps: daily earn limits create a sink-like effect by blocking sources.
- Refunds and rollbacks: refunds are sources; chargebacks are sinks or corrections depending on your policy.
- Partial consumption: crafting may consume materials in batches, which changes the effective sink rate.
Example: A crafting system consumes 3 “Ore” per attempt. If the attempt fails but returns 1 Ore, the sink is not 3; it’s 2 net Ore per attempt.
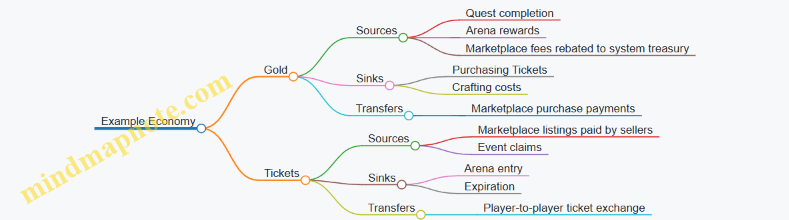
Step 5: Use a Worked Example Flow
Suppose the economy has Gold and Tickets.
- Quests grant Gold (source).
- Arena entry costs Tickets (sink).
- Arena rewards grant Gold (source).
- A marketplace lets players trade Tickets for Gold (transfer plus sink/source depending on fees).
Step 6: Represent It as a Diagram for Communication
    flowchart LR
  Q[Quests] -->|+Gold| W1[Player Gold Wallet]
  A[Arena Rewards] -->|+Gold| W1
  W1 -->|Spend Gold| M[Crafting or Marketplace]
  M -->| -Gold | S1[Gold Sink]
  E[Marketplace Listing] -->|Transfer Tickets| W2[Player Ticket Wallet]
  W2 -->|Spend Tickets| R[Arena Entry]
  R -->| -Tickets | S2[Ticket Sink]
Step 7: Turn the Map Into Tuning Levers
Once flows are explicit, tuning becomes mechanical:
- Increase a sink rate to reduce inflation.
- Add a new source only if you also add a matching sink or adjust conversion ratios.
- If transfers dominate, check for inequality: transfers can concentrate currency among active traders even when total supply is stable.
A good flow map ends with one practical artifact: a checklist of every earn path, every spend path, and every conversion rule for each currency. If you can’t list them, the economy will keep surprising you.
1.3 Distinguishing Progression Systems from Economic Systems
Progression systems and economic systems both shape how players spend time, but they do it through different mechanisms. Progression answers “What can I do next?” Economic systems answer “What do I have, how did I get it, and what does it cost?” When you mix them up, you get confusing pacing, inconsistent value, and monetization pressure that feels unfair.
Core Definitions and Player Experience
A progression system is a structured path of capability growth. It usually changes what a player can access or how effective they are in play: new levels, skill ranks, story chapters, equipment tiers, or unlockable modes. The key feature is gating by advancement state.
An economic system is a structured flow of resources. It governs acquisition, conversion, and consumption of value: currencies, crafting materials, upgrade components, energy, tickets, and time-limited tokens. The key feature is accounting: sources, sinks, and transfers.
A quick way to tell them apart is to ask what changes when the player advances. If the player’s access expands because their “level” changed, that’s progression. If the player’s inventory changes because a “reward” was granted and later spent, that’s economy.
The Shared Surface Area
In many games, progression and economy overlap because progression often requires resources. For example, a “level 10” requirement might be satisfied by XP (progression) and also by spending upgrade materials (economy). The overlap is not a problem; the confusion happens when the design intent is unclear.
A useful rule: progression should be legible as a ladder, while economy should be legible as a ledger. Players can understand a ladder without doing math. They understand a ledger when costs and rewards are consistent and explainable.
Mind Map: How They Differ
Example: Same Outcome, Different System
Consider a weapon upgrade.
- Progression framing: “At level 5, your weapon can reach tier B.” The player’s advancement state determines eligibility.
- Economic framing: “To upgrade, spend 120 scrap and 30 alloy.” The player’s resource balance determines affordability.
If you implement both, keep the player’s mental model aligned. If the UI says “Upgrade requires tier B,” but the real blocker is a currency shortage, players will blame the wrong system.
Example: Energy as Progression vs Economy
Energy often gets treated as progression when it’s actually economy.
- Progression interpretation: “Your energy level increases as you level up.” This makes energy a capability that grows with advancement.
- Economic interpretation: “Energy regenerates and is spent on actions.” Here energy is a resource with a regeneration rate and a consumption cost.
If you label energy as a “level” but tune it like a spendable budget, you create mismatched expectations. Players will plan around what they think is a ladder, then hit a ledger constraint.
Advanced Distinction: Control Surfaces and Tuning Knobs
Progression is tuned with pacing knobs: XP curves, rank thresholds, quest step requirements, and content unlock order. Economy is tuned with accounting knobs: drop rates, conversion ratios, sink sizes, regeneration rates, and pricing.
When progression stalls, players feel stuck. When economy stalls, players feel constrained. Those are different emotions with different fixes.
- If XP progression stalls, reduce friction in earning XP or adjust gating thresholds.
- If currency economy stalls, rebalance sources and sinks or clarify alternative earn paths.
Practical Checklist for Designers
Before you decide which system to change, identify the control surface:
- Does the player’s eligibility change? That’s progression.
- Does the player’s inventory balance change? That’s economy.
- Does the UI explain a ladder step or a cost payment? Match the explanation to the real mechanism.
- If you remove the currency requirement, does the player still advance? If yes, economy was gating progression indirectly.
A clean distinction lets you tune monetization without breaking trust. You can offer economy choices while keeping progression readable, or you can pace progression while keeping economic value stable. Either way, players should never have to guess which system is responsible for their next step.
1.4 Establishing Design Goals for Revenue and Player Satisfaction
Design goals are the bridge between “we want more revenue” and “players still feel good after spending.” If you skip this bridge, you end up tuning numbers without knowing what experience you’re protecting.
Start with Player Outcomes Before Money Outcomes
Revenue goals should be expressed as consequences of player outcomes, not as independent targets. A practical way to do this is to define three player outcomes and then map revenue to them.
- Predictable progression: Players can plan effort and understand what improves their account.
- Fair choice: Purchases change the game in ways players can evaluate, not in ways that feel arbitrary.
- Respect for time: Earn loops do not punish players for being busy or casual.
Example: If your economy uses a premium currency to skip crafting time, the player outcome goal is “time is reduced without erasing the value of effort.” The revenue goal becomes “more purchases of time-savers among players who value speed,” rather than “sell more premium currency.”
Define Revenue Goals as Constraints, Not Just Targets
Revenue goals work best when they include constraints that prevent satisfaction from collapsing.
- Revenue constraint: “No offer should require repeated purchases to access core content.”
- Satisfaction constraint: “Free players must reach meaningful milestones without feeling stuck.”
- Trust constraint: “Currency conversion rates and costs must remain stable within a season.”
Example: Suppose you introduce a limited-time pack. The revenue target might be “increase pack conversion by 8%.” The constraint is “the pack does not become the only path to a competitive advantage.” That forces pricing and item selection to align with fairness.
Translate Goals Into Economy Behaviors
Once outcomes and constraints exist, convert them into economy behaviors you can measure.
- Earn behavior: How players gain currency and resources.
- Spend behavior: What players can buy, and how often.
- Conversion behavior: How currencies exchange and whether conversions feel optional.
- Supply behavior: How scarcity is created and maintained.
Example: If you want predictable progression, you should ensure that the spend behavior supports planning. A crafting system with random outcomes can still be predictable if it includes a pity counter that guarantees a minimum result after a known number of attempts.
Build a Goal Map from Metrics to Decisions
Metrics are not goals; they are signals. The goal map links each metric to a decision lever.
- Inflation risk → adjust sink strength or reward frequency.
- Low premium adoption → check offer clarity, not just price.
- High churn after purchase → review whether the purchase changed expectations or pacing.
Example: If average premium spend rises but retention drops for purchasers, the decision lever is likely “offer composition and pacing,” not “increase discounts.”
Mind Map: Design Goals to Economy Levers
Use Scenario Testing to Validate Goals
Scenario testing turns goals into concrete simulations. Pick a few archetypes and run them through the economy.
- Casual free player: plays 20 minutes per day.
- Committed free player: completes most events.
- Value buyer: purchases a small monthly pack.
- Time buyer: uses premium to reduce crafting time.
Example: If your goal is “respect for time,” simulate the time buyer’s experience: confirm that premium reduces wait without causing a resource shortage that forces additional purchases. If they run out of a different bottleneck, the time-saver becomes a trap, and satisfaction drops.
Write Goals as Testable Statements
A goal statement should include what changes, for whom, and what “good” looks like.
- Bad: “Increase monetization while keeping players happy.”
- Better: “For value buyers, monthly packs should improve progression pacing without making free players feel behind after 30 days.”
Example: If you set a 30-day window, you can compare free and paid cohorts on milestone reach and perceived pacing. Use a fixed observation date such as 2026-04-01 for consistency across experiments.
Final Checklist Before You Touch Numbers
- Outcomes are defined before revenue targets.
- Constraints prevent pay-to-win pressure and trust erosion.
- Each metric has a decision lever.
- Scenario testing covers free, casual, and spender archetypes.
- Goal statements are testable with cohort comparisons.
With these pieces in place, tuning the economy becomes a controlled process: you’re not guessing what players will tolerate, you’re enforcing what players should experience.
1.5 Selecting Metrics That Reflect Both Economic Health and Experience
Good economy metrics do two jobs at once: they describe whether the system is stable, and they explain whether players feel the system is fair and usable. If you track only currency balances, you’ll miss frustration. If you track only player sentiment, you’ll miss quiet inflation.
Start with Player-Facing Outcomes
Economic health is ultimately experienced through outcomes. Choose metrics that map directly to what players do and notice.
- Progression reliability: percent of sessions where a player can complete a goal they set for themselves (e.g., “craft one upgrade,” “finish a quest chain,” “reach the next tier”).
- Time-to-meaningful-upgrade: median time from first login to the first upgrade that changes gameplay (not just a cosmetic).
- Decision friction: rate of “abandon purchase” or “inventory full” events around key moments like crafting, upgrading, or claiming rewards.
Example: If your premium currency store is popular but players report “nothing I buy helps,” you may be selling convenience while progression reliability is dropping for free players.
Add System Health Metrics for Currency Flow
Once player outcomes are covered, measure the economy itself. Think in flows: sources, sinks, and transfers.
- Inflation pressure: growth rate of soft currency per active user over time, adjusted for activity level.
- Sink effectiveness: soft currency removed per active user per day, and how that removal correlates with upgrade usage.
- Spend depth: distribution of spenders across offer tiers, plus how often players hit “next meaningful step” after buying.
Example: If soft currency per active user rises while sink effectiveness stays flat, players accumulate currency without converting it into upgrades. That often leads to either stalled progression or forced sinks that feel punitive.
Measure Conversion and Opportunity Cost
Players don’t just earn and spend; they choose between options. Track conversion rates and the opportunity cost of those choices.
- Earn-to-spend conversion: percent of earned currency that is spent within a defined window (e.g., 7 days). Low conversion can mean poor item usefulness or confusing choices.
- Offer-to-outcome conversion: percent of purchases that result in an upgrade, completion, or meaningful gameplay change within the next session.
- Alternative path usage: how often players use non-monetized routes to reach the same outcome (crafting, exchange, quest rewards).
Example: A bundle that sells well but rarely leads to an upgrade suggests the purchased items are either too low impact, too hard to combine, or gated behind missing materials.
Use Cohorts and Segmentation to Avoid False Confidence
Averages hide problems. Segment by behavior and progression stage.
- New vs. established: early players often experience different reward pacing.
- Free vs. paying: compare reliability and friction separately.
- Inventory state: players with full inventories behave differently from those with room to craft.
Example: Overall inflation might look stable, but new players could be stuck because their early sinks are too aggressive or their early sources are too stingy.
Balance Metrics with Guardrails
Create a small set of guardrails that must not drift while you tune monetization.
| Metric | Healthy Direction | Common Failure Mode |
|---|---|---|
| Progression reliability | Stable or improving | Players feel “stuck” despite earning |
| Time-to-meaningful-upgrade | Decreasing for new players | Long early grind or gating |
| Sink effectiveness | Correlated with upgrade usage | Currency piles up without impact |
| Offer-to-outcome conversion | Stable or improving | Purchases don’t change gameplay |
| Decision friction | Decreasing | Confusing crafting, clutter, or UI timing |
Guardrails prevent “fixing” one metric by breaking another. If you increase sink effectiveness by adding expensive requirements, progression reliability may drop even if currency balances look fine.
Mind Map: Metric System
Example: A Practical Metric Pack
Suppose you’re tuning a crafting system that uses soft currency plus materials.
- Experience metrics: percent of sessions where a player completes one craft goal; median time to first craft completion.
- Economy metrics: soft currency removed per active crafter; average materials consumed per successful craft.
- Conversion metrics: earn-to-spend conversion for soft currency among active crafters; purchase-to-upgrade conversion for material packs.
- Guardrails: decision friction rate near crafting UI; progression reliability for free players.
If a patch increases successful crafts but also increases decision friction and reduces progression reliability for free players, you likely shifted costs into confusing steps rather than improving the system.
Implementation Notes That Keep Metrics Honest
Define measurement windows (session, 7-day, 30-day) and ensure each metric has a clear denominator. For example, “progression reliability” should be calculated only for players who attempted the relevant goal, not for everyone who logged in.
Finally, document the metric intent in plain language. When a metric’s purpose is clear, teams argue less about numbers and more about what players actually experience.
2. Player Behavior Modeling for Economic Decisions
2.1 Identifying Player Segments by Motivation and Spending Patterns
Player segmentation is the step where you stop treating “players” as one blob and start treating them as groups with different reasons to play and different ways to spend. The goal is not to label people forever; it’s to design economy decisions that work for each group without accidentally punishing others.
Start with Motivation, Then Add Spending
Motivation explains what players are trying to accomplish when they log in. Spending patterns explain how they choose to pay for that outcome.
A practical approach is to define motivation axes first, then overlay spending behaviors. For example:
- Motivation axis: mastery and improvement, social belonging, collection and identity, story and progression, or convenience and time savings.
- Spending axis: occasional small purchases, steady mid-tier spend, high spend with frequent transactions, and non-spenders.
This order matters. If you start with spending alone, you’ll confuse “can’t spend” with “doesn’t want to.” If you start with motivation, you can design offers that match the reason they play.
Use Observable Signals Instead of Guesswork
You can’t ask every player why they play, so you infer motivation from behavior. Choose signals that are measurable and stable.
Common motivation signals include:
- Time allocation: time spent in competitive modes vs. crafting vs. social hubs.
- Progression shape: how often they chase the next unlock, vs. how often they repeat activities.
- Engagement with systems: whether they interact with crafting, trading, or event tasks.
- Response to friction: whether they churn after long grinds or after confusing UI steps.
Spending signals include:
- Purchase frequency: how often they buy.
- Average order value: typical spend per transaction.
- Offer preference: whether they buy bundles, single items, or subscriptions.
- Currency usage: whether they convert premium currency into upgrades, cosmetics, or skips.
Build a Segmentation Map That Supports Design Decisions
A segmentation model should answer design questions, not just describe players. Each segment should connect to at least one economy lever.
For instance:
- If a segment is motivated by mastery, they need predictable progression and clear skill-to-reward mapping.
- If a segment is motivated by collection, they need stable rarity communication and meaningful cosmetic ownership.
- If a segment is motivated by convenience, they need time-saving options that don’t break the economy for everyone else.
Mind Map of Segmentation Inputs and Outputs
Example Segments with Concrete Behaviors
Below are example segments you can define using the signals above.
Segment A: Mastery Progressors (Low to Mid Spend)
- Behavior: plays the same competitive loop repeatedly, improves over time, rarely buys large bundles.
- Spending pattern: occasional purchases timed around new seasons or balance changes.
- Economy implication: offer small accelerators that don’t change competitive power, like cosmetic badges or training items that don’t affect match outcomes.
Segment B: Collectors With Identity Goals (Mid Spend)
- Behavior: spends time in cosmetic preview screens, returns for limited-time items, participates in events for themed rewards.
- Spending pattern: buys event passes or themed bundles, not frequent microtransactions.
- Economy implication: keep rarity messaging consistent and ensure collectors can plan purchases without feeling tricked by shifting odds.
Segment C: Convenience Buyers (High Spend, High Frequency)
- Behavior: completes tasks quickly, skips repetitive steps, shows strong response to “reduce time” offers.
- Spending pattern: frequent small-to-mid purchases.
- Economy implication: provide time-saving options that consume premium currency or premium-only resources, while keeping earn loops intact for non-spenders.
Segment D: Social Anchors (Low Spend or Non-Spend)
- Behavior: spends most time in social spaces, follows friends into activities, values group rewards.
- Spending pattern: low purchase rate, occasional cosmetic buys.
- Economy implication: design group-friendly sinks and rewards so social play doesn’t stall due to solo-focused economy design.
Validate Segments with Simple Checks
Before you build offers, test whether segments behave differently in ways that matter.
- Retention check: do segments show different churn points after economy changes?
- Currency flow check: do segments spend premium currency differently across sinks?
- Offer response check: does the same offer work for one segment but fail for another?
If segments don’t diverge on these checks, your segmentation is probably describing noise rather than motivation.
Keep Segment Definitions Stable and Documented
Write down the exact signals and thresholds you used, such as “plays competitive mode at least 40% of session time” or “buys event passes at least twice per event cycle.” When definitions drift, your economy experiments become hard to interpret. Stability is boring, but it prevents expensive confusion.
2.2 Translating Player Intent Into Economic Actions and Choices
Player intent is what the player is trying to accomplish, not what the UI button happens to say. Translating that intent into economic actions means mapping “what they want” to “what the economy lets them do” with minimal confusion and maximal consistency.
Start with Intent Statements That Survive Contact with Reality
Write intent as short, testable statements tied to observable behavior. Examples:
- “I want to feel stronger in my next match.”
- “I want to customize my character without falling behind.”
- “I want to finish a goal today, even if it takes effort.”
Each statement should imply a likely economic action: earn, spend, convert, wait, or choose among alternatives. If an intent statement doesn’t suggest an action, it’s too vague to design for.
Convert Intent Into Economic Jobs to Be Done
Economic jobs are the specific economic outcomes the player is seeking. Common jobs include:
- Power job: reduce time-to-advantage (upgrades, crafting, rerolls).
- Identity job: obtain cosmetics or themed items with low mechanical impact.
- Completion job: finish a set, quest line, or collection milestone.
- Control job: reduce randomness or uncertainty (pity, protection, deterministic crafting).
For each job, define the “acceptable trade.” For instance, a power job might accept higher effort but not higher uncertainty; an identity job might accept slower progress if the item is guaranteed.
Build a Decision Ladder from Intent to Choice
A practical ladder has four rungs: goal, constraint, option set, and commitment.
- Goal: what success looks like.
- Constraint: what blocks them now (time, currency, level, inventory space, risk tolerance).
- Option Set: which economic actions are available (earn route, spend route, convert route, or hybrid).
- Commitment: what they must give up (currency, opportunity cost, or future flexibility).
Example: If the player’s intent is “I want to feel stronger in my next match,” the constraint might be “I lack upgrade materials.” The option set becomes “earn materials via a repeatable activity,” “spend premium currency for a material pack,” or “craft using a mix of resources.” Commitment is the cost and the effect on future upgrades.
Use a Currency Action Taxonomy to Prevent Miswiring
Players interpret actions through currency semantics. Keep a taxonomy so every UI action maps cleanly:
- Earn: actions that increase a currency balance through play.
- Spend: actions that decrease a currency balance for an upgrade or item.
- Convert: actions that exchange one currency for another or for a bundle.
- Transfer: actions that move value between inventories or item states (e.g., dismantle to crafting parts).
When intent is “I want control,” prioritize convert and transfer options that reduce randomness. When intent is “I want speed,” prioritize spend options that shorten time-to-result while keeping the long-term economy stable.
Mind Map: Intent to Economic Choice
Translate Intent Into an Option Set with Clear Tradeoffs
An option set should be small enough to understand and consistent enough to trust. Use “two-lane design”:
- Lane A: Earn-first with time and effort as the main cost.
- Lane B: Spend-first with currency as the main cost.
Both lanes should reach the same economic outcome class. If Lane B grants a different outcome class (like a unique power item), the player will feel the system is cheating, even if it’s technically allowed.
Example: Three Intents, One Upgrade Screen
Assume the screen offers an upgrade to a weapon tier.
-
Intent: “I want to feel stronger soon.”
- Constraint: materials missing.
- Options: earn materials via a repeatable mission (Lane A) or buy a material pack (Lane B).
- Tradeoff: Lane B reduces time but doesn’t change the upgrade math.
-
Intent: “I don’t want to gamble.”
- Constraint: upgrade success is probabilistic.
- Options: use protection tokens that guarantee success after failures.
- Tradeoff: protection costs extra, but it converts uncertainty into predictable cost.
-
Intent: “I’m close to finishing my build.”
- Constraint: inventory space or partial components.
- Options: transfer duplicates into crafting parts, then craft the missing component.
- Tradeoff: transfer preserves value and prevents the player from feeling punished for earlier choices.
Validate the Mapping with Player-Facing Consistency Checks
Before launch, verify three things:
- Semantic consistency: the UI action label matches the currency effect (earn/spend/convert).
- Outcome consistency: different lanes lead to the same outcome class.
- Constraint clarity: the player can identify what is blocking them without reading a manual.
If any check fails, the intent-to-action mapping is broken, and monetization will feel like a surprise rather than a choice.
2.3 Modeling Friction and Time Costs in Earn and Spend Loops
Friction is anything that makes earning or spending feel slower, harder, or more uncertain than the player expects. Time cost is the part of friction that shows up as minutes, clicks, loading screens, travel time, or waiting for a cooldown. In an earn loop, friction can reduce how often players reach the “I have enough to do the thing” moment. In a spend loop, friction can reduce willingness to commit resources even when the player has them.
A useful starting point is to separate three layers of cost:
- Interaction cost: how many actions the player must take (menus, confirmations, crafting steps).
- System cost: how long the game takes to respond (server processing, animations, queue times).
- Uncertainty cost: how likely the player is to get what they want (random outcomes, unclear requirements, missing information).
Each layer affects different player motivations. A player who wants efficiency hates interaction cost. A player who wants certainty hates uncertainty cost. A player who wants variety may tolerate interaction cost if it feels like play rather than paperwork.
Mind Map: Friction and Time Costs in Earn and Spend Loops
Modeling Time Cost in Earn Loops
Earn loops usually have a “threshold” moment: the player earns enough currency or materials to justify spending. Model time cost as time per threshold, not time per action. For example, if a player earns 10 soft currency per match and needs 200 to buy an upgrade, the threshold time is the sum of match time plus travel plus any post-match processing.
A practical method is to define a small set of earn actions and compute:
- Median time to earn one unit (or one bundle).
- Median time to threshold for common spend targets.
- Drop-off probability at each step (queue, loading, match start, reward claim).
Example: Suppose a crafting loop requires 50 materials. Players earn 12 materials per event, but claiming rewards takes 25 seconds due to a multi-screen flow. If the median event time is 4 minutes and the claim flow is 25 seconds, then the threshold time for 50 materials is roughly 4 minutes × 5 events + 25 seconds × 5 claims. Even if the event itself is fun, the claim flow dominates the threshold time and can make the loop feel grindy.
To reduce friction without removing effort, you can batch claims, auto-collect low-risk rewards, and show a progress bar toward the next spendable threshold. The key is to keep the player’s mental model aligned with the system’s pacing.
Modeling Time Cost in Spend Loops
Spend loops have a commitment point where the player decides to convert currency into an upgrade, item, or entry. Time cost here includes the time to preview, the time to confirm, and the time until the result appears.
Model time to spend completion as the duration from “player initiates spend” to “player sees the final state.” Then measure abandonment between preview and confirmation. If players frequently back out after preview, the issue is often uncertainty cost, not raw speed.
Example: A player clicks “Upgrade” and sees a preview that says “Chance to succeed.” If the preview also hides the exact failure consequence (e.g., whether materials are refunded), uncertainty cost rises. Even if the UI is fast, players may delay spending because the risk feels opaque. Fixing this is about clarity: show exact outcomes, refund rules, and the expected number of attempts given current stats.
Advanced Details Without Guesswork
-
Friction should be proportional to stakes. High-stakes spends (currency that is hard to earn) can justify extra confirmation, but low-stakes spends should be quick. If every action requires the same confirmations, players learn to treat the UI as a tax.
-
Separate “waiting” from “doing.” Cooldowns are waiting; crafting animations can be doing if they provide meaningful feedback. If the player is waiting anyway, shorten the perceived wait with progress indicators that match real timers.
-
Use step-level instrumentation. Track timestamps for: initiation, first screen response, preview render, confirmation, server receipt, and final inventory update. When you see a spike, you know whether it’s interaction cost, system cost, or uncertainty cost.
-
Make thresholds visible. If the player cannot tell how close they are to the next spendable amount, time cost becomes psychological. A simple “X remaining to next upgrade” reduces uncertainty and reduces the urge to check menus repeatedly.
Integrated Example: One Loop, Two Friction Profiles
Consider two versions of the same earn-spend loop.
- Version A: Earn is fast, but claiming rewards requires multiple screens. Spend is quick and outcomes are fully shown.
- Version B: Earn has longer match time, but reward claims are one tap. Spend requires confirmation and shows only a vague success chance.
In Version A, the player’s threshold time is inflated by interaction cost during claiming. In Version B, the threshold time may be acceptable, but the spend loop abandonment increases due to uncertainty cost. Both versions can feel “slow,” but the fix differs: Version A needs flow simplification; Version B needs outcome transparency.
The goal is not to remove friction entirely. It’s to ensure friction matches the design intent: effort for meaningful progression, clarity for commitment, and pacing that lets players predict what happens next.
2.4 Designing for Retention Without Creating Pay to Win Pressure
Retention is not the same thing as compulsion. The goal is to keep players coming back because the game stays rewarding and understandable, not because their wallet becomes a shortcut through the rules. Pay to win pressure usually appears when spending changes outcomes in a way that feels unfair, unavoidable, or too efficient compared to normal play.
Start with a Fairness Model
A practical way to prevent pay to win pressure is to define what “fair” means in your game’s context.
- Outcome fairness: If two players invest the same time, their results should be meaningfully comparable.
- Progress fairness: Spending can accelerate progress, but it should not erase the gap created by skill, knowledge, or play choices.
- Opportunity fairness: Free players should have a clear path to the same competitive participation, even if it takes longer.
Example: In a co-op dungeon, premium currency might speed up crafting. If it also lets players bypass mechanics that require learning, then the premium path changes outcomes more than it changes convenience.
Separate Power from Value
Retention improves when players feel agency. Agency drops when the best strategy is always “buy the strongest option.” Separate the things that affect competitive power from the things that affect perceived value.
- Power includes stats, damage multipliers, accuracy, survivability, and any mechanic that directly changes win probability.
- Value includes cosmetics, convenience, personalization, and non-competitive utility.
A common best practice is to allow premium purchases to improve comfort rather than combat math. Comfort examples: faster crafting timers, extra inventory slots, or reduced travel time to a crafting station.
Use Time and Effort as the Main Differentiator
If spending reduces time-to-power too aggressively, free players feel trapped in a treadmill where effort is always behind. Instead, design so that spending mainly changes when progress happens, not what progress enables.
- Time gating: Premium can shorten waits, but the maximum achievable power at a given account level remains aligned.
- Effort gating: Premium can help with logistics, but the core requirements still demand play actions like completing objectives, earning reputation, or mastering rotations.
Example: Suppose upgrading a weapon requires collecting three materials and winning two matches. Premium can let players buy one crafting material, but the two match wins remain required. The player still has to perform.
Build Competitive Guardrails
Competitive modes are where pay to win pressure becomes obvious. Guardrails keep matches readable.
- Matchmaking normalization: Use level caps, stat brackets, or normalized loadouts so players compete on skill within a band.
- Mode-specific rules: Allow different monetization rules per mode. If a ranked mode is sensitive, keep it stricter than casual play.
- Soft caps on premium advantages: If premium affects stats, cap the effect so it cannot dominate outcomes.
Example: A ranked arena could normalize weapon rarity into a fixed stat range. Players still choose builds, but buying a higher rarity does not automatically translate into higher damage.
Design Progression That Rewards Skillful Play
Retention rises when players see progress as a result of decisions. If spending replaces decisions, retention becomes fragile.
Use progression that ties to observable actions:
- Learning-based progression: Unlocks that require completing challenges, mastering timing, or using specific tactics.
- Choice-based progression: Systems where different builds trade off strengths, so no single purchase is always best.
- Consistency loops: Daily or weekly goals that reward participation and planning rather than grinding one currency sink.
Example: A strategy game can offer premium “expeditions” that grant extra resources, but the best units still require tech research earned through in-game tasks. Players who learn the tech tree progress faster, not just richer.
Mind Map: Retention Without Pay to Win Pressure
Example: A Purchase That Feels Helpful, Not Mandatory
Imagine a mobile RPG with a premium currency that speeds crafting.
- What the purchase does: reduces crafting time and increases the number of crafting attempts per day.
- What it does not do: does not increase the maximum rarity tier available to a player at their current progression bracket.
- Why it supports retention: players return to use their time efficiently, but they still need to earn materials and complete the same crafting recipes.
To make this work, communicate the rule precisely in the purchase description and in the crafting UI. If players can’t tell whether spending changes power, they will assume it does—and that assumption becomes pressure.
Validate with Player Signals
You can’t rely on intentions; you need signals.
- Behavioral signals: free players stop participating in competitive modes after a monetization change.
- Friction signals: support tickets spike around “unfair advantage” or “can’t compete.”
- Engagement signals: premium users churn because they feel the game is pay-locked, not because they lack content.
Use these signals to adjust guardrails, caps, and mode rules so spending remains a convenience layer, not a dominance layer.
2.5 Validating Assumptions Using Telemetry and Experimentation
Good economy design starts with assumptions, but assumptions are only useful when you can test them. Validation means two things: (1) you measure what actually happens, and (2) you change one thing at a time so you can attribute differences to that change.
Start with Assumptions You Can Measure
Write each assumption as a testable statement tied to an observable outcome. For example: “If we reduce the cost of an upgrade by 10%, more players will complete the upgrade path within 7 days.” The measurable outcomes might be upgrade completion rate, time-to-upgrade, and currency remaining at day 7.
To keep tests honest, define the smallest unit of change. If you adjust both drop rates and crafting costs, you won’t know which lever caused the result. Economy work often fails here: teams run “economy updates” that bundle multiple changes, then argue about causality.
Telemetry That Matches the Economy Model
Telemetry should mirror the currency flows you designed: earn events, spend events, transfers, and sinks. If your model says players earn soft currency from quests and spend it on crafting, you need events for quest completion rewards, crafting confirmations, and any refunds or cancellations.
A practical event set includes:
- Currency balance snapshots at session start and end
- Earn events with source identifiers (quest id, event id, loot table id)
- Spend events with destination identifiers (item id, upgrade tier, crafting recipe id)
- Conversion events between currencies, including rate version
- Progression milestones that depend on the economy (e.g., “reached tier 3”)
Example: Suppose you suspect inflation is creeping in because players earn too much soft currency. You should confirm whether the increase comes from higher earn volume, reduced spending, or both. Balance snapshots plus earn/spend event totals let you separate those causes.
Build Dashboards Around Health, Not Just Volume
Volume metrics are tempting because they’re easy to graph. Economy health metrics are harder but more informative.
Use a small set of dashboards:
- Inflation pressure: average soft currency balance over time by cohort
- Spend depth: distribution of spend per player per week
- Sink effectiveness: spend per sink type divided by active players who could use it
- Friction signals: drop-off rates at key decision points (e.g., before crafting confirmation)
- Offer engagement: conversion from viewing an offer to purchasing, segmented by currency balance
If you only track “total currency earned,” you can miss a common failure mode: players earn more but also spend more, leaving balances stable. That’s not inflation; it’s a healthier loop.
Mind Map: Validation Pipeline
Experiment Design That Doesn’t Lie
Experiments should be randomized and segmented. Randomization reduces bias, but segmentation ensures you don’t average away the truth. For instance, a cost reduction might help new players but harm mid-spenders by shifting their purchase timing.
Choose an experiment unit that matches the decision. If the change affects an offer price, randomize at the player level. If it affects a loot table, randomize at the session or match level so the loot outcomes are comparable.
Define guardrails before you run the test. Guardrails are not “nice to have” metrics; they are the stop signs. Examples:
- No significant drop in retention for cohorts that previously spent
- No spike in refund rate or purchase cancellations
- No extreme increase in currency balances that would break progression pacing
Example: Testing a Crafting Cost Reduction
Assumption: “Reducing crafting cost by 10% increases the share of players who craft at least once within 7 days without increasing average soft currency balance by more than 5%.”
Telemetry plan:
- Track crafting attempts and confirmations
- Track soft currency balance at day 0 and day 7
- Track progression milestones tied to crafted items
Experiment plan:
- Control: original crafting cost
- Treatment: 10% reduced cost
- Segment: new players and returning players separately
Analysis approach:
- Compare craft-at-least-once rate within 7 days
- Compare day-7 average soft currency balance and its distribution
- Check whether the increase comes from more attempts or faster confirmations
If craft rate rises but balance rises sharply, the change may be shifting spending later rather than improving the loop. That’s still useful information, but it means the assumption about net economy impact was incomplete.
Mind Map: Metrics and Attribution
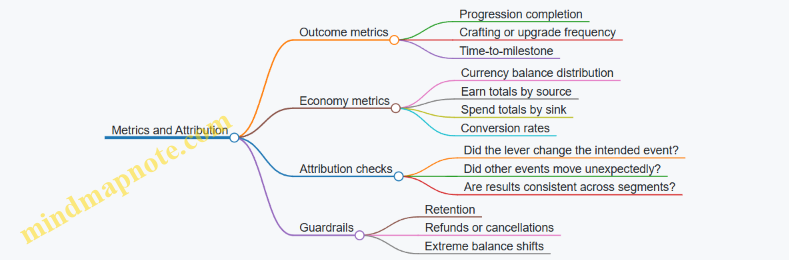
Interpreting Results Without Overfitting
A result is not “good” just because it’s statistically significant. Look for effect size and practical impact. A tiny lift in conversion might not justify the risk of destabilizing progression pacing.
Also check whether the change behaved as designed. If you reduced crafting cost, you should see the spend event amounts shift accordingly. If spend amounts don’t change, the cost reduction might not have reached the intended players, or the UI might be confusing, causing fewer confirmations.
Finally, document the chain from assumption to measurement to decision. Economy systems are interconnected; future changes will be easier when you can trace what you learned and why you trusted it.
3. Virtual Currency Architecture and Taxonomy
3.1 Classifying Currencies by Earnability Spendability and Convertibility
A currency system stops being “just numbers” when players can predict what the numbers let them do. To make that prediction reliable, classify each currency by three properties: how it is earned, how it is spent, and whether it can be converted into other currencies.
Earnability
Earnability describes the allowed ways players can obtain the currency.
- Player-earned: Obtained through gameplay actions like quests, wins, crafting, or time-based rewards. Example: a currency called Gems earned from daily missions and event participation.
- Store-earned: Obtained only through purchases. Example: Premium Coins granted only after buying a pack.
- Hybrid-earned: Obtained through both gameplay and purchases, usually with different rates or caps. Example: Event Tokens drop in limited quantities during an event, and can also be bought to finish a track.
Why this matters: earnability determines how much the economy must “pay” to keep progression feeling fair. If a currency is player-earned, its supply will grow with active users and playtime, so sinks must exist.
Spendability
Spendability describes what the currency can buy and where it can be used.
- Broad spendability: Used across many systems, such as upgrading, crafting, and cosmetics. Example: Gems can buy upgrade materials and also reroll crafting stats.
- Narrow spendability: Used only for specific categories, such as cosmetics only. Example: Premium Coins buy skins and emotes but never affect combat stats.
- Conditional spendability: Used only under certain rules like ownership requirements, time windows, or eligibility tiers. Example: Event Tokens can only be spent on the event shop during the event.
Why this matters: narrow spendability reduces the risk that a currency becomes a universal “power lever.” It also makes player expectations simpler: “This currency is for that thing.”
Convertibility
Convertibility describes whether and how a currency can be exchanged for another.
- Non-convertible: No conversion path exists. Example: Premium Coins cannot be exchanged into Gems.
- One-way convertible: Conversion exists in one direction only. Example: players can convert Gems into Crafting Dust, but not back.
- Two-way convertible: Conversion exists both directions, usually at a rate that prevents arbitrage. Example: Event Tokens can be converted to Gems at 1:0.8, and Gems can be converted back at 1:1.25.
Why this matters: convertibility changes the effective value of currencies. Even if two currencies look different in UI, two-way conversion can make them behave like the same economic lever.
Putting It Together with a Classification Grid
Use the three axes to label each currency. A simple grid keeps design intent consistent across teams.
| Currency | Earnability | Spendability | Convertibility |
|---|---|---|---|
| Gems | Player-earned | Broad | Non-convertible |
| Premium Coins | Store-earned | Narrow | Non-convertible |
| Event Tokens | Hybrid-earned | Conditional | One-way to Gems |
Mind Map: Currency Classification
Example: Designing Three Currencies for One Economy
Imagine a game with progression upgrades, cosmetic customization, and an event.
-
Gems (player-earned, broad spendability, non-convertible): Players earn Gems from normal play and spend them on upgrade materials and crafting. Because Gems are player-earned and broadly spendable, you must include strong sinks like crafting costs and upgrade tiers.
-
Premium Coins (store-earned, narrow spendability, non-convertible): Premium Coins buy cosmetics only. Since they cannot convert into Gems, spending them cannot inflate upgrade power indirectly.
-
Event Tokens (hybrid-earned, conditional spendability, one-way convertibility to Gems): Players earn Tokens during the event and spend them in the event shop. After the event ends, Tokens are either removed or converted to Gems at a fixed rate, so the economy doesn’t permanently accumulate an unused supply.
Practical Checks to Avoid Common Mistakes
- If a currency is player-earned and broadly spendable, verify there are enough sinks to prevent runaway inflation.
- If a currency is store-earned but broadly spendable, check whether it can indirectly affect competitive outcomes through conversion or shared upgrade paths.
- If two-way conversion exists, ensure exchange rates include a loss or friction so players cannot “print value” by cycling currencies.
A clean classification makes future decisions easier: when someone proposes a new reward or shop item, you can immediately ask which earnability, spendability, and convertibility rules it should follow.
3.2 Designing Soft Currency, Hard Currency, and Premium Currency Rules
Soft currency is earned through gameplay and spent on routine progression. Hard currency is typically earned more slowly or via limited sources, and premium currency is the one tied to real-money purchases. The rules you write for these currencies determine whether players feel in control or feel forced into spending.
Core Definitions That Drive Rule Design
Start by defining what each currency is allowed to do.
- Soft currency: Used for frequent upgrades, crafting, and everyday purchases. It should be abundant enough to keep play moving, but scarce enough to make choices matter.
- Hard currency: Used for faster progression, convenience, or limited-time items. It should be less common than soft currency, with clear reasons for its existence.
- Premium currency: Used for monetized offers and often for the same categories as hard currency. Even if premium and hard are similar in UI, their sources and constraints must be different.
A practical rule: if a currency can be earned through normal play, it should not be the only way to access core content. Otherwise, “normal play” becomes a long detour.
Rule Set for Earn, Spend, and Convert
Write rules as three layers: sources, sinks, and conversion.
-
Sources
- Soft: quests, daily tasks, event participation, passive income with caps.
- Hard: limited rewards, achievement milestones, event tracks with throttles.
- Premium: store purchases, subscription bundles, platform promos with strict caps.
-
Sinks
- Soft sinks should be frequent and varied: crafting materials, upgrade costs, rerolls with limits.
- Hard sinks should be fewer and more deliberate: speed-ups, premium crafting tickets, limited inventory expansions.
- Premium sinks should align with monetized offers: cosmetics, convenience items, and bundles that include value without breaking progression.
-
Conversion
Conversions are where economies quietly break. If players can convert soft to premium too easily, premium loses meaning. If conversions are too restrictive, players feel punished for earning.
A safe baseline is:
- Soft to hard: allowed only via rare events or long-term grinds with meaningful opportunity cost.
- Hard to premium: allowed only at a 1:1 rate if hard is effectively a “wallet” for premium entitlements.
- Premium to hard: usually allowed at 1:1, but avoid letting premium become a substitute for soft sinks.
Designing Spend Rules That Preserve Choice
Spending rules should explain themselves through constraints.
- Rate limits: limit how often a currency can be used for rerolls or speed-ups.
- Eligibility: require ownership of prerequisites for upgrades so currency doesn’t bypass progression gates.
- Batching: allow bulk purchases for premium offers, but keep the underlying costs consistent so players can predict outcomes.
Example: Suppose an upgrade requires 200 soft currency and 2 crafting tokens. If a premium item “instant upgrade” exists, it should still require the crafting tokens, or it should convert the soft cost into a premium cost without removing the need for tokens. That keeps the economy from collapsing into a single-click path.
Preventing Currency Confusion with Clear Rules
Players should never wonder what a currency is for. Use consistent naming and consistent UI behavior.
- If soft currency is earned in gameplay, show it as the default payment method for routine actions.
- If hard currency is rarer, show it as a “faster path” with visible tradeoffs.
- If premium currency is purchased, show it as the store currency and keep it out of core crafting loops.
A simple test: can a new player explain, after one session, what each currency is used for without reading a guide? If not, your rules are too clever.
Mind Map: Currency Rules and Their Effects
Example Rule Templates You Can Implement
Template A: Upgrade Purchase
- Cost: 200 soft + 2 tokens
- Optional speed-up: 10 hard, limited to 3 times per day
- Premium “instant complete”: 10 hard equivalent, but still requires tokens
Template B: Event Shop
- Soft currency: buy common rewards
- Hard currency: buy rare cosmetics or crafting tickets
- Premium currency: buy bundles that include hard currency and cosmetic variants
Template C: Conversion Policy
- Soft to hard: only during a limited event, exchange rate fixed, cap per account
- Hard to premium: 1:1, instant, only via wallet screen
Advanced Detail: Guardrails Against Economic Drift
Once rules exist, enforce them with accounting and validation.
- Track every currency change as a transaction with a reason code: earn, sink, conversion, refund.
- Validate conversion rates server-side and log mismatches.
- Ensure sinks scale with content updates so soft inflation doesn’t turn into a free-for-all.
If your economy is stable, your rules are doing their job. If it isn’t, the first place to look is conversions and eligibility, because those are the levers that quietly change player behavior.
3.3 Handling Exchange Rates and Conversion Paths Between Currencies
Exchange rates are the rules that decide how much of one currency you get for a given amount of another. Conversion paths are the allowed routes between currencies, including whether players can swap directly or must go through intermediate currencies. Getting both right prevents “currency confusion,” reduces arbitrage exploits, and keeps progression feeling fair.
Core Concepts That Prevent Broken Economies
Start with a simple currency taxonomy: soft currency (earned in gameplay), hard currency (premium), and premium bundles or tokens (often used for limited-time offers). Exchange rates should be treated like a contract, not a suggestion. If 100 soft currency buys 1 hard currency, that ratio must remain consistent within a defined scope (for example, a specific event or a specific exchange booth).
A conversion path is a directed graph: each edge is a conversion rule, and each node is a currency. If you allow multiple edges, you must check for cycles. A cycle is when a player can convert A → B → C → A and end up with more than they started. Even small rounding differences can create profitable loops.
Designing Conversion Rules with Clear Scope
Define three scopes for exchange rates:
- Permanent exchange rules: stable ratios used for long-term systems like crafting exchanges.
- Event exchange rules: temporary ratios tied to an event window.
- Offer exchange rules: conversions implied by bundles, where the “exchange” is really a pricing model.
For each scope, specify:
- Rate (how much you receive)
- Fees (if any; fees should be explicit and consistent)
- Limits (daily caps, inventory caps, or per-transaction caps)
- Rounding (floor, ceil, or nearest; and whether rounding favors the player or the system)
Example: A crafting exchange booth might convert 500 soft currency into 1 crafting token, with a 0% fee and floor rounding. If a player tries to exchange 999 soft currency, they should receive 1 token and the remaining soft currency should stay unchanged.
Choosing Conversion Paths That Match Player Intent
Not every conversion should be allowed. Conversion paths should mirror player intent:
- If players want to speed up progression, allow soft → hard conversions only through controlled systems (for example, “buy missing materials” rather than “convert everything”).
- If players want flexibility, allow hard → soft conversions only when the soft currency is clearly a “catch-up” resource.
- If players want specialization, keep some currencies non-convertible except via specific sinks.
A common mistake is enabling direct conversions between every pair of currencies. Instead, pick a hub currency for conversions. For instance, allow conversions only between soft and hard, while other currencies (like event tokens) convert only into soft at a fixed redemption rate.
Handling Rounding and Fees Without Surprise
Rounding and fees are where trust is won or lost. Players notice when they “lose” more than expected.
Use a consistent rounding method and show it in the UI. If the system uses floor rounding, display “You receive X tokens” rather than “You receive approximately X.” If there is a fee, show it as a separate line item.
Example: Suppose the exchange rule is 300 soft → 1 hard, with a 5% fee. For 300 soft, the player effectively receives 0.95 hard before rounding. If you floor to whole hard units, they might receive 0 hard, which feels broken. To avoid that, either remove the fee, increase the rate granularity (allow fractional hard in internal math), or enforce a minimum exchange amount.
Preventing Arbitrage with Cycle Checks
If you allow multiple conversion edges, you must ensure no profitable cycles exist. The simplest approach is to restrict conversion paths so that cycles are impossible. If cycles are unavoidable, enforce a “loss” on every conversion edge (fees or unfavorable rounding) so that any cycle reduces value.
Mind map of the conversion design checklist:
Example Conversion System That Stays Predictable
Imagine three currencies:
- Gold (soft)
- Gems (hard)
- Festival Tickets (event token)
Rules:
- Gold → Gems: 1000 Gold = 10 Gems, no fee, floor rounding, minimum 1000 Gold.
- Gems → Gold: 10 Gems = 900 Gold, 0% fee, floor rounding, daily cap of 50 Gems.
- Festival Tickets → Gold: 1 Ticket = 200 Gold, tickets are non-purchasable with Gems.
This design avoids direct Ticket ↔ Gems conversions, so players can’t chain conversions to exploit rounding. It also keeps the event token tied to a clear sink (redeeming for Gold).
Diagram of the conversion graph:

Implementation Details That Keep Math Honest
Treat conversions as atomic transactions: validate balances, compute outputs using the defined rounding, apply fees/limits, then write ledger entries. Store the exchange rule version used for each conversion so audits and support cases can reproduce the exact math.
Example: If you later adjust the Gold → Gems rate for an event, you should not retroactively change past conversions. Each conversion record should reference the rate version and scope, ensuring the player’s history remains consistent.
3.4 Preventing Currency Confusion with Clear UI and Messaging
Currency confusion happens when players can’t tell what a number means, where it came from, or what it can do. The fix is not a single label; it’s a chain of clarity that starts at the currency definition and ends at the purchase confirmation.
Establish Currency Identity in the Interface
Treat each currency like a named tool, not a generic counter. In practice, every currency should have a consistent visual identity across the game: icon, color, placement, and wording. If “Gems” appear as a blue gem icon in the shop, they should not appear as a gold coin icon in the inventory.
Use a short, repeatable naming rule:
- Soft currency: earned through play, used for routine progression.
- Premium currency: purchased, used for convenience or optional acceleration.
- Event currency: earned in limited windows, spent only in event stores.
Example: If your premium currency is “Crystals,” the UI should never label it as “Credits” in one screen and “Crystals” in another. Consistency beats cleverness.
Make Earn and Spend Paths Obvious
Players get confused when they see a spend button but can’t infer how they’ll pay for it. Every screen that shows a cost should also show the relevant currency and a quick path to earn it.
A practical pattern:
- Show the cost with the currency icon and amount.
- Next to the cost, show a small “Earned by” hint when the player lacks the currency.
- When the player has enough, show “You can buy now” without extra text.
Example: A crafting screen costs 50 “Scrap.” If the player has 20, the button reads “Craft (50 Scrap)” and the UI includes a small line: “Earn Scrap via Salvage Missions.” If the player has 60, the hint disappears and the button becomes “Craft.”
Use Messaging That Explains Conversion Rules Without Math
Conversion is a major source of confusion because it changes the meaning of a currency. If conversion exists, the UI must state the rule at the moment of decision.
Keep conversion messaging rule-based and concrete:
- State whether conversion is one-way or two-way.
- State whether conversion is fixed rate or variable.
- State whether conversion is instant or requires a process.
Example: If 100 “Coins” can be exchanged for 10 “Crystals,” the exchange screen should show: “Exchange 100 Coins for 10 Crystals.” If the exchange is limited, add: “Limit 3 per day.” Avoid vague lines like “Coins can be exchanged.”
Prevent Misleading Affordances in Buttons and Flows
Buttons should match the player’s expectation. If a button triggers a purchase, it should look like a purchase. If it triggers spending soft currency, it should look like spending.
Common pitfalls:
- A “Buy” button that sometimes spends soft currency and sometimes spends premium currency.
- A “Confirm” screen that shows a different currency than the button implied.
- A shop item card that shows premium currency cost, but the checkout uses a different currency due to a discount rule.
Rule of thumb: the currency icon and amount must appear in the button label area and again in the final confirmation.
Add Guardrails for Insufficient Funds and Partial States
When players can’t afford something, the UI should explain what’s missing and what the next step is.
A systematic approach:
- Show the shortfall: “You have 20, need 50.”
- Offer the correct action: “Earn Scrap” or “Get Crystals” depending on which currency is required.
- Disable actions that would lead to failure, but keep the reason visible.
Example: On a “Buy Booster” screen costing 200 premium currency, if the player has 120, the primary button becomes “Get 80 more” and routes to the premium currency purchase flow. The UI should not route to a soft-currency earn screen because that would waste time.
Keep Currency Displays Stable During Navigation
Confusion spikes when numbers change unexpectedly while the player is browsing. If costs or discounts update, the UI should communicate the change.
Practical techniques:
- Freeze displayed prices while the player is on a purchase screen.
- If a discount expires, show a clear message like “Discount ended” and refresh the cost.
- Avoid background updates that silently change totals.
Mind Map: Currency Clarity Checklist
Example: Three Screens with Coherent Messaging
Shop Item Card: “Booster Pack — 300 Crystals” with the crystal icon.
Purchase Screen: Summary repeats “300 Crystals” and shows “You have 120 Crystals.”
Insufficient Funds Button: Primary action reads “Get 180 more Crystals” and routes to the premium currency purchase flow.
This sequence prevents the classic failure mode where players think they’re spending one currency, then discover at checkout that the game used another.
Example: Conversion Screen That Doesn’t Surprise
Exchange screen shows:
- “Exchange 100 Coins for 10 Crystals”
- “Coins will be removed immediately”
- “You have 70 Coins”
The player sees the rule, the timing, and the affordability before confirming. That’s the whole job: reduce interpretation work so the player can decide confidently.
3.5 Implementing Currency Ledgers and Accounting in Game Systems
A currency ledger is the system of record for every currency movement: who paid, who received, what changed, and why. Without it, you end up debugging “economy bugs” by guessing, which is like balancing a checkbook using vibes.
Core Concepts and Invariants
Start with a small set of invariants that must always hold:
- Conservation of value per transaction: if currency moves from A to B, the total amount across all accounts changes only by the configured source or sink rules.
- Non-negative balances: a player’s balance should not go below zero unless you explicitly support debt and handle it consistently.
- Idempotency: retrying the same grant or purchase should not double-credit.
- Traceability: every balance change must reference a reason code and a transaction identifier.
A practical mental model is: accounts hold balances, transactions move amounts, and events explain intent.
Ledger Data Model
Use a ledger that separates balances from movements.
- Account: player, guild, inventory container, or system wallet.
- Balance snapshot: optional, but useful for audits and fast reads.
- Ledger entry: immutable record of a movement.
- Transaction header: groups multiple ledger entries under one action (e.g., purchase plus entitlement).
Each ledger entry should include:
account_idcurrency_iddelta(positive or negative)transaction_idreason_code(earn, spend, refund, migration, admin adjustment)timestampmetadata(offer id, item id, match id)
Transaction Types and Reason Codes
Reason codes keep your system understandable when you’re staring at logs at 2 a.m. (or whenever you’re unlucky).
Common types:
- Earn: quest reward, daily login, crafting output.
- Spend: upgrade cost, crafting input, entry fees.
- Transfer: trade, gifting, escrow release.
- Conversion: exchange between currencies.
- Adjustment: admin correction, migration, bug fix.
- Refund: chargeback reversal, purchase reversal.
For conversion, treat it as two ledger entries under one transaction: debit source currency and credit target currency, with a recorded rate.
Idempotency and Consistency Controls
Idempotency prevents double charges from retries. The simplest approach is to require a unique external id per action, such as purchase_receipt_id or reward_batch_id.
- On first processing, write the transaction header and ledger entries.
- On retries, detect the existing
transaction_idor external id and return the already-processed result.
Consistency controls also matter:
- Validate that the player has sufficient balance before applying a spend.
- Apply updates atomically for the transaction header and ledger entries.
- Use optimistic concurrency for balance writes if you store balances separately.
Example: Purchase Flow with Ledger Entries
Imagine a player buys a pack for premium currency and receives a bundle of items.
- Debit premium currency from the player.
- Credit items to inventory (items can be modeled as separate ledgers or as inventory counts with their own accounting).
- Record the offer id and receipt.
Transaction: purchase_pack_2026-04-12_abc123
Entries:
1) player_77 premium_delta -120 reason purchase_offer offer_9
2) player_77 item_gold_ticket +1 reason grant_offer offer_9
3) player_77 item_skin_shard +50 reason grant_offer offer_9

Validation:
- Ensure premium balance >= 120 before entry 1
- Ensure receipt id is unique for idempotency
Example: Refund and Chargeback Reversal
Refunds are tricky because you must reverse both the currency and any granted outcomes.
A safe pattern is:
- Create a refund transaction that reverses the original spend.
- For granted items, either reverse via ledgered inventory deltas or mark entitlements as revoked and remove items if your design allows.
Transaction: refund_2026-04-12_def456
Entries:
1) player_77 premium_delta +120 reason refund original_tx purchase_pack_2026-04-12_abc123
2) player_77 item_gold_ticket -1 reason revoke original_tx purchase_pack_2026-04-12_abc123
3) player_77 item_skin_shard -50 reason revoke original_tx purchase_pack_2026-04-12_abc123

Guardrails:
- If items were consumed later, decide whether to allow negative inventory or block refund
Mind Map: Ledger Responsibilities and Flows
Reconciliation and Audits
Even with perfect code, you still need reconciliation. Produce reports that compare:
- Sum of ledger deltas per currency against expected sources and sinks.
- Player balances computed from ledger entries versus stored balances.
- Offer-level totals: how much premium currency was debited for each offer.
Reconciliation should be deterministic: given the same ledger history, the computed balances must match.
Implementation Checklist
- Define currency ids and reason codes up front.
- Implement immutable ledger entries with transaction grouping.
- Enforce idempotency using unique external ids.
- Validate spend sufficiency before applying debits.
- Handle refunds by reversing both currency and outcomes consistently.
- Reconcile balances from ledger history and investigate mismatches.
When these pieces are in place, your economy stops being a black box and becomes a set of accountable, inspectable facts.
4. Economic Loops for Progression and Engagement
4.1 Designing Earn Loops That Reward Skill and Exploration
An earn loop is the repeated pattern of actions that generate player value, such as currency, crafting materials, or progression resources. To reward skill and exploration, the loop must (1) connect effort to outcomes, (2) make exploration legible through goals and feedback, and (3) avoid turning every session into the same optimal grind.
Core Principles for Skill and Exploration
Skill reward means controllable outcomes. If a player’s performance changes the result, the loop feels fair. For example, a timed dodge mechanic that reduces damage taken can also increase the amount of “survival tokens” earned at the end of the run. The player learns that better execution yields better returns.
Exploration reward means meaningful discovery. Exploration should change what the player can do next, not just where they walk. A simple pattern is to place optional zones that contain unique resource nodes, each with a distinct risk profile. A cave with higher enemy density can grant more “ore” but requires better routing and combat choices.
Earn loops need clear boundaries. If players can earn the same value from trivial actions, skill and exploration get crowded out. Set minimum effort thresholds: time-on-task, distance traveled, quest completion steps, or “area mastery” milestones.
The Loop Anatomy
A practical earn loop has five parts:
- Entry condition: what starts the loop (enter a region, accept a contract, begin a mission).
- Action space: what players can do (fight, craft, navigate, solve, trade).
- Decision points: where skill and exploration matter (route choice, loadout selection, puzzle difficulty).
- Outcome calculation: how rewards are computed (base reward plus performance modifiers).
- Feedback: what the player sees immediately (progress bars, end-of-run breakdowns).
A good outcome calculation uses a base plus modifiers model. Example: base earn is 50 coins for completing a contract; modifiers add up to a maximum of +50 based on accuracy, time efficiency, and optional objectives.
Mind Map: Earn Loop Design
Earn Loop Design Mind Map
Concrete Example: Exploration-Driven Earn
Imagine a game with a soft currency called “Trail Credits” used for crafting upgrades.
Entry condition: Players accept a “Survey Contract” in a hub.
Action space: They travel to three optional sites. Each site has a different mechanic: one is a stealth scan, one is a combat relay, and one is a puzzle vault.
Decision points: Players choose which sites to attempt based on their current gear. A stealth scan site offers higher Trail Credits if the player avoids alarms; the combat relay offers moderate credits but higher credits if they complete it without taking a hit.
Outcome calculation:
- Base: 40 Trail Credits for completing the contract.
- Site bonuses: each completed site adds 15–35 credits depending on performance.
- Exploration bonus: discovering a “hidden marker” adds 10 credits once per site per week.
Feedback: At the end, the UI shows a breakdown: Base, Site Performance, Hidden Marker. This prevents the common frustration of “I did stuff but I don’t know what mattered.”
Concrete Example: Skill-Driven Earn Without Grind
Now consider a combat arena that awards “Focus Shards.”
Entry condition: Players queue for a match.
Action space: They fight waves with objectives like capturing beacons.
Decision points: Players can either play safe for consistent clears or take riskier routes to shorten beacon capture time.
Outcome calculation:
- Base Shards per wave: fixed.
- Skill modifiers: accuracy, objective uptime, and damage taken.
- Anti-grind: the highest-yield modifier caps after repeated clears, encouraging players to vary tactics or attempt harder objectives.
This cap is not a punishment; it’s a nudge that keeps the loop from collapsing into one strategy.
Guardrails That Keep Earn Loops Honest
To ensure earn loops reward skill and exploration, use three guardrails:
- Minimum effort thresholds: require meaningful participation before rewards scale.
- Diminishing returns on repeatable nodes: reduce the value of farming the same spot without adding new decisions.
- Server-side validation: prevent client-side reward manipulation and keep outcomes consistent.
When these are in place, players can trust that effort changes results, and exploration feels like a path to better options rather than a detour with no payoff.
4.2 Designing Spend Loops That Support Meaningful Choices
Spend loops are the other half of the economy coin: players earn resources, then spend them in ways that change their experience. A meaningful spend loop does two things at once: it offers decisions that feel consequential, and it keeps the economy stable so those decisions remain available over time.
Foundational Idea: Spend as Decision, Not Just Consumption
A spend loop is “meaningful” when the player can choose among options that differ in outcomes, not just in appearance. The key design move is to define spend categories that map to player goals. For example, a player who wants faster progression should see different spending options than a player who wants collection completion.
A simple way to structure this is to separate spending into three layers:
- Immediate effect: what changes right now (damage, crafting speed, energy use).
- Path effect: what changes later (which upgrades become affordable, what content opens).
- Opportunity effect: what the player gives up (time, inventory slots, future currency).
When all three layers are present, players can reason about tradeoffs without needing a spreadsheet.
Designing Choice Sets with Clear Tradeoffs
Meaningful choices require a bounded set of options. If there are too many, players default to the “best” option and the loop becomes repetitive. If there are too few, the loop becomes automatic.
A practical pattern is the three-option offer:
- Safe: lower cost, smaller effect, low risk.
- Balanced: mid cost, mid effect.
- Risky: higher cost, larger effect, higher variance or stricter conditions.
Example: In a crafting system, Safe might guarantee a common component, Balanced might yield a mix of common and rare, and Risky might attempt a rare component but can fail and return partial materials. Players learn the system quickly because each option has a distinct “shape” of outcome.
Cost Depth That Matches Player Intent
Spend loops fail when costs are either trivial (no decision) or punishing (no choice). Cost depth means the player feels the spend, but not so much that they avoid spending entirely.
Use cost depth tiers tied to player intent:
- Exploration tier: small costs that encourage trying different strategies.
- Commitment tier: medium costs that support a chosen build.
- Investment tier: larger costs that consolidate progress.
Example: A strategy game could offer a small “reroll” for a loadout card (exploration), a mid-cost “upgrade” to increase stats (commitment), and a high-cost “specialization” that locks in a playstyle (investment). Each tier teaches different behavior.
Preventing Choice Illusions
A choice is not meaningful if one option is always strictly better. To avoid this, ensure that each option has at least one advantage that matters to a different player goal.
Common fixes:
- Different constraints: one option uses energy, another uses a crafting ingredient, another uses time.
- Different timing: one option is immediate, another is delayed but stronger.
- Different synergy: options interact with different gear sets or quest types.
Example: If two upgrade paths both increase the same stat by the same amount, players will pick one. Instead, make one path improve survivability for boss fights while the other improves farming efficiency for routine stages.
Mind Map: Spend Loop Design
Example: A Spend Loop for Upgrades
Consider an upgrade currency called Gems and a crafting material called Scrap. The game offers a weekly shop with three upgrade bundles:
- Starter Bundle: 50 Gems + 10 Scrap for a small stat boost on any item.
- Specialist Bundle: 90 Gems + 25 Scrap for a larger boost on one item type.
- Forge Bundle: 140 Gems + 40 Scrap for a chance at a rare modifier, with partial refund on failure.
Meaningfulness comes from constraints and timing. Starter helps players experiment across items. Specialist supports a build they already use. Forge is a commitment with variance, so it’s attractive to players who can tolerate risk and have enough inventory to benefit from rare modifiers.
Example: Spend Loop for Energy and Time
If the game uses energy, spending should not only reduce wait time; it should change what the player can do.
A good pattern is to offer energy spending in two forms:
- Direct energy: spend currency to refill energy now.
- Efficiency spending: spend currency to reduce energy cost of a specific activity for the next run.
Players choose based on what they plan to do. If they want to grind one activity, efficiency spending is attractive. If they want flexibility across multiple activities, direct energy is attractive.
Implementation Notes That Keep Choices Honest
To ensure the loop stays meaningful after content updates, validate three things:
- Option selection diversity: if nearly everyone picks one option, the others likely lack a real advantage.
- Spend-to-progression mapping: players should be able to see how spending changes their next meaningful milestone.
- Friction alignment: if the game requires too much setup before spending pays off, players will treat spending as a chore.
A spend loop is successful when players can explain their decision in one sentence, and the economy continues to function even when different players choose different options.
4.3 Balancing Short Term Daily Loops With Long Term Goals
Daily loops are the game’s “heartbeat”: they create predictable moments of play, stable expectations, and quick feedback. Long term goals are the “spine”: they give direction, make effort feel cumulative, and prevent the economy from turning into a treadmill. The balance problem is simple to state and tricky to execute: daily loops must be satisfying on their own, but they must also feed the long term plan without stealing its meaning.
Core Principle: Daily Value Must Be Partial
A daily loop should deliver value that is useful immediately, but not so complete that it replaces the long term objective. For example, if a long term goal is upgrading a ship to Level 10, daily rewards can include upgrade materials and small progress tokens, while the final step still requires multi-week accumulation. This keeps the daily loop from becoming a complete substitute for the long term track.
A practical rule of thumb is to separate reward types by time horizon:
- Daily horizon rewards: energy refills, small crafting inputs, short quest progress, or currency that buys convenience.
- Long horizon rewards: major unlocks, high-tier crafting outputs, or progression milestones that change gameplay options.
Design the Daily Loop Around Clear Micro-Goals
Daily loops work best when each day has a concrete micro-goal. “Play more” is vague; “Complete 3 patrol contracts” is measurable. Micro-goals also help you tune economy pressure because you know exactly how many actions a player can complete per day.
Example: A fantasy RPG has a daily loop called “Herb Run.” Players gather herbs to craft potions. The daily reward is a bundle of herbs plus a small amount of soft currency. The long term goal is building an apothecary that increases potion potency. Daily herbs matter now, but the apothecary upgrade requires a rarer ingredient that only appears in weekly events.
Prevent Daily Completion from Collapsing Long Term Motivation
If players can finish the daily loop in 10 minutes and get everything they need, long term goals become optional. You can avoid that collapse with three mechanisms.
- Progress gating by quantity, not by time: Let players progress daily, but cap how much of the long term resource they can earn per day. This keeps the long term track meaningful without forcing long sessions.
- Staggered reward quality: Daily rewards can be consistent in quantity but vary in quality over time. For instance, daily crafting yields common items, while higher-tier outputs require weekly “quality stamps.”
- Opportunity cost through competing daily choices: Offer two daily contracts with different rewards. Players can choose the one that best supports their long term plan, but they can’t do both. This creates strategy without adding complexity to the economy.
Align Currency Flows with Time Horizons
Daily loops usually involve soft currency, energy, or materials. Long term goals often involve premium currency sinks, rare crafting components, or major upgrade costs. To keep the economy coherent, ensure that daily loops primarily feed daily sinks and only partially feed long term sinks.
Example: Suppose premium currency can speed up crafting. If daily loops grant enough premium currency to fully bypass long term crafting costs, the long term track loses its purpose. Instead, daily loops should grant soft currency and materials, while premium currency offers partial acceleration that still leaves a meaningful gap.
Use a Simple Budget Model to Tune Balance
A systematic way to tune the balance is to model expected weekly totals.
- Estimate daily completion rate (what fraction of players finish the daily loop).
- Estimate average daily reward in each resource.
- Convert those into weekly resource inflow.
- Compare inflow to weekly resource outflow from sinks tied to long term goals.
If weekly inflow is too high, long term costs feel trivial. If too low, daily rewards feel like busywork.
Mind Map: Daily Loop to Long Term Goal Alignment
Example: Two-Track Economy with Weekly Milestones
Consider a shooter with a long term goal: building a weapon mastery tier.
- Daily loop: “Training Drills” (3 matches). Rewards: soft currency, weapon parts, and a small mastery token.
- Weekly milestone: “Mastery Trials.” Rewards: a rare component required for tier upgrades.
Players can make steady progress daily, but the rare component is the bottleneck. That bottleneck prevents daily completion from replacing the weekly milestone, while the daily loop still feels worthwhile because it reduces the number of trials needed once the rare component arrives.
Practical Checks Before Shipping
- Completion substitution test: If a player only plays daily loops, can they reach the next major milestone? If yes, the daily loop is too complete.
- Resource ratio check: Compare daily inflow of long term inputs to the long term sink requirement. Aim for partial progress per day.
- Choice sanity check: If daily choices exist, confirm that each option meaningfully supports a different long term path rather than all roads leading to the same outcome.
Balancing daily loops with long term goals is mostly about controlling how much “today” can solve “later.” When daily rewards are useful but incomplete, players feel progress without losing the reason to keep going.
4.4 Managing Inflation and Deflation Through Loop Tuning
Inflation means prices in player time or currency rise because too much value is circulating without enough sinks. Deflation means prices fall because sinks are too strong or sources are too weak, making rewards feel stingy and slowing progression. Loop tuning is the practical work of adjusting earn and spend rates so the economy stays stable while content and player populations change.
Start with the Loop Model
Treat every progression or monetization path as a loop: Sources generate currency or resources, Transfers move them between inventories or characters, and Sinks remove them through upgrades, crafting, rerolls, repairs, or entry fees. Then define what “price” means in your game. For example, if upgrading a weapon costs 200 scrap and players earn 50 scrap per day, the effective daily price is 4 days of scrap. Inflation appears when that effective price grows over time.
A useful baseline is to compute three ratios per currency:
- Earn Rate: average currency gained per active player per day.
- Sink Rate: average currency removed per active player per day.
- Velocity: how quickly players spend after earning. If earn rate exceeds sink rate, the currency stock grows and prices drift upward. If sink rate exceeds earn rate, players accumulate less and progression slows.
Tune Inflation with Sink Strength and Sink Timing
When inflation is the problem, you can increase sink strength or improve sink timing so currency leaves the economy when players are ready to spend.
Sink strength examples:
- Raise upgrade costs slightly (for instance, 200 → 230 scrap) while keeping the number of upgrade tiers unchanged.
- Add a crafting fee that consumes the same currency as upgrades, not a different one that players can ignore.
- Increase reroll costs for loot rolls, but only after players reach a certain progression stage.
Sink timing examples:
- Move a major sink earlier in the loop by requiring a “refinement” step before a high-tier item can be used.
- Gate a powerful crafting recipe behind a consumable that is only obtainable through normal play, so sinks scale with engagement.
A concrete example: suppose players can earn 1,000 gold per week and spend it mostly on cosmetic bundles that are optional. Gold stock rises, and later shop items feel overpriced. Switching part of the gold spend from optional bundles to mandatory crafting steps (still using gold) increases sink rate without changing the player’s daily routine.
Tune Deflation with Source Strength and Reward Distribution
Deflation usually shows up as “nothing feels worth saving for,” because players can’t accumulate enough currency to reach meaningful upgrade thresholds.
Source strength examples:
- Increase quest rewards from 120 scrap to 140 scrap, but only for quests that are otherwise skipped.
- Add a small guaranteed component to loot (for example, every chest gives at least 30 scrap) to reduce variance and improve perceived fairness.
- Reduce cooldowns on repeatable activities that generate the currency.
Reward distribution examples:
- Shift rewards toward early progression so players hit first meaningful upgrades within the first session.
- Use catch-up rewards for players behind the median progression, but cap them so they don’t permanently distort the economy.
Concrete example: if crafting requires 500 scrap for a mid-tier item and most players earn 300 scrap per week, they wait too long and churn. Raising weekly sources to 360 scrap and adding a small guaranteed scrap floor per activity keeps the upgrade cadence stable.
Control Inflation and Deflation with Loop Coupling
Many economies fail because designers tune one loop in isolation. Currency often couples to other systems through conversions. If you convert soft currency to premium currency, or scrap to crafting tokens, you’ve created a bridge where inflation can leak.
Use coupling rules:
- Keep conversion rates stable and avoid “free” conversions that bypass sinks.
- Ensure that any conversion from one currency to another is paired with a sink in the original currency.
- When you change a sink in one system, check downstream effects on the other systems that consume the same currency.
Apply Guardrails with Thresholds and Caps
Loop tuning works best with guardrails that prevent runaway behavior.
- Caps: limit how much currency can be earned per day from a repeatable source.
- Thresholds: increase sink costs only after players reach certain inventory states, so early progression stays smooth.
- Diminishing returns: reduce earn rates for highly efficient activities to keep the economy from being dominated by a small group.
A simple guardrail pattern: if players can farm a dungeon for 200 scrap per run, add a daily cap of 1,000 scrap from that dungeon. Then tune the upgrade cost so the average player still completes one meaningful upgrade per week.
Validate with Scenario Checks
Before shipping, run scenario checks that simulate different player behaviors.
- Low spenders: earn mostly from free loops and spend on essential upgrades.
- Mid spenders: buy occasional packs that accelerate sinks.
- High spenders: spend frequently and may reach caps.
Track whether the effective “days to afford” a key upgrade stays within a target band. If it drifts upward, inflation is creeping in; if it drifts downward too far, deflation is starving progression.
Mind Map: Inflation and Deflation Through Loop Tuning
Example: Tuning a Scrap Economy Without Breaking Progression
Imagine a scrap currency used for weapon upgrades and crafting. After an update, players report that upgrading takes longer.
- Measure earn and sink rates: earn is unchanged, but sink rate dropped because crafting recipes became optional.
- Increase sink timing: require crafting materials for the next upgrade tier, making scrap spending part of the main path.
- Keep early cadence: reduce the first-tier upgrade cost slightly so new players still reach their first upgrade within the same session length.
- Add a guardrail: cap scrap earnings from the fastest repeatable activity to prevent a small group from pushing inflation faster than the rest.
The result is a stable loop: scrap leaves the economy at the right moment, players still feel progress, and the currency stock stops drifting.
4.5 Creating Durable Progression Without Overreliance on Purchases
Durable progression means players can move forward for meaningful reasons even when they don’t spend. The trick is to design progression as a system of earned value, then treat purchases as a way to accelerate or customize—not as the only path to competence.
Core Principle: Earned Progress Must Cover the “Why”
Progression should answer three questions for free players: What did I do? What did it change? What can I do next? If the next step only becomes possible after a purchase, the system quietly turns into a gate. A durable alternative is to ensure every major progression milestone has at least one non-spending route that is time-feasible and skill-relevant.
Example: In a crafting-based RPG, let players reach a new tier by completing a set of missions and crafting challenges. Premium currency can reduce the number of crafting runs, but the tier still becomes available through the mission chain.
Separate “Access” from “Acceleration”
A common failure mode is mixing access and acceleration. Access is whether a player can reach a feature. Acceleration is how quickly they reach it.
- Access via earned requirements: quests, exploration, reputation, or mastery checks.
- Acceleration via purchases: extra attempts, reduced timers, or additional crafting materials.
Example: If a new dungeon drops a key item, the key should be obtainable through normal play. A premium offer can sell “key rerolls” or “skip one lockout,” but it shouldn’t be the only way to obtain the key.
Build Progression from Multiple Earn Loops
Durability improves when progression is supported by more than one loop. If progression depends on a single loop (like daily login rewards), players feel stuck the moment they miss a day.
A robust setup often includes:
- A primary loop tied to gameplay performance (wins, objectives, crafting quality).
- A secondary loop tied to exploration or social contribution (discoveries, assists, guild tasks).
- A catch-up loop that compensates for time missed without erasing effort.
Example: A tactics game can award progression points for match outcomes (primary), for completing map-specific objectives (secondary), and for weekly challenges that convert unused energy into progress (catch-up).
Use Cost Curves That Match Player Reality
Purchases become tempting when costs spike faster than earned income. Durable progression requires cost curves that track how players actually earn.
Practical approach:
- Model the average earn rate for free players by segment.
- Set milestone costs so that a player can reach them within a predictable range of playtime.
- Add optional acceleration that reduces time, not required effort.
Example: If a weapon upgrade requires 120 upgrade parts, ensure free players can earn roughly 30 parts per week through normal activities. A premium offer might provide 60 parts, cutting the upgrade from four weeks to two, but the four-week path still exists.
Add Friction Where It Improves Choice, Not Where It Blocks
Timers, stamina, and limited attempts can be fine when they create meaningful decisions. They become harmful when they turn progression into a waiting game that only purchases solve.
A durable pattern is:
- Use friction to shape pacing (how often you play, what you do next).
- Avoid friction that prevents reaching the next milestone entirely.
Example: Instead of “no more attempts until you buy,” use “attempts refresh daily, and you can spend earned tokens to extend one day.” Purchases can buy convenience, but the system still progresses through earned tokens.
Design Guardrails Against “Purchase-Only” Milestones
Guardrails are rules that keep the economy honest.
- Milestone redundancy: every milestone has at least two earned routes.
- Spend depth separation: purchases accelerate optional cosmetics or convenience, while core power progression remains earnable.
- Telemetry checks: monitor the share of players who stall at specific upgrade steps and whether stalling correlates with purchase prompts.
Example: If many players stop at upgrade level 7, check whether the required materials are only obtainable from a monetized event. If so, add an earned source like a weekly quest reward or a crafting recipe.
Mind Map: Durable Progression Without Overreliance on Purchases
Durable Progression Mind Map
Worked Example: Turning a Purchase-Dependent Upgrade Into Earnable Progress
Suppose an upgrade requires 200 “core parts,” and the only reliable source is a premium event.
- Create an earned source: add a weekly quest that awards 60 parts.
- Add a gameplay source: grant 20 parts per successful run of a relevant activity.
- Keep purchases as acceleration: offer a bundle that provides 100 parts, reducing the typical completion time.
- Adjust costs if needed: if free players still take too long, reduce the upgrade requirement to 180 or increase earned parts slightly.
The result is a system where players can plan around normal play, while purchases simply shorten the timeline for those who want it.
Durable progression is not about removing monetization; it’s about ensuring the game remains understandable and playable without it. When earned routes are reliable, purchases stop being the foundation and start being the shortcut.
5. Pricing Virtual Goods and Monetization Offers
5.1 Building Price Architecture for Packs Bundles and Subscriptions
Price architecture is the system that turns “we sell items” into a consistent set of prices, bundles, and recurring plans that players can understand and that your economy can sustain. The goal is not just revenue; it’s predictable value for different player intents.
Start with Value Units and Player Intent
Define what “value” means in your game before you set any price. Use value units that map to player actions: time saved, progression steps, convenience, or risk reduction. Then classify offers by intent:
- Starter intent: players who want to get moving quickly.
- Collector intent: players who want variety and completeness.
- Optimizer intent: players who want specific upgrades with fewer surprises.
- Habit intent: players who want steady rewards for ongoing play.
A simple check: if two offers serve the same intent but have different price logic, players will compare them and notice the mismatch.
Build a Price Ladder for Packs
A pack is a one-time purchase with a clear contents list. Create a price ladder so each step has a reason to exist. Common ladder structure:
- Entry pack: small, low-friction, teaches the offer format.
- Core pack: the “most bought” tier with strong value per currency unit.
- Premium pack: larger quantity or higher-impact items.
To keep the ladder coherent, compute a value-per-premium-currency metric for each pack. If your premium currency is the bridge between real money and in-game spending, then every pack should land near a target range for that metric.
Example: Suppose a premium pack includes 300 premium currency plus 1 cosmetic set. If the currency portion is worth 300 units and the cosmetic set is valued by your design team at an equivalent of 60 currency units (based on how players trade off cosmetics vs. currency), then the pack’s effective value is 360 units. Your entry pack might target 1.0x effective value, while premium targets 1.15x to justify the bigger commitment.
Use Bundles to Reduce Decision Cost
Bundles combine multiple items so players don’t have to assemble a plan. Bundles should be grouped by a single player goal, not by convenience alone.
- Goal-based bundles: “upgrade a weapon,” “complete a set,” “prepare for an event.”
- Complement bundles: items that naturally pair in gameplay (energy + crafting mats).
- Avoid mixed-purpose bundles: if half the bundle is for one mode and the other half is for another, players feel like they’re paying for something they won’t use.
Example: A “Forge Bundle” includes 10 upgrade stones and 2 crafting blueprints. If the stones are only useful with blueprints, the bundle reduces friction and makes the price feel earned.
Design Subscription Tiers with Clear Benefit Boundaries
Subscriptions are recurring offers, so their value must be stable and their boundaries must be explicit. Use three layers:
- Base benefit: daily or weekly rewards that are always available.
- Tiered enhancement: higher tiers add extra rewards or convenience.
- Non-overlapping perks: avoid stacking perks that duplicate the same function in different wording.
A practical rule: subscription rewards should not replace core progression loops in a way that breaks free-player pacing. Instead, they should add consistency—players know what they get each week.
Example: A subscription grants 200 premium currency per month and a weekly “event ticket.” If your free loop already provides a similar amount of premium currency through normal play, then the subscription’s extra value should come from the ticket enabling participation, not from raw currency inflation.
Apply Price Consistency Across Offer Types
Packs, bundles, and subscriptions should share a common pricing logic. Create a price anchor: one premium currency amount that you treat as the reference. Then express every offer as either:
- Currency-forward: most value is premium currency.
- Item-forward: most value is items that reduce grind.
- Time-forward: most value is convenience that saves player effort.
Keep the anchor consistent so players can compare offers without doing mental math.
Example: If 100 premium currency is your anchor unit, then a 500-currency pack should not be priced so that its effective currency-per-dollar is worse than a subscription’s monthly currency portion. If it is worse, players will either wait for the subscription or feel the pack is overpriced.
Mind Map: Price Architecture for Packs, Bundles, and Subscriptions
Price Architecture Mind Map
Practical Checklist for Implementation
- List every offer with its contents and intended player intent.
- Compute effective value using your chosen value units.
- Set target ranges for each tier so packs form a ladder.
- Validate bundle coherence by checking item dependencies and shared goals.
- Define subscription boundaries so tiers add distinct value without duplicating functions.
- Run cross-offer consistency checks against the price anchor.
When these steps are done, pricing stops being a collection of one-off numbers and becomes a system players can reason about—without needing a spreadsheet, and without your economy getting surprised.
5.2 Converting Real Money Prices Into Value per Currency Unit
Real money pricing only becomes “economy design” when you translate it into value per in-game currency unit. The goal is simple: make the player’s perceived cost match the currency’s utility, while keeping your revenue targets stable across regions, platforms, and offer formats.
Core Concept: Value per Currency Unit
Start with a consistent definition:
- Real money price: the amount the player pays (e.g., $4.99).
- Currency unit: the specific spendable currency the offer grants (e.g., 500 premium coins).
- Value per unit: how much utility the player gets per coin, expressed as a ratio.
A basic ratio is:
- Nominal value = (real money price) / (currency units)
But nominal value alone is not enough, because utility depends on what the currency can do. A coin that buys only cosmetics should not be treated like a coin that buys progression items.
Step 1: Choose the Utility Baseline
Pick a baseline that reflects how players actually use the currency.
- If the currency is mainly for cosmetics, baseline against the average cost of a cosmetic item in that currency.
- If it buys power-adjacent items, baseline against the average cost of the smallest meaningful upgrade step.
- If it’s used for multiple sinks, baseline against a weighted average of sink costs.
Example: Suppose premium coins can buy (1) a cosmetic set for 800 coins and (2) a battle pass for 1,200 coins. If most purchases are cosmetics, weight cosmetics higher. If you don’t weight, you’ll overestimate value for players who rarely buy the pass.
Step 2: Compute Currency Utility per Offer
For each offer, compute the effective currency value using the baseline.
- Offer currency amount: coins granted.
- Utility per coin: derived from baseline item costs.
Example: If a cosmetic set costs 800 coins and is priced at $7.99 in your internal valuation model, then utility per coin is $7.99 / 800 = $0.0099875 per coin. If an offer gives 500 coins for $4.99, the implied utility is 500 × $0.0099875 ≈ $4.99. That’s a “fair” alignment: the offer price matches the currency’s utility baseline.
Step 3: Normalize for Regional Pricing and Platform Fees
Real money prices vary by region and platform. To keep value consistent, normalize using a reference currency.
- Convert local prices to a reference (often USD-equivalent) using your existing pricing tables.
- Keep the value per coin target within a tolerance band.
Example: If $4.99 in Region A maps to 4.49€ in Region B, but the offer grants the same coins, then the value per coin should remain close after conversion. If it drifts, players in one region will feel the currency is “cheaper” or “more expensive,” which can distort spending patterns.
Step 4: Account for Friction and Time Costs
Players don’t only compare money to coins; they compare money to time.
Include a time-to-earn adjustment when the currency is earnable.
- Estimate how long it takes to earn the same coin amount via gameplay.
- If an offer reduces that time significantly, the player may accept a higher nominal value per coin.
Example: If 500 coins take 10 hours to earn, and the offer is $4.99, the player is effectively paying for time. If those 10 hours are mostly optional grind, the perceived value rises. If they’re required for progression, perceived value rises less because players already “need” the time.
Step 5: Validate with Spend Depth and Sink Coverage
After pricing conversion, verify that the currency amount supports your economy’s sink design.
- Ensure the offer doesn’t flood sinks faster than you can absorb demand.
- Check that the currency amount aligns with how often players can spend it.
Example: If your main sink is a weekly upgrade that costs 300 coins, then a 500-coin offer creates 200 coins of leftover value. That’s fine if players have other sinks, but if they don’t, leftover coins can reduce perceived value and increase refunds.
Mind Map: Converting Real Money Prices Into Value per Currency Unit
Example: Three Offers with Different Utility Profiles
Assume the same premium currency is used for two sinks: cosmetics (average 800 coins) and a utility feature (average 1,600 coins). Weight cosmetics at 70% and utility at 30%.
- Cosmetic-heavy pack: 600 coins for $5.99
- Utility baseline per coin is based on weighted sink costs.
- If the computed effective utility is close to $5.99, the pack feels consistent.
- Utility-heavy pack: 600 coins for $4.99
- If the pack is positioned as “utility,” but the currency amount is identical, the player will compare it to the same coin utility baseline.
- If $4.99 is too low versus baseline, you may see higher conversion but weaker long-term sink balance.
- Starter bundle: 300 coins for $2.99
- Smaller bundles often have higher perceived fairness thresholds.
- Ensure the value per coin doesn’t jump wildly between starter and mid-tier offers, or players will treat the system as inconsistent.
The practical takeaway: convert money to value using a utility baseline, normalize across regions, adjust for time friction, and then confirm the currency amount behaves correctly in your sink network.
5.3 Designing Offer Composition with Utility and Scarcity Controls
Offer composition is where pricing meets behavior. A good offer doesn’t just state “buy this”; it makes the value legible, controls how often players can get it, and prevents the economy from turning into a vending machine that empties itself. The goal is simple: players should understand what they’re getting, feel it’s worth the cost, and still have reasons to keep playing without being forced into purchases.
Utility First: Make Value Concrete
Utility is what the item does for the player, not what the item is called. Start by listing the player’s immediate pain point and the offer’s direct remedy.
- Immediate utility: reduces time, fixes a bottleneck, or enables a next step.
- Strategic utility: improves efficiency over multiple sessions (for example, crafting success rate or inventory management).
- Social utility: supports team roles or shared progression when relevant.
Example: Suppose progression is gated by crafting materials. An offer that includes the exact missing material has immediate utility. An offer that includes a random loot chest has utility too, but it’s harder to reason about, so scarcity controls must work harder to maintain trust.
A practical rule: every offer should map to one primary utility claim and one secondary benefit. If you try to claim five benefits, players will remember none.
Scarcity Controls: Choose the Right Kind
Scarcity is not only about limiting quantity. It’s about limiting availability in a way that matches the economy’s needs.
Use scarcity controls in three layers:
- Quantity scarcity: limited stock or limited redemption count.
- Time scarcity: limited window, such as an event duration.
- Access scarcity: limited eligibility, such as requiring a minimum level or owning a prerequisite item.
Example: A “starter bundle” for new players should use access scarcity (only for accounts below level 10) rather than quantity scarcity. Otherwise, early players who buy quickly could drain the supply and leave later players with a worse experience.
Pairing Utility with Scarcity Without Confusing Players
Scarcity should reinforce the utility, not obscure it. If an offer is scarce because it’s meant to solve a short-term bottleneck, the UI and copy should reflect that bottleneck.
- If the utility is time reduction, use time scarcity so the offer aligns with the period when time matters.
- If the utility is progression enablement, use access scarcity so players who can’t use it yet aren’t tempted into disappointment.
- If the utility is economy stabilization, use quantity scarcity to cap currency sinks.
Example: A crafting accelerator that reduces the number of crafting attempts should be scarce by quantity or access. If it’s only time-limited, players might buy it, then still be blocked by missing materials, which turns utility into frustration.
Offer Composition Patterns That Keep Economies Stable
Compose offers using a small set of repeatable patterns.
-
Primary Item + Supporting Currency
- Primary item: the thing that solves the bottleneck.
- Supporting currency: a small amount that reduces immediate friction.
- Example: 1 guaranteed crafting recipe token + 50 soft currency for consumables.
-
Guaranteed Outcome + Optional Enhancement
- Guaranteed: removes uncertainty.
- Optional: adds value for players who want faster completion.
- Example: guaranteed rare material + a choice between two cosmetic-only variants.
-
Progression Ticket + Catch-Up Safety
- Ticket: enables a specific next step.
- Catch-up: prevents long-term punishment for unlucky players.
- Example: a “raid entry ticket” plus a limited redemption of a protection token.
Mind Map: Utility and Scarcity Composition
Worked Example with Clear Controls
Assume a soft-currency economy where players earn coins through missions and spend them on crafting attempts.
- Offer goal: help players who are stuck at “Tier 2 crafting” without inflating long-term crafting volume.
- Utility: include a guaranteed Tier 2 crafting token.
- Scarcity: set redemption to 3 per account per week (quantity scarcity) and require Tier 2 unlocked (access scarcity).
- Supporting amount: add a small soft-currency top-up that covers only one extra attempt.
Why this works: the guaranteed token solves the bottleneck, the soft-currency top-up reduces immediate friction, and the weekly redemption cap prevents the offer from becoming a permanent crafting engine.
Implementation Checklist for Designers
Before shipping, verify these points:
- The offer has one primary utility and one secondary benefit.
- Scarcity type matches the reason players need the offer.
- Eligibility rules prevent “can’t use it” purchases.
- Redemption limits cap the sink impact on the economy.
- The offer’s currency amounts are consistent with the expected earn rates.
When utility is concrete and scarcity is purposeful, players can make a purchase decision without guessing what the offer is really doing to the economy.
5.4 Applying Discounting Rules Without Undermining Trust
Discounting is a promise you make twice: first with the original price, then with the reduced one. Trust holds when players can predict the rules, understand why a discount exists, and feel they are not being tricked into paying more earlier.
Foundations of Trust in Discounting
Start with three principles. First, consistency: the same discount logic should apply across similar items and player states. Second, clarity: players should see what changes and what does not (price, bundle contents, eligibility). Third, fairness: discounts should not punish players who bought earlier, unless the game also offers a compensating mechanism.
A simple example: if a “Starter Pack” is 20% off for one week, the UI should state the end date, and the pack contents should remain identical. If the pack later changes, the discount becomes a moving target and players will assume the earlier purchase was less valuable than it seemed.
Discount Types and When They Fit
Different discount types create different trust outcomes.
- Time-limited price cuts work best for seasonal events or limited-time bundles. Trust improves when the discount is tied to a clearly defined window.
- Tiered discounts (e.g., buy more, save more) can be fair if the thresholds are visible and stable. Trust drops when thresholds shift after purchase.
- Personalized offers require extra care because players compare their offer to others. Trust improves when personalization is based on transparent eligibility rules like “first purchase” or “returning after inactivity,” and when the offer does not silently change the value of the same item.
Example: a returning player offer that gives a one-time bonus currency for re-entry is usually easier to justify than a discount that changes the effective value of a permanent item without explanation.
Rule Design That Prevents “Price Whiplash”
Price whiplash happens when the same item is discounted repeatedly with no stable pattern, or when discounts stack in ways players cannot reason about.
Use a small set of discount rules:
- Define eligibility windows for each discount. If an item is discounted for “Week 1,” it should not also be eligible for a separate “New Player” discount that changes the final price unpredictably.
- Cap discount frequency per item. For example, allow at most one major discount per 30 days for the same SKU.
- Lock bundle composition during the discount period. If the pack contains 100 gems and 1 skin, it should not become 80 gems and 1 skin mid-sale.
- Avoid silent stacking. If two discounts can apply, show the final price and the breakdown.
Example: a bundle that is 25% off should not suddenly become 40% off because a hidden “loyalty” discount applied. If you want stacking, present it as a deliberate mechanic.
Compensation Mechanisms That Feel Fair
When players buy before a discount, you have three options.
- No compensation can work if discounts are rare and clearly framed as event-specific. Trust is maintained by predictability.
- Retroactive refunds are the strongest fairness signal but can be operationally complex.
- Store credit is a middle ground: refund the difference as credit usable on future purchases.
Example: if a player buys a $9.99 pack and it goes on sale at $7.99 within 7 days, grant $2.00 store credit. The player does not need to repurchase immediately, and the game avoids refunding real money.
Communication Rules That Reduce Misinterpretation
Trust is often lost in the details of messaging.
- State the discount basis: “20% off for 3 days” is clearer than “limited deal.”
- Show the comparison price only when it is meaningful. If the comparison price is inflated, players notice.
- Clarify what does not change: “Same items, lower price” prevents confusion.
Example: “Same bundle contents, price reduced from 9.99 to 7.99 until June 1” is concrete. If you need a date, use a specific one like “April 15.”
Mind Map: Discounting Without Undermining Trust
Example: A Discount System That Stays Understandable
Imagine three SKUs: a permanent “Resource Bundle,” an event “Festival Bundle,” and a “First Purchase Bonus.”
- The Resource Bundle gets a maximum one major discount every 30 days, with composition locked.
- The Festival Bundle is discounted only during the event window, and the UI shows the end date.
- The First Purchase Bonus is never discounted because it is already a one-time eligibility reward.
If the Resource Bundle goes on sale, early buyers within 7 days receive store credit equal to the price difference. The game avoids retroactive complexity for the event bundle by keeping event discounts strictly time-bound.
Operational Guardrails
Even perfect policy fails if execution is sloppy. Validate that the offer shown equals the offer charged, and that entitlements match the receipt. Version SKUs so the system cannot accidentally treat a changed bundle as the same item. Finally, ensure eligibility checks are deterministic so two players with the same state see the same discount rules.
A discount should feel like a planned event, not a surprise mechanic. When rules are stable, communication is specific, and early buyers are treated consistently, players can make decisions without second-guessing whether the game is moving the goalposts.
5.5 Ensuring Offer Consistency Across Platforms and Regions
Offer consistency is less about making the same button everywhere and more about keeping the underlying value story coherent: what the player gets, how much it costs, and how the game explains both. In practice, inconsistency usually comes from three sources—currency conversion, catalog differences, and entitlement rules that drift between platforms.
Start with a single offer definition that is platform-agnostic. Treat an offer as a bundle of components: product identifier, included items, currency amounts, pricing tier mapping, eligibility rules, and delivery timing. Then create a build step that compiles those definitions into platform-specific store products. This prevents “same name, different contents” bugs, which are the most expensive kind because they look like user error.
Next, standardize the currency model. If your game uses soft currency, premium currency, and item rewards, define which components are priced in real money and which are priced in premium currency. For example, a $4.99 pack might grant 300 premium coins plus 2 loot keys. The premium coins are the priced component; the keys are included value. When regions change, you should only swap the real-money price and the store’s tax handling, not the premium coin amount or the included keys.
Price tier mapping is where teams often lose control. Many stores expose localized price points that do not align perfectly with your target exchange rate. The fix is to map each offer to a store price tier per platform and region, then verify that the resulting premium-per-dollar ratio stays within an agreed tolerance. A simple rule works well: keep premium currency amounts fixed per tier, and only adjust the real-money price to match the store’s tier. If you must change premium amounts, do it through a controlled “offer revision” so analytics and entitlement logic remain consistent.
Catalog parity should be enforced with a checklist that runs before release. Define three categories: global offers, region-locked offers, and platform-locked offers. Region-locked offers might exist because of legal constraints or content ratings; platform-locked offers might exist because one store requires different packaging. For each category, document the reason and the exact differences. Then ensure the client UI pulls from the same compiled catalog so the player sees the same offer structure across devices.
Entitlements are the final consistency gate. A player should receive the same rewards for the same store purchase regardless of platform. That means your backend must validate receipts, map them to the canonical offer definition, and grant entitlements using the same item and currency rules. If you use idempotency keys, base them on the store transaction id plus the canonical offer id. This avoids double grants when a receipt is retried.
Finally, align messaging. The UI should display the same reward summary and the same “what you pay” framing everywhere. If a platform requires different wording for taxes or refunds, keep the reward summary identical and only vary the legal text. For example, show “300 Premium Coins + 2 Keys” consistently, while the footer may differ by region.
Mind Map: Offer Consistency Across Platforms and Regions
Example: A Cross-Region Coin Pack
Assume Offer A grants 300 premium coins and 2 loot keys. You define Offer A once in the canonical catalog. For Region EU, the store lists a localized price tier equivalent to $4.99; for Region BR, it lists a different tier equivalent to $6.49. Your compilation step assigns Offer A to the correct store tier in each region, but keeps the premium coin and key amounts unchanged. On purchase, the backend validates the receipt, maps it to Offer A, and grants exactly 300 coins and 2 keys. The UI shows the same reward summary in both regions, with only the displayed price and tax footer changing.
Example: Preventing “Same Name, Different Contents”
A common failure mode is editing the client catalog for one platform while the backend still uses the older canonical definition. To avoid this, require a catalog version id to be included in the client request and stored with the purchase grant. If the client requests Offer A version 7 but the backend recognizes version 6, the purchase is rejected with a safe error and the offer is refreshed. This keeps the player experience consistent and prevents silent reward mismatches.
Example: Handling Region-Locked Offers Without Breaking Parity
Suppose Offer B is unavailable in a specific region due to content rating rules. Mark it as region-locked in the canonical catalog with an explicit reason and a region allowlist. The client catalog compiler removes Offer B only for those regions, while keeping Offer C and Offer D unchanged. The backend still recognizes Offer B as a canonical definition so receipts from other regions grant correctly, but the client never presents Offer B where it is not allowed.
A Practical Release Routine
Before shipping, run three automated checks: (1) every store product maps to exactly one canonical offer definition, (2) every canonical offer revision has the same reward summary across platforms for the same region category, and (3) entitlement grants match the canonical item list for a sample of test receipts. If these checks pass, the offer experience stays consistent even when stores and regions insist on doing their own thing.
6. Resource Sinks Sources and Supply Control
6.1 Designing Sinks for Items Upgrades and Crafting Systems
A sink is any game action that removes player-owned value from the economy. In upgrade and crafting systems, sinks usually consume materials, durability, time, or crafting energy, and they convert those inputs into a more powerful or more useful item. The goal is simple: make the economy feel steady for free players while still giving paying players a clear, fair path to progress.
Core Sink Principles for Upgrades and Crafting
Sink Purpose
Upgrades and crafting sinks should do three jobs at once:
- Control item power growth by making stronger items cost more than weaker ones.
- Create meaningful choices by offering multiple ways to reach the same outcome (different materials, different crafting routes).
- Stabilize supply by preventing infinite item scaling from low-effort farming.
Example: If a sword upgrade increases damage by 5% each tier, the sink must rise faster than the benefit. Otherwise, players will upgrade everything immediately, and the economy will flood with high-tier gear.
Sink Inputs
Common sink inputs include:
- Crafting materials (ore, cloth, cores)
- Upgrade components (refinement stones, catalysts)
- Gold or soft currency (labor fees, repair costs)
- Durability or repair tokens (consumed to keep items usable)
- Time gates (cooldowns, work orders)
A good rule of thumb: use at least one sink that is tied to item progression (materials/components) and one that is tied to player pacing (currency or time). That way, players can’t bypass progression entirely by only grinding one resource.
Sink Depth and Player Feel
Sink depth is how much value a player must spend to reach the next meaningful milestone. If the sink is too shallow, players hoard and then instantly jump tiers. If it’s too deep, players stall and stop engaging.
Example: Suppose tier 1 to tier 2 requires 20 iron and 1 catalyst. Tier 2 to tier 3 might require 45 iron and 2 catalysts. The iron roughly doubles, but the catalyst increases too, so the system doesn’t rely on only one resource.
Designing Upgrade Sinks Step by Step
Step 1: Define Upgrade Outcomes
Write down what changes per upgrade: stats, rarity, slot effects, crafting passives, or unlocks. Then decide what must be expensive.
Example: If upgrades improve both damage and a special effect, the special effect should be the cost driver. Otherwise, players will treat the upgrade as a cheap way to gain the “real” advantage.
Step 2: Choose a Sink Curve
Use a curve that matches your power curve. Many teams start with a simple progression:
- Linear for cosmetic or minor stat changes
- Quadratic or exponential-ish for power jumps
Example: If crafting tier 1 items are common and tier 5 items are rare, the sink for tier 5 should be dramatically higher than tier 1, even if the player can still craft tier 5 directly.
Step 3: Add Failure or Protection Carefully
If upgrades can fail, the sink must include protection so players don’t feel punished for participating.
Example: A “refinement” system might have a 70% success rate. To keep it fair, add a pity counter that guarantees success after repeated failures, consuming extra materials each attempt. The sink becomes predictable over time.
Step 4: Prevent Resource Confusion
Players should understand what they’re spending and why. If “iron” is used for both crafting and upgrades, ensure the UI clearly shows which sink applies.
Example: A crafting screen can show “Iron used for base item” and an upgrade screen can show “Iron used for refinement.” Same material, different purpose, clear labels.
Designing Crafting Sinks That Avoid Hoarding Traps
Use Multiple Materials to Reduce Single-Loop Farming
Crafting sinks work best when no single resource fully determines progress.
Example: A “steel ingot” recipe that requires iron + coal + flux prevents players from only farming iron. Even if they stockpile iron, they still need the other inputs.
Add Conversion Paths with Tight Ratios
Allow conversion between materials, but keep ratios consistent with the sink’s intent.
Example: If 3 low-tier ores convert into 1 mid-tier ore, then crafting recipes should reflect that conversion cost. Otherwise, players will convert and bypass the intended sink depth.
Separate Crafting Quality from Quantity
If crafting produces variable quality, the sink should scale with expected value.
Example: If a recipe yields either “common” or “rare” with a 20% chance, the average sink per rare should match the rarity’s role in the economy. Otherwise, rare items become too cheap.
Mind Map: Upgrade and Crafting Sinks
Practical Example: Two Systems, One Economy
Imagine a game with:
- Upgrade system: refine an existing weapon
- Crafting system: create a new weapon from scratch
Upgrade sink: 1 catalyst + 25% of the weapon’s current “refinement durability” + a gold fee. This ties spending to the item already owned.
Crafting sink: 3 materials (ore, alloy, temper) with a small gold fee. This ties spending to the player’s ability to gather multiple inputs.
To keep the economy coherent, ensure that the total expected sink to reach the same tier is comparable between systems. If crafting is cheaper than upgrading by a large margin, players will always craft the best items and ignore upgrades, breaking your intended progression pacing.
Validation Checklist for Sink Health
- Milestone reachability: Can a typical free player reach the next tier without extreme hoarding?
- Dominant resource check: Does one material alone determine progress?
- Expected value consistency: Are failure rates and pity counters aligned with the sink’s cost?
- UI consumption clarity: Can players tell what they spent and what they gained?
- Supply stability: Do high-tier items remain scarce relative to their power impact?
When these checks pass, sinks stop being “taxes” and become the mechanism that turns player effort into steady, understandable progression.
6.2 Designing Sources for Quests Events Loot and Rewards
Sources are where value enters the economy. In practice, “sources” means every system that grants currency, crafting materials, upgrade components, or lootable items. The goal is not just to give rewards, but to control the rate and shape of inflow so the rest of the economy can reliably absorb it through sinks.
Start with Reward Intent and Player Context
Before tuning numbers, decide what each source is trying to accomplish. A quest source often targets engagement and narrative pacing; an event source often targets short-term activity spikes; a loot source targets excitement and variety. Each intent implies different reward behavior.
Example: If a daily quest is meant to keep players moving, it should grant predictable value with low variance. If a seasonal event is meant to create a reason to return, it can include a mix of predictable milestones and smaller chance-based drops.
Player context matters because the same reward can feel generous or stingy depending on progression stage. Early-game sources should reduce “time-to-first-power” friction. Mid-game sources should support build diversity. Late-game sources should avoid trivializing long-term goals.
Define the Reward Payload and Its Economic Role
Every reward has a payload: currency type(s), item(s), and any conversion rules. Assign each payload an economic role:
- Progression fuel: materials that enable upgrades.
- Choice enablers: tokens that let players select from options.
- Collection value: cosmetics or unique items.
- Monetization adjacency: rewards that are not paywalled but can be accelerated.
Example: A quest that grants “upgrade stones” is progression fuel. A quest that grants “selection tickets” is choice enabler. If you accidentally treat progression fuel as collection value, players will perceive upgrades as irrelevant and stop caring.
Choose Source Types and Their Inflow Patterns
Sources come in several patterns. Mixing patterns is usually better than relying on one.
- Fixed rewards: stable, easy to forecast.
- Example: “Complete 3 matches: 50 soft currency.”
- Milestone rewards: stepwise growth tied to effort.
- Example: “Reach 10 event points: craft material bundle.”
- Chance-based loot: variance for excitement.
- Example: “Event chest: 1–3 crafting parts with rarity tiers.”
- Scaled rewards: adjust based on player state.
- Example: “Quest reward increases with player level bracket.”
A common mistake is to make chance-based loot the primary source of progression fuel. It creates inconsistent upgrade pacing and makes players feel punished for doing the same work.
Build Reward Tables with Clear Math
For each source, create a reward table that specifies quantities, rarity, and conditions. Keep the table readable enough that designers can sanity-check it without spreadsheets gymnastics.
Example structure for an event chest:
- Guaranteed: 1 common crafting part
- Additional: 0–2 extra parts based on drop tier
- Rare: 5% chance for a “recipe fragment”
Then compute expected value per chest and compare it to the sink capacity. If players can earn 100 chests during the event, expected inflow must be designed to be absorbable by crafting and upgrade sinks.
Control Frequency, Eligibility, and Cooldowns
Inflow is not just “how much,” it is “how often.” Frequency control prevents runaway supply.
- Eligibility rules: prevent repeat farming of the same content.
- Example: “Quest can be completed once per day per character.”
- Cooldowns: limit reward cadence.
- Example: “Event task refreshes every 6 hours.”
- Progress gating: tie rewards to meaningful completion.
- Example: “Reward triggers only after match results, not during loading.”
Example: If a loot chest is awarded for “participation,” players will optimize for low-effort participation. If it is awarded for “completion with minimum performance,” the source becomes harder to farm and easier to balance.
Use Segmentation to Keep Sources Fair
Different players should not receive different types of rewards, but they often need different rates to maintain similar progression experiences.
- New players: higher soft currency per hour, fewer high-variance drops.
- Mid players: balanced mix of materials and choice enablers.
- High players: more sink-relevant materials, less redundant low-tier loot.
Example: A quest line can grant the same “upgrade stones” but scale quantity by progression bracket so players don’t stall at the same upgrade tier.
Mind Map: Sources for Quests Events Loot and Rewards
Example: A Cohesive Quest-to-Event Source Chain
Imagine a soft-currency economy with a crafting sink.
- Quest source: daily quest grants 120 soft currency and 1 common crafting part. This is predictable and low variance.
- Event source: weekly event tasks grant milestone bundles of crafting parts plus a small chance at a recipe fragment. The chance is limited to avoid erratic upgrade pacing.
- Loot source: event chests drop mostly crafting parts, but include a “selection ticket” as a guaranteed choice enabler every 5 chests.
The chain works because the quest keeps players progressing reliably, the event adds variety without breaking pacing, and the loot layer provides both expected value and controlled choice.
Validate with Economy Fit Checks
After designing sources, validate them against sinks and player experience.
- Inflow vs sink capacity: can players spend what they earn?
- Variance tolerance: does chance-based inflow create upgrade frustration?
- Time-to-goal: does the average player reach meaningful milestones without grinding?
Example: If crafting requires 20 parts per upgrade and the average player earns 6 parts per day from quests plus 10 parts from the event, then the event schedule must align so upgrades land on sensible cadence rather than forcing either hoarding or constant underpowered waiting.
6.3 Controlling Supply With Drop Rates and Reward Tables
Controlling supply is how you keep the economy from drifting into “everyone has everything” or “nothing feels obtainable.” In practice, you do this by shaping the probability of obtaining items (drop rates) and the structure of what can appear (reward tables). The goal is not to maximize rarity; it’s to match supply to the pace of player progression and the intended value of items.
Core Concepts That Make Drop Rates Work
A drop rate is a probability per attempt. A reward table is the list of possible outcomes plus their weights. If you treat them separately, you can reason clearly: the table defines what can drop, while the rate defines how often the table is consulted.
Example: Suppose a dungeon run has a 30% chance to award a “rare crafting shard.” If it triggers, the shard type is chosen from a reward table with weights: 50% shard A, 30% shard B, 20% shard C. The effective probability of shard B per run is 0.30 × 0.30 = 0.09.
This separation matters when you tune. If players complain about “rare items never drop,” you first check whether the issue is the outer rate (the 30% trigger) or the inner table weights (the 30% for shard B).
Reward Table Design from First Principles
Reward tables should be built around player intent and item function.
- Define item tiers by role: common items support crafting or progression; rare items support long-term goals; ultra-rare items should have clear purpose beyond bragging rights.
- Group items by acquisition context: items that belong to the same activity should share a table so you can tune that activity without side effects.
- Use weights that reflect target supply: weights are not “rarity vibes”; they are levers for expected quantities.
Example: If you want players to craft one mid-tier weapon per week on average, you can estimate how many runs they do and then set the expected shard supply accordingly. If the table yields too many of one shard, crafting becomes lopsided even if the overall drop rate is correct.
Supply Control Using Expected Value and Variance
Expected value tells you the average supply; variance tells you how uneven it feels.
- High variance creates streaks. Players experience long dry spells even if the average is fine.
- Low variance feels consistent but can reduce the sense of effort-to-reward.
A simple way to reduce harmful variance is a pity or protection rule, which changes the effective probability after repeated failures.
Example: A chest has a 5% chance to drop a legendary. Without protection, a player might go 60 opens with no legendary. With protection that guarantees one legendary after 40 opens, the worst-case experience improves while the average can remain near the original target.
Practical Drop Rate Patterns That Avoid Economy Drift
Use patterns that keep supply aligned with sinks.
- One table per sink: If an item is primarily used in upgrades, keep its drops tied to upgrade-related activities. This prevents “upgrade materials” from flooding unrelated systems.
- Separate “progress” from “completion”: Early progression items should drop reliably; completion items can be rarer but should not block basic play.
- Cap the number of high-value outcomes per run: If a run can drop multiple ultra-rare items, supply can spike after content updates or event weeks.
Example: If a raid run can drop up to 3 legendary fragments, a small increase in run participation can multiply supply quickly. Limiting to 1 legendary fragment per run makes tuning more stable.
Mind Map: Drop Rates and Reward Tables
Example: Building and Validating a Reward Table
Assume a daily activity has 1 attempt per day.
- Outer chance to award a “rare upgrade token”: 40%
- If awarded, token type is chosen from a table:
- Token X: weight 60
- Token Y: weight 30
- Token Z: weight 10
Effective probabilities per day:
- X: 0.40 × (60/100) = 0.24
- Y: 0.40 × (30/100) = 0.12
- Z: 0.40 × (10/100) = 0.04
If upgrades consume 1 token per day for Token X and Token Y combined, you can see whether the expected supply meets demand. If players are short on X but not Y, the issue is not the outer rate; it’s the inner weights.
Advanced Details That Prevent Common Failure Modes
- Exclusions and duplicates: If multiple items can drop, decide whether duplicates are allowed. If duplicates are disallowed, renormalize weights after each draw.
- Reroll rules: If a draw produces an item that is already owned at a cap, rerolling changes effective probabilities. Document the rule so tuning stays predictable.
- Versioning: When you change tables, track which players experienced which version. Otherwise, telemetry mixes eras and makes tuning decisions noisy.
Example: If you reduce Token Z weight but keep reroll behavior the same, Token Z might still appear frequently because rerolls push probability into the remaining outcomes. The fix is to retune with the reroll logic in mind, not just the base weights.
Controlling supply is ultimately about making probability math match player experience and sink demand. When drop rates and reward tables are treated as separate, testable levers, tuning becomes systematic instead of guesswork.
6.4 Using Caps Cooldowns and Limits to Stabilize Economies
Stabilizing an economy is mostly about controlling how often and how much players can push resources through the system. Caps, cooldowns, and limits are the three most common guardrails because they are simple to reason about and easy to test. The trick is to apply them to the right parts of the economy loop: sources, conversions, and sinks.
Core Concepts and When They Help
Caps set a maximum amount per time window, per account, per item, or per transaction chain. They prevent runaway accumulation when a source is too generous or when players find an unintended shortcut.
Cooldowns restrict frequency. They are especially useful when the economy depends on repeated actions, such as daily missions, crafting batches, or claim-based rewards.
Limits constrain quantity or eligibility. Examples include “one active contract at a time,” “only one reroll per day,” or “maximum 3 crafting attempts per recipe per event.” Limits are often better than caps when you want to preserve choice while reducing spam.
A good rule: use caps to control volume, cooldowns to control tempo, and limits to control structure.
Mind Map: Guardrails and Their Targets
Designing Caps That Don’t Feel Arbitrary
Start with a target: “We want the average daily supply of X to stay within a band.” Then decide the cap scope.
- Global cap: limits total items created across the whole server. This can stabilize supply but may create social frustration if players feel blocked.
- Account cap: limits per player. This is usually fairer and easier to explain.
- Item cap: limits a specific resource, such as rare upgrade stones.
Example: Suppose a dungeon drops “Refinement Dust.” If players can farm it quickly, the dust supply inflates and upgrades become cheap. Add an account cap like “2,000 Dust per day from dungeon rewards.” Keep other sources (events, quests) intact so players still have variety.
To avoid “why can’t I get more,” show a progress indicator: “Dungeon Dust remaining today: 650.” Players hate hidden math, even when the math is correct.
Cooldowns for Tempo Control and Anti-Spam
Cooldowns work best when the action is meaningful and time-based. They should match the player’s expected session rhythm.
- Short cooldowns (minutes): good for repeated crafting or claim actions.
- Daily cooldowns (hours to 24): good for quests, chests, and rerolls.
- Long cooldowns (multi-day): good for high-impact conversions.
Example: A crafting system lets players convert common ore into rare bars. Without a cooldown, players can run the conversion loop nonstop, turning common ore into rare bars too efficiently. Add a cooldown to the conversion action: “Rare bar conversion can be performed once every 6 hours, up to 3 times per day.” This preserves the crafting fantasy while preventing endless cycling.
A subtle but important detail: cooldowns should apply to the action, not the inventory. If the player runs out of ingredients, they shouldn’t lose the cooldown progress unfairly. Track cooldown timers server-side and let players resume when they have materials.
Limits That Preserve Choice While Reducing Abuse
Limits are structural constraints that reduce exploit paths.
Common limit types:
- Eligibility limits: “Only one active contract,” “only one reroll per item per day.”
- Chain limits: “You can’t convert premium currency into soft currency more than once per day.”
- Batch limits: “Max 10 items per crafting batch.”
Example: If players can buy a low-value pack, convert it into a higher-value resource, then use that resource to buy another pack, you get a conversion chain that multiplies value. Add a chain limit: “Premium-to-soft conversion is limited to 1,000 soft per day.” The player still can choose to convert, but the loop can’t scale indefinitely.
Implementation Checks and Failure Modes
- Cap scope consistency: If “daily” means UTC midnight, communicate it. Otherwise, players will interpret it as a bug.
- Refund and rollback behavior: If a purchase is reversed, ensure the cap usage is also rolled back. Otherwise, players get punished for system errors.
- UI alignment: The UI should reflect remaining cap/cooldown time immediately after actions.
- Exploit resistance: Caps and cooldowns must be enforced server-side. Client-only checks are just a suggestion.
- Economy math sanity: After adding guardrails, re-run the expected supply calculation for free and paying segments. Guardrails often shift where players spend time, not just how much they earn.
Worked Example: Stabilizing a Soft Currency Loop
Imagine a soft currency “Coins” earned from matches and spent on shop refreshes. Players can refresh the shop repeatedly, causing coins to circulate too fast and making prices drift.
Apply:
- Cooldown on shop refresh: “Refresh available once every 2 hours.”
- Limit on refresh count: “Max 6 refreshes per day.”
- Cap on total discounted items purchased: “Discounted items limited to 3 per day.”
Result: players still get shop agency, but the system can’t be spammed into price collapse. The economy stabilizes because the tempo of spending and the volume of discounted purchases are constrained.
Finally, treat guardrails as part of the economy design, not a patch. When caps, cooldowns, and limits are chosen with clear scope and visible feedback, they reduce variance without turning gameplay into a waiting room.
6.5 Auditing Sink Source Balance with Scenario Testing
A sink-source audit answers one question: if players earn resources at certain rates, do your sinks remove them at a matching pace so the economy stays usable? The tricky part is that “matching” depends on player behavior, not just on your design math. Scenario testing turns that question into a repeatable checklist: you simulate plausible player paths, measure currency and item outcomes, and compare them to targets.
Start with a baseline model. Define each resource’s lifecycle: sources (where it enters), sinks (where it leaves), and transfers (where it moves between inventories or currencies). For example, if “Gold” is earned from quests and spent on upgrades, then Gold has sources and sinks; if Gold is converted into “Gems” via a shop exchange, that conversion is a transfer plus a sink/source pair depending on how you model it. Keep the accounting consistent: every unit that appears must be traceable to an origin, and every unit that disappears must land in a sink bucket.
Next, set targets that reflect player experience. A common target is “time-to-afford” for key purchases. If an upgrade costs 500 Gold and the median player earns 120 Gold per day, time-to-afford is about 4.2 days before considering variability. Your sink audit should check not only totals but also affordability distribution: too many players should not get stuck waiting, and too few should not accumulate excess.
Then build scenarios that stress the system in different ways. Use scenario categories rather than random test cases:
- Low-Activity Players: fewer sessions, fewer completed quests, but still spending when they can.
- High-Activity Players: more sessions, more completions, higher exposure to reward sources.
- Lucky Loot Paths: higher-than-average drops that feed crafting materials.
- Crafting-Heavy Players: spend more on crafting and less on direct purchases.
- Conversion Users: players who frequently exchange one currency into another.
For each scenario, run the same time window and the same progression milestones. Measure outcomes at multiple checkpoints, not just at the end. Track: total earned, total spent, net change, inventory caps reached, and the fraction of players who can afford each sink item at each milestone.
A practical example: suppose you have Soft Currency (SC) earned from daily quests and spent on crafting. You also have a premium offer that sells SC bundles. Your audit should test three versions of the same economy:
- No Premium Purchases: SC sinks must still keep SC from inflating uncontrollably.
- Moderate Premium Purchases: SC bundles increase SC supply; sinks must absorb the extra without breaking affordability.
- High Premium Purchases: a small segment buys often; you check whether their spending drains SC faster than it enters, and whether free players experience longer wait times.
To make scenario testing concrete, use a ledger-style simulation. The goal is not perfect prediction; it’s consistency and coverage. Below is a minimal ledger approach for one resource.
For each player p in scenario:
  gold = starting_gold
  For each day d in window:
    gold += sources(p, d)
    gold -= sinks(p, d)
    gold = clamp(gold, 0, max_inventory)
    record affordability(p, d)
Aggregate across players:
  total_net = sum(gold_end - gold_start)
  sink_rate = total_spent / window
  source_rate = total_earned / window
  affordability_stats = percent_can_afford_by_milestone
Compare to targets:
  net_change near zero or within tolerance
  affordability within acceptable bands
After you simulate, audit discrepancies systematically. If net change is positive, you have a supply leak: either sources are too generous, sinks are too weak, or players aren’t reaching the sinks you expected. If net change is negative, you may be over-sinking: players hit inventory scarcity, crafting stalls, or progression feels grindy.
Use “why” probes to locate the leak. For instance, if crafting-heavy players hoard materials instead of crafting, the sink isn’t failing mathematically; it’s failing behaviorally. Add probes that separate sink capacity from sink usage. Capacity is how much the system can remove (based on costs and availability). Usage is how much players actually spend (based on access, UI clarity, and opportunity timing). If capacity is high but usage is low, the issue is usually friction or gating, not numbers.
Finally, close the loop by turning findings into specific adjustments and re-running only the affected scenarios. If SC inflation appears only in the conversion-heavy scenario, adjust exchange rates or add conversion friction. If affordability collapses for low-activity players, reduce early sink costs or increase early source availability. The audit is complete when every scenario meets its targets with acceptable tolerance, and every adjustment has a measurable effect on the specific metric that was failing.
7. Drop Rates Crafting Systems and Loot Economy Design
7.1 Defining Loot Tables and Reward Rarity Structures
Loot tables are the part of your economy that turns “players did something” into “players received something.” A good loot table makes rewards feel consistent with effort, while rarity structures prevent the economy from becoming either too stingy or too flooded.
Core Concepts for Loot Tables
Start with three building blocks: reward entries, selection rules, and constraints.
- Reward entries describe what can drop: item ID, quantity range, and whether the reward is stackable.
- Selection rules define how one or more entries are chosen: single roll, multiple rolls, weighted roll, or tiered roll.
- Constraints keep outcomes sane: maximum duplicates per run, required progression gates, and “no currency + no crafting material together” style rules.
A simple example: a dungeon chest can award either (a) one weapon skin, (b) one crafting material bundle, or (c) a small amount of soft currency. The table must encode that these are mutually exclusive, otherwise players will see confusing bundles that don’t match the chest’s promise.
Designing Rarity Tiers That Mean Something
Rarity is not just a label; it’s a promise about expected value and player experience. Use rarity tiers to communicate how often players should see an item and how much it should matter.
A practical tier set for many games is: Common, Uncommon, Rare, Epic, Legendary. Each tier needs:
- Weight: how likely it is to be selected.
- Value profile: what the tier represents (cosmetic variety, crafting usefulness, power impact, or convenience).
- Quantity behavior: whether higher tiers drop in smaller quantities or remain single-item.
Example: if Legendary items are powerful weapons, you usually want them to be rare in frequency and low in quantity per drop. If Legendary items are cosmetics, you can allow more frequent Legendary drops as long as duplicates are handled carefully.
Weighted Selection Without Confusing Players
Weighted loot tables choose entries based on relative weights. The key is to ensure the weights match the player’s mental model of “how lucky I feel.” If Rare is supposed to be “sometimes,” its weight must be high enough that players experience it within a reasonable number of runs.
A common mistake is using weights that look balanced in isolation but create long dry spells. To avoid that, pair rarity weights with protection rules.
Protection Systems That Keep Rarity Honest
Protection means the table adapts based on recent outcomes. Two widely used patterns:
- Pity counter: after N unsuccessful rolls for a target tier, the next roll guarantees it.
- Duplicate protection: if the player already owns an item, the table rerolls within the same tier until it finds an unowned option.
Example: Suppose Epic-tier items are 20 distinct cosmetics. Without duplicate protection, a player can “earn” Epic drops that are repeats, which feels like the game is wasting their time. With duplicate protection, Epic drops remain meaningful until the player’s collection is nearly complete.
Multi-Roll Tables and Tier Coupling
Many loot systems do more than one roll per chest. When you do, decide whether rolls are independent or coupled.
- Independent rolls: each roll draws from the full rarity distribution.
- Coupled rolls: the first roll determines a tier band for subsequent rolls.
Coupling helps you keep the chest identity consistent. Example: a “Legendary chest” could guarantee at least one Rare-or-better item, then allow additional rolls that can still be Common. This prevents the chest from feeling like a random grab bag.
Constraints That Prevent Economic Weirdness
Constraints are what stop loot tables from breaking your economy.
- Currency caps: limit soft currency per run to avoid inflation spikes.
- Material pairing rules: if a run gives crafting materials, it may restrict additional crafting materials to keep crafting costs predictable.
- Progression gates: higher tiers should not appear before the player can use them.
Example: If a player is level 5, they should not receive Legendary crafting components for endgame gear. Even if the table technically allows it, the constraint should block it so the reward has immediate utility.
Mind Map: Loot Table Design
Example Loot Table Structure
Consider a chest with one primary reward and one secondary reward.
- Primary reward: weighted by rarity (Common 60%, Uncommon 25%, Rare 12%, Epic 2.5%, Legendary 0.5%).
- Secondary reward: always Common-to-Uncommon, but with duplicate protection for unique cosmetics.
- Constraints: soft currency can appear only as secondary, and total soft currency per chest is capped.
If a player opens 30 chests and never sees Epic or Legendary, the pity system should intervene. If they see Epic repeatedly but only as duplicates, duplicate protection should intervene. The table’s job is to keep both outcomes aligned with player expectations and economic stability.
Practical Validation Before Shipping
After you define weights, tiers, and constraints, validate three things with simple calculations and test runs:
- Expected value per chest: average currency and material output should match your economy targets.
- Rarity experience: measure dry spell length for Epic and Legendary.
- Constraint behavior: confirm that blocked rewards reroll correctly and do not silently reduce total loot.
When these checks pass, your loot table becomes a predictable engine: not perfectly fair in any single run, but consistent in the long run, which is the only kind of fairness loot tables can afford.
7.2 Implementing Pity Systems and Protection Against Bad Luck
Bad luck protection is a design feature that reduces the chance of long, demotivating dry spells without erasing the excitement of getting a rare drop. The key is to define what “bad luck” means in your economy, then translate that definition into a rule that is fair, transparent enough to be trusted, and measurable.
Start with Clear Failure Modes
First, identify the specific player pain you’re addressing. Common failure modes include: (1) streaks with no meaningful progress, (2) repeated duplicates that don’t convert into useful value, and (3) rare items that are technically obtainable but practically unreachable for many sessions. For example, if a player can open 50 chests in a week and still never see a featured weapon, they may interpret the system as broken even if the math is correct.
Next, decide what counts as “progress” for the pity counter. You can count only the target rarity, or you can count any drop that moves the player toward the target. A practical approach is to count only the featured item tier, because it keeps the player’s mental model aligned: “I’m getting closer to the featured item.”
Choose a Pity Style That Matches Your Loot Structure
There are two widely used pity styles.
Hard pity guarantees a target after a fixed number of attempts. Example: after 60 openings without the featured item, the 61st opening gives it. This is easy to explain and easy to test, but it can feel abrupt if the guarantee is too small.
Soft pity increases the probability as the pity counter grows. Example: base chance is 1% each open; at 30 attempts without the item, the chance rises gradually to 10% by attempt 60. Soft pity smooths the experience, but you must communicate the existence of the protection carefully to avoid confusion.
A hybrid works well when you have multiple tiers. For instance, you can apply soft pity to the featured tier and hard pity only for the topmost tier.
Define the Counter, Reset, and Scope
A pity system needs three rules.
-
Counter increment rule: what events increase the counter. Example: every chest opening increments by 1 if the featured item is not received.
-
Reset rule: when the counter returns to zero. Example: receiving the featured item resets the counter immediately.
-
Scope rule: whether pity is per player, per banner, per item, or per loot pool. Example: pity is per banner, so switching banners doesn’t carry the counter. Alternatively, pity can be per item family, which reduces frustration when players chase a specific weapon across multiple events.
To keep the system fair, ensure the counter increments even when the player receives a duplicate. If duplicates are common, you can also add a separate protection layer that improves duplicate value.
Add Duplicate Protection Without Breaking Value
If your loot includes duplicates, players can feel punished for being unlucky. Duplicate protection can be simple:
- Duplicate conversion: duplicates convert into crafting materials at a fixed rate.
- Duplicate replacement: once a player owns the item, future drops become a different item from the same tier.
- Duplicate pity: after N duplicates, the next drop must be a non-owned item.
Example: A player owns 3 of 5 rare skins. After 10 openings with only duplicates, the system guarantees a non-owned rare skin. This keeps the “rare” feeling while preventing a dead-end.
Keep the Math Auditable with a Worked Example
Suppose your featured item has a base chance of 1% per open, and you implement hard pity at 60.
- Attempts 1–60: each open has 1% chance.
- If the player fails 59 times, attempt 60 is guaranteed.
This means the maximum number of opens to obtain the item is 60, which is the main psychological benefit. If you instead use soft pity, you can model it as a curve. For example, chance increases linearly from 1% at attempt 1 to 10% at attempt 60. The expected number of opens becomes smoother, and players are less likely to experience a sudden “guarantee cliff.”
Mind Map: Pity System Design Flow
Implementation Checklist That Prevents Common Bugs
- Server-authoritative counters: store pity state server-side so client tampering can’t reset or skip increments.
- Atomic reward resolution: ensure the system increments the counter and resolves the drop in one transaction, so crashes don’t duplicate rewards.
- Deterministic logging: record the pity counter value used for each roll so QA can reproduce outcomes.
- Edge-case handling: define behavior for refunds, rerolls, and partial purchases. Example: if a purchase is canceled before completion, do not increment pity.
- Economy consistency: verify that pity does not accidentally inflate supply of the target item beyond what your sink/source tuning expects.
Example: Banner-Based Hard Pity with Duplicate Conversion
Imagine a banner with a featured weapon tier and 5 rare skins.
- Featured weapon: base 1% per chest, hard pity at 60, pity resets on weapon receipt.
- Rare skins: duplicates convert into 50 crafting shards.
- Duplicate protection: after 10 consecutive duplicate skins, the next skin drop is guaranteed to be a non-owned skin.
A player who gets unlucky for weeks still has a clear maximum wait for the weapon, while duplicate-heavy luck doesn’t feel like wasted time because conversion and non-owned guarantees keep the reward moving forward.
7.3 Designing Crafting and Exchange Systems with Clear Math
Crafting and exchange systems turn “I have resources” into “I have something useful,” but they only feel fair when the math is legible. Clear math also prevents accidental economy breaks, like crafting that quietly prints value or exchange rates that make one currency meaningless.
Core Building Blocks
Start by naming the exact quantities your system moves.
- Inputs: item or currency amounts consumed per craft or exchange.
- Outputs: item or currency amounts granted.
- Rates: deterministic amounts, probabilistic outcomes, or both.
- Constraints: inventory limits, crafting station requirements, cooldowns, and eligibility rules.
A crafting recipe is easiest to reason about when it has a single “expected value” path, even if the actual output is random.
Recipe Math: Deterministic First
For deterministic crafting, the math is straightforward:
- Cost = sum of each input quantity multiplied by its unit value.
- Value = sum of each output quantity multiplied by its unit value.
- Net Gain = Value − Cost.
You don’t need a perfect valuation model at first; you need a consistent one. A practical approach is to use reference prices derived from typical acquisition paths (drops, quests, shop prices, or exchange rates).
Example: A recipe uses 10 Copper Ore and 2 Wood to produce 1 Bronze Ingot.
- Reference values: Copper Ore = 1, Wood = 0.2, Bronze Ingot = ?
- Cost = 10×1 + 2×0.2 = 10.4
- If Bronze Ingot reference value is set to 10.4, Net Gain = 0, meaning crafting doesn’t create value.
If Net Gain is positive, players can farm the recipe for profit; if negative, crafting becomes a tax that players only use when they need a specific item.
Probabilistic Crafting with Expected Value
When outputs are random, use expected value so you can still balance the economy.
- Expected Output Value = Σ (probability of outcome i × value of outcome i)
- Expected Net Gain = Expected Output Value − Cost
Example: “Refine” uses 5 Silver Dust to produce either:
- 1 Rare Gem with probability 10%, value 120
- 1 Uncommon Gem with probability 90%, value 14
Expected Output Value = 0.10×120 + 0.90×14 = 12 + 12.6 = 24.6
If Silver Dust cost is 5×5 = 25, Expected Net Gain = 24.6 − 25 = −0.4. That’s slightly unfavorable, which is fine if the system is meant to be a sink for Silver Dust, not a profit engine.
Exchange Systems: Rate Design and Conservation
Exchange systems convert one resource into another. The key is to decide whether exchange should be:
- Value-neutral: players can swap without profit.
- Value-reducing: exchange acts as a sink.
- Value-increasing: exchange is effectively a reward disguised as a trade, which usually causes inflation unless tightly constrained.
For a simple 1:1 exchange with a fee, use:
- Exchange Rate: output quantity per input quantity
- Fee: portion removed or additional input required
Example: 100 Gold Coins → 90 Gems. If Gold reference value is 1 per coin and Gems reference value is 1 per gem, then:
- Cost = 100×1 = 100
- Value = 90×1 = 90
- Net Gain = −10, so exchange consumes value and helps stabilize supply.
If you later change reference values (for example, by adjusting how Gold is earned), you must re-check exchange math so the sink doesn’t flip into a profit loop.
Crafting Tiers and Marginal Cost
Players don’t just compare total cost; they compare marginal cost between tiers.
A clean method is to compute the expected net gain for each tier and ensure it trends in the direction you want:
- Upgrading should usually become more expensive in reference value terms.
- Side-grades should be value-neutral or slightly sink-like.
Example: Tier 1 craft: cost 10, expected output value 10 (neutral). Tier 2 craft: cost 30, expected output value 29 (slightly sink). Tier 3 craft: cost 90, expected output value 88 (slightly sink). This creates a consistent “you pay for convenience or specificity” feel.
Guardrails Against Hidden Profit
Even with clear math, profit can appear through edge cases.
- Stacking discounts: if players can reduce input costs via multiple systems, recompute cost using the final effective inputs.
- Multiple acquisition routes: if one input is easier to obtain than its reference value assumes, the recipe becomes profitable.
- Rounding and integer constraints: if outputs are integer quantities, expected value may not match actual average over small sample sizes.
Example: If a recipe expects 0.5 of a component per craft but the game rounds up, the real cost is higher than your spreadsheet. Use integer-aware calculations when setting reference values.
Implementation Checklist for Clear Math
- Define reference values for every input and output used in math.
- Specify whether each recipe is deterministic, probabilistic, or hybrid.
- Compute expected output value for probabilistic outcomes.
- Ensure expected net gain matches the intended role: neutral for swapping, negative for sinks.
- Re-check math under discounts, fees, and rounding.
Mind Map: Crafting and Exchange Math
Worked Example Summary
A good crafting system answers three questions with numbers: what it costs, what it returns on average, and whether that average creates, removes, or preserves value. When those answers are consistent across tiers and exchange paths, players feel the system is predictable even when outcomes are random.
7.4 Preventing Loot Box Style Confusion with Transparent Rules
Loot boxes feel confusing when players can’t tell what they’re buying, what they’re likely to get, and how the rules behave over time. The goal of transparent rules is simple: remove ambiguity about odds, outcomes, and repeatability of the system. When transparency is consistent, players can make choices without guessing.
Start with What Players Think They’re Buying
Many players interpret a “loot box” as a single, self-contained purchase with a clear expected value. If your system instead behaves like a long-running progression mechanic, you must say so in plain language. A practical approach is to define three things in the purchase UI and in the item description:
- What the purchase contains: one box equals one roll, or one box equals multiple rolls.
- What the box can produce: list categories (e.g., weapon skin, crafting material) and the rarity tiers.
- What the box cannot produce: exclude items that are not part of the current pool.
Example: If a box can award both cosmetics and crafting materials, label them as separate reward types and show how many of each type are possible per roll.
Make Odds Understandable Without Forcing Math
Odds transparency fails when it’s technically present but cognitively unusable. Present odds in a way that matches how players compare decisions.
- Show odds per rarity tier (e.g., 60% common, 30% rare, 9% epic, 1% legendary).
- Show odds per item only when the pool is small enough to read.
- State whether odds change by time, event, or player state.
If odds are affected by pity or protection, don’t hide it behind fine print. State the rule in one sentence and then show the threshold.
Example: “Legendary odds are 1% per roll. If you don’t receive a legendary after 50 rolls, the 51st roll guarantees one.”
Clarify Outcome Rules over Multiple Purchases
Confusion often comes from treating each purchase as independent when the system isn’t. Players notice patterns, but they can’t verify them, so they assume the worst.
Use transparent language for:
- Pity counters: whether they reset after a legendary, after a guaranteed item, or after a time window.
- Pool rotation: whether the item list changes between events.
- Duplicate handling: whether duplicates convert to currency, crafting materials, or nothing.
Example: “Duplicates of cosmetic items convert into 10 fragments. Fragments can be used to craft any cosmetic in the current pool.”
Prevent “Surprise” Through Consistent Reward Presentation
Even with odds shown, players can feel misled if the reward screen contradicts the rules.
- Use the same reward breakdown format every time: show rarity tier, item name, and any conversion value.
- Avoid mixing “estimated” and “actual” in the same screen.
- Show the current pool label when the pool is event-based.
Example: If a box is “Season 3,” the reward screen should display “Season 3 pool” so players can connect the outcome to the purchase.
Mind Map: Transparent Rules That Reduce Confusion
Example: Three Levels of Transparency
Level 1: Minimal
- “Buy a box and get random rewards.”
- No odds, no pool explanation.
- Result: players treat it like a black box and compare outcomes emotionally.
Level 2: Practical Transparency
- “Each box contains one roll.”
- “Rarity odds: Common 60%, Rare 30%, Epic 9%, Legendary 1%.”
- “Legendary guarantee after 50 rolls.”
- Result: players can plan spending and understand variance.
Level 3: System Transparency
- Adds: “Legendary pool rotates monthly; duplicates convert to fragments.”
- “Pity counter resets when a legendary is received.”
- Reward screen shows “Pool: Current Month” and “Fragments: +10.”
- Result: players can verify outcomes against rules, reducing disputes.
System Checks That Catch Confusion Early
Before launch, run internal checks that mirror player questions:
- If a player asks “Can I get item X from this box?” can you answer from the UI text?
- If a player asks “How many boxes until a guarantee?” is the threshold visible?
- If a player asks “Do odds change during events?” is that stated clearly?
- If a player sees a duplicate, do they understand what it becomes?
A good transparency system doesn’t just publish rules; it makes those rules easy to apply to a real purchase decision. When the UI, odds, and reward outcomes agree, loot boxes stop feeling like a mystery and start feeling like a known gamble.
7.5 Testing Loot Outcomes for Fairness and Economic Impact
Loot systems fail in two predictable ways: players feel outcomes are unfair, or the economy quietly drifts until prices and progression stop making sense. Testing should cover both, using the same core idea: measure what the system actually does, then compare it to what the design claims.
Fairness Foundations Before You Test
Start by defining fairness in operational terms.
- Outcome fairness means players experience consistent rarity behavior relative to the rules you set, including any protection like pity timers.
- Process fairness means the game communicates the rules clearly enough that players can form reasonable expectations.
- Economic fairness means loot rewards do not inflate player power or currency in a way that breaks progression for free and paying players.
A simple example: if a “rare” item is supposed to appear about 1% of the time, fairness testing should confirm that across many trials, the observed frequency clusters around that target, and that pity protection shifts the distribution in the expected direction.
Test Design That Separates Randomness from Bugs
Use three layers of tests: deterministic checks, statistical simulations, and live telemetry.
-
Deterministic checks validate the math and implementation.
- Confirm reward tables are versioned and loaded correctly.
- Verify rarity thresholds, pity counters, and reroll rules are applied in the right order.
- Example: if pity guarantees a legendary after 50 pulls, test that the 50th pull always produces legendary when the pity counter is at 49, even if other modifiers exist.
-
Statistical simulations validate distributions.
- Run large batches (hundreds of thousands of simulated pulls) using the same code paths as production.
- Track not only overall rarity rates, but also conditional rates like “legendary rate after 10 pulls without legendary.”
- Example: if you use pity, the “after 10 pulls” rate should be higher than the base rate, but still lower than the “after 45 pulls” rate.
-
Live telemetry validates real player behavior.
- Collect per-pull outcomes, pity state, and any modifiers tied to player level, region, or event flags.
- Example: if you run a weekend event that increases drop rates, confirm the increase applies only to the intended cohorts.
Metrics That Tie Fairness to Economic Impact
Fairness metrics and economy metrics should be measured together so you can see tradeoffs.
- Rarity distribution metrics: observed rarity frequency, variance, and tail behavior (how often players hit extremely unlucky streaks).
- Pity effectiveness metrics: probability of legendary at each pity step, and how quickly the system “rescues” unlucky players.
- Resource conversion metrics: how often loot becomes upgrades, crafting materials, or sellable currency.
- Inflation pressure metrics: total expected value of loot per pull in each currency and item category.
A concrete example: suppose legendary items can be converted into crafting materials that reduce upgrade costs. Even if legendary rarity feels fair, the conversion path can inflate upgrade throughput. Testing should compute expected crafting materials per pull and compare it to the intended sink capacity.
Mind Map: What to Measure and Why
Example: A Fairness Test Plan for a Pity System
Assume a loot box with base legendary rate of 0.5% and pity guarantees legendary at pull 60.
- Deterministic test: set pity counter to 59 and simulate a pull; legendary must occur.
- Simulation test: run 200,000 pulls with pity enabled.
- Confirm overall legendary rate matches the expected value from the base rate plus pity rescue.
- Plot legendary probability by pity step; it should rise smoothly as the guarantee approaches.
- Economic test: compute expected legendary count per 100 pulls, then multiply by the legendary-to-material conversion rate.
- Compare the resulting material inflow to the crafting sink capacity measured in your economy model.
If the legendary-to-material conversion is higher than planned, players may feel the system is generous, but the economy may still break because sinks cannot absorb the extra materials.
Example: Detecting Unfairness from Implementation Order
A common bug is applying pity after selecting the reward instead of before. The result is subtle: the system still “mostly” works, but unlucky streaks become longer than the guarantee implies.
Testing catches this by checking conditional outcomes.
- Measure legendary rate for pulls where pity counter equals 59.
- If pity is implemented correctly, the rate should be 100%.
- If it’s implemented in the wrong order, you’ll see a lower rate that matches the base probability, and the tail behavior will worsen.
Decision Thresholds and Pass Criteria
Define pass criteria before running tests.
- For base rates without pity, allow a small tolerance band around expected frequency based on sample size.
- For pity systems, require strict correctness at guarantee steps and tight tolerances for nearby steps.
- For economic impact, require that expected inflow per pull stays within a tolerance band relative to sink throughput.
Example pass criteria: “Guarantee step must be 100% legendary; overall legendary rate must be within 2% relative error of simulation expectation; expected crafting materials per 100 pulls must not exceed sink capacity by more than 1%.”
Closing the Loop Between Fairness and Economy
When tests fail, fix the smallest cause first. If rarity distribution is off, focus on reward table math and pity counter updates. If distribution looks fine but economy drifts, focus on conversion rules, sell values, and how loot feeds sinks. Fairness is not just about who gets what; it’s also about whether the game’s economy can absorb those outcomes without turning progression into a spreadsheet with feelings.
8. Progression Balancing and Pay to Win Risk Management
8.1 Separating Competitive Power from Cosmetic and Utility Rewards
Competitive power is anything that changes outcomes in a way players can measure against each other: damage, armor, healing throughput, accuracy, speed, crowd-control strength, and similar stats. Cosmetic rewards change appearance only. Utility rewards help with convenience or quality-of-life without directly raising win probability. The goal is to keep monetization from turning match results into a receipt check.
Define What Counts as Power
Start by writing a “power boundary” list for your game. Include both direct stats and indirect effects that scale with skill or time.
- Direct power: higher DPS, stronger defenses, faster resource generation that increases combat output.
- Indirect power: reduced cooldowns that increase effective uptime, larger inventory that enables more loadout variety in competitive modes, faster crafting that shortens the time to reach a strong build.
- Non-power: skins, emotes, lobby animations, cosmetic trails, and most UI-only changes.
A practical test: if two players with identical skill and playtime can still end up with systematically different win rates because of the reward, it’s power.
Use a Three-Lane Reward Taxonomy
Organize rewards into three lanes and enforce them consistently across offers, battle passes, events, and bundles.
-
Cosmetic Lane
- Changes appearance, audio cues, or presentation.
- Examples: character skin, weapon model, victory pose, emote pack.
-
Utility Lane
- Improves convenience, clarity, or accessibility without increasing combat effectiveness.
- Examples: extra loadout slots for non-competitive modes, faster navigation UI, colorblind-friendly reticles, reduced menu friction.
-
Competitive Power Lane
- Anything that changes combat math or competitive outcomes.
- Examples: stat boosts, exclusive weapons with higher base damage, upgrades that increase survivability.
Your monetization strategy should keep most paid rewards in lanes 1 and 2. If you must include lane 3, restrict it to non-competitive contexts or make it strictly time-limited and non-stacking.
Design Utility So It Doesn’t Become Power
Utility often “creeps” into power because convenience can translate into more effective play. Prevent that with constraints.
- Scope utility to non-combat time. If it reduces time spent in menus, it should not reduce time spent in fights.
- Avoid stat-adjacent effects. “+5% crafting speed” can become “+5% faster access to better gear,” which becomes power.
- Keep utility symmetric across competitive modes. If one player has better information presentation, they may react faster.
Example: A paid “auto-sort inventory” feature is utility. A paid “auto-target weak points” feature is effectively power because it changes hit quality.
Keep Competitive Modes Clean
Competitive modes should have a clear rule: the only differences that matter are player skill, not purchased build strength.
- Use matchmaking normalization: cap or equalize certain stats in competitive playlists.
- Separate progression tracks: let competitive progression be earned through play, not through paid stat items.
- Ensure cosmetics remain visible but not advantageous. If a cosmetic changes silhouette or readability, it can become an unfair advantage.
A simple readability check: can opponents reliably identify targets and abilities regardless of skin? If not, treat it as power-adjacent and adjust.
Mind Map: Reward Separation Logic
Concrete Examples That Stay on the Right Side
Example 1: Paid skin vs paid weapon
- Paid skin: same weapon stats, different model and sound. Outcome depends on aim and decisions.
- Paid weapon: higher base damage. Outcome depends partly on purchase, so it’s competitive power.
Example 2: Paid loadout slots vs paid faster upgrades
- Paid loadout slots in a casual mode: utility, because it reduces friction and supports variety without changing combat math.
- Paid faster upgrades that unlock stronger gear sooner: can become power because it changes the build strength at the moment of play.
Example 3: Paid “aim assist” setting
- If it changes aim behavior in a way that improves hit accuracy, it’s power.
- If it only provides accessibility for players who need it, and it’s available through non-monetized settings, it can be utility.
Implementation Checklist for Designers and Economy Owners
- Every monetized item gets a lane label: Cosmetic, Utility, or Competitive Power.
- Every Utility item gets a “power creep” review: does it change combat time, information advantage, or build strength?
- Every competitive playlist gets a normalization rule set and a readability check for cosmetics.
- Every offer description matches the lane: no “convenience” language for stat changes.
When this separation is enforced, players can spend for identity and comfort without feeling that the economy is quietly taking aim at their win rate.
8.2 Designing Upgrade Paths That Preserve Skill Based Advantage
Skill-based advantage means players who play well should reliably improve outcomes without needing to buy raw power. The upgrade path is where that promise either holds or quietly breaks, because it controls how much of the final performance comes from player decisions versus purchased stats.
Core Principle: Separate Decision Power from Stat Power
Start by identifying what “skill” actually affects in your game: aim accuracy, timing, positioning, build choices, route planning, or resource management. Then map each upgrade tier to one of two buckets:
- Decision power: upgrades that improve the player’s options in response to skill (e.g., faster cooldowns that reward precise timing, extra loadout slots that enable better planning).
- Stat power: upgrades that directly raise baseline performance regardless of play quality (e.g., flat damage multipliers, universal health boosts).
A skill-preserving upgrade path can include stat power, but it must be constrained so that skilled play still outperforms average play at the same upgrade level.
Mind Map: Upgrade Path Components
Designing Decision Power Upgrades with Concrete Examples
Consider a shooter with a weapon upgrade system. A decision power upgrade might reduce recoil recovery time slightly, but only meaningfully when the player fires in controlled bursts. The UI can show that the upgrade improves “stability after burst,” not “damage.” Players still need to manage burst timing to benefit.
In a strategy game, a decision power upgrade could add an extra unit slot or allow a second active ability. The upgrade doesn’t increase unit stats by itself; it increases the number of meaningful choices. Skilled players use the extra slot to create better synergies, while less skilled players often place units inefficiently.
In an action RPG, a decision power upgrade can improve stamina regeneration only when the player avoids taking damage for a short window. That turns the upgrade into a reward for clean play rather than a blanket buff.
Constraining Stat Power Without Removing Progression
Stat power is not automatically bad; it’s bad when it dominates the outcome. Use three practical constraints.
-
Diminishing returns on raw multipliers
If damage scales linearly with upgrade rank, purchases quickly become the main differentiator. Instead, use a curve where each additional rank adds less than the previous one.
-
Caps tied to meaningful skill thresholds
Cap the maximum stat advantage in competitive modes. For example, allow upgrades to affect non-competitive modes fully, but in ranked play cap effective damage bonuses so that skill still drives the gap.
-
Cost scaling that matches impact
If a stat upgrade gives +10% damage, the cost should rise faster than the benefit as ranks increase. This makes extreme purchases expensive without making early progression feel stingy.
Example: Two Upgrade Paths That Feel Fair
Imagine a character progression system with three ranks.
-
Path A: “Raw Power”
- Rank 1: +8% damage
- Rank 2: +16% damage
- Rank 3: +28% damage This path makes outcomes increasingly purchase-driven because the benefit is always on.
-
Path B: “Skill-Conditioned Power”
- Rank 1: +6% damage plus improved hit confirmation window
- Rank 2: +10% damage plus faster recovery after perfect dodges
- Rank 3: +14% damage plus reduced stamina cost for timed actions Here, the upgrade improves both baseline and the player’s ability to execute skillful patterns. Even if purchases raise the ceiling, skilled timing still produces better results.
Guardrails for Competitive Integrity
Even with good upgrade design, you need operational rules.
- Equal progression in competitive brackets: If ranked matches allow different upgrade levels, ensure the matchmaking reduces the advantage gap by capping effective bonuses.
- Mode-specific economy: Let monetization accelerate cosmetics or convenience in competitive modes, while keeping power progression more controlled.
- Clear player expectations: If upgrades affect performance, communicate what they affect in gameplay terms, not vague “boosts.” Players should be able to reason about why they won.
Validation: Prove Skill Still Matters
Test with a simple comparison: at the same upgrade tier, measure performance for players who demonstrate the relevant skill behavior. For instance, in a dodge-based combat game, compare damage taken and damage output for players who consistently dodge correctly versus those who don’t.
Then measure purchase impact by segment. If high spenders outperform low spenders primarily because of upgrades, your stat power is too dominant. If high spenders outperform because they execute better patterns, your upgrade path is doing its job.
A skill-preserving upgrade path is essentially a contract: upgrades should widen the set of good decisions, not replace them. When the best outcomes still require correct play, the economy can support revenue without turning matches into a receipt contest.
8.3 Handling Gating Systems for Content Access and Rewards
Gating systems decide who can access content, when they can access it, and what rewards they receive for doing so. Done well, gating protects pacing and economy balance; done poorly, it creates frustration, churn, and “I paid so I could play” resentment. The goal is simple: make the gate feel like a fair rule of the game, not a surprise bill.
Core Gate Types and What They Control
Start by choosing the gate’s purpose, because each type controls a different variable.
- Progression gates control player readiness. Example: a dungeon unlocks after completing a tutorial boss and reaching level 12. The gate prevents players from entering with under-leveled gear, which stabilizes difficulty and reward expectations.
- Time gates control pacing and operational load. Example: a weekly raid opens every Monday 10:00 and closes Sunday 23:59. The gate also limits how often rewards enter the economy.
- Currency gates control economic access. Example: a premium shop event requires 200 event tokens to claim a limited weapon skin. The gate ties rewards to a sink, preventing token inflation.
- Skill or performance gates control competence. Example: a challenge mode requires clearing a stage within a time threshold. The gate reduces reward farming by players who can’t meet the bar.
- Ownership gates control compatibility. Example: a “seasonal questline” requires the player to own a specific starter pack item. The gate prevents confusion and reduces support tickets.
A common mistake is mixing purposes. If a gate is meant to pace content, don’t also use it as a hidden paywall for power.
Designing Gate Rules That Players Can Predict
Players accept gates when they can predict outcomes from visible information. Use three principles.
- Make the requirement visible and specific. Example: “Complete Chapter 3-2” is clearer than “Reach the next stage.”
- Explain the reward logic in plain terms. Example: “Event tokens are earned by completing daily missions; spending them claims the limited cosmetic.”
- Ensure the gate is consistent across modes. Example: if the same token is used in multiple shops, the conversion rate and claim limits must match.
A practical approach is to treat each gate as a contract: requirement, timing, reward, and limits. If any part changes, update the contract text and the UI.
Reward Gating Without Pay to Win Pressure
Reward gating should shape behavior without forcing purchases for power. Use reward tiers that separate competitive advantage from monetizable convenience.
- Cosmetic-first rewards reduce pay-to-win risk. Example: a gated battle pass track grants a new banner and emote at tier 10, while power items are either absent or strictly cosmetic variants.
- Utility rewards with caps can be acceptable when they don’t scale into dominance. Example: a gated “resource crate” gives 3 crafting rolls per week, capped so free players can still progress.
- Power rewards only when they are earned through play. Example: a weapon upgrade requires completing the gated activity and spending earned materials, not premium currency.
If you must include premium currency, keep it in the role of time compression rather than stat inflation. Example: premium can reduce the number of days to finish a crafting track, but the final upgrade still requires the same total materials.
Handling Edge Cases and Player Experience
Gates create edge cases: returning players, partial progress, and platform differences. Plan for them.
- Returning players: If a weekly event ended, show what can still be claimed and what is permanently unavailable. Example: “You can still claim the event skin until the end of the month; the raid challenge is closed.”
- Partial progress: If a player started a multi-step questline, preserve their state. Example: “You completed step 2; step 3 is now available.”
- Platform and region differences: Keep gate timing consistent. Example: use server time for event windows and display local time derived from it.
Also guard against “soft lock” situations where a player meets the requirement but can’t find the content. Example: after unlocking a chapter, place a clear navigation marker to the entry point.
Mind Map: Gating Systems for Content Access and Rewards
Example: A Weekly Event Gate That Stays Fair
Imagine a weekly event with a gated “Boss Run” and a token-based shop.
- Gate requirement: Boss Run opens weekly from 2026-04-05 10:00 to 2026-04-12 10:00 server time.
- Access rule: Players can enter if they completed “Prologue Boss” and are level 10+.
- Reward loop: Each run grants 10–20 event tokens based on performance; tokens are a sink because they are spent in the event shop.
- Shop limits: Each limited item can be claimed once per event; the shop also offers a repeatable cosmetic bundle with no stat effects.
- Premium role: Premium currency can buy “skip tickets” that reduce the time to complete the daily mission, but tokens still come from the Boss Run.
This structure keeps the gate predictable, prevents token inflation, and avoids turning the event into a power race.
Validation Checklist for Gate Implementation
Before shipping, verify that the gate’s behavior matches the contract.
- The UI shows the exact requirement and remaining time.
- The reward preview matches actual payouts.
- Claim limits are enforced server-side.
- Returning players see correct availability states.
- Economy metrics show stable token supply and sink usage.
A gating system is successful when players understand it without reading patch notes, and when the economy behaves as if the gate were part of the design rather than an afterthought.
8.4 Calibrating Costs So Free Players Can Progress Reliably
Free players should feel like the game is “on rails” for progress: they can predict what they’ll earn, what it will buy, and how long it will take to reach the next meaningful milestone. Reliable progression doesn’t mean fast progression for everyone; it means consistent progression for the players who don’t buy.
Core Principle: Cost Calibration Against Earn Rates
Cost calibration is the practice of matching what you ask players to spend with what they can earn through normal play. Start by defining a target milestone, such as “upgrade a weapon to level 5” or “complete a crafting tier.” Then compute three numbers for the free path:
- Earn rate of the relevant resource (per hour or per play session)
- Spend cost of the milestone (including intermediate materials)
- Time-to-milestone under typical play patterns
If time-to-milestone varies wildly, players interpret it as unfair even when the averages are correct. The goal is to keep the median time stable and the tail time tolerable.
Step 1: Choose the Right Cost Currency
Costs should be expressed in a currency that matches the player’s experience. If the milestone is about time spent in combat, charging a “combat energy” currency is clearer than charging an abstract token. If the milestone is about exploration, use a resource that naturally drops from exploration activities.
A practical rule: if players can’t explain where the cost comes from, they can’t plan around it, and “reliable” becomes “hope-based.”
Step 2: Build a Free-Player Earn Model
Model free-player earnings using three layers:
- Guaranteed baseline from quests, daily objectives, and mission completions
- Variable layer from drops and random rewards
- Behavior layer from player choices, such as which modes they repeat
For reliability, the baseline matters most. Variable rewards should smooth the experience, not carry it. If your baseline is too low, players will feel stuck unless they buy or grind an unpopular activity.
Step 3: Calibrate Costs with a Budget Window
Instead of a single target time, use a window. For example, “upgrade to level 5” might be achievable in 3–5 sessions for the median free player. Then set costs so that:
- The baseline earn path reaches the milestone within the window
- The variable layer reduces the number of sessions needed for some players
- The tail case still reaches the milestone without requiring extreme repetition
This is where many economies fail: costs are tuned to the average earn rate, but players experience the median and the tail.
Step 4: Separate Progression Gates from Monetization Pressure
Monetization should change convenience or choice, not whether the game is playable. If a free player can’t reach the next content gate without purchasing, the economy is acting like a lock.
A safer pattern is to let free players reach the gate, but charge money for faster preparation. For instance, free players can craft the required item, while premium currency reduces the crafting time or provides a shortcut to missing materials.
Mind Map: Cost Calibration for Reliable Free Progress
Example: Weapon Upgrade Costs That Don’t Trap Free Players
Imagine a weapon upgrade from level 4 to 5 requires:
- 120 Scrap
- 30 Alloy
- 1 Blueprint Fragment
Scrap is earned from matches with a baseline of 40 per session plus variable bonuses. Alloy is earned from a weekly quest with a baseline of 15 per session and occasional extra drops. Blueprint Fragments drop only from a repeatable activity.
To make progression reliable, you tune the system so a free player can reach the milestone in 3–5 sessions:
- Baseline Scrap: 40 × 3 sessions = 120, so the Scrap requirement is achievable at the low end
- Baseline Alloy: 15 × 3 sessions = 45, so the 30 Alloy requirement is covered even before bonuses
- Blueprint Fragment: ensure the repeatable activity provides a baseline of 1 fragment every 3 sessions on average, with protection against long droughts (for example, a pity counter that increases drop chance after misses)
Now premium currency can help by reducing the number of sessions needed to gather Blueprint Fragments, but the free path still reaches the upgrade without buying.
Example: When Costs Are “Average-Right” but Player-Wrong
Suppose you set Scrap costs based on average earnings of 50 per session, but the baseline is actually 30 and the rest comes from rare bonuses. The average might hit 50, yet many players will experience 30, stretching time-to-milestone beyond the budget window.
The fix is not to lower the cost blindly. Instead, raise the baseline earn sources or reduce the cost component that depends on variable drops. Reliability comes from controlling the baseline-to-cost relationship.
Validation Checklist for Cost Calibration
- Median time-to-milestone for free cohorts falls inside the budget window
- Tail time-to-milestone is acceptable without requiring purchases
- Baseline earn sources explain most of the progress
- Monetization offers reduce time or provide convenience, not access
- Costs are expressed in resources players can identify and plan around
8.5 Implementing Guardrails for Monetization Impact on Balance
Guardrails are the rules you put in place so monetization can coexist with fair play, stable progression, and predictable outcomes. They work best when they are measurable, enforceable, and tied to specific failure modes like “premium players skip intended progression” or “economy inflation makes free play feel pointless.”
Guardrail Mindset and Failure Modes
Start by naming what can go wrong. Common balance-impact failures include:
- Power acceleration: paid items reduce the time or resources needed to reach competitive capability.
- Progression bypass: purchases replace core loops like crafting, questing, or skill-based upgrades.
- Economy distortion: premium currency changes supply-to-sink ratios, causing inflation or scarcity.
- Opportunity collapse: free players face widening gaps because costs scale faster than earn rates.
- Perception mismatch: players feel forced to pay to keep up, even if raw stats are close.
A guardrail should address one failure mode with a clear constraint and a test.
Guardrail Types That Actually Hold
1) Capability Boundaries
Define what paid value can and cannot change. A practical approach is to separate competitive power from non-competitive value.
- If a premium item improves damage, it should do so within a narrow band that does not invalidate skill or build diversity.
- If a premium item is cosmetic, it can be fully premium without balance risk.
Example: A battle pass includes a weapon skin (safe) and a “reforging token” that reduces crafting time by 30%. The token does not change stats, only schedule. That keeps the economy and combat math stable.
2) Progression Parity Constraints
Set limits on how much purchases can shorten the path to key milestones.
- Use a maximum effective level gap between a typical free cohort and a typical paying cohort.
- Apply constraints to time-to-milestone rather than raw spend.
Example: If the intended route to a tier-3 workshop is 14 days of play, the premium option can reduce it to 10 days, but not 2. The guardrail is “no more than 4 days of acceleration” for that milestone.
3) Currency Flow Limits
Guardrails for virtual currency should control both earn and spend.
- Cap how often premium currency can be used to buy progression-critical resources.
- Ensure sinks remain meaningful by preventing premium currency from replacing all sinks.
Example: Premium currency can buy cosmetic bundles freely, but when it comes to crafting materials, it can only cover up to 25% of the required materials. The remaining 75% must come from in-game sources.
4) Offer Scope and Substitution Rules
Prevent “paying to substitute the whole system.”
- If a purchase grants a resource, define what it cannot replace.
- If a purchase grants a shortcut, define what still requires gameplay.
Example: A “starter bundle” gives extra crafting materials, but it cannot be used to craft the final weapon tier. Players still need to complete the quest chain to unlock that tier.
5) Statistical Guardrails for Match Impact
For multiplayer balance, enforce constraints on the distribution of outcomes.
- Monitor win rate deltas between cohorts after controlling for skill proxies.
- Limit how much a paid advantage can shift matchmaking performance.
Example: If premium users show a 6% higher win rate, the guardrail triggers an investigation. The fix might be reducing the premium item’s effectiveness by 5% or adjusting matchmaking rules.
Mind Map: Guardrails for Monetization Impact on Balance
Implementation Mechanics Without Guesswork
Guardrails need enforcement points. Typical enforcement locations are:
- Economy transaction layer: validate currency usage rules and caps.
- Progression unlock checks: ensure purchases cannot bypass gating requirements.
- Item stat calculation: clamp paid item effects within allowed ranges.
- Matchmaking and loadout validation: prevent illegal combinations.
Example: A “premium crafting accelerator” is implemented as a time reducer only. The system explicitly blocks it from modifying the item’s stat roll or rarity tier.
Guardrail Testing with Concrete Scenarios
Test guardrails using scenario-based checks that mirror real play:
- Free-only baseline: confirm intended time-to-milestone and economy stability.
- Light spender: confirm acceleration stays within the allowed window.
- Heavy spender: confirm no bypass of critical unlocks and no runaway inflation.
- Mixed cohorts: confirm match impact stays within the win-rate delta threshold.
Example: Run a simulation where a heavy spender buys every eligible accelerator for 30 days. Verify that the final tier unlock still requires the quest chain and that the premium currency spend cannot exceed the 25% material substitution limit.
Operational Guardrails for Live Tuning
When guardrails are violated, you need a response plan that is specific and reversible.
- Define which parameter changes are safe: time reductions, material substitution caps, or stat clamps.
- Avoid changing multiple levers at once so you can attribute outcomes.
- Use staged rollouts with monitoring of the same metrics used for guardrail triggers.
Example: If inflation rises after an offer update, first reduce the substitution cap from 25% to 20% rather than altering drop tables and pricing simultaneously.
Summary of the Guardrail Loop
A strong guardrail is a constraint with a reason, a measurement, and an enforcement point. When you tie monetization options to bounded effects—time, substitution limits, and stat clamps—you keep revenue progression aligned with player satisfaction instead of letting one quietly eat the other.
9. Economy Telemetry Experimentation and Live Operations
9.1 Instrumenting Economy Events and Currency Transactions
Instrumenting economy systems means turning “what happened” into reliable, queryable facts. The goal is not to count everything; it’s to capture the smallest set of events that lets you reconstruct currency movement, detect anomalies, and explain player outcomes.
Core Event Model for Currency Movement
Start with a simple model: every currency change is a transaction that has a reason, a direction, and an amount. In practice, you’ll track both the player-facing currency balance and the internal ledger entries that justify the change.
Define these fields for every economy event:
- Actor: player id, account id, and platform.
- Currency: currency id and type (soft, hard, premium).
- Direction: earn, spend, refund, transfer, or conversion.
- Amount: signed delta and the display amount if rounding rules exist.
- Reason: a stable event code like
QUEST_REWARD,UPGRADE_COST, orSTORE_PURCHASE. - Source Context: item id, offer id, quest id, match id, or loot table id.
- Correlation: a transaction id that ties together multi-step flows.
- Timing: event timestamp plus server processing timestamp.
A useful mental check: if you can’t answer “why did the balance change?” from the event alone, you’ll struggle during incident review.
Currency Ledger Events and Idempotency
Most economy bugs are “double spends” or “missing spends.” Instrumentation should therefore support idempotency. When a purchase callback arrives twice, you want the second one to be a no-op.
Capture ledger-style events in addition to gameplay events:
- Ledger Entry Created: the authoritative record of the delta.
- Ledger Entry Applied: confirmation that the balance update succeeded.
- Ledger Entry Reversed: explicit reversal with a reason code.
Use a unique key such as (player_id, ledger_entry_id) so replays don’t create new deltas. If you also store a request_id from the client or commerce provider, you can correlate retries without guessing.
Instrumenting Earn Loops
Earn loops often span multiple systems: quests, crafting, loot drops, and time-based rewards. Instrument at the moment the currency becomes available, not when the UI shows it.
Example: a quest completion grants 120 soft currency and 1 crafting token.
- Emit
QUEST_REWARD_EARNwithcurrency=SOFT,amount=120,context=quest_id. - Emit
CRAFTING_TOKEN_EARNseparately so you can analyze token scarcity without mixing it with soft currency. - If the reward is modified by boosters, include the booster id in context rather than baking it into the amount only.
Instrumenting Spend Loops
Spends should be recorded when the cost is committed, even if the purchase later fails due to inventory constraints. That sounds strict, but it prevents “phantom spending” where the player sees an item consumed without a matching ledger entry.
Example: upgrading an item costs 300 soft currency.
- Emit
UPGRADE_COST_SPEND_REQUESTwhen the upgrade is initiated. - Emit
UPGRADE_COST_SPENDonly after validation passes and the ledger entry is created. - If validation fails, emit
UPGRADE_COST_SPEND_REJECTEDwith a reason code likeINSUFFICIENT_FUNDS.
This separation lets you measure friction: rejected spends often correlate with confusion or UI mismatch.
Instrumenting Store Purchases and Conversions
Store purchases are special because they involve external confirmation. Treat them as two phases: commerce confirmation and entitlement application.
Example: buying a premium pack that grants 500 premium currency.
- Emit
STORE_PURCHASE_CONFIRMEDwithoffer_id,receipt_id, andcommerce_transaction_id. - Emit
PREMIUM_CURRENCY_EARNwith the ledger correlation id. - If the pack includes a conversion (e.g., premium to soft), emit
CURRENCY_CONVERSION_EARNandCURRENCY_CONVERSION_SPENDas separate ledger deltas.
Conversions should never be “magic.” If you can’t see both sides of the conversion in your ledger, you’ll misread inflation.
Data Quality Checks That Catch Real Problems
Instrumentation is only useful if it’s trustworthy. Add checks that run continuously:
- Balance Consistency: ledger sum equals current balance delta for a time window.
- No Negative Balance Unless Allowed: if negative balances are impossible, flag any occurrence.
- Reason Coverage: every delta must map to a known reason code.
- Currency Id Integrity: reject unknown currency ids rather than defaulting.
When something breaks, you want the event stream to fail loudly, not silently.
Mind Map: Economy Event Instrumentation
Example Event Set for One Player Session
Assume a player completes a quest, crafts an item, and buys a pack. A coherent event set might include:
QUEST_REWARD_EARNfor soft currency.CRAFTING_COST_SPENDfor soft currency.CRAFTING_RESULT_EARNfor the crafted item or token.STORE_PURCHASE_CONFIRMEDwith receipt and commerce transaction id.PREMIUM_CURRENCY_EARNtied to the ledger correlation id.
If you can query these five events and reconstruct the balance changes in order, your instrumentation is doing its job.
Practical Implementation Notes for 9.1
Use stable reason codes and keep them versioned. Store context ids as ids, not free-form strings, so dashboards and alerts don’t break when wording changes. Finally, ensure every event includes enough correlation to trace from a player action to the ledger delta, because that’s where most “why did this happen?” questions get answered.
9.2 Building Dashboards for Inflation Sink Health and Spend Depth
Inflation is what happens when the game’s economy produces more value than it removes. A dashboard for inflation sink health and spend depth answers two questions at once: are players getting rid of currency in meaningful ways, and are monetization offers deep enough to matter without breaking progression.
Core Dashboard Goals
Start by separating three layers of truth.
- Currency supply pressure: how quickly currency is created.
- Currency removal quality: how effectively currency is sunk into lasting outcomes.
- Monetization depth: how much paid value translates into currency and progression, not just one-off purchases.
A useful dashboard shows these layers side by side so you can spot mismatches. For example, sinks might be working numerically while spend depth is shallow, meaning players are buying small amounts but not converting them into long-term progression.
Data Model Foundations
Before charts, standardize event definitions.
- Currency Earn Events: every place currency enters the player inventory (quests, loot, daily rewards, refunds, compensation).
- Currency Spend Events: every place currency leaves inventory (upgrades, crafting, rerolls, fast travel, entry fees).
- Sink Classification: tag each spend event as progression, consumption, reroll, or access.
- Player State: track level, account age, and progression milestones so you can compare like with like.
Example: if “reroll tokens” are a separate currency, treat them as their own economy. If they’re just a spend mechanic for a premium currency, still log the spend as a sink so you can measure whether rerolls are draining value or merely cycling it.
Inflation Sink Health Metrics
Use metrics that connect sinks to outcomes.
1) Net Currency Flow Rate
- Compute net flow per player per day:
earn - spend. - Plot it by currency type and by sink category.
2) Sink Coverage
- Measure what fraction of earned currency is removed within a time window (for example, 7 days).
- If coverage drops after an update, you likely introduced a new earn source without a matching sink.
3) Sink Efficiency
- For each sink category, compute currency spent per meaningful outcome.
- “Meaningful outcome” could be an upgrade tier reached, a crafted item equipped, or an access unlock completed.
Example: if crafting consumes currency but players stop crafting after a certain tier, sink efficiency will fall even if total spend looks stable.
4) Inventory Half-Life
- Estimate how long it takes for a typical currency balance to halve under current earn and spend rates.
- A shorter half-life means sinks are absorbing value; a longer one suggests hoarding.
Spend Depth Metrics
Spend depth should reflect sustained conversion into progression.
1) Paid Currency Conversion Rate
- Paid currency spent divided by paid currency earned.
- If conversion is low, players may be stockpiling premium currency or buying without using it.
2) Offer-to-Progression Ratio
- Compare the amount of premium currency purchased to the number of progression milestones reached afterward.
- Example: if a $9.99 pack yields 1,000 premium currency but rarely leads to upgrades, the offer is not deep enough.
3) Cohort Spend Depth Curve
- For each purchase cohort, track cumulative spend and cumulative progression over time.
- This helps you see whether early purchases lead to continued engagement or stall.
Dashboard Layout That Prevents Misreads
A practical layout uses three rows.
-
Row 1: Economy Pressure
- Net flow rate by currency type.
- Earn rate trend by source.
-
Row 2: Sink Health
- Spend rate by sink category.
- Sink coverage and inventory half-life.
- Sink efficiency by progression tier.
-
Row 3: Spend Depth
- Paid currency conversion rate.
- Offer-to-progression ratio.
- Cohort spend depth curve.
Add one “break glass” panel: a table of top earn sources and top sink categories by net impact. When something shifts, you want the culprit in the first screen.
Mind Map: Inflation Sink Health and Spend Depth
Integrated Example Walkthrough
Imagine a patch on 2026-04-05 adds a new daily quest that grants 200 soft currency. Two days later, the dashboard shows:
- Net flow rate rises for soft currency.
- Sink coverage drops from 85% to 70% in the 7-day window.
- Spend rate by sink category is unchanged, but sink efficiency for crafting falls at mid tiers.
Interpretation: the new earn source is increasing balances, but players are not converting those balances into crafting outcomes. The likely fix is not “add more sinks everywhere,” but adjust crafting costs, availability, or tier gating so currency removal resumes where it matters.
Now check spend depth:
- Paid currency conversion rate is stable.
- Offer-to-progression ratio for the mid-tier pack declines.
That combination suggests players are buying the pack but not reaching the intended upgrade milestones. The dashboard ties monetization to progression outcomes, so you can tune offer composition or upgrade requirements without guessing.
Practical Implementation Notes
Keep dashboards currency-type specific and cohort-aware. If you mix currencies or compare new players to long-term players, you’ll get graphs that look busy and explain nothing. The goal is not more charts; it’s fewer, sharper signals that connect earn, sink, and progression in one view.
9.3 Running a B Tests for Reward Rates and Offer Changes
B tests for reward rates and offers work best when you treat them like controlled experiments on player decisions, not like “try a new number and see.” The goal is to estimate how a change affects outcomes you can measure, while keeping other variables stable.
Core Experiment Design
Start with a single, testable change. Examples: “Reduce the common-tier drop rate by 10%” or “Replace the $4.99 pack with a bundle that includes 2x the premium currency but 0.8x the consumable.” Keep the change atomic so you can attribute results.
Then define the hypothesis and the primary metric. A good primary metric is directly tied to the economic behavior you’re adjusting. For reward rates, common primary metrics include conversion to the next progression step, time-to-next-spend event, or average currency earned per session. For offers, use purchase conversion rate, revenue per eligible user, and retention of purchasers versus non-purchasers.
Finally, choose the unit of randomization. Randomize at the player level to avoid cross-contamination from shared inventories or social effects. If you must randomize at session level, ensure the economy change cannot leak across sessions for the same player.
Mind Map: B Test Workflow
Guardrails That Prevent “Fixing” the Wrong Thing
A reward-rate change can improve one metric while harming another. That’s why you need guardrails. Typical guardrails include:
- Currency sink health: average spend depth and sink completion rate.
- Progression fairness: share of players reaching key milestones without purchases.
- Economy stability: inflation proxies like currency in circulation per active user.
- Monetization integrity: refund rate, chargeback rate, and offer exposure-to-purchase ratio.
Example: If you lower drop rates to reduce inflation, you might see fewer purchases but also fewer players reaching the next upgrade tier. That’s not a win; it’s a progression bottleneck.
Implementation Details That Matter
Consistency is the silent hero. Ensure both variants:
- Use the same reward presentation logic except for the intended change.
- Share the same eligibility rules and cooldowns.
- Log the same event schema so analysis doesn’t become a scavenger hunt.
For offers, keep the purchase flow identical. If the treatment changes the number of items, confirm the UI still shows the same currency formatting and entitlement mapping. A mismatch between what players see and what they receive can create “mystery churn” that looks like economic failure.
Example: Reward Rate B Test
Suppose you want to test a new loot table for a crafting material.
- Control: 5% rare drop, 20% uncommon drop.
- Treatment: 4.5% rare drop, 22% uncommon drop.
Primary metric: time-to-craft-completion for players who start crafting.
Guardrails: average premium currency spend per active user, and percentage of players who abandon crafting after starting.
Interpretation example: If treatment reduces abandonment and keeps spend stable, the shift toward more commons likely improves perceived progress even with a slightly lower rare rate. If treatment increases abandonment and reduces crafting completion, the rare tier may be acting as a psychological and economic pacing mechanism.
Example: Offer Change B Test
You test an offer that replaces a single premium pack with a bundle.
- Control: $4.99 pack includes 300 premium currency.
- Treatment: $4.99 bundle includes 240 premium currency plus 1 limited consumable.
Primary metric: revenue per eligible user.
Guardrails: conversion rate for the next 7 days, and retention of purchasers at day 7.
Interpretation example: If revenue per eligible user rises while day-7 retention stays flat, the bundle likely improves value without creating a short-term purchase spike. If retention drops, the consumable may be substituting for later purchases rather than supporting progression.
Analysis and Decision Rules
Use effect size, not just significance. A statistically significant change can still be too small to matter, or too large to be safe.
A practical decision rule:
- Treatment must beat control on the primary metric.
- Treatment must not worsen any guardrail beyond a predefined threshold.
- The result should hold across key segments like new versus returning players and different progression tiers.
When segments disagree, don’t average them away. If new players benefit but returning players churn, you may need a narrower eligibility rule or a different offer structure.
Monitoring During the Test
Set pause criteria before launch. Monitor early indicators like exposure-to-purchase conversion and major economy event rates. If the treatment causes an abrupt drop in crafting completion or a spike in refunds, stop the test and investigate entitlement and reward logging first.
A good habit: verify that the treatment is actually being served as intended. Many “economy” failures are really routing or configuration issues wearing a fake mustache.
9.4 Interpreting Results With Segmentation and Cohort Analysis
When an experiment changes rewards or pricing, the overall average can lie. Segmentation and cohort analysis help you see which players benefited, which were unaffected, and which got stuck in a different part of the economy loop. The goal is not to find a single “winner,” but to confirm that the change behaves correctly across the economy’s real users.
Start with What “Result” Means
A result is usually a bundle of outcomes: currency earned per session, conversion rate to premium offers, progression milestones reached, and retention after the change. Before comparing groups, define the primary metric and at least one supporting metric. For example, if the primary metric is 7-day retention, a supporting metric might be “time-to-first-upgrade” or “soft currency spend per active day.” This prevents the classic trap where retention improves because players churn later, not because the economy feels better.
Segment by Behavior, Not Just Demographics
Demographic segments rarely explain economy outcomes. Behavior segments do. Use dimensions that map to economic decisions:
- Economy role: earn-heavy players, spend-heavy players, balanced players.
- Friction level: players who frequently hit crafting requirements, and players who rarely craft.
- Progress stage: early onboarding, mid progression, endgame.
- Monetization state: free, recent purchasers, lapsed purchasers.
Example: Suppose you test a small increase to soft currency drop rates. Overall retention might barely move. In segmentation, you may find early-stage players reach their first upgrade 30% faster, while endgame players show no change because they already have stable income sources. That’s a meaningful result even if the global average looks flat.
Use Cohorts to Control for Timing Effects
Cohorts group players by when they started playing, when they entered the experiment, or when they reached a progression milestone. This matters because economy tuning often interacts with content cadence and player learning.
A practical cohort approach:
- Entry cohort: group by the date they were exposed to the change.
- Milestone cohort: group by the first time they reached a relevant progression checkpoint.
- Currency cohort: group by their baseline currency holdings at exposure.
If you run an A/B test during a content update window, entry cohorts can reveal whether the change helped players who were learning the new system versus players who already knew it.
Mind Map: How to Interpret Experiment Outcomes
Read the Patterns, Not Just the Numbers
A good interpretation checks four things:
- Direction consistency: Did the change move metrics in the expected direction for most relevant segments?
- Magnitude: Is the effect large enough to matter in gameplay terms? A 0.2% lift in conversion might be noise.
- Metric trade-offs: Did retention rise while progression stalls, or did spend shift from one currency to another?
- Guardrails: Did the change increase churn among players who already struggle with the economy loop?
Example: You reduce the cost of a crafting recipe using premium currency. Conversion might rise, but segmentation could show that free players churn sooner because they now delay crafting and spend time waiting for premium availability. The supporting metric “time-to-crafting completion” would likely worsen for free players, even if premium conversion improves.
Example Workflow with Concrete Checks
Assume an A/B test ran from 2026-04-10 to 2026-04-17.
- Primary metric: 7-day retention.
- Supporting metrics: soft currency spend per active day, time-to-first-upgrade, and premium conversion.
Interpretation steps:
- Compare retention by progress stage. If early-stage cohorts improve but mid-stage cohorts decline, the change may be front-loading value.
- Compare economy role segments. If earn-heavy players improve retention but spend-heavy players show no change, the economy loop might already be stable for spenders.
- Check currency baseline cohorts. If players with low starting soft currency benefit most, the change likely reduces early scarcity.
- Validate guardrails. If churn increases for players with high crafting frequency, the economy may have shifted bottlenecks.
Common Failure Modes
- Averages hide harm: overall retention rises while a key segment’s churn increases.
- Segment leakage: if segmentation uses post-exposure behavior, it can bias conclusions.
- Confusing cause and correlation: a higher conversion rate might be driven by UI changes rather than economy tuning.
Segmentation and cohorts turn “the experiment worked” into “the experiment behaved correctly for the people who actually make the economy move.”
9.5 Performing Safe Rollouts with Rollback and Monitoring Plans
A safe rollout is a controlled change to economy logic, reward tables, pricing, or currency conversion rules that can be stopped quickly if player behavior or financial outcomes shift unexpectedly. The goal is not to “avoid bugs forever,” but to reduce the blast radius and make the system’s response legible.
Define Rollout Scope and Success Criteria
Start by writing a short rollout brief that answers three questions: what changes, who is affected, and what “good” looks like. For example, if you adjust a crafting recipe cost, scope it to a single item category and a single currency pair. Success criteria should be measurable and tied to economy health, not just engagement.
Example criteria for a currency conversion change:
- Currency balance stability: average premium currency balance per active user changes less than 2%.
- Sink health: crafting completion rate stays within ±5% of baseline.
- Friction signals: support tickets about “missing items” do not increase.
Build a Rollout Ladder
Use a staged ladder so each step increases exposure only after monitoring looks normal. A common ladder is:
- internal testers or QA accounts
- a small percentage of production users
- a larger percentage split by region/platform
- full rollout
Example: If you’re changing loot rarity weights, start with 1% of users in one region. If the rarity distribution matches expected ranges and sink/source metrics remain stable, expand to other regions.
Instrument Monitoring That Catches the Right Failures
Monitoring should cover both economy math and player-facing outcomes. Economy math catches silent errors; player-facing outcomes catch UI, entitlement, and reward delivery issues.
Track these categories:
- Transaction integrity: failed purchase counts, negative balance attempts, ledger mismatches.
- Distribution checks: reward rarity frequencies, crafting output rates, conversion ratios.
- Behavioral effects: earn/spend loop participation, time-to-first-purchase, upgrade completion rates.
- Trust signals: refund rate, chargebacks, “item not received” tickets.
Example: After changing drop weights, compare the observed rarity distribution against the expected distribution using a simple tolerance band. If the “rare” bucket is 30% higher than expected, stop before the change spreads.
Set Guardrails and Automated Stop Conditions
Guardrails are thresholds that trigger an automatic stop or immediate rollback. They should be strict enough to prevent damage, but not so strict that normal variance causes constant interruptions.
Example stop conditions for a pricing update:
- premium currency purchase conversion rate drops more than 10% within the first hour
- refund rate increases by more than 0.5 percentage points
- average premium currency delivered per dollar deviates from expected by more than 1%
Plan Rollback Like It’s Part of the Feature
Rollback needs a clear definition of what “revert” means for each system. Some changes can be reverted by flipping a feature flag. Others require data correction.
Example rollback plan for a reward table update:
- Revert mechanism: feature flag controls which reward table version is active.
- Data handling: if the new table already granted items, do not delete them automatically. Instead, restore the old table for future grants and investigate whether any entitlements were mispriced.
- Player communication: only if required by policy; otherwise rely on support tooling and internal notes.
Use a Concrete Timeline and Ownership
Assign an owner for each stage: rollout approval, monitoring review, and rollback execution. Use a timeline with review checkpoints.
Example timeline:
- T+0: enable feature flag for 1% cohort
- T+30m: review transaction integrity and distribution checks
- T+2h: review behavioral effects and trust signals
- T+24h: review cohort-level economy stability before expanding
If you need a reference date for internal documentation, use a date like 2026-04-05.
Mind Map: Safe Rollouts with Rollback and Monitoring Plans
Integrated Example End to End
Suppose you adjust the crafting system so a mid-tier upgrade consumes 20% fewer soft currency units. You:
- scope the change to one recipe family
- define success criteria for sink health and upgrade completion rate
- roll out to 1% in one region
- monitor ledger integrity, crafting completion rate, and soft currency balance drift
- set stop conditions if conversion math deviates or support tickets spike
- keep rollback ready via feature flag, leaving already granted items intact
- review at 30 minutes and 2 hours before expanding
This approach keeps the economy change measurable, reversible, and explainable—without turning every rollout into a guessing game.
10. Compliance Safety and Player Trust in Monetization
10.1 Designing Transparent Purchase Flows and Receipt Clarity
A transparent purchase flow reduces confusion, prevents accidental overspending, and makes refunds and entitlement corrections easier. The goal is simple: when a player taps “Buy,” they should already know what they will receive, how much it costs, and what will happen after the purchase.
Core Principles for Transparent Purchases
Show the exact item and outcome. If the offer contains a bundle, list the contents in plain language. If it grants a currency amount, show the currency type and quantity. Example: “500 Gold Coins + 1 Forge Ticket” is clearer than “Starter Pack.”
Make price and payment method unambiguous. Display the final price in the player’s currency, including taxes when applicable. If the platform handles taxes, reflect the platform total on the confirmation screen.
Confirm before charging. The final step should be a review screen that repeats the critical details: item, quantity, price, and any limitations. Avoid “one-tap” purchases unless the platform provides a strong confirmation mechanism.
Use consistent language across screens. The same offer name should appear in the store tile, the details panel, the confirmation screen, and the receipt. Consistency prevents “I thought I bought something else” tickets.
Separate “preview” from “grant.” If the UI shows a preview of what the player will get, label it as a preview. The grant happens only after successful payment confirmation.
Purchase Flow Blueprint
A reliable flow typically has these stages:
- Offer discovery: show title, price, and a short contents summary.
- Offer details: show full contents, currency types, and any constraints (time limits, one-time purchase, region restrictions).
- Review and confirm: show final price, payment method, and the exact grant.
- Processing: show a non-blocking status indicator and disable repeated taps.
- Receipt and entitlement: show confirmation, receipt ID, and what was granted.
- Post-purchase access: ensure the player can find the receipt and the granted items in-game.
Receipt Clarity Requirements
A good receipt answers five questions quickly:
- What was purchased? Include offer name and contents.
- How much did it cost? Include currency, price, and tax if shown.
- When did it happen? Use a timestamp in the player’s locale.
- What was granted? List the exact currencies/items and quantities.
- How can it be verified? Provide a receipt ID and transaction reference.
If the grant is delayed due to backend processing, the receipt should still show the purchase status and the expected grant behavior. Example: “Purchase confirmed. Granting items now.”
Mind Map: Transparent Purchase Flow and Receipt Clarity
Concrete Examples That Work
Example: Bundle offer with mixed rewards
- Store tile: “Forge Starter Bundle — $4.99”
- Details: “Includes 300 Gold Coins, 1 Forge Ticket, and 2 Repair Kits.”
- Receipt: “Purchased Forge Starter Bundle. Cost: $4.99. Granted: 300 Gold Coins, 1 Forge Ticket, 2 Repair Kits. Receipt ID: R-18492. Time: 2026-04-05 14:22.”
Example: Currency grant with one-time limit
- Details screen includes: “One-time purchase. Available once per account.”
- Receipt includes the same limit language: “This purchase is a one-time entitlement.”
- If the player tries again, the store should explain why it cannot be purchased, using the same offer name.
Example: Delayed grant due to server processing
- Confirmation screen: “Payment confirmed. Granting items now.”
- Receipt status: “Confirmed” plus receipt ID.
- In-game: show a temporary “Pending grant” indicator tied to the receipt ID, then replace it with the actual items once delivered.
Implementation Notes That Prevent Real-World Confusion
- Receipt IDs must be stable and unique. Use them as the primary key for support and reconciliation.
- Entitlement grants should be idempotent. If the client retries after a timeout, the server should not double-grant.
- Show the same contents list everywhere. Generate the receipt contents from the same offer definition used for the grant.
- Avoid “best effort” receipts. If the grant fails, the receipt should reflect the failure state and the next action, not silently pretend everything succeeded.
Transparent purchase flows are not just polite UI. They are operational tools: they reduce disputes, speed up refunds, and make entitlement corrections straightforward because the player and the system share the same record of what happened.
10.2 Handling Refunds Chargebacks and Entitlement Corrections
Refunds, chargebacks, and entitlement corrections are three different failure modes that all look similar from the outside: a player paid, then the game’s state no longer matches what the player believes they own. The goal is to restore consistency quickly, fairly, and with minimal collateral damage to legitimate purchases.
Core Concepts and System Boundaries
Start by separating three layers:
- Payment outcome: whether money was captured, reversed, or disputed.
- Entitlement state: what the player account is allowed to use in-game.
- Economy impact: what items, currencies, or progression were already consumed or granted.
A robust system treats entitlements as the source of truth, not purchase history logs. If the entitlement says “owned,” the player can use the item; if it says “not owned,” the player cannot. Everything else is bookkeeping.
Refunds Versus Chargebacks
A refund is typically initiated by the store and confirmed through a platform signal. A chargeback is initiated by the card issuer and often arrives later, sometimes with incomplete context. Both require entitlement changes, but chargebacks are more likely to involve disputes about whether the player used the content.
Practical rule: handle both with the same entitlement correction pipeline, but treat chargebacks as higher risk for abuse and prioritize faster review.
Entitlement Correction Workflow
Use a deterministic workflow so the same inputs produce the same outputs.
- Detect event: receive refund or chargeback signal, or detect a mismatch between entitlement records and store receipts.
- Freeze affected entitlements: mark the entitlement as “revoking” to prevent new uses while you reconcile.
- Reconcile grants: identify what was granted because of the purchase (currencies, items, subscriptions, battle pass tiers).
- Choose remediation: either remove unconsumed items, revoke access to gated content, or refund consumed value via a compensating mechanism.
- Apply account changes atomically: update entitlement state and inventory/progression in one transaction.
- Notify player: provide a clear summary of what changed and why, without exposing internal heuristics.
- Audit trail: store event IDs, timestamps, and the exact remediation actions.
Mind Map: Refunds, Chargebacks, and Entitlement Corrections
Remediation Strategies with Concrete Examples
Example: Unconsumed item pack
- Player buys a pack containing 500 premium currency and a cosmetic.
- They refund within an hour and have not spent the currency.
- Remediation: revoke the premium currency entitlement and remove the cosmetic from inventory. If the cosmetic is equipped, unequip it and move it to a “locked” state or remove it entirely, depending on your policy.
Example: Partially consumed currency
- Player buys a pack with 1000 premium currency.
- They spend 300 on a skin and keep 700.
- Remediation options:
- Strict removal: remove the remaining 700 and revoke any future access tied to the purchase.
- Compensation: if your policy allows, refund 700 as a temporary “recovery currency” that expires after a short window, so the player can still participate without permanently benefiting from the disputed purchase.
Pick one policy per currency type and stick to it. Mixing policies midstream creates confusion and support load.
Example: Subscription or battle pass tiers
- Player refunds a month-long subscription after claiming some rewards.
- Remediation: revoke future entitlements immediately, and for already claimed tiers, either keep them (if your policy treats them as earned) or remove only the incremental benefits that are clearly tied to the refunded period.
The key is to define “earned versus granted” at design time, not during incident response.
Entitlement Consistency and Data Integrity
Entitlement corrections fail when inventory and progression updates are not coordinated. Two common pitfalls:
- Double-grant: a player receives rewards twice due to repeated receipt events.
- Orphaned items: inventory contains items that no longer have an entitlement record.
Mitigation: use idempotent grant logic keyed by store transaction IDs, and run a reconciliation job that flags inventory items without matching entitlements.
Player Communication That Reduces Back-and-Forth
When notifying players, focus on observable facts:
- The purchase was refunded or disputed.
- The game removed or revoked the benefits tied to that purchase.
- If something remains usable, state it plainly.
Avoid implying wrongdoing. The player experience should feel like a correction of state, not a verdict.
QA Scenarios and Operational Checks
Test at least these scenarios:
- Refund arrives after the player has spent some currency.
- Chargeback arrives after multiple sessions and multiple reward claims.
- Receipt mismatch triggers while a revoking state is already active.
- Network retries cause duplicate entitlement updates.
Operationally, monitor for spikes in “inventory without entitlement” and “revoking state stuck” so corrections don’t silently stall.
A well-run entitlement correction system is boring in the best way: it makes the account state match the payment outcome, keeps the economy stable, and gives support a clear trail to explain what happened.
10.3 Age Rating Considerations and Parental Controls
Age ratings and parental controls are not just compliance chores; they shape what players can access, what they see, and how purchases are presented. In a game economy, that matters because access to currencies, offers, and progression systems can change based on age and account settings.
Foundations of Age Rating Requirements
Start by separating three concepts: content rating, account age gating, and purchase permissions. A content rating describes the game’s overall suitability. Account age gating decides which features a specific account can use. Purchase permissions decide whether and how money can be spent.
A practical workflow is to treat the rating as a set of constraints you map onto systems: reward visibility, chat and social features, loot presentation, and monetization UI. For example, if a rating restricts gambling-like mechanics, you should review whether your loot system uses randomized outcomes, whether odds are shown, and how the experience is described in UI.
Mapping Rating Constraints to Economy Features
Build a checklist that links rating constraints to economy components.
- Currency visibility: If younger accounts should not see premium currency as a “goal,” consider hiding certain balances or using simplified labels.
- Offer presentation: Keep purchase prompts out of core gameplay loops for restricted accounts. A common approach is to show offers only in a dedicated store area that is disabled for underage accounts.
- Randomized rewards: If random rewards are allowed, ensure the presentation is consistent with the rating requirements and does not mimic gambling cues.
- Progression gating: If content is age-restricted, make sure progression does not silently route players into monetization prompts to “catch up.”
Example: A crafting system that uses a premium currency to speed up crafting should either be disabled for restricted accounts or replaced with a non-monetized alternative that preserves the same crafting outcomes over time.
Parental Controls That Actually Help
Parental controls should be understandable to adults and predictable for children. The key is to control three things: spending, communication, and content access.
- Spending controls: Provide clear toggles for purchases and require parental approval for any transaction above a defined threshold. If you support subscriptions, treat them as purchases with the same approval flow.
- Communication controls: If chat is restricted by age, ensure that economy-related messages (trades, gift requests, or “buy this” prompts) are also restricted.
- Content access controls: If certain modes are restricted, disable the store entry points that are tied to those modes.
A simple example: If a parent disables purchases, the store button can remain visible but should show a “parent approval required” state rather than a broken flow. That prevents repeated confusion and reduces support tickets.
Designing Age-Aware Purchase Flows
Age-aware purchase flows reduce accidental spending and improve trust. Use the same purchase UI structure for all ages, but change the allowed actions.
- For restricted accounts: show the price, but block the “confirm purchase” step and route to a parental approval screen.
- For allowed accounts: keep the flow identical so players learn one pattern.
- For refunds and corrections: ensure that entitlement changes do not re-enable purchases automatically.
Example: A player sees a pack offer. On a restricted account, the confirm button is replaced with “Request approval.” The request creates a record for the parent, and the game does not grant the pack until approval is completed.
Mind Map: Age Rating and Parental Controls
Testing with Realistic Scenarios
Test with scenario-based checks rather than only unit tests.
- Scenario A: Underage account opens store from the main menu. Expected: store is disabled or shows approval-required messaging.
- Scenario B: Underage account attempts a premium-currency speed-up. Expected: action is blocked or replaced with a non-monetized alternative.
- Scenario C: Parent toggles spending permission off while an approval request is pending. Expected: request remains pending or is canceled according to policy, and no entitlements are granted.
- Scenario D: Refund occurs after a purchase. Expected: entitlements and any derived economy effects are reverted consistently.
Example: A Cohesive Policy Implementation
Imagine a game where premium currency can be used for cosmetic bundles and crafting speed.
- For restricted accounts, cosmetic bundles remain viewable but purchases require approval.
- Crafting speed is disabled; crafting continues with time-based completion.
- Loot crates are replaced with deterministic crafting recipes for restricted accounts, avoiding randomized reward presentation.
This keeps the economy coherent: players still progress, but the systems that could be interpreted as gambling-like or spending-pressure are constrained.
Operational Guardrails
Finally, treat compliance as a system property. Maintain audit logs for age gating decisions and purchase approvals, and ensure that entitlement logic is centralized so that a configuration change does not accidentally grant access. If you need a reference point for internal documentation, use a date like 2026-04-01 for your last policy review record, and keep it consistent across teams.
10.4 Communicating Odds and Reward Rules Where Required
When regulations require it, “odds” communication is really about making reward expectations legible. Players should be able to answer three questions without doing math in their heads: what they can receive, how likely each outcome is, and what rules govern the process (including pity or protection systems). The goal is clarity, not persuasion.
What Counts as Odds and Reward Rules
Odds usually refer to the probability of receiving specific reward tiers or items from a randomized mechanism. Reward rules include the full set of constraints that affect outcomes: eligibility, time windows, purchase limits, pity counters, conversion steps, and any exceptions (like event-only pools). If a system has multiple stages—such as “draw a rarity, then roll an item within that rarity”—rules must describe both stages, and odds must map to the stage they regulate.
A practical way to keep this consistent is to define a “reward contract” for each randomized offer. The contract lists the pool, the tiers, the mapping from tiers to items, and the algorithmic modifiers (like pity). Then the UI can present the contract in a player-friendly form.
Legal and Platform Requirements as Design Inputs
Different jurisdictions and storefront policies may require different granularity. Some require odds by rarity tier; others require odds by item. Some require odds to be shown before purchase; others allow it in a dedicated details screen. Treat these as constraints on presentation, not on the underlying economy math.
To avoid mismatches, keep a single source of truth for odds and rules. The same data should drive both the backend draw logic and the displayed odds. If the UI is manually maintained, it will eventually drift, and drift is where trust goes to retire early.
Player-Facing Presentation That Stays Honest
Odds should be presented in a way that supports comparison. A common pattern is a table listing each reward tier with its probability, plus a short note explaining how pity changes the odds over repeated attempts.
Reward rules should be written as checkable statements. Instead of “guarantees a good drop,” use “after N unsuccessful draws, the next draw will include at least tier X.” If there are multiple currencies or conversion steps, state them plainly: what the player spends, what the system draws, and what the player receives.
Mind Map: Odds and Reward Rules Communication
Example: Tier-Based Odds with Pity
Imagine a randomized chest that awards one of four rarity tiers: Common, Rare, Epic, Legendary. The system uses pity: after 10 draws without Legendary, the next draw guarantees Legendary.
A compliant presentation could include:
- A tier table showing base probabilities for each draw.
- A pity note stating the guarantee rule.
- A clarification that pity affects the probability distribution starting from draw 11.
Example text for the UI details screen:
- “Each chest contains 1 item from the current pool.”
- “Base odds per chest: Common 70%, Rare 25%, Epic 4%, Legendary 1%.”
- “Pity rule: If you do not receive Legendary for 10 chests, your next chest will award Legendary.”
This works because it separates base odds from the modifier rule, and it tells players exactly when the modifier applies.
Example: Multi-Stage Draws Without Confusing Players
Suppose the chest first rolls a rarity tier, then rolls a specific item within that tier. If odds regulations apply to rarity tiers, show odds for tiers. If they apply to items, you must either show item-level odds or provide a tier-level odds view plus item-level odds where required.
A clear reward rule statement might be:
- “Step 1: Roll rarity tier using the odds table.”
- “Step 2: Roll 1 item from the selected tier’s item list using equal weights.”
If weights are not equal, the rule must say so, and the odds display must reflect the actual probabilities.
Example: Limited-Time Pools and Versioning
If an offer changes during an event, odds and rules must reflect the current pool. The UI should display the odds for the specific offer version the player is purchasing. Reward rules should mention eligibility boundaries:
- “This offer uses the Event Pool active from [start] to [end].”
If a date is required for clarity, use a fixed date such as 2026-04-15 rather than a moving reference.
QA Checklist for Odds and Rules Consistency
Before shipping, verify that:
- The displayed odds match the backend draw probabilities for every tier or item.
- Pity counters reset and persist exactly as described.
- Limits (like “max 5 purchases per day”) are shown where required and enforced in the backend.
- Localization preserves numeric meaning (percent signs, decimal separators, and rounding).
- Region-specific requirements swap in the correct odds presentation.
A small but effective habit is to run automated checks that compare the odds data used by the draw service with the odds data rendered in the UI for each offer version. If they differ, the UI should fail the build rather than fail the player.
10.5 Avoiding Misleading Practices in Currency and Offer Presentation
Misleading currency and offer presentation usually comes from one of three gaps: the player does not understand the value they’re getting, the game implies a benefit that the rules don’t support, or the UI hides the cost structure until after commitment. The fix is not “be nicer”; it’s to make the economic rules legible at the moment of choice.
Core Principle: Make Value and Cost Observable
A purchase offer should answer, in plain language, what changes for the player. If an offer says “Get 500 coins,” the player should also see what those coins can do, what they cannot do, and whether any conversion or eligibility rules apply. For example, a pack that includes “Premium Coins” should clarify whether they can be spent only on cosmetics, only on crafting, or only after completing a tutorial quest.
A simple test: if a player could screenshot the offer and still understand the outcome without opening another screen, you’re close. If they need to infer hidden constraints, you’re likely misleading.
Core Principle: Avoid False Equivalence Between Currencies
Players often assume that currencies with similar names behave similarly. If your game has soft currency (earned), hard currency (premium), and event currency (time-limited), the UI must prevent “same-looking, different rules” confusion.
Example: Suppose the offer card shows “Event Tokens” with a green badge, but the spend button is disabled unless the player has an active event pass. The offer should either show the requirement on the card or adjust the button state with an explanation like “Requires Event Pass.” Without that, the offer feels like it’s promising a spend that the rules block.
Core Principle: Don’t Present Discounts That Aren’t Real
Discounts are a common source of accidental deception. A “50% off” label is only meaningful if the comparison price is stable and historically grounded. If the “before” price is a temporary inflated number, players interpret it as manipulation.
Example: A bundle shows “Was 20, Now 10.” If the “Was” price only existed for one day and the game had been selling the bundle for 10 for weeks, the label is misleading even if the math is technically correct. Better practice: base discounts on a consistent reference price window, and show the reference period in a subtle way (for example, “Compared to standard price”).
Core Principle: Keep “Free” and “Bonus” Claims Honest
“Free” should mean no payment and no hidden conditions that effectively require payment. “Bonus” should specify what triggers it.
Example: An offer says “Free bonus: +100 coins.” If the bonus only applies when you buy a specific pack tier, the UI should show “Bonus included with this tier” rather than implying it’s granted independently.
Core Principle: Prevent Post-Purchase Surprise Through Entitlement Clarity
After purchase, players should see the exact items and currencies granted, including any delayed delivery, conversion, or eligibility checks.
Example: If a pack grants “Crafting Materials” but those materials are converted into a different item after a migration, the post-purchase screen should show both the original grant and the final result. Otherwise, players may believe the game took their money and then “fixed it later.”
Mind Map: Misleading Practices and Countermeasures
Practical Checks Before Shipping
- Offer Card Completeness: Every offer card should include the currency type, quantity, and the primary use destination. If the destination is gated, state the gate.
- Spendability Preview: If the player can’t spend the currency immediately, show what they can do now and what unlocks later.
- Receipt Consistency: The purchase confirmation should match the offer exactly in naming and quantity, including any conversion.
- Discount Reference Integrity: Ensure “was” pricing is based on a consistent baseline and that the UI does not imply a different comparison than the system uses.
- Button Behavior Transparency: If a button is disabled, the reason should be visible without extra clicks.
Example: A Correct Offer Presentation Flow
A player opens an offer labeled “Premium Coins Pack.” The card shows “Spendable on cosmetics only,” includes the quantity, and displays a small “Cosmetics” spend preview. The price shows “Standard price comparison” rather than a dramatic percentage. After purchase, the receipt screen lists “Premium Coins: 300” and confirms “Cosmetics spend enabled.” No extra conditions appear after the player commits.
When these checks are consistent, the game can monetize without turning the offer screen into a guessing game. Players may still decide not to buy, but they won’t feel tricked by the interface.
11. Case Study Patterns for Sustainable Monetization Economies
11.1 Case Study Pattern: Designing a Soft Currency Upgrade Loop
A soft currency upgrade loop is a repeating cycle where players earn a non-premium currency, spend it on meaningful improvements, and then earn again to pursue the next upgrade. The goal is not just “more spending,” but a stable rhythm where costs match earn rates, and where free players can progress without feeling stuck.
Core Loop Definition
Start by writing the loop as a flow of events:
- Earn: Players complete activities that grant soft currency.
- Decision: Players choose whether to spend on upgrades now or save.
- Spend: Upgrades increase power, convenience, or access.
- Feedback: The game shows progress toward the next upgrade tier.
- Repeat: The increased capability makes future earn activities more efficient.
A practical example: a dungeon crawler uses “Gems” as soft currency. Players earn Gems by clearing rooms. Spending Gems upgrades a weapon slot that increases damage, which shortens future clears, which increases Gems earned per hour.
Mind Map: Loop Components and Constraints
Step 1: Choose Upgrade Value That Changes Play
Soft currency should buy upgrades that affect gameplay in a way players can feel within a session. If upgrades only change a number on a screen, players will treat the currency as background noise.
Example: “Forge Level” increases weapon damage and unlocks a new crafting recipe at level 5. Players notice faster clears immediately, and the recipe unlock gives a concrete reason to keep spending.
Step 2: Build a Cost Curve That Matches Earn Reality
Define upgrade tiers with costs that grow faster than early tiers but slower than late-game frustration. A simple approach is to target a consistent time-to-next-tier for each segment.
Example math (illustrative):
- Tier 1 cost: 200 Gems
- Tier 2 cost: 450 Gems
- Tier 3 cost: 900 Gems
- Tier 4 cost: 1600 Gems
If a typical player earns 250 Gems per day from routine play, Tier 1 is under a day, Tier 2 is about two days, and Tier 3 is about four days. That pacing supports planning without requiring a spreadsheet obsession.
Step 3: Design Earn Loops That Respect Player Time
Earn sources should be predictable enough to reduce anxiety, but varied enough to avoid boredom.
Example earn design:
- Daily missions: 60–90 Gems, fixed tasks.
- Run completion: 20–40 Gems per run, scales with difficulty.
- Streak bonus: +10% Gems after consecutive days, capped.
This keeps the loop fair: players who play more get more, but the “shape” of earnings stays similar.
Step 4: Add Decision Friction Without Making It Painful
Players need meaningful choices, not just a single button. Offer at least two upgrade branches that share the same soft currency.
Example: Gems can upgrade either “Weapon” or “Armor.” Weapon increases damage; Armor reduces damage taken. Early on, both are attractive, but later tiers shift value depending on the player’s build.
To prevent paralysis, show a “next tier impact” preview: “Weapon Tier 3 reduces boss time by ~15%.” Even a rough estimate helps players choose.
Step 5: Include Catch-Up and Anti-Frustration Guardrails
A soft currency loop fails when behind players can’t reach the next meaningful tier. Add guardrails that do not require premium currency.
Example guardrails:
- Catch-up multiplier: If a player is 2+ tiers behind the median, their next run grants +25% Gems for that day.
- Partial refund: If an upgrade is canceled within 10 minutes, refund 80% of Gems.
- Protection on crafting: If crafting fails repeatedly, the next attempt guarantees the intended output.
These rules reduce dead ends while keeping the economy consistent.
Step 6: Validate with Conversion and Time-to-Tier Metrics
Track whether players actually move through the loop.
Example metrics:
- Currency per session: Are players earning too slowly or too quickly?
- Upgrade conversion rate: What fraction of earned currency becomes upgrades?
- Time to next tier: Does it match your target pacing by segment?
- Drop-off after spending: Do players stop after upgrades, suggesting costs are too high?
If conversion is low, players may not trust the value of upgrades or may be saving for a tier that feels unreachable. If time-to-tier is too long, costs likely outpace earn.
Step 7: Operational Tuning After Content Drops
When new content adds more earn sources, the loop must stay stable. Adjust either earn or costs, not both at once.
Example tuning rule:
- If a new event adds +15% Gems to the economy, reduce Tier 3 and Tier 4 costs by 5–8% or reduce event Gems by a similar amount.
Keep changes small and measurable so players see consistency rather than whiplash.
Worked Example Summary
A dungeon game implements Gems as soft currency, upgrades “Forge Level” with four tiers, and offers two branches (Weapon and Armor). Costs follow a tier curve that targets roughly 1–4 days to reach the next tier for typical players. Earn sources are predictable daily missions plus run-based rewards. Catch-up multipliers and partial refunds prevent dead ends. Telemetry confirms conversion and time-to-tier, and event tuning keeps the loop stable.
The result is a loop where spending feels like progress, earning feels like a plan, and the economy stays balanced without relying on premium purchases.
11.2 Case Study Pattern: Building a Premium Currency Pack Strategy
A premium currency pack strategy is easiest to reason about when you treat it like a small product catalog with strict rules: what players can buy, what they receive, how value is communicated, and how the economy stays stable afterward. The goal is not to “maximize revenue at all costs,” but to make purchases feel like a sensible option inside a well-behaved economy.
Core Premises for Premium Currency Packs
Start with three foundational decisions.
First, define what premium currency does. It should be a tool for specific outcomes, such as speeding up non-competitive progression, buying cosmetic variants, or purchasing limited-time convenience items. If premium currency can directly buy raw power in a competitive mode, the rest of the system becomes a constant firefight.
Second, decide how premium currency relates to soft currency. Many games allow conversion, but conversion rules must be consistent with your pricing math. If conversion exists, keep the exchange rate stable and avoid creating arbitrage where players can earn soft currency efficiently and then “launder” it into premium value.
Third, choose a pack structure that supports both first-time buyers and repeat buyers. A common pattern is a small starter pack, a mid pack, and a larger value pack. Each pack should map to a clear player need: “I want to progress today,” “I’m building toward a goal,” or “I want to reduce waiting time.”
Pack Catalog Design with Concrete Examples
Assume your premium currency is called Gems, and your soft currency is Coins. Also assume your primary use of Gems is to purchase time-saving items and cosmetics, while Coins handle crafting and upgrades.
Create three packs:
- Starter Pack: 60 Gems for $4.99
- Value Pack: 300 Gems for $19.99
- Large Pack: 900 Gems for $49.99
Now add a fourth option that is not “just more Gems”: a bundle tied to a specific event. For example, during a weekend event you sell:
- Event Pack: 300 Gems + 1 event ticket for $19.99
The ticket should be consumable only during the event and should not replace core progression. This keeps the premium currency purchase meaningful without turning the event into a paywall.
Pricing Logic and Value Communication
Players compare value using a simple mental model: “How many Gems per dollar?” Your job is to make that comparison consistent across regions and platforms.
Use a baseline rate from the Starter Pack: 60 Gems / $4.99 ≈ 12.0 Gems per dollar. Then set the Value Pack at a slightly better rate, such as 300 / $19.99 ≈ 15.0, and the Large Pack at a better rate again, such as 900 / $49.99 ≈ 18.0. This step-up rewards larger purchases without making the smallest pack feel like a trap.
Communicate value with one clear number in the store UI: Gems per dollar or a “best value” badge. Avoid showing multiple competing metrics that force players to do math under pressure.
Economy Guardrails After Purchase
A premium pack strategy must include post-purchase checks so the economy doesn’t drift.
First, ensure Gems have sinks. If Gems only accumulate, players will stop buying because the next purchase feels redundant. Typical sinks include time-saving skips with diminishing returns, cosmetic bundles with limited availability, and event convenience items.
Second, cap the impact of time-saving. For example, if a skip reduces a 6-hour timer, limit the number of skips per day to prevent a single buyer from compressing progression too far.
Third, keep inventory and entitlement consistent. If a pack grants items, store them as separate entitlements with clear expiration rules. This prevents “missing item” support tickets and avoids accidental double-grants.
Mind Map: Premium Currency Pack Strategy
Example: A Full Purchase Flow That Stays Fair
Imagine a player buys the Value Pack during a crafting-heavy week. The store grants 300 Gems immediately and also shows two recommended uses: “Skip 1 crafting timer” and “Buy the cosmetic variant for this week.”
When the player uses Gems to skip, the system enforces a daily cap of 2 skips. If the player already used 2 skips, the UI should hide the skip option rather than letting the purchase feel like it “did nothing.”
Finally, the event cosmetic should be time-limited. After the event ends, the cosmetic remains owned, but the option to buy it again disappears. That keeps the store from turning into an endless discount loop.
Implementation Checklist for This Pattern
- Define Gems sinks and enforce caps at the system level
- Set pack sizes and price points using a consistent Gems-per-dollar ladder
- Ensure event packs add relevance without replacing core progression
- Validate entitlements, expiration, and inventory updates
- Test store messaging so players understand what they receive and how it can be used
11.3 Case Study Pattern: Tuning Loot and Crafting With Protection
Loot and crafting systems fail in predictable ways: players feel cheated by bad luck, economies drift because reward supply isn’t controlled, and “protection” gets implemented so late that it looks like a punishment with a coupon. This case study pattern fixes those issues by treating loot and crafting as one connected reward pipeline with explicit math, clear player-facing rules, and telemetry-backed tuning.
Step 1: Define the Reward Pipeline and Player Promise
Start by writing a one-paragraph “player promise” for each reward type.
- Loot promise: “You can earn rare items through drops, and repeated unlucky outcomes reduce the chance of staying unlucky.”
- Crafting promise: “You can convert common materials into targeted outcomes using a cost that scales predictably.”
Example: Suppose a rare weapon has a 1% drop rate. Your promise might be: “After 50 loot pulls without the rare, the next pull is guaranteed.” For crafting, you might promise: “A rare weapon requires 20 weapon parts; parts drop frequently enough that free players can craft within a reasonable play window.”
Step 2: Build a Shared Supply Model
Even if loot and crafting are separate UI features, they share the same economy. Model them together as sources (drops, quest rewards, dismantling) and sinks (crafting recipes, upgrade costs, material destruction).
Concrete example:
- Loot drops: 1% rare weapon, 99% common weapons.
- Dismantling: 10 common weapons convert into 1 weapon part.
- Crafting: 20 parts craft 1 rare weapon.
Now you can compute expected rare acquisition from both paths and ensure they don’t accidentally double-count rare supply.
Step 3: Implement Protection That Is Legible
Protection should be based on player-visible state or at least player-understandable behavior.
Common protection options:
- Pity counter for loot: track pulls since last rare.
- Material floor for crafting: ensure a minimum material yield per activity streak.
- Recipe safety: cap the number of failed refinement attempts by converting failures into partial progress.
Example pity rule:
- Rare drop chance starts at 1%.
- After 40 pulls, chance increases linearly to reach 100% at pull 60.
- Display “Luck Progress” as a bar that fills with each pull.
This avoids the “invisible mercy” problem where players can’t tell whether the system is working.
Step 4: Tune Loot Tables with Rarity Math and Player Time
Loot tuning is about controlling time-to-target and variance.
- If variance is too high, players experience long dry spells.
- If variance is too low, rare items become too common and the economy inflates.
Practical tuning method:
- Choose a target median time-to-rare for each segment (free, light spender, heavy spender).
- Use protection to cap worst-case time.
- Adjust base drop rate and pity curve slope to hit the median.
Example target:
- Median time-to-rare: 25 pulls.
- Worst-case time-to-rare: 60 pulls.
Then adjust the base 1% and the pity curve until simulated outcomes match those numbers.
Step 5: Align Crafting Costs with Loot Outcomes
Crafting should not be a second lottery. It should be a plan.
A clean alignment rule:
- If loot is the “random path,” crafting is the “budget path.”
- The crafting cost should be set so that a player who consistently dismantles commons can reach the target without feeling forced to grind.
Example:
- If a player averages 10 common drops per 10 pulls, and dismantling yields 1 part per 10 commons, they earn ~1 part per 10 pulls.
- If crafting needs 20 parts, expected crafting time is ~200 pulls without loot rares.
- Protection then reduces the need for crafting for players who hit rares earlier.
This creates a system where crafting is always viable, but loot still matters.
Step 6: Add Guardrails for Economy Stability
Protection changes player behavior, which changes supply. Add guardrails:
- Material caps per day or per event to prevent runaway hoarding.
- Recipe versioning so old materials don’t break new crafting math.
- Sink checks after major updates to confirm that crafted rares don’t outpace sinks.
Example guardrail:
- Limit dismantling conversion to 200 commons per day.
- If a new event increases common drops, reduce conversion yield slightly to keep part inflow stable.
Step 7: Validate with Telemetry and Scenario Testing
Use scenario tests before rollout and telemetry after rollout.
- Track pity counter distributions.
- Measure time-to-rare percentiles (p50, p75, p95).
- Compare crafted rare rates versus loot rare rates.
Example dashboard questions:
- Are players hitting the pity guarantee too often, indicating base drop is too low?
- Are parts accumulating faster than crafted rares, indicating a sink imbalance?
Mind Map: Loot and Crafting with Protection
Example: One Cohesive Configuration
Assume:
- Rare loot base rate: 1%
- Loot pity: guaranteed at pull 60 with linear ramp from pull 40
- Common-to-part: 10 commons → 1 part
- Crafting: 20 parts → 1 rare
- Dismantling cap: 200 commons/day
Resulting behavior:
- Players who get lucky earlier craft less often.
- Players who don’t still have a capped worst-case time via pity.
- Crafting remains a consistent fallback because part inflow is bounded and predictable.
This configuration works because protection caps variance, crafting provides planning, and the shared supply model prevents rare items from quietly flooding the economy.
11.4 Case Study Pattern: Stabilizing Economy After Content Updates
When new content lands, the economy usually changes in three ways: new rewards create new sources, new sinks appear through upgrades or crafting, and player behavior shifts because the “best” path to progress changes. Stabilizing the economy after an update means you treat those changes like a controlled experiment, not like a surprise party.
Step 1: Inventory What Changed
Start by listing every economy-affecting change in plain terms: what items were added, what drop tables changed, what crafting recipes were modified, what costs were adjusted, and what new offers were introduced. Then map each change to one of four categories: new sources, new sinks, altered conversion rates, or altered player demand.
Example: A new dungeon adds a rare material. That is a new source. If that material is also required for a new weapon upgrade, it becomes a new sink. If the dungeon replaces an older dungeon in the daily rotation, demand shifts away from the older material.
Step 2: Model the Before and After Flows
Even a lightweight flow model helps. Track currency and key resources separately. For each resource, write: current earn rate (per active player), current spend rate (per active player), and current net change. After the update, estimate the new earn and spend rates using patch notes plus observed early telemetry.
Step 3: Detect Imbalances Early
Look for symptoms that show up quickly and are hard to reverse later.
- Inflation signals: the average balance of a currency rises while upgrade completion rates stall.
- Sink starvation: players earn the new resource but cannot convert it into meaningful progress, so they hoard it.
- Supply overshoot: drop rates are too generous, causing crafting to become cheap and undermining the value of older items.
- Progression breakpoints: a small subset of upgrades becomes the new bottleneck, creating a “traffic jam” that makes players feel progress is stuck.
Example: After adding a new crafting tier, you notice that players complete the dungeon but stop crafting after one step. That suggests the next recipe cost is miscalibrated or the required materials are too scarce relative to the new earn loop.
Step 4: Choose the Least Disruptive Fix
Stabilization is about changing the smallest number of levers to restore balance.
- If the problem is too much supply, reduce the source: adjust drop rates, tighten eligibility, or add a cap on how often the reward can be claimed.
- If the problem is too little conversion, reduce the sink: lower crafting costs, add alternative recipes, or increase the availability of the missing component.
- If the problem is conversion distortion, tune exchange rates or crafting yields so players can reach the same upgrade outcomes with consistent effort.
Example: Suppose the new dungeon material is flooding the market. Instead of changing the dungeon directly, you can adjust the crafting recipe to require a mix of old and new materials. That keeps the dungeon rewarding while restoring the value of the older sink.
Step 5: Use Guardrails That Preserve Player Trust
Guardrails prevent “whiplash” where players feel punished for playing the update.
- Soft caps: limit the number of high-value claims per day or per event, rather than hard removing rewards.
- Pity or protection: if you change drop rates, keep protection systems consistent so unlucky players do not get a worse experience.
- Cost smoothing: avoid large step changes in upgrade costs between tiers; adjust gradually.
Example: If you reduce a rare drop rate, keep the protection threshold unchanged so the expected time-to-reward remains stable for most players.
Step 6: Validate with Cohorts, Not Averages
Averages hide problems. Compare cohorts by progression stage and spending behavior.
- New players: may be disproportionately affected by early sink changes.
- Returning players: may have different inventory baselines.
- Free players: reveal whether the earn loop still supports steady progression.
- Paying players: show whether offers now create unintended shortcuts that break balance.
Example: If paying players can craft the new tier immediately while free players cannot, you may see a spike in premium currency spending tied to a single bottleneck. That bottleneck likely needs sink tuning or alternative earn paths.
Step 7: Monitor and Iterate with a Hotfix Playbook
Define alert thresholds before launch. For instance, trigger an investigation if net currency change exceeds a set band for two consecutive days, or if upgrade completion rate drops sharply while dungeon completion stays flat.
Example: If dungeon completion remains steady but crafting completion falls, prioritize sink-side changes first. If both completion rates rise, prioritize source-side tuning.
Step 8: Close the Loop with a Clear Outcome Summary
After stabilization, document what changed and why in internal terms: which lever moved, what metric improved, and which cohort was most affected. This prevents the next update from repeating the same “fix the symptom, break the cause” cycle.
11.5 Case Study Pattern: Reducing Friction While Preserving Value
A common economy failure mode looks like this: players feel “stuck,” so they buy more. The problem is that the economy becomes less valuable because the game starts handing out progress too easily. This pattern fixes friction without erasing value by separating effort from cost and by making the player’s next step feel obvious.
Core Idea
Reduce friction by improving clarity, reducing avoidable time loss, and smoothing decision points. Preserve value by keeping the underlying currency math intact: sinks still remove resources at the same pace, and sources still generate at the same rate. The goal is fewer dead ends, not more free stuff.
Mind Map: Friction Reduction with Value Preservation
Step 1: Identify Friction That Is Not About Money
Start with three buckets of complaints: “I don’t know what to do,” “I did it but it took forever,” and “I did it and it didn’t help.” Only the first two are true friction. If the third bucket is caused by low reward quality, that’s a value problem and needs economy tuning, not just UX.
Example: In a crafting game, players say they “can’t progress.” Telemetry shows they are crafting, but the crafted item rarely improves their build. The fix is not to reduce the crafting cost; it’s to adjust the crafting output distribution or the crafting requirements so the effort reliably produces usable upgrades.
Step 2: Make the Next Step Obvious Without Changing Rewards
Friction often comes from unclear goals. Add a “next action” panel that uses the player’s current inventory and level to recommend one concrete path, including the exact currency and item requirements.
Example: A player wants to upgrade a weapon. The UI shows: “Upgrade to Tier 3 requires 120 Alloy and 2 Springs. You have 80 Alloy and 0 Springs. Earn 40 Alloy from Daily Shipment and 2 Springs from Salvage.” The player sees the plan, not a vague checklist.
This preserves value because you are not changing drop rates or prices; you are reducing wasted time spent figuring out what to do.
Step 3: Replace Dead Time with Earnable Actions
If players wait for timers, travel, or repeated low-signal tasks, they perceive the economy as “expensive,” even when the math is fine. Convert dead time into actions that still respect sink/source balance.
Example: Instead of a 6-hour “refine” timer, allow the player to start a second batch immediately but cap the number of active batches. The player feels less blocked, while the total refined output per day remains controlled by the cap and the same sink costs.
Step 4: Smooth Decision Points with Bundles and Safe Defaults
Friction spikes when players face too many options with unclear tradeoffs. Provide a small set of bundles aligned to intent: “catch up,” “finish a set,” or “optimize build.” Each bundle should map to existing goods and currencies rather than introducing new value.
Example: A “catch up” bundle includes a fixed amount of soft currency plus one guaranteed crafting token. The token is already part of the crafting system; the bundle just packages it so the player can act immediately.
Step 5: Keep Currency Math Stable and Audit Currency Velocity
After UX changes, re-check the economy. Even “free” clarity can change behavior: players may spend more often because they understand what they’re buying.
Example: If you reduce the number of screens before a purchase, conversion may rise. That’s fine, but you must ensure sinks still remove resources at the same pace. Run a quick scenario test: simulate a week of play with the new flow and compare currency velocity (earned per day vs spent per day) to the baseline.
Step 6: Use Protection to Reduce Perceived Cost
Perceived cost is often bad luck. Add pity or protection so players don’t feel punished for trying. This reduces friction without inflating the economy because protection reshapes distribution, not total sink/source volume.
Example: For a rare cosmetic, guarantee a drop after 50 attempts. If the average attempts stay similar, the economy’s long-run value remains stable, but the player’s experience becomes predictable.
Step 7: Validate with Cohorts and “Time to Meaningful Progress”
Measure whether friction actually decreased. Track time to first meaningful upgrade, number of failed attempts to reach a goal, and how often players abandon a loop after encountering a requirement.
Example: Before changes, players abandon crafting after seeing missing Springs. After adding the next-action panel and a “Salvage Springs” recommendation, abandonment drops, while the number of Springs consumed per upgrade stays the same.
Practical Checklist
- Next step is explicit and uses current inventory
- Dead time is converted into capped, earnable actions
- Bundles package existing value, not new value
- Sink/source math is unchanged; currency velocity is re-audited
- Protection improves predictability without raising long-run output
- Cohorts show reduced time to meaningful progress
12. Practical Implementation Toolkit for Designers and Engineers
12.1 Creating Economy Design Documents With Clear Assumptions
An economy design document is the place where “it feels fair” becomes “it is fair under these rules.” The goal is not to predict every player behavior; it is to make your intended economy legible to teammates and testable in production.
Economy Design Document Purpose
Start with a one-page summary that states what the economy must achieve and what it must avoid. For example:
- Goal: Players can progress meaningfully without needing purchases.
- Constraint: Purchases should accelerate convenience and choice, not invalidate core skill.
- Non-goal: Making every session end with a purchase prompt.
Then list the currencies, the main progression tracks, and the monetization surfaces that interact with them. If a system touches currency, it belongs in the document.
Assumptions That Must Be Explicit
Write assumptions in plain language, each with a test method.
Player Behavior Assumptions
- Earn behavior: “Most players spend 10–20 minutes per day on the primary loop.”
- Test: Track session length distribution and loop completion rate.
- Spend behavior: “A minority of players buy premium currency monthly.”
- Test: Measure purchase frequency by cohort.
- Friction tolerance: “Players accept one gating step per day before feeling blocked.”
- Test: Compare conversion and churn around gating events.
Economy Math Assumptions
- Target inflation: “Average spendable currency should grow slowly enough that upgrade costs remain reachable.”
- Test: Simulate earn and sink rates per day and compute net currency.
- Drop expectations: “Rarity distribution should match the intended time-to-item.”
- Test: Run reward table simulations and compare to desired acquisition curves.
- Conversion rules: “Soft currency cannot be converted to premium currency.”
- Test: Validate transaction permissions and conversion endpoints.
Content and Operations Assumptions
- Content cadence: “New upgrade tiers arrive every 6–8 weeks.”
- Test: Confirm release schedule and update windows.
- Hotfix policy: “Economy parameter changes require a rollback plan.”
- Test: Ensure every tunable has a safe revert path.
Mind Map: Economy Design Document Structure
Economy Design Document Mind Map
Document Sections with Integrated Examples
Economy Overview with a Concrete Example
Write a short “what players experience” paragraph. Example: “Players earn soft currency from daily missions and spend it on crafting materials. Premium currency offers are optional and mainly reduce time spent farming materials.” This ties the economy to player actions, not just numbers.
Currency Model with Flow Clarity
For each currency, include a flow diagram in text: “Soft currency is earned from missions (source), spent on crafting (sink), and transferred via marketplace trades (transfer).” Then state what is forbidden: “Premium currency cannot be earned through normal gameplay.” This prevents accidental design drift.
Progression Model with Time Targets
Define time-to-reach targets for key milestones. Example: “A typical free player can reach Tier 3 upgrades in 21–28 days through normal play.” Pair it with the assumptions that make it true: mission completion rate, average reward size, and upgrade cost curve.
Monetization Model with Offer Intent
List each offer type and its intended role. Example:
- Starter pack: reduces early friction by providing crafting materials.
- Monthly pass: offers predictable value through a steady sink-friendly bundle.
- Premium currency pack: supports convenience purchases without changing core upgrade requirements.
Reward Systems with Math-Friendly Rules
Describe loot and crafting rules so QA can verify them. Example: “Rare item has a pity counter that guarantees one drop every 50 openings, and crafting requires 20 materials with a 5% chance to refund one material.” Even if you later tune values, the rule shape stays stable.
Assumption Table Template
Use a compact table so assumptions are searchable.
| Assumption | Why It Matters | Owner | Test Metric | Pass Condition |
|---|---|---|---|---|
| Daily loop completion is 60% | Determines earn rate | Design | Loop completion rate | ≥ 55% in cohort |
| Upgrade costs scale linearly | Prevents runaway inflation | Economy | Upgrade cost vs time | Within ±10% |
| Premium cannot be earned | Prevents pay-to-win acceleration | Engineering | Premium earn attempts | 0 successful earns |
Versioning and Review Discipline
Add a “last reviewed” field using a stable reference date such as 2026-04-01. Then require two sign-offs: one for economy math and one for player experience constraints. This keeps the document from becoming a museum piece.
A good economy design document makes disagreements concrete. When someone says “this will feel unfair,” the document should already contain the specific assumption, metric, and rule that would prove or disprove that claim.
12.2 Building Currency Data Models and Transaction Validation
A currency system is only as trustworthy as its data model and the rules that validate every change. The goal is simple: represent currency clearly, record every movement, and prevent invalid states from ever reaching players.
Core Data Model Concepts
Start with a small set of entities that cover most games without forcing special cases.
- Currency Definition: Each currency has an ID, display name, type (soft, hard, premium), and rules for earn/spend/convert.
- Player Balance: A per-player ledger of current amounts by currency ID.
- Transaction Record: An immutable log entry that captures what changed, why, and under which game context.
- Reason Codes: Stable identifiers for the “why” behind changes, such as quest_reward, crafting_cost, store_purchase, or compensation.
A good model keeps “current balance” separate from “history.” The balance is derived from the ledger, or updated atomically alongside the ledger entry.
Balance Representation Choices
Use integer amounts for currency. If you need fractional units (rare for real money currencies), store them as scaled integers (for example, cents or 1/100th units). This avoids rounding drift that slowly turns into support tickets.
For multi-currency games, store balances as a map keyed by currency ID. For performance, you can denormalize into a table per currency, but the logical model remains the same.
Transaction Validation Pipeline
Treat validation as a gate that runs before any balance update. A typical pipeline looks like this:
- Validate Input: currency ID exists, amount is non-zero, and reason code is allowed.
- Validate Player Context: player is active, account is in good standing, and the request is tied to a valid gameplay event.
- Validate Economic Rules: earn/spend/convert rules match the currency type and the reason code.
- Validate Balance Constraints: for spends, ensure sufficient funds; for earns, ensure the amount is within expected bounds.
- Validate Idempotency: the same request should not apply twice.
- Write Transaction Atomically: insert ledger entry and update balance in one transaction.
A single missing step can create duplication bugs. Idempotency is the most common one: network retries happen, and without a unique transaction key you get double rewards.
Idempotency and Uniqueness
Every transaction request should include a transaction key generated by the caller or derived from the gameplay event. Store it with a uniqueness constraint.
Example: if a crafting action costs 50 soft currency and the client retries due to a timeout, the server should detect the same transaction key and return the already-applied result.
Ledger Entry Schema
A ledger entry should include enough fields to reconstruct the story later.
transaction_id(unique)player_idcurrency_iddelta(positive or negative)pre_balanceandpost_balance(optional but helpful)reason_codesource(system, store, quest, admin)context(event IDs like quest_instance_id, match_id, or order_id)created_at
If you store pre_balance and post_balance, validate them during write to catch race conditions.
Validation Rules That Prevent Common Bugs
- No Negative Earns: an earn reason must produce a positive delta.
- No Free Spends: a spend reason must require sufficient balance.
- No Cross-Currency Confusion: conversion must explicitly specify from/to currency IDs and rates.
- No Silent Caps: if you cap amounts (daily limits), record the cap decision in the reason code or context.
Mind Map: Currency Data Model and Validation
Example: Spend Validation for Crafting
Suppose crafting costs 50 soft currency. The server receives a request with transaction_key = craft_9182 and currency_id = SOFT_1.
Validation checks:
- amount is
-50and reason code iscrafting_cost - player has at least 50 soft currency
transaction_keyhas not been used- the crafting event ID in context matches an eligible recipe
If all checks pass, the server writes a ledger entry with delta = -50 and updates the balance atomically.
Example: Conversion with Explicit Rates
For conversion, never “spend one currency and then separately earn another” without a single validated operation. Compute the output amount using the configured rate, validate both currencies’ rules, then apply both ledger deltas within one atomic transaction.
- Ledger delta A:
-from_amount - Ledger delta B:
+to_amount - Both entries share the same
transaction_idand context
This keeps the economy consistent even if one write fails.
Minimal Implementation Sketch
-- Pseudocode schema constraints
-- Unique idempotency key per player and transaction type
CREATE UNIQUE INDEX ux_tx_key ON transactions(player_id, transaction_key);

-- Atomic update pattern
BEGIN;
  -- 1) Check idempotency
  -- 2) Load pre_balance FOR UPDATE
  -- 3) Validate spend/earn rules
  -- 4) Insert ledger row
  -- 5) Update balance row
COMMIT;
The key idea is that validation and state changes happen together, with a ledger that records the exact decision path. When something goes wrong, you can answer “what happened, why, and which rule blocked or allowed it” without guessing.
12.3 Authoring Reward Tables and Offer Catalogs With Versioning
Reward tables and offer catalogs are two sides of the same coin: tables define what can be earned, while catalogs define what can be purchased. Versioning is what keeps those two sides from drifting apart when you patch balance, add content, or fix mistakes. The goal is simple: the game should always be able to answer, “What did this player see and receive, and why?”
Core Concepts That Keep Everything Coherent
Start by separating three layers.
-
Reward definitions describe items, currencies, quantities, and constraints (for example, “Gold Coin: 100–200, stackable, bound on pickup”).
-
Reward tables assemble definitions into probability rules (for example, a loot table with rarity weights and pity counters).
-
Offer catalogs bundle purchasable value into a SKU-like structure (for example, “Starter Pack” includes 500 premium currency plus a weapon skin).
A common failure mode is editing definitions directly without tracking which tables and offers depend on them. Versioning prevents that by making changes explicit and traceable.
Data Model for Rewards and Offers
A practical model uses stable IDs and immutable versions.
- Stable IDs identify the concept:
item_gold_coin,reward_weapon_skin,table_seasonal_loot,offer_starter_pack. - Versioned records capture the exact rules used at a point in time:
table_seasonal_loot:v12,offer_starter_pack:v7. - Effective windows define when a version is active:
effectiveFromandeffectiveTo.
When a player opens a loot chest, the server selects the active table version for that chest type and logs the version ID alongside the outcome. When a player buys an offer, the server validates the active offer version and logs it before granting rewards.
Versioning Strategy That Avoids “Silent Balance Drift”
Use semantic intent for version bumps.
- Patch versions change small parameters that do not alter reward structure (for example, adjusting a weight from 10 to 11).
- Minor versions change structure while preserving compatibility (for example, adding a new item to a table with a default weight).
- Major versions change reward semantics (for example, switching a currency from unbound to bound, or changing how pity works).
To keep clients consistent, treat the catalog as a read-only snapshot for the duration of a session. The server remains the source of truth, but the client should display the same offer contents it will receive.
Mind Map: Reward Tables and Offer Catalogs
Authoring Workflow with Concrete Examples
Example: Loot Table with Pity
Suppose table_seasonal_loot has a legendary drop that uses pity. Version v11 might define: legendary weight 1%, pity triggers after 50 opens, and pity guarantees 1 legendary from a fixed set.
When you change only the pity threshold from 50 to 45, create table_seasonal_loot:v12 rather than editing v11. Then set effectiveFrom for v12 and keep v11 available for audit and for any in-progress pity state that references it.
Example: Offer Catalog with Bundled Rewards
Consider offer_starter_pack that includes 300 premium currency and a cosmetic. If you later add a second cosmetic, create offer_starter_pack:v8. Keep v7 active only until the new version becomes effective. If a player purchases during the overlap window, the server must decide based on the active version at purchase time and log that version ID.
Validation Rules That Catch Mistakes Early
Before publishing a new version, validate:
- Reward schema compatibility: every reward reference exists and matches expected types.
- Currency conservation: if an offer claims “value,” ensure the included currencies and items match the catalog definition.
- Probability sanity: weights sum correctly, rarity bands do not overlap incorrectly, and pity guarantees are reachable.
- Eligibility filters: tables that depend on player level or region must not produce empty outcomes.
Minimal Pseudocode for Version Selection
function grantLoot(player, chestType):
  tableId = chestType.tableId
  tableVer = getActiveTableVersion(tableId, now())
  outcome = rollWithPity(player.pityState, tableVer)
  logGrant(player.id, tableId, tableVer.id, outcome)
  applyOutcome(player, outcome)
Publishing Checklist for Versioned Catalogs
- Create new versioned records for tables and offers.
- Set effective windows with no unintended gaps.
- Run schema, probability, and eligibility validations.
- Confirm that server grant logic uses version IDs, not “latest.”
- Ensure logs store both the table version and offer version for every grant.
A good versioning system is boring in the best way: it makes balance changes explainable, reversible, and consistent across the whole pipeline from authoring to player receipt.
12.4 Establishing QA Checklists for Economy Consistency
Economy QA is the boring part that keeps your game from quietly turning into a math problem. The goal is consistency: the economy behaves the same way across content, platforms, and time, even when designers iterate and engineers refactor.
Core Checklist Philosophy
Start with invariants, not opinions. An invariant is a rule the economy must always respect, such as “currency never goes negative,” “a sink consumes the intended resource,” or “offer price maps to the correct premium currency amount.” Then test the invariants at three layers: data correctness, runtime correctness, and player-facing correctness.
A practical workflow is: (1) define expected flows, (2) generate test cases from those flows, (3) run automated checks on data and scripts, (4) run scripted gameplay scenarios, and (5) review telemetry for anomalies.
Economy Invariants You Should Test Every Time
- Conservation of Value: If a player spends 100 soft currency to craft an item, the item appears and the currency decreases by exactly 100, with no side effects.
- No Phantom Currency: Currency balances only change through approved transactions.
- No Double Charging: UI confirmation, server validation, and reward granting must not apply twice.
- Correct Currency Identity: The system must never treat hard currency as soft currency due to ID mismatches.
- Deterministic Reward Math: Drop rates, pity counters, and crafting outputs must match the configured rules.
- Version Consistency: Live clients, server rules, and content bundles must agree on the same reward tables.
Economy QA Coverage Mind Map
Mind Map: Economy QA Coverage
Data Correctness Checks
These catch the “wrong number in the wrong place” issues before anyone presses Play.
- Currency ID Mapping: Verify every reward table entry references the correct currency type and amount. Example: an offer labeled “Gold” must grant the currency ID used by the upgrade system, not the one used by cosmetics.
- Reward Table Integrity: Ensure rarity weights sum correctly and pity thresholds reference the same progression track. Example: if pity triggers at 50 pulls, confirm the counter resets only when the intended reward is granted.
- Offer Composition Consistency: Confirm each pack’s contents match its price and region rules. Example: a bundle that includes 1,000 premium currency plus a cosmetic must not accidentally omit the cosmetic on one platform build.
Runtime Correctness Checks
Runtime QA ensures the economy behaves under real conditions: retries, latency, and concurrent actions.
- Transaction Validation: Server must validate spend requests against current balances and configured costs. Example: if a player tries to craft with insufficient soft currency, the server rejects and returns the correct error without changing balances.
- Idempotency for Purchases and Claims: If a client retries due to a timeout, the server should not grant rewards twice. Example: simulate a purchase request that times out after payment confirmation; the second request should detect prior completion.
- Concurrency Handling: Two actions in parallel should not both consume the same currency. Example: double-clicking “Craft” should result in one craft and one currency deduction.
- Rollback Behavior: If reward granting fails after currency spend, the system must revert the spend. Example: if inventory write fails, the soft currency deduction should not remain.
Player-Facing Correctness Checks
Players judge the economy by what they see, not what the ledger says.
- UI-to-Server Math Match: Tooltips and confirmation screens must reflect the exact server calculation. Example: if crafting cost scales with level, the tooltip must show the current level’s cost.
- Balance Label Accuracy: “Hard” and “Soft” currency labels must match the actual currency granted. Example: a tooltip that says “Spend Gems” must never subtract coins.
- Receipt and Entitlement Consistency: After purchase, the entitlement should appear immediately and persist after relog. Example: buy a subscription pack, restart the game, and confirm the same benefits remain.
Scenario Tests That Tie It Together
Use short, repeatable scenarios that cover earn, spend, and conversion.
- Scenario A: Earn-to-Sink Loop: Earn soft currency via a quest, craft an item, verify balances and inventory.
- Scenario B: Conversion Path: Convert soft to premium via an exchange, then spend premium on an upgrade, verifying exchange rate and caps.
- Scenario C: Offer Purchase Under Stress: Purchase an offer while simulating retries and network delays, then verify no double grants.
Economy QA Checklist Template
- Invariant Checks
- Currency never negative
- No phantom currency changes
- No double charging
- Data Checks
- Currency IDs match across tables
- Reward math matches config
- Offer contents match price
- Runtime Checks
- Server validates spend and grants
- Idempotency works on retries
- Rollback on failure
- Player-Facing Checks
- UI labels match balances
- Tooltips match server math
- Entitlements persist after relog
- Evidence
- Transaction logs captured
- Telemetry sanity checks pass
- Config diffs reviewed
Final QA Gate and Sign-Off
A change should not ship until the checklist passes for the affected economy surfaces: reward tables, sinks, sources, conversions, and monetization offers. For each pass, keep evidence in the form of transaction traces and a config diff summary, so the next regression has a clear starting point. If you can’t explain why a balance changed, the checklist didn’t go far enough.
12.5 Operational Playbooks for Hotfixes and Economy Adjustments
Hotfixes are where economy design meets reality: data arrives late, players interpret changes instantly, and edge cases show up right on launch day. A good playbook keeps decisions consistent, reduces guesswork, and makes rollback a normal option rather than a panic button.
Pre-Change Readiness and Guardrails
Start with a checklist that makes “safe to change” measurable.
- Define the change type: economy math (prices, drop rates), economy rules (caps, conversion), or content wiring (which table an event uses). Each type has different risk.
- Lock the scope: list affected currencies, items, and systems. If you can’t name them, you can’t test them.
- Set guardrails: maximum allowed variance for key KPIs (e.g., spend per active user, currency sink burn rate, upgrade completion rate). Guardrails prevent “fixing” one issue by breaking three others.
- Prepare a rollback: identify the exact configuration version to revert to, and confirm it can be deployed quickly.
Example: If you reduce a premium pack price, you must also confirm the entitlement mapping and any region-specific price tables, or you’ll create mismatched receipts that look like fraud to the player.
Triage Workflow for Economy Incidents
When something goes wrong, treat it like an incident with stages.
- Detect: alerts from telemetry (currency inflation spikes, abnormal spend drops, sudden inventory deltas).
- Classify: is it a data pipeline issue, a content routing issue, or a math/rule issue?
- Reproduce internally: run the same reward calculation path using captured inputs.
- Estimate impact: compute how many transactions are affected and whether the change is reversible.
- Choose action: hotfix, partial rollback, or mitigation (e.g., temporarily disable a problematic offer).
Example: If players report “crafting costs doubled,” you should check whether the crafting UI is reading the updated cost while the backend still applies the old cost, or vice versa. Those two failures produce different telemetry signatures.
Change Design for Hotfixes
Economy adjustments should be designed so they can be applied surgically.
- Prefer additive fixes: adjust the smallest parameter that corrects the imbalance (e.g., sink amount) rather than rewriting the whole loop.
- Use staged rollout: start with a small cohort or limited time window to validate behavior.
- Keep player-facing messaging aligned: if you change odds or costs, ensure the UI and receipts reflect the new rules.
- Document assumptions: record the expected direction of change for each KPI so reviewers can spot contradictions.
Example: If inflation is rising because a source is too generous, reduce that source’s reward range first. If you instead increase sinks, you may fix inflation but harm progression pacing and increase churn.
Verification Plan Before and After Deployment
Verification is two-part: correctness and economy health.
- Correctness checks: unit tests for reward math, validation for currency ledger entries, and entitlement consistency checks.
- Economy health checks: monitor sink/source balance, conversion rates, and progression completion rates.
- Time-window comparisons: compare the same day-of-week window to reduce noise.
Example: After changing drop rates, verify not only the average drop but also the distribution. A small change to the pity threshold can shift outcomes for long-session players without moving the mean much.
Monitoring After Deployment and Decision Thresholds
Post-deploy monitoring should answer three questions quickly.
- Is the bug gone? Look for the specific telemetry signature that triggered the incident.
- Did we create a new imbalance? Track inflation proxies and progression friction proxies.
- Are players behaving differently? Watch offer conversion and upgrade attempt rates.
Decision thresholds should be explicit. For instance: if currency sink burn drops by more than a set percentage within a defined window, you revert or mitigate.
Rollback and Mitigation Playbooks
Rollback is a tool, not a confession.
- Rollback triggers: broken entitlements, ledger inconsistencies, or KPI guardrail breaches.
- Mitigation options: disable the affected offer, pause the event that uses the faulty table, or cap the problematic conversion.
- Communication discipline: confirm what changed, what didn’t, and whether purchases remain valid.
Example: If a hotfix accidentally routes a limited-time event to the wrong loot table, disabling the event is often safer than trying to patch the table live while players are mid-session.
Mind Map: Operational Playbooks for Hotfixes and Economy Adjustments
Example Runbook for a Common Failure Mode
Scenario: A weekly event uses a reward table that was updated for a new patch, but the event still points to the old table. Players see inconsistent rewards compared to the event description.
- Triage: classify as wiring/routing because the reward math is correct when tested, but the event configuration is stale.
- Fix: update the event-to-table mapping and keep the reward table version consistent with the description.
- Verify: run a reward calculation for the event’s entry conditions and confirm ledger entries match expected currency amounts.
- Monitor: track event participation rewards per cohort and compare against the previous week’s distribution.
- Rollback: if ledger mismatches appear, revert the mapping change and disable the event until the correct table is restored.
This runbook works because it separates “what the math does” from “which content points to which math,” then uses telemetry to confirm the separation is real.