Closet Farming for Beginners
1. Closet Farming Basics and What You Can Grow
1.1 Define Closet Farming and Controlled Microclimates
Closet farming is growing edible plants inside a small, enclosed area—usually a closet, wardrobe, or cabinet—using artificial light and a few targeted environmental controls. The enclosure matters because it turns a random room into a repeatable growing zone. Instead of fighting whatever the house is doing that day, you manage a smaller volume where temperature, airflow, and humidity can be kept within a workable range.
A controlled microclimate is the specific set of conditions around your plants. In a closet, that microclimate is shaped by three main levers: light, air movement, and moisture. Light drives photosynthesis and plant form; airflow influences how quickly leaves dry and how evenly heat spreads; moisture affects germination, nutrient uptake, and disease risk. When these levers are intentionally set, plants behave more consistently from week to week.
What Makes a Closet Different from a Windowsill
A windowsill relies on weather and sun angles you can’t control. A closet farm replaces that variability with predictable lighting schedules and a controlled airflow pattern. Even if you only manage two things—light timing and airflow—you reduce the most common causes of uneven growth, like stretched seedlings and persistent dampness.
The Microclimate Triangle
Think of your grow space as a triangle of constraints. If one corner is ignored, the other two often compensate in ways that cause problems.
- Light: Too little light leads to tall, weak stems and slow growth. Too much heat near the canopy can raise stress and slow development.
- Airflow: Stagnant air increases leaf wetness time, which raises the chance of fungal issues. Strong airflow can dry plants too quickly and cool them below comfortable ranges.
- Moisture: Overly wet media or consistently high humidity can reduce oxygen around roots and encourage mold. Too dry slows germination and causes nutrient uptake problems.
Practical Examples of Controlled Microclimates
Example: Seedlings That Don’t Stretch
You start lettuce seeds in small trays. With a closet setup, you run a consistent light schedule and position the light close enough to keep seedlings compact. If the seedlings still lean toward the light, you adjust height or add a simple reflector to improve coverage. The microclimate here is “steady light plus even intensity,” which directly changes stem thickness and leaf posture.
Example: Herbs That Stay Healthy Between Waterings
You grow basil and chives in containers. Instead of watering on a vague schedule, you water based on media moisture and ensure airflow is enough to dry leaf surfaces after misting or humidity spikes. The microclimate becomes “controlled moisture plus drying capacity,” which reduces the cycle of wet leaves followed by slow drying.
Example: Preventing Mold in a Small Enclosure
You notice fuzzy growth near the top layer of soil or on damp surfaces. The fix is rarely one thing. You check whether airflow is too weak, whether humidity is staying high, and whether the light is too far away (which can keep the canopy cooler and slower to dry). In a closet, these factors stack quickly because the space is small.
Mind Map: Closet Farming Components
Mind Map: Microclimate Cause and Effect

A Simple Definition You Can Use While Planning
Closet farming is indoor plant production in a confined space where you control the microclimate—especially light timing, airflow, and moisture—so plants grow with fewer surprises. The enclosure is not magic; it’s a boundary that makes your adjustments count. When you treat the closet as a small system with measurable inputs and visible outputs, the learning curve becomes practical instead of guessy.
1.2 Choose Crops That Fit Small Space Constraints
Small closets reward crops that stay compact, tolerate indoor conditions, and don’t demand huge root volume. The trick is to match plant needs to your actual constraints: light intensity, airflow, container size, and how often you can check on the setup.
Start with Your Constraints, Not Your Favorites
List what your space can reliably provide. Light is usually the limiting factor, followed by airflow and container depth.
- Light: If your light is modest, prioritize short-cycle crops and leafy greens that don’t require long, intense days.
- Airflow: If air movement is weak, avoid plants that stay dense and humid inside the canopy. Choose crops that are naturally less prone to mildew.
- Container size: Shallow containers favor herbs and greens. Deep containers are needed for fruiting plants and larger root systems.
- Time and attention: If you can’t check daily, pick crops that forgive missed watering and don’t demand frequent pruning.
Use a Simple Crop Fit Checklist
For each candidate crop, score these factors from 1 (hard) to 5 (easy).
- Space footprint: Does it stay small or can it be trained vertically?
- Root demand: Can it grow well in a container you can fit?
- Light demand: Does it produce with your available brightness and distance?
- Water and nutrient sensitivity: Does it tolerate small mistakes?
- Cycle length: Can you harvest before conditions drift too far?
A beginner-friendly first list usually includes crops that score high on footprint, root demand, and cycle length.
Best Categories for Closets
Leafy greens and herbs are the “high success rate” group because they grow quickly and don’t require pollination.
- Leafy greens: Lettuce, arugula, spinach, and baby kale. They’re fast, harvestable in stages, and can be grown in shallow trays.
- Herbs: Basil (warm and bright), cilantro (cooler seasons), chives, and parsley. Many herbs can be harvested repeatedly, which makes small batches feel productive.
- Compact roots and greens: Radishes and mustard greens. They mature quickly and don’t need long-term canopy management.
- Fruiting plants with training: Cherry tomatoes and peppers can work, but only if you can provide strong light and a stable watering routine.
- Vining crops: Cucumbers and similar plants can be grown vertically, but they demand more space for trellising and more consistent moisture.
Match Crop Type to Your Setup
Consider how your closet is built.
- Shelf grow with limited height: Choose greens and herbs, plus radishes. If you want fruiting plants, use dwarf varieties and keep expectations modest.
- Hanging or vertical space: Herbs and some greens do well. Vining crops can work if you have a sturdy trellis and enough airflow.
- Deep floor containers: You can attempt peppers and determinate tomatoes, but plan for larger watering and nutrient needs.
Mind Map: Crop Selection Logic
Example: Two Closets, Two Crop Plans
Example 1: Small closet with moderate light and shallow trays
- Pick: lettuce, arugula, spinach, chives, radishes.
- Why it fits: these crops tolerate container limits, mature quickly, and can be harvested leaf-by-leaf.
- What you do: sow in small batches every 10–14 days so you always have something ready.
Example 2: Closet with stronger light and deeper containers
- Pick: basil, cilantro (cooler periods), plus one compact pepper plant.
- Why it fits: basil and peppers respond well to brighter conditions, and deeper containers support root growth.
- What you do: keep one fruiting plant as a “learning crop” while greens handle most of the harvest volume.
Common Beginner Mistakes to Avoid
- Choosing tall plants first: A plant that reaches for light will steal space from everything else.
- Overcrowding for speed: Dense canopies reduce airflow and increase disease risk.
- Ignoring container depth: A crop can survive in a small pot but struggle to produce.
- Planting only one type: If one crop struggles, you still have others to harvest.
A Practical Starter Crop Set
If you want a straightforward first cycle, choose two leafy greens, one herb, and one quick crop. For instance: lettuce + arugula + chives + radishes. This mix covers different growth habits while staying manageable in a small controlled space.
1.3 Understand Growth Cycles from Seed to Harvest
A growth cycle is the timeline from starting a plant to the moment you harvest it. In a closet, the cycle matters because your space, light schedule, and watering habits stay the same while your plants change week by week. If you know what stage you’re in, you can adjust conditions without guessing.
The Big Stages and What They Need
Seed and germination is when the plant is building its first roots and leaves. The main goal is consistent moisture and warmth. If the medium dries out, germination stalls; if it stays soggy, seeds can rot. A practical approach is to keep the top layer evenly damp and avoid soaking the whole tray.
Seedling establishment is when the plant starts using light efficiently. This is where leggy growth usually begins: if light is too weak or too far away, seedlings stretch and become harder to manage later. In a closet, you can prevent this by positioning lights so the top leaves are close to the light and by keeping a steady light schedule.
Vegetative growth is when leafy crops bulk up and herbs build stems and leaf area. Plants need enough light to support fast leaf production, and they need watering that matches growth rate. Overwatering during vegetative growth often shows up as slow growth and yellowing leaves, not as dramatic wilting.
Flowering and fruiting applies to crops like peppers and tomatoes, and it also affects some herbs and leafy plants when they bolt. This stage changes priorities: plants often need slightly different watering consistency and more stable temperatures. In small spaces, swings in temperature can trigger stress, which may reduce fruit set.
Harvest and post-harvest is not just picking. For many leafy greens, you harvest leaves and keep the plant producing. For others, you harvest the whole plant. After harvest, you either replant for a new cycle or reset the area to reduce disease carryover.
A Simple Timeline You Can Use
Use a “days to key events” mindset rather than memorizing exact dates. Different varieties vary, but the sequence is consistent.
- Days 0–7: Germination and early root formation
- Days 7–21: Seedling growth and leaf development
- Days 21–45: Rapid vegetative growth for many greens and herbs
- Days 45–90+: Harvest window expands; fruiting crops may take longer
If your closet runs a fixed light schedule, you can treat each week as a predictable step. When you track what you see—leaf count, height, and color—you can adjust before problems spread.
What to Track Each Week
Track three things: size, color, and behavior.
- Size: Height, leaf number, and canopy thickness tell you whether growth is on pace.
- Color: Pale leaves can mean insufficient light or nutrients; dark, overly lush growth can mean too much nitrogen or too little airflow.
- Behavior: Curling, drooping, or slow recovery after watering often points to water or temperature issues.
A helpful habit is to take one photo from the same angle each week. It makes changes obvious, especially when you’re busy.
Mind Map: Seed to Harvest Cycle
Example: Leafy Greens in a Closet
Suppose you grow lettuce or arugula using a cut-and-come-again approach.
- Week 1: Seeds germinate in a lightly moist medium. If you see uneven emergence, you likely had uneven moisture.
- Week 2: Seedlings develop true leaves. If they look tall and thin, move lights closer or reduce the distance by a few inches.
- Weeks 3–4: Leaves expand quickly. Water when the top layer starts to dry, not on a rigid calendar.
- Weeks 5–6: Harvest outer leaves. Leave the center intact so the plant can regrow.
Notice how the “what to do” changes by stage: germination focuses on moisture, seedlings focus on light, vegetative growth focuses on consistent conditions, and harvest focuses on technique.
Example: Peppers with a Longer Cycle
Peppers take longer, so the cycle is more about patience and consistency.
- Early weeks: Seedlings need strong light to avoid stretching.
- Mid cycle: As plants grow, they need enough space and airflow to prevent damp leaves.
- Later weeks: When flowering begins, keep temperatures stable and avoid letting the medium swing between very wet and very dry.
- Harvest: Pick peppers when they reach the size and color you want, then continue until production slows.
In a closet, the biggest mistake is treating every week like the same week. Growth cycles give you a structure for decisions: adjust the factor that matters most for the stage you’re actually in.
1.4 Set Realistic Expectations for Yield, Time, and Effort
Closet farming works best when you plan around three limits: space, light, and your willingness to do small tasks consistently. If you expect “garden results” from a closet, you’ll be disappointed. If you expect “repeatable harvests from a controlled micro-setup,” you’ll be pleasantly surprised.
Understand Yield in Small Spaces
Yield is not just “how much food you get.” It’s also how much of your plant’s energy goes into edible parts versus stems, leaves, flowers, or fruit. In a closet, light intensity and coverage decide how efficiently plants convert energy into harvestable growth.
Leafy greens are usually the easiest way to get meaningful yield because you harvest frequently and they don’t require long ripening periods. A typical first cycle might look like this: sow seeds, grow for several weeks, then cut outer leaves or harvest heads. Herbs often behave similarly, especially when you trim regularly.
Fruit crops like peppers and tomatoes can produce well indoors, but they take longer and demand more consistent conditions. Even when everything is correct, the first harvest is usually smaller than you expect because plants spend early time building roots and structure.
A practical expectation rule: plan for “enough to taste and cook,” not “enough to replace your grocery bill.” Then adjust upward once you know your setup’s pace.
Estimate Time by Crop Stage
Time in closet farming is mostly about stage length. Germination and early growth are usually quick, but the middle stage can stretch if light is weak or temperatures drift.
Use a simple timeline mindset:
- Start-up time: assembling the system, testing airflow, and dialing in light height.
- Seed-to-transplant time: varies by crop and seed quality.
- Vegetative growth time: where leafy greens and herbs build mass.
- Reproductive time: where fruiting crops form flowers and then edible parts.
- Harvest and reset time: includes trimming, replanting, and cleaning.
If you only track “days to harvest,” you’ll miss the real bottleneck: the days you spend waiting for plants to catch up after a setup mistake. For example, if lights are too far away, plants may stretch and slow down, and you’ll spend extra weeks correcting the problem.
Match Effort to Your Weekly Rhythm
Effort is not constant. It clusters around a few tasks: checking moisture, adjusting light height, inspecting leaves, and harvesting. The goal is to make those tasks easy enough that you actually do them.
A realistic weekly effort plan for a beginner setup might include:
- 2–4 quick checks of soil moisture or reservoir level
- 1 inspection session for pests and leaf issues
- 1 harvest or trim session (more often for fast greens)
- 1 cleaning or reset task every cycle
If your system requires complicated adjustments every day, it will eventually get ignored. Simpler systems win because they reduce the chance of “I meant to check it” becoming “the crop is stressed.”
Use a Planning Example That Fits Reality
Example: You want a steady supply of salad greens.
- Choose two varieties with similar growth needs.
- Start with a small batch so you can learn your light and watering pace.
- Plan for staggered sowing so you’re not harvesting everything at once.
A realistic expectation: you might harvest a small amount after the first few weeks, then increase output as you learn how quickly your plants respond to your specific light and temperature. The second batch often performs better because you already know the correct watering frequency and light height.
Example: You want basil and cilantro.
- Expect frequent trimming to keep plants compact.
- Plan for a shorter production window than you’d get outdoors.
A realistic expectation: you’ll get more usable leaves by trimming consistently than by waiting for “maximum size.”
Example: You want peppers.
- Expect a longer timeline before meaningful fruit.
- Plan for more attention to airflow and temperature stability.
A realistic expectation: your first cycle may be mostly about plant establishment, with the first harvest being modest.
Mind Map: Realistic Expectations for Closet Farming
Quick Self-Check Before You Start
Before sowing, ask three questions: What crop stage am I actually preparing for right now? What task will I do on the days I’m busy? And what would “success” look like in a realistic amount of food, not an idealized amount?
1.5 Plan Your First Grow with a Simple Crop List
A good first crop list does two things: it matches what your closet can reliably provide, and it gives you fast feedback. “Fast feedback” means you can see whether your light height, watering rhythm, and airflow are working without waiting months.
Start by choosing one “anchor” crop and one “support” crop. The anchor crop is the one you expect to harvest first and most consistently. The support crop is smaller, quicker, or more forgiving, so you still get results even if the anchor needs a tweak.
Step 1: Pick a Closet-Friendly Anchor Crop
For most beginners, leafy greens and herbs are the easiest anchor crops because they grow quickly and don’t require fruiting conditions. Choose one of these:
- Leafy greens: lettuce, arugula, spinach, or baby kale. Many can be harvested leaf-by-leaf.
- Herbs: basil (warm-loving), cilantro (cooler), chives (very steady).
If your closet runs cooler, prioritize greens and chives. If it runs warmer, basil can work well, but you’ll still want to avoid letting it overheat under strong lights.
Step 2: Add One Support Crop for Early Wins
Support crops should be quick and compact. Good options:
- Radishes: often ready in about a month, and they show problems early (watering and spacing matter).
- Microgreens: harvest in about 1–3 weeks, perfect for learning the “seed-to-sprout-to-harvest” workflow.
- Baby greens mixes: similar care to lettuce, but you get variety in one tray.
A support crop also helps you practice harvesting without disturbing the anchor too much.
Step 3: Match Crop to Your Light Schedule
Instead of guessing, decide your light schedule first, then pick crops that fit it. A simple beginner plan is:
- Greens and herbs: typically do well with a consistent daily light window.
- Radishes and microgreens: tolerate shorter cycles better than fruiting plants.
If you can only run lights for a limited number of hours, avoid crops that demand long, steady light to stay compact.
Step 4: Decide Your Growing Style
Choose one style for the first run:
- Single batch: plant everything at once, harvest in a window, then reset.
- Staggered batches: plant support crops more frequently so you always have something ready.
Single batch is simpler. Staggered batches reduce the “everything is ready at once” problem.
Step 5: Use a Simple Crop List Template
Fill in these items for each crop:
- Crop name
- Expected harvest window
- Container size (or tray size)
- Spacing approach (thin as needed or sow densely for baby leaves)
- Watering style (keep evenly moist vs. allow slight drying)
- Light height sensitivity (low, medium, high)
This prevents the common beginner mistake of treating every plant like it has the same needs.
Mind Map: First Grow Crop List Logic
Example: A Two-Crop Beginner Plan
- Anchor: lettuce in a shallow tray or several small containers.
- Support: radishes in a separate tray.
Reasoning: lettuce teaches you leaf growth and harvesting without needing fruiting conditions. Radishes give you a clear milestone and show whether watering is too wet or too dry.
Planting approach:
- Sow lettuce densely if you plan baby leaves, or thin to spacing if you want larger heads.
- Sow radishes with consistent spacing so roots form evenly.
Care approach:
- Keep moisture even for both crops, but don’t flood. If the top layer stays soggy for long periods, reduce watering frequency.
- Adjust light height if plants stretch. Stretching is usually a light intensity or distance issue, not a “nutrients are missing” issue.
Example: Microgreens Plus Herbs for a Small Closet
- Anchor: chives in a small container.
- Support: microgreens in a tray.
Reasoning: microgreens provide quick harvest practice, while chives are forgiving and keep producing after cutting.
Care approach:
- Microgreens: focus on even moisture and gentle airflow to prevent damping-off.
- Chives: water when the top layer starts to dry, and harvest gradually so the plant keeps growing.
Quick Checklist Before You Plant
- Your crop list includes one anchor and one support.
- You can name the first harvest date range for each crop.
- Your containers match the crop’s root depth needs.
- Your watering plan is consistent with the media you’re using.
- You’re not trying to learn everything at once—just enough to get a reliable first cycle.
2. Selecting Your Closet, Space Layout, and Workflow
2.1 Measure Your Closet Accurately and Account for Door Clearance
Accurate measurements prevent the most common closet-farming frustration: everything fits on paper, then the door hits the light, the fan can’t be mounted, or the plants end up too close to the wall for airflow. Start with a quick “fit check” mindset: you’re measuring for clearances, not just area.
What to Measure First
Measure in this order so you don’t waste time redoing work.
- Inside width and depth: Measure the usable interior space at plant height, not just at the floor. Closets often narrow due to baseboards, shelves, or curved walls.
- Inside height: Measure from the floor to the lowest obstruction (shelf underside, ceiling vent, hanging rod, or light fixture). If you plan to hang a light, measure the height where the light will sit.
- Door opening geometry: Measure the door’s swing arc and the maximum opening width at the moment the door is fully open. A closet can be “wide enough” but still block the front of the grow area.
- Obstructions: Note anything that reduces usable space: closet rods, hooks, built-in shelves, electrical outlets, and any wall seams.
- Plant clearance: Decide the maximum plant height you want at maturity, then add clearance for light distance, airflow, and harvest access.
Door Clearance That Actually Matters
Door clearance is more than “will the door open.” You need to know whether the door can open without scraping the light, fan duct, or hanging straps.
Measure three distances:
- Front clearance at the light level: Measure from the closet’s interior edge to where the door would pass at the height of your light.
- Front clearance at the plant level: Measure at the height you expect to harvest (for leafy greens, this might be 8–12 inches; for taller herbs, more).
- Front clearance at the equipment level: If you mount a fan or filter near the top, measure clearance at that height too.
If you’re using a hanging light, also measure the light’s projected footprint. Even if the light clears the door, the hanging hardware might not.
A Simple Measurement Workflow
Use a tape measure, a notebook, and one helper if possible.
- Draw a rough floor plan: Sketch the closet rectangle and label the door location.
- Mark the door swing: With the door fully open, trace the arc on your sketch. This shows where equipment cannot be placed.
- Add equipment zones: Reserve a “no-install” strip along the door swing path.
- Record heights: Write down inside height at three points: left, center, right. Record the lowest point.
- Check access: Stand where you’ll harvest. Measure how far your hands can reach without leaning into the plants.
Mind Map: Closet Measurements for a Working Layout
Example: A Closet That Looks Big Enough
Assume your closet interior is 24 inches wide and 18 inches deep. The door opens to 20 inches, but the light hangs 10 inches from the front edge.
- If the door swing arc crosses the light’s hanging hardware, the door will scrape it even though the plants would fit.
- If your fan duct runs near the top front, the door may still clear the plants but not the duct.
Fixes are straightforward once you measure correctly:
- Move the light slightly inward and reduce the hanging hardware length.
- Shift the grow area deeper so the door swing path stays empty.
- Place the fan and duct along a side wall rather than the front.
Example: Measuring Height Without Guessing
You want leafy greens at 10 inches tall. Your light needs a buffer of 6–8 inches above the canopy for safe operation and even coverage. If the closet’s lowest obstruction is 70 inches high and you mount the light at 60 inches, you have 10 inches for plants plus 0 inches for adjustment. That’s tight.
Instead, measure the lowest obstruction, then subtract:
- light mounting height
- light-to-canopy buffer
- a small adjustment margin for leveling
Write the numbers down. When you do, “tight” becomes a specific problem you can solve.
Quick Checklist Before You Buy Anything
- I measured width and depth at plant height, not just the floor.
- I measured the lowest interior height at multiple points.
- I traced the door swing arc and marked a no-install strip.
- I checked clearance at light height, plant height, and equipment height.
- I confirmed I can open the door fully without touching hanging hardware.
Once these are recorded, the rest of the setup becomes a matter of choosing equipment that fits your measured reality.
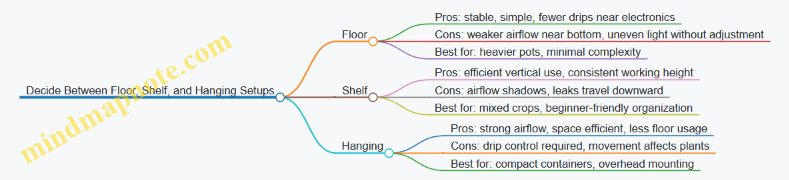
2.2 Decide Between Floor, Shelf, and Hanging Setups
Your closet farm’s layout is mostly a trade between space efficiency, ease of maintenance, and how evenly you can deliver light. The “best” setup is the one you can keep consistent for weeks, not the one that looks most impressive on day one.
Floor Setups
A floor setup uses the bottom of the closet for containers, trays, and any system that needs stability. It’s the simplest to start with because you can place everything at a comfortable working height by using short shelves or a low table.
When floor wins
- You’re growing heavier containers like larger soil pots.
- You want fewer moving parts and less risk of drips landing on electronics.
- You plan to use a simple watering approach with a catch tray.
What to watch
- Air tends to be less consistent near the floor, so seedlings may grow slower or unevenly.
- If your light is mounted high, floor plants can receive less uniform illumination unless you use multiple smaller light sources or adjust height carefully.
Concrete example A 24" x 48" closet holds four 6" pots on a waterproof tray. You mount a single LED bar above, keep the canopy 10–14" from the light, and rotate the tray weekly. The rotation compensates for the natural light falloff near the edges.
Shelf Setups
Shelf setups use one or more horizontal levels. This is usually the most practical choice for beginners because it balances access, light distribution, and efficient use of vertical space.
When shelves win
- You want multiple crop types at once, like leafy greens on the top shelf and herbs below.
- You can mount lights per shelf or use a light that covers both levels evenly.
- You prefer working at a consistent height without bending deeply.
What to watch
- Stacking shelves can create airflow shadows, where the lower shelf stays cooler and damper.
- Water management becomes more important; a small leak on an upper shelf can become a repeated problem.
Concrete example You install two shelves with a 16" gap between them. You place shallow trays of lettuce on the top shelf and seedling cups on the bottom shelf. Each shelf has its own drip tray and a small fan aimed across the canopy. The separate trays let you remove one shelf for harvesting without disturbing the other.
Hanging Setups
Hanging setups suspend plants from above using hooks, rails, or a hanging rack. This approach is space-efficient and can improve airflow around the foliage.
When hanging wins
- You’re growing compact plants in small containers or net pots.
- You want strong airflow and minimal floor clutter.
- Your closet has good overhead mounting points.
What to watch
- Water and nutrient solutions can drip unpredictably, so you need a reliable catch system.
- Hanging plants can swing slightly when you open the door, which can disturb seedlings and shift light exposure.
Concrete example You hang a row of 5" net pots in a simple vertical rack above a large catch basin. A drip line feeds each pot, and the basin drains into a reservoir. You add a short baffle under the rack to prevent splashing when you harvest.
Quick Comparison Mind Map
Choosing Based on Your Constraints Mind Map

A Simple Decision Checklist
Use this checklist to pick a layout that matches your habits:
- Can you reach every plant without moving the whole setup?
- Do you have a clear path for runoff to land in a catch tray or basin?
- Can you keep the canopy height consistent relative to the light?
- Will airflow reach the middle of the plant mass, not just the edges?
If you’re unsure, start with a shelf setup. It’s the easiest way to gain vertical space while keeping maintenance straightforward—like having a kitchen counter instead of working on the floor.
2.3 Create a Work Zone for Watering, Harvesting, and Cleaning
A closet farm works best when you treat it like a small kitchen: plants live in the “prep area,” and you keep tools and mess in a predictable “work zone.” In a tight space, the work zone is less about having room and more about reducing backtracking, spills, and missed chores.
Define the Work Zone Boundaries
Pick one side of the closet (or one adjacent counter) as the work zone. The boundary should be where you can reach plants without stepping into the growing area. A practical rule: if you have to twist your body to reach the back row, you’ll eventually knock something over.
Use three zones, even if they’re small:
- Clean zone: dry tools, gloves, labels, and a tray for harvested items.
- Wet zone: watering container, nutrient measuring cup, and a catch tray.
- Dirty zone: used wipes, empty plant debris, and a small trash bin.
Keep the wet zone closest to where water will land. If your watering can or bottle has to travel across the closet, you’ll eventually water the floor, the floor will eventually get algae, and algae will eventually get everywhere.
Choose a Catch System That Prevents “Floor Farming”
Water control is the heart of the work zone. Decide how you’ll catch drips before they leave the growing footprint.
Common options:
- Under-tray catch: Place every container inside a tray with a lip. For soil grows, use trays that can hold a few cups without overflowing.
- Runoff collection: If you use soilless media or frequent feeding, add a secondary pan under the main tray.
- Wipe-first workflow: Keep a roll of paper towels or microfiber wipes in the wet zone so you can clean drips immediately.
Example: If you grow lettuce in small pots, set each pot in a shallow tray. When you water, pour slowly until the top looks evenly damp, then stop. Any extra drains into the tray, and you empty it after the light cycle so the area stays dry.
Organize Tools by Task, Not by Brand
Tools should be staged so you can complete a task in one pass.
Create a “watering kit” and a “harvest kit.”
- Watering kit: watering can or squeeze bottle, measuring cup, gloves (optional), and a small notebook or phone notes for what you fed and when.
- Harvest kit: clean scissors or snips, a harvest tray, and a damp towel for wiping tools if you switch between crops.
Keep frequently used items at hand height. If your watering bottle lives on the top shelf, you’ll either skip watering or spill it. The work zone should reduce decisions, not add them.
Set a Simple Cleaning Routine That Matches Your Workflow
Cleaning should happen right after the mess, not later when you’re tired.
A workable rhythm:
- After watering: quick wipe of any drips on trays and the floor edge.
- After harvesting: remove plant debris immediately and wipe the harvest tray.
- Weekly: sanitize tools and empty catch trays fully. If you use soil, check for compacted debris in corners.
Example: When you harvest herbs, cut stems into the harvest tray, then wipe the scissors with a damp wipe before moving to the next plant. That small habit reduces the chance of transferring disease-causing organisms between plants.
Plan for Water, Drainage, and Disposal
Decide where water goes before you start watering.
- Drain location: Use a sink, a bucket, or a designated drain pan outside the closet. If you must carry a bucket through the room, use a bucket with a lid or a stable handle.
- Disposal: Keep a small bag or bin for plant waste in the dirty zone. If you leave debris in the clean zone, you’ll eventually mix it with harvested produce.
If you’re using nutrient solutions, label the container and keep it separate from plain water. Mixing them accidentally is easy when you’re working quickly.
Mind Map: Work Zone Layout and Flow
Example: A One-Closet Setup That Stays Tidy
Imagine a closet with shelves and a small floor area beside the door.
- Put a shallow catch tray under the shelf where you water.
- Keep a watering bottle and measuring cup on a small mat in the wet zone.
- Store scissors and a harvest tray in the clean zone.
- Place a lidded trash bin in the dirty zone.
When you water, you pour into the pot slowly, watch for runoff into the tray, then wipe the shelf edge. When you harvest, you cut into the harvest tray, remove debris immediately, and wipe the scissors. When you finish, you empty catch trays and wipe the wet zone mat.
This setup doesn’t require perfect discipline. It just makes the right actions the easiest actions.
2.4 Manage Airflow Paths to Prevent Stagnation and Mold
Airflow is the difference between “plants are breathing” and “plants are sitting in a warm, damp pocket.” In a closet farm, you want air to move in a predictable loop: fresh air enters, passes the canopy, and exits without creating dead zones where humidity lingers.
Understand What Causes Stagnation
Stagnation happens when air can’t reach certain corners, shelves, or the space behind leaves. Mold spores don’t need much; they need moisture plus time. If your exhaust pulls air from only one spot, the rest of the closet can become a slow-moving swamp.
A quick diagnostic is to watch where condensation forms. If you see recurring dampness near a wall, on the back of a shelf, or around a vent opening, that area is likely a low-flow zone.
Design a Simple Air Path
Aim for a clear direction: intake at one side, airflow across the plants, exhaust at the opposite side or near the top. Heat rises, so warm air often collects near the ceiling; exhausting high helps remove that heat before it spreads.
Use this practical rule: place the intake so air is forced to travel through the plant area, not just into the empty space above it.
Example setup:
- Intake: small vent or passive opening near the lower front corner.
- Air movement: a clip fan aimed to push air across the canopy, not directly at one leaf.
- Exhaust: inline fan pulling from the upper back corner.
This creates a “front-to-back, low-to-high” flow that reduces corners where humidity can pool.
Use Fans Correctly Without Drying Everything
Fans don’t just “circulate”; they shape airflow patterns. A fan pointed straight at the canopy can cause uneven drying: leaves closest to the fan may crisp while the far side stays damp.
Instead, aim for gentle, consistent movement across the whole grow area. Oscillating fans can help, but in small closets they may create alternating dead zones if the airflow is blocked by shelves.
Example: If you have two shelf levels, mount one small fan per level or use a single fan with a duct or deflector so each shelf gets airflow. One fan for both levels often leaves the upper shelf with weaker movement.
Prevent Short-Circuiting
Short-circuiting occurs when intake air goes straight to the exhaust without passing through the plants. You’ll notice this when humidity stays high even though the exhaust is running.
To prevent it:
- Separate intake and exhaust openings as much as the closet layout allows.
- Avoid placing the exhaust directly behind the intake.
- Use baffles or ducting to guide air through the plant zone.
Example: If your intake is a vent near the top and your exhaust is also near the top, add a simple internal baffle so air is directed downward across the canopy before it rises to exit.
Manage Airflow Around Obstacles
Shelves, trellises, and dense foliage block airflow like furniture blocks a hallway. Air will take the easiest route, which is often around the plants rather than through them.
Plan for “air channels.” Leave space between the plant mass and the walls, and avoid stacking containers so tightly that leaves form a solid barrier.
Example: For leafy greens in multiple rows, keep a narrow gap between the back row and the wall. That gap becomes a channel where air can move behind the leaves.
Balance Humidity and Air Movement
Airflow helps by removing boundary-layer moisture from leaf surfaces. But too much airflow can lower humidity so quickly that plants dry out and tip-burn becomes more likely.
Use a target approach:
- If humidity is consistently high, increase airflow across the canopy.
- If leaves are drying too fast or edges brown, reduce fan intensity or redirect airflow so it’s less direct.
Example: If your hygrometer reads 70–80% and you see fuzzy growth on older leaves, increase canopy airflow first. Remove the affected leaves immediately, then adjust airflow so the canopy dries more evenly.
Build a Quick Verification Routine
You don’t need fancy tools to confirm airflow paths. Use a simple method:
- Turn on your fans.
- Hold a thin strip of tissue or a smoke-free vapor source near corners and behind leaves.
- Watch whether the air strip moves steadily or hangs in place.
If a corner shows little movement, that’s a dead zone. Fix it by repositioning the clip fan, adding a small deflector, or changing the intake/exhaust placement.
Common Mistakes and Fixes
- Mistake: Exhaust too small or too far from the plant area. Fix: Move exhaust closer to the top of the plant zone or increase ducting efficiency.
- Mistake: Fan aimed at one spot. Fix: Re-aim to sweep across the canopy, or add a second fan for separate levels.
- Mistake: Plants pressed against walls. Fix: Create a small clearance so air can pass behind leaves.
Mind Map: Airflow Paths for Mold Prevention
Example: Two-Shelf Closet Layout
A two-shelf closet often fails because the upper shelf becomes a humidity pocket. Use this layout:
- Intake: lower front vent.
- Fan 1: aimed to push air across the lower shelf.
- Fan 2: aimed to push air across the upper shelf.
- Exhaust: upper back inline fan.
After setup, run the tissue test at the back corners of both shelves. If the upper back corner barely moves, add a small deflector behind the upper shelf so air is pushed forward before it rises to the exhaust.
2.5 Build a Layout That Supports Easy Access to Plants
A closet farm layout should let you reach every plant without turning the whole system into a puzzle. “Easy access” is not about comfort alone; it reduces mistakes like missed pests, uneven watering, and delayed harvesting. Start by designing for the three moments you’ll repeat most: checking, watering, and harvesting.
1) Map Your Access Routes
Choose one primary access path from the closet door to the back wall. Keep it clear so you can open the door, reach in, and work without shifting containers. If you use shelves, place the most frequently handled plants at the easiest reach height.
A practical rule: if you can’t touch the soil surface or leaf base with your hand in a single motion, you’ll eventually skip that plant during routine checks.
2) Use Zones Instead of a Single “Plant Area”
Divide the interior into zones with distinct jobs.
- Plant Zone: Where containers sit and where you’ll inspect leaves.
- Water Zone: Where you can pour, refill, or drain without splashing the rest.
- Tools Zone: Where you store scissors, gloves, labels, and a small towel.
Even a small closet benefits from this separation. When watering and tools share the same space, you’ll inevitably drip water onto tools or knock containers while searching for something.
3) Plan Container Placement for Reach and Light
Arrange containers so you can access the top and sides. For shelf setups, stagger containers slightly so you can see leaf undersides without leaning awkwardly.
If you use a single light bar, keep the plant canopy aligned under it. Uneven canopy height forces you to reach around taller plants to check shorter ones, which is how problems hide.
Example: On a three-shelf unit, put leafy greens on the middle shelf first. They’re harvested often, and their leaves show early signs of nutrient or pest issues. Put slower crops on the top or bottom shelves where you’ll check them less frequently.
4) Leave “Working Clearance” Around the Door
The door area is where you’ll bump things. Create clearance for:
- opening the door fully
- reaching the front row of plants
- placing a tray or bucket during watering
If you mount fans or ducting near the door, ensure they don’t block your hand. A fan that’s great for airflow can still be a nuisance if it forces you to work from an awkward angle.
Example: If your ducting runs along the top front, keep the first container row at least a few inches back from the duct so you can access the soil without hitting the tubing.
5) Make Water Containment Part of the Layout
Water spills are layout problems, not user problems. Use a drip tray or waterproof base that extends under the entire plant zone. If you use fabric pots, plan for extra runoff and place them on trays with raised edges.
Position a drain or catch point where you can remove liquid without carrying it through the plant zone. If you can’t drain easily, you’ll delay maintenance, and delayed maintenance is where fungus and algae start.
Example: Put a shallow catch tray under the lowest shelf and keep a small siphon or turkey baster within reach. You can remove excess water without moving containers.
6) Design for Harvesting Without Disturbing Neighbors
Harvesting is where plants get knocked over. Leave space between containers so you can cut or pull without brushing adjacent leaves. If you grow herbs, consider placing them in clusters with enough gap for scissors to fit.
Example: For basil, keep individual pots slightly separated rather than tightly packed. You’ll be able to remove leaves without tearing stems or bending neighboring plants.
7) Add a Simple “Checkpoints” Routine
A layout supports access when it supports routine. Put your most important checkpoints where your eyes naturally land.
- Front-left: leaf inspection for pests
- Front-right: soil moisture check
- Back-center: airflow and condensation check
This reduces the chance you’ll forget a corner. Corners are where humidity collects and where you’ll notice issues too late.
Mind Map: Layout Priorities
Example: Two Layouts That Work
Layout A: Shelf Closet with Front Access
- Middle shelf holds leafy greens and herbs.
- Lowest shelf holds slower crops or seedlings.
- Tools sit on a small hook or bin at the door side.
- Watering is done at the front water zone using a tray.
Layout B: Single Tier with Floor Trays
- One continuous plant surface under the light.
- A dedicated water corner at one side with a catch tray.
- Containers are arranged in rows with hand space between them.
Quick Checklist for “Easy Access”
- Can you reach every plant without moving other containers?
- Can you water without splashing the tools or the door area?
- Can you harvest without bending neighboring leaves?
- Are the most important inspection points visible from the door?
- Is there a clear path for your hand and a clear place for runoff?
If you can answer “yes” to these, your layout will support consistent care. Consistency is what turns a closet setup from a one-time project into a dependable routine.
3. Essential Equipment and Cost-Effective Choices
3.1 Lighting Options and How to Match Light to Crop Needs
Lighting is the main “engine” of closet farming. It drives photosynthesis, which then determines how fast plants grow and how compact they stay. The trick is matching the light’s intensity, spectrum, and timing to what your crop needs—without cooking your plants or turning your closet into a heat box.
Light Intensity and Distance
Most beginner setups fail because the light is either too far (weak growth) or too close (leaf stress). Intensity depends on the fixture type and the distance to the canopy. A practical approach is to start at a safe working distance, then adjust after you observe plant response.
Easy observation cues:
- Too little light: slower growth, larger spacing between leaves, and pale or dull color.
- Too much light: leaf edges curling, bleaching on the top surfaces, or plants that look “washed out.”
For leafy greens and herbs, aim for steady, even coverage. Uneven coverage shows up as one side growing faster, so keep the light centered and consider a reflector or diffuser if your fixture creates hot spots.
Spectrum and Why It Matters
Plants use different wavelengths for different jobs. You don’t need to memorize physics, but you do need to understand the pattern.
- Blue light helps keep plants compact and supports leaf development.
- Red light supports flowering and fruiting, and it also contributes strongly to overall growth.
- Full-spectrum LEDs combine multiple bands so you can grow many crops without swapping fixtures.
If you’re growing mostly leafy greens and herbs, you can often get excellent results with a fixture that emphasizes blue and red. If you’re growing fruiting crops like peppers or tomatoes, you’ll want more red contribution so the plants have the light they need to transition and set fruit.
Lighting Types for Closets
LED grow lights are popular for a reason: they produce usable light efficiently and generate less heat than many alternatives. They also come in compact forms that fit shelves.
Fluorescent lights (including T5-style fixtures) are simple and forgiving for seedlings and small leafy crops. They can work well in a closet, but they often require more careful placement because coverage can be narrower.
High-intensity discharge lights can grow plants, but they’re usually harder to manage in small spaces due to heat and power needs. In a closet, you’ll spend more time controlling temperature and ventilation than you will growing.
Photoperiod and Timing
Plants don’t just need light; they need the right amount of time. Leafy greens and many herbs typically do well with a consistent daily schedule. Fruiting crops often need longer days to support flowering and fruiting.
A simple rule: keep the schedule consistent. If you run lights for 14 hours one day and 10 the next, plants respond with uneven growth.
Practical starting points:
- Seedlings and transplants: shorter days at first, then increase as plants establish.
- Leafy greens and herbs: moderate daily light duration.
- Fruiting crops: longer daily light duration once plants are established.
Adjust based on your observations. If plants stretch, increase light intensity or duration slightly. If leaves bleach or curl, reduce intensity or shorten the day.
Coverage and Canopy Management
Closet farming is a geometry problem. Your goal is to keep the canopy within the effective light zone.
- Use shelves or plant stands to maintain a consistent distance from the light.
- For taller plants, consider staggered heights so the tallest leaves don’t end up in the “too close” zone.
- Rotate trays or pots every few days if your fixture has a directional output.
Mind Map: Matching Light to Crop Needs
Example: Leafy Greens Under an LED Panel
You set up an LED panel centered above a shelf with lettuce and arugula. Start with the light at a conservative distance so you don’t scorch tender leaves. Run a consistent daily schedule.
After a week, check three things:
- Leaf color: should look healthy and not washed out.
- Leaf spacing: should be tight enough that plants don’t look leggy.
- Uniformity: tops should look similar across the tray.
If plants are pale and slow, lower the light slightly or increase daily duration. If the top leaves bleach while lower leaves look fine, raise the light a bit or reduce time.
Example: Seedlings on Fluorescent T5 Bars
For a tray of seedlings, fluorescent bars can be placed closer because they run cooler than many alternatives. Keep the light close enough to prevent stretching, but not so close that leaves contact hot surfaces.
As seedlings grow, raise the tray rather than dropping the light. This keeps intensity stable and reduces the “one day it’s perfect, next day it’s too weak” problem.
Example: Fruiting Crops with Red-Heavy Output
For peppers or tomatoes, use a fixture that provides stronger red content. Start with a moderate schedule while plants are still establishing, then increase daily light time once they’re sturdy.
If flowering starts but fruit set is weak, don’t immediately change everything. First verify that the canopy is staying within the effective light zone and that the schedule is consistent. Then adjust intensity or duration based on leaf response.
Quick Checklist for Choosing and Setting Light
- Pick a fixture that matches your crop mix: leafy-focused or full-spectrum, with more red for fruiting.
- Start with safe distance, then adjust using leaf color and spacing.
- Keep a consistent daily schedule.
- Ensure even coverage by centering, rotating, and controlling canopy height.
- Use observation to guide changes: distance first, then duration.
3.2 Ventilation Components and How to Size Them
Ventilation in a closet farm is mostly about moving air in a controlled way: fresh air comes in, stale air leaves, and the plants get a stable environment instead of a drafty guessing game. The goal is to manage heat, humidity, and airflow patterns so leaves dry at a reasonable pace and equipment doesn’t overheat.
What Ventilation Needs to Do
Start by separating three jobs that often get lumped together.
- Heat removal: Lights and fans add heat. If the closet can’t shed it, temperature rises and growth slows.
- Humidity control: Transpiration increases moisture. Without exhaust, humidity climbs and fungal problems become more likely.
- Air mixing: Stagnant pockets create uneven leaf conditions. A gentle, consistent circulation helps plants behave more uniformly.
A common beginner mistake is using one fan for everything. In practice, you want exhaust to remove heat and moisture, and circulation to prevent dead zones.
Core Components
Exhaust fan: Pulls air out of the closet. Size it based on heat and humidity needs, not just closet volume.
Intake path: A passive vent, duct, or small fan that lets air enter. If intake is too small, the exhaust fan works harder and airflow becomes noisy and uneven.
Ducting: Connects the fan to the exhaust outlet. Longer runs and sharp bends reduce effective airflow.
Carbon filter (optional): Used when odor matters. It adds resistance, which means you must size the fan for reduced airflow.
Circulation fan: Moves air inside the closet without removing it. It should create a light breeze across the canopy, not blast directly at seedlings.
Sensors: A thermometer and humidity meter help you verify that your sizing choices actually match reality.
How to Size Exhaust Airflow
Sizing starts with a practical target: how many times per hour you exchange air. For closet grows, you typically aim for about 1 to 2 air changes per hour as a baseline, then adjust based on temperature and humidity behavior.
Step 1: Calculate closet volume
- Volume (cubic feet) = length × width × height (in feet)
Step 2: Choose a baseline air change rate
- Start with 1 air change per hour for mild conditions.
- Use 2 air changes per hour if humidity tends to spike or heat is significant.
Step 3: Convert to CFM
- CFM ≈ (Volume × air changes per hour)
Step 4: Add real-world losses
- Duct length, bends, and filter resistance reduce airflow.
- If your setup includes a carbon filter, plan for a noticeable drop in delivered CFM.
A simple rule: if the fan’s rated CFM is much higher than what you need, you can often run it at a lower speed. If it’s only barely enough, you’ll struggle to control humidity.
Example: Sizing for a Small Closet
Assume a closet that is 2 ft × 2 ft × 6 ft.
- Volume = 2 × 2 × 6 = 24 cubic feet
Baseline airflow:
- At 1 air change per hour: CFM ≈ 24 × 1 = 24 CFM
- At 2 air changes per hour: CFM ≈ 24 × 2 = 48 CFM
If you use a carbon filter and ducting with a few bends, you might find the delivered airflow is lower than the fan rating. In that case, selecting a fan that can comfortably cover the 48 CFM target gives you room to dial it down.
Intake Sizing and Pressure Balance
Exhaust fans don’t create air; they move it. If intake is restricted, the closet becomes slightly negative pressure, which can reduce airflow and increase noise.
Practical intake guidance:
- Match intake area to exhaust duct area as closely as possible.
- If using a passive intake vent, ensure it’s not a tiny slit.
- If you must use a ducted intake, keep the run short and avoid tight bends.
Circulation Fan Placement
Circulation fans handle mixing, not exhaust. Place them so air moves across the canopy and then returns toward the exhaust side.
Good placement patterns:
- One fan near the top aimed to sweep across leaves.
- Avoid direct, continuous blasting at seedlings.
- If you see leaves drying unevenly, adjust the fan angle rather than increasing exhaust.
Mind Map: Ventilation Components and Sizing Inputs
Mind Map: Sizing Logic from Volume to Delivered Air

Quick Sizing Checklist
- Measure closet dimensions and compute volume.
- Decide whether you need 1 or 2 air changes per hour as a starting point.
- Include ducting and carbon filter losses in your fan choice.
- Ensure intake is not the bottleneck.
- Use circulation fans to even out airflow across the canopy.
- Confirm with temperature and humidity readings after the lights run for a while.
3.3 Fans, Ducting, and Carbon Filtration for Odor Control
Odor control in a closet farm is mostly about moving air through the right path, at the right rate, and for long enough. The goal is simple: pull air from the plant zone, filter it, then exhaust it out of the closet without creating dead zones where stale air collects.
Fan Selection and Placement
Start with a fan that can move air consistently rather than one that’s oversized and noisy. A practical approach is to match the fan to your closet volume and target a few air changes per hour. If you’re unsure, begin with moderate airflow and adjust after you observe humidity and temperature behavior.
Placement matters. Put the intake side where air is likely to be warm and humid—usually near the top of the grow area—because warm air rises. If your closet has a door, avoid pulling air directly from the door gap; instead, create a clear circulation path inside the closet so the fan draws air that has actually passed over the plants.
A common beginner mistake is mounting the fan so it “works,” but the duct run forces air to fight sharp bends. Every bend adds resistance, which reduces actual airflow at the filter.
Ducting Basics for Reliable Airflow
Use smooth, rigid ducting when possible, or quality flexible ducting that doesn’t collapse. Keep duct runs short and minimize elbows. If you must use bends, use gradual curves rather than tight turns.
Seal duct joints with appropriate tape or clamps so air doesn’t leak before it reaches the carbon filter. Leaks are sneaky: you may still see plants growing fine while odor escapes through the closet walls.
Route ducting so it doesn’t touch hot surfaces or create kinks when the closet door closes. Also plan for condensation. If your exhaust air is cooler than the surrounding space, moisture can collect in the duct. A slight downward slope toward the exhaust end helps prevent pooling.
Carbon Filtration for Odor Control
Carbon filters work by adsorption: odor molecules stick to the carbon surface. That means airflow rate and contact time both matter. If you push too much air through too quickly, the carbon can’t capture as much odor per pass.
Mount the carbon filter upstream of the exhaust fan so the fan pulls air through the carbon bed. This arrangement keeps the filter under negative pressure, which reduces the chance of odor leaking from the filter housing.
Check the filter orientation and ensure the airflow arrow direction matches the actual flow. If your filter has a pre-filter sleeve or mesh, keep it in place; it catches dust that would otherwise clog the carbon and reduce performance.
Balancing Airflow and Plant Comfort
Odor control is not only about carbon. You also need enough fresh air movement to prevent stagnant pockets. Use a small circulation fan inside the grow area to keep leaves gently moving, but don’t rely on it to replace exhaust. The exhaust fan is what actually removes air from the closet.
A good rule of thumb is to separate functions: circulation fan moves air within the closet; exhaust fan removes air from the closet. When both are doing the right job, you get fewer humidity spikes and more predictable odor control.
Mind Map: Fans, Ducting, and Carbon Filtration
Example: Quiet Closet Setup with Effective Odor Control
Imagine a closet grow with a small grow shelf and a single exhaust path. You mount a carbon filter at the top rear of the closet, connect it to a short duct run that exits through the ceiling or wall, and place the exhaust fan after the filter. Inside the closet, you add a low-speed circulation fan aimed to gently stir the canopy.
You then test airflow with a simple tissue or lightweight strip near the exhaust opening. If the tissue barely moves, the duct run is too restrictive or the fan is undersized. If the tissue flutters strongly but humidity still rises, the issue may be insufficient internal circulation rather than exhaust capacity.
Finally, you check for odor leaks by standing outside the closet during the light cycle and after watering. If odor is noticeable near seams or duct joints, seal leaks first before changing the carbon filter. Carbon is for odor capture; duct sealing is for odor containment.
Example: Fixing a Common Ducting Problem
A beginner setup uses a long flexible duct with several tight bends. The plants look fine, but the closet smells after watering. The airflow is likely reduced by duct resistance, so the carbon sees less effective flow through the filter.
The fix is practical: shorten the duct run, replace tight bends with gradual curves, and reseal joints. After the change, re-check airflow at the exhaust outlet and confirm the closet no longer smells during normal operation.
Quick Checklist for This Section
- Fan pulls air from the plant zone, not from random gaps
- Duct runs are short with minimal bends
- Duct joints are sealed to prevent odor leaks
- Carbon filter is placed before the exhaust fan
- Pre-filter is installed and kept clean
- Circulation fan handles internal movement; exhaust handles removal
3.4 Growing Containers, Trays, and Water Containment
Containers and trays are where your system either behaves or quietly makes a mess. In a closet, the goal is simple: keep roots happy, keep water where it belongs, and make cleanup fast enough that you’ll actually do it.
Container Types and What They’re Good At
Fabric pots breathe well and help prevent waterlogged roots. They also dry faster, which is helpful if your closet runs humid. A practical example: grow basil in a fabric pot and check moisture daily at first; you’ll learn your closet’s drying speed quickly.
Plastic nursery pots are predictable and easy to find. They hold water longer, which can be good for leafy greens that like steady moisture. Example: start lettuce in plastic pots, then move them to a tray with a shallow reservoir so you can water from below without flooding.
Rigid grow buckets or tubs work well for soilless media or larger plants. They’re stable and easy to drill for drainage. Example: use a lidded storage tote as a container only if you add a proper drain path and never rely on “mostly dry” as a plan.
Seedling trays and cell packs reduce mess during germination. Use them with a humidity dome if you like, but keep the tray on a catch surface so condensation doesn’t become a puddle.
Drainage Rules That Prevent Root Problems
Most indoor failures come from water staying in the wrong place. Use these rules:
- Every container needs drainage. If it doesn’t drain, it’s not a container—it’s a swamp.
- Use a catch layer. The catch layer should be separate from the growing medium so you can remove or empty it.
- Avoid standing water touching the pot’s base for long periods unless your system is designed for it.
A simple test: after watering, wait 10–15 minutes, then check whether water is still pooling at the bottom. If it is, you either need better drainage holes, a different tray height, or a different watering method.
Tray Design and Catchment Strategies
Trays come in two jobs: catching runoff and supporting airflow. Choose based on how you water.
Shallow runoff trays are best for top-watering. They should be wide enough to catch splashes and tall enough to hold runoff without overflow. Example: place multiple small pots on a single tray, but keep them spaced so leaves don’t sit in wetness.
Elevated trays or racks improve airflow under pots. This reduces fungus risk because the underside dries faster. Example: set plastic pots on a wire rack inside a larger waterproof tub; the tub catches water, while the rack keeps the pot base from sitting in it.
Bottom-watering trays work for seedlings and some leafy crops. Use a tray that can be filled and then drained. Example: for cell packs, fill the tray with a thin layer of water, wait until the top looks evenly moist, then empty the tray.
Water Containment for Real Life Closets
Containment is about preventing leaks during watering, accidental overflows, and condensation. A good setup uses multiple layers:
- Primary catch: a waterproof tray or tub under everything.
- Secondary barrier: a liner or drip mat that catches small spills.
- Leak-proof watering habits: water slowly and aim at the medium, not the leaves.
If your closet has a door that swings or a floor that slopes slightly, add a raised edge or choose a tub with corners that hold water. Example: a shallow tray can slide a bit when you open the door; a deeper tub reduces the chance of runoff escaping.
Choosing Materials That Don’t Turn into Problems
Food-safe plastic tubs are common and easy to clean. Look for smooth surfaces so algae doesn’t cling.
Metal trays can work, but ensure they’re coated or protected from corrosion. If you use metal, dry it thoroughly after cleaning.
Wood or unsealed materials are risky because they absorb water and become hard to sanitize.
For cleaning, choose containers that you can scrub without damaging coatings. A tray that’s “almost clean” is a tray that will eventually grow something.
Mind Map: Containers, Trays, and Containment
Example: A Simple Setup That Works
Use three layers: cell packs on a small seedling tray, that tray sits on a shallow waterproof catch tray, and the catch tray sits inside a larger plastic tub. When you water from above, the catch tray captures runoff. When you water from below, you fill the shallow tray, wait for even moisture, then empty it. This arrangement keeps water contained even if you spill a little while moving the tub to harvest.
Example: Preventing Overflow During Busy Weeks
If you’re away from the closet for a day, overflow risk rises. Reduce it by watering less frequently but more precisely: water until the medium is evenly moist, then stop. After 10–15 minutes, empty the catch tray if it has pooled water. This keeps the system from turning into a slow leak that you only notice when the floor is wet.
3.5 Thermometers, Hygrometers, and Basic Monitoring Tools
Closet farming is mostly about controlling a few variables: light, air, water, and time. Monitoring tools help you confirm what’s happening instead of guessing. In a small space, a small measurement error can lead to big plant consequences, so the goal is simple: measure the right things, place sensors correctly, and use readings to make practical adjustments.
What to Measure First
Start with three measurements that cover most beginner problems.
- Air temperature: Affects growth speed and how much water plants use.
- Relative humidity: Influences transpiration and disease risk.
- Optional soil or media temperature: Helps explain slow germination or stressed roots.
If you only buy one device, choose a thermometer first. If you buy two, add humidity. If you buy three, include media temperature.
Thermometers That Don’t Lie
A thermometer is only useful if it’s measuring the air your plants actually experience.
- Place it at canopy height for leafy crops. If your light is close, the air near the leaves can be warmer than the closet’s upper area.
- Avoid direct light and airflow jets. A sensor sitting in the path of a fan can read cooler or warmer than the surrounding air.
- Use a second check if you’re unsure. Compare two thermometers for a day; if they disagree wildly, fix placement before troubleshooting plants.
Example: If your thermometer reads 82°F during the light cycle but your plants look fine, the sensor may be too close to the lamp. Move it to the same height as the top leaves and re-check.
Hygrometers That Match Your Reality
Humidity readings can be surprisingly sensitive to placement and condensation.
- Keep the sensor away from wet surfaces like a drip line or a tray that’s actively evaporating.
- Don’t let it touch plastic walls. Condensation on a wall can make the sensor read higher than the air.
- Calibrate if possible. Many hygrometers drift over time, especially in warm, humid conditions.
Example: If humidity spikes to 90% right after watering, that might be normal evaporation. What matters is whether humidity stays high for hours. If it drops back within 30–60 minutes, you likely just need better airflow.
Media Temperature for Root Sanity
Roots behave differently than leaves. Media temperature affects germination and nutrient uptake.
- For soil or coco: measure near the root zone, not at the surface.
- For seedlings: keep media warm enough for germination, but avoid overheating.
Example: Seeds that sprout slowly in a cold closet often improve when the media warms slightly, even if air temperature looks acceptable.
Basic Monitoring Tools That Earn Their Space
You don’t need a control system to monitor well. A few simple tools cover most needs.
- Data logging thermometer/hygrometer: Records highs and lows so you can see daily patterns.
- Timer for lights and fans: Monitoring without consistent cycles is like measuring with a moving target.
- A small notebook or spreadsheet: Write down readings and what you changed. This turns “mystery problems” into traceable causes.
- Infrared thermometer for quick spot checks: Useful for verifying whether a light’s heat is creating hot spots.
Placement Checklist for Sensors
Use this quick routine before you trust any numbers.
- Put sensors at canopy height. 2 Keep them out of direct airflow. 3 Keep them away from splashes. 4 Confirm they’re not touching reflective surfaces that can skew readings. 5 Record readings for one full light cycle before making changes.
Mind Map: Monitoring Priorities
Example: Interpreting Readings and Taking Action
Scenario: Your hygrometer shows 85% humidity during the light cycle, and leaves look a bit limp.
- Step 1: Check whether humidity stays high continuously or only right after watering.
- Step 2: Verify air temperature at canopy height. If temperature is low, plants transpire less and humidity can rise.
- Step 3: Improve airflow without blasting the leaves. Increase fan runtime or adjust ducting so air moves through the closet, not just across one spot.
- Step 4: Re-check after one cycle. If humidity drops and leaves firm up, you’ve solved the likely cause.
The key is to change one or two variables at a time and observe the next full cycle. In a closet, the environment can shift quickly, so short-term readings can mislead.
Example: A Simple Daily Monitoring Routine
- Morning: Record temperature and humidity at canopy height.
- Midday: Do a quick spot check with an infrared thermometer if you suspect hot spots.
- Evening: Record highs and lows from the logger.
- Notes: Write what you watered, pruned, or adjusted.
This routine keeps monitoring grounded in what actually happened, not what you hoped happened.
4. Growing Systems for Small Indoor Spaces
4.1 Soil-Based Growing in Closets and Its Practical Tradeoffs
Soil-based growing in a closet is the simplest way to start because you can use familiar containers, familiar media, and familiar watering habits. The tradeoffs show up quickly, though: soil tends to be heavier, it can dry unevenly in small spaces, and it can invite fungus gnats if you keep the surface too wet. The good news is that most of these issues are manageable with a few deliberate choices.
What “Soil-Based” Means in a Closet
In this context, soil-based means you grow in a pot or fabric container filled with potting mix or a soilless mix that behaves like soil. You’re not required to use garden dirt. In fact, closet growers usually avoid outdoor soil because it can carry pests and compact in a way that slows drainage.
A practical setup uses:
- A container with drainage holes
- A tray or saucer to catch runoff
- A consistent watering method
- A light schedule that matches the crop
The Main Benefits
1) Simple watering logic. Soil gives you a buffer. If you miss a watering by a day, the mix often holds moisture longer than many soilless media. For leafy greens and herbs, that buffer can reduce stress.
2) Lower equipment complexity. You can skip pumps, reservoirs, and plumbing. That matters in closets where space is tight and access is limited.
3) Easier root temperature stability. Soil changes temperature more slowly than thin media layers. In a small enclosure, that can help keep roots from swinging as the light turns on and off.
The Main Tradeoffs
1) Weight and mess. A full container plus wet mix can be surprisingly heavy. Also, runoff is real. Even if you use a tray, you still need a plan for wiping floors, preventing drips, and keeping the closet door from becoming a conveyor belt for water.
2) Uneven drying. Closets often have airflow that’s stronger near the fan outlet and weaker near the corners. Soil dries faster where airflow is strongest, which can cause patchy growth. You may see one side of a plant look healthier because that side’s root zone is getting better moisture.
3) Nutrient control is less precise. With soil, nutrients are partly “stored” in the mix and partly supplied by fertilizer. That can be forgiving, but it’s also harder to correct quickly if you overshoot. In small spaces, small mistakes can show up as leaf color changes.
4) Pest risk from wet surfaces. Fungus gnats love consistently damp topsoil. In a closet, you can’t rely on outdoor conditions to dry things out. If you keep the surface wet, you’re basically inviting them to move in.
Practical Mind Map
Mind Map: Soil-Based Growing in Closets
Concrete Example Setups
Example 1: Leafy Greens in Small Pots Use 4–6 inch pots with a well-draining potting mix. Place them on a tray with a lip so runoff stays contained. Water thoroughly until you see a little drainage, then wait until the top inch feels dry before watering again. Rotate pots every few days so the side closest to airflow doesn’t dry first.
What you’ll notice: the plants will look fine even if you’re off by a day, but if you water lightly every day, the top layer stays damp and gnats become a problem.
Example 2: Herbs in Fabric Containers Fabric containers breathe more than plastic, which can help prevent stagnant moisture. The tradeoff is faster drying. For herbs like basil or chives, check moisture more often and water until runoff appears. If you see the surface staying wet, reduce how much you water at each session and increase frequency slightly, rather than keeping the top constantly damp.
Example 3: One Closet, Mixed Heights If you grow taller plants and shorter plants together, airflow and light distribution create different drying rates. The soil in taller pots may dry slower because the canopy blocks airflow. Rotate positions and consider grouping plants with similar height and watering needs.
Quick Tradeoff Checklist
Before you commit to soil, confirm you can handle:
- Catching and cleaning runoff
- Checking moisture with your fingers or a simple probe
- Rotating pots for even drying
- Managing damp topsoil to reduce gnats
If those are acceptable, soil-based closet growing is a practical starting point that rewards consistency rather than complexity.
4.2 Soilless Media and When to Use It
Soilless media are growing materials that support roots without using traditional soil. In a closet farm, that matters because you can control water movement, drainage, and nutrient delivery more precisely than with most potting mixes. The tradeoff is that you must manage feeding and moisture more actively—roots can’t “search” for nutrients the way they might in soil.
What Soilless Media Actually Do
Soilless media mainly provide three things: physical support, pore space for oxygen, and a way to hold water and nutrients. Different media hold water differently, which changes how often you water and how quickly roots dry out.
- Water retention affects watering frequency.
- Air space affects root oxygen and disease risk.
- Cation exchange affects how nutrients behave in the medium.
A simple way to think about it: if your medium holds water like a sponge, you water less often but must prevent soggy conditions. If it drains fast like a colander, you water more often but reduce the chance of stagnant roots.
Common Soilless Media for Beginners
Coco coir is popular because it holds water well while still draining enough for oxygen. It also buffers nutrients, which can help stability. Coco usually needs a quick rinse and often benefits from a balanced nutrient approach.
Perlite is an additive that increases air space. It doesn’t feed plants, but it helps prevent compaction and improves drainage.
Rockwool is a manufactured fiber block. It’s consistent and easy to use in systems like drip or wick, but it requires careful pH management and proper handling.
Peat-based mixes are technically soil-based, but many closet growers treat them similarly. If you use peat, you still need to manage watering and nutrients closely.
Wick-friendly blends often combine a water-retentive component (like coco or peat) with something airy (like perlite) so the wick can supply moisture without flooding.
When to Use Soilless Media
Soilless media are a good fit when you want predictable performance in a small, enclosed space.
Use soilless media if you want:
- More consistent watering: media that drain predictably reduce “mystery” swings.
- Faster response to changes: when you adjust nutrients or water, plants usually react more quickly.
- Cleaner setups: less mess than soil, easier to keep the closet tidy.
- Better root oxygen: especially when you pair media with good airflow and proper drainage.
Avoid soilless media if you:
- Want a hands-off approach: you’ll still need regular checks.
- Don’t have a way to measure pH and EC: many soilless setups depend on it.
- Overwater out of habit: soilless media can still drown roots if you keep them constantly wet.
Choosing the Right Medium for Your System
Match the medium to the watering method.
- Drip systems pair well with coco blends, rockwool, and other media that can stay evenly moist without pooling.
- Wick systems need a medium that can feed moisture upward steadily; coco blends are common.
- Flood-and-drain (less common in closets) requires media that tolerate wet-dry cycling without breaking down.
- Top-water in pots works with coco-perlite mixes, but you must ensure excess water drains freely.
Mind Map: Soilless Media Decision Guide
Practical Examples in a Closet
Example 1: Leafy greens in a small drip tray You grow lettuce and arugula in containers with coco-perlite. You run drip long enough to wet the root zone, then stop so air can refill the pores. Because the medium drains well, you can keep the surface from staying wet, which helps reduce fungus gnats and surface mold.
Example 2: Herbs on a wick system You use a wick to pull nutrient solution upward into a coco-based medium. The goal is steady moisture, not constant saturation. You check moisture by feel: the medium should be damp and cool, not dripping. If it’s drying too fast, you increase wick contact or adjust the medium’s water retention.
Example 3: Seedlings in rockwool starter blocks You start seeds in rockwool because it’s uniform and easy to transplant. You keep the blocks evenly moist and monitor pH closely. If pH drifts, seedlings can show slow growth or uneven color even when the lighting is correct.
Quick Setup Checklist
- Confirm your medium drains properly in your container.
- Plan how you’ll measure pH and nutrient strength.
- Decide watering frequency based on retention, not guesswork.
- Keep airflow steady so roots get oxygen between waterings.
- Start with a small batch so you can learn the medium’s “personality” before scaling up.
4.3 Hydroponic Basics for Beginners in Tight Footprints
Hydroponics grows plants without soil by delivering water, oxygen, and nutrients directly to the roots. In a closet, the main challenge is not “can it work,” but “can you keep roots oxygenated and the system simple enough to maintain.” A tight footprint rewards setups that are compact, easy to drain, and forgiving when you miss a day.
What Hydroponics Changes for Roots
In soil, roots find oxygen between particles. In hydroponics, oxygen must be supplied by aeration and by avoiding stagnant water. That’s why most beginner systems either circulate water or keep roots in a medium that holds air while still wicking moisture.
A practical rule: if your roots sit in water for long stretches without airflow, you’re asking for trouble. Lettuce and herbs tolerate hydroponics well because they grow fast and don’t demand thick, woody root systems.
Choose a Starter System That Fits a Closet
For small spaces, three approaches are common.
-
Wick systems: simplest, no pump. A wick pulls nutrient solution upward by capillary action. Works best for short cycles and smaller plants.
-
Deep Water Culture: roots hang in a tank with an air stone. It’s straightforward, but you must manage temperature and keep aeration strong.
-
Drip or recirculating systems: a pump delivers solution to plants, then drains back. More parts, but excellent control and good yields when set up carefully.
If you’re starting in a closet, wick or deep water culture usually beats drip for simplicity. Drip shines when you want multiple plants and consistent feeding.
Core Components You Actually Need
A beginner hydroponic setup can be built from a few essentials:
- Reservoir: holds nutrient solution. Use a light-blocking container to reduce algae.
- Growing area: net pots, cups, or a small channel where roots can access solution.
- Aeration (for deep water culture): an air pump and air stone.
- Nutrients: a hydroponic fertilizer blend designed for water-only feeding.
- Water management: a way to drain, refill, and prevent spills.
You don’t need fancy controllers to start. You do need a reliable method to measure and mix solution and to keep the reservoir clean.
Nutrient Solution Basics Without Guesswork
Hydroponic nutrients are typically mixed from concentrates. The key beginner habit is to follow the label for starting strength, then adjust based on plant response.
Use two checks:
- Mixing accuracy: measure volumes consistently.
- Solution consistency: if you change strength every day, plants can’t settle.
A simple schedule for many beginners is to mix fresh solution on a regular interval and top off with plain water between changes. Topping off prevents the solution from becoming too concentrated as water evaporates.
Growing Medium and Why It Matters
Medium supports seedlings and helps manage moisture. Common options include rockwool, coco coir, and inert media like clay pebbles.
- Rockwool: great for starting seeds, but it needs proper wetting and handling.
- Coco coir: holds water and air well, often forgiving for beginners.
- Inert media: stable and reusable, but you must ensure nutrients reach roots.
In tight footprints, choose a medium that lets you transplant without breaking root structure. That reduces downtime and keeps growth steady.
Example Wick Setup for Herbs
A wick system can fit on a shelf. Place a shallow reservoir under a tray. Insert net cups into the tray and fill with a medium like coco or a starter plug. Cut wicks from a material that stays stable in water, then route them from the reservoir to the base of each cup.
How to make it work in real life:
- Keep the reservoir covered to limit algae.
- Start with small plants so the wick can keep up with demand.
- Check moisture daily at first; wick flow can lag if the medium is too dry.
If leaves droop and the medium looks dry, increase wick contact or reduce plant size. If the medium stays soggy, reduce wick thickness or ensure excess water can drain.
Example Deep Water Culture for Leafy Greens
In deep water culture, roots hang into a tank and an air stone runs continuously during the light period and often during the dark period too.
A simple layout:
- Net cups sit in a lid or foam board over the tank.
- Air stone bubbles rise directly under the root zone.
- Use a thermometer to watch water temperature.
Beginner success tip: keep water temperature moderate. Warm water holds less oxygen and encourages algae. If your closet gets hot when lights run, consider insulating the tank or using a smaller, better-aerated volume.
Mind Map: Hydroponic Basics for Tight Footprints
Troubleshooting with Clear Signals
When something goes wrong, look for patterns tied to hydroponic mechanics.
- Dry medium or wilting: nutrient solution isn’t reaching roots fast enough (wick contact, medium dryness, or pump delivery).
- Slimy roots or foul odor: oxygen is insufficient or the tank is dirty.
- Slow growth despite healthy color: feeding may be too weak, or the plant may be under light.
Fix one variable at a time. Change the solution strength or improve aeration, then observe for a couple of days rather than making multiple adjustments in the same afternoon.
What to Grow First in a Tight Hydroponic Space
Start with leafy greens and herbs because they establish quickly and tolerate minor imperfections. Choose varieties that fit your light schedule and harvest timeline, then scale up once you can keep solution fresh and roots oxygenated.
4.4 Wick, Drip, and Recirculating Approaches Compared
Closet farming systems often differ less in “what nutrients” and more in “how water moves.” Wick, drip, and recirculating approaches each solve the same problem—delivering moisture and dissolved nutrients to roots—using different levels of control and different amounts of plumbing.
Wick Systems
A wick system relies on capillary action. A strip of grow media or fabric pulls nutrient solution from a reservoir into a growing medium. Because the flow is passive, the system is quiet and simple, but it also means you must match the wick’s ability to move water with the crop’s demand.
Best fit: seedlings, herbs, and leafy greens in media that stays evenly moist.
How it works in practice:
- Put a reservoir below the plant container.
- Place one end of a wick in the reservoir and the other end in the growing medium.
- Keep the reservoir filled so the wick stays in contact with solution.
Example: Grow basil in small pots filled with a water-retentive medium. Use a wick per pot. Start with a shallow reservoir and check moisture daily for the first week. If the medium dries at the top, increase wick contact area or reduce pot size so the wick can keep up.
Common failure mode: uneven moisture. The reservoir may be fine, but the top of the medium can dry if the wick can’t supply enough water. That shows up as wilting during the light period even when the reservoir level looks normal.
Drip Systems
A drip system uses a pump and emitters to deliver solution on a schedule. The medium receives measured doses, and excess typically drains away unless you add a collection and reuse step.
Best fit: faster-growing crops, larger containers, and setups where you want more consistent moisture control.
How it works in practice:
- Install a small pump in the reservoir.
- Run tubing to a distribution line.
- Use emitters to drip into each container.
- Let runoff drain to a tray or directly to a waste line.
Example: Grow lettuce in net pots or small containers. Use one emitter per container. Run short cycles during the light period, then stop at night. If leaves look droopy right after watering, reduce cycle length or emitter flow. If the medium is dry before the next cycle, increase run time or add a second emitter.
Common failure mode: clogged emitters. In small closets, a tiny blockage can cause one plant to get far less solution than the others. Prevent this by filtering the reservoir solution and keeping the pump intake clean.
Recirculating Systems
Recirculating systems pump solution through the grow area and collect runoff back into the reservoir. This turns your system into a loop: deliver, drain, collect, and reuse.
Best fit: when you want uniform delivery across multiple containers and you’re comfortable monitoring solution strength and cleanliness.
How it works in practice:
- Pump solution from the reservoir to a distribution manifold.
- Let it flow through the grow medium or channels.
- Collect runoff in a return tray.
- Return it to the reservoir through a drain line.
Example: Grow compact greens in a shallow channel system. Use a timer to run the pump for brief intervals. Because runoff returns, you can keep the reservoir level stable and reduce waste. However, you must stir or circulate the reservoir and check pH and nutrient concentration regularly, since plants and microbes change the solution over time.
Common failure mode: solution drift. If you only top off with water, nutrient concentration can rise or fall depending on evaporation and plant uptake. If you only “set and forget,” you’ll eventually see slow growth or leaf edge issues.
Mind Map: Approach Comparison
Choosing Between Them
If you want the simplest setup with minimal moving parts, wick is the easiest starting point, but it demands careful matching of wick capacity to your medium and container size. If you want more reliable moisture timing, drip gives you that control without the complexity of a full loop. If you want uniformity across many plants and can handle ongoing solution checks, recirculating is the most controllable—also the most sensitive to maintenance.
Quick Setup Example Comparison
| Approach | Reservoir Placement | Delivery Method | Run Control | Typical Maintenance Focus |
|---|---|---|---|---|
| Wick | Below grow container | Capillary pull | None or minimal | Wick contact and medium moisture |
| Drip | Below or side | Pump + emitter | Timer cycles | Emitter cleanliness and runoff |
| Recirculating | Below grow area | Pump loop with return | Timer cycles | pH/nutrient stability and hygiene |
4.5 Choose a System and Build a Simple Setup Plan
Picking a growing system is mostly about matching three constraints: how often you can check on plants, how much mess you’re willing to manage, and what kind of light you’re already planning to use. In a closet, the “best” system is the one you can run consistently without turning your weekend into maintenance.
Start with a Simple Decision Grid
Use this quick filter before buying anything:
- If you want the simplest learning curve: choose soil in containers.
- If you want faster growth and tighter control: choose wick or drip with a soilless or semi-soilless medium.
- If you want maximum precision and don’t mind setup time: choose recirculating hydroponics.
- If you’re worried about leaks: choose soil or wick first.
A practical rule: if you can’t confidently answer “How will I handle spills and drips?” then don’t choose the most complex system.
Compare Systems Using Real Closet Tradeoffs
Soil in containers
- Pros: forgiving, less plumbing, easier cleanup.
- Cons: slower nutrient response, more variability between plants.
- Example: grow basil and lettuce in separate fabric pots on a tray. Water until a little drains, then empty the tray.
Wick systems
- Pros: low effort once set, minimal pump noise.
- Cons: limited oxygenation compared to active systems, slower nutrient delivery.
- Example: place seedlings in a medium like coco coir in cups, with a wick leading to a reservoir. Keep the reservoir filled and check weekly.
Drip systems
- Pros: good control, scalable, faster than wick.
- Cons: requires a timer and careful leak prevention.
- Example: run a drip line to each pot, using a timer to deliver short pulses. Put the entire setup on a waterproof base.
Recirculating hydroponics
- Pros: consistent feeding, efficient water use.
- Cons: most moving parts, needs monitoring to avoid failures.
- Example: use a small reservoir with an air pump, then return excess solution to the tank. Plan for daily or near-daily checks.
Build a Simple Setup Plan That You Can Actually Follow
A good plan is a checklist with numbers. Here’s a straightforward sequence.
-
Pick your crop set and target cycle length
- Leafy greens and herbs often fit a shorter cycle, so you can iterate faster.
- Example: start with lettuce, arugula, and basil so you can learn without waiting forever.
-
Choose your system type based on your tolerance for complexity
- If you’re new, start with soil or wick.
- If you already have a timer and are comfortable with basic plumbing, consider drip.
-
Design the physical layout for gravity and cleanup
- Put the reservoir or water source at the lowest practical point.
- Ensure everything sits on a tray or pan that can catch the worst-case spill.
-
Set your light and airflow assumptions before finalizing the system
- Light intensity and airflow affect how quickly plants drink.
- Example: if your airflow is strong, you’ll likely need more frequent watering or shorter drip pulses.
-
Create a “first week” operating routine
- Check moisture daily for soil, and reservoir level daily for wick/drip.
- Adjust only one variable at a time.
-
Plan for nutrient handling even if you start simple
- Decide whether you’ll use pre-mixed nutrient solution or a measured mix.
- Example: for soil, you can start with a gentle feeding schedule after seedlings establish.
Mind Map: System Choice to Setup Steps
Example: A Starter Soil Setup Plan for Lettuce and Basil
- Containers: 6–8 inch pots or grow bags on a single waterproof tray.
- Medium: potting mix suitable for containers.
- Watering rule: water until a small amount drains, then empty the tray.
- Monitoring: touch test 1–2 inches down; if it feels dry, water.
- Light assumption: keep lights on a consistent schedule and avoid moving plants daily.
This setup teaches you how your specific closet dries out, which is the foundation for any system.
Example: A Wick Setup Plan for Compact Greens
- Reservoir: a sealed container with a lid to reduce evaporation.
- Wicks: absorbent material sized so it stays in contact with the reservoir.
- Medium: coco coir or a similar medium that holds moisture.
- Operating rule: keep reservoir level stable; check at least daily at first.
- Monitoring: look for steady leaf growth and avoid letting the medium fully dry.
Wick systems reward patience: small adjustments matter, but constant tinkering usually makes things worse.
Example: A Drip Setup Plan for Multiple Containers
- Timer: set to short pulses rather than long runs.
- Tubing and emitters: route so drips land in the same zone of each pot.
- Catchment: waterproof base plus a secondary tray.
- Operating rule: start with conservative pulses, then increase based on how quickly the medium dries.
- Monitoring: watch for uneven wetting; rotate containers if needed.
Use a One-Page Setup Sheet
Before you start, write down these items so you don’t rely on memory:
- System type and medium
- Container count and sizes
- Reservoir size (if applicable)
- Light schedule and expected daily runtime
- Watering or pulse schedule
- First-week check times
If you can fill that sheet in 10 minutes, you’ve chosen a system you can run. If you can’t, the system is probably too complex for your first closet cycle.
5. Light, Temperature, and Humidity Control
5.1 Set Photoperiods and Light Schedules by Crop Type
Photoperiod is the number of hours lights stay on each day. In a closet farm, it’s also your main lever for controlling growth rate and plant shape. Most leafy vegetables behave like “day-length followers,” while fruiting crops care more about total light intensity and consistency than exact day length.
Core Rules That Keep Schedules Simple
- Start with a crop-appropriate baseline. If you’re growing lettuce, use a shorter day than you would for basil. If you’re growing tomatoes, don’t assume they need the same schedule as greens.
- Keep the schedule consistent. Plants don’t need perfect timing, but they do benefit from predictable on/off cycles.
- Use light duration to manage stretch. If seedlings look tall and loose, shorten the day slightly or check light distance and intensity.
- Avoid long nights for most greens. Continuous light can increase stress and reduce tidy growth.
Mind Map: Choosing a Light Schedule
Crop-Type Schedules with Practical Examples
Leafy Greens: Lettuce, Spinach, Arugula
A common starting point is 14–16 hours on. Lettuce often tolerates the lower end, while spinach can handle the higher end if temperature and airflow are stable.
Example: You grow butterhead lettuce in a 2 ft by 2 ft closet. Set lights to 16 hours on / 8 hours off. If leaves start to look thin and stems lengthen, switch to 14 hours on for the next week.
Herbs: Basil, Cilantro, Chives
Most herbs do well with 12–16 hours on. Basil tends to respond well to longer days, but it still benefits from a real night.
Example: You start basil from seed. Use 14 hours on for the first two weeks, then move to 16 hours on once plants are established. Harvesting regularly helps keep growth compact, so your schedule supports the regrowth rather than replacing it.
Root Crops: Radishes, Beets
Roots generally prefer 10–14 hours on. Too much day can encourage leaf growth at the expense of the edible part.
Example: You sow radishes. Start at 12 hours on. If you notice big tops with small roots, reduce to 10 hours on and keep watering steady.
Fruiting Crops: Peppers, Tomatoes, Cucumbers
Fruiting crops usually need 14–18 hours on because they’re building more tissue and supporting reproductive growth.
Example: You’re growing a compact pepper variety. Use 16 hours on during vegetative growth. Once flowering begins, keep the schedule steady rather than changing it weekly. If plants flower but drop blossoms, check for temperature swings and airflow before changing photoperiod.
How to Set the Schedule in Real Life
Pick a daily window that matches your routine. Many growers run lights during the time they’re awake so they can observe plants and adjust quickly. If your closet lights are on a timer, choose a single start time and keep it there.
Example: Your lights turn on at 7:00 AM. For a 16-hour schedule, they turn off at 11:00 PM. For a 14-hour schedule, they turn off at 9:00 PM. The exact clock time matters less than the total hours and the consistency.
Quick Adjustment Guide
- Stretching or long, weak stems: reduce photoperiod by 1–2 hours and verify light distance.
- Slow growth with dark, pale leaves: increase photoperiod by 1–2 hours only after confirming nutrients and watering are correct.
- Leaf edge issues or wilting: don’t immediately change photoperiod. First check temperature, airflow, and substrate moisture.
A Simple Weekly Logging Habit
Write down the crop, the schedule, and one observation each week. Over time you’ll see patterns like “this lettuce likes 14 hours” or “this basil gets leggy at 12.” That’s not guesswork; it’s controlled note-taking, and it makes your next adjustment faster.
5.2 Position Lights for Even Coverage and Reduced Stretching
Even coverage is mostly geometry plus a little discipline. When light is uneven, plants grow toward the brighter side, stretch, or develop weak, floppy stems. The goal is not “maximum brightness everywhere,” but a consistent light level across the canopy.
Start with Canopy Height, Not Light Wattage
Measure from the light’s mounting point to the top of the plants you expect during the growth stage you’re targeting. For leafy greens and herbs, the canopy stays relatively low, so you can keep the light closer without cooking seedlings. For taller crops, you’ll need a plan for raising the light as plants grow.
A practical rule: set the light height so the brightest area is only modestly brighter than the rest of the canopy. If you can see a sharp “hot spot” on leaves, your height is too low or your reflector is too narrow.
Use a Simple Coverage Check
Do this before planting anything valuable.
- Place a flat, matte surface at the canopy height.
- Turn on the light for 10–15 minutes.
- Observe leaf-like cues: where the surface looks noticeably brighter, that’s where plants will stretch toward.
- If you have a phone app or a cheap light meter, measure at several points across the growing area. Aim for small differences between points.
Even without instruments, you can still improve results by spreading the light more evenly.
Choose the Right Light Spread
Two common setups behave differently:
- Single bar or panel: Often creates a center-bright pattern. You reduce unevenness by raising the light slightly and/or using a wider fixture.
- Multiple smaller fixtures: You can overlap their coverage so the center isn’t dramatically brighter than the edges.
If your closet is narrow, a single fixture may be enough. If it’s wide, plan for overlap.
Reduce Stretching with Distance and Timing
Stretching happens when seedlings receive too little light relative to their growth rate. Distance is the main lever.
- Seedlings and early transplants: Keep the light closer than you think, but watch for leaf “stress” like curling or bleaching.
- Vegetative growth: Raise the light gradually as the canopy rises.
A good workflow is to adjust light height every few days rather than making big jumps. Plants respond quickly to changes, and small corrections prevent oscillation.
Use Reflectors and Mounting to Smooth the Edges
Reflectors help distribute light, but they also change the pattern. A reflector that’s too tight can intensify the center. If your fixture supports it, use a reflector designed for the fixture, and keep it clean.
Mounting matters too. A light that’s slightly tilted can create a diagonal brightness gradient. Use a level when installing, and re-check after moving equipment.
Mind Map: Light Positioning Logic
Example: 2x2 Closet with One LED Panel
Assume a 2 ft by 2 ft growing area and a single LED panel that covers about that footprint when mounted at a moderate height.
- Start with the light at a height that keeps the brightest area only slightly brighter than the corners.
- After 3–5 days, check spacing between leaves and stem thickness.
- If stems lengthen quickly and leaves angle upward, lower the light a small amount.
- If leaves show pale patches or the canopy looks “washed out,” raise the light slightly.
This is a feedback loop: adjust, observe, repeat.
Example: Wide Shelf with Two Fixtures
For a 2 ft by 4 ft shelf, two fixtures usually work better than one. Position them so their coverage overlaps in the middle.
- Set both fixtures at the same height.
- Aim for similar brightness at the left edge, center overlap, and right edge.
- If the overlap region is much brighter, raise both fixtures slightly or reduce overlap by shifting one fixture a few inches.
The result is a canopy that grows evenly instead of leaning toward the brightest zone.
Quick Troubleshooting
- Plants stretch upward and lean: Light is too far, or coverage is too center-focused.
- Corners lag behind: Light is too narrow or too high; add overlap or adjust height.
- Leaves bleach near the center: Light is too close or too concentrated; raise the light or widen spread.
- Uneven growth after you moved the light: Check level and re-run the coverage check.
Even coverage isn’t a one-time setting. It’s a habit: set a reasonable starting height, verify the pattern, then fine-tune as the canopy changes.
5.3 Temperature Targets for Seedlings and Vegetative Growth
Temperature is the steering wheel for indoor growth: it controls how fast plants develop, how strongly they drink water, and how easily they get stressed. In a closet farm, your goal isn’t one magic number—it’s a stable range that matches the plant’s stage.
Temperature Targets by Stage
Seedlings (from germination to first true leaves):
- Day: 70–75°F (21–24°C)
- Night: 62–68°F (17–20°C)
- Why it matters: Warmth speeds germination and early root growth, while a cooler night helps prevent leggy stretching.
Vegetative growth (after seedlings establish):
- Day: 68–74°F (20–23°C)
- Night: 60–66°F (16–19°C)
- Why it matters: Many leafy crops and herbs grow best when temperatures are steady and not pushed too high under lights.
Quick rule for beginners: If your plants look healthy but slow, you’re likely on the cool side. If they grow fast but weak or stretched, you’re likely too warm or your light is too far.
How Light Changes the Temperature You Actually Get
LEDs and grow lights add heat, but not evenly. The air near the canopy can be several degrees warmer than the closet floor. Measure where it counts: at plant height.
- Measure at canopy level using a thermometer/hygrometer probe.
- Compare “lights on” vs “lights off” readings.
- Watch for hotspots directly under the light; they can push leaves into stress even when the rest of the closet looks fine.
Practical Targets for Common Beginner Crops
These ranges work well for many closet-friendly crops. Use them as starting points, then adjust based on plant response.
-
Lettuce and other leafy greens:
- Seedlings: 70–75°F day, 62–68°F night
- Vegetative: 66–72°F day, 60–66°F night
- Example: If lettuce leaves curl upward and growth stalls, check for heat stress—closet temperatures above the mid-70s°F often cause trouble.
-
Basil and many herbs:
- Seedlings: 72–78°F day, 65–70°F night
- Vegetative: 70–76°F day, 64–70°F night
- Example: If basil seedlings look pale and slow, slightly warmer daytime temps can help, but keep nights from dropping too far.
-
Peppers and tomatoes (vegetative):
- Day: 70–80°F
- Night: 65–72°F
- Example: If plants are growing but leaves look limp during the day, your closet may be too hot under lights or airflow may be too weak.
What “Too Hot” and “Too Cool” Look Like
Plants show temperature stress in ways you can observe without fancy tools.
-
Too hot (especially under lights):
- Faster growth with weaker structure
- Leaves may look thin, droopy, or develop edge stress
- Soil or media dries quickly
- Example: If your watering schedule suddenly becomes more frequent within a few days, check temperature first.
-
Too cool:
- Slow growth and delayed leaf expansion
- Darker leaves that don’t brighten as expected under light
- Watering problems from slower uptake
- Example: If seedlings stay small and the media stays wet longer than usual, raise the temperature rather than adding more fertilizer.
Mind Map: Temperature Control Logic
Example: Fixing a Closet That Runs Warm
You measure 78°F at canopy level during lights-on, while seedlings are stretching and drying out quickly.
- Confirm the hotspot: Check readings near the center and corners of the canopy.
- Increase airflow: Add or reposition a fan so air moves across leaves, not just around the closet.
- Adjust light distance: Raise the light slightly if your setup allows safe intensity.
- Recheck after 30–60 minutes: Temperature changes lag behind adjustments.
Within a day or two, you should see steadier leaf posture and a more normal watering rhythm.
Example: Fixing a Closet That Runs Cool
Your seedlings sit at 64°F during lights-on and growth is slow.
- Check night drop: If nights are far below 62°F, seedlings may never fully recover.
- Warm the intake air: If you use passive intake, improve airflow path insulation.
- Use lights strategically: Keep photoperiod consistent so plants get predictable warmth.
- Avoid overwatering: Cool media holds water longer; let the top layer dry slightly before watering again.
After temperature stabilizes, seedlings typically expand their first true leaves more reliably.
Simple Target Checklist
- Seedlings: 70–75°F day, 62–68°F night
- Vegetative: 68–74°F day, 60–66°F night
- Measure at plant height
- Adjust based on symptoms + readings, not guesswork
5.4 Humidity Management To Reduce Disease Risk
Humidity is the quiet driver behind many indoor plant problems. In a closet, the air can get saturated quickly because the same small volume of air is repeatedly warmed by lights and cooled by the closet walls. When humidity stays high for long stretches, leaf surfaces remain wet longer, spores germinate more easily, and plants become more vulnerable. The goal is not “low humidity at all costs,” but stable humidity that doesn’t linger at the risky end.
What Humidity Does to Leaves
Plants lose water through stomata. When the surrounding air is very humid, the air can’t “accept” much more moisture, so transpiration slows. That can reduce nutrient flow and make plants less resilient. Meanwhile, condensation is the bigger villain: if leaf temperature drops below the dew point, water forms on surfaces. Even if you never see visible droplets, a thin film of moisture can support fungal growth.
Target Ranges That Actually Help
Use a practical approach: aim for moderate humidity and avoid long periods of near-saturation.
- Seedlings and young transplants: keep humidity slightly higher than mature plants, but still avoid constant “foggy” conditions.
- Leafy greens and herbs: generally do well with mid-range humidity where leaves dry reasonably fast after watering.
- Higher-risk periods: after lights turn on, humidity often drops; after lights turn off, humidity often rises. Plan around the lights-off spike.
If you want one simple rule: let leaves dry between watering cycles and avoid hours of very high humidity.
Mind Map: Humidity Control and Disease Risk
Practical Examples That Fit Closet Reality
Example 1: The Lights-Off Humidity Spike A grower notices RH climbs from 55% during the day to 80–90% after lights off. The closet walls are cooler, so the canopy cools too, and condensation becomes more likely.
- Fix: run the exhaust fan on a timer that continues for 30–60 minutes after lights off.
- Why it works: you keep air moving while the canopy temperature drops, reducing the time the air stays saturated.
Example 2: Overwatering Creates a Humidity Feedback Loop Watering at the end of the day keeps the media surface damp overnight. Evaporation raises RH, which slows drying, which keeps the surface damp.
- Fix: water earlier in the light period so the closet has time to dry before lights off.
- Extra detail: if using trays, empty runoff promptly so it can’t keep evaporating.
Example 3: Fan Placement Prevents “Wet Corners” A small circulation fan aimed directly at leaves can dry them unevenly, while corners stay stagnant.
- Fix: position the fan so it moves air across the canopy and through the closet volume, not just across one plant.
- Why it works: disease risk often tracks with stagnant microclimates, not the average RH reading.
A Simple Humidity Checklist
- Measure RH at canopy height, not at the floor.
- Track RH by time of day (lights on vs lights off).
- Inspect leaves 1–2 hours after lights turn on for early signs of moisture retention.
- Keep watering consistent and avoid leaving standing water in trays.
- Use airflow to mix air, not to blast leaves.
Quick Troubleshooting Logic
If you see disease symptoms, don’t guess randomly. Start with the most common humidity pattern:
- High RH mostly at night: extend exhaust after lights off and ensure circulation continues.
- High RH right after watering: shift watering earlier and reduce runoff.
- High RH in one area: adjust fan direction and spacing so air reaches the corners.
Humidity management is mostly about timing and air movement. Once you control when moisture enters the system and how quickly the closet air exchanges, disease risk drops without needing complicated gear.
5.5 Troubleshoot Common Environmental Symptoms
Small indoor grows are basically a feedback loop: light, air, water, and temperature all push on the plant at the same time. When something looks “off,” the goal is to identify which environmental lever is most likely responsible, then confirm with quick checks rather than changing everything at once.
A Simple Symptom-to-Cause Method
Use this order when troubleshooting:
- Check the obvious first: light height, timer schedule, and whether the fan is actually running.
- Measure, don’t guess: record temperature and humidity at canopy height.
- Look for patterns: does the symptom match a time of day (lights on vs. off) or a location (front vs. back)?
- Change one variable: adjust the most likely cause, then wait long enough to see a response (usually 24–72 hours for environmental effects).
Mind Map: Environmental Troubleshooting Flow
Symptom: Leaves Curl Up or Down
Most common environmental drivers are heat stress, low humidity, or inconsistent watering that makes the plant “panic.”
- Curling up with dry edges often points to low humidity or hot air. Check humidity at canopy height during the hottest part of the light cycle. If humidity is low, increase humidity gradually and ensure airflow isn’t blasting directly at leaves.
- Curling down with limp leaves can be overwatering plus poor oxygen in the root zone, but it can also happen when the canopy is too cool. Verify soil moisture or media saturation before changing nutrients.
Example: If lettuce leaves curl during lights-on but look normal after lights-off, start by checking temperature spikes and airflow direction before touching watering.
Symptom: Yellowing Leaves
Yellowing can be nutrient-related, but environmental issues often cause it indirectly.
- Uniform yellowing across the whole plant with stable growth can indicate light too weak. If plants are stretching or staying small, raise light output or reduce distance to the canopy.
- Yellowing that starts on older leaves is often nutrient-related, but if it appears suddenly after a ventilation change, consider temperature stress affecting uptake.
- Yellowing with leaf edge burn suggests drying cycles or high salt concentration from inconsistent watering. Confirm by checking whether the media dries too fast between waterings.
Example: If basil yellows right after you increased fan speed, check whether the airflow is drying the canopy faster than the roots can keep up.
Symptom: White Powdery Spots
Powdery mildew often shows up when humidity is high enough for fungal growth, especially with limited airflow.
- Look for powdery patches that spread over time.
- Confirm by checking whether humidity stays elevated during lights-on and whether condensation appears on walls or trays.
Fix: Increase air exchange and reduce stagnant pockets. Remove heavily affected leaves to reduce spore load, then keep humidity in a safer range for the crop.
Symptom: Wilting Despite Wet Media
This is a classic “something else is wrong” sign.
- Wet media + wilting often means root stress from low oxygen, usually caused by overwatering, poor drainage, or a system that isn’t getting enough air to roots.
- High heat can also cause wilting even when water is present because transpiration outpaces uptake.
Fix: Check media drainage and airflow around the root zone. If temperature is high, cool the environment first, then reassess watering frequency.
Example: If seedlings wilt while the tray feels damp, don’t add more water. Instead, verify drainage and check whether the light is too close, heating the media.
Symptom: Leggy Growth and Long Internodes
Leggy growth is usually a light problem, not a “plant personality” problem.
- If plants stretch toward the light, the intensity is likely too low or the light is too far.
- If only one side stretches, airflow or light distribution may be uneven.
Fix: Adjust light height and ensure even coverage. Rotate trays or reposition plants if the closet has hot spots.
Symptom: Leaf Edges Browning or Crisping
This often comes from low humidity, salt buildup, or heat.
- Crisp edges with otherwise green leaves often match dry air.
- Burning after a watering change can indicate uneven wetting or nutrient concentration issues.
Fix: Stabilize humidity and watering consistency. If you use nutrients, confirm dilution and avoid feeding when the plant is under environmental stress.
Mind Map: Common Symptoms and Likely Environmental Causes
Quick Confirmation Checks
- Canopy-height readings: If your thermometer is at floor level, it can lie to you. Move it to where leaves actually are.
- Condensation check: If you see droplets on walls or inside surfaces, humidity is likely too high or airflow too weak.
- Air movement observation: Watch leaves for gentle movement. If leaves don’t move at all, airflow is probably insufficient; if they whip constantly, airflow may be too direct.
One-Change Rule
When you change multiple things at once, you can’t tell what helped. Pick the most likely cause based on the symptom pattern, adjust it, and observe for the next 1–3 days. Plants don’t respond instantly to environment changes, but they do respond consistently when you give them stable conditions.
6. Watering, Nutrients, and Feeding Schedules
6.1 Watering Fundamentals for Soil and Soilless Media
Watering is the simplest control you have, and it’s also the easiest to mess up. The goal isn’t “more water” or “less water.” The goal is to keep roots supplied with moisture while still letting oxygen reach them. In small indoor spaces, that balance matters because containers dry out faster and excess water can’t escape as easily.
What Watering Is Actually Doing
Plants use water for two jobs: moving nutrients and maintaining cell structure. Roots also need oxygen, which is why soggy media can cause slow growth even when the plant looks “well watered.” Think of the container as a sponge with two needs at once: moisture in the pores and air in the remaining space.
Soil Media Watering Basics
Soil behaves like a slow sponge. Water moves downward, then spreads and is held by particles and organic matter. A common beginner mistake is watering on a fixed schedule. Soil drying speed depends on light intensity, airflow, pot size, and how much the plant is actively growing.
Use a simple check:
- Stick a finger 1–2 inches into the soil. If it feels cool and damp, wait.
- If it feels dry at that depth, water thoroughly.
Water thoroughly, not frequently: When you water, add enough until you see drainage from the bottom. That flushes salts and ensures the whole root zone gets moisture, not just the top layer.
Let it breathe: After drainage, empty any saucer. Standing water can turn the bottom of the pot into a swamp.
Soilless Media Watering Basics
Soilless mixes (like coco coir, rockwool, or peat-lite blends) often hold water differently than soil. Many are more consistent, but they can also dry unevenly if the container surface dries while the lower portion stays wet.
Use weight or runoff cues:
- Lift the container after watering; compare it later. A noticeably lighter pot usually means it’s time.
- For systems that allow runoff, water until you get consistent drainage, then stop.
Watch for “dry top, wet bottom”: In small setups, the top can crust while the lower media remains saturated. If you see this, water more evenly and consider a slightly smaller container or improved airflow.
How to Match Watering to Growth Stage
Seedlings and young plants use less water than established plants. If you water the same way throughout the cycle, you’ll overwater early and under-water later.
- Early stage: Keep moisture steady but not drenched. Aim for “evenly damp,” not “wet and heavy.”
- Vegetative stage: Increase watering frequency as transpiration rises, but keep the same principle: water thoroughly when the root zone needs it.
- Harvest stage: Some crops slow down; reduce watering slightly to avoid excess moisture in tissues.
Water Temperature and Water Quality
Cold water can shock roots, especially in small enclosures where temperatures swing. Use room-temperature water when possible.
If your water is very hard or high in salts, salts can build up in soil and soilless media. The practical fix is periodic thorough watering that allows drainage, which carries excess salts out of the container.
Common Problems and What They Mean
Problem: Leaves droop but soil is wet.
- Likely oxygen shortage from saturation.
- Fix: Pause watering, improve airflow, and ensure drainage.
Problem: Soil is dry on top and plant wilts quickly.
- Likely water is not penetrating evenly.
- Fix: Water slowly and evenly; consider a mulch layer in soil or adjust container size.
Problem: Yellowing with damp media.
- Often root stress rather than “not enough nutrients.”
- Fix: Check drainage, reduce watering, and confirm you’re not keeping the media constantly wet.
Mind Map: Watering Fundamentals
Example: First Closet Grow Watering Routine
You’re growing lettuce in a small fabric pot with potting mix.
- Day 1 after transplant: Water until you see runoff, then empty the saucer.
- Day 2–3: Check the soil 1–2 inches down. If it’s still cool and damp, wait.
- Next watering: When the finger test shows dryness at depth, water thoroughly again.
- During warm, bright days: Expect more frequent watering because the plant transpires faster.
- If the plant droops while the soil is wet: stop watering immediately and improve airflow.
This routine works because it ties watering to root-zone moisture, not to the calendar.
Example: Coco Coir in a Small Tray Setup
You’re growing basil in coco coir blocks inside a tray.
- After watering: Ensure the blocks receive water evenly until runoff is consistent.
- Between waterings: Lift the tray or blocks to judge weight change. When they feel noticeably lighter, water again.
- If the top looks dry but the plant is still stressed: water more slowly and evenly to re-wet the media without flooding.
- Avoid leaving runoff pooled: keep the tray from becoming a constant reservoir.
In coco, the “how” matters as much as the “when,” because uneven wetting creates uneven roots.
6.2 How to Avoid Overwatering and Root Stress
Overwatering is usually less about “too much water” and more about “not enough oxygen.” In a closet, the same small volume of air and media can stay wet longer than you expect, so roots spend more time in low-oxygen conditions. Root stress shows up as slow growth, yellowing, wilting that doesn’t improve after watering, and a sour smell from the container.
The Core Rule for Soil and Soilless Media
Aim for a wet-dry rhythm that matches how fast your setup dries. Water should move through the media, then drain so air can refill the pore spaces. If the media stays saturated, roots can’t breathe, and beneficial microbes can’t do their job.
A quick mental model: water fills space; drainage empties space; air returns. If you keep refilling before drainage finishes, the “air return” never happens.
Learn Your Dry-Down Time with a Simple Check
Instead of watering on a calendar, check the media.
- Finger test: Push a finger 1–2 inches (or to the depth of most roots). If it feels cool and wet, wait.
- Weight test: Lift the container after watering, then again the next day. When it feels noticeably lighter but not bone-dry, you’re close.
- Drainage observation: If runoff is still coming out heavily after a minute, your watering method may be flooding the surface without distributing evenly.
Example: If your leafy greens in 6-inch pots feel wet for three days, you’ll likely need smaller, less frequent waterings than you’d use for the same crop outdoors.
Watering Technique That Prevents Saturation
Overwatering often comes from how water is applied.
- Water slowly and evenly. Pour in a steady stream so the media can absorb. If water pools on top, pause and let it soak.
- Stop when you see proper runoff. For containers with drainage holes, water until you get a modest amount of runoff, then stop.
- Empty the saucer. If your pots sit in a tray, remove standing water after draining. Standing water turns a “drainage system” into a “soak system.”
- Use the right amount for the pot size. A small pot can need less water than you think because the media volume is smaller.
Example: Two planters may look identical, but one has more compacted soil. The compacted one holds water longer, so it needs less water per session.
Match Watering to Light and Temperature
Plants drink faster when they’re actively growing. In a closet, growth rate changes with your light schedule.
- Higher light intensity and longer photoperiods increase transpiration, so the media dries faster.
- Cooler temperatures slow transpiration, so the same watering schedule can become too much.
Practical approach: If you change your light height or photoperiod, re-check dry-down time for a week. Don’t assume the old schedule still fits.
Avoid Root Stress by Managing Oxygen
Root stress is often oxygen deprivation. You can reduce the chance of saturation by improving drainage and media structure.
- Don’t pack media tightly. Compaction reduces pore space.
- Use containers with real drainage. Holes should be clear, not partially blocked by roots or debris.
- Keep airflow moving around the container. Gentle air movement helps the surface dry and supports oxygen exchange.
Example: If you notice algae on the top layer, it usually means the surface stays wet and light reaches it. Let the surface dry more between waterings and consider a thinner top layer of media.
Recognize Early Warning Signs
Catching problems early is easier than fixing them after roots are damaged.
- Wilting with wet media: The plant can’t take up water because roots are stressed.
- Yellowing that starts low: Roots struggle to supply nutrients.
- Musty or sour smell: Indicates prolonged saturation.
- Slow growth despite adequate light: Often a root oxygen issue.
What to do immediately: stop watering, improve drainage (check holes and trays), and increase airflow. If the media is soaked, let it dry to your usual “next watering” point before resuming.
Mind Map: Overwatering and Root Stress
Example: A Weekly Watering Plan That Doesn’t Guess
Start with a baseline: water once when the finger test shows the media is damp but not wet at the root depth.
- Day 1: Water until you see light runoff. Empty any tray.
- Day 2: Check finger depth. If still wet, do not water.
- Day 3: Check again. Water only if the media is starting to dry.
- Day 4–5: Repeat the check pattern.
After one week, you’ll know your closet’s actual dry-down time for that crop and container. Then you can water with fewer checks, but you still verify before each watering.
Quick Checklist Before You Pour
- Media at root depth is damp, not wet.
- Container drains freely and trays are empty.
- You’re watering slowly and evenly.
- Light and temperature haven’t changed since your last schedule.
If you follow that checklist, you’ll prevent most overwatering problems without needing complicated equipment or guesswork.
6.3 Nutrient Basics and How to Read Labels
Indoor plants don’t get nutrients from soil alone, and closets don’t forgive sloppy feeding. Nutrient labels are your map, but only if you know what the numbers mean and how they relate to what your plants actually need.
What Nutrient Labels Usually Tell You
Most fertilizer labels list nutrients as percentages by weight. For example, a product marked “N-P-K 3-1-2” means 3% nitrogen (N), 1% phosphorus (P), and 2% potassium (K) by mass. The remaining percentage is mostly filler, water, or other ingredients depending on the product type.
Many labels also list secondary nutrients such as calcium (Ca), magnesium (Mg), and sulfur (S), plus micronutrients like iron (Fe), manganese (Mn), zinc (Zn), copper (Cu), boron (B), and molybdenum (Mo). Micronutrients are needed in tiny amounts, but they still matter—especially in soilless systems where nothing buffers shortages.
A label may also include a pH range or “intended use” notes. Those aren’t decoration. If a product is designed to be used at a specific pH, your results will depend on whether you match that target.
The Three Numbers That Control Most Decisions
- Nitrogen (N) drives leaf growth. If you underfeed, plants look pale and slow. If you overfeed, you often get lots of soft growth that’s easier to stress.
- Phosphorus (P) supports early root and flowering processes. In leafy crops, you still need it, but it’s rarely the limiting factor.
- Potassium (K) supports overall plant function, including water movement and stress tolerance. Low K can show up as weak growth and poor vigor.
When you read a label, ask: “Is this fertilizer meant for vegetative growth, flowering, or general use?” A “grow” formula often has higher N. A “bloom” formula often has higher P and K. For closet farming beginners growing mostly greens and herbs, a balanced or slightly nitrogen-forward approach is usually the simplest.
How to Translate Percentages into Real Feeding
Labels typically provide a recommended dilution rate, such as “X grams per gallon” or “Y mL per liter.” That recommendation assumes you’re using the product as directed and that your water source isn’t wildly unusual.
If you’re using a liquid concentrate, the label might also specify a target electrical conductivity (EC) or parts per million (ppm). EC and ppm are ways to describe total dissolved salts, which correlate with nutrient strength. You don’t need to memorize conversions, but you do need consistency: measure the same way each time.
A common beginner mistake is mixing “percent by weight” with “how much to add.” Percentages tell you composition; dilution instructions tell you dose.
Micronutrients and Why “It’s Only Trace” Is Not an Excuse
Micronutrients are often included as chelates or salts. Chelated forms of iron, for example, are more stable in certain pH ranges. If your label mentions chelated iron, it’s a clue that the product is designed to stay available under typical indoor conditions.
If a label lists only N-P-K and nothing else, it may still work in soil with a complete potting mix. In soilless media, you usually need a fertilizer that includes micronutrients.
Example: Reading Two Labels and Choosing One
Example A: “N-P-K 5-3-3” general fertilizer
- Higher N suggests good support for leafy growth.
- If the label lists Ca, Mg, and micronutrients, it’s more likely to be complete for soilless setups.
- If the label recommends a moderate dilution, start there and adjust based on plant response.
Example B: “N-P-K 0-10-10” bloom fertilizer
- Very low N means it’s not ideal for greens that need steady leaf production.
- It can be useful later for certain crops, but beginners growing lettuce, basil, or arugula usually get better results with a more balanced formula.
In both cases, the “best” choice depends on your crop and your system. The label helps you match nutrient emphasis to plant needs.
Quick Label Checklist
- N-P-K numbers: Identify whether it’s balanced, grow-focused, or bloom-focused.
- Micronutrient list: Confirm it’s complete for your system type.
- Dilution instructions: Use the label’s dose, not the percentages.
- pH guidance: Match your measurement and adjustment routine.
- EC or ppm targets: If provided, follow the measurement method consistently.
Mind Map: Nutrient Labels and Practical Feeding
Example: A Simple Feeding Routine That Uses Labels Correctly
Start with the label’s recommended dilution for your system. Mix thoroughly, then check your solution strength using the same tool each time. If your plants look pale and slow after a full light cycle and stable conditions, increase slightly rather than jumping to a much stronger mix. If leaves look overly lush but weak or you see tip burn, reduce the dose. The label gives you the starting point; your measurements and plant response tell you how to fine-tune.
6.4 Feeding Schedules for Leafy Greens and Herbs
Leafy greens and most herbs are forgiving, but they still follow a simple rule: feed enough to keep growth steady, then avoid excess that turns into weak flavor, limp leaves, or algae in your system. A good schedule is less about “more fertilizer” and more about matching nutrient strength to plant size and water use.
What “Good Feeding” Looks Like
For leafy greens and herbs, aim for consistent leaf growth rather than fast, stretchy growth. In practice, that means using a moderate nutrient strength and adjusting based on how quickly your medium dries and how the plants respond.
- Seedlings: Use a diluted nutrient solution so roots don’t get overwhelmed.
- Vegetative growth: Increase to a standard strength once plants have established roots.
- Late cycle: Slightly reduce strength if growth slows or leaves start to look overly dark and soft.
Soil vs Soilless Schedules
If you’re growing in soil, your schedule is usually “less frequent, gentler,” because the medium buffers nutrients. In soilless setups, nutrients are the whole meal, so you feed more regularly and measure more carefully.
- Soil: Often starts with a light feed after the first true leaves, then continues every 1–2 weeks depending on your potting mix.
- Soilless: Typically feeds every watering, with nutrient concentration changing by growth stage.
A Simple Growth-Stage Schedule
Use this as a baseline and fine-tune with your readings and plant appearance.
Seedling Stage (Days 7–21)
- Goal: Build roots and steady leaf formation.
- Nutrient strength: Start at 25–40% of your target.
- Frequency:
- Soil: light feed once, then wait.
- Soilless: feed with every watering.
Example: Basil seedlings in a small soilless tray often look happiest when the nutrient mix is mild for the first two weeks, then gradually strengthened as the roots fill the container.
Vegetative Stage (Days 21–Harvest for Most Greens)
- Goal: Produce dense leaves and strong stems.
- Nutrient strength: Move to 60–100% of your target.
- Frequency:
- Soil: every 1–2 weeks.
- Soilless: every watering.
Example: Lettuce grown under consistent light usually benefits from a steady nutrient concentration rather than big jumps. If you notice pale leaves, increase slightly; if leaves are dark and soft, reduce slightly.
Late Cycle (Final 3–7 Days)
- Goal: Maintain quality and avoid buildup.
- Nutrient strength: Drop to 50–70% of target.
- Frequency: Keep the same watering rhythm, but with reduced concentration.
Example: For arugula harvested quickly, lowering strength near the end can help keep leaves crisp and reduce the “overfed” look.
Mind Map: Feeding Logic for Leafy Greens and Herbs
Feeding Schedules Mind Map
Concrete Examples You Can Copy
Example 1: Soilless Lettuce in a Small Closet
- Target nutrient strength: Set your “standard” to what your fertilizer label recommends for leafy greens.
- Week 1–2: Use 30% of target at every watering.
- Week 3 onward: Use 80–90% at every watering.
- Final week: Use 60–70%.
Adjustment rule: If leaves are pale and growth is slow, bump strength by a small step (not a leap). If leaves are dark and the plants look soft, reduce strength.
Example 2: Basil in Soil Pots
- Potting mix: Use a mix that isn’t already heavily fertilized.
- Week 1–2: No feed or a very light feed after true leaves appear.
- Week 3–harvest: Feed every 10–14 days with a diluted solution.
- Final week: Reduce concentration slightly.
Adjustment rule: If basil leaves yellow from the bottom upward, check watering first, then consider a mild nutrient increase.
Common Mistakes and Fixes
- Feeding too strong too early: Seedlings can stall. Fix by reducing concentration and keeping watering consistent.
- Changing both light and nutrients at once: You lose the ability to tell what caused the change. Fix by adjusting one variable per cycle.
- Ignoring pH stability: Nutrients can be present but unavailable. Fix by monitoring and correcting pH to your system’s target range.
A reliable feeding schedule is basically a rhythm: mild at the start, steady during growth, and slightly lighter near harvest. Keep notes on nutrient strength, pH, and plant appearance, and your “baseline” will become your own, with fewer surprises.
6.5 Calibrate Your System with Simple Measurement Checks
Calibration is just making your measurements match reality. In a closet, small errors compound fast: a light that’s a few inches off, a fan that’s slightly too weak, or a nutrient mix that’s a little concentrated. The goal here is not perfection; it’s consistency you can trust.
Start with a “baseline day.” Pick a time when the closet is stable—no recent watering, no door-open marathon, and lights have been running long enough to reach a steady temperature. Record readings, then adjust one variable at a time. If you change three things at once, you’ll have no idea which one helped.
What to Measure First
Measure the things that directly control plant behavior:
- Light intensity at canopy height (or at least distance and schedule consistency)
- Air temperature and humidity near the plants
- Airflow direction and strength (qualitatively at first, then with a simple method)
- Water volume delivered and drain behavior for your system
- Nutrient concentration using a meter you can repeat
If you only have one tool, choose the one that matches your system. Soil growers often benefit most from consistent watering and drainage checks; soilless growers need nutrient and water consistency.
Simple Measurement Checks That Actually Matter
1) Light distance check Use a tape measure and mark the light’s height relative to the top of your plants. Then do a quick “canopy uniformity” check: place a sheet of white paper at several points under the light and observe how evenly it brightens. If one side is clearly dimmer, rotate trays or adjust the light spread before you start chasing nutrient or watering issues.
2) Temperature and humidity check at plant level Don’t measure near the floor or at the exhaust vent. Put your sensor where leaves are—typically mid-canopy height. Take readings at the same times each day: once early in the light cycle and once near the end. If humidity swings wildly, you’ll see it in disease pressure and leaf edges.
3) Airflow check with a safe indicator Use a thin strip of tissue or a small piece of lightweight paper near vents and along the plant row. You’re looking for a smooth path: air should move across the canopy and exit without dead zones. If tissue just flutters near the fan but doesn’t travel, your ducting or intake placement needs adjustment.
4) Water delivery check For any watering method, confirm volume. Put a container under the outlet or tray and run your normal watering cycle once. Measure how much water you used. Then check how much drained (if applicable). This prevents the classic “it feels like the same amount” problem.
5) Nutrient concentration check with repeatability Mix nutrients to your target, stir thoroughly, and wait a few minutes for bubbles to settle. Measure concentration, then measure again after 5 minutes without adding anything. If readings jump around, your mixing or measurement technique needs tightening.
A Practical Calibration Routine
Run this routine once at the start of a cycle and again after any major change.
- Set lights and fans to your intended schedule.
- Stabilize for 30–60 minutes before recording.
- Record temperature, humidity, and one airflow check.
- Perform one watering/nutrient cycle and measure volume and concentration.
- Compare to your baseline and adjust only one variable.
Keep a small log. The log doesn’t need to be fancy; it needs to be consistent.
Mind Map: Calibration Inputs and Outputs
Example: Soil Closet Watering Calibration
You water “until it looks right,” but plants dry out unevenly. Do this:
- Place three identical cups under three representative spots in the tray.
- Run your normal watering amount once.
- Measure the water collected in each cup.
If one cup collects 30% more, your watering is uneven. Fix it by adjusting the pour pattern or using a slower, more distributed application. After the change, repeat the same test. Your goal is not equal cups forever; it’s predictable distribution.
Example: Soilless Nutrient Calibration
Your meter reads 900 ppm one day and 1050 ppm the next, even though you “mix the same.” Do this:
- Mix for the same duration every time.
- Stir in the same order.
- Measure after the same settling time.
- Measure twice, 5 minutes apart.
If the second reading is consistently higher or lower, you’ve found a measurement timing issue. Fix the timing, then keep the mixing routine stable.
Quick Checklist for Measurement Checks
- Sensor placement matches plant level
- Light height is marked and repeatable
- Airflow has a clear path across the canopy
- Water volume is measured at least once per method
- Nutrient readings are repeatable after settling
- One change at a time, with re-stabilization
Calibration is boring in the best way: it turns guesswork into a routine you can repeat, so your plants get the same conditions every cycle.
7. Planting, Germination, and Transplanting
7.1 Seed Starting Methods That Work in Small Spaces
Small spaces reward methods that reduce mess, shorten time under weak light, and make it easy to keep seedlings consistent. The goal is simple: get seeds to germinate reliably, then move young plants into the right light and moisture conditions before they get leggy.
Choose a Method Based on Seed Type
Start by matching the method to the seed’s needs.
- Tiny seeds (lettuce, arugula): prefer surface sowing on a fine, moist medium.
- Medium seeds (basil, cilantro): sow at a shallow depth and keep moisture steady.
- Larger seeds (beans, peas): sow deeper and avoid letting them dry out during the first week.
A practical rule: if you can’t easily control moisture in your container, you’ll struggle more than you expect. Small spaces make drying faster, especially near lights or vents.
Method 1: Tray and Cell Starts Under Controlled Light
This is the most forgiving approach for beginners because each seed gets its own space.
How to do it
- Fill seed-starting mix into cells and water until evenly damp, not muddy.
- Sow seeds at the recommended depth, then cover lightly with mix or vermiculite.
- Label the tray with crop and sow date.
- Cover with a humidity dome or plastic wrap until germination, then remove.
- Place under a light source as soon as sprouts appear.
Why it works in a closet
- Cells prevent root tangling.
- You can bottom-water by placing the tray in a shallow pan for a short time.
- Light can be kept close because seedlings are compact.
Example For lettuce: press seeds gently into the surface, mist lightly, and keep the top layer consistently moist. Once you see green, remove the cover and increase light exposure so the seedlings stay upright.
Method 2: Paper Towel Germination Then Potting
This method is great when you want to see germination progress quickly.
How to do it
- Moisten paper towels and wring out excess water.
- Spread seeds in a single layer, fold, and place in a sealed bag.
- Check daily. When roots appear, pot each seed carefully.
- Keep newly potted seedlings under light and lightly moist.
Why it works in a small space
- You avoid guessing whether seeds are alive.
- You can start only the number of seedlings you actually need.
Example For basil: germinate in a bag for a few days, then pot as soon as roots show. Basil seedlings are small; potting early reduces the chance of damaged roots.
Method 3: Direct Sowing in Final Containers
Some crops tolerate starting where they’ll grow.
How to do it
- Use a container size appropriate for the crop’s final needs.
- Sow seeds at the correct depth and thin later if needed.
- Keep the top layer moist until emergence.
Why it works in a closet
- Fewer transplant steps means less disturbance.
- It reduces the number of containers you must manage under lights.
Example For radishes: sow directly in a shallow container. Thin to spacing that matches the variety. Radishes move fast, so you spend less time babysitting seedlings.
Method 4: Mini “Seedling Flats” With DIY Humidity Control
When you don’t want a full tray system, you can use small flats with a clear cover.
How to do it
- Use a shallow, clean container with drainage.
- Fill with seed-starting mix and water evenly.
- Sow, cover lightly, then place a clear cover over the top.
- Vent the cover briefly each day to prevent constant condensation.
- Remove the cover at first true leaf.
Example For spinach: keep moisture consistent during germination, then remove the cover promptly. Spinach seedlings can get crowded quickly, so thin early.
Mind Map: Seed Starting Choices in Small Spaces
Quick Setup Checklist for Day One
- Use clean containers and fresh seed-starting mix.
- Label everything immediately.
- Water the medium before sowing so seeds don’t float.
- Plan where seedlings will go the moment they sprout.
Common Mistakes and Fixes
- Cover left on too long: seedlings can stretch and develop weak stems. Remove covers as soon as you see sprouts.
- Medium too wet: seeds can rot. Aim for damp, not saturated.
- Light delayed: even a day or two matters. If you can’t provide strong light right away, germinate in smaller batches so you’re not waiting.
Example Plan for a First Closet Batch
Start with two methods to reduce risk: germinate basil on paper towels for visibility, and sow lettuce in cells for simplicity. Keep both under light immediately after emergence, and thin lettuce early so airflow can reach the base of the plants.
7.2 Germination Conditions and Timing for Fast Success
Fast germination in a closet farm is mostly about consistency: the seed needs the right moisture level, a stable temperature, and enough oxygen to start respiration. Timing then becomes predictable because you control the variables instead of guessing.
Germination Conditions That Actually Matter
Moisture level: Seeds need water to activate enzymes, but they also need air. If your medium is soggy, oxygen drops and seeds can rot. A practical target is “evenly damp, not dripping.” For example, when you squeeze a handful of starter mix, it should feel like a wrung-out sponge—no streams, no dust-dry clumps.
Temperature range: Each crop has a preferred range, but most common leafy greens and herbs germinate well in the same neighborhood. A simple rule: keep the seed zone warm, not hot. For many vegetables, a range around 70–80°F (21–27°C) works well; cooler conditions slow germination, warmer conditions can cause uneven sprouting.
Light during germination: Many seeds do not require light to sprout. In practice, you can cover most seeds lightly with medium and keep the surface from drying out. Tiny seeds (like basil) often need only a light press into the surface rather than deep coverage.
Oxygen and airflow: Even in a closed closet, you can support oxygen by avoiding waterlogged media and by using containers with drainage. If you’re using a humidity dome, open it briefly each day to prevent a constantly wet surface.
Seed depth and contact: Seeds germinate faster when they have good contact with moist medium. A helpful guideline is to plant at a depth about 1–2 times the seed thickness for most seeds. If you’re unsure, err shallow and keep the surface consistently damp.
Timing: What “Fast” Looks Like
Germination timing is usually measured in days from sowing to visible sprout. “Fast success” means you hit the right conditions early, not that you force seeds to rush.
Typical ranges for beginners:
- Leafy greens (lettuce, arugula, spinach): often 3–7 days
- Herbs (basil, cilantro, chives): often 5–10 days
- Radish: often 3–6 days
- Peppers and tomatoes: often 7–21 days (slower by nature)
If your seeds are taking longer than the upper end of these ranges, check moisture first, then temperature. Light coverage issues are common too: seeds planted too deep may take longer even in perfect warmth.
A Simple Workflow for Consistent Germination
- Pre-moisten the medium before filling cells or trays.
- Sow at the correct depth and label varieties immediately.
- Cover and seal for humidity if your closet air is dry, but plan to vent daily.
- Maintain temperature at the seed level, not just the room.
- Check once daily for the first signs of sprouting.
- Remove the dome as soon as sprouts appear to prevent damping-off.
Here’s a concrete example: suppose you’re starting lettuce in a small closet where the air runs cool at night. Place the seed tray on a stable warm surface (like a controlled heat mat under the tray) so the seed zone stays in range. Keep the medium damp, vent the dome daily, and expect sprouts in about a week.
Mind Map: Germination Conditions and Timing
Example: Diagnosing Slow Germination in a Closet
You sow arugula on day 1 and see no sprouts by day 7. First, touch the medium: if it’s dry on top and wet underneath, the surface may be too dry for oxygen exchange. Mist lightly and improve moisture uniformity by watering from the bottom if your tray allows it. Next, measure temperature at the tray level. If it’s closer to 60–65°F (15–18°C), germination will lag; adjust the seed-zone warmth. Finally, confirm depth: if seeds were buried deeply, they may take longer because they must travel farther to reach the surface.
Example: Getting Basil to Sprout Reliably
Basil seeds are small and easy to bury too deep. Sow them on the surface of a pre-moistened mix, then press gently so they contact the medium. Keep the surface consistently damp using a dome or cover, but vent daily. Expect sprouts around a week to ten days under stable warmth. Once you see seedlings, remove the cover so the surface doesn’t stay wet.
Quick Checklist for Fast Success
- Medium is damp, not soggy
- Seed zone temperature is stable
- Correct depth and good contact
- Dome is vented daily
- Sprouts trigger immediate cover removal
- Timing matches the crop’s typical range
7.3 Transplanting Without Shock in Confined Setups
Transplanting “without shock” means the plant keeps doing the same job it was already doing: taking up water, using light, and growing roots. In a closet, the margin for error is smaller because airflow, temperature swings, and light intensity change quickly when you open the door or move trays.
What Shock Looks Like
Shock is usually not dramatic. It shows up as slowed growth, drooping that doesn’t bounce back the next day, or leaves that look slightly dull or curled. The most common cause is a mismatch between the seedling’s root environment and the new container’s conditions—especially moisture level and temperature.
Timing That Prevents Root Stress
Transplant when seedlings have enough structure to handle handling. A practical rule: transplant when you can see sturdy stems and a few true leaves, not just the first seed leaves. If you wait too long, roots tangle and break more easily; if you transplant too early, the plant has fewer reserves to recover.
In a closet, schedule transplanting for a time when your lights and fans will stay stable. If your setup runs a strict light schedule, transplant shortly before lights go on or shortly after they’ve been on for a while, so the plant isn’t forced to adjust to both a new pot and a sudden lighting change.
Prepare the New Home First
Before you touch the seedlings, make the new containers ready.
- Moisten the medium so it’s evenly damp, not soggy. Think “wrung-out sponge,” not “standing water.”
- Match the temperature of the medium to the room. Cold wet media can slow root activity.
- Pre-stage spacing so you don’t hover over one plant while the others dry out.
A simple workflow: fill and water containers, label them, set them in place, then begin transplanting.
Handle Seedlings by the Leaves’ Neighborhood
Roots are delicate, but seedlings are tougher than they look when you handle them correctly.
- Lift seedlings by the root ball or leaves (not by the stem).
- Keep roots shaded and out of air for as short a time as possible.
- If you must pause, place seedlings back into a tray with a light mist on the surface of the medium.
In tight spaces, it helps to move one tray at a time. Reaching across a shelf can bruise stems and stretch roots.
Planting Depth and Firming Without Compaction
Plant at the same depth the seedling was growing, unless your crop guide says otherwise. Deeper planting can help some stems form extra roots, but in small containers it can also bury tender tissue and slow recovery.
After placing the seedling, gently firm the medium around the root ball. You want contact, not compression. Over-compacting reduces pore space, which makes it harder for roots to breathe.
Watering Strategy for the First 48 Hours
The first watering is the difference between “settling in” and “staying stuck.”
- Water immediately after transplanting to eliminate air gaps around roots.
- Then avoid frequent top-ups. Instead, check moisture by touch: if the surface is dry but the medium below feels cool and slightly damp, wait.
If your closet runs warm or dry, consider a slightly higher humidity environment for a day—just enough to reduce leaf wilting while roots re-establish.
Light and Airflow Adjustment
Seedlings often tolerate light, but not sudden intensity.
- Start with gentler light for the first day if your grow light is strong or close.
- Keep airflow steady but not blasting. A small fan is great; a direct jet can dry leaves faster than roots can drink.
A good sign: leaves remain upright and the plant stops drooping within 12–24 hours.
Mind Map: Transplanting Without Shock
Example: Lettuce in a Small Shelf Closet
You start lettuce in a seed tray under lower light. When seedlings have 2–3 true leaves, you fill small cups with damp potting mix and set them on the shelf before transplanting.
You lift each seedling by the leaves’ base, place it at the same depth, and gently firm the mix. After transplanting, you water thoroughly until a little drains, then stop. For the first day, you raise the light a bit or shorten the light intensity exposure so leaves don’t fry while roots reattach. You keep the fan on low and indirect.
By the next day, leaves look less droopy and the plants hold their posture. If they’re still limp after 24 hours, you check medium moisture and airflow direction before assuming anything else.
Example: Basil in a Tight Hydroponic-Adjacent Setup
If you’re using a soilless medium like coco coir in small net cups, shock often comes from dry-out at the root zone. You pre-wet the medium until it’s evenly moist, then transplant quickly.
You place the seedling so the root ball sits snugly in the medium, then water or wick to ensure immediate contact. Basil seedlings dislike sudden strong light; you keep the light slightly farther away for a day and maintain gentle airflow. The success check is simple: new growth should not stall for more than a couple of days, and leaves should stop drooping as roots resume uptake.
Transplanting is mostly logistics: prepare the new containers, handle quickly, match moisture and temperature, and smooth the first day of light and airflow. In a closet, that’s what prevents shock.
7.4 Spacing, Thinning, and Canopy Management
Spacing is the quiet work that decides whether your closet farm turns into a tidy salad factory or a tangled science experiment. In small spaces, every centimeter matters because light, airflow, and water all compete for the same limited real estate.
Spacing Basics That Actually Matter
Start with the mature size, not the seedling size. A lettuce that looks tiny at transplant time can become a dense mat later, shading lower leaves and slowing drying after watering. Use three rules:
- Leave room for airflow between plants. If leaves touch, humidity hangs around and fungal problems get a head start.
- Match spacing to light intensity. Stronger light lets plants handle slightly tighter spacing, but uneven light still creates weak spots.
- Plan for access. If you can’t reach the center without stepping on leaves, you’ll harvest late, and late harvests reduce quality.
A practical method: place plants at the recommended spacing, then do a “future canopy check” by imagining the leaves at full size. If you can’t picture it, measure the expected spread on the seed packet or label and compare it to your bed width.
Thinning Without Regret
Thinning is removing extra seedlings so the remaining ones can grow properly. It’s not optional for most direct-sown crops because germination is rarely uniform.
When to thin: thin when seedlings have at least two true leaves. At that point, you can distinguish weaker seedlings by leggy growth, pale color, or poor leaf shape.
How to thin:
- Cut, don’t yank when seedlings are close. Cutting at soil level reduces root disturbance for neighbors.
- Thin in stages if you’re unsure. Remove the clearly weakest first, then reassess a few days later.
Example: If you sow arugula thickly in a narrow tray, you might see 30 seedlings where you planned for 12. Thin to the target spacing once true leaves appear. You’ll get fewer plants, but each one forms a better leaf mass and you’ll harvest more consistently.
Canopy Management for Light and Air
Canopy management means shaping the plant cover so light reaches the leaves that matter and air can move through the crop.
Key goals:
- Reduce shading of lower leaves. Lower leaves that never get light become limp and more disease-prone.
- Keep the canopy from becoming a wall. Dense canopies trap moisture.
- Maintain a predictable height. Uniform height makes harvesting easier and reduces the “one plant is tall, the rest are stuck” problem.
For leafy greens and herbs, canopy control is mostly about spacing and harvest timing. For vining crops, it’s about training and pruning.
Simple Canopy Strategies by Crop Type
Leafy Greens and Herbs
- Harvest early and often. For cut-and-come-again lettuce or baby greens, remove outer leaves before the center becomes crowded.
- Remove damaged leaves. Leaves with tears or persistent discoloration don’t contribute much to growth and they slow drying.
Vining Crops
- Train upward. Use a trellis or string line so the canopy doesn’t sprawl across the floor of the closet.
- Prune for access. Remove leaves that block airflow around the main stem.
Mind Map: Spacing, Thinning, and Canopy Management
Example: Lettuce in a Narrow Closet Shelf
Assume you have a shelf that’s 30 cm wide. If the label suggests 20 cm spacing for full-size heads, you can’t fit multiple full heads without crowding. Instead, you can:
- Choose a smaller target. Grow loose-leaf lettuce for repeated harvests.
- Space for leaf spread, not head size. Place plants so their outer leaves can expand without touching.
- Harvest the outer leaves first. This keeps the center from becoming a dense, humid clump.
If you notice the center leaves staying pale and wet after watering, that’s a canopy signal: either spacing is too tight or harvest timing is too slow.
Example: Direct-Sown Radishes and the “Too Many Seedlings” Problem
Radishes are often sown thickly for convenience. If you leave them crowded, they stay small and can become woody.
- Sow, then thin to the target spacing once true leaves appear.
- If your closet is cool and growth is slow, thin promptly anyway. Slow growth doesn’t justify overcrowding; it just makes the competition last longer.
A good rule of thumb: if you can’t see soil between plants after thinning, you’re likely too tight for healthy airflow.
Quick Self-Check After Thinning
After you thin and adjust plant placement, do a 30-second inspection:
- Can you see airflow paths between leaves?
- Do plants have enough room to expand without immediately touching?
- Are lower leaves likely to receive light, or will they be permanently shaded?
If any answer is “no,” fix spacing now. Waiting usually turns a simple adjustment into a bigger cleanup later.
7.5 Succession Planting for Continuous Harvests
Succession planting means you plant in batches on a schedule, so you harvest something regularly instead of all at once. In a closet, this matters even more because your space is fixed: if you fill it with one crop cycle, the next cycle waits for empty shelves.
The Core Idea
Pick a crop with a predictable harvest window, then stagger plantings so at least one batch is always near harvest. For example, if lettuce heads take about 45 days from sowing to harvest, you can start new seeds every 10–15 days. That way, you harvest a small amount from each batch rather than a big harvest from one batch.
A practical rule: choose a planting interval that is shorter than the time between “ready to harvest” and “past peak.” If your crop stays good for about 20 days, starting new batches every 7–10 days gives you overlap without crowding.
A Simple Scheduling Method
- Write down your timeline. For each crop, note approximate days to first harvest and days to last good harvest.
- Choose your batch interval. Use 1/2 to 2/3 of the “good harvest window” as your interval.
- Assign shelf space to batches. If you have 3 shelves, you can run 3 overlapping batches at once.
- Keep the same light and watering routine. Consistency reduces the number of variables when you troubleshoot.
Mind Map: Succession Planting Workflow
Example: Leafy Greens That Keep Paying Rent
Let’s say you want continuous harvests of baby lettuce and arugula. You can run a “leafy rotation” where you harvest leaves rather than waiting for full heads.
- Batch size: 1 tray per interval.
- Interval: every 10 days.
- Harvest style: start picking outer leaves when plants are 3–5 inches tall.
- Space logic: keep 2–3 trays growing at once.
Concrete routine:
- Day 0: sow Tray A.
- Day 10: sow Tray B.
- Day 20: sow Tray C.
- Day 30: harvest Tray A leaves, then keep harvesting Tray A while Tray B and C grow.
- Day 40: harvest Tray B leaves; Tray C is now your main harvest.
When a tray slows down (leaves get smaller or plants start bolting), remove it and sow a replacement tray. This keeps your closet from turning into a salad museum.
Example: Herbs with Short Turnarounds
Herbs like basil and cilantro can be succession-planted, but the harvest method matters.
- Basil: pinch regularly to encourage branching. Start a new batch every 2–3 weeks so you always have plants at different sizes.
- Cilantro: harvest leaves frequently, but plan for a shorter “good period.” If cilantro bolts quickly in your conditions, shorten the interval and use smaller batch sizes.
A helpful detail: herbs often respond strongly to light intensity. If your light is adjusted, your “days to harvest” changes too, so update your interval based on what you actually see.
Example: Radishes for Fast, Predictable Overlap
Radishes are ideal for beginners because they mature quickly. If your radishes take about 25–30 days to harvest, you can sow every 7–10 days.
- Batch size: a shallow tray or a small number of holes in a container.
- Harvest: pull whole plants at peak size.
- Rotation: when Tray A is harvested, it’s replaced with a new sowing.
This creates a steady rhythm: you’re not waiting weeks to see results, and you’re not stuck with a single “all at once” harvest.
Labeling and Tracking That Actually Helps
Use simple labels on every tray or container:
- crop name
- sowing date
- batch number (optional)
Then keep a one-line log for each batch: “first harvest date” and “last good harvest date.” After two or three cycles, you’ll know your closet’s real timing, not just the seed packet’s estimate.
Common Mistakes and Fixes
- Mistake: planting too frequently so batches crowd each other.
- Fix: reduce batch size or increase interval.
- Mistake: harvesting too late so quality drops.
- Fix: harvest at the first sign of peak size or leaf tenderness.
- Mistake: forgetting to remove spent plants.
- Fix: treat removal as part of the harvest routine, not an extra chore.
Succession planting works best when you treat it like a repeatable schedule: sow in batches, harvest on time, replace promptly, and let your observations refine the interval.
8. Crop-Specific Guides for Beginner-Friendly Vegetables
8.1 Leafy Greens Like Lettuce, Spinach, and Arugula
Leafy Greens That Fit Closet Farming
Leafy greens are the easiest way to learn closet farming because they grow fast, stay compact, and forgive small mistakes. Lettuce, spinach, and arugula also let you practice the core skills—light positioning, watering rhythm, and harvest timing—without waiting months for results.
What to Expect from Each Crop
Lettuce is usually the most predictable for beginners. Many varieties form heads or loose rosettes, and they prefer steady moisture and moderate temperatures.
Spinach grows quickly and handles cooler conditions well. It can bolt if it gets too warm or if light is too intense for long periods, so temperature control matters more than with some other greens.
Arugula is peppery and fast. It tends to be less fussy about minor fluctuations, but it can also bolt when conditions push it toward flowering.
A Simple Setup That Works
Aim for a consistent environment rather than chasing perfection. For most closets, start with these practical targets:
- Light: keep leaves close enough to the light to prevent stretching, but far enough to avoid heat buildup.
- Temperature: prioritize cooler conditions for spinach and arugula.
- Humidity: keep airflow steady so leaves dry between watering cycles.
A good beginner workflow is to run lights on a timer and check plants at the same times each day. If you notice wilting, drooping, or slow growth, you can usually trace it to water timing, light distance, or airflow.
Soil Versus Soilless for Leafy Greens
If you’re using soil, choose a mix that drains well and holds moisture without turning into a swamp. If you’re using soilless media, focus on consistent moisture and gentle feeding.
Leafy greens don’t need heavy nutrient strength. Overfeeding often shows up as dark, overly lush growth that’s more prone to disease and tip burn. Underfeeding shows up as pale leaves and slowed growth.
Watering That Doesn’t Turn into a Guessing Game
Watering is the main variable you’ll adjust. Instead of watering on a strict schedule, water based on media moisture.
Try this routine for your first batch:
- Water thoroughly until excess drains or the media is evenly saturated.
- Wait until the top layer feels slightly dry before watering again.
- If leaves droop after watering, you may be watering too late or the media may be staying too wet.
Concrete example: if lettuce leaves look limp in the morning but perk up later, the media is likely drying too fast between waterings. If leaves stay limp even after watering, the media may be staying too wet or roots may not be getting enough oxygen.
Light Management for Compact Growth
Leafy greens want light close to the canopy. If plants stretch, raise the light or reduce the distance. If leaves look scorched or curl with crispy edges, increase distance or reduce intensity.
A practical rule: adjust one variable at a time. If you change light distance and watering together, you won’t know what fixed the problem.
Spacing and Thinning
Crowding reduces airflow and increases disease risk. It also makes it harder to harvest without damaging neighbors.
Example spacing approach:
- Sow densely for baby-leaf harvest, then thin.
- For cut-and-come-again lettuce, leave enough room for regrowth.
- For spinach and arugula, thin early so leaves don’t overlap.
Thinning is not a failure; it’s how you prevent future problems.
Harvesting Like a Beginner Who Wants More Than One Crop
Harvest timing determines whether you get regrowth or a second planting.
- Lettuce: harvest outer leaves first for cut-and-come-again varieties. If the center starts to bolt, switch to a new planting.
- Spinach: harvest leaves when they’re large enough to eat. If plants bolt, harvest quickly and replant.
- Arugula: harvest young leaves for tenderness. If plants flower, the leaf quality changes, so replant for the next cycle.
Mind Map: Leafy Greens in a Closet
Example: First 21-Day Leafy Green Cycle
Day 1: Sow lettuce and spinach in separate trays. Sow arugula slightly denser if you plan baby leaves.
Day 7: Thin lettuce and arugula so airflow can move between plants. Check media moisture and adjust watering frequency.
Day 14: Start harvesting lettuce outer leaves and arugula leaves. Leave spinach until leaves are large enough to eat.
Day 21: Harvest remaining spinach and finish lettuce. If any plants show early bolting signs, remove them and start a new batch immediately.
This cycle teaches the three most important habits: keep light close, water based on moisture, and harvest before stress turns into bitterness.
8.2 Herbs Like Basil, Cilantro, and Chives
Herbs are a great closet-farming starting point because they tolerate smaller containers and shorter harvest windows than many vegetables. The trick is to treat each herb like its own little climate preference, even when they share the same light and airflow.
Basil
Basil grows fast when it has warm temperatures, steady light, and enough water to keep the soil lightly moist. In a closet, basil often stretches if the light is too far away, so aim for compact growth: keep the canopy close to the light and watch for long, pale stems.
Container and media: Use a pot with drainage holes and a media that holds moisture without staying soggy. A simple approach is a quality potting mix plus perlite for extra drainage. If water runs straight through, add a bit more mix; if water pools, add more perlite.
Watering example: Check the top 1 inch of media. If it feels dry there, water until you see a little runoff, then empty the tray. If it still feels damp, wait a day. Basil dislikes both drought stress and constantly wet roots.
Harvesting example: Start pinching when plants have at least 6–8 leaves. Pinch above a leaf pair to encourage branching. Harvesting regularly prevents basil from focusing energy on flowering, which also helps keep leaves tender.
Cilantro
Cilantro is the closet farmer’s “timing herb.” It grows quickly, but it can bolt when conditions are too warm or when it’s stressed. Your goal is cool, consistent growth and frequent harvesting.
Temperature and airflow: Cilantro prefers cooler conditions than basil. If your closet runs warm, consider placing cilantro slightly farther from the hottest part of the light or using a gentler airflow pattern that doesn’t dry the leaves too aggressively.
Watering example: Keep moisture even. If you let it swing from dry to soaked, the plant is more likely to bolt. A practical routine is to water small amounts more often rather than one big soak.
Harvesting example: Snip outer leaves and stems regularly. For a continuous supply, harvest in small batches instead of taking everything at once.
Chives
Chives are forgiving and slow to complain. They handle a range of indoor conditions and bounce back after cutting.
Container and spacing: Use a deeper pot than you think you need, because chives form clumps. Space clumps so air can move between them; crowded clumps stay damp longer and are more prone to issues.
Cutting example: Cut chives about 1–2 inches above the soil line. If you cut too low, regrowth slows. After cutting, keep watering consistent so new shoots emerge evenly.
Shared Setup That Works
Even though these herbs differ, you can run them together if you manage two variables: light intensity and watering consistency.
- Light: Keep plants close enough for compact growth. If basil looks leggy, reduce the distance to the light or increase daily light time.
- Airflow: Use gentle, indirect airflow to prevent stagnant pockets. Strong direct airflow can dry cilantro leaves too fast.
- Watering: Use a “check first” habit. Herbs in small containers dry quickly, so daily checks beat guessing.
Mind Map: Herb Planning for a Closet
Example: A Simple Three-Herb Layout
Place basil on the side that receives the most consistent light. Put cilantro where it gets slightly less heat from the light and where airflow is gentle. Keep chives near the back or side where you can cut them without disturbing other plants.
Routine example for a 2-week window:
- Day 1: Pinch basil tips on the tallest plants; remove any damaged leaves.
- Day 2: Harvest cilantro outer leaves; leave the center growth.
- Day 3: Cut chives lightly if they’ve reached harvest height.
- Days 4–14: Repeat small harvests every few days, and water based on the top-inch moisture check.
This approach keeps each herb in its preferred rhythm: basil branches, cilantro stays productive without stress, and chives regrow reliably.
8.3 Compact Crops Like Radishes and Baby Greens
Compact crops are the closet farmer’s best friend because they finish quickly, fit in shallow containers, and tolerate the “small mistakes” that happen when you’re learning. Radishes and baby greens also make it easy to practice the core skills—light positioning, watering consistency, and harvest timing—without committing to a long cycle.
What Makes Radishes and Baby Greens Work in Closets
Radishes are fast: many varieties are ready in about 3–5 weeks. Baby greens can be harvested as early as 2–3 weeks depending on the mix and how you cut. Short cycles reduce the time you have to keep conditions perfect, but they still reward good setup.
Both crop types prefer consistent moisture rather than constant wetness. In small spaces, it’s easy to swing between “too dry” and “too soggy,” so your goal is stable dampness in the root zone. A simple rule helps: water until the medium is evenly moist, then wait until the top layer just starts to lose its sheen before watering again.
Container and Medium Choices
For radishes, use containers at least 4–6 inches deep so roots can form without hitting the bottom. Baby greens can grow in 2–4 inches of medium, which is great for tight shelving.
Use a seed-starting mix or a light potting mix that drains well. Heavy mixes compact in small containers, which can lead to uneven germination and bitter leaves. If you’re reusing containers, wash them thoroughly and replace the top layer of medium to reduce residue buildup.
Light and Spacing That Actually Matters
Aim for strong, even light. Uneven light causes leggy seedlings and patchy growth, which is especially noticeable in baby greens.
For radishes, sow seeds according to the packet, then thin if needed. Crowding makes roots smaller and can increase the chance of splitting. For baby greens, you can sow more densely because you’ll harvest young, but keep the surface evenly covered so you don’t get a “mosaic” canopy.
A practical approach: after sowing, gently press seeds into the medium and mist lightly. Then check daily for the first signs of germination. Early adjustments are easier than fixing stretched plants later.
Watering and Feeding Without Overcomplicating
Radishes and baby greens usually do fine with modest feeding because they’re harvested young. Overfeeding can cause fast, soft growth that collapses under its own weight.
If you’re using a pre-fertilized potting mix, you may not need additional nutrients for the first couple of weeks. If you’re using a plain seed-starting mix, use a diluted, balanced fertilizer once seedlings are established—think “small dose, not a full meal.”
For watering, use a method that avoids disturbing seeds: a fine mist for the first week, then a gentle pour around the edges once plants are up. If you see water pooling on the surface, slow down and let it absorb.
Temperature and Airflow for Quick, Clean Growth
Radishes and baby greens grow best when temperatures are moderate. In closets, heat can build near the light. Keep airflow moving so leaves dry slightly between waterings.
A simple check: after watering, look for condensation on walls or the inside of the door. If you see it, increase airflow or reduce watering frequency. Condensation is a clue that your humidity is staying high longer than it should.
Harvesting Techniques That Prevent Regret
For radishes, harvest when roots are the right size for the variety. Leaving them too long can lead to woody texture or splitting. Pull gently, and if you want to keep the soil tidy, loosen the medium around the base first.
For baby greens, cut with clean scissors just above the soil line. Leave a small portion of growth if the variety supports regrowth; otherwise, treat the bed as a single harvest. Harvesting in the morning can reduce wilting because plants are less stressed after a night of cooler temperatures.
Example: A Two-Stage Plan for Continuous Harvest
Stage 1: Start a tray of baby greens. Harvest the first cut at about 2–3 weeks.
Stage 2: Start radishes on a separate shelf. Harvest radishes around week 3–5.
When you harvest, replace the medium surface or start a new tray so you’re not trying to “rescue” a tired bed. This keeps your closet from turning into a long-term experiment.
Mind Map: Compact Crops Workflow
Example: Troubleshooting by Symptom
- Seeds don’t sprout evenly: medium may be too dry at the surface or too compact; mist more consistently during the first week.
- Seedlings stretch: light is too far or too dim; raise intensity or move the light closer while keeping heat in check.
- Leaves look pale: light may be uneven or too weak; rotate trays and confirm the canopy is receiving direct light.
- Radish roots split: harvest timing is late or watering fluctuates; harvest earlier and keep moisture steadier.
- Moldy surface: airflow is insufficient or the medium stays wet; reduce watering frequency and improve circulation.
Quick Checklist for Your Next Tray
Use shallow, well-draining containers; sow evenly; keep moisture stable; maintain airflow; and harvest on time. With radishes and baby greens, your biggest wins come from small, consistent actions rather than perfect conditions.
8.4 Peppers and Tomatoes in Small Controlled Spaces
Peppers and tomatoes both want steady light, consistent watering, and enough airflow to keep leaves dry. The difference is that tomatoes grow taller and heavier, and they need more pruning and support. Peppers stay more compact, but they’re slower to start producing.
What to Grow First
Start with one pepper variety and one tomato variety. Choose compact types so you’re not fighting the ceiling or the light height. A good beginner plan is 2–3 pepper plants and 1–2 tomato plants in the same closet, because peppers tolerate slightly drier conditions than tomatoes.
Containers and Media That Behave
Use containers with drainage holes and a tray that catches runoff. For peppers, 3–5 gallons per plant is comfortable; for tomatoes, 5–7 gallons helps prevent frequent watering. If your closet is small, bigger containers reduce how often you’ll open the door to water.
Use a potting mix that drains well. In tight spaces, soggy roots are the fastest route to leaf problems. A simple rule: water until you see a little runoff, then wait until the top 1–2 inches feel dry before watering again.
Light and Plant Height Management
Tomatoes stretch if light is too weak or too far away. Keep the light close enough that leaves don’t reach for it, but far enough to avoid heat stress. A practical approach is to raise or lower the light as plants grow, rather than letting them “solve” the problem by stretching.
Peppers also benefit from strong light, but they’re less dramatic about stretching. Still, consistent light prevents weak stems and improves flowering.
Temperature and Airflow for Fruit Set
Tomatoes and peppers both set fruit best when temperatures are stable. Aim for a warm daytime range and a cooler night range, without big swings. Airflow matters because it strengthens stems and helps pollen move. Use a gentle fan that moves air across the canopy, not a hurricane that constantly flaps leaves.
If you notice flowers dropping, check two things first: airflow and temperature stability. Overly humid air can also slow drying of leaf surfaces.
Watering and Feeding Without Guesswork
Tomatoes are heavier feeders once they start flowering. Peppers also need nutrients, but they often do fine with a moderate feeding schedule.
A simple feeding rhythm:
- Early growth: light feeding after seedlings establish.
- Flowering: increase gradually.
- Fruit development: keep nutrients steady, not spiky.
Watch the leaves. Dark green leaves with slow flowering can mean too much nitrogen. Pale leaves can mean nutrients are too low or watering is inconsistent.
Pollination in a Closet
In outdoors, wind and insects help move pollen. Indoors, you can do it manually. When flowers are open, gently tap the main stem or use a small electric toothbrush to vibrate the flower clusters for a few seconds. Do this once a day for several days during peak flowering.
Pruning and Training for Tomatoes
Tomatoes need structure. Remove lower leaves that touch the soil or get too shaded. Pinch off suckers—small shoots that grow between the main stem and branches—so energy goes into fruiting.
Support is non-negotiable. Use a stake or trellis and tie stems loosely with soft ties. Tight ties can cut into growth.
Peppers don’t require the same pruning intensity. You can remove damaged leaves and keep the plant from becoming a tangled mess, but avoid aggressive pruning that reduces leaf area.
Common Problems and Practical Fixes
- Yellow lower leaves on tomatoes: often normal early aging, but if many leaves yellow quickly, check watering consistency.
- Blossom drop: usually temperature swings, weak airflow, or insufficient pollination.
- Curling leaves: can be watering stress; verify soil moisture before changing nutrients.
- Slow growth: check light distance and whether the plant is root-bound.
Mind Map: Peppers and Tomatoes in Small Controlled Spaces
Example: A First Closet Layout for One Tomato and Two Peppers
Place the tomato in the center or back where it gets the most consistent light. Put peppers on the sides so their leaves don’t block the tomato’s lower canopy.
Use one watering routine for the whole closet, but check moisture per plant. Tomatoes often dry faster than peppers in the same pot size, so you may need to water tomatoes slightly earlier.
For pollination, schedule a quick daily check during flowering. Tap or vibrate flowers while the light is on, so you can observe results the same day.
Example: A Simple Weekly Checklist
- Daily: confirm airflow is running; check soil surface moisture.
- During flowering: pollinate once per day.
- Weekly: inspect leaves for early yellowing or curling; adjust light height if plants are reaching.
- As tomatoes grow: tie stems and remove suckers as needed.
Example: Matching Pot Size to Your Watering Comfort
If you prefer opening the closet as rarely as possible, choose larger pots. If you’re comfortable checking moisture more often, smaller pots work, but you’ll need tighter attention to watering timing. Either way, the goal is consistent moisture rather than frequent wet-dry swings.
Quick Summary of What Matters Most
For peppers and tomatoes in small controlled spaces, prioritize strong light, stable temperatures, gentle airflow, and consistent watering. Support and pruning are the main tomato-specific tasks, while pollination is the main closet-specific task for both.
8.5 Cucumbers and Other Vining Crops with Vertical Training
Vining crops are a great fit for closet farming because they can climb instead of spreading. The trick is to train them early, keep airflow moving through the canopy, and manage water so the plants don’t swing between soggy and dry.
What to Grow in a Closet
Cucumbers are the headline act, but you can also grow compact vining types like some beans and certain squash varieties if you keep them pruned and supported. For beginners, choose bushy or “compact” cucumber varieties when possible, then still plan to train vertically.
Easy example plan: Start with 1 cucumber plant plus 2–3 companion herbs (like dill or basil) in separate containers. The herbs don’t climb, but they help you practice spacing and airflow around the main vine.
Choosing a Support System
Vertical training works best when the plant has a clear path upward. In a closet, you typically have three practical options:
- Trellis net or grid: A net with small squares lets the vine grab as it grows.
- Twine lines: Tie twine from a top anchor down to the pot, then guide the main stem upward.
- Single-stem stake: Use a stake for one main leader, then prune side growth.
Concrete example: For a 2 ft x 2 ft (about 60 cm x 60 cm) area, a trellis net mounted across the top third gives enough climbing room without blocking light at the bottom.
Training Steps That Actually Work
Start training when the plant has a few true leaves and a stem you can gently guide. The goal is to establish one main leader and keep side growth from turning into a tangled mat.
- Pick a main stem. If multiple stems emerge, choose the strongest one.
- Guide the leader upward. Use soft ties or weave the vine through the trellis.
- Manage side shoots. For a single-leader approach, pinch or prune side shoots below the first fruiting zone.
- Keep the canopy airy. Remove leaves that touch the soil media or block airflow.
Easy example: If your cucumber is producing near the middle of the trellis, prune side shoots below that height so the plant spends energy on fruiting rather than making a dense wall.
Pollination in Small Spaces
Many cucumbers need pollination to set fruit. Indoors, you may need to help.
- If you see flowers but no fruit swelling: pollination is likely the issue.
- Hand pollination method: Use a small brush to transfer pollen from male flowers to female flowers. Female flowers have a small swelling at the base.
Concrete example: Do hand pollination once per day when flowers are open. If your closet has strong airflow, pollen can dry out faster, so timing matters.
Watering and Nutrient Management for Vines
Vining crops drink more as they grow and fruit. In small containers, the root zone can dry quickly under lights and airflow.
- Water consistency beats volume. Aim for steady moisture rather than large “rescue” waterings.
- Watch leaf posture. Drooping during lights-on can mean the plant is thirsty; drooping that improves after watering suggests you’re close.
- Feed for fruiting. As soon as flowering begins, shift to a nutrient mix that supports fruit development.
Easy example: If you’re using soil, water until a small amount drains, then wait until the top 1 inch (2–3 cm) feels dry before watering again. For soilless media, follow the same “check moisture” habit but with smaller, more frequent irrigation.
Light Placement for Vertical Growth
Vertical training changes how light hits the plant. You want the upper canopy to receive the strongest light while the lower leaves don’t become a shaded sink.
- Keep the leader near the brightest zone. Adjust the trellis height or guide the vine so the top doesn’t crowd the light.
- Remove excess lower leaves. This improves airflow and lets light reach fruiting nodes.
Concrete example: If your lower leaves look pale while the top is healthy, prune a few leaves and guide the leader higher rather than adding more fertilizer.
Common Problems and What to Do
- Dense foliage, few fruits: prune side growth and improve airflow; check pollination.
- Yellowing leaves: could be nutrient imbalance or inconsistent watering; verify your watering rhythm first.
- Powdery mildew risk: increase airflow, avoid wetting leaves, and remove infected leaves early.
Easy example: If you notice mildew spots after a humid day, reduce humidity by improving ventilation and stop any leaf misting immediately.
Mind Map: Vertical Training Workflow
Mind Map: Quick Decision Guide
Example Training Plan for a First Closet Cucumber
- Week 1–2: Plant in a container with good drainage, start guiding the main stem to the trellis.
- Week 3–4: Begin side shoot management so the plant forms a clear climbing structure.
- Week 5–6: When flowering starts, prepare for hand pollination and tighten watering consistency.
- Ongoing: Prune leaves that block airflow, harvest regularly, and keep the leader positioned for strong light.
Vertical training turns a messy tangle into a predictable structure. Once you commit to a main leader, airflow and fruiting become easier to manage, even in a small closet.
9. Pest, Disease, and Odor Prevention in Enclosed Areas
9.1 Preventing Introductions With Clean Handling Practices
Clean handling is the boring part that keeps your closet farm from becoming a pest hotel. In a small, enclosed space, one hitchhiker can spread fast because there are fewer places for problems to hide and fewer opportunities for natural predators to show up.
What “Introduction” Means in a Closet
An introduction is anything that brings a pest, disease, or weed seed into your grow area. Common sources include plants and soil/media from outside, contaminated tools, splashing water, and even clothing or hands that touched infested areas. The goal is not sterile perfection; it’s reducing the number of chances for something unwanted to arrive.
Clean Workflow That Actually Fits Real Life
Start with a simple rule: treat your grow area like a “clean zone” and everything else like “not clean.” When you enter, do tasks in an order that minimizes backtracking.
- Plan your sequence. Check plants, then harvest, then only after that do any messy work like wiping floors or handling trash. If you do messy tasks first, you’ll carry residue back onto leaves.
- Use dedicated tools. Keep a small set of scissors, tweezers, and a watering can that never leaves the closet. If you must share tools, wipe and disinfect before and after.
- Control where water goes. Splashing spreads spores and pests. Water at the base, avoid wetting leaves, and use trays or liners so runoff doesn’t travel across the floor.
- Handle plants gently and consistently. Damaged leaves are easier entry points for issues. When you prune, remove only what you need and dispose of it immediately.
Mind Map: Preventing Introductions
Practical Examples You Can Use Immediately
Example: Bringing in Store-Bought Starts
- Keep new plants outside the closet for a short observation period.
- Inspect leaf undersides and stems with good light.
- Remove dead leaves right away; they often hide problems.
- If you see tiny moving insects or webbing, don’t “wait and see.” Remove the plant from your grow area and clean the area it touched.
Example: Reusing Pots and Trays
- Empty and rinse first to remove soil residue.
- Then disinfect using a product appropriate for plant use, following the label directions.
- Let items dry fully before reuse. Damp surfaces can spread issues instead of preventing them.
Example: Tool Sharing Between Rooms
- If you garden outdoors and then come inside, treat your indoor tools as separate.
- If you must use the same hands, wash thoroughly and avoid touching leaf surfaces until you’re done.
- Keep a small “cleaning step” towel or wipes near the closet entrance for quick surface wipe-downs.
Example: Watering Without Spreading Problems
- Use a narrow spout or watering can that targets the soil.
- Place containers on a tray so runoff stays contained.
- After watering, check for puddles. If you see standing water, adjust your watering amount and improve drainage.
A Simple Inspection Routine That Complements Clean Handling
Clean practices reduce risk, but inspection catches what slips through.
- Frequency: once per week is enough for most beginner closets.
- Where to look: leaf undersides, new growth, and the top layer of media.
- What to notice: tiny specks, stippling, sticky residue, or unusual webbing.
When you find something, isolate the plant if possible and remove the most affected leaves. The point is to stop spread while keeping your overall workflow clean.
Quick Checklist for the Day You Start a New Cycle
- New plants inspected before entering the closet
- Tools dedicated or disinfected
- Floors and trays dry and contained
- Watering method set to avoid leaf wetting
- Trash disposal ready so removed material doesn’t sit around
Clean handling is mostly about reducing opportunities. If you make the “clean zone” easy to follow and the “messy zone” hard to mix in, your closet farm stays a lot more predictable.
9.2 Identifying Common Indoor Pests and Early Signs
Indoor closets are small, so pests spread fast once they arrive. The good news is that early signs are usually visible if you check the same spots on a schedule. Aim for a quick inspection every time lights are on or off—pick one moment and stick to it.
What You’re Looking For
Start with the plant surface, then move outward to the growing area.
- Leaf texture changes: stippling, tiny pale dots, or a dusty film can indicate sap-sucking pests.
- Webbing: fine strands on undersides often point to spider mites.
- Misshapen growth: curled leaves, distorted new growth, or stunted tips can come from aphids or thrips.
- Sticky residue: honeydew (a shiny tacky coating) suggests aphids or whiteflies.
- Fungal-looking spots that don’t match your watering: some pests cause feeding damage that later looks like disease.
- Insect movement: adults may be small and quick, but you can often see them when you gently shake a plant.
A practical rule: if the damage is mostly on new growth and leaf undersides, suspect pests before you suspect nutrient issues.
Common Indoor Pests and Their Early Signs
Spider Mites
Spider mites are tiny and easy to miss, but their early damage is distinctive.
- Early signs: pale speckling on leaves, especially near the edges; fine webbing at leaf joints.
- Where to check: undersides of the newest leaves and the top layer of the canopy.
- Example: you notice lettuce leaves that look “faded” in patches. After you flip one leaf, you see tiny moving dots and faint webbing along the veins.
Aphids
Aphids cluster and feed in groups, so damage often appears in concentrated areas.
- Early signs: curled leaves, sticky honeydew, and clusters of soft-bodied insects on stems.
- Where to check: tender shoots, around the base of new leaves, and near any growth points.
- Example: basil tips curl downward and feel tacky. When you wipe a leaf with a damp paper towel, a sticky film transfers.
Whiteflies
Whiteflies are easier to spot because they lift off when disturbed.
- Early signs: adults that flutter upward; yellowing leaves; sticky residue.
- Where to check: undersides of leaves, particularly on plants with dense foliage.
- Example: when you open the closet, small white specks rise like dust that refuses to settle. Under a leaf, you find pale bodies and tiny eggs.
Thrips
Thrips can be tricky because the first signs look like minor leaf scarring.
- Early signs: silvery streaks or scabs on leaves; black specks (their droppings); distorted new growth.
- Where to check: leaf undersides and the newest leaves where damage is most obvious.
- Example: arugula shows thin silvery lines that don’t match watering patterns. New leaves emerge twisted and rough.
Fungus Gnats
These aren’t usually the main threat to plant tissue, but their larvae can damage roots.
- Early signs: adults hovering near soil; larvae in the top layer; wilting despite adequate moisture.
- Where to check: soil surface and the first inch of media.
- Example: you see small dark flies around the watering can. After a week, seedlings look weak and pull away from the media more easily.
Mind Map: Pest Identification Workflow
Early-Sign Examples You Can Use Immediately
- “My leaves look dusty.” Flip a leaf. If you see tiny moving specks and faint webbing, treat it as spider mites rather than assuming a cleaning issue.
- “New growth is curling.” Check for clusters at the tips. If leaves feel tacky, aphids are a strong candidate.
- “I see fluttering white insects.” Disturb a leaf and watch where they land. If they settle back on undersides, whiteflies are likely.
- “There are thin silvery lines.” Inspect the newest leaves closely. If you also find black specks, thrips damage fits.
- “Small flies appear when I water.” Look at the soil surface. If adults hover and larvae are present, fungus gnats are involved.
A Simple Inspection Routine That Works
Use the same order each time so you don’t miss patterns.
- Check the undersides of the top three plants.
- Check the newest growth on each plant.
- Check the soil surface (or media surface) for gnats.
- Look for sticky spots on leaves and nearby surfaces.
- Note what you saw and where, even if it seems minor.
Small, consistent checks turn pest identification from guesswork into a short, repeatable process. That’s the difference between catching a problem early and spending the next week trying to reverse it.
9.3 Managing Fungal Issues with Environmental Adjustments
Fungal problems in a closet farm usually start with a simple pattern: moisture stays on leaves or in the air long enough for spores to settle and grow. The good news is that you can often fix the root cause without changing your nutrient plan or buying new products.
The Environmental Levers That Matter Most
- Leaf wetness duration: If water droplets or high humidity linger on foliage, fungal spores have time to germinate. Your goal is to keep leaves from staying wet between light cycles.
- Air exchange and airflow: Stagnant air lets humidity build up near the canopy. Gentle, consistent airflow helps move moisture away from leaf surfaces.
- Humidity level: High relative humidity increases the chance that condensation forms, especially when temperatures dip.
- Temperature stability: Rapid temperature swings can cause condensation. Stable temps reduce “morning fog” inside the closet.
- Light intensity and schedule: Light supports faster drying and stronger plant structure. If plants are underlit, they stay tender and take longer to recover from minor wetness.
A Practical Adjustment Workflow
Start with observation, then change one thing at a time so you can tell what worked.
-
Step 1: Identify the moisture source
- Check whether you’re misting leaves, dripping during watering, or splashing from a tray.
- Look for condensation on the inside walls or on the underside of shelves.
-
Step 2: Improve airflow before lowering humidity
- Aim airflow across the canopy without blasting leaves directly.
- If you have a fan, place it so air moves from intake to exhaust, not just oscillating in place.
-
Step 3: Reduce humidity using timing
- Run lights on first, then adjust ventilation to keep humidity from climbing during the dark period.
- If your closet gets cooler at night, plan for extra ventilation during the temperature drop.
-
Step 4: Adjust watering habits
- Water the media, not the leaves.
- Water earlier in the light cycle so excess moisture has time to evaporate.
-
Step 5: Remove the “wettest” problem areas
- Remove heavily affected leaves promptly.
- Don’t compost inside the closet; bag and discard outside the growing area.
Mind Map: Environmental Fixes for Fungal Problems
Concrete Examples You Can Apply
Example: Powdery Mildew on Leafy Greens
- What you’ll notice: White dusting that spreads on older leaves, often when humidity is high and airflow is weak.
- Environmental adjustments:
- Increase airflow so leaves dry faster after watering.
- Avoid watering late in the light cycle.
- Remove the most affected leaves to reduce spore load.
- Why it works: Powdery mildew thrives when conditions are favorable for growth and when plants stay damp or stressed. Faster drying and better airflow reduce the time spores can establish.
Example: Botrytis-Like Gray Mold on Dense Canopies
- What you’ll notice: Soft, brownish patches that appear where leaves overlap or where airflow is blocked.
- Environmental adjustments:
- Thin the canopy by removing crowded leaves.
- Reposition fans or ducting to prevent dead zones.
- Keep humidity lower during the dark period.
- Why it works: Dense growth traps moisture. Air movement and canopy spacing reduce the microclimate that mold prefers.
Example: Condensation on Walls and Shelf Surfaces
- What you’ll notice: Water droplets on the inside of the closet, especially when lights go off.
- Environmental adjustments:
- Improve exhaust airflow during the cooler hours.
- Keep temperatures steadier by reducing drafts or insulating the closet walls.
- Avoid adding water to the air (no misting, and ensure trays drain).
- Why it works: Condensation is a “time machine” for fungal growth. If water forms on surfaces, spores have a wet place to start.
Quick Troubleshooting Checklist
- If you see wet leaves: change watering timing and stop leaf misting.
- If you see mold in corners: fix airflow path and remove dead zones.
- If problems spike at night: increase ventilation during the temperature drop.
- If plants stay stressed and slow: verify light level so they can recover and dry faster.
Environmental adjustments are most effective when they target the moisture timeline: reduce how long leaves stay wet, reduce humidity spikes, and keep air moving through the canopy.
9.4 Safe, Practical Control Options for Beginners
Indoor closets are small, which is great for control and also great for mistakes. The safest approach is to prevent problems from starting, then use targeted, low-toxicity actions that you can repeat without turning your grow into a chemistry lab.
Start with Prevention That Actually Works
Prevention is not a vibe; it’s a checklist. Keep plants clean at the start, and keep the environment stable.
- Quarantine new plants and cuttings. If you bring in a basil plant from outside, treat it like it might be carrying hitchhikers. Keep it separate for a week and inspect the undersides of leaves.
- Use clean tools and containers. Wipe scissors and trays between crops. Reusing dirty runoff trays is a common way to reintroduce spores.
- Avoid wet leaves. Water at the base when possible. If you must mist, do it early in the light period so surfaces dry before lights off.
- Keep airflow consistent. Stagnant corners invite mildew. A gentle, steady circulation fan is usually safer than blasting one spot.
Identify the Problem Before You Treat It
Beginners often treat “something is wrong” instead of the specific cause. The fastest way to choose a safe control is to match symptoms to likely culprits.
- Tiny moving dots or specks that leave residue: often insects.
- Powdery white patches on leaves: often fungal mildew.
- Yellowing with distorted new growth: often sap-feeding pests.
- Blackened stems near soil line: often damping-off or root issues.
If you can, remove one affected leaf and check both sides under bright light. That single step usually prevents unnecessary spraying.
Mechanical Controls That Are Low-Risk
Mechanical options are boring, which is why they work.
- Hand removal. Pinch off heavily infested leaves and seal them in a bag before disposal.
- Rinse for light infestations. For aphids or spider mites on hardy greens, a gentle water rinse can knock populations down. Do this when lights are on so leaves dry quickly.
- Sticky traps for monitoring. Use them to track flying pests like fungus gnats. Traps don’t fix the root cause, but they help you confirm what’s happening.
Example: If you see a few aphids clustered on new lettuce growth, remove the worst leaf, rinse the plant, and check again after one day. If the cluster returns, move to a targeted spray.
Safer Sprays and Treatments for Beginners
When you need a spray, choose one that is practical, label-following, and compatible with edible crops.
- Insecticidal soap. Works best on soft-bodied pests like aphids and some scale-like insects. It must contact the pest, so thorough coverage matters.
- Horticultural oil. Useful for certain pests and can help with mildew pressure when used correctly. Oils can stress plants if used at the wrong temperature or light intensity.
- Microbial options. Some products use beneficial microbes to suppress specific diseases. They still require correct timing and coverage.
Key safety rules:
- Follow the label exactly. Concentration and timing are not optional.
- Spray when lights are off or dim. This reduces leaf stress and helps the product stay where you put it.
- Test on one plant first. If you have multiple varieties, test on a less valuable plant and wait 24 hours.
- Avoid spraying flowers you plan to eat. For herbs and leafy greens, focus on leaves and stems where pests live.
Example: For aphids on basil, spray insecticidal soap in the evening, cover leaf undersides, and repeat after 3–5 days if you still see live insects. If you only spray once, you often treat the survivors, not the eggs.
Disease Control Through Environment and Targeted Removal
Most indoor plant diseases are easier to manage by changing conditions than by repeated treatments.
- Improve drying time. Reduce watering frequency, water earlier in the light period, and ensure airflow reaches the canopy.
- Remove infected tissue early. Cutting off the first few leaves with mildew prevents it from spreading through the whole shelf.
- Separate affected plants. If one plant is clearly worse, move it away to reduce spore spread.
Example: If lettuce develops powdery mildew on lower leaves, remove those leaves, increase airflow, and avoid overhead wetting. If the problem persists, then consider a label-approved disease product rather than escalating sprays immediately.
A Simple Decision Flow for Beginners
Use this to choose the least risky option that matches the situation.
    flowchart TD
A[See a symptom] --> B[Check leaf undersides and stems]
B --> C{What do you see}
C -->|Moving insects or residue| D[Use mechanical removal + insecticidal soap]
C -->|Powdery or spreading spots| E[Remove leaves + adjust airflow and drying]
C -->|Wilting with stem near soil| F[Check watering and drainage + isolate]
D --> G[Repeat treatment on schedule if needed]
E --> G
F --> H[Stabilize conditions and monitor closely]
G --> I{Improving in 3-7 days}
I -->|Yes| J[Continue monitoring]
I -->|No| K[Re-check ID and escalate carefully]
Practical “Do This, Not That” Rules
- Do: treat in small steps—remove, rinse, then spray only if needed.
- Do: keep notes on what you applied and when, so you can judge results.
- Don’t: spray everything “just in case.” That increases plant stress and makes future diagnosis harder.
- Don’t: use multiple products back-to-back without a clear reason.
Mini Case Study for a Typical Closet Problem
A grower notices tiny specks on arugula and slight leaf curling on new growth. They inspect the undersides and find small clusters consistent with aphids.
They remove the most affected leaves, rinse the plant gently, and apply insecticidal soap in the evening with full underside coverage. They repeat after 4 days because new growth appears and aphids can re-establish from remaining individuals. After the second treatment, the clusters stop forming. They then focus on prevention by keeping airflow steady and checking undersides during routine harvests.
The takeaway is simple: correct identification plus targeted, repeatable actions beats random spraying every time.
9.5 Odor Control Strategies for Closets and Small Rooms
Closet farms can smell for three main reasons: wet organic material, stagnant air, and nutrient or water issues. The goal is simple—keep moisture where it belongs, keep air moving through the grow zone, and prevent water from becoming a science project.
Root Causes and Fast Checks
Start with quick observations before buying anything.
- Smell source location: If the odor is strongest at the floor or near the reservoir, suspect water, algae, or spills. If it’s strongest near the exhaust path, suspect stagnant air or insufficient ventilation.
- Timing: If odor appears right after watering, suspect runoff pooling or wet media. If it appears after lights go off, suspect temperature drop plus poor airflow.
- Visual clues: Green film on surfaces usually means algae from light + moisture. Dark, slimy spots mean biofilm.
A practical rule: fix the cause first, then fine-tune with odor control.
Airflow That Carries Odor Away
Odor control is mostly airflow management.
- Use a real exhaust path: Air should leave the closet through a vent, not just circulate inside. A small fan that only recirculates can move smells around without removing them.
- Create a pressure direction: Intake air should enter low or from the side, then exit through a higher exhaust point. This helps carry warm, humid air out.
- Avoid dead corners: If a corner never gets airflow, it becomes a moisture trap. Add a small deflector or reposition the fan so air sweeps across the plant canopy.
Example: In a 2 ft x 2 ft closet, place the exhaust fan at the top rear, intake near the bottom front, and aim the circulation fan so it gently moves air across the leaves rather than blasting directly at one plant.
Moisture Control That Prevents Smells
Most odor problems come from water where it shouldn’t be.
- Catch and contain runoff: Use trays with a lip and keep them level. If water overflows, you’ll smell it later.
- Water at the right time: Watering during the light period gives plants and surfaces more time to dry. If you water near lights-off, drying slows.
- Keep media surface tidy: For soil grows, avoid leaving a constantly wet top layer. A thin dry crust is normal; a wet, dark, mushy surface is not.
- Clean drips immediately: Condensation on walls and tubing can collect organics. Wipe weekly, not “when it gets bad.”
Example: If you notice a sour smell after watering, check whether the tray is slightly tilted. Even a small slope can send runoff to one corner where it sits.
Odor Adsorption and When It Helps
Activated carbon can reduce odors, but it works best when airflow is correct.
- Match carbon to airflow: Carbon needs air passing through it. If your exhaust is weak, carbon won’t have enough contact.
- Use it in the exhaust line: Place carbon where air exits the grow space, not where air is merely circulating.
- Don’t expect miracles: Carbon helps with smell molecules, but it won’t fix algae, spills, or biofilm.
Example: If your closet smells “earthy” even when ventilation is on, inspect for algae on the reservoir lid or wet media edges. Fix those first, then add carbon to the exhaust for extra insurance.
Nutrient and Water Hygiene
Water quality affects odor even in small systems.
- Prevent algae growth: Keep reservoirs and tubing out of light. Cover any exposed water surfaces.
- Avoid stagnant water: In recirculating setups, ensure flow is consistent and clean lines if you notice slime.
- Use appropriate cleaning: When you reset a cycle, remove media debris, rinse surfaces, and dry them. Odor often returns if residue remains.
Example: In a wick system, a slow drip can leave a damp strip that smells over time. Widen the wick contact so water distributes evenly, and keep the surrounding floor dry.
Mind Map: Odor Control in Closets
Case Study: One Closet, Three Smells
Scenario 1: Sour smell after watering. The tray had a slight tilt and runoff pooled in one corner. Leveling the tray and wiping the corner after watering removed the odor.
Scenario 2: Musty smell at night. Exhaust ran, but airflow across the canopy was weak. Repositioning the circulation fan to sweep the leaves reduced humidity pockets and the night smell.
Scenario 3: Earthy smell that lingered. Algae film was visible on a reservoir lid. Covering the reservoir and cleaning the lid during the next reset reduced odor; adding carbon to the exhaust line provided the final smoothing.
Quick Checklist for Daily Use
- Tray is level and dry outside the grow area
- No standing runoff after watering
- Exhaust fan runs during the grow window
- Reservoir and tubing are not exposed to light
- Condensation wiped weekly
- Carbon is placed on the exhaust path
10. Harvesting, Pruning, and Extending Production
10.1 Harvest Methods That Preserve Quality and Regrowth
Harvesting in a closet farm is less about “picking whenever you feel like it” and more about timing, technique, and how you handle the plant right after cutting. The goal is simple: remove what you can use now while keeping the plant healthy enough to produce more.
Harvest Timing That Matches Plant Behavior
Leafy greens and herbs usually respond best to harvests that remove outer growth while leaving the center or growing points intact. For lettuce and similar rosette plants, harvest when leaves are large enough to eat but before they get tough or bitter. For basil, harvest frequently enough to prevent flowering; pinching tips encourages branching.
A practical rule: if you can see the plant’s “next leaves” forming near the center, you’re in the right window for a cut-and-come-again approach. If the plant looks stretched, the leaves are turning coarse, or the center is rapidly changing shape, switch to a full harvest plan for that crop.
Techniques That Reduce Damage
Use clean hands or sanitized tools so you don’t smear plant tissue with residue. When cutting, aim for a clean snip rather than tearing. Tearing bruises the leaf base and can slow regrowth.
For cut-and-come-again leafy crops, harvest outer leaves first. Leave the inner leaves and the crown area untouched. If you cut too low, you remove the tissue that would have produced the next flush.
For herbs, use the “pinch and leave” method. Pinch or cut just above a node where new growth can form. If you cut below nodes, the plant has fewer places to branch.
How to Harvest by Crop Type
Leafy greens:
- Remove outer leaves with scissors or a knife.
- Keep the crown intact.
- Avoid harvesting more than about one-third of the plant at a time for best regrowth.
Basil and similar herbs:
- Pinch the top growth to encourage side shoots.
- Harvest in the morning if possible, when leaves are less limp.
- Don’t remove all leaves; keep enough foliage for photosynthesis.
Baby greens:
- Harvest by cutting the whole tray or section when density is right.
- Regrowth is usually limited at this stage, so treat it as a single cycle crop.
Post-Harvest Handling That Protects Quality
Quality drops fast once leaves are cut, mainly from moisture loss and bruising. Handle gently and move harvested greens to a cool, clean area immediately.
Rinse only if needed and dry thoroughly. Wet leaves can encourage rot in storage containers. If you store in a container, use a paper towel to absorb excess moisture and keep leaves from sitting in water.
For closet farms, a simple workflow helps: harvest, sort, rinse if necessary, dry, then pack. Sorting while leaves are still fresh prevents you from mixing damaged pieces with good ones.
Mind Map: Harvesting for Regrowth
Example: Lettuce Cut-and-Come-Again
You have a small tray of lettuce in a closet system. The outer leaves are about hand-length, and the center still looks compact. You harvest by cutting the outer leaves at the base, leaving the crown untouched. After harvest, you check the crown area for any damaged tissue and remove only leaves that are clearly ready.
Two days later, you should see new leaf growth starting from the center. If regrowth is slow, the most common causes are cutting too much at once or injuring the crown during harvest.
Example: Basil Pinch Strategy
Your basil plants have several sets of leaves and a visible top shoot. Instead of removing a large portion of the plant, you pinch the top above a node. The plant responds by sending growth from the node below the cut, creating two stems instead of one.
If you notice the plant is getting leggy, you can harvest more frequently rather than waiting for a big cut. Frequent small pinches keep the plant in a leafy mode.
Quick Checklist for Each Harvest
- Tools are clean and sharp.
- You harvest outer growth first.
- You leave the crown or nodes intact.
- You remove only a manageable portion of the plant.
- You cool and handle gently right after cutting.
- You dry before storing to reduce rot risk.
10.2 Pruning Techniques for Better Light Penetration
Pruning in a closet farm is mostly about one thing: making sure light reaches the leaves that are actually doing the work. In small spaces, the canopy can get dense fast, and the inner leaves end up living in dim, humid conditions where disease risk rises. The goal is not to make plants “look tidy”; it’s to create an even, breathable light pattern.
What Light Penetration Needs
Plants use light at the leaf surface, so pruning should reduce shading and improve airflow without stripping too much leaf area. A simple rule of thumb: remove leaves that block light to other leaves, not leaves that are already receiving good light. If you can see a leaf is shaded by a neighbor, it’s a candidate. If it’s already on the edge and getting direct light, keep it.
Pruning Targets and Priorities
Start with the lowest, oldest leaves. Lower leaves often receive the least light and can become yellow or spotty first. Next, thin crowded zones where stems overlap. Finally, manage growth tips only when the plant is clearly outgrowing its allotted height.
A practical priority list:
- Remove yellowing or damaged leaves to reduce wasted energy and potential infection sites.
- Thin overlapping leaves so the canopy becomes “see-through” in the middle.
- Limit excessive height by pruning tips or training, so light stays near the top leaves.
Leaf Removal Methods
Use clean hands or sanitized scissors. Make cuts close to the stem without tearing. Tearing creates ragged wounds that take longer to heal.
For most leafy crops, you’ll prune by removing individual leaves:
- Leaf-by-leaf thinning: remove 1–3 leaves per plant at a time, then reassess after a few days.
- Selective harvest pruning: for lettuce and similar greens, harvest outer leaves and leave the center to regrow.
For vining or branching crops, pruning often means managing stems:
- Remove side shoots that create dense tangles.
- Keep one or two main stems if your space is narrow.
Timing and Frequency
Prune when plants are actively growing and conditions are stable. In a closet, that usually means pruning during the light period or right before it starts, so plants can recover as light drives growth.
Avoid heavy pruning in one session. A good beginner pace is to prune lightly, wait, and then prune again if needed. If you remove too much at once, the plant may slow down because it has fewer leaves to power regrowth.
How Much to Remove
A safe starting target is no more than about 10–20% of leaf area per session for most beginner-friendly crops. If you’re unsure, remove fewer leaves and focus on the most shaded ones.
If the plant is already stressed—wilting, yellowing broadly, or showing nutrient issues—prune less. In that situation, pruning can reduce the plant’s ability to recover.
Example: Lettuce in a Shelf Closet
You have a small shelf with a compact lettuce cluster. After a week under the light, the inner leaves look pale and slow.
Steps:
- Turn the pot slightly so you can see which leaves are shaded.
- Remove 2–3 outer leaves that are yellowing or touching the soil.
- Thin one crowded section by removing a leaf that overlaps another leaf directly above it.
- Leave the center growth intact.
Result you’re looking for: the remaining leaves should be more evenly lit, and new growth should appear from the center without the plant looking “stripped.”
Example: Basil That Gets Dense
Basil can turn into a leafy wall. When the middle stays shaded, lower leaves may yellow.
Steps:
- Pinch the top lightly only if the plant is too tall for your light height.
- Remove lower leaves that are shaded and touching the pot rim.
- Thin overlapping stems so each stem has a clear path to light.
Beginner-friendly check: after pruning, you should be able to see through the plant from one side to the other.
Mind Map: Pruning for Light Penetration
Quick Troubleshooting
If pruning doesn’t improve the inner leaf color after a few days, the issue may be light placement or canopy height rather than leaf density. If leaves wilt after pruning, you likely removed too much or the plant is already under stress; reduce the next pruning session and check watering consistency.
Pruning is easiest when you treat it like a measurement tool. You change the canopy, then you observe how light and growth respond. In a closet, that feedback loop is fast enough to guide your next cut.
10.3 Managing Bolting and Heat Stress in Leafy Crops
Bolting is when leafy crops switch from making leaves to making flowers and seeds. Heat stress speeds that switch up, especially when plants experience warm temperatures, irregular watering, or long light periods. The goal is simple: keep growth steady so the plant stays in “leaf mode.”
What Bolting Looks Like in Real Life
Bolting often starts with a noticeable change in structure. Leaves may become smaller, tougher, and more bitter. You might also see a thicker center stem forming, followed by rapid vertical growth. In lettuce, the head may loosen or fail to form. In arugula and spinach, the plant may shoot upward and look less “leafy” even if it still has some foliage.
Heat Stress Triggers and Why They Matter
Leafy crops generally prefer cooler conditions. When temperatures rise, plants increase respiration and water use. If the roots can’t keep up, the plant closes stomata to conserve water, which slows leaf expansion. Stress also disrupts nutrient uptake, so leaves may look pale or uneven. Bolting becomes more likely when stress is repeated, not just when it happens once.
A practical way to think about it: bolting is the plant’s response to conditions it interprets as “not stable.” Your job is to make conditions stable enough that the plant doesn’t feel the need to rush.
Temperature Targets That Reduce Risk
Use your closet’s thermometer readings as the main reference point. Aim for a consistent range rather than chasing a perfect number.
- Seedlings and young plants: keep the environment closer to the cooler end of your crop’s comfort zone.
- Mature leafy plants: avoid spikes during the light period.
- Watch for “light heat”: LEDs and especially high-output fixtures can warm the canopy even if the room temperature is fine.
If you can only measure one thing, measure canopy temperature at plant height. Air temperature near the floor can be misleading.
Light Schedule Adjustments Without Causing New Problems
Long days can encourage bolting in some leafy crops. If your system runs 16–18 hours of light, try reducing to a shorter photoperiod that still supports growth. Keep the schedule consistent day to day.
If you reduce light hours, you may need to slightly increase light intensity or improve distance to maintain leaf size. The key is to avoid a trade where plants get both cooler and underlit, because weak growth can also increase stress.
Watering Practices That Prevent “Stress Cycling”
Irregular watering is a common bolting accelerant. A plant that repeatedly dries out and then gets soaked experiences swings in root function.
Use a simple rule: water when the root zone is ready, not when the calendar says it is. For soil, check moisture by feel or by a moisture meter if you have one. For soilless media, learn the weight difference between “dry enough” and “too wet.”
Example: If your lettuce wilts slightly in the afternoon and rebounds overnight, you’re likely cycling too hard. Increase watering frequency or adjust the medium’s water-holding capacity so the plant stays evenly hydrated.
Airflow and Humidity Control for Heat Management
Good airflow helps remove heat from the canopy and reduces stagnant pockets where leaves stay warmer. It also helps prevent surface moisture from lingering, which can contribute to disease.
Humidity matters because it affects how quickly leaves lose water. If humidity is very low during hot periods, plants transpire faster and stress sooner. If humidity is very high with poor airflow, leaves can stay wet longer and become more vulnerable.
Aim for airflow that gently moves air across the canopy without blasting leaves. If you see leaves curling inward during warm hours, airflow might be too strong or too dry.
Crop Choices and Spacing That Buy You Time
Some leafy crops bolt faster than others under heat. If you’re growing a crop known for bolting, treat it as a “cool-season priority” and plan your cycle accordingly.
Spacing also affects heat. Dense plantings trap warm air and reduce airflow between leaves. Thin or space plants so air can move through the canopy. This also improves light penetration, which reduces the temptation to run higher light intensity that can add heat.
Mind Map: Bolting and Heat Stress Control
Example: Fixing a Lettuce Batch That Started Shooting Up
You notice a thick center stem and smaller leaves after a few warm afternoons.
- Check canopy temperature during the light period. If it’s higher than your target, reduce fixture intensity or raise the light slightly while keeping coverage.
- Shorten photoperiod by 2–3 hours and keep the start time consistent.
- Review watering logs. If you watered heavily after the medium dried out, switch to smaller, more frequent waterings.
- Improve airflow across the canopy. Add a gentle circulation fan or adjust vent placement so air reaches the middle of the shelf.
If the plants have already committed to bolting, you can still harvest leaves for quality before bitterness increases. The prevention steps matter most for the next cycle.
Example: Arugula Bolting After a Dry Week
Arugula often bolts quickly when it experiences drought stress.
- Symptom: rapid upward growth with thinner leaves.
- Fix: re-establish steady moisture and reduce heat exposure.
- Implementation: water earlier in the day so the medium doesn’t dry during the warmest hours, and ensure airflow is strong enough to cool the canopy.
The practical takeaway is that bolting prevention is mostly about stability: stable temperature, stable moisture, and stable light timing.
10.4 Replanting and Resetting Between Cycles
Replanting is the part where you turn “the last harvest is done” into “the next batch is already growing.” Resetting is what keeps pests, disease, and nutrient leftovers from hitchhiking into the next cycle. In a closet, small mistakes compound fast, so this section focuses on repeatable steps.
Decide What “Reset” Means for Your System
A soil setup usually needs a deeper media refresh, while a soilless or hydro setup needs more attention to lines, reservoirs, and filters. Start by writing down what you used last cycle: soil type, container size, nutrient brand or recipe, and whether you had any leaf spots, fungus gnats, or root issues. That note becomes your checklist for the next reset.
Remove Old Plants Correctly
Pull plants at the base and remove all plant material, including roots and fallen leaves. If you leave roots behind, you keep a food source for pests and a place for disease to persist. Bag the waste immediately so you’re not shaking spores or eggs around your closet.
Example: If you grew lettuce, don’t just cut the leaves. Pull the whole plant, then wipe the growing surface so the next seedlings don’t start in a layer of decaying residue.
Clean Surfaces and Containers
Use a two-step approach: first remove debris, then disinfect. Debris removal can be as simple as warm water and a scrub, followed by drying. Disinfection should match your materials; for most closet setups, a diluted disinfectant wipe or spray works, then you rinse if the label requires it. Let everything dry fully before you reassemble.
Practical tip: Dry time matters. A damp closet is a friendly place for mold, especially when lights are off and humidity rises.
Reset the Growing Medium
Soil media: If you used potting mix and it stayed relatively clean, you can reuse containers with fresh top-dressing only for short cycles. For a true reset, replace media or at least refresh it heavily, because salts and decomposing roots build up.
Soilless media: Many growers replace rockwool or similar blocks between cycles. If you reuse, you must clean and sanitize thoroughly, and you should expect more variability in water behavior.
Hydro reservoirs: Empty, rinse, and clean the reservoir and any tubing that held nutrient solution. Flush lines with clean water until the flow runs clear. Then run a short clean-water circulation before starting seedlings, so you don’t trap old residue in low points.
Manage Nutrient Leftovers and Salt Build-Up
Even if plants looked fine, nutrient salts can remain in containers and trays. For soil, a thorough watering until some runoff occurs helps move salts downward, but it doesn’t replace media refresh. For hydro, leftover nutrient solution is the bigger issue: it changes pH and concentration, and it can carry microbial growth.
Example: If your last cycle ended with leaf edge burn, assume salt buildup. Replace media or flush thoroughly, then start the next cycle with a gentler nutrient strength for seedlings.
Recalibrate Your Environment Before Planting
Resetting isn’t only physical. Before you sow, confirm your basics: light height and schedule, fan direction, and humidity behavior. If you changed anything during cleanup—moved a fan, adjusted a shelf, or tightened ducting—your airflow pattern likely changed.
Simple check: Run the lights and ventilation for a full cycle day (or at least several hours) and observe temperature and humidity stability. If humidity spikes when lights go off, plan for it before seedlings arrive.
Start the Next Cycle with a “Seedling-Friendly” Plan
Seedlings don’t need the same intensity or feeding as mature plants. Use a staged approach:
- Start with the light schedule you used for germination.
- Keep nutrients mild until roots are established.
- Water based on media feel, not on last cycle timing.
Example: If your last crop was a leafy green that tolerated stronger feeding, don’t assume the next batch should start the same day. Begin with a lower concentration and adjust after you see new growth.
Mind Map: Replanting and Resetting Between Cycles
Case Example: Two Cycles of Lettuce in the Same Closet
Cycle A ends with slightly crispy leaf edges. You remove plants and roots, scrub the trays, and replace the top layer of soil with fresh mix. You also flush the watering system so salts don’t keep accumulating in the same spots. Before sowing Cycle B, you run the closet for several hours to confirm humidity doesn’t climb too high when lights off. You start seedlings with a lighter nutrient approach and only increase feeding once you see steady new leaf growth.
Quick Reset Checklist
- Remove plants and all debris
- Clean surfaces and containers
- Disinfect and fully dry
- Refresh or replace medium
- Flush lines and reservoir if hydro
- Confirm light, airflow, and humidity behavior
- Start seedlings with gentler feeding and watering
10.5 Storing Harvested Produce from Indoor Grows
Storing indoor harvests is mostly about two things: slowing down moisture loss and slowing down spoilage. Since closet farming often produces smaller batches, you can reduce waste by matching storage conditions to the crop’s natural behavior.
What Changes After Harvest
Most vegetables keep best when you manage three variables: temperature, humidity, and airflow. Lower temperatures slow respiration, which is the plant’s ongoing “life processes” after picking. Humidity affects surface drying and wilting, while airflow prevents condensation that can feed mold.
Leafy greens are the drama queens here: they lose water quickly and bruise easily. Root crops are more forgiving because their skins protect them, though they still benefit from cool, dry storage. Herbs sit in the middle: they want moisture, but not soggy stems.
Quick Sorting Rules That Save Food
Before storage, sort by condition. Remove anything with soft spots, punctures, or moldy patches. Keep damaged items for immediate use, because storage only buys time, not miracles.
Also separate by texture. For example, keep delicate lettuce away from sturdier items like radishes, since handling and airflow preferences differ.
Storage Targets by Crop Type
Leafy Greens and Baby Greens
- Wash only if needed. If you wash, dry thoroughly so you’re not storing water.
- Store in a breathable container or a perforated bag with a paper towel to absorb extra moisture.
- Keep cool and avoid freezing temperatures.
Example: Harvest a tray of arugula. Rinse only the visibly dirty leaves, spin-dry, then place in a container lined with a dry paper towel. Replace the towel if it becomes damp.
Herbs
- Trim the ends and store like cut flowers.
- Use a jar or container with a small amount of water for stems, then cover loosely with a bag.
- Change water if it clouds.
Example: Pick basil and cilantro. Remove any leaves that would sit in water, place stems in a small jar, and loosely cover with a bag. Keep it cool but not cold enough to damage tender leaves.
Radishes and Other Roots
- Remove greens if they’re thick and leafy, since they draw moisture from the root.
- Store in a cool place with moderate humidity.
Example: Pull radishes, twist off greens, and place roots in a container with a lightly damp paper towel. Check every couple of days for softening.
Peppers and Tomatoes
- Peppers store better at cool room temperatures or slightly cooler conditions, depending on variety.
- Tomatoes are sensitive to chilling; if you refrigerate, use them sooner.
Example: Harvest a few peppers and keep them in a single layer on a counter for a day, then move to a cool spot. Refrigerate tomatoes only if you plan to use them quickly.
Humidity and Condensation Control
Condensation usually happens when warm produce meets a cooler container. To avoid it, let produce cool slightly before sealing. If you use bags, don’t fully vacuum-seal leafy greens; trapped moisture increases mold risk.
A simple practice: after harvest, place produce in the shade for 15–30 minutes, then package. This reduces temperature shock and helps the container stay drier.
Airflow and Container Choices
Airflow is a balancing act. Too much airflow dries leaves; too little invites mold. Containers with small vents or perforations work well for greens. For herbs, a loose cover reduces drying without trapping heavy moisture.
Example: Use a perforated produce container for lettuce, not an airtight box. If you only have airtight containers, add a paper towel and open briefly once a day to refresh airflow.
A Simple Storage Workflow
- Harvest early in the light cycle if possible, since plants are less stressed.
- Handle gently to avoid bruising.
- Sort by quality and separate damaged items.
- Clean only when necessary, then dry.
- Package by crop type with the right moisture strategy.
- Label with date and crop.
- Check every 1–3 days depending on delicacy.
Mind Map: Storage Decisions That Match Produce Behavior
Case Example: One Closet Harvest, Three Storage Outcomes
A grower harvests lettuce, basil, and radishes from the same closet day. They rinse lettuce only if needed, spin-dry, and store it in a perforated container with a dry paper towel. They store basil stems in a small jar with water and loosely cover the leaves. They twist off radish greens and store roots in a container with a lightly damp towel. Two days later, lettuce is still crisp, basil leaves look fresh, and radishes remain firm—because each batch got the storage condition that matches its structure and water needs.
When you treat storage as part of the harvest process rather than an afterthought, you reduce waste and make your indoor growing feel reliably productive.
11. Maintenance, Cleaning, and System Troubleshooting
11.1 Routine Maintenance Checklist for Daily and Weekly Tasks
A closet farm runs on small, repeatable checks. The goal is to catch problems early: a drooping leaf is a symptom, but the cause is usually water, light, airflow, or temperature. Use this checklist as a “look, touch, listen” routine.
Daily Checklist
1) Quick visual scan (2 minutes)
- Check leaf color and turgor. Healthy plants look firm; stressed plants look limp even if the soil looks “wet.”
- Look for uneven growth. If one side is taller, the light may be misaligned or the canopy is blocking itself.
- Inspect the undersides of leaves. Indoor pests often start where you don’t see them first.
Example: If basil tips curl downward and stems feel soft, don’t jump to nutrients. First verify temperature and watering consistency.
2) Temperature and humidity spot check (1 minute)
- Record or glance at your thermometer/hygrometer.
- If humidity is high, confirm airflow is actually moving air through the canopy, not just spinning a fan.
Example: Condensation on plastic walls usually means humidity is too high for the airflow you’re providing.
3) Water level and delivery check (3 minutes)
- Soil: feel the top layer. If it’s dry 1–2 cm down, water. If it’s still damp, wait.
- Soilless or hydro: verify reservoir level and that emitters or wicks are flowing.
Example: A lettuce tray that stays soggy can smell “earthy” and look fine at first, then suddenly collapse. Catch it by checking moisture depth, not just surface wetness.
4) Drainage and runoff control (1 minute)
- Confirm containers sit in trays and nothing is pooling under the grow area.
- Empty catch trays if your system design requires it.
Example: If runoff collects under a fabric pot, roots can sit in low-oxygen water and growth slows even with correct feeding.
5) Fan and filter sanity check (1 minute)
- Listen for changes in fan sound.
- If you use a carbon filter, check airflow direction and that ducting isn’t kinked.
Example: A slightly louder fan often means dust buildup or a partially blocked intake.
Weekly Checklist
1) Clean surfaces and remove debris (10–20 minutes)
- Wipe down walls, shelves, and any splashes.
- Remove dead leaves and plant debris from the grow zone.
Example: One fallen leaf can become a disease starter if it stays damp and shaded.
2) Inspect roots and media condition (10–15 minutes)
- Soil: check for compacted or hydrophobic spots by observing how water spreads.
- Soilless/hydro: look for root color and smell. Healthy roots are typically light and firm; foul odors and slimy textures are warning signs.
Example: If only one bucket smells off, the issue is usually localized—clogged lines, uneven flow, or a bad batch of media.
3) Verify light height and coverage (5–10 minutes)
- Measure light distance from the canopy.
- Rotate or reposition plants if you see consistent “one side taller” patterns.
Example: Leaf edges that curl upward can be a light intensity or heat issue; check distance before changing anything else.
4) Calibrate your feeding routine (15 minutes)
- Check pH and EC/conductivity if you track them.
- Mix nutrients thoroughly and confirm your measuring tools are clean and accurate.
Example: If growth stalls while leaves look pale, don’t assume the plant “needs more.” First confirm pH and that your solution isn’t diluted by leftover water in a dirty container.
5) Check airflow path and seals (5–10 minutes)
- Confirm intake and exhaust aren’t blocked by stored items or tangled ducting.
- Look for gaps that let unfiltered air in or let humid air escape where it shouldn’t.
Example: A small gap near the door can reduce effective airflow and increase humidity in the canopy.
6) Replace or service consumables (as needed)
- Replace clogged filters or worn tubing sections.
- If you use prefilters, clean them before they restrict airflow.
Mind Map: Daily and Weekly Maintenance Flow
Example: One Week with Leafy Greens
Day 1: Visual scan shows slight droop. Moisture depth is dry 1–2 cm down, so watering fixes it.
Day 3: Humidity is higher than usual and you see a damp corner. You confirm the fan isn’t blocked and adjust airflow so air moves across the canopy.
Day 5: One tray grows slower. You check drainage and find runoff pooling under that tray; you correct the catch tray setup.
Weekly Day: You remove dead leaves, wipe surfaces, inspect roots (or media spread), and verify light height. After that, the next cycle starts with fewer surprises.
11.2 Cleaning Surfaces, Trays, and Tools Without Contamination
Cleaning in a closet farm is less about “getting everything shiny” and more about breaking the chain that moves problems from one plant to the next. The goal is simple: remove plant debris, remove residue, and prevent cross-contact.
Cleaning Principles That Actually Matter
Start with the dirtiest tasks first, then move toward cleaner work. If you wipe a clean tray with a cloth that just touched soil, you’ve basically invited microbes to a free tour.
Use a two-step approach: wash to remove material, then disinfect to reduce remaining microbes. Disinfectants work best after grime is gone; otherwise they’re fighting through a layer of gunk.
Keep “clean” and “dirty” zones. A small bin for used rags and a separate bin for clean tools prevents accidental mixing. If you only have one sink, rinse tools thoroughly and dry them before they touch anything else.
Drying is part of cleaning. Many issues spread more easily when surfaces stay wet. After disinfecting, let items air-dry or dry with clean, dedicated towels.
What to Clean, How Often, and Why
Floors and walls inside the grow area: Wipe weekly, and immediately after spills. Soil splashes and nutrient drips can become sticky residue that traps dust.
Trays and saucers: Clean after each cycle or whenever you see algae, salt buildup, or root debris. Algae often means light plus moisture plus residue.
Plant-contact tools: Clean after every use. Scissors, pruners, and transplanting tools can carry sap or spores.
Gloves and cloths: Gloves are “single-task” items. If you touch diseased leaves, discard or sanitize before touching healthy plants. Cloths should be dedicated to cleaning, not used for drying food-safe items.
Step-By-Step Cleaning Workflow
- Remove plants and debris. Pull dead leaves and root scraps into a trash bag. Don’t rinse debris into drains where it can spread.
- Pre-wash. Use warm water and a mild detergent to remove soil and nutrient film. Rinse until water runs clear.
- Disinfect. Apply an appropriate disinfectant for the material (plastic, metal, fabric). Keep surfaces wet for the contact time on the label.
- Rinse if required. Some disinfectants require a rinse to avoid residue that can irritate plants.
- Dry fully. Air-dry or use clean towels.
- Reassemble and reset. Only after everything is dry should you return trays and tools.
Mind Map: Cleaning Without Cross-Contamination
Practical Examples You Can Copy
Example: Cleaning a Lettuce Tray After Harvest
- Scrape off roots and leaf bits into the trash.
- Wash the tray with warm water and mild detergent, focusing on corners where residue hides.
- Rinse thoroughly.
- Disinfect, keeping the tray wet for the required contact time.
- If the disinfectant label says to rinse, do it, then dry completely.
- Store the tray upside down so it doesn’t collect dust.
Example: Sanitizing Pruners Between Plants
- Wipe sap and leaf residue off with a clean paper towel.
- Disinfect the blades (and any hinge area) and let them sit wet for the contact time.
- Dry before cutting again.
- If you suspect disease on a plant, finish that plant last, then clean tools immediately before touching anything else.
Example: Handling a Spill During Watering
- Stop watering and remove any wet debris.
- Wipe the spill area with detergent water first, then disinfect.
- Dry the area before restarting airflow and lighting schedules.
Quick Checklist for the End of a Cleaning Session
- All trays are dry and free of visible residue.
- Tools are disinfected and stored in a clean container.
- Used rags and gloves are discarded or placed in a designated dirty bin.
- Floors and walls show no sticky nutrient film.
Clean habits are easiest when they’re consistent. A predictable routine reduces the number of decisions you have to make while you’re busy growing food in a small space.
11.3 Fixing Uneven Growth from Light or Airflow Issues
Uneven growth usually comes from one of two things: plants are receiving different light levels, or they’re experiencing different airflow and humidity conditions. The fix is mostly measurement and adjustment, not guesswork.
Quick Diagnosis Using Plant Clues
Start by looking for patterns that repeat across the closet.
- Light imbalance signs: leaves on one side look paler, taller, or more stretched; plants near the brightest area look sturdier; the canopy forms a slope.
- Airflow imbalance signs: leaf edges curl or dry on one side; plants closer to a fan look “crisper,” while the far side looks softer; you see uneven drying or spotting that tracks with airflow.
A simple rule: light problems often change plant shape, while airflow problems often change leaf condition.
Mind Map: Uneven Growth Troubleshooting
Fixing Light-Related Uneven Growth
- Confirm light coverage, not just brightness. If your light is a single bar or panel, it can create a bright center and darker edges. Lowering the light can help, but only if it doesn’t overheat leaves or cause bleaching.
- Use a canopy leveling approach. If some plants are taller, they will steal light from shorter neighbors. Thin seedlings to the intended spacing and remove the weakest ones early so the canopy stays even.
- Check reflector and distance. A missing or poorly positioned reflector can reduce edge coverage. If you use reflective material, ensure it’s not blocking airflow vents and that seams don’t create gaps that act like “dark lanes.”
- Rotate trays or pots. In small closets, rotating every few days can correct minor intensity gradients without changing hardware. Do it consistently so you can tell whether the change helps.
Example: You notice lettuce on the left side is taller and lighter. After measuring, you find the light is centered but the left edge is closer to a wall that blocks spread. You adjust the light height slightly and add reflective coverage on the blocked side. You also rotate the tray every three days. Within a week, new leaves on the left stop stretching as much, and the canopy becomes flatter.
Fixing Airflow-Related Uneven Growth
- Map the airflow path. Place a thin strip of tissue paper near the canopy at several points (front, back, left, right). You’re looking for consistent movement across the whole growing area.
- Avoid direct blasting. A fan aimed at leaves can cause localized drying and curling. Aim airflow so it moves around the canopy, not straight into it.
- Create a clear intake-to-exhaust route. Air should enter one side and exit the other with minimal recirculation in dead corners. If plants are packed tightly against walls, pull them forward slightly or add spacing so air can pass behind.
- Prevent condensation pockets. If humidity is higher near a wall or vent, airflow may be too weak there. Increase circulation in that zone rather than raising humidity overall.
Example: Basil near the fan has crisp, slightly curled leaf edges, while basil at the far back looks broader and softer. Tissue paper shows strong airflow only near the front. You reposition the fan to blow across the top of the canopy and add a small oscillating fan to sweep the back area. After a few days, the far-back leaves look less “wet-looking,” and the front leaves stop drying as quickly.
A Simple Adjustment Sequence That Works
Make changes one at a time so you know what fixed the problem.
- Step 1: Level the canopy. Correct spacing and remove obvious outliers.
- Step 2: Fix light placement. Adjust height or coverage, then rotate trays.
- Step 3: Fix airflow routing. Re-aim fans and ensure movement reaches corners.
- Step 4: Wait for new growth. Focus on the next set of leaves rather than older ones.
What “Fixed” Looks Like
After adjustments, you should see new growth becoming more uniform across the closet. Older leaves may not recover, but the pattern should stop spreading. If the unevenness persists in the same location after both light and airflow adjustments, re-check for physical obstructions like blocked vents, uneven shelf levels, or plants touching the light housing.
11.4 Diagnosing Nutrient Deficiencies and Imbalances
Nutrient problems in closet farming usually show up as leaf color changes, growth slowdown, or odd spotting. The trick is to separate “not enough” from “not available” and from “too much of something else.” In a small space, one wrong setting can affect everything quickly, so diagnosis should be systematic rather than guessy.
Start with a Quick Symptom Map
Before changing anything, note three things: which plants show symptoms, which plant parts are affected first, and how the pattern looks.
- Older leaves first often points to nutrients that the plant can’t keep in place, such as nitrogen, phosphorus, or potassium.
- New growth first often points to nutrients that are needed during active growth, such as calcium, magnesium, or iron.
- Uniform pale color across the whole plant can be low nitrogen, but it can also be a pH issue that prevents uptake.
- Spots, streaks, or edge burn can be nutrient imbalance, salt buildup, or inconsistent watering.
Example: If your basil’s newest leaves are pale while older leaves look fine, you should suspect an uptake problem (often pH or iron/magnesium availability) rather than simply “add more fertilizer.”
Check the Two Most Common Root Causes
1) pH Drift and Nutrient Lockout
Even when you add the right nutrients, the plant may not absorb them if the medium pH is off. In soil, pH can drift with watering quality and time. In soilless media, it can drift faster.
Practical approach:
- Measure pH of your runoff or reservoir solution.
- Compare to the target range for your crop and system.
- If pH is out of range, correct pH first, then reassess symptoms after a few days.
Example: Lettuce looks washed-out and slow, and your runoff pH is consistently high. Instead of increasing nutrient strength, adjust pH and flush lightly to reduce salt concentration.
2) Salt Buildup from Overfeeding or Inconsistent Watering
Closet setups often have limited drainage or uneven watering. When water evaporates and refills unevenly, salts concentrate at the root zone.
Signs that point toward salt buildup:
- Leaf edges crisping or browning
- Wilting that doesn’t improve after watering
- White crust on media or container rims
Practical approach:
- Check EC or nutrient concentration if you measure it.
- If you don’t, do a controlled flush with clean water (system-appropriate) and then resume at a lower feed strength.
Example: Your tomato seedlings have dark green leaves but also show burnt tips. That combination often means “too much,” not “too little.”
Use a Deficiency vs Imbalance Decision Tree
A deficiency is “not enough available.” An imbalance is “enough total, wrong ratio,” which can still cause symptoms.
Mind Map: Nutrient Diagnosis Workflow
Common Nutrient Issues with Clear Examples
Nitrogen Shortage
- What you see: older leaves yellowing, slower growth, thinner stems.
- Why it happens: low feed strength, or plants using up available N quickly.
- What to do: increase nitrogen portion gradually, and confirm pH isn’t blocking uptake.
Example: Your arugula grows slowly and older leaves turn pale yellow while new leaves stay relatively greener. Raise feed strength slightly and keep watering consistent.
Magnesium Shortage
- What you see: older leaves show yellowing between veins while veins stay greener (interveinal chlorosis).
- What to do: adjust magnesium availability and verify pH.
Example: In a small hydro setup, spinach shows yellow patches between veins on older leaves. Before adding random supplements, check pH and then correct magnesium.
Iron Availability Problems
- What you see: new leaves pale or yellow with green veins, often in cooler conditions or when pH is high.
- What to do: correct pH first; then apply iron in the form your system supports.
Example: Basil’s newest leaves are light green and your runoff pH is above target. Fix pH, then feed at normal strength rather than doubling everything.
Calcium Shortage or Uptake Issue
- What you see: new growth distorted, tip burn, or dead patches on young leaves.
- What to do: stabilize watering (calcium moves with transpiration), check pH, and avoid letting the medium swing dry.
Example: Lettuce shows browning on new leaf tips even though older leaves look okay. The fastest fix is often consistent moisture, not extra fertilizer.
Potassium Imbalance
- What you see: edge yellowing or browning, sometimes with overall weak growth.
- What to do: confirm feed strength and reduce if salts are high; then adjust K ratio.
Example: Your peppers have curling edges and crisp tips while the rest of the plant looks dark. That pattern often means “too concentrated,” so reduce feed strength and flush if needed.
Make One Change at a Time
After you identify the likely cause, change only one variable: pH correction, flush/reduce salts, or nutrient adjustment. Then wait long enough to see new growth reflect the fix. In a closet, symptoms can look dramatic, but the plant still needs days to produce new tissue.
Example: If you both lower pH and increase nutrient strength at the same time, you won’t know which action helped. Keep the plan simple: fix the availability problem first, then fine-tune feeding.
11.5 Handling Power, Water, and Equipment Failures Safely
Closet farms run on a few simple systems: electricity for light and fans, water for roots, and equipment that moves air and nutrients. When something fails, the goal is to protect plants first, then protect people and property. A good safety mindset is: stop the problem from spreading, keep water and electricity separated, and return the system to a stable baseline.
Power Failures
Start by distinguishing “no power” from “partial power.” If the lights and fans both stop, assume the whole circuit is down. If only one device stops, check that device’s plug, switch, and timer settings before touching wiring.
Immediate actions
- Keep the closet closed to slow temperature swings.
- If you have a thermometer probe, note the current temperature so you can judge how long the outage lasts.
- Do not open electrical panels or bypass safety switches.
After power returns
- Restart in a controlled way: turn on fans first, then lights, then any pumps.
- Watch for unusual smells, buzzing, or tripped breakers. If a breaker trips again, stop and do not keep resetting.
Example Your grow light is on a timer, but the fan is on a separate plug. The lights turn off while the fan keeps running. That’s a partial failure. Check the timer’s settings and plug connections, then confirm the fan still maintains airflow before resuming the light schedule.
Water Failures
Water failures usually show up as either “too much water” or “not enough water.” Both can damage roots quickly in small containers because there’s less buffer volume.
Immediate actions
- If you suspect a leak, unplug pumps and lights before you investigate. Water and electricity do not mix, even if the water seems “clean.”
- If plants look dry, prioritize restoring water to the root zone rather than adjusting nutrients.
Common failure points
- Pump stops: check power to the pump, then inspect for clogs.
- Tubing disconnects: look for loose fittings and confirm the line still slopes correctly.
- Overflow: verify drain paths and that trays sit level.
Example A drip line detaches and water pools in one corner. The fix is not just reattaching the line; it’s also checking that the tray is level and that the drain path is clear, so the next cycle doesn’t repeat the same pooling.
Equipment Failures
Equipment failures often come from wear, dust buildup, or simple misalignment.
Fans and airflow
- If airflow drops, plants can develop uneven growth and higher humidity pockets.
- Clean fan intakes and check that ducting isn’t crushed or disconnected.
Lighting failures
- If light output drops, seedlings may stretch and older plants may stall.
- Verify the bulb or driver connection before replacing parts, and keep the fixture supported so it doesn’t stress wiring.
Sensors and controllers
- If a controller reads wildly wrong values, treat it as unreliable and cross-check with a basic thermometer/hygrometer.
- Avoid changing multiple settings at once after a failure; you want to know what actually fixed the issue.
Safety Checklist for Fast Response
Use this as a quick mental script when something goes wrong.
- Stop: unplug pumps or any device near water if you suspect leaks.
- Separate: keep electrical components dry and elevated.
- Stabilize: restore airflow first, then water, then lighting.
- Observe: check plants for immediate stress signs like drooping or wilting.
- Document: note what failed, when it failed, and what you changed.
Mind Map: Failure Response Priorities
Example Scenarios with Clear Fixes
Scenario 1: Breaker trips when the pump starts Unplug the pump, reset the breaker once, then test the pump alone. If it trips again, stop using the pump and inspect for a jammed impeller or damaged cord. Do not keep resetting repeatedly; repeated trips can indicate a persistent fault.
Scenario 2: Fan runs but plants look stressed Check whether the fan is moving air through the closet or just spinning with blocked intake/exhaust. Look for closed vents, blocked ducting, or a disconnected duct segment. Restore airflow path before changing nutrients.
Scenario 3: Watering resumes but leaves show spotting Confirm whether water is splashing onto foliage due to a misdirected drip line or a clogged emitter. Adjust the emitter angle and ensure water lands at the media surface, not on leaves.
Practical Habits That Reduce Risk
- Use drip trays or secondary containment under any pump or reservoir.
- Route cords so they cannot wick water toward outlets.
- Keep a spare fuse or spare fan/pump on hand if your setup depends on one critical device.
- Label switches and timers so you can restore the system quickly without guessing.
When failures happen, the safest approach is systematic: protect people, protect electricity, then protect roots. The plants will forgive a short interruption; they won’t forgive repeated chaos.
12. Building Your First Closet Farm Step by Step
12.1 Choose Your Crop Plan and Target Harvest Dates
A crop plan is a small set of decisions that prevents the most common closet-farming problem: growing something that looks great on day 10 and then stalls because the timing, space, or light schedule doesn’t match the crop’s needs. Start by choosing crops that share similar requirements, then map those requirements to your available light hours and your closet’s usable footprint.
Step One: List Your Constraints in Plain Numbers
Write down what you can control every day. For example:
- Light window: If your lights run 14 hours/day, you’ll plan crops that tolerate that schedule.
- Usable height: If your tallest plants must stay under 60 inches, you’ll avoid long vining crops unless you train them.
- Time for maintenance: If you can only check plants 10 minutes daily, you’ll prefer slower-growing, lower-drama crops.
- Watering method: If you don’t want daily hand-watering, choose media and systems that hold moisture longer.
Concrete example: If your closet is short and you can’t raise lights often, pick compact leafy greens and herbs first. They recover from minor mistakes faster than tall, fruiting plants.
Step Two: Choose Crops by “Space Occupation,” Not Just Taste
Closet space is mostly about how long a plant occupies the same area under the light.
- Short-cycle crops: radishes, baby greens, many herbs. They free up space quickly.
- Medium-cycle crops: lettuce heads, spinach, cilantro. They need steady conditions but don’t demand constant attention.
- Long-cycle crops: peppers, tomatoes. They require more time, more stable light, and more patience.
Practical rule: In a first cycle, aim for at least one short-cycle crop so you get an early harvest while you learn your environment.
Step Three: Build a Simple Harvest Calendar
Target harvest dates are easiest when you work backward from “day you want to eat.” Use approximate timelines for planning, then adjust after your first cycle.
Example plan for a 4-week starter cycle (leafy focus):
- Week 1: Start seeds for baby greens and radishes.
- Week 2: Start a second batch of baby greens so you harvest in waves.
- Week 3: Thin and harvest baby greens; keep the rest growing.
- Week 4: Harvest radishes and the remaining baby greens; replant immediately.
This approach reduces the “all plants are ready at once” problem, which is common in small spaces.
Step Four: Match Crop Timing to Your Light Schedule
Most closet growers run lights on a fixed schedule. If your lights are on 16 hours/day, you can often keep leafy crops moving steadily. If you can only run 10–12 hours/day, choose crops that don’t stall easily under lower daily light.
Concrete example: If your light schedule is shorter, avoid starting long-cycle fruiting crops in the same cycle as your first leafy batch. Fruit crops may spend extra time waiting for conditions to improve.
Step Five: Plan for Overlap and Space Reuse
A good crop plan includes what happens after harvest. Decide whether you will:
- Replant immediately in the same containers, or
- Stagger containers so one area is always producing.
If you’re using shelves, reuse is easier because you can swap trays without disturbing the entire system.
Mind Map: Crop Plan to Harvest Dates
Example: Two Practical Crop Plans
Plan A: “Learn and Eat” (first cycle)
- 60% space: baby greens and radishes (staggered batches)
- 40% space: herbs (one or two varieties)
- Target: at least one harvest by the end of week 3
- Reasoning: you get feedback quickly, and herbs help you practice trimming without major replanting.
Plan B: “Steady Leaf” (second cycle after you’ve tuned conditions)
- 70% space: lettuce or spinach (staggered)
- 30% space: one short-cycle crop to fill gaps
- Target: consistent harvest every 7–10 days
- Reasoning: medium-cycle crops benefit from stable routines, while the short-cycle crop prevents empty shelves.
Step Six: Write Your Target Dates as Actions
Instead of only dates, attach a task to each date.
- Day X: sow batch 2
- Day Y: thin seedlings
- Day Z: first harvest and replant
Concrete example: If you want radishes by Saturday, sow them the previous week on a specific weekday. Then schedule thinning the day before you expect noticeable growth changes.
A crop plan is successful when it turns your closet into a predictable routine: sow, grow, harvest, and reuse space without scrambling. Your first plan should be simple enough to follow exactly, then refined based on what actually happened in your specific closet.
12.2 Assemble a Starter Equipment List and Budget Priorities
A good starter closet farm avoids two common mistakes: buying “everything” before you know your crop plan, and buying the wrong version of the same essential item. Start with a short list of must-haves, then add upgrades only after your first cycle proves what you actually need.
Step One: Pick Your Crop Plan Before You Buy
Choose one primary crop group for your first run, because it determines light intensity, watering style, and space layout. For example, leafy greens and herbs usually tolerate simpler setups than fruiting crops. If you plan to grow lettuce and basil, you can often start with fewer lighting watts and a simpler nutrient approach than you would for tomatoes.
Step Two: Use a Must-Have List That Covers the Basics
Below is a starter equipment list organized by function, not by brand. Each item includes a practical example so you can picture the job it does.
Lighting
- LED grow light with a dimmer or adjustable height: Example: If your seedlings look stretched, you raise the light or reduce distance; if leaves look pale, you increase intensity.
- Timer: Example: Set 16 hours for many leafy greens during early growth, then adjust based on how the plants respond.
Air and Temperature
- Inline fan or circulation fan: Example: A small circulation fan inside the closet prevents stagnant pockets that encourage mildew.
- Ventilation path: Example: Intake near the bottom and exhaust near the top helps warm air leave efficiently.
- Thermometer and humidity meter: Example: If humidity spikes after watering, you can shorten watering time or increase airflow.
Water and Containment
- Watering method: Example: For soil, a watering can with a narrow spout reduces splashing; for soilless, a small reservoir and simple delivery method keeps moisture consistent.
- Catch tray or waterproof liner: Example: A tray under containers prevents salt buildup from leaking onto closet floors.
Growing Containers and Media
- Food-safe containers or pots: Example: For herbs, use smaller pots so you can harvest frequently without waiting for a full-size container.
- Growing medium: Example: Use a beginner-friendly potting mix for soil grows; for soilless, choose a media that matches your chosen system.
Monitoring and Safety
- Basic tools: Example: Scissors for harvesting, a small spray bottle for targeted misting, and a marker for labeling trays.
- Power strip with surge protection: Example: Keeps timers, fans, and lights on one controlled setup.
Step Three: Budget Priorities That Prevent Regret
Spend money in this order because it affects plant survival first, then plant quality.
- Lighting that matches your space: Underpowered light leads to slow growth and weak structure.
- Air movement and ventilation: Poor airflow causes disease risk and uneven growth.
- Reliable timers and monitoring: If your schedule drifts or you can’t measure conditions, troubleshooting becomes guesswork.
- Water containment and a consistent watering approach: Leaks and inconsistent moisture create recurring problems.
- Containers and media: These matter, but you can start with simple, correct choices.
Step Four: A Practical Budget Example
Here’s a realistic way to allocate funds for a first closet run.
- Lighting: 40% of budget
- Ventilation and fans: 25% of budget
- Timers, meters, and power control: 15% of budget
- Containers, trays, and waterproofing: 10% of budget
- Media and initial seeds or starts: 10%
Example: If you have $200 total, you’d aim for about $80 on lighting, $50 on airflow, $30 on timers and meters, $20 on containment, and $20 on media and seeds.
Mind Map: Starter Equipment and Budget Priorities
Step Five: Quick “Buy or Wait” Checks
Before purchasing, verify these three points:
- You can control light timing with a timer.
- You can measure temperature and humidity at plant height.
- You can prevent water from escaping the growing area.
If any of these are missing, it’s usually better to spend on that gap than to upgrade something else.
12.3 Set Up Lighting, Ventilation, and Monitoring in Order
Start with lighting, then ventilation, then monitoring. That order prevents you from chasing symptoms that are caused by the previous step.
1) Lighting Setup First
Choose your light type and mounting plan. If you’re using an LED grow light, mount it so you can adjust height easily. A simple way is to use a hanging system with multiple height positions, then fine-tune after you see plant response.
Set an initial height using a conservative target. For most closet grows, begin with the light high enough that leaves don’t bleach or curl, then lower gradually over several days. This avoids the common mistake of “dialing it in” by guessing and burning seedlings.
Pick a schedule that matches the crop stage. Seedlings and young plants usually need less intense light than mature plants, but they still need consistent daily exposure. A practical starting point is 14–16 hours for leafy greens and herbs, then adjust based on how quickly plants reach the next stage.
Aim for even coverage, not maximum brightness. Uneven light creates uneven growth, which then makes watering and pruning harder. If your closet is narrow, center the light and use reflectors or light-colored surfaces to reduce dead zones.
Example: One closet, two shelves. If you have plants on two levels, treat them like separate zones. Either use two lights or ensure the single light covers both levels evenly. If the top shelf is much brighter, the bottom shelf will lag and you’ll end up harvesting at different times.
2) Ventilation Setup Second
Create an airflow path with a clear direction. Most closet farms work best with air moving from an intake area toward an exhaust area. This reduces stagnant pockets where humidity lingers.
Size the fan for your closet volume. A good rule of thumb is to aim for multiple air exchanges per hour, but don’t overshoot so hard that plants dry out too fast. If you can feel strong drafts at leaf level, reduce fan speed or reposition the intake.
Use ducting and filters correctly. Keep duct runs short and smooth. If you add a carbon filter for odor control, place it in the exhaust line so air passes through it before leaving the closet.
Control humidity with airflow, not constant misting. Misting can raise humidity briefly, but it also wets leaves and increases disease risk. Instead, let ventilation handle humidity by running on a schedule that matches your light cycle.
Example: Preventing condensation on the back wall. If you see water droplets forming, it usually means warm moist air is hitting a cooler surface. Improve airflow behind plants, avoid blocking vents, and ensure the exhaust is pulling from the highest humidity area.
3) Monitoring Setup Third
Monitoring should be simple enough that you actually use it. You’re not collecting data for fun; you’re preventing preventable problems.
Measure the right things at the right height.
- Temperature: Place the sensor near the canopy height, not on the floor.
- Humidity: Put the hygrometer where leaves are, since that’s where condensation risk matters.
- Light timing: Use a timer for consistency so you don’t accidentally run a long day.
Add one “spot check” method. A cheap infrared thermometer can help confirm whether the light is too close. If leaf surfaces are consistently much hotter than expected, raise the light.
Set thresholds you can act on. For beginners, focus on three actions: adjust light height, adjust fan speed, and adjust watering timing. If you can’t connect a reading to one of those actions, the sensor isn’t helping.
Example: Heat spikes during the light cycle. If temperature climbs quickly after lights turn on, raise the light slightly and reduce fan speed only if humidity rises too much. The goal is stable conditions, not the lowest temperature possible.
Mind Map: Lighting, Ventilation, Monitoring Order
Quick Setup Checklist
- Mount light so height is adjustable.
- Start with a conservative light height and a consistent daily schedule.
- Install intake and exhaust so airflow has a clear direction.
- Run ventilation on a schedule that matches your light cycle.
- Place temperature and humidity sensors at canopy height.
- Confirm you can respond: light height, fan speed, watering timing.
Example: First Week Workflow
Day 1: Set light height high, start the timer, run ventilation.
Day 2: Check temperature and humidity at canopy height; adjust fan speed if humidity is too high.
Day 3: Inspect leaves for stress; lower light slightly if plants look pale and stretched.
Day 4–7: Keep changes small and track the effect. If conditions stabilize, stop tweaking and focus on watering consistency.
12.4 Start Your First Batch From Seed to First Harvest
Start with a small, boring plan that you can actually finish. In a closet farm, the first win is consistency: the same light schedule, the same watering rhythm, and the same daily check. Your goal for this batch is not maximum yield; it’s learning what your setup does under real conditions.
Step 1: Pick One Crop Lane and One Container Style
Choose either leafy greens or herbs for the first batch. They forgive small mistakes and usually reach harvest quickly. Pair that crop with a container style you can manage without drama.
Example plan for a first batch:
- Crop: lettuce or arugula
- Containers: 4–6 inch pots or a shallow tray
- Media: potting mix for soil grows, or a starter mix for soilless
- Target: first harvest in about 4–6 weeks (leafy greens vary by variety and temperature)
Step 2: Set Your Light Schedule Before You Plant
Turn on the light and confirm it behaves like you expect. If you’re using a timer, test it for a full cycle so you know it turns on and off reliably.
Practical starting points:
- Seedlings: 14–16 hours per day
- After true leaves appear: keep the same schedule for leafy greens, then adjust only if you see stretching or slow growth
Reasoning: light timing affects how quickly plants build sturdy leaves. If you start seeds without stable lighting, you’ll spend the first week diagnosing preventable problems.
Step 3: Prepare Media and Watering So Germination Isn’t a Guess
Moisture should be steady, not soaked. For soil or starter mix, aim for “damp like a wrung-out sponge.” If you can squeeze a handful and water drips, it’s too wet.
Example germination routine:
- Fill containers with pre-moistened mix.
- Sow seeds at the depth recommended on the packet.
- Cover lightly if needed, then mist the surface.
- Keep the surface consistently moist until sprouting.
Reasoning: germination fails most often from dryness at the surface or waterlogging that deprives seeds of oxygen.
Step 4: Use a Simple Daily Check That Matches Closet Reality
You don’t need a lab. You need a repeatable glance.
Daily checklist (5 minutes):
- Light: confirm it’s on during the correct window
- Temperature: note if it’s drifting too high or too low
- Moisture: check the top inch of media; water only if it’s drying
- Leaves: look for wilting, curling, or unusual color
- Air: confirm airflow isn’t blocked by a towel, box, or plant canopy
Reasoning: most closet problems show up as small changes in leaf posture and media moisture before they become visible disease.
Step 5: Thin and Space Early to Prevent a Crowded Canopy
When seedlings have a few true leaves, thin them so each plant has room. For leafy greens, crowding can lead to weak stems and uneven growth.
Example thinning rule:
- If seedlings touch leaves, thin until there’s a small gap between plants.
- Keep the strongest seedlings; remove the rest gently.
Reasoning: spacing is easier than fixing stretched, tangled growth later.
Step 6: Introduce Feeding Only When Plants Ask for It
For many leafy greens in fresh potting mix, you can start with minimal feeding. Begin with a diluted nutrient solution once plants are actively growing and have established true leaves.
Example feeding approach:
- Week 1–2: water only
- Week 3 onward: use a mild nutrient concentration, then adjust based on growth speed and leaf color
Reasoning: overfeeding in small containers can cause salt buildup and leaf edge issues, which are harder to correct than underfeeding.
Step 7: Harvest in a Way That Teaches You the Plant’s Rhythm
Harvest leafy greens by taking outer leaves first. Don’t cut everything at once unless you’re doing a full reset.
Example harvest method:
- Start when leaves are large enough to eat.
- Snip the outer leaves, leaving the center to continue growing.
- Harvest on a consistent schedule so regrowth stays steady.
Reasoning: partial harvest gives you multiple learning cycles—how fast regrowth happens under your exact light and watering.
Mind Map: Seed to First Harvest Workflow
Example Timeline for a Leafy Greens Batch
- Day 0: Sow seeds in pre-moistened mix; start light timer.
- Days 3–7: Watch for sprouting; keep surface damp.
- Days 10–18: Thin when true leaves appear; keep watering consistent.
- Days 18–28: Begin mild feeding if growth is steady.
- Days 28–42: First harvest of outer leaves; continue daily checks.
Quick Troubleshooting During the First Batch
- Seedlings fail to sprout: check surface moisture and sow depth.
- Stretching: increase light intensity or adjust distance; keep schedule stable.
- Yellowing: verify watering consistency and consider mild feeding only after true leaves.
- Slow growth: confirm temperature range and airflow; avoid frequent overwatering.
Your first batch is successful if you can describe what happened each week: when sprouting started, when thinning occurred, when feeding began, and how quickly regrowth followed harvest. That record becomes your operating manual for the next cycle.
12.5 Evaluate Results and Adjust Your Next Cycle
After your first harvest, treat the closet like a small lab: you’re not judging yourself, you’re collecting data. The goal is to make the next cycle easier, not to chase perfection.
What to Record After Each Cycle
Keep a single page log for each run. Include:
- Planting dates and the date you switched lights or changed any settings.
- Crop list with variety if you know it (even “store-bought lettuce” helps).
- Environment readings at least 2–3 times per week: temperature, humidity, and whether condensation appeared.
- Watering notes: how often you watered, how much runoff you saw (if any), and whether media stayed soggy.
- Growth observations: leaf color, stem thickness, spacing issues, and any pest sightings.
- Harvest results: total harvest weight (optional), number of usable heads/leaves, and how long quality lasted.
A simple rule: if you can’t explain a problem using your notes, you don’t yet have enough information.
Evaluate by Category, Not by Mood
Use a checklist that separates causes from symptoms.
Environment
Ask:
- Did plants look “stretched” (light too weak or too far)?
- Did leaves curl or look scorched (heat or light intensity too high)?
- Did you see mold or persistent wet surfaces (humidity too high or airflow too weak)?
Concrete example: if seedlings were pale and tall, but humidity was fine, the likely issue is light intensity or distance rather than watering.
Watering and Media
Ask:
- Did the media dry out too fast (container too small, airflow too strong, or watering too infrequent)?
- Did it stay wet and smell earthy or sour (overwatering, poor drainage, or too little airflow)?
- Were roots brown or slimy (a sign to reduce saturation and check system flow)?
Concrete example: if lettuce stayed small and the soil stayed damp for days, reduce watering frequency and ensure containers have drainage paths.
Nutrition
Ask:
- Were leaves uniformly pale (often low nutrients) or patchy (often uneven watering or pH issues)?
- Did older leaves yellow first (commonly nitrogen-related) or did new growth fail (often a different limiting factor)?
Concrete example: if basil leaves yellowed from the bottom while new growth stayed smaller than expected, adjust feeding strength gradually rather than changing everything at once.
Planting Density and Training
Ask:
- Did plants compete for light (crowding)?
- Did vining crops sprawl into airflow gaps (training needed)?
Concrete example: if radishes were woody, check spacing and harvest timing; they often get tough when they sit too long.
Mind Map: Cycle Review to Next Adjustments
A Practical Adjustment Plan That Doesn’t Overcomplicate Things
Pick one primary issue to fix per cycle. Then choose one measurable change.
- If the main problem was stretching, adjust light distance or intensity and keep watering the same.
- If the main problem was mold or dampness, increase airflow and reduce how long surfaces stay wet.
- If the main problem was slow growth, adjust feeding rate slightly and confirm watering consistency.
Concrete example: Suppose your first batch of spinach grew slowly and stayed pale. Your notes show soil stayed wet for 3–4 days after watering and humidity hovered high. Next cycle, you reduce watering frequency and improve airflow first. If color still lags after the plants stabilize, then adjust feeding.
Example Review Notes and Next Cycle Changes
Your notes:
- Lettuce seedlings were tall by day 10.
- Leaves were pale, but humidity stayed around the same.
- Media dried in 1–2 days.
Diagnosis: Light likely too weak or too far.
Next cycle changes:
- Move lights closer by a small amount.
- Keep watering schedule unchanged.
- Check leaf color and height again after one week.
Your notes:
- Basil developed dark spots and a musty smell near the soil line.
- Condensation appeared on the inner wall after watering.
Diagnosis: Excess moisture and insufficient drying time.
Next cycle changes:
- Reduce watering volume per event.
- Increase airflow so surfaces dry faster.
- Avoid wetting leaves during watering.
How to Know You’re Improving
Improvement should show up as fewer symptoms, not just “better looking plants.” Track:
- Seedling height rate (less stretching).
- Leaf color consistency.
- Drying time of the media.
- Absence of new spots or mold patches.
If the same problem returns unchanged after your single-variable adjustment, your diagnosis is incomplete. Go back to the notes and look for the missing link—often it’s airflow timing, watering method, or light placement.
Keep the Next Cycle Simple
Your second cycle should be easier to manage because you already know what your closet does. Use the log, choose one fix, and run the batch with the same crop plan until the results match your expectations.