Digital Privacy & Security for Non-Tech People
1. Understanding Digital Privacy and Security
1.1 What is Digital Privacy? Simple Definitions and Everyday Examples
Digital Privacy refers to the right and ability of individuals to control how their personal information is collected, used, shared, and stored when they are online or using digital devices.
It means keeping your personal data—like your name, photos, location, messages, and browsing habits—safe from unwanted access or misuse.
Mind Map: Understanding Digital Privacy
Everyday Examples of Digital Privacy
-
Using Social Media Privacy Settings
- When you post a photo on Facebook or Instagram, you decide who can see it — friends only, public, or a custom group.
- Example: Sarah sets her Instagram account to “private” so only approved followers can see her pictures.
-
Browsing the Internet
- Websites often track what pages you visit to show you personalized ads.
- Example: After searching for running shoes, John notices ads for sneakers on other websites. Digital privacy means limiting this tracking.
-
Sharing Location Data
- Apps on your phone may ask to access your location.
- Example: Lisa allows a weather app to use her location to give accurate forecasts but denies location access to a game app that doesn’t need it.
-
Email and Messaging
- Your emails and messages contain private information.
- Example: Mike uses encrypted messaging apps like Signal to keep his conversations private from hackers or snoopers.
-
Online Shopping
- When you buy something online, you share your credit card and address.
- Example: Emma shops on a website that uses HTTPS (secure connection) to protect her payment details.
Why Digital Privacy Matters
- Protects Your Identity: Prevents others from stealing your personal information.
- Maintains Your Reputation: Controls what information about you is visible online.
- Keeps Your Data Safe: Stops unauthorized people from accessing your private files and messages.
- Gives You Control: Lets you decide what to share and with whom.
Simple Analogy
Think of digital privacy like the curtains on your windows at home. You choose when to open or close them to let people see inside or keep your home private. Just like you wouldn’t want strangers peeking into your house, digital privacy helps keep strangers from peeking into your online life.
By understanding digital privacy in these simple terms and examples, you can start making smarter choices about your online activities and protect yourself in the digital world.
1.2 What is Digital Security? Why It Matters to Everyone
Digital security refers to the protection of your digital devices, online accounts, and personal information from unauthorized access, theft, damage, or misuse. In simple terms, it’s about keeping your digital life safe from hackers, scammers, and other threats that exist on the internet.
Why Digital Security Matters to Everyone
Whether you are a casual internet user, a freelancer, or a small business owner, digital security is crucial because:
- Personal Information Protection: Your name, address, phone number, and even financial details can be stolen and misused.
- Preventing Identity Theft: Criminals can impersonate you to commit fraud or other crimes.
- Safeguarding Financial Assets: Online banking and shopping require secure practices to avoid losing money.
- Maintaining Privacy: Protecting your communications and online activities from being monitored.
- Ensuring Business Continuity: For freelancers and small businesses, data breaches can cause loss of clients and reputation.
Mind Map: What Digital Security Covers
Everyday Examples of Digital Security in Action
-
Example 1: Protecting Your Email Account
- Using a strong password like “Sunflower!2024” instead of “password123”
- Enabling two-factor authentication (2FA) so even if someone guesses your password, they need a code sent to your phone to log in.
-
Example 2: Avoiding Phishing Scams
- Receiving an email that looks like it’s from your bank asking you to “verify your account”.
- Instead of clicking the link, you directly visit the bank’s official website or call their customer service.
-
Example 3: Securing Your Smartphone
- Setting a fingerprint lock or PIN on your phone.
- Installing updates regularly to fix security holes.
Mind Map: Why Digital Security Matters to You
Summary
Digital security is not just for tech experts; it is essential for everyone who uses digital devices or the internet. By understanding what digital security means and why it matters, you can take simple, practical steps to protect yourself and your information from common online threats.
1.3 Common Digital Threats Explained in Plain Language
Understanding digital threats can sound complicated, but breaking them down into simple terms helps everyone stay safe online. Here, we explain the most common threats you might face and provide easy examples to recognize them.
Mind Map: Common Digital Threats
Malware
What is it? Malware is malicious software designed to harm your device or steal your information.
- Viruses: Like a cold for your computer, viruses can slow it down or cause it to crash.
- Ransomware: Imagine someone locking your house and demanding money to give you the key back. Ransomware locks your files and asks for payment.
- Spyware: This secretly watches what you do online and sends that info to someone else.
Example: You download a free game from an unknown website, and suddenly your computer starts acting strangely. This could be a virus.
Phishing
What is it? Phishing is when scammers try to trick you into giving away personal info like passwords or credit card numbers.
- Usually comes as emails or messages that look real but aren’t.
- They might say, “Your bank account is locked, click here to fix it!”
Example: You get an email from “Your Bank” asking you to log in via a link. The link leads to a fake website designed to steal your password.
Password Attacks
What is it? These attacks try to guess or steal your passwords to get into your accounts.
- Brute Force: Trying every possible password until one works.
- Credential Stuffing: Using passwords leaked from other sites to try on your accounts.
Example: If you use “password123” everywhere, hackers can easily guess it and access your accounts.
Man-in-the-Middle Attacks
What is it? This is when someone secretly intercepts communication between you and a website or person.
Example: Using public Wi-Fi at a coffee shop, a hacker can capture the information you send, like login details.
Social Engineering
What is it? Manipulating you into giving away confidential info or access.
Example: A scammer calls pretending to be tech support and asks for your password to “fix” your computer.
Data Breaches
What is it? When companies storing your data get hacked, and your info is leaked.
Example: A popular online store gets hacked, and your email and credit card info are exposed.
Summary Table of Threats and Easy Examples
| Threat | What It Does | Easy Example |
|---|---|---|
| Malware | Infects your device | Downloading a fake app that slows your phone |
| Phishing | Tricks you into giving info | Fake email asking to reset your password |
| Password Attacks | Guesses or steals passwords | Using “123456” as your password |
| Man-in-the-Middle | Intercepts your communication | Using public Wi-Fi to check bank account |
| Social Engineering | Tricks you into sharing info | Phone call from “tech support” asking for your password |
| Data Breaches | Exposes your stored data | Online store hack leaking your credit card info |
By understanding these threats in simple terms and recognizing real-life examples, you can better protect yourself and your digital life.
1.4 How Personal Data is Collected and Used Online
Understanding how your personal data is collected and used online is essential to protect your privacy. Let’s break it down in simple terms with examples and mind maps.
What is Personal Data?
Personal data is any information that can identify you or relate to you. This includes:
- Your name and contact details
- Your location
- Your browsing habits
- Your preferences and interests
- Your financial information
How Is Personal Data Collected?
Personal data is collected through various methods when you use the internet:
- Websites and Apps: When you visit websites or use apps, they may collect data through forms, cookies, or tracking pixels.
- Social Media: Platforms collect data based on your posts, likes, shares, and connections.
- Online Purchases: E-commerce sites gather your payment details, shipping address, and purchase history.
- Search Engines: Your search queries and clicks are tracked to personalize results and ads.
- Public Wi-Fi: Sometimes data can be intercepted if the network is unsecured.
Mind Map: Methods of Data Collection
Examples of Data Collection in Action
-
Example 1: Cookies on a Shopping Website When you visit an online store, cookies remember the items you viewed or added to your cart. This helps the site show you related products or remind you to complete your purchase.
-
Example 2: Social Media Likes If you like posts about hiking on a social media platform, the platform may show you ads for hiking gear or outdoor trips based on your interests.
-
Example 3: Search Engine Suggestions When you start typing a query, search engines suggest popular searches based on your past searches and trends.
How Is Your Data Used?
Once collected, your data can be used in many ways:
- Personalization: To tailor content, ads, and recommendations to your preferences.
- Analytics: To understand user behavior and improve services.
- Advertising: To target ads that are more relevant to you.
- Selling Data: Some companies may sell anonymized or aggregated data to third parties.
- Security: To detect fraud or unauthorized access.
Mind Map: Uses of Personal Data
Example: Targeted Advertising
Imagine you search for running shoes online. Later, when you visit a news website, you see ads for running shoes or sportswear. This happens because your browsing data was used to show ads tailored to your interests.
Why Should You Care?
- Privacy: You may not want certain information shared or used.
- Security: Data breaches can expose your sensitive info.
- Control: Knowing how data is used helps you make informed choices.
Simple Tips to Manage Your Data
- Review privacy settings on websites and apps.
- Clear cookies regularly or use browser settings to limit tracking.
- Use incognito/private browsing modes when you want less tracking.
- Think twice before sharing personal info online.
By understanding how your personal data is collected and used, you can take simple steps to protect your digital privacy without needing to be a tech expert.
1.5 Real-Life Stories: When Privacy and Security Fail
Understanding the importance of digital privacy and security becomes clearer when we look at real-life examples where things went wrong. These stories highlight common mistakes and the consequences of neglecting simple security practices.
Story 1: The Phishing Email That Cost a Freelancer Thousands
Scenario: Sarah, a freelance graphic designer, received an email that looked like it was from a client asking her to update payment details. The email seemed legitimate, with the client’s logo and familiar tone.
What Went Wrong: Sarah clicked the link and entered her bank details on a fake website. The attacker used this information to withdraw money from her account.
Lesson: Always verify unexpected requests by contacting the person directly using a known phone number or email. Never click on suspicious links.
Story 2: The Small Business Owner’s Data Breach
Scenario: John runs a small online store. He reused the same simple password across multiple accounts. When one service was hacked, attackers accessed his email and then his business accounts.
What Went Wrong: Reusing passwords made it easy for hackers to move from one account to another, stealing customer data and causing business disruption.
Lesson: Use unique, strong passwords for each account and enable two-factor authentication (2FA).
Story 3: Public Wi-Fi and the Stolen Identity
Scenario: Maria was working from a café using public Wi-Fi. She logged into her email and social media accounts without using a VPN.
What Went Wrong: A hacker on the same network intercepted her login credentials and later used her identity to open credit accounts in her name.
Lesson: Avoid accessing sensitive accounts on public Wi-Fi or use a trusted VPN to encrypt your connection.
Story 4: Oversharing on Social Media Leads to Burglary
Scenario: Tom posted on social media about his upcoming vacation, including dates and photos.
What Went Wrong: Burglars saw the posts and targeted his home while he was away.
Lesson: Be cautious about sharing personal plans publicly. Adjust privacy settings and consider sharing sensitive information only with close friends or family.
Mind Map: Common Privacy & Security Failures
Mind Map: Lessons Learned and Best Practices
Summary
These stories demonstrate that digital privacy and security are not just technical issues but everyday concerns that affect everyone. By learning from these examples, non-tech users can adopt simple, practical habits to protect themselves from similar pitfalls. Remember, security is about being cautious, verifying information, and using available tools to safeguard your digital life.
2. Protecting Your Personal Information Online
2.1 Creating Strong, Memorable Passwords with Easy Techniques
Creating strong passwords is one of the simplest yet most effective ways to protect your online accounts. However, many people struggle to remember complex passwords, which leads them to use weak or repeated passwords. This section will guide you through easy techniques to create passwords that are both strong and memorable.
Why Strong Passwords Matter
- Strong passwords help prevent unauthorized access to your accounts.
- Weak passwords can be guessed or cracked quickly by hackers.
- Using unique passwords for each account reduces the risk if one password is compromised.
Characteristics of a Strong Password
- At least 12 characters long.
- Mix of uppercase and lowercase letters.
- Includes numbers and special characters (like !, #, $, %).
- Avoids common words, names, or easily guessable info (like birthdays).
Easy Techniques to Create Strong, Memorable Passwords
Use a Passphrase
A passphrase is a sequence of words or a sentence that is easy for you to remember but hard for others to guess.
Example:
- Phrase: “I love eating spicy tacos on Fridays!”
- Password:
ILoveSpicyTacosOnFri!
This is long, mixes uppercase letters, and includes a special character.
Use the First Letters of a Sentence
Take a sentence you can easily remember and use the first letter of each word, adding numbers or symbols.
Example:
- Sentence: “My dog Max was born in 2015”
- Password:
MdMwbi2015!
This password is compact but meaningful to you.
Combine Two Unrelated Words with Numbers and Symbols
Pick two random words and combine them with numbers and symbols.
Example:
- Words: “Coffee” and “Guitar”
- Password:
Coffee#Guitar42!
This creates a strong password that’s easier to remember than random letters.
Modify a Favorite Quote or Lyric
Take a line from a song or quote and modify it.
Example:
- Quote: “To be or not to be, that is the question”
- Password:
2B!OrNot2B?
Using numbers and symbols to replace words or letters makes it stronger.
Mind Map: Creating Strong Passwords
Additional Tips
- Avoid using personal info like your name, birthday, or phone number.
- Don’t use common passwords like “password123” or “qwerty”.
- Change your passwords regularly, especially for important accounts.
- Use different passwords for different accounts to limit damage if one is hacked.
Practice Example
Try creating a password using the first letters technique:
- Sentence: “I enjoy morning coffee at 7 am”
- Password:
Iemc@7am!
This password is short but combines uppercase, lowercase, symbols, and numbers.
By using these easy techniques, you can create passwords that are both secure and easy to remember, helping you protect your digital life without frustration.
2.2 Using Password Managers: What They Are and How to Use Them
What is a Password Manager?
A password manager is a tool that helps you create, store, and manage your passwords securely. Instead of remembering dozens of passwords, you only need to remember one strong master password. The password manager takes care of the rest.
Why Use a Password Manager?
- Strong Passwords: It generates complex passwords that are hard to guess.
- Unique Passwords: Ensures you don’t reuse the same password across multiple sites.
- Convenience: Automatically fills in your login details so you don’t have to type them.
- Security: Encrypts your passwords so only you can access them.
Mind Map: Benefits of Password Managers
How Does a Password Manager Work?
- You create a master password — the only password you need to remember.
- The manager encrypts and stores all your other passwords in a secure vault.
- When you visit a website, the manager can auto-fill your username and password.
- You can generate new strong passwords directly within the manager.
Mind Map: How Password Managers Work
Examples of Popular Password Managers
- LastPass: Easy to use, free and premium versions, browser extensions.
- 1Password: Great for families and teams, strong security features.
- Bitwarden: Open-source and free, with paid options.
- Dashlane: Includes dark web monitoring and VPN in premium plans.
Step-by-Step Example: Setting Up a Password Manager (Using Bitwarden)
- Go to the Bitwarden website or download the app.
- Click “Create Account” and choose a strong master password (e.g., a phrase like “BlueTiger$2024!” ).
- Log in and explore the dashboard.
- Use the password generator to create a new password for your email account.
- Save the new password entry.
- Install the browser extension to enable auto-fill.
- When you log in to your email next time, Bitwarden will suggest the saved password.
Tips for Using Password Managers Safely
- Choose a very strong master password — this is the key to your vault.
- Enable two-factor authentication (2FA) on your password manager account.
- Regularly update your passwords using the password generator.
- Avoid storing passwords in unencrypted files or notes.
Mind Map: Best Practices for Password Managers
Real-Life Scenario
Imagine you have accounts on 10 different websites. Without a password manager, you might use the same password everywhere or write them down on paper, which is risky. With a password manager, you create unique, strong passwords for each site and never have to remember them all. When you visit a site, your password manager fills in your login details automatically — saving time and keeping you safe.
Summary
Password managers are essential tools for anyone looking to improve their digital security without the headache of remembering numerous passwords. They combine security, convenience, and peace of mind, making them perfect for non-tech people.
Try it today: Download a trusted password manager and start by saving just one or two passwords to experience how easy and secure it can be!
2.3 Two-Factor Authentication (2FA): Adding a Simple Extra Layer of Security
Two-Factor Authentication, commonly known as 2FA, is a security method that requires you to provide two different types of information to verify your identity when logging into an account. This extra step makes it much harder for someone else to access your accounts, even if they have your password.
What is 2FA?
Think of 2FA as a double lock on your front door. Even if someone has one key (your password), they still need the second key (a code or confirmation) to get in.
The Two Factors Explained
- Something you know: This is usually your password or PIN.
- Something you have: This could be a smartphone app, a text message code, or a physical security key.
Why Use 2FA?
- Passwords can be stolen or guessed.
- 2FA adds an extra barrier to protect your accounts.
- Many popular services support 2FA for free.
Common Types of 2FA
- SMS Codes: You receive a text message with a code each time you log in.
- Authenticator Apps: Apps like Google Authenticator or Authy generate time-sensitive codes.
- Email Codes: Some services send a code to your email.
- Hardware Tokens: Physical devices like YubiKey that you plug into your computer.
Easy-to-Understand Example
Imagine you want to enter your email account:
- Step 1: Enter your password (something you know).
- Step 2: The service sends a 6-digit code to your phone via an app or SMS (something you have).
- Step 3: You enter the code, and only then can you access your account.
Mind Map: Understanding 2FA
How to Set Up 2FA (Step-by-Step Example)
Let’s say you want to enable 2FA on your Google account:
- Go to your Google Account settings.
- Click on “Security”.
- Find “2-Step Verification” and click “Get Started”.
- Follow the prompts to add your phone number.
- Choose your preferred method (text message or authenticator app).
- Verify by entering the code sent to your phone.
- 2FA is now active!
Real-Life Scenario
Sarah uses 2FA on her social media account. One day, someone tries to log in using her password, but they can’t get past the second step because they don’t have the code sent to Sarah’s phone. This stops the hacker from accessing her account.
Tips for Using 2FA Safely
- Always keep your phone or authentication device secure.
- Do not share your 2FA codes with anyone.
- Consider using an authenticator app instead of SMS for better security.
- Backup your 2FA codes or use recovery options in case you lose your device.
Mind Map: Tips for Effective 2FA Use
Summary
Two-Factor Authentication is a simple yet powerful way to protect your online accounts. By requiring two forms of identification, it significantly reduces the risk of unauthorized access. Setting it up takes just a few minutes and can save you from potential headaches caused by hacking or identity theft.
2.4 Recognizing and Avoiding Phishing Scams with Practical Examples
Phishing scams are one of the most common ways cybercriminals try to steal your personal information, such as passwords, credit card numbers, or other sensitive data. These scams often come in the form of emails, text messages, or fake websites that look legitimate but are designed to trick you.
What is Phishing?
Phishing is a type of online scam where attackers impersonate trustworthy entities to lure you into providing confidential information.
Mind Map: Recognizing Phishing Scams
Practical Examples of Phishing Emails
Example 1: Fake Bank Alert
Subject: Urgent: Your Bank Account Has Been Suspended
Dear Customer,
We detected suspicious activity on your bank account. Please verify your identity immediately by clicking the link below or your account will be permanently locked.
Verify Now
How to spot the scam:
- The sender’s email address is not from your bank’s official domain.
- The link leads to a suspicious URL that doesn’t match the bank’s website.
- The email uses urgent language to pressure you.
- The greeting is generic.
What to do:
- Do NOT click the link.
- Go directly to your bank’s official website or call their customer service.
Example 2: Fake Package Delivery Notification
Subject: Your Package Could Not Be Delivered
Hello,
We attempted to deliver your package but were unsuccessful. Please confirm your address by downloading the attached form.
Attachment: delivery_form.exe
How to spot the scam:
- Unexpected email about a package you didn’t order.
- Attachment is an executable file (.exe), which is suspicious.
- No tracking number or legitimate courier details.
What to do:
- Do NOT open the attachment.
- Delete the email.
Mind Map: How to Avoid Phishing Scams
Additional Tips with Examples
-
Hover Over Links: If you receive an email with a link, hover your mouse over it without clicking. For example, a link that says “www.paypal.com” might actually lead to “www.paypa1.com” (note the number 1 instead of the letter l).
-
Check for HTTPS: When entering sensitive information, ensure the website URL starts with “https://” and has a padlock icon. For example, https://www.yourbank.com is safer than http://yourbank.com.
-
Be Wary of Unexpected Requests: Legitimate companies rarely ask for passwords or sensitive info via email. For example, if you get an email asking for your password to “verify your account,” it’s almost certainly a phishing attempt.
-
Use Spam Filters: Most email services have spam filters that catch many phishing emails. Regularly check your spam folder to ensure legitimate emails are not filtered out.
-
Keep Your Devices Updated: Updates often include security patches that help protect you from phishing and other attacks.
Summary
Phishing scams try to trick you by pretending to be someone you trust. By learning to recognize suspicious signs—such as strange sender addresses, urgent language, unexpected attachments, and suspicious links—you can protect yourself. Always verify the source, avoid clicking on unknown links, and when in doubt, contact the company directly using official contact details.
Remember: When it comes to your personal information, it’s better to be cautious than sorry!
2.5 Managing Privacy Settings on Social Media Platforms
Social media platforms are a big part of our daily lives, but they can also expose a lot of personal information if privacy settings are not managed properly. This section will guide you through managing privacy settings on popular platforms with easy-to-understand examples and mind maps to visualize the process.
Why Manage Privacy Settings?
- Protect your personal information from strangers.
- Control who sees your posts, photos, and personal details.
- Prevent misuse of your data by advertisers or malicious actors.
Step 1: Understand Common Privacy Setting Categories
Step 2: Managing Privacy Settings on Facebook (Example)
Example: You want only your friends to see your posts and limit who can send you friend requests.
- Go to Settings & Privacy > Privacy Settings.
- Under “Your Activity,” set “Who can see your future posts?” to “Friends.”
- Under “How People Find and Contact You,” set “Who can send you friend requests?” to “Friends of friends.”
- Review “Profile and Tagging” settings to control who can post on your timeline and who can see tagged posts.
Visual Mind Map:
Step 3: Managing Privacy Settings on Instagram (Example)
Example: You want to make your account private so only approved followers see your photos.
- Go to Profile > Settings > Privacy.
- Toggle “Private Account” on.
- Control who can comment on your posts under “Comments.”
- Manage story sharing and message controls.
Visual Mind Map:
Step 4: Managing Privacy Settings on Twitter (Example)
Example: You want to protect your tweets so only approved followers can see them.
- Go to Settings and privacy > Privacy and safety.
- Enable “Protect your Tweets.”
- Control who can tag you in photos and who can send direct messages.
Visual Mind Map:
Step 5: General Tips for Managing Privacy Settings
- Regularly review your privacy settings; platforms update them frequently.
- Limit personal info like phone number, email, birthday from public view.
- Use friend lists or groups to share posts with specific people only.
- Turn off location sharing unless necessary.
- Be cautious with third-party apps connected to your social accounts.
Summary Mind Map: Managing Privacy Settings Across Platforms
By following these simple steps and using the examples above, even non-tech people can take control of their digital privacy on social media platforms. Remember, privacy is a continuous process, not a one-time setup!
3. Safe Browsing Habits for Everyday Internet Use
3.1 Understanding Secure Websites: What HTTPS Means and Why It Matters
When you browse the internet, you often see website addresses starting with either http:// or https://. But what do these letters mean, and why should you care? This section will explain HTTPS in simple terms, why it matters for your privacy and security, and how to recognize secure websites.
What is HTTPS?
- HTTP stands for HyperText Transfer Protocol — it’s the basic way your browser and websites communicate.
- HTTPS means HTTP Secure — it’s HTTP but with an extra layer of security called encryption.
Think of HTTP as sending a postcard through the mail: anyone handling it can read what’s written. HTTPS is like sending a sealed envelope — only the person receiving it can read the message.
Why HTTPS Matters
- Protects Your Data: HTTPS encrypts the information you send and receive, such as passwords, credit card numbers, or personal details.
- Prevents Eavesdropping: Without HTTPS, hackers or malicious actors on the same network can intercept your data.
- Ensures Website Authenticity: HTTPS verifies that the website you’re visiting is the real one, not a fake copy designed to steal your info.
How to Recognize a Secure Website
Look at the address bar in your browser:
- The URL starts with https://
- A padlock icon appears next to the URL
Example:
https://www.examplebank.com 🔒
If you see these signs, your connection is encrypted and more secure.
Mind Map: HTTPS Basics
Real-World Example: Online Shopping
Imagine you’re buying a gift online. When you enter your credit card details on a website without HTTPS, someone could intercept your card number and use it fraudulently. But if the website uses HTTPS, your card details are encrypted, making it extremely difficult for anyone to steal your information.
What Happens When a Website Isn’t Secure?
- Browsers often show warnings like “Not Secure” next to the URL.
- Your data can be intercepted or altered.
- You risk falling victim to phishing or man-in-the-middle attacks.
Example warning in Chrome:
Not Secure http://www.example.com
Mind Map: Risks of Non-HTTPS Websites
Easy Tips to Stay Safe
- Always check for https:// and the padlock icon before entering passwords or payment info.
- If a website shows a “Not Secure” warning, avoid submitting sensitive data.
- Use bookmarks for trusted sites to avoid mistyping URLs and landing on fake sites.
Summary
HTTPS is your first line of defense for safe browsing. It ensures your data is encrypted and that you’re communicating with the genuine website. By understanding and recognizing HTTPS, you can protect your personal information from prying eyes and cybercriminals.
For more detailed guidance, see the next sections on safe browsing habits and recognizing phishing scams.
3.2 Using Private Browsing Modes: When and How to Use Them
Private browsing modes, often called “Incognito Mode” or “Private Window,” are features available in most modern web browsers. They help you browse the internet without saving certain information like your browsing history, cookies, or form data on your device. However, it’s important to understand what private browsing does and does not protect you from.
What Does Private Browsing Do?
- Does NOT save your browsing history locally.
- Does NOT save cookies or site data after the session ends.
- Does NOT save information you enter into forms.
What Private Browsing Does NOT Do:
- It does NOT make you anonymous online.
- Your internet service provider (ISP), employer, or websites can still track your activity.
- It does NOT protect against malware or phishing attacks.
When to Use Private Browsing Modes
- Using a public or shared computer: To avoid leaving your browsing history or login information behind.
- Shopping for gifts: To prevent others sharing the device from seeing your searches.
- Logging into multiple accounts: For example, checking two different email accounts simultaneously.
- Testing website behavior: If you want to see how a website behaves for a new user without cookies.
How to Open Private Browsing Mode
| Browser | How to Open Private Mode |
|---|---|
| Google Chrome | Ctrl+Shift+N (Windows) / Cmd+Shift+N (Mac) |
| Mozilla Firefox | Ctrl+Shift+P (Windows) / Cmd+Shift+P (Mac) |
| Microsoft Edge | Ctrl+Shift+N (Windows) / Cmd+Shift+N (Mac) |
| Safari | Cmd+Shift+N (Mac) |
Example Scenario: Shopping for a Surprise Gift
Imagine you want to buy a surprise gift online but don’t want other family members to see your browsing history or targeted ads later. Using private browsing mode:
- You open a private window.
- Search for the gift.
- Add it to your cart and complete the purchase.
- Close the private window.
Because private mode doesn’t save cookies or history, your searches and purchases won’t appear in the browser history or influence ad targeting on that device.
Mind Map: Understanding Private Browsing Mode
Mind Map: When to Use Private Browsing
Tips for Better Privacy Beyond Private Browsing
- Use a VPN to encrypt your internet traffic.
- Regularly clear cookies and cache.
- Use privacy-focused browsers or extensions.
- Be cautious about the information you share online.
Summary
Private browsing mode is a useful tool for keeping your browsing activity off your local device, especially on shared or public computers. However, it is not a magic shield for online privacy or security. Combining private browsing with other good security habits will help keep your digital life safer and more private.
3.3 Avoiding Dangerous Links and Downloads: Spotting Red Flags
When browsing the internet, clicking on links or downloading files can sometimes expose you to harmful software or scams. Learning to spot red flags helps you stay safe without needing to be a tech expert.
What Makes a Link or Download Dangerous?
- Malware: Software designed to harm your device or steal information.
- Phishing: Fake websites or files that trick you into giving personal info.
- Scams: Links leading to fraudulent offers or fake downloads.
Mind Map: Red Flags in Links and Downloads
Examples of Red Flags in Links
-
URL Mismatch:
- Legitimate: https://www.paypal.com/login
- Suspicious: https://paypal-login-secure.com
-
Hover to Preview:
- When you hover your mouse over a link (without clicking), check the bottom-left corner of your browser to see the actual URL.
- Example: A link text says “Click here to update your account,” but hovering shows “http://fakebanking.site/update”
-
Shortened URLs:
- Links like bit.ly/xyz123 can hide the real destination.
- Use URL preview tools (e.g., https://checkshorturl.com/) to see where they lead before clicking.
Examples of Dangerous Downloads
- Receiving an email claiming to be from your bank with an attachment named “account_statement.exe” — executable files are rarely sent legitimately.
- Downloading “free” software from unknown websites that prompt for additional downloads or ask for admin permissions.
Best Practices to Avoid Dangerous Links and Downloads
- Verify the Source: Only click links or download files from trusted websites or contacts.
- Check URLs Carefully: Look for misspellings, strange domain endings, or extra words.
- Use Antivirus Software: It can scan downloads automatically and warn you.
- Avoid Clicking on Pop-ups: Close them using the browser’s close button, not the pop-up’s buttons.
- Keep Software Updated: Updates often include security patches.
- When in Doubt, Don’t Click: If something feels off, it’s safer to avoid.
Mind Map: Safe Clicking Habits
Real-Life Scenario
You receive an email from “[email protected]” saying your account will be suspended unless you click a link to verify your details. The email urges immediate action and contains a link labeled “Verify Now.”
- Red Flags:
- Email address misspells Amazon as “amaz0n.com”
- Urgent, threatening language
- Link URL (hovered) points to “http://amaz0n-security-check.com/login”
What to do:
- Do NOT click the link.
- Visit the official Amazon website directly by typing the URL yourself.
- Report the email as phishing.
By understanding these red flags and practicing caution, you can greatly reduce the risk of falling victim to dangerous links and downloads. Remember, staying safe online is about being aware and taking simple steps—not being a tech expert!
3.4 Clearing Cookies and Cache: Why and How to Do It Regularly
What Are Cookies and Cache?
- Cookies are small files websites save on your device to remember your preferences, login info, or track your activity.
- Cache is temporary storage where your browser keeps parts of websites (like images and scripts) to load pages faster next time.
Why Should You Clear Them Regularly?
- Privacy Protection: Cookies can track your browsing habits and build profiles about you. Clearing them limits this tracking.
- Free Up Space: Cache can take up storage over time, slowing down your device.
- Fix Loading Issues: Sometimes cached files get outdated or corrupted, causing websites to display incorrectly.
- Security: Old cookies might contain sensitive info that could be exploited if your device is accessed by others.
Mind Map: Reasons to Clear Cookies and Cache
Easy-to-Understand Examples
- Example 1: You visit an online store, add items to your cart, but when you return the next day, the cart is empty because cookies were cleared.
- Example 2: A website looks broken or outdated. Clearing cache forces your browser to download fresh files, fixing the display.
- Example 3: You stay logged into a social media account on a public computer because cookies saved your login. Clearing cookies logs you out, protecting your account.
How to Clear Cookies and Cache: Step-by-Step Guides
Google Chrome
- Click the three dots (menu) in the top-right corner.
- Select Settings.
- Scroll down and click Privacy and security.
- Click Clear browsing data.
- Choose a time range (e.g., “Last 24 hours” or “All time”).
- Check Cookies and other site data and Cached images and files.
- Click Clear data.
Mozilla Firefox
- Click the three horizontal lines (menu) in the top-right corner.
- Select Settings.
- Go to Privacy & Security panel.
- Under Cookies and Site Data, click Clear Data.
- Check Cookies and Site Data and Cached Web Content.
- Click Clear.
Safari (Mac)
- Click Safari in the menu bar.
- Select Preferences.
- Go to the Privacy tab.
- Click Manage Website Data.
- Click Remove All and confirm.
Microsoft Edge
- Click the three dots (menu) in the top-right corner.
- Select Settings.
- Click Privacy, search, and services.
- Under Clear browsing data, click Choose what to clear.
- Select Cookies and other site data and Cached images and files.
- Click Clear now.
Mind Map: How to Clear Cookies and Cache (General Steps)
Tips for Non-Tech People
- Set a reminder to clear cookies and cache monthly or when you notice slow browsing.
- Clearing cookies will log you out of websites, so keep your passwords handy.
- Use browser settings to automatically clear cookies when you close the browser if you want extra privacy.
Summary
Clearing cookies and cache is a simple but powerful way to protect your privacy, improve device performance, and fix website issues. By following easy steps in your browser, you can keep your online experience safer and smoother.
3.5 Using Browser Extensions to Enhance Privacy: Simple Recommendations
Browser extensions are small software programs that add extra features to your web browser. Some extensions can help protect your privacy by blocking trackers, ads, and malicious scripts that collect your data without your knowledge. For non-tech people, using the right browser extensions can be an easy way to improve online privacy without complicated setups.
Why Use Privacy-Focused Browser Extensions?
- Block trackers that follow your activity across websites.
- Prevent unwanted ads that may slow down browsing.
- Stop malicious scripts that can steal personal information.
- Control what information websites can access.
Simple Recommendations for Privacy Browser Extensions
| Extension Name | What It Does | Example Use Case |
|---|---|---|
| uBlock Origin | Blocks ads and trackers efficiently | Stops annoying ads on news sites and blocks trackers that profile you. |
| Privacy Badger | Automatically learns and blocks trackers | Automatically blocks invisible trackers as you browse. |
| HTTPS Everywhere | Forces websites to use secure HTTPS | Ensures your connection is encrypted on many sites. |
| Cookie AutoDelete | Deletes cookies automatically after you close tabs | Prevents websites from storing tracking cookies long-term. |
| Decentraleyes | Locally serves common web libraries to avoid CDN tracking | Stops third-party content from tracking you via common libraries. |
How to Install and Use Browser Extensions (Example with uBlock Origin)
- Open your browser’s extension/add-on store (e.g., Chrome Web Store or Firefox Add-ons).
- Search for “uBlock Origin”.
- Click “Add to Browser” or “Install”.
- Once installed, you’ll see the uBlock icon near the address bar.
- By default, it blocks many ads and trackers automatically.
- You can click the icon to see how many items were blocked on the current page.
Mind Map: Choosing and Using Privacy Browser Extensions
Mind Map: How Extensions Protect Your Privacy
Practical Examples
-
Example 1: You visit a news website that usually shows many ads and tracks your reading habits. With uBlock Origin installed, most ads disappear, and trackers are blocked, so your browsing is faster and more private.
-
Example 2: You want to make sure your connection is secure when shopping online. HTTPS Everywhere automatically redirects you to the secure HTTPS version of the site, protecting your payment details.
-
Example 3: After browsing multiple shopping sites, you notice targeted ads following you around. Cookie AutoDelete removes cookies from closed tabs, preventing long-term tracking.
Important Tips
- Only install extensions from official browser stores to avoid malicious add-ons.
- Don’t install too many extensions; they can slow down your browser and sometimes conflict.
- Regularly update your extensions to get security patches and improvements.
- Review permissions requested by extensions—avoid those asking for excessive access.
Using privacy-focused browser extensions is a simple and effective way for non-tech users to take control of their online privacy. By blocking trackers, ads, and unwanted cookies, these tools help keep your browsing safer and less intrusive without needing advanced technical knowledge.
4. Email and Communication Security
4.1 Identifying Suspicious Emails: Practical Tips and Examples
Emails are one of the most common ways cybercriminals try to trick you into giving away personal information or infecting your device with malware. Learning to identify suspicious emails is a crucial skill for protecting your digital privacy and security.
What Makes an Email Suspicious?
Here is a mind map summarizing key signs of suspicious emails:
Practical Tips to Spot Suspicious Emails
-
Check the Sender’s Email Address Carefully
- Example: An email claiming to be from your bank but the sender is “[email protected]” instead of the official bank domain.
-
Look for Generic Greetings
- Example: “Dear User” or “Dear Customer” instead of your actual name.
-
Beware of Urgent or Threatening Language
- Example: “Your account will be closed in 24 hours unless you verify your details.”
-
Hover Over Links Before Clicking
- Example: The link text says “www.paypal.com” but hovering shows “http://paypa1.com/fake” (note the number 1 instead of letter l).
-
Avoid Opening Unexpected Attachments
- Example: An email with an attachment named “invoice.zip” from an unknown sender.
-
Look for Spelling and Grammar Mistakes
- Example: “Congratulation! You has won a prize. Click here to claim.”
-
Verify Requests for Personal Information
- Legitimate companies rarely ask for passwords or sensitive info via email.
Example 1: Phishing Email Pretending to be a Bank
From: [email protected]
Subject: Urgent: Verify Your Account Now

Dear Customer,

We have detected suspicious activity on your account. Please verify your information immediately to avoid suspension.
Click here to verify: http://bank-secure-verify.com/login

Thank you,
Your Bank Security Team
Why this is suspicious:
- Sender email is not the official bank domain.
- Urgent language pressuring immediate action.
- Link URL does not match the official bank website.
- Generic greeting “Dear Customer”.
Example 2: Scam Email Offering a Prize
From: [email protected]
Subject: Congratulations! You Won a $1000 Gift Card

Dear User,

You have been selected as a winner in our monthly lucky draw. To claim your prize, please download the attached form and fill in your details.

Best regards,
Lucky Draw Team
Why this is suspicious:
- Unexpected prize with no prior participation.
- Attachment could contain malware.
- Generic greeting.
- No contact information or official website link.
How to Respond to Suspicious Emails
- Do not click on any links or download attachments.
- Do not reply with personal information.
- Verify the sender by contacting the company directly using official contact details.
- Mark the email as spam or phishing in your email client.
- Delete the email after reporting.
Summary Mind Map: Steps to Handle Suspicious Emails
By practicing these simple tips and staying vigilant, you can greatly reduce the risk of falling victim to email scams and protect your digital privacy and security.
4.2 Encrypting Your Emails: What Non-Tech People Need to Know
Email encryption might sound complicated, but it’s simply a way to keep your messages private so only the intended recipient can read them. Think of it like sending a letter in a locked box that only the receiver has the key to open.
Why Encrypt Your Emails?
- Privacy: Prevents hackers, internet providers, or even email service providers from reading your messages.
- Security: Protects sensitive information like passwords, financial details, or personal conversations.
- Trust: Shows recipients you care about their privacy.
How Email Encryption Works (Simple Mind Map)
Types of Email Encryption for Non-Tech Users
-
End-to-End Encryption (E2EE)
- Encrypts email on sender’s device and decrypts only on receiver’s device.
- Example: ProtonMail, Tutanota.
- Example scenario: You send a confidential contract via ProtonMail; only your client can read it.
-
Transport Layer Security (TLS)
- Encrypts email while it travels between email servers.
- Most modern email providers use this automatically.
- Example scenario: When you send an email via Gmail to another Gmail user, TLS helps protect your message in transit.
-
PGP (Pretty Good Privacy) / GPG (GNU Privacy Guard)
- Uses a pair of keys (public and private) to encrypt and decrypt.
- More technical but powerful.
- Example scenario: A freelancer shares their public key with clients; clients encrypt sensitive files before sending.
Easy Ways to Start Encrypting Your Emails
-
Use Secure Email Providers:
- ProtonMail and Tutanota offer built-in end-to-end encryption with easy-to-use interfaces.
- No need to manage keys manually.
-
Use Email Encryption Plugins:
- For Gmail or Outlook, plugins like Mailvelope or FlowCrypt add PGP encryption.
- These tools guide you through key creation and usage.
-
Encrypt Attachments:
- If full email encryption is too complex, encrypt sensitive attachments with a password before sending.
- Example: Use tools like 7-Zip or WinRAR to create password-protected archives.
Example: Sending an Encrypted Email with ProtonMail
- Sign up for a free ProtonMail account.
- Compose your email as usual.
- ProtonMail automatically encrypts your message.
- If sending to a non-ProtonMail user, you can set a password for the recipient to unlock the email.
- The recipient receives a link and enters the password to read your message securely.
Common Misconceptions
-
“Encryption is only for tech experts.”
- Many tools simplify encryption for everyday users.
-
“Encrypted emails are hard to send or receive.”
- With services like ProtonMail, it’s as easy as regular email.
-
“Encryption slows down communication.”
- The process is almost instant and doesn’t affect your workflow.
Mind Map: Steps to Start Encrypting Your Emails
Final Tips
- Always keep your private keys or passwords safe and never share them.
- Regularly update your email software and encryption tools.
- Educate your contacts about encryption benefits to encourage secure communication.
Encrypting your emails is a powerful step to protect your privacy and personal information. With simple tools and a little practice, anyone can keep their digital conversations safe.
4.3 Secure Messaging Apps: Choosing the Right One for Privacy
In today’s digital world, messaging apps are essential for staying connected with friends, family, and colleagues. However, not all messaging apps are created equal when it comes to privacy and security. Choosing the right secure messaging app helps protect your conversations from hackers, eavesdroppers, and even the app providers themselves.
Why Use Secure Messaging Apps?
- End-to-End Encryption (E2EE): Ensures only you and the recipient can read the messages.
- Minimal Data Collection: The app collects little to no personal data.
- Open Source Code: Transparency so experts can verify security claims.
- Regular Security Updates: Keeps the app protected against new threats.
Popular Secure Messaging Apps and Their Features
How to Choose the Right App for You
-
Consider Your Privacy Needs:
- Casual chatting vs. sensitive conversations.
- Do you want anonymity or just encryption?
-
Check User Base:
- Are your contacts using the app?
- Convenience vs. security trade-offs.
-
Look for Transparency:
- Open source apps allow independent security audits.
-
Evaluate Features:
- Disappearing messages, screenshot notifications, group chat security.
-
Ease of Use:
- User-friendly interface encourages consistent use.
Real-Life Example: Choosing Between Signal and WhatsApp
- Scenario: You want to chat privately with your family.
- Signal: Offers strong privacy with E2EE, minimal data collection, and open source code. However, some family members may find it less familiar.
- WhatsApp: Also uses E2EE and is widely used, but owned by Meta, which collects metadata and has had privacy concerns.
Best Practice: Encourage family to use Signal for sensitive chats, while using WhatsApp for casual conversations.
Tips for Using Secure Messaging Apps Safely
- Always keep your app updated.
- Enable disappearing messages for sensitive conversations.
- Verify contacts’ safety numbers or keys when possible.
- Avoid sharing sensitive info over apps without E2EE.
Mind Map: Steps to Start Using a Secure Messaging App
By understanding the differences between messaging apps and following these simple steps, even non-tech users can significantly improve their digital privacy and security in everyday communication.
4.4 Avoiding Oversharing in Emails and Messages
Oversharing in emails and messages can unintentionally expose sensitive information, damage your reputation, or even lead to security risks like identity theft or phishing attacks. This section will guide you through understanding what oversharing means, why it’s risky, and practical ways to communicate safely and effectively.
What is Oversharing?
Oversharing means providing more personal or sensitive information than necessary in your communications. This can happen in both professional and personal emails or messages.
Examples of Oversharing:
- Including your full home address or phone number in casual emails.
- Sharing passwords, PINs, or security answers.
- Revealing vacation plans or absence details that could be exploited.
- Discussing confidential work matters in unsecured messages.
Why Avoid Oversharing?
- Protect Your Privacy: Personal details can be used by scammers or hackers.
- Maintain Professionalism: Oversharing can harm your credibility.
- Prevent Social Engineering Attacks: Attackers use personal info to trick you.
Mind Map: Key Areas to Avoid Oversharing
Practical Tips to Avoid Oversharing
-
Think Before You Send: Ask yourself if the information is necessary for the recipient.
-
Use Professional Language: Keep emails concise and focused on the topic.
-
Limit Personal Details: Share only what’s relevant.
-
Avoid Sharing Passwords or Security Info: Never send passwords or PINs via email or messages.
-
Be Careful with Attachments: Don’t attach documents containing sensitive info unless encrypted.
-
Use Private Channels for Sensitive Topics: Discuss confidential matters in secure, trusted platforms.
-
Review Your Message: Before sending, re-read to spot any unnecessary personal details.
Example Scenarios
Example 1: Oversharing in a Work Email
Oversharing:
“Hi team, I’ll be on vacation from July 10 to 20 at my beach house in Florida. If you need anything, call my home phone at 555-1234. Also, here is the client’s confidential report attached.”
Better Approach:
“Hi team, I’ll be out of office from July 10 to 20. Please contact [colleague’s name] for urgent matters. The client report is attached with restricted access.”
Example 2: Oversharing in a Personal Message
Oversharing:
“Hey, my birthday is coming up on March 15, and my full address is 123 Maple Street. Also, my bank account number is 987654321.”
Better Approach:
“Hey! Looking forward to celebrating soon. Let’s catch up!”
Mind Map: Steps to Review Your Email Before Sending

Tools and Features to Help Avoid Oversharing
- Email Draft Review: Use the ‘Draft’ feature to revisit your message after some time.
- Privacy Checklists: Keep a checklist handy to verify sensitive info isn’t included.
- Secure Messaging Apps: Use apps with end-to-end encryption for sensitive conversations.
- Email Encryption: For confidential information, use encryption tools.
By being mindful of what you share in emails and messages, you can protect your privacy, maintain professionalism, and reduce security risks. Always remember: less is more when it comes to personal and sensitive information in digital communication.
4.5 Managing Contact Lists and Permissions Safely
Managing your contact lists and the permissions you grant to apps and services is a crucial part of maintaining your digital privacy and security. Many people overlook this step, but it can prevent unauthorized access to your personal information and reduce the risk of scams or data leaks.
Why Managing Contact Lists and Permissions Matters
- Protects your personal network: Your contacts often include family, friends, colleagues, and clients. If an app or service misuses this data, it can expose them to spam, phishing, or identity theft.
- Prevents unauthorized sharing: Some apps request access to your contacts to send invites or sync information. Without proper control, they might share your contacts’ details without consent.
- Reduces risk of data breaches: The fewer apps that have access to your contact list, the smaller the attack surface for hackers.
Mind Map: Key Areas in Managing Contact Lists and Permissions
How to Review and Control App Permissions on Your Phone
Example: Managing Permissions on Android
- Open Settings > Apps & notifications > App permissions.
- Select Contacts.
- You’ll see a list of apps with access to your contacts.
- Toggle off permissions for apps that don’t need it.
Example: Managing Permissions on iPhone
- Open Settings > Privacy > Contacts.
- Review the list of apps with access.
- Disable access for unnecessary apps.
Tip: Some apps request contact access during installation or first use. Always read the prompt carefully before granting permission.
Organizing and Cleaning Your Contact List
- Delete outdated contacts: Remove numbers or emails you no longer use or recognize.
- Merge duplicates: Many phones have built-in tools to merge duplicate contacts, reducing clutter.
- Use groups or labels: Categorize contacts (e.g., Family, Work, Clients) to control sharing more easily.
Example:
- On Google Contacts, you can create labels and assign contacts to them. When sharing, you can choose to share only a specific group.
Sharing Contacts Safely
- Share only what’s necessary: Instead of sharing entire contact cards, send only the relevant details.
- Use secure channels: Prefer encrypted messaging apps (like Signal or WhatsApp) when sharing sensitive contact info.
- Avoid bulk sharing: Don’t share your entire contact list with apps or people unless absolutely necessary.
Example:
- When inviting a friend to an app, enter their email or phone number manually instead of granting the app access to your whole contact list.
Backup and Sync Considerations
- Use reputable services (Google Contacts, iCloud) for backups.
- Understand what data is synced and with whom.
- Regularly check sync settings to avoid unintended sharing.
Example:
- If you use Google Contacts sync, your contacts are stored in your Google account and synced across devices. Make sure your Google account is secured with 2FA.
Responding to Suspicious Activity Related to Contacts
- If your contacts receive spam or suspicious messages from your account, your device or account may be compromised.
- Inform your contacts to ignore suspicious messages.
- Change your passwords and review app permissions immediately.
Example:
- A friend receives a message from your number asking for money urgently. Contact them directly using another method to clarify and secure your account.
Summary Checklist for Managing Contacts and Permissions Safely
- Regularly review which apps have access to your contacts.
- Remove permissions from apps that don’t need access.
- Clean and organize your contact list.
- Share contact information sparingly and securely.
- Backup contacts using trusted services.
- Monitor for suspicious messages and act quickly if detected.
By taking these simple but effective steps, you can protect not only your own privacy but also that of the people in your contact list, making your digital life safer and more secure.
5. Securing Your Devices: Computers, Smartphones, and Tablets
5.1 Keeping Your Operating System and Apps Updated Automatically
Keeping your operating system (OS) and apps updated is one of the simplest yet most effective ways to protect your devices from security threats. Updates often include patches that fix vulnerabilities hackers might exploit. For non-tech people, enabling automatic updates means you don’t have to remember to check for updates manually — your device takes care of it for you!
Why Updates Matter
- Security patches: Fix holes that cybercriminals can use to break into your device.
- Bug fixes: Resolve issues that might cause apps or your device to crash.
- New features: Sometimes updates bring helpful new tools or improvements.
Mind Map: Why Keep Your Device Updated?
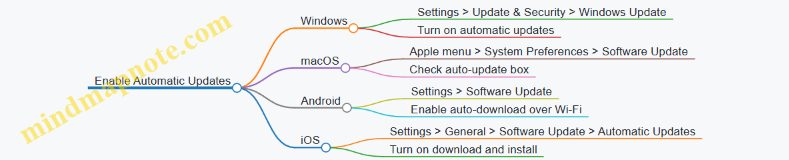
How to Enable Automatic Updates
For Windows 10/11
- Click the Start menu and select Settings (gear icon).
- Choose Update & Security.
- Click Windows Update.
- Make sure Automatic Updates are turned on (usually the default).
- You can click Check for updates to manually trigger an update if needed.
Example:
Sarah, a freelancer, enables automatic updates on her laptop. One day, a new security patch is released to fix a vulnerability. Because her updates are automatic, her laptop installs the patch overnight without her needing to do anything, keeping her data safe.
For macOS
- Click the Apple menu (top-left corner).
- Select System Preferences.
- Click Software Update.
- Check the box Automatically keep my Mac up to date.
Example:
John uses a MacBook for his small business. He enables automatic updates so his system always has the latest security fixes, reducing the risk of cyberattacks.
For Android Devices
- Open the Settings app.
- Scroll to Software Update or System Update (may vary by brand).
- Tap Download and install or Auto-download over Wi-Fi.
- Enable automatic updates if available.
Example:
Maria’s phone automatically updates apps and system software when connected to Wi-Fi overnight, saving her time and keeping her phone secure.
For iPhone/iPad (iOS)
- Open Settings.
- Tap General.
- Select Software Update.
- Tap Automatic Updates.
- Turn on Download iOS Updates and Install iOS Updates.
Mind Map: How to Enable Automatic Updates
Tips for Smooth Automatic Updates
- Connect to Wi-Fi: Updates can be large, so use Wi-Fi to avoid data charges.
- Charge your device: Make sure your device has enough battery or is plugged in.
- Restart when prompted: Some updates require a restart to finish installing.
What If Updates Fail?
- Restart your device and try again.
- Check your internet connection.
- If problems persist, seek help from a trusted tech-savvy friend or professional.
Summary
Keeping your OS and apps updated automatically is like locking your doors and windows without having to think about it every day. It helps protect your personal information and keeps your devices running smoothly with minimal effort.
Quick Checklist
- Enable automatic updates on your computer and mobile devices.
- Connect to Wi-Fi regularly to allow updates.
- Keep devices charged or plugged in during updates.
- Restart devices when updates require it.
- Ask for help if updates don’t install properly.
5.2 Installing and Using Antivirus and Anti-Malware Software
Antivirus and anti-malware software are essential tools to protect your devices from harmful programs that can steal your data, damage your files, or slow down your computer. Even if you’re not tech-savvy, understanding how to install and use these programs can keep your digital life safe.
What Are Antivirus and Anti-Malware Software?
- Antivirus software mainly targets viruses — malicious programs that can replicate and spread.
- Anti-malware software covers a broader range of threats, including spyware, ransomware, trojans, and adware.
Many modern security programs combine both antivirus and anti-malware features for comprehensive protection.
Why Do You Need Them?
- They detect and remove harmful software before it damages your device.
- They prevent unauthorized access to your personal information.
- They help keep your device running smoothly by stopping malicious programs.
How to Choose the Right Software
Consider these simple factors:
- Reputation: Choose well-known brands like Norton, McAfee, Bitdefender, or free options like Avast and Windows Defender (built into Windows).
- Ease of Use: Look for software with a simple interface and automatic updates.
- Cost: Free versions often provide basic protection; paid versions offer advanced features.
Step-by-Step Guide to Installing Antivirus Software
-
Download from Official Source: Always download software from the official website or trusted app stores to avoid fake or malicious versions.
-
Run the Installer: Open the downloaded file and follow the on-screen instructions.
-
Set Up Automatic Updates: Ensure the software updates itself automatically to stay protected against new threats.
-
Perform an Initial Scan: After installation, run a full scan to check your device for existing threats.
-
Enable Real-Time Protection: This feature continuously monitors your device for suspicious activity.
Mind Map: Installing and Using Antivirus Software
How to Use Antivirus Software Daily
- Keep it Updated: New threats appear all the time. Updates help your software recognize them.
- Run Regular Scans: Schedule scans weekly or monthly to catch any hidden malware.
- Review Alerts: If the software flags a file or website, read the alert carefully and follow recommended actions.
- Quarantine vs. Delete: Quarantine isolates suspicious files safely. Delete only if you’re sure the file is harmful.
Example Scenario: Using Windows Defender
- Windows Defender comes pre-installed on Windows 10 and 11.
- It runs automatically and updates through Windows Update.
- To run a scan manually:
- Open Settings > Update & Security > Windows Security > Virus & threat protection.
- Click Quick scan or Full scan.
- If a threat is found, Defender will notify you and suggest actions like Remove or Quarantine.
What to Do If Malware Is Detected
- Don’t Panic: Most antivirus programs handle threats automatically.
- Follow the Software’s Guidance: Usually, it will quarantine or delete the malware.
- Restart Your Device: Some malware removal requires a reboot.
- Run Another Scan: Confirm the threat is fully removed.
- Seek Help if Needed: If problems persist, contact a trusted tech support service.
Common Myths About Antivirus Software
- Myth: “I don’t need antivirus because I’m careful.”
- Reality: Even careful users can accidentally download malware.
- Myth: “Antivirus slows down my computer too much.”
- Reality: Modern software is designed to work efficiently in the background.
- Myth: “Free antivirus isn’t good enough.”
- Reality: Many free antivirus programs provide solid basic protection.
Summary
Installing and using antivirus and anti-malware software is a straightforward but crucial step in protecting your digital privacy and security. By choosing trusted software, keeping it updated, and running regular scans, you can significantly reduce the risk of malware infections—even without technical expertise.
5.3 Setting Up Device Locks: PINs, Passwords, and Biometrics Explained
Keeping your devices locked is one of the simplest yet most effective ways to protect your personal information from unauthorized access. Whether it’s your smartphone, tablet, or computer, setting up a secure lock screen ensures that only you (or trusted users) can access your data.
Why Device Locks Matter
Imagine leaving your front door unlocked — anyone could walk in and take your belongings. Your device lock acts like that door lock, preventing strangers from accessing your private photos, emails, banking apps, and more.
Types of Device Locks
There are three main types of device locks commonly used today:
- PIN (Personal Identification Number)
- Passwords
- Biometrics (Fingerprint, Face Recognition, etc.)
Let’s explore each with examples and easy explanations.
PIN (Personal Identification Number)
- What is it? A short numeric code, usually 4 to 6 digits.
- Example: 4829
Why use a PIN?
- Easy to remember.
- Faster to enter than long passwords.
Best Practices:
- Avoid obvious PINs like “1234”, “0000”, or your birth year.
- Use a random combination that only you know.
Example Scenario:
Sarah uses a 6-digit PIN “739182” to unlock her phone. She avoids using her birthday or simple sequences to keep it secure.
Passwords
- What is it? A combination of letters, numbers, and symbols.
- Example: “Sunshine#2024”
Why use a password?
- More secure than a PIN because it can be longer and more complex.
- Can include uppercase, lowercase, numbers, and special characters.
Best Practices:
- Use at least 8 characters.
- Mix letters, numbers, and symbols.
- Avoid common words or easily guessable info.
Example Scenario:
John sets his laptop password as “CoffeeLover!89”. It’s easy for him to remember but hard for others to guess.
Biometrics
- What is it? Using your unique physical traits to unlock devices.
- Examples: Fingerprint scan, Face ID, Iris scan.
Why use biometrics?
- Very convenient — no need to remember codes.
- Harder for others to replicate.
Best Practices:
- Use biometrics combined with a PIN or password for extra security.
- Register your biometrics only on trusted devices.
Example Scenario:
Maria uses fingerprint unlock on her smartphone. If the fingerprint scanner fails, she enters her PIN “5682” as a backup.
Mind Map: Types of Device Locks
How to Choose the Right Lock for You
| Lock Type | Ease of Use | Security Level | Recommended For |
|---|---|---|---|
| PIN | High | Medium | Quick access, casual users |
| Password | Medium | High | Sensitive data, computers |
| Biometrics | Very High | High | Smartphones, frequent access |
Tip: Combine biometrics with a PIN or password for the best protection.
Step-by-Step Example: Setting Up a PIN on an Android Phone
- Open Settings.
- Tap Security or Lock Screen.
- Select Screen Lock.
- Choose PIN.
- Enter a 4-6 digit PIN.
- Confirm the PIN.
Now your phone will ask for the PIN each time you unlock it.
Step-by-Step Example: Setting Up Face ID on an iPhone
- Open Settings.
- Tap Face ID & Passcode.
- Enter your existing passcode.
- Tap Set Up Face ID.
- Follow the on-screen instructions to scan your face.
- Complete the setup.
Your iPhone will now unlock when it recognizes your face.
Backup Options
Always set a backup PIN or password when using biometrics. This ensures you can still unlock your device if the biometric sensor fails or your appearance changes (e.g., wearing glasses or a hat).
Summary
- Always lock your devices.
- Use a PIN or password that’s hard to guess.
- Biometrics add convenience and security.
- Combine methods for stronger protection.
- Regularly update your lock methods as devices and threats evolve.
By following these simple steps, you can significantly reduce the risk of unauthorized access to your personal devices and keep your digital life safe.
5.4 Backing Up Your Data: Simple Methods Anyone Can Use
Backing up your data means making copies of your important files so that if something happens to your computer, phone, or tablet, you won’t lose everything. Think of it like making a spare key for your house — if you lose the original, you still have a way to get in.
Why Backing Up is Important
- Devices can get lost, stolen, or damaged.
- Files can be accidentally deleted.
- Viruses or ransomware can corrupt your data.
Simple Backup Methods
External Hard Drives or USB Flash Drives
- What it is: A physical device where you copy your files.
- Example: Copy your family photos and important documents onto a USB stick every month.
- How to do it: Plug the device into your computer, drag and drop files or use built-in backup software.
Cloud Storage Services
- What it is: Online services that store your files securely on the internet.
- Examples: Google Drive, Dropbox, Microsoft OneDrive.
- How to do it: Upload files manually or set up automatic syncing.
Automatic Backup Software
- What it is: Programs that regularly save copies of your files without you needing to remember.
- Example: Windows Backup, Apple Time Machine.
- How to do it: Set up the software once, and it will back up your files on schedule.
Mind Map: Backup Options
How Often Should You Back Up?
- For most people, backing up once a week is enough.
- If you create or change files daily (like freelancers), consider daily backups.
Example Scenario
Maria is a freelance writer. She writes articles on her laptop and saves them in a folder called “Work.” To protect her work:
- She uses Google Drive to automatically sync her “Work” folder.
- Once a month, she copies all her files to an external hard drive.
This way, if her laptop breaks or she accidentally deletes a file, she can recover her work easily.
Tips for Effective Backups
- Test your backups: Occasionally try to open files from your backup to make sure they work.
- Keep backups in different places: For example, one backup at home and one in the cloud.
- Label your backup devices: So you know which is which.
Mind Map: Backup Best Practices
Summary
Backing up your data is a simple but essential step to protect your digital life. Whether you choose an external drive, cloud storage, or automatic software, the key is to do it regularly and keep your backups safe. This small effort can save you from big headaches later!
5.5 What to Do if Your Device is Lost or Stolen
Losing a device like your smartphone, tablet, or laptop can be stressful, but knowing the right steps to take immediately can protect your personal information and minimize damage. This section will guide you through practical actions with easy-to-understand examples and visual mind maps to help you remember what to do.
Immediate Actions to Take
-
Report the Loss
- Contact your mobile carrier or internet provider to suspend service. This prevents unauthorized calls, texts, or data use.
- File a police report with your device’s serial number. This can help in recovery and is sometimes required for insurance claims.
-
Lock or Locate Your Device
- Use built-in tracking services:
- Apple: Use “Find My iPhone” via iCloud.com
- Android: Use “Find My Device” via Google
- Windows: Use “Find My Device” in Microsoft account
- These services can help locate, lock, or even erase your device remotely.
- Use built-in tracking services:
-
Change Your Passwords Immediately
- Start with your email accounts, banking apps, and social media.
- Example: If your phone is lost, someone could access your email and reset other passwords.
-
Notify Your Contacts
- Let friends, family, and colleagues know your device is lost to prevent them from falling victim to scams pretending to be you.
-
Backup Your Data
- If you have automatic backups enabled (e.g., iCloud, Google Drive), your data is safe.
- If not, try to backup any accessible data remotely if possible.
Mind Map: Step-by-Step Response Plan
Example Scenario
Maria’s Smartphone is Stolen at a Coffee Shop:
- Maria immediately uses “Find My iPhone” to locate her phone but sees it’s moving away.
- She remotely locks the phone and displays a message with her alternate contact number.
- Maria calls her mobile provider to suspend her service.
- She changes her email and banking passwords from her laptop.
- She notifies her close contacts via social media to ignore any suspicious messages from her number.
- Maria files a police report with her phone’s IMEI number.
Additional Tips
- Enable device encryption: This protects your data even if someone accesses the device.
- Set up a strong lock screen: PIN, password, or biometric lock can delay unauthorized access.
- Regularly backup your data: So you don’t lose important files if your device is gone.
- Use apps that allow remote wipe: Some apps let you erase your data remotely if recovery seems unlikely.
Summary Checklist
- Report loss to carrier and police
- Use tracking service to locate or lock device
- Change all important passwords immediately
- Notify contacts about the loss
- Backup data if possible
- Monitor accounts for suspicious activity
- Consider remote wipe if device is unrecoverable
By following these steps, even non-tech users can effectively respond to a lost or stolen device, protecting their privacy and minimizing potential harm.
6. Safe Use of Public Wi-Fi and Networks
6.1 Risks of Public Wi-Fi: What Can Go Wrong?
Public Wi-Fi networks, like those in cafes, airports, hotels, and libraries, offer convenient internet access. However, they come with significant risks that can compromise your digital privacy and security. Understanding these risks helps you stay safe while enjoying free or convenient internet.
Common Risks of Using Public Wi-Fi
Eavesdropping: Someone Listening In
When you connect to a public Wi-Fi, your data travels through the air. Without proper encryption, attackers nearby can “listen” to your internet traffic using simple tools.
Example: You’re logging into your email at a coffee shop. An attacker uses a packet sniffer to capture your username and password because the website doesn’t use HTTPS.
Man-in-the-Middle (MitM) Attacks
In this attack, a hacker positions themselves between you and the Wi-Fi router, intercepting and possibly altering the communication.
Example: You think you’re connected to “Airport_WiFi” but the attacker created a fake hotspot with the same name. All your data passes through their device first.
Malware Distribution
Attackers can inject malware into your device via unsecured Wi-Fi, especially if your device is set to automatically connect or download files.
Example: Connecting to a compromised network triggers a fake software update popup. If you accept, malware installs on your device.
Session Hijacking
Attackers steal your session cookies, which are like digital keys to your logged-in accounts, allowing them to impersonate you.
Example: While using public Wi-Fi, an attacker captures your social media session cookie and posts malicious content pretending to be you.
Snooping and Sniffing
Using freely available software, attackers can capture unencrypted data packets traveling over the network.
Example: An attacker captures your online shopping details because the website uses HTTP instead of HTTPS.
Fake Hotspots (Evil Twins)
Attackers set up Wi-Fi networks with names similar to legitimate ones to trick users into connecting.
Example: You see “Starbucks_WiFi_Free” and connect, but it’s a fake hotspot designed to steal your data.
Lack of Encryption
Many public Wi-Fi networks don’t encrypt data, making everything you send or receive visible to others.
Example: Sending a private message on an unencrypted network can be intercepted and read by others.
How to Spot Risky Situations
- Unsecured networks: No password required to connect.
- Multiple networks with similar names: Could be fake hotspots.
- Pop-ups asking for personal info or software updates: Likely scams.
- Websites without HTTPS: Avoid entering sensitive info.
Summary Table of Risks and Examples
| Risk | What Happens | Example Scenario |
|---|---|---|
| Eavesdropping | Data intercepted over the air | Password stolen while logging into email at cafe |
| Man-in-the-Middle | Attacker intercepts communication | Fake airport Wi-Fi captures your browsing data |
| Malware Distribution | Malware installed via fake updates | Fake popup installs virus on your smartphone |
| Session Hijacking | Account access via stolen session cookie | Hacker posts on your social media account |
| Snooping and Sniffing | Unencrypted data captured | Credit card info stolen during online shopping |
| Fake Hotspots | Connecting to attacker’s network | Connecting to “Starbucks_WiFi_Free” steals your data |
| Lack of Encryption | Data visible to others | Private messages read by strangers on public Wi-Fi |
Real-Life Example
In 2017, a traveler connected to a fake hotel Wi-Fi network at an airport. The attacker intercepted their login credentials and accessed their work email, leading to a data breach. This shows how easy it is to become a victim without realizing it.
Key Takeaway
Public Wi-Fi is convenient but risky. Always assume that public networks are not secure and take precautions to protect your data.
Next, we will explore easy ways to protect yourself when using public Wi-Fi, including how to use VPNs and avoid risky behaviors.
6.2 Using Virtual Private Networks (VPNs) Made Easy
A Virtual Private Network, or VPN, is a tool that helps protect your online privacy and security by creating a secure, encrypted connection between your device and the internet. Think of it as a private tunnel that hides your online activity from prying eyes, such as hackers, your internet service provider, or even websites tracking you.
Why Use a VPN?
- Privacy Protection: Your real IP address is hidden, making it harder for websites and advertisers to track you.
- Security on Public Wi-Fi: VPNs encrypt your data, protecting you from hackers on unsecured networks.
- Accessing Restricted Content: VPNs can help you access websites or services that might be blocked in your region.
How Does a VPN Work? (Mind Map)
Simple Example:
Imagine you’re at a coffee shop using public Wi-Fi. Without a VPN, anyone on the same network could potentially see what you’re doing online. But if you connect through a VPN, your data is encrypted, so even if someone tries to spy, all they see is scrambled information.
Choosing a VPN: What to Look For
- Ease of Use: Look for VPN apps with simple interfaces.
- No-Logs Policy: The VPN provider should not keep records of your activity.
- Speed: VPNs can slow your connection; choose one with good speed.
- Server Locations: More locations mean more options to access content.
- Security Protocols: Look for strong encryption standards like OpenVPN or WireGuard.
How to Use a VPN (Step-by-Step)
- Choose a VPN Provider: Examples include ExpressVPN, NordVPN, or ProtonVPN.
- Download and Install the App: Available for smartphones, tablets, and computers.
- Open the App and Sign In: Create an account if needed.
- Connect to a Server: Usually, you can select a country or let the app choose the fastest server.
- Verify Connection: The app will show when you’re connected.
- Browse Safely: Your internet traffic is now encrypted and private.
Mind Map: Using a VPN
Common Questions and Easy Answers
Q: Will a VPN make my internet slower? A: Sometimes, because your data travels through an extra server. But good VPNs minimize this slowdown.
Q: Can I use a free VPN? A: Free VPNs exist but often have limitations like slower speeds, fewer servers, or data caps. Some may even sell your data, so choose carefully.
Q: Does a VPN make me completely anonymous? A: A VPN improves privacy but doesn’t guarantee full anonymity. Combine it with other good habits for better protection.
Real-Life Example
Sarah is a freelancer working from cafes. She uses a VPN on her laptop to protect client information and avoid hackers on public Wi-Fi. When traveling, she connects to a VPN server in her home country to access websites that are blocked abroad.
Summary
Using a VPN is a straightforward and effective way to boost your online privacy and security, especially when using public Wi-Fi or accessing region-restricted content. By following simple steps and choosing a trustworthy VPN provider, anyone can protect their digital life with ease.
6.3 Avoiding Sensitive Transactions on Public Networks
When you connect to public Wi-Fi networks—like those in cafes, airports, hotels, or libraries—your data can be more vulnerable to interception by cybercriminals. Sensitive transactions, such as online banking, shopping, or accessing confidential work files, should be avoided on these networks unless you take extra precautions.
Why Avoid Sensitive Transactions on Public Wi-Fi?
Public Wi-Fi networks often lack strong security measures. This means hackers can potentially:
- Eavesdrop on your data: Intercept information you send or receive.
- Perform Man-in-the-Middle (MitM) attacks: Intercept and alter communications between you and the website.
- Set up fake hotspots: Trick you into connecting to a malicious network that looks legitimate.
Mind Map: Risks of Sensitive Transactions on Public Wi-Fi
Examples of Sensitive Transactions to Avoid
- Logging into your online banking account
- Making purchases on e-commerce websites
- Accessing work emails or company portals
- Entering credit card or personal details on websites
- Sending confidential messages or documents
Practical Tips to Avoid Risks
-
Wait to perform sensitive transactions until you are on a trusted, private network.
Example: Instead of paying your credit card bill at the airport Wi-Fi, wait until you are home on your secure Wi-Fi.
-
If you must use public Wi-Fi, use a Virtual Private Network (VPN).
Example: A VPN encrypts your internet traffic, making it much harder for attackers to intercept your data.
-
Use mobile data (3G/4G/5G) for sensitive activities instead of public Wi-Fi.
Example: When checking your bank balance, switch off Wi-Fi and use your phone’s cellular data.
-
Look for HTTPS in website URLs before entering any personal information.
Example: https://www.yourbank.com is safer than http://www.yourbank.com
-
Enable two-factor authentication (2FA) on your accounts.
Example: Even if someone steals your password over public Wi-Fi, they’ll need the second factor (like a code sent to your phone) to access your account.
Mind Map: Safe Practices for Sensitive Transactions
Real-Life Scenario
Sarah is at a coffee shop and wants to pay her credit card bill. She notices the free Wi-Fi and considers logging in. Instead, she remembers the risks and decides to use her phone’s mobile data to access her bank’s app securely. Later, at home, she connects to her private Wi-Fi and completes the payment.
Summary
Avoid performing sensitive transactions on public Wi-Fi to protect your personal and financial information. When necessary, use tools like VPNs, prefer mobile data, and always verify website security. These simple habits help keep your data safe from prying eyes.
6.4 How to Recognize Fake Wi-Fi Hotspots
Fake Wi-Fi hotspots are malicious networks set up by attackers to trick you into connecting. Once connected, they can steal your personal information, passwords, or even inject malware into your device. Recognizing these fake hotspots is crucial to staying safe when using public Wi-Fi.
What is a Fake Wi-Fi Hotspot?
A fake Wi-Fi hotspot looks like a legitimate network but is controlled by a cybercriminal. These are often called “Evil Twins” because they mimic real hotspots in cafes, airports, hotels, or other public places.
Mind Map: Recognizing Fake Wi-Fi Hotspots
Examples of Fake Wi-Fi Hotspots
-
Example 1: The Evil Twin at a Coffee Shop
- Legitimate network: “StarCafe_WiFi”
- Fake network: “StarCafe_FreeWiFi”
- The fake network has a very strong signal and no password, tempting users to connect quickly.
- Once connected, users are redirected to a fake login page asking for email and phone number.
-
Example 2: Airport Wi-Fi Scam
- Legitimate network: “Airport_Public_WiFi”
- Fake network: “Airport_WiFi”
- The fake hotspot does not require a password and immediately asks to download an app to connect.
- The app contains malware that steals sensitive data.
-
Example 3: Hotel Wi-Fi Trap
- Legitimate network: “HotelGuest”
- Fake network: “HotelGuest_Free”
- The fake hotspot’s signal is unusually strong even in areas far from the hotel lobby.
- Users experience slow internet and frequent disconnections.
Practical Tips to Avoid Fake Wi-Fi Hotspots
- Verify the network name with staff: Always ask employees for the exact Wi-Fi network name.
- Avoid connecting to networks without passwords: Legitimate hotspots usually require at least a simple password.
- Use VPNs: A Virtual Private Network encrypts your data even if you accidentally connect to a fake hotspot.
- Disable automatic Wi-Fi connections: Turn off settings that auto-connect your device to open networks.
- Look for HTTPS: When browsing, ensure websites use HTTPS to protect your data.
- Watch for unusual behavior: Unexpected login pages, pop-ups, or slow connections can be red flags.
Mind Map: Steps to Stay Safe from Fake Wi-Fi Hotspots
Summary
Fake Wi-Fi hotspots are a common threat in public places. By paying attention to network names, connection behavior, and using simple safety practices like VPNs and verifying network details, you can protect your personal information from cybercriminals. Always stay alert and cautious when connecting to public Wi-Fi.
6.5 Best Practices for Home Wi-Fi Security
Securing your home Wi-Fi network is essential to protect your personal data, devices, and privacy. Many people overlook their home Wi-Fi security, leaving an easy entry point for hackers or unauthorized users. This section will guide you through simple, practical steps to make your home Wi-Fi safer.
Why Secure Your Home Wi-Fi?
- Prevent unauthorized access to your internet connection.
- Protect sensitive information like passwords, banking details, and personal files.
- Avoid bandwidth theft which can slow down your internet.
- Stop hackers from using your network for illegal activities.
Best Practices for Home Wi-Fi Security
Change Default Router Login Credentials
Example: Most routers come with default usernames and passwords like “admin/admin” or “admin/password”. Leaving these unchanged is like leaving your front door unlocked.
How to do it:
- Access your router’s admin panel (usually via a web browser at 192.168.1.1 or 192.168.0.1).
- Find the settings for username and password.
- Change them to a strong, unique password.
Use Strong Wi-Fi Passwords (WPA3 or WPA2 Encryption)
Example: Instead of a simple password like “12345678”, use something like “Sunset!2024$Beach”.
How to do it:
- In your router settings, set the Wi-Fi security to WPA3 if available, or WPA2.
- Create a complex password with letters, numbers, and symbols.
Rename Your Wi-Fi Network (SSID)
Example: Avoid default names like “Linksys” or “NETGEAR” which reveal your router brand and can help hackers.
How to do it:
- Change your SSID to something unique but not personally identifiable (avoid names like “John’s Wi-Fi”).
Disable WPS (Wi-Fi Protected Setup)
Why: WPS is a feature that makes connecting devices easier but is vulnerable to hacking.
How to do it:
- Find WPS settings in your router and disable it.
Keep Router Firmware Updated
Example: Manufacturers release updates to fix security vulnerabilities.
How to do it:
- Check your router’s admin panel for firmware updates regularly.
- Enable automatic updates if available.
Enable Network Firewall
Example: Most routers have built-in firewalls that block unauthorized access.
How to do it:
- Ensure the firewall is enabled in your router settings.
Use Guest Networks for Visitors
Why: Keeps your main network private and limits access for guests.
How to do it:
- Set up a separate guest Wi-Fi network with its own password.
Limit DHCP Leases and Connected Devices
Example: Restrict the number of devices that can connect to your network.
How to do it:
- In router settings, set a maximum number of devices.
Turn Off Your Wi-Fi When Not in Use
Example: If you’re away for a long time, turning off your router reduces risk.
Mind Map: Home Wi-Fi Security Best Practices
Real-Life Example: How a Weak Wi-Fi Password Led to a Data Breach
Jane used the default Wi-Fi password on her home router. A neighbor was able to connect without permission and accessed her unsecured devices, stealing personal photos and accessing her online banking. After changing her password and enabling WPA2 encryption, Jane noticed her internet speed improved and felt safer.
Summary Checklist
- Change default router login credentials
- Use WPA3 or WPA2 encryption with a strong password
- Rename your Wi-Fi network (SSID)
- Disable WPS
- Keep router firmware updated
- Enable router firewall
- Set up a guest network for visitors
- Limit the number of connected devices
- Turn off Wi-Fi when not in use
By following these simple steps, even non-tech people can significantly improve their home Wi-Fi security and protect their digital lives.
7. Managing Your Digital Footprint
7.1 What is a Digital Footprint and Why It Matters
Your digital footprint is the trail of data you leave behind whenever you use the internet. This includes everything from the websites you visit, the posts you like on social media, the emails you send, to even the searches you perform on search engines. Think of it as footprints in the sand—each step you take online leaves a mark that can be tracked, stored, and sometimes shared.
Types of Digital Footprints
There are two main types of digital footprints:
- Active Digital Footprint: Data you intentionally share online. For example, posting a photo on Instagram, commenting on a blog, or sending an email.
- Passive Digital Footprint: Data collected about you without you actively sharing it. For example, websites tracking your browsing habits or apps collecting location data in the background.
Mind Map: Components of a Digital Footprint

Why Does Your Digital Footprint Matter?
-
Privacy: Your digital footprint can reveal a lot about your habits, preferences, and personal life. Companies and advertisers use this data to target you with ads, but it can also be accessed by hackers or unauthorized parties if not protected.
-
Reputation: Employers, clients, or even friends might search your name online. What they find can affect your professional opportunities or personal relationships.
-
Security: A large digital footprint can increase your risk of identity theft or scams if sensitive information is exposed.
-
Control: Understanding your footprint helps you make informed decisions about what you share and how to protect your data.
Mind Map: Why Digital Footprint Matters

Everyday Examples
-
Example 1: Social Media Posts
- You post vacation photos on Facebook. These photos are public and can be seen by anyone, including potential employers or strangers. This is part of your active digital footprint.
-
Example 2: Browsing Online Stores
- You visit an online store to look at shoes but don’t buy anything. Later, you notice ads for shoes appearing on other websites you visit. This happens because of cookies tracking your browsing behavior—a passive digital footprint.
-
Example 3: Using a Free App
- You download a free weather app that collects your location data in the background and shares it with advertisers. This data collection is part of your passive footprint.
-
Example 4: Email Usage
- Sending emails with personal information (like your phone number or address) contributes to your active footprint. If your email account is compromised, this information could be exposed.
How to Visualize Your Own Digital Footprint
Try this simple exercise:
- Google your full name and see what information appears.
- Check your social media profiles and review what you have shared publicly.
- Look at the permissions you have granted to apps on your phone.
- Notice the ads you receive online and consider what browsing behavior might have triggered them.
Understanding your digital footprint is the first step toward managing your online privacy and security effectively.
7.2 Searching and Reviewing Your Online Presence
Your online presence is the collection of information about you that exists on the internet. This can include social media profiles, news articles, photos, comments, and more. Regularly searching and reviewing your online presence helps you understand what others can find about you and gives you control over your digital footprint.
Why Review Your Online Presence?
- Protect your reputation: Employers, clients, or acquaintances may search for you online.
- Identify sensitive information: Personal details like phone numbers or addresses that shouldn’t be public.
- Spot misinformation or errors: Correct wrong or outdated information.
Step 1: Start with Simple Search Engines
Use popular search engines like Google, Bing, or DuckDuckGo to search your name and variations of it.
Example Searches:
- “John Smith”
- “John A. Smith”
- “John Smith New York”
Look through the first 2-3 pages of results. Pay attention to:
- Social media profiles
- News articles or blog posts
- Public records or directories
Mind Map: Basic Search Strategy
Step 2: Check Social Media Platforms Directly
Sometimes, social media platforms don’t appear prominently in search engines. Visit popular platforms and search for your profile or mentions.
Platforms to Check:
- TikTok
Example: Search your name on Facebook and review your profile as others see it. Check your posts, photos, and tagged content.
Mind Map: Social Media Review
Step 3: Use People Search Tools
There are websites designed to aggregate public information about people. Use them cautiously to see what data is publicly available.
Examples:
- Whitepages
- Spokeo
- Pipl
Tip: Use these tools to identify if sensitive info like your phone number or address is publicly listed.
Step 4: Review Photos and Videos
Images and videos can reveal more than text. Use Google Reverse Image Search or TinEye to find where your photos appear online.
Example: Upload a recent photo to Google Images and see if it appears on unknown websites.
Mind Map: Reviewing Multimedia
Step 5: Set Up Alerts for Future Monitoring
Use tools like Google Alerts to get notified when new content about you appears online.
Example: Create a Google Alert for your full name to receive weekly email updates.
Practical Example: Reviewing Sarah’s Online Presence
Sarah, a freelancer, wants to check what potential clients see when they search her name.
- She googles “Sarah Johnson freelance writer” and finds her LinkedIn profile, a few blog posts she wrote, and a mention in a local newspaper.
- On Facebook, she notices some old public photos she prefers to keep private.
- Using Google Reverse Image Search, she finds one of her photos used without permission on a website.
- She sets up a Google Alert for “Sarah Johnson freelance writer” to monitor future mentions.
By doing this, Sarah can now update her privacy settings, request removal of unauthorized photos, and maintain a professional online image.
Summary Checklist
- Search your name and variations on multiple search engines
- Review your social media profiles and posts
- Use people search tools to find public info
- Perform reverse image searches for your photos
- Set up alerts to monitor new online mentions
Regularly reviewing your online presence empowers you to manage your digital identity and protect your privacy effectively.
7.3 Removing or Correcting Unwanted Information Online
In today’s digital world, information about you can appear online in places you might not expect or want. This could be an outdated phone number, an embarrassing photo, or incorrect personal details. Removing or correcting this unwanted information is important to protect your privacy and reputation.
Why Remove or Correct Unwanted Information?
- Prevent identity theft or fraud
- Protect your personal and professional reputation
- Reduce unwanted contact or harassment
- Maintain control over your digital footprint
Step 1: Identify Unwanted Information
Start by searching your name and other personal details on popular search engines like Google, Bing, or DuckDuckGo.
Example:
- Search for your full name in quotes: “John A. Smith”
- Include variations like nicknames or maiden names
- Check image search results for unwanted photos
Step 2: Determine Where the Information Is Hosted
Once you find unwanted information, note the website or platform hosting it. It could be:
- Social media profiles
- Public forums or message boards
- News articles or blogs
- Data broker sites (sites that collect and sell personal info)
Step 3: Request Removal or Correction
Most websites have a process to request removal or correction of personal information. Here’s how to approach it:
- Social Media: Use built-in privacy settings or report the content. For example, Facebook allows you to remove tagged photos or request content removal.
- Websites/Blogs: Look for a “Contact Us” page or privacy policy with instructions. Politely request removal or correction.
- Data Brokers: Many data broker sites offer opt-out forms. Examples include Whitepages, Spokeo, and PeopleFinder.
Example Request Email Template:
Subject: Request for Removal of Personal Information

Dear [Website Owner],

I recently found personal information about me on your website ([URL]). This information is outdated/inaccurate and I kindly request its removal/correction to protect my privacy.

Thank you for your understanding and assistance.

Sincerely,
[Your Name]
Step 4: Use Online Tools and Services
There are tools designed to help manage your online presence:
- Google’s Removal Tool: For removing outdated content from Google search results.
- Reputation Management Services: Paid services that assist in removing or suppressing unwanted info.
Step 5: Correct Information When Possible
If the information is incorrect but cannot be removed, ask for correction. For example, if a news article has wrong details, contact the publisher to issue a correction.
Mind Map: Removing or Correcting Unwanted Information Online
Real-Life Example:
Scenario: Sarah found an old forum post from 10 years ago with inaccurate personal details.
Action:
- Sarah searched the forum for contact info.
- She sent a polite email requesting removal.
- The forum admin responded and removed the post.
- Sarah then used Google’s removal tool to expedite removal from search results.
Tips for Success
- Be polite and clear in your requests.
- Keep records of your communications.
- Understand that some sites may refuse removal due to public interest or policy.
- Regularly monitor your online presence to catch new unwanted info early.
By following these steps, even non-tech people can take control of their online information and improve their digital privacy and security.
7.4 Using Privacy Tools to Limit Data Tracking
In today’s digital world, many websites and apps track your online activities to collect data for advertising, analytics, or other purposes. While some tracking is harmless, excessive or unwanted tracking can invade your privacy. Fortunately, there are simple privacy tools you can use to limit data tracking and regain control over your online footprint.
What Are Privacy Tools?
Privacy tools are software or browser features designed to block or reduce the amount of data websites and apps can collect about you. They help prevent tracking cookies, block ads, and stop third-party trackers from following your activities across the internet.
Common Types of Privacy Tools
Browser Extensions
-
Ad Blockers: These block intrusive ads and many trackers embedded in ads. Example: uBlock Origin is a popular, easy-to-use ad blocker.
-
Tracker Blockers: Extensions like Privacy Badger automatically learn and block trackers that follow you.
-
Script Blockers: Tools like NoScript block potentially harmful scripts but require some learning to use effectively.
Example:
Sarah installs Privacy Badger on her Chrome browser. When she visits news websites, the extension blocks invisible trackers that would have collected her browsing habits. As a result, she notices fewer targeted ads and feels more secure.
Private Browsers
-
Brave Browser: Blocks trackers and ads by default, providing a faster and more private browsing experience.
-
Tor Browser: Routes your internet traffic through multiple servers to anonymize your identity.
-
Firefox Focus: A mobile browser that automatically blocks trackers and erases your browsing history when closed.
Example:
John uses the Tor Browser when researching sensitive topics. It prevents websites from knowing his real location and stops trackers from profiling him.
Virtual Private Networks (VPNs)
VPNs encrypt your internet connection and mask your IP address, making it harder for trackers to link your activity to your real identity or location.
Example:
Maria connects to a VPN before using public Wi-Fi at a coffee shop. This prevents the network provider and potential eavesdroppers from tracking her online activities.
Privacy-Focused Search Engines
Unlike Google, which tracks searches to personalize ads, search engines like DuckDuckGo and Startpage do not track or store your search history.
Example:
Tom switches his default search engine to DuckDuckGo. He notices that his searches no longer influence the ads he sees on other websites.
Cookie Management
-
Regularly clear cookies and cache in your browser.
-
Block third-party cookies, which are often used by advertisers to track you across sites.
Example:
Emily configures her browser to block third-party cookies and clears cookies weekly. This reduces the number of ads targeted based on her browsing history.
How to Get Started: Step-by-Step Example
- Install Privacy Badger: Go to your browser’s extension store, search for Privacy Badger, and add it.
- Switch to DuckDuckGo: Set DuckDuckGo as your default search engine in browser settings.
- Block Third-Party Cookies: In your browser’s privacy settings, enable blocking of third-party cookies.
- Clear Cookies Weekly: Set a reminder to clear cookies and cache every week.
Summary Mind Map
By integrating these privacy tools into your daily internet use, you can significantly reduce unwanted data tracking and protect your personal information without needing to be a tech expert.
7.5 Teaching Children and Family Members About Digital Footprints
Teaching children and family members about digital footprints is essential in today’s connected world. A digital footprint is the trail of data you leave behind when you use the internet, including social media posts, websites visited, photos shared, and even comments made. Understanding this helps everyone make safer, smarter choices online.
What is a Digital Footprint?
- Definition: The record of all your online activities.
- Example: Posting a photo on social media, commenting on a blog, or even searching on Google.
Why Should We Care?
- Digital footprints can be permanent.
- They affect reputation, privacy, and sometimes future opportunities like jobs or school admissions.
Mind Map: Understanding Digital Footprints
How to Teach Children and Family Members
-
Start with Simple Language and Examples
- Explain that everything shared online is like writing on a wall that many people can see.
- Example: “If you post a photo, your friends and even strangers might see it, and it could stay there forever.”
-
Use Real-Life Scenarios
- Scenario: A teenager posts a funny video that later embarrasses them at school.
- Discuss how thinking before posting can prevent such situations.
-
Show How to Check Their Own Digital Footprint
- Guide them to Google their name and see what appears.
- Example: “Look, here are some photos and posts you made last year. Do you want these to be public?”
-
Teach Privacy Settings on Social Media
- Walk through how to set profiles to private.
- Example: “Only your friends can see your posts, not everyone on the internet.”
-
Encourage Thoughtful Posting
- Ask: “Would you want your teacher, future employer, or grandma to see this?”
- Example: Avoid sharing personal details like home address or phone number.
-
Discuss the Importance of Respect and Kindness Online
- Explain how negative comments or bullying leave a digital footprint too.
- Example: “Being kind online helps keep your digital footprint positive.”
Mind Map: Teaching Digital Footprints to Family
Practical Example: Family Discussion Activity
Activity: Have a family meeting where everyone:
- Shares one thing they have posted online.
- Discusses how it might be seen by others.
- Together, review privacy settings on a social media account.
- Agree on some family rules for safe online behavior.
Tips for Parents and Guardians
- Set a good example by managing your own digital footprint carefully.
- Use parental controls and monitoring tools thoughtfully.
- Keep communication open and non-judgmental about online activities.
By teaching children and family members about digital footprints with clear examples, interactive discussions, and easy-to-understand concepts, you empower them to navigate the digital world safely and responsibly.
8. Protecting Your Finances and Online Transactions
8.1 Recognizing Secure Payment Methods and Websites
When making payments online, it’s crucial to ensure that the method and website you use are secure to protect your financial information from theft or fraud. This section will guide you through recognizing secure payment methods and websites with clear examples and easy-to-understand mind maps.
Why Security Matters in Online Payments
Every time you enter your credit card or bank details online, you risk exposing sensitive information. Hackers and scammers often target online shoppers to steal this data. Recognizing secure payment methods and websites helps you avoid falling victim to fraud.
Mind Map: Key Signs of a Secure Payment Website
Check for HTTPS and the Lock Icon
Example:
-
When you visit an online store like
https://www.amazon.com, you will see a lock icon next to the URL in your browser. This means the site uses HTTPS, which encrypts your data during transmission. -
Avoid sites that show “Not Secure” or have URLs starting with
http://without the “s”.
Use Trusted Payment Gateways
Many websites don’t process payments directly but use trusted third-party services. These services have strong security measures in place.
Examples of Trusted Payment Gateways:
- PayPal: Allows you to pay without sharing your card details with the seller.
- Stripe: Used by many businesses; securely processes credit card payments.
- Square: Popular for small businesses and freelancers.
Example:
If you shop on a small boutique website but see a PayPal button for payment, this is a good sign that your payment is handled securely.
Mind Map: Recognizing Secure Payment Methods
Prefer Credit Cards or Digital Wallets
Why? Credit cards usually offer better fraud protection and the ability to dispute unauthorized charges.
Example:
-
Using a credit card on a site like
https://www.ebay.comgives you a safety net if something goes wrong. -
Digital wallets like Apple Pay or Google Pay add an extra layer of security by not sharing your actual card number with the merchant.
Look for Clear Contact and Privacy Information
A legitimate website will provide clear ways to contact them and a privacy policy explaining how your data is used.
Example:
-
On
https://www.etsy.com, you can find seller contact info and privacy policies easily. -
If a website lacks this information or only provides a contact form without phone or email, be cautious.
Beware of Red Flags
- Websites offering deals that seem too good to be true.
- Pop-ups asking for payment details unexpectedly.
- Poor website design with broken links or spelling mistakes.
Example:
- A website selling brand-name electronics at 90% off with no HTTPS is likely a scam.
Summary Checklist Before Making a Payment
- Does the URL start with HTTPS and show a lock icon?
- Is the payment processed through a trusted gateway?
- Are credit cards or digital wallets accepted?
- Is there clear contact info and a privacy policy?
- Does the website look professional and trustworthy?
By following these simple steps and using the mind maps as a guide, even non-tech users can confidently recognize secure payment methods and websites, protecting their money and personal information.
Quick Example Scenario
Scenario: You want to buy a handmade necklace from a small online store.
- Step 1: Check the URL — it shows
https://and a lock icon. - Step 2: Look for payment options — PayPal and credit cards are accepted.
- Step 3: Find contact info — phone number and email are listed.
- Step 4: Review the website — professional photos, no suspicious pop-ups.
Decision: Safe to proceed with payment.
Remember, when in doubt, trust your instincts and do a quick online search for reviews about the website or seller before making a payment.
8.2 Using Credit Cards vs. Debit Cards Online: Pros and Cons
When shopping or paying bills online, many people wonder whether to use a credit card or a debit card. Both options allow you to pay electronically, but they have important differences that affect your security, convenience, and financial protection.
What Are Credit Cards and Debit Cards?
- Credit Card: Lets you borrow money from the card issuer up to a certain limit. You pay back later, often with interest if not paid in full.
- Debit Card: Directly linked to your bank account. Money is withdrawn immediately when you make a purchase.
Mind Map: Key Differences Between Credit and Debit Cards
Pros and Cons of Using Credit Cards Online
Pros:
- Fraud Protection: Credit cards often have stronger consumer protections. If someone steals your card info and makes unauthorized purchases, you usually aren’t liable for the charges.
- Dispute Resolution: Easier to dispute charges if a merchant doesn’t deliver goods or services.
- Credit Building: Responsible use helps build your credit score.
- Rewards: Many cards offer cashback, points, or travel rewards.
Cons:
- Debt Risk: If you don’t pay your balance in full, interest charges can add up.
- Overspending: Easy to spend money you don’t have yet.
Example: Imagine you buy a gadget online with your credit card, but the item never arrives. You can contact your credit card company, dispute the charge, and potentially get your money back while the investigation happens.
Pros and Cons of Using Debit Cards Online
Pros:
- No Debt: You’re spending your own money, so no risk of interest or debt.
- Simple: Easy to track spending since money leaves your account immediately.
Cons:
- Limited Fraud Protection: Although protections exist, your bank account funds may be frozen during fraud investigations, causing inconvenience.
- Direct Impact: Fraudulent charges immediately reduce your available balance.
- No Credit Building: Debit card use doesn’t affect your credit score.
Example: If your debit card info is stolen and used fraudulently, the stolen money is taken directly from your bank account. It might take days or weeks to get the money back after reporting fraud, during which time you may face bounced payments or overdrafts.
Mind Map: Security Considerations for Online Card Use
Practical Tips for Choosing Which Card to Use Online
- Use credit cards for most online purchases, especially from new or less-known merchants.
- Use debit cards for small, trusted transactions or when you want to avoid debt.
- Always monitor your bank and credit card statements frequently.
- Enable transaction alerts via SMS or email to catch suspicious activity early.
- Consider virtual credit card numbers if your issuer offers them — they generate a temporary card number for online use.
Summary Table: Credit Card vs. Debit Card for Online Shopping
| Feature | Credit Card | Debit Card |
|---|---|---|
| Money Source | Borrowed from issuer | Your bank account |
| Fraud Protection | Strong, zero liability | Moderate, funds temporarily held |
| Impact on Credit Score | Builds credit | No impact |
| Risk of Debt | Possible if balance unpaid | No debt, but overdraft possible |
| Rewards | Often available | Rarely available |
| Dispute Process | Easier and faster | Slower, funds tied up |
Final Thought
For most non-tech users, using a credit card online offers better protection and peace of mind. Debit cards are convenient but carry more risk to your actual funds. Whichever you choose, following good security habits—like monitoring accounts, using strong passwords, and avoiding suspicious websites—will keep your money safer.
8.3 Setting Up Alerts for Suspicious Financial Activity
Monitoring your financial accounts for suspicious activity is a crucial step in protecting your money and personal information. Setting up alerts helps you stay informed in real-time about any unusual transactions or potential fraud. This section will guide you through easy-to-understand practices, with examples and mind maps to help you visualize the process.
Why Set Up Alerts?
- Immediate notification of unauthorized transactions
- Early detection of fraud or identity theft
- Better control over your spending and account activity
Types of Alerts You Can Set Up
Mind Map: Types of Financial Alerts
How to Set Up Alerts: Step-by-Step Example
Example: Setting Up Alerts on Your Bank’s Mobile App
- Log in to your bank’s mobile app or website.
- Navigate to the “Alerts” or “Notifications” section.
- Choose the types of alerts you want to receive (e.g., transactions over $100, login from a new device).
- Select how you want to be notified: via email, SMS, or push notification.
- Save your preferences.
Example Alert:
- You receive a text message: “Alert: A purchase of $250 was made on your debit card at Electronics Store. If this was not you, please contact us immediately.”
Practical Tips for Effective Alerts
Mind Map: Tips for Effective Financial Alerts
Real-Life Scenario
Scenario: Jane notices an alert for a $500 purchase she did not make.
- She immediately calls her bank using the number on the back of her card.
- The bank freezes her card to prevent further unauthorized use.
- Jane files a fraud claim and receives a new card within a few days.
Without the alert, Jane might have missed the fraudulent charge until her next statement, potentially losing more money.
Additional Tools to Enhance Monitoring
- Credit Card Apps: Many credit card companies offer their own alert systems.
- Third-Party Apps: Apps like Mint or Personal Capital can aggregate alerts from multiple accounts.
- Bank Websites: Some banks allow you to set up alerts directly on their websites if you prefer desktop access.
Summary
Setting up alerts for suspicious financial activity is a simple yet powerful way to protect your money. By customizing alerts to fit your lifestyle and acting quickly on notifications, you reduce the risk of financial loss and identity theft.
Remember, your bank or financial institution is your partner in security—don’t hesitate to use the tools they provide.
8.4 Avoiding Common Online Shopping Scams
Online shopping scams are increasingly common, targeting unsuspecting buyers with fake deals, counterfeit products, or outright theft of money and personal information. Understanding how these scams work and recognizing the warning signs can save you from financial loss and frustration.
Common Types of Online Shopping Scams
How to Spot and Avoid These Scams
-
Check the Website URL Carefully
- Example: A scam site might use “amaz0n.com” instead of “amazon.com”. Always look for subtle misspellings.
- Practice: Hover over links before clicking to see the real URL.
-
Look for HTTPS and Security Certificates
- Legitimate shopping sites use HTTPS, indicated by a padlock icon in the browser address bar.
- Example: If a site lacks HTTPS, avoid entering payment details.
-
Research the Seller
- Check reviews on independent platforms, not just the seller’s site.
- Example: If a seller has many negative reviews mentioning non-delivery, avoid them.
-
Beware of Unrealistic Discounts
- If a product is priced 70-90% below market value, it’s likely a scam or counterfeit.
- Example: A $100 branded watch selling for $10 is suspicious.
-
Avoid Unsecure Payment Methods
- Never pay by wire transfer, gift cards, or direct bank transfers for online purchases.
- Use credit cards or trusted payment services like PayPal that offer buyer protection.
-
Be Wary of Unsolicited Emails or Ads
- Phishing emails pretending to be from popular stores may ask for payment or personal info.
- Example: An email claiming your order failed and asking you to “confirm payment” via a suspicious link.
-
Check Return and Refund Policies
- Legitimate sellers clearly state these policies.
- Avoid sites that don’t provide contact information or have vague policies.
Example Scenario: Spotting a Fake Deal
Imagine you receive an email advertising a brand-new smartphone at 80% off from a well-known brand. The email urges you to “act fast” and provides a link.
- Step 1: Hover over the link and see it leads to “bestdeals-smartphones.com” instead of the official brand site.
- Step 2: The website lacks HTTPS and has many spelling mistakes.
- Step 3: Payment is requested via wire transfer only.
Conclusion: This is a scam. Do not click the link or provide any information.
Mind Map: Steps to Verify an Online Store
Summary Tips for Safe Online Shopping
- Always shop from reputable websites or well-known marketplaces.
- Use strong, unique passwords for shopping accounts.
- Enable two-factor authentication where possible.
- Keep your devices updated with the latest security patches.
- Monitor your bank and credit card statements regularly for unauthorized charges.
By following these simple but effective practices, you can enjoy the convenience of online shopping while minimizing the risk of falling victim to scams.
8.5 Using Digital Wallets and Mobile Payment Apps Safely
Digital wallets and mobile payment apps have become incredibly popular for their convenience and speed. Whether you use Apple Pay, Google Pay, Samsung Pay, PayPal, Venmo, or other apps, understanding how to use them safely is essential to protect your money and personal information.
What Are Digital Wallets and Mobile Payment Apps?
- Digital Wallets: Apps or software that store your credit/debit card information securely and allow you to pay without physically using your cards.
- Mobile Payment Apps: Apps that let you send or receive money, pay bills, or shop online using your smartphone.
Why Use Them?
- Convenience: Pay quickly without carrying cash or cards.
- Security: Many apps use encryption and tokenization to protect your data.
- Tracking: Easy to keep track of your spending.
Mind Map: Key Safety Practices for Using Digital Wallets and Payment Apps
Step-by-Step Example: Setting Up Apple Pay Safely
- Add your card: Open Wallet app, tap ‘+’, and follow prompts to add your credit/debit card.
- Verify your card: Your bank may send a verification code via SMS or email.
- Enable Face ID or Touch ID: This adds biometric security to approve payments.
- Use two-factor authentication on your Apple ID: Adds extra protection.
- Make payments: Hold your iPhone near the payment terminal and authenticate with Face ID/Touch ID.
Example: Jane uses Apple Pay at her local grocery store. She never shares her phone passcode and always double-checks the payment amount before confirming.
Real-Life Scenario: Avoiding a Payment Scam
Situation: Mike receives a text message claiming to be from his mobile payment app, asking him to verify his account by clicking a link.
What Mike Should Do:
- Do not click the link.
- Open the payment app directly from his phone.
- Check for any notifications or messages within the app.
- Contact customer support if unsure.
Lesson: Phishing scams often try to trick users into giving away login credentials or verification codes. Always verify through official app channels.
Tips for Freelancers and Small Business Owners
- Use separate digital wallets/accounts for business and personal transactions.
- Regularly export transaction reports for bookkeeping.
- Educate clients on secure payment methods.
Summary Checklist for Safe Use
- Use strong device security (PIN/biometrics).
- Enable two-factor authentication on payment apps.
- Only download apps from official stores.
- Avoid using public Wi-Fi for payments.
- Regularly monitor your transaction history.
- Never share verification codes or passwords.
- Be cautious of unsolicited messages requesting payment info.
By following these simple yet effective practices, you can enjoy the convenience of digital wallets and mobile payment apps while keeping your financial information safe and secure.
9. Privacy and Security for Freelancers and Small Business Owners
9.1 Protecting Client Data: Simple Steps Anyone Can Take
Protecting client data is crucial for freelancers and small business owners, even if you’re not a tech expert. Client information often includes sensitive details like names, contact info, payment data, or project specifics. Losing or exposing this data can damage your reputation and lead to legal trouble.
Why Protecting Client Data Matters
- Builds trust with clients
- Complies with legal regulations (like GDPR or CCPA)
- Prevents financial loss and identity theft
Simple Steps to Protect Client Data
Understand What Data You Collect
- Example: If you’re a freelance graphic designer, you might collect client names, emails, project files, and payment info.
- Keep a list of all types of client data you handle.
Limit Data Collection and Storage
- Only collect what you really need.
- Avoid storing sensitive info on unsecured devices.
- Example: Instead of saving credit card details, use payment services like PayPal or Stripe that handle payments securely.
Use Strong Passwords and Authentication
- Protect devices and accounts with strong, unique passwords.
- Enable two-factor authentication (2FA) where possible.
- Example: Use a password manager like LastPass or Bitwarden to generate and store passwords.
Secure Your Devices
- Keep your computer and phone updated with the latest security patches.
- Install reputable antivirus software.
- Lock devices when not in use.
Encrypt Sensitive Files
- Use tools to encrypt files containing client data.
- Example: Use built-in encryption tools like BitLocker (Windows) or FileVault (Mac) or apps like VeraCrypt.
Backup Data Regularly
- Keep backups of important client files in secure locations.
- Use encrypted cloud storage or external drives.
Be Careful with Email and File Sharing
- Avoid sending sensitive info over unsecured email.
- Use secure file-sharing services like Dropbox with password protection or encrypted services like Tresorit.
Dispose of Data Properly
- Delete client data you no longer need securely.
- Use file shredding tools to prevent recovery.
Mind Map: Protecting Client Data
Real-Life Example: Freelance Writer Protecting Client Data
Sarah is a freelance writer who works with multiple clients. She collects client contact info and project briefs via email.
- She uses a password manager to create strong passwords for her email and cloud storage.
- She enables 2FA on her email account.
- She stores project files in an encrypted folder on her laptop.
- Sarah backs up her files weekly to an encrypted cloud service.
- When a project ends, she securely deletes the client’s files from her devices.
By following these simple steps, Sarah keeps her clients’ data safe without needing advanced technical skills.
Tips for Non-Tech People
- Start small: pick one or two steps to implement this week.
- Use tools with simple interfaces designed for beginners.
- Ask clients if they have specific data protection preferences.
- Keep learning gradually about digital security.
Protecting client data is a continuous process, but with these easy-to-follow steps and examples, you can confidently safeguard your clients’ information and your business reputation.
9.2 Securing Business Communications and Files
In today’s digital world, freelancers and small business owners often exchange sensitive information with clients, partners, and team members. Securing these communications and files is crucial to protect your business reputation, client trust, and avoid costly data breaches. This section will guide you through practical and easy-to-understand methods to keep your business communications and files safe.
Why Securing Communications and Files Matters
Imagine you send a contract or financial details via email, and someone intercepts it. This could lead to identity theft, financial loss, or damage to your professional relationships. Securing your communications ensures that only intended recipients can access your information.
Key Practices to Secure Business Communications and Files
Use Encrypted Communication Tools
Encryption scrambles your messages so only the recipient can read them.
- Example: Use messaging apps like Signal or WhatsApp for client conversations instead of regular SMS.
- Example: Use email services that support encryption, such as ProtonMail or enable encryption plugins for Gmail.
Password-Protect Sensitive Files
Before sending important documents, add password protection.
- Example: When sending a PDF contract, use Adobe Acrobat or free tools like PDF24 to set a password.
- Share the password through a different channel (e.g., call or text) rather than in the same email.
Use Secure File Sharing Services
Avoid sending large files or sensitive data as email attachments.
- Example: Use services like Dropbox, Google Drive, or OneDrive with link sharing permissions set to “Only people with the link” and add expiration dates.
- Enable two-factor authentication (2FA) on these accounts for extra security.
Keep Software Updated
Regularly update your email clients, messaging apps, and file-sharing tools to patch security vulnerabilities.
- Example: Enable automatic updates on your computer and smartphone.
Avoid Public Wi-Fi for Business Communications
Public Wi-Fi networks can be insecure and allow hackers to intercept data.
- Example: Use a VPN (Virtual Private Network) when accessing business emails or files on public networks.
Mind Map: Securing Business Communications and Files
Real-World Example: How Sarah Protects Her Freelance Business Communications
Sarah is a freelance graphic designer who often sends design drafts and contracts to clients. Here’s how she secures her communications:
- She uses ProtonMail for email, which encrypts her messages.
- When sending contracts as PDFs, she adds a password and calls clients to share the password.
- For large design files, she uploads them to Google Drive with restricted access links.
- She enables two-factor authentication on all her accounts.
- When working from cafes, she connects through a trusted VPN to secure her internet connection.
By following these simple steps, Sarah ensures her client information stays private and her business runs smoothly.
Additional Tips
- Regularly review who has access to your shared files and revoke permissions when no longer needed.
- Use clear file naming conventions to avoid confusion but avoid including sensitive info in file names.
- Educate any collaborators or employees about these security practices to maintain consistent protection.
Securing your business communications and files doesn’t require advanced technical skills—just consistent use of the right tools and habits. By implementing these practices, you build trust with your clients and protect your business from potential cyber threats.
9.3 Using Cloud Services Safely: What to Look For
Cloud services have become essential tools for freelancers and small business owners, offering convenient ways to store, share, and collaborate on files. However, using them safely is crucial to protect your data and your clients’ information. This section will guide you through what to look for when choosing and using cloud services, with easy-to-understand examples and helpful mind maps.
What Are Cloud Services?
Cloud services let you store data on remote servers accessed via the internet instead of your local computer. Examples include Google Drive, Dropbox, Microsoft OneDrive, and many others.
Key Factors to Consider When Choosing a Cloud Service
Mind Map: Choosing a Cloud Service Safely
Security Features
Encryption:
- Look for services that encrypt your data both during transfer (in transit) and when stored on their servers (at rest).
- Example: Google Drive encrypts files in transit and at rest, making it harder for hackers to access your data.
Two-Factor Authentication (2FA):
- Adds an extra layer of security by requiring a second verification step when logging in.
- Example: Dropbox offers 2FA via an authentication app or SMS code.
Access Controls:
- Ability to set permissions on who can view, edit, or share your files.
- Example: In Microsoft OneDrive, you can share a document with view-only access or allow editing.
Privacy Policies
- Understand who owns your data and how the provider uses it.
- Example: Some free services may scan your files to serve ads, while paid services usually have stricter privacy commitments.
- Always read the privacy policy or look for summaries online.
Reliability
- Choose providers with strong uptime guarantees (e.g., 99.9% uptime) to ensure your files are accessible when you need them.
- Check if the service offers automatic backups or version history to recover previous file versions.
- Example: Dropbox keeps a 30-day version history, so if you accidentally delete or change a file, you can restore it.
Ease of Use
- Pick a cloud service that fits your workflow and integrates with tools you already use.
- Example: Google Drive integrates seamlessly with Google Docs, Sheets, and Slides.
Cost
- Free plans are great to start but often have limited storage and fewer security features.
- Paid plans usually offer more storage, advanced security, and priority support.
- Example: Small businesses might upgrade to Google Workspace for business-grade security and collaboration tools.
Practical Tips for Using Cloud Services Safely
Mind Map: Safe Cloud Usage Practices
Example 1: Reviewing Shared Permissions
- Sarah, a freelancer, shared a folder with a client for project files. After the project ended, she checked and revoked the client’s access to prevent unintended future access.
Example 2: Avoid Storing Highly Sensitive Data
- John runs a small accounting firm and avoids storing unencrypted client financial data on cloud services. Instead, he uses encrypted local storage and only shares necessary documents securely.
Example 3: Keeping Local Backups
- Maria uses Dropbox for daily work files but also keeps a backup on an external hard drive in case of cloud service outages or accidental deletions.
Summary
Using cloud services safely involves understanding the security features, privacy policies, reliability, usability, and costs of the provider. By enabling strong security measures like encryption and 2FA, managing sharing permissions carefully, and maintaining backups, freelancers and small business owners can protect their data and maintain trust with clients.
Remember: The cloud is a powerful tool, but your vigilance is key to keeping your digital workspace secure.
9.4 Managing Passwords and Access for Team Members
Managing passwords and access for team members is crucial for freelancers and small business owners to protect sensitive information and maintain operational security. Even if you’re not tech-savvy, adopting simple, clear practices can significantly reduce risks.
Why Managing Passwords and Access Matters
Imagine you run a small design agency with three team members. Each person needs access to client files, email accounts, and project management tools. If everyone uses the same password or shares passwords via email or chat, one compromised account could expose everything.
Proper management ensures:
- Only authorized people access sensitive data
- Passwords are strong and unique
- Access can be revoked quickly if someone leaves or changes roles
Best Practices for Managing Passwords and Access
Use a Password Manager for Teams
A password manager securely stores and shares passwords among team members without revealing the actual passwords.
Example:
- Tools like LastPass Teams, 1Password Business, or Bitwarden Teams allow you to create a shared vault.
- Each team member logs in with their own master password.
- You can assign access to specific passwords or accounts only to those who need them.
Mind Map:
Assign Role-Based Access
Not everyone needs access to everything. Define roles and limit access accordingly.
Example:
- A freelancer handling social media doesn’t need access to financial accounts.
- A bookkeeper should have access to accounting software but not client project files.
Mind Map:
Enforce Strong, Unique Passwords
Each account should have a unique password that’s hard to guess.
Example:
- Instead of “Password123”, use a password manager to generate something like “v9$Tq!4rLp#2”
- Avoid reusing passwords across different services.
Mind Map:
Enable Two-Factor Authentication (2FA)
Add an extra layer of security by requiring a second form of verification.
Example:
- Google Authenticator or Authy apps generate time-based codes.
- Even if a password is stolen, the attacker can’t log in without the 2FA code.
Mind Map:
Regularly Review and Revoke Access
People change roles or leave the team. Regularly check who has access and remove permissions when no longer needed.
Example:
- If a freelancer finishes a project, immediately revoke their access to client files.
- Schedule quarterly reviews of access permissions.
Mind Map:
Practical Example Scenario
Scenario: You run a small marketing consultancy with 4 team members.
- You use a password manager (e.g., Bitwarden Teams).
- Each member has their own login to the password manager.
- Passwords for client accounts, social media, and billing are stored in shared folders based on role.
- 2FA is enabled on all critical accounts.
- Every 3 months, you review access and remove any unnecessary permissions.
This setup keeps your business secure without requiring deep technical knowledge.
Summary Checklist
- Use a team password manager
- Define roles and assign access accordingly
- Enforce strong, unique passwords
- Enable two-factor authentication
- Regularly review and revoke access
By following these straightforward steps, you can confidently manage passwords and access for your team, protecting your business and clients from common digital threats.
9.5 Preparing for and Responding to Data Breaches
Data breaches can happen to anyone, including freelancers and small business owners. Being prepared and knowing how to respond quickly can minimize damage and protect your clients and yourself.
What is a Data Breach?
A data breach occurs when unauthorized individuals gain access to sensitive information such as client details, passwords, financial data, or business documents.
Example: Imagine you run a small graphic design business and store client contact info and project files on your computer. If a hacker breaks in and steals this data, that’s a data breach.
Why Prepare for Data Breaches?
- Protect your reputation
- Avoid legal penalties
- Minimize financial loss
- Maintain client trust
Mind Map: Preparing for a Data Breach
Step 1: Back Up Your Data Regularly
Backing up your data ensures you have copies if your original files are stolen or corrupted.
Example: Use Google Drive or Dropbox to automatically back up client files daily.
Step 2: Use Strong, Unique Passwords and 2FA
Weak passwords are an easy way for hackers to get in.
Example: Instead of “password123,” use a password manager to generate and store complex passwords like “T9!v#2pLq@xZ” and enable two-factor authentication (2FA) on your email and business accounts.
Step 3: Keep Software Updated
Updates often include security patches.
Example: When your computer prompts you to update your operating system or apps, do it promptly to fix vulnerabilities.
Step 4: Limit Access to Sensitive Data
Only give access to trusted people.
Example: If you hire a virtual assistant, only share the files they need, not your entire client database.
Mind Map: Responding to a Data Breach
Step 1: Detect and Confirm the Breach
Watch for signs like unexpected password reset emails, unknown login locations, or strange account activity.
Example: You receive an alert that someone logged into your email from a different country. This could indicate a breach.
Step 2: Contain the Breach
Immediately change all passwords related to the breached accounts and revoke any suspicious access.
Example: Reset your email and cloud storage passwords and log out all devices remotely.
Step 3: Assess the Impact
Figure out what information was accessed and which clients or projects might be affected.
Example: Check your cloud storage logs to see which files were accessed during the breach.
Step 4: Notify Stakeholders
Transparency builds trust. Inform your clients about the breach, what data was affected, and what you’re doing to fix it.
Example: Send a clear, honest email to clients explaining the situation and advising them to watch for suspicious activity.
Step 5: Recover and Improve
Restore lost data from backups and strengthen your security to prevent future breaches.
Example: After restoring files, update your security policies and consider using additional tools like VPNs or enhanced firewalls.
Real-Life Example
Scenario: Sarah, a freelance writer, noticed unusual activity on her email account. She quickly changed her passwords, informed her clients, and restored her files from backups. She then started using a password manager and enabled 2FA on all accounts. Sarah’s quick response helped her avoid major damage.
Summary Checklist
- Regularly back up your data
- Use strong, unique passwords and 2FA
- Keep software updated
- Limit access to sensitive information
- Have an incident response plan
- Detect and act quickly if a breach happens
- Notify affected parties transparently
- Learn and improve your security practices
By preparing ahead and knowing how to respond, freelancers and small business owners can protect their digital assets and maintain trust with their clients even if a data breach occurs.
10. Staying Informed and Continuing Your Digital Security Journey
10.1 Reliable Sources for Privacy and Security News
Staying informed about the latest developments in digital privacy and security is crucial, especially for non-tech people who want to protect themselves online. There are many sources available, but not all are trustworthy or easy to understand. This section will guide you through reliable, easy-to-follow sources and how to use them effectively.
Why Follow Privacy and Security News?
- Stay ahead of threats: Learn about new scams, vulnerabilities, and breaches.
- Understand new tools: Discover apps and services that enhance your privacy.
- Make informed decisions: Know when to update your devices or change your habits.
Types of Reliable Sources
Easy Examples of Using These Sources
-
Krebs on Security (https://krebsonsecurity.com/)
- Example: When a new data breach happens, Brian Krebs writes detailed, easy-to-understand articles explaining what happened and how to protect yourself.
- How to use: Bookmark the site or subscribe to the newsletter for weekly updates.
-
Electronic Frontier Foundation (https://www.eff.org/)
- Example: EFF provides guides on how to use encryption tools and explains privacy rights in simple language.
- How to use: Visit their “Surveillance Self-Defense” section for practical tips.
-
Security Now Podcast
- Example: Hosts explain recent security news and concepts in a conversational style.
- How to use: Listen on your favorite podcast app during commutes or breaks.
-
Twitter Experts
- Example: Follow @troyhunt to get alerts about compromised passwords and data breaches.
- How to use: Create a dedicated Twitter list for security experts to keep your feed focused.
-
Reddit Communities
- Example: r/privacy shares news, tools, and user experiences related to protecting personal data.
- How to use: Read top posts weekly and ask questions if you’re unsure about a topic.
Tips for Non-Tech People When Using These Sources
- Look for summaries: Many sites provide “key takeaways” or “what you should do” sections.
- Avoid panic: News can sound scary; focus on actionable advice.
- Use trusted aggregators: Some newsletters curate the most important news for you.
- Ask questions: Join forums or communities where you can get simple explanations.
Mind Map: How to Stay Updated
By regularly consulting these reliable sources and following simple habits, you can keep your digital life safer and make smarter privacy decisions without needing to be a tech expert.
10.2 Simple Daily Habits to Maintain Your Digital Safety
Maintaining digital safety doesn’t have to be complicated or time-consuming. By adopting a few simple daily habits, you can significantly reduce your risk of falling victim to cyber threats. Below are practical habits explained with examples and mind maps to help you visualize and remember them.
Habit 1: Use Strong and Unique Passwords for Every Account
Why: Reusing passwords makes it easier for hackers to access multiple accounts if one is compromised.
Example: If your email password is “Sunshine123”, don’t use “Sunshine123” for your bank or social media accounts.
Mind Map:
Habit 2: Enable Two-Factor Authentication (2FA) Wherever Possible
Why: Adds an extra layer of security by requiring a second form of verification.
Example: After entering your password, you receive a code on your phone to enter before accessing your account.
Mind Map:
Habit 3: Be Cautious with Links and Attachments
Why: Phishing attacks often use fake links or malicious attachments to steal information or infect devices.
Example: You get an email from “YourBank” asking you to click a link to verify your account. Instead of clicking, you visit the bank’s official website directly.
Mind Map:
Habit 4: Keep Your Software and Devices Updated
Why: Updates often fix security vulnerabilities that hackers exploit.
Example: Your smartphone prompts you to install an update. Instead of ignoring it, you install it promptly.
Mind Map:
Habit 5: Regularly Review Privacy Settings on Social Media and Apps
Why: Default settings may share more information than you want.
Example: You adjust your Facebook privacy settings so only friends can see your posts.
Mind Map:
Habit 6: Backup Important Data Frequently
Why: Protects your information in case of device loss, theft, or ransomware attacks.
Example: You save important documents and photos to a cloud service like Google Drive or an external hard drive weekly.
Mind Map:
Habit 7: Log Out of Accounts When Using Shared Devices
Why: Prevents others from accessing your accounts on public or shared computers.
Example: After checking your email at a library computer, you log out and close the browser.
Mind Map:
Habit 8: Use Secure Wi-Fi Networks and VPNs When Possible
Why: Public Wi-Fi can be insecure; a VPN encrypts your internet traffic.
Example: When at a coffee shop, you connect to your VPN before accessing your bank account online.
Mind Map:
Habit 9: Limit Sharing Personal Information Online
Why: Oversharing can expose you to identity theft or targeted scams.
Example: Avoid posting your full birthdate or home address on social media.
Mind Map:
Habit 10: Stay Educated About New Threats and Scams
Why: Cyber threats evolve; staying informed helps you recognize and avoid them.
Example: You subscribe to a trusted cybersecurity newsletter or follow official security blogs.
Mind Map:
By integrating these simple habits into your daily routine, you build a strong foundation for digital privacy and security without needing advanced technical knowledge. Remember, consistency is key — small actions every day add up to big protection over time.
10.3 Understanding Updates and Changes in Technology
Technology is constantly evolving, and staying informed about updates and changes is key to maintaining your digital privacy and security. But what does this mean for non-tech people? Let’s break it down with simple explanations, examples, and helpful mind maps.
Why Do Updates Matter?
Updates are improvements or fixes made to software, apps, or devices. They often include:
- Security patches: Fix vulnerabilities hackers might exploit.
- New features: Improve usability or add helpful tools.
- Bug fixes: Resolve errors or glitches.
Example: Imagine your smartphone has a lock with a small crack. An update is like fixing that crack so burglars can’t sneak in.
Types of Updates You Encounter
- Operating System Updates: Windows, macOS, Android, or iOS updates that keep your device secure and running smoothly.
- Application Updates: Updates for apps like your email client, social media apps, or banking apps.
- Browser Updates: Browsers like Chrome or Firefox update to protect you from malicious websites.
- Firmware and Drivers: These are updates for the hardware inside your devices, like your router or printer.
- Security Definitions: Antivirus software updates its database to recognize new threats.
How to Recognize and Manage Updates
-
Automatic Updates: Many devices and apps update automatically. This is the safest and easiest way to stay protected.
-
Manual Updates: Sometimes you need to approve or initiate updates yourself.
-
Update Notifications: Your device or app will often notify you when an update is available.
Example: When your phone says “Update available,” think of it as a reminder to fix the locks and keep your data safe.
What Happens If You Don’t Update?
- Your device or app may become vulnerable to hackers.
- You might experience crashes or bugs.
- New apps or features may not work properly.
Example: Not updating your software is like leaving your front door unlocked in a risky neighborhood.
Understanding Major Changes: When Updates Bring New Features
Sometimes updates change how your apps or devices look or work. This can be confusing.
Example: A social media app might rearrange buttons or add new privacy settings.
Tips to Handle Major Changes:
- Read update notes or summaries.
- Explore new features slowly.
- Look for tutorials or help guides online.
Mind Map: Staying Updated Safely
Practical Examples
-
Example 1: Your smartphone prompts you to update iOS. You enable automatic updates so future patches install overnight without you needing to do anything.
-
Example 2: Your antivirus software updates daily to recognize new viruses. You notice it runs quietly in the background.
-
Example 3: A popular messaging app introduces end-to-end encryption in an update. You read the update notes and enable the new feature to enhance your privacy.
Summary
Understanding updates and changes in technology means:
- Recognizing the importance of regular updates for security and performance.
- Knowing the types of updates you might encounter.
- Managing updates safely and confidently.
- Being prepared for new features and changes.
By staying proactive and informed, you keep your digital life safer and smoother without needing to be a tech expert.
10.4 Joining Communities and Forums for Support and Learning
One of the best ways to stay updated and improve your digital privacy and security knowledge is by joining communities and forums where people share tips, ask questions, and discuss the latest trends. These communities offer support, practical advice, and real-life examples that can help non-tech people feel more confident and informed.
Why Join Communities and Forums?
- Learn from real experiences: Members often share stories about scams, hacks, or privacy breaches and how they handled them.
- Ask questions in simple language: You can get answers tailored to your level of understanding.
- Stay updated: Cybersecurity is always evolving; communities help you keep pace.
- Find trustworthy resources: Members often recommend reliable tools, websites, and tutorials.
Popular Communities and Forums for Digital Privacy & Security
| Community/Forum | Description | Example Topics Covered |
|---|---|---|
| Reddit r/privacy | Discussions on privacy news, tools, and advice | VPN recommendations, privacy laws explained |
| Reddit r/cybersecurity | Broader cybersecurity topics, beginner-friendly | Phishing scams, password managers |
| Stack Exchange Information Security | Q&A site for security questions | How to secure home Wi-Fi, encrypt emails |
| PrivacyTools.io Community | Focused on privacy tools and best practices | Browser extensions, secure messaging apps |
| Twitter (Follow Experts) | Follow cybersecurity experts and organizations | Real-time alerts, tips, and news |
How to Get Started
- Choose a platform: Reddit and Stack Exchange are great for beginners.
- Create an account: Use a strong password and enable two-factor authentication.
- Introduce yourself: Many communities have welcome threads.
- Start reading: Browse popular posts to get a feel for the community.
- Ask questions: Don’t hesitate to ask even simple questions.
- Contribute when ready: Share your experiences or tips.
Example Mind Map: Benefits of Joining Privacy & Security Communities
Example: How a Freelancer Used a Forum to Avoid a Scam
Maria, a freelance graphic designer, received an email from a potential client asking her to install a file to start work. Unsure if it was safe, she posted the email content on r/cybersecurity asking for advice. Community members quickly identified it as a phishing attempt and advised her not to open the file. Thanks to the forum, Maria avoided a malware infection.
Tips for Safe Participation
- Use a pseudonym if you prefer privacy.
- Never share sensitive personal information.
- Verify advice by cross-checking with multiple sources.
- Be respectful and patient; communities thrive on positive interaction.
By joining these communities and forums, you build a support network that helps you navigate the complex world of digital privacy and security with confidence and ease.
10.5 When and How to Seek Professional Help
Even if you follow all the best practices for digital privacy and security, sometimes situations arise that require expert assistance. Knowing when and how to seek professional help can save you time, money, and stress. This section will guide you through recognizing these moments and finding the right help.
When to Seek Professional Help
-
After a Security Breach or Data Leak
- Example: You notice unauthorized transactions on your bank account or receive alerts about your email being compromised.
- Why: Professionals can help contain the breach, recover your accounts, and advise on next steps.
-
If You Suspect Malware or Ransomware Infection
- Example: Your computer suddenly slows down, files become inaccessible, or you see ransom messages.
- Why: Malware removal often requires specialized tools and knowledge to avoid further damage.
-
When Handling Sensitive Client or Business Data
- Example: As a freelancer or small business owner, you need to comply with data protection laws (e.g., GDPR).
- Why: Experts can help you set up secure systems and policies to protect data legally and effectively.
-
If You Experience Persistent Phishing or Identity Theft Attempts
- Example: You repeatedly receive phishing emails or notice your identity being misused.
- Why: Professionals can assist with identity restoration and implement stronger defenses.
-
When Setting Up Complex Security Systems
- Example: You want to implement VPNs, encrypted communications, or advanced firewalls but find it confusing.
- Why: Experts can tailor solutions to your needs and ensure proper configuration.
-
If You’re Unsure About the Safety of Your Online Activities
- Example: You feel overwhelmed by privacy settings, password management, or device security.
- Why: A consultation can clarify doubts and provide personalized guidance.
How to Seek Professional Help
-
Identify the Type of Expert You Need
- Cybersecurity Consultant: For overall security assessments and solutions.
- IT Support Specialist: For device and software troubleshooting.
- Data Privacy Advisor: For compliance and data protection strategies.
- Identity Theft Recovery Service: For restoring compromised identities.
-
Where to Find Professionals
- Local IT service companies with good reviews.
- Online platforms like Upwork or Freelancer for vetted cybersecurity experts.
- Recommendations from trusted friends or business networks.
- Official organizations or government resources offering cybersecurity assistance.
-
Questions to Ask Before Hiring
- What experience do you have with cases like mine?
- Can you provide references or testimonials?
- What are your fees and service terms?
- How do you protect client confidentiality?
-
Preparing for Your Consultation
- Gather relevant information: account details, error messages, suspicious emails.
- List your concerns and what you want to achieve.
- Be ready to follow their instructions carefully.
Mind Map: When to Seek Professional Help
Mind Map: How to Seek Professional Help
Example Scenario
Situation: Sarah, a small business owner, notices suspicious activity on her business email and fears a data breach.
What She Did:
- Tried to fix it herself but felt overwhelmed.
- Contacted a local cybersecurity consultant recommended by a fellow entrepreneur.
- The consultant identified a phishing attack, helped secure her accounts, and set up two-factor authentication.
- Sarah also received training on spotting phishing emails.
Outcome: Sarah regained control of her business communications and feels confident managing security going forward.
Remember, seeking professional help is a smart and responsible step, not a sign of failure. Cybersecurity experts are there to support you, making your digital life safer and less stressful.