Home Fermentation Science
1. Fermentation Fundamentals for Home Practice
1.1 What Fermentation Is and Why It Works
Fermentation is a controlled process where microorganisms convert food components into new compounds. In home fermentation, the goal is not “making something alive,” but steering a predictable set of chemical changes so the food becomes safer, more stable, and often more flavorful.
The Core Idea
Most fermentations rely on microbes that can grow in the environment you provide. As they grow, they consume available nutrients and produce acids, gases, and flavor molecules. Those byproducts change the food’s pH, texture, and aroma.
A simple way to think about it: fermentation is a trade. You supply conditions and ingredients; microbes supply acids and other compounds that shift the food into a more stable state.
What Microbes Actually Do
Different fermentations use different microbial groups, but the logic is similar.
- Lactic acid fermentation: bacteria convert sugars into lactic acid. The acid lowers pH, which discourages many spoilage organisms.
- Alcoholic fermentation: yeasts convert sugars into alcohol and carbon dioxide. The CO₂ can help create texture and, in some systems, pressure.
- Mixed fermentation: multiple microbes work together, often in sequence. One group may create conditions that help another group thrive.
In yogurt, lactic acid bacteria dominate. In kombucha, yeast and bacteria collaborate, with bacteria typically doing much of the acid work after yeasts generate alcohol and CO₂.
Why Lowering pH Matters
pH is a practical control knob. Many unwanted microbes prefer near-neutral pH. When fermentation drops pH quickly enough, the food becomes harder for them to grow.
For example, if you start with milk or sweet tea, the initial pH is relatively high. As fermentation proceeds, acids accumulate. Once the pH crosses a threshold, the microbial “competition” changes: the fermenting microbes keep going, while many others slow down.
The Role of Time and Temperature
Temperature affects how fast microbes grow and how quickly acids accumulate. Time is the duration that allows those changes to reach a target.
A useful mental model is rate versus endpoint. You don’t just “wait”; you wait until the food reaches an endpoint you can recognize—such as a thicker yogurt set, a tangy flavor, or a measured acidity.
If temperature is too low, fermentation may stall and allow slower, less desirable microbes to gain ground. If temperature is too high, the desired microbes may produce off flavors or the process may overshoot the texture or acidity you want.
Substrate and Conditions
Microbes need food (substrate) and suitable conditions.
- Sugar availability: more fermentable sugar generally means faster acid or gas production.
- Salt and brine strength: salt selects for salt-tolerant microbes and helps control texture in vegetables.
- Oxygen: some microbes need oxygen, others do not. Kombucha’s surface growth reflects oxygen exposure, while many lactic ferments work well with limited oxygen.
- Water activity: the “effective dryness” of the food influences microbial growth. Brining and proper sealing both affect this.
Integrated Example: From Ingredients to Outcome
Consider a basic lactic ferment of vegetables.
- You chop vegetables and mix them with the right salt level.
- Salt draws out liquid, creating brine where lactic acid bacteria can grow.
- Over time, sugars in the vegetables are converted into lactic acid.
- The pH drops, and the vegetables become tangy and more stable.
- Texture changes occur because acids and enzymes affect cell structure.
The key is that each step sets up the next. Salt helps create the environment; the environment enables acid production; acid production changes both safety and sensory qualities.
Mind Map: Fermentation Logic
A Quick Reality Check
Fermentation is not magic; it’s chemistry plus biology under constraints. If you can state your starting ingredients, your conditions, and your target outcome, you can reason about what should happen and what “wrong” looks like. That’s the foundation for reliable yogurt, kombucha, and functional fermented foods.
1.2 Microbes in Fermented Foods and Their Roles
Fermentation is a controlled microbial takeover. You are not trying to “create bacteria”; you are steering which microbes win under your conditions—temperature, oxygen exposure, salt level, sugar availability, and acidity. Different foods favor different teams, and the same team can behave differently depending on what it has to eat.
Core Microbial Players
Lactic Acid Bacteria (LAB) are the workhorses of yogurt and many vegetable ferments. They convert sugars into lactic acid, which lowers pH and makes the environment hostile to many spoilage organisms. LAB also produce small flavor compounds that contribute to tang and mild complexity.
Yeasts often show up in fermented beverages and some mixed ferments. They can ferment sugars into alcohol and carbon dioxide. In kombucha, yeast activity helps generate carbonation and can contribute to aroma compounds, but it also depends on oxygen and sugar levels.
Acetic Acid Bacteria (AAB) convert ethanol into acetic acid when oxygen is available. This is why oxygen exposure matters in vinegar-like outcomes and why some kombucha batches can taste sharper if conditions favor AAB.
Molds are not “part of the plan” for most home ferments. Some molds can grow on surfaces when oxygen and moisture are available and when acidity or salt is insufficient. Surface mold is a safety and quality problem, not a flavor feature.
How Microbes Choose Their Niche
Microbes do not all prefer the same environment. A useful way to think about it is: each microbe has a comfort zone for pH, temperature, oxygen, and available nutrients.
- pH tolerance: Many spoilage organisms struggle as acidity rises. LAB typically acidify first, which then protects the batch.
- Temperature preference: Yogurt cultures are usually selected for consistent performance at incubation temperatures. If you incubate too cool, acidification slows and the window for unwanted microbes widens.
- Oxygen needs: LAB are often more comfortable with low oxygen. Yeasts and AAB can be more active with oxygen present.
- Nutrient availability: Sugar content in tea, fruit, or vegetables determines how much acid, alcohol, and gas can be produced.
What Each Microbe Produces and Why It Matters
Microbes create outcomes you can taste and observe.
- Lactic acid drives tang and improves safety by lowering pH.
- Carbon dioxide creates bubbles and can lead to pressure in bottled ferments.
- Ethanol can appear when yeasts ferment sugars; it is later converted to acetic acid if oxygen and AAB are present.
- Exopolysaccharides from some LAB can thicken yogurt by influencing gel texture.
- Aroma compounds come from metabolic byproducts; their balance depends on which microbes dominate.
Mind Map: Microbes in Fermented Foods and Their Roles
Integrated Examples
Example: Yogurt You start with milk and a yogurt starter. LAB multiply and acidify the milk. As pH drops, milk proteins coagulate into a gel. If incubation is too short, the gel may be weak and the flavor may be flat because acidification did not reach the typical range.
Example: Kombucha In first fermentation, yeast and LAB work together. Yeast helps generate CO2 and small amounts of alcohol, while LAB contribute acidity. In second fermentation, added sugar can increase carbonation. If oxygen exposure is high or the batch stays too long before bottling, AAB can become more active and the taste can shift toward sharper, more vinegar-like notes.
Example: Brined Vegetables Salt selects for LAB and discourages many unwanted microbes. LAB then acidify the brine, which protects the vegetables. Keeping vegetables submerged reduces oxygen at the surface, lowering the chance of mold growth.
Practical Takeaway
When a ferment goes well, it is usually because the “right” microbes got a head start and the environment stayed within their comfort zone. When it goes poorly, it is often because conditions allowed competitors to gain traction before acidity or salt levels could do their job.
1.3 Fermentation Conditions That Control Outcomes
Fermentation is not a single switch that turns “good” on. It’s a set of conditions that favors certain microbes and certain chemical reactions. Change the conditions, and you change the speed, the flavor, the texture, and the safety margin.
The Core Levers
Temperature
Temperature controls how fast microbes grow and how quickly acids and other compounds accumulate. In practice, it also changes texture because protein and polysaccharide behavior depends on time spent at specific temperatures.
Example: If you incubate plain yogurt too warm, it may set faster but can become looser and tangier than expected. If you incubate too cool, it may take longer and taste flatter because acid production lags behind.
Rule of thumb: Use a stable target temperature and avoid frequent opening or moving the container mid-incubation.
Time
Time determines how far fermentation proceeds. Early in fermentation, you’ll often get mild acidity and gentle flavor. Later, acidity rises and some microbes slow down while others may contribute different byproducts.
Example: Two batches of kombucha brewed with the same tea and sugar can taste very different if one is bottled a day earlier. The earlier batch will be less sour and may generate less carbonation in the second fermentation.
pH and Acidity
pH is both an outcome and a control signal. As acidity increases, it suppresses many unwanted microbes and changes enzyme activity. Different ferments tolerate different pH ranges, so “lower is always better” is not a universal rule.
Example: For lacto-fermented vegetables, once the brine reaches a sufficiently acidic state, the texture tends to stabilize. If you stop too early, you may get a less sour product that is more prone to spoilage.
Oxygen Availability
Oxygen changes which organisms dominate. Some ferments prefer low-oxygen conditions; others tolerate or even benefit from oxygen exposure.
Example: Kombucha’s surface culture forms where oxygen is available. If you keep the brew fully sealed from the start, you may reduce the typical surface activity and alter flavor development.
Salt and Water Activity
Salt reduces water availability and selectively pressures microbes. It also affects texture by influencing how plant tissues hold water.
Example: In brined vegetables, too little salt can lead to softening and off odors because the wrong microbes gain an advantage. Too much salt can slow fermentation and keep vegetables firm but underdeveloped in flavor.
Sugar and Nutrient Sources
Sugar fuels acid production and carbonation potential. The type of sugar matters because microbes metabolize different carbohydrates differently.
Example: Kombucha made with a lighter tea and the same total sugar can taste less complex because the tea compounds and extraction level influence flavor balance.
Mind Map: Fermentation Conditions
How Conditions Interact in Real Batches
Temperature × Time
A higher temperature can shorten fermentation time, but it can also push reactions toward different byproducts. If you adjust one lever, you usually need to re-check the others.
Example: If you raise yogurt incubation temperature slightly, reduce incubation time to hit the same end point rather than relying on the clock.
Salt × Oxygen
In vegetable ferments, salt and limited oxygen work together. Salt slows unwanted growth, while keeping vegetables submerged reduces oxygen exposure at the surface.
Example: If you notice a film at the top, it often means the surface got oxygen and not enough acid yet. Correcting submersion and maintaining brine strength matters more than adding extra “effort.”
Sugar × pH in Carbonated Ferments
For second fermentations, sugar provides fuel for carbonation. As pH drops, microbial activity changes, which affects how much gas is produced.
Example: If you bottle kombucha when it’s already very acidic, it may generate less carbonation because the microbes are already near their comfortable operating range.
Practical End Points Instead of Guessing
Conditions are best managed by targeting an end point, not just following a schedule. End points can be measured (pH, temperature) or observed (thickness, aroma, carbonation).
Example: For yogurt, thickness and clean tang are end points. For kombucha, acidity and carbonation level are end points. For vegetables, sourness and firmness are end points.
A Simple Control Checklist
Before you start, decide what you’re controlling and how you’ll know you hit it.
- Choose a temperature target and keep it steady.
- Plan a time window, but verify with an end point.
- Track acidity using pH when possible.
- Manage oxygen by using lids, headspace, or submersion appropriately.
- Set salt and sugar based on the recipe’s ratios.
- Adjust one variable at a time when troubleshooting.
When you treat fermentation conditions like a system rather than a ritual, results become repeatable. The microbes still do the work, but you stop leaving the outcome to chance.
1.4 Food Safety Principles for Fermentation at Home
Food safety in home fermentation is mostly about controlling three things: what gets in, what gets out, and how fast conditions change. The goal is simple—encourage the microbes you want, discourage the ones you don’t, and recognize problems early.
The Safety Mindset and Core Rules
Start with the assumption that fermentation is not sterilization. You’re not making food “clean”; you’re making it “safe enough” by shifting conditions.
-
Start clean, then stay clean. Wash hands, sanitize work surfaces, and use clean jars and lids. If you touch a utensil to a contaminated surface, don’t use it again for the ferment.
-
Use the right vessel and closure. For lactic acid ferments, keep food submerged in brine to limit oxygen exposure. For yogurt, keep the system sealed enough to prevent contamination while allowing stable incubation. For kombucha, avoid airtight sealing during first fermentation.
-
Control time and temperature. Many failures happen because fermentation runs too long at the wrong temperature. Temperature affects speed, and speed affects whether unwanted microbes gain ground.
-
Rely on sensory checks plus simple measurements. Smell, appearance, and texture matter, but so do pH and temperature when the process allows it.
Mind Map: Safety Controls and Their Effects
Cleanliness That Actually Helps
Sanitizing is not the same as washing. Washing removes debris; sanitizing reduces microbial load. Use a sanitizer appropriate for food contact and follow the label instructions for contact time.
Example: If you rinse a jar with hot water but then set it on a counter where dust settles, you’ve undone the benefit. A practical habit is to sanitize right before use and keep the jar covered until filling.
Oxygen, Submersion, and Why It Matters
Oxygen management is a major safety lever for vegetable ferments. When vegetables float, they form a dry, oxygen-rich surface where spoilage organisms can grow.
Example: For a cabbage brine ferment, pack tightly, weigh down the vegetables, and ensure the brine covers them by at least a finger’s width. If you see exposed pieces, remove them promptly and keep the rest submerged.
For kombucha first fermentation, you generally want airflow. Sealing too tightly can create pressure and shift microbial balance.
Temperature Control and the “Too Slow” Problem
Temperature determines how quickly desired microbes acidify the food. If fermentation is too slow, unwanted microbes may establish first.
Example: If your yogurt incubates at a cool room temperature, it may take much longer to thicken. Longer time at mild temperatures increases the chance that contaminants multiply before acidity stabilizes.
A useful rule is to aim for the temperature range specified by your method and avoid frequent opening.
Acidity Development and pH Checks
Acidity is a safety barrier. Many ferments become safer as pH drops, but the exact target depends on the product and method.
Example: For a lactic ferment, you can track progress by pH if you have a meter. If pH isn’t dropping as expected after a reasonable time window, assume something is off—salt ratio, temperature, or contamination.
If you don’t measure pH, you still need discipline: follow time guidance and don’t extend indefinitely.
Visual and Sensory Checks Without Guessing
Use a consistent inspection routine.
- Normal signs: bubbles, cloudy brine, softening over time, sour smell.
- Concerning signs: fuzzy mold, strong off odors (beyond sour), slimy surface growth that doesn’t match the expected texture.
Taste rule: Only taste when the process is intended to be tasted and you’re confident it’s safe. If anything looks or smells wrong, don’t “test” it.
Decision Points and Discard Criteria
When in doubt, discard. Fermentation is forgiving for many variables, but not for mold or persistent off odors.
Example: If you see fuzzy growth on the surface of a brined ferment, don’t scrape and continue. Mold can leave microscopic material behind, and the remaining ferment may not be reliably safe.
Integrated Workflow for Safer Batches
- Sanitize tools and jars.
- Measure ratios carefully (salt, starter, sugar).
- Manage oxygen (submerge for vegetables; vent for kombucha first fermentation).
- Incubate at the target temperature without frequent opening.
- Monitor at defined checkpoints using sight, smell, and pH when available.
- Decide early: continue only if signs match the expected trajectory.
Quick Reference Mind Map: What to Do When Something Goes Wrong
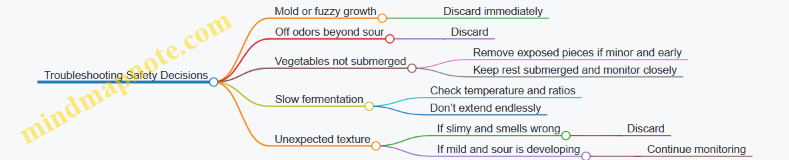
Practical Example: A Safe Yogurt Checkpoint
Incubate until thickening is expected, then refrigerate promptly. If it never thickens and smells odd, don’t keep it “to see.” The safe move is to discard and review the starter handling, milk temperature before inoculation, and incubation temperature stability.
Food safety in fermentation is less about perfection and more about consistent control: clean inputs, controlled conditions, and clear stop rules when the batch doesn’t behave.
1.5 Reading Recipes and Understanding Process Variables
A good fermentation recipe is really a set of controlled experiments written in plain language. Your job is to translate each instruction into a variable you can measure, then decide which variables you can keep steady and which ones you must adapt.
Start by scanning for three anchors: time, temperature, and starter strength. If a recipe doesn’t state them, treat it as incomplete. Next look for inputs (milk or tea type, sugar or salt level, water quality) and targets (thickness, acidity, carbonation, flavor). Finally, check for end-point cues—what the recipe says “done” looks like. Without end-point cues, you’re forced to guess, and guessing is where most failures hide.
Process Variables You Can Control
Temperature is the steering wheel. Yogurt cultures generally prefer a narrow temperature band; kombucha ferments more slowly at cooler temperatures and faster at warmer ones. If you incubate in a “warm spot” without measuring, you’ll get batch-to-batch drift.
Time is the engine hour meter. Longer isn’t always better. Many ferments become sharper or thinner as acids accumulate and proteins break down. A recipe that says “until it tastes right” is missing a measurable endpoint.
Starter strength is the dose. In yogurt, starter amount affects how quickly acid forms and how thick the final set becomes. In kombucha, the ratio of starter liquid to sweet tea influences how fast acidity rises and how stable the brew is.
Substrate composition changes everything. Milk fat and protein content affect yogurt texture. Tea type and sugar amount affect kombucha fermentation rate and final balance. For vegetables, the salt level determines which microbes win.
Oxygen exposure matters most for kombucha and some vegetable ferments. Oxygen can shift microbial balance and influence off-flavors. Recipes that specify covering, cloth, or sealing are describing oxygen management.
Vessel geometry controls heat loss and gas behavior. A wide jar cools faster than a tall one. Bottles for second fermentation can build pressure quickly if headspace and sugar additions aren’t consistent.
How to Read a Recipe Like a Scientist
Use a simple checklist while reading:
- Identify the culture: yogurt starter type or kombucha SCOBY source.
- List the measured inputs: grams, milliliters, °C/°F, salt %, sugar %, and water type.
- Extract the process plan: when you add ingredients, when you stir, when you cover.
- Find the endpoint: pH target, thickness, aroma description tied to a time window, or carbonation cues.
- Note the failure modes the recipe anticipates: curd not setting, kombucha too sweet, vegetables softening.
If a recipe omits a measurement, look for a substitute. For example, if it doesn’t give temperature, it may give a time window that only works at a specific warmth. If it doesn’t give starter strength, it may specify a “starter-to-milk” ratio.
Mind Map: Recipe Variables and What They Affect
Example: Yogurt Recipe Interpretation
Imagine a yogurt recipe that says: “Incubate until thick, then refrigerate.” To make it usable, translate it into variables. Ask: what temperature range is implied? If the recipe suggests a warm setting that typically holds around 42–45°C, then “until thick” likely corresponds to a specific acidification window. If you can measure pH, you can replace vague timing with a target. If you can’t, you can still standardize by using the same thermometer, the same jar size, and the same starter-to-milk ratio.
Now consider a second recipe: “Use 2 tablespoons of starter per quart.” That’s starter strength. If you keep the same milk type and incubation temperature, you can treat time as the main adjustment knob. If your yogurt sets too soft, reduce incubation time or increase starter strength slightly next batch.
Example: Kombucha Recipe Interpretation
A kombucha recipe often includes: tea amount, sugar amount, starter liquid volume, and a first-fermentation duration. Treat sugar and starter liquid as the two levers that set the pace. If the recipe says to bottle for second fermentation “until lightly carbonated,” you still need a consistent method: same bottle size, same amount of added flavoring, and the same time window at a known room temperature.
If one batch tastes flat, the likely causes are insufficient sugar for the second fermentation, too cool a room, too short a second-fermentation time, or too much headspace management that reduced effective fermentation. If it tastes overly sharp, the first fermentation likely ran too long or started too strong.
Turning Variables into Repeatable Decisions
When you change one variable, change only one. Keep a short batch log with temperature, start and end times, and what “done” looked like. Over a few batches, you’ll see which variables your kitchen actually controls well and which ones need measurement. That’s how recipes stop being instructions and start being tools.
2. Microbiology and Chemistry Behind Yogurt
2.1 Yogurt Starter Cultures and Their Metabolic Pathways
Yogurt is mostly a controlled acidification process. The “starter culture” is a small community of microbes that turns milk’s sugars into lactic acid and a handful of flavor compounds. The result is a thicker, tangier food because acidity changes milk proteins and because the microbes leave behind specific metabolites.
What Starter Cultures Actually Are
Most classic yogurt relies on two main groups working in tandem: Lactobacillus delbrueckii subsp. bulgaricus and Streptococcus thermophilus. In many home-friendly recipes, you’ll see them described as “thermophilic” cultures because they grow best at incubation temperatures used for yogurt.
A practical way to think about them: one group tends to be strong at breaking down milk components and producing growth factors; the other often responds quickly to the conditions and helps drive rapid acidification. Together they create a faster, more stable fermentation than either alone.
Milk’s Starting Materials
Milk isn’t just “white water with protein.” For yogurt fermentation, the key inputs are:
- Lactose: the main sugar that microbes convert into lactic acid.
- Milk proteins: mainly caseins, which will later form the yogurt gel.
- Minerals and buffering compounds: they resist pH change, so acid production must be sufficient.
Because lactose is the primary substrate, starter cultures are selected for their ability to metabolize lactose efficiently under yogurt conditions.
The Core Metabolic Pathway
At a high level, both starter organisms follow a similar end goal: convert lactose into lactic acid. The details differ, but the outcome is the same—pH drops, proteins coagulate, and flavor develops.
Step 1: Lactose Uptake and Breakdown
Microbes first bring lactose into the cell and then break it down into usable smaller sugars. This step matters for consistency: if the culture is stressed or the milk is overheated beyond what the recipe intends, the fermentation can slow because the microbes start less efficiently.
Example: If you incubate a batch at the low end of the target range, you may still get yogurt, but the set can be weaker because acidification takes longer and the protein gel has less time to form under the right pH trajectory.
Step 2: Lactic Acid Production
Inside the cell, the sugar is processed through fermentation pathways that yield lactic acid as the main product. Lactic acid lowers pH. As pH approaches the range where casein proteins lose their stability, they aggregate into a gel.
Example: Two batches can have the same final taste but different textures if one reaches the key pH sooner. Faster acidification often produces a firmer set, assuming temperature is stable.
Step 3: Flavor Compounds as Side Products
Yogurt flavor isn’t only “sour.” Small amounts of compounds like acetaldehyde and diacetyl contribute to the characteristic aroma and buttery notes. These arise from secondary reactions during growth.
Example: If you stop incubation too early, you may get a mild tang but less of the typical aroma because those side products accumulate with time and metabolic activity.
Why Two Cultures Work Better Together
The pairing of S. thermophilus and L. bulgaricus is not just tradition; it’s functional. Their growth can be mutually supportive.
- S. thermophilus often ramps up quickly and can help create conditions that favor L. bulgaricus.
- L. bulgaricus can contribute enzymes and breakdown products that support continued growth.
This “handoff” helps the culture community maintain acid production across the incubation window.
Example: If you use an older starter that has lost activity, you may notice a lag phase—acidification starts late and the final set may be thin. Fresh, active cultures reduce that lag.
Mind Map: Yogurt Starter Metabolism
Practical Control Points Tied to Metabolism
-
Temperature controls growth rate. If it’s too cool, microbes produce acid slowly; the gel may be weak. If it’s too hot, growth can stall or proteins can be affected before fermentation finishes.
-
Starter activity controls the lag phase. A culture that has been repeatedly warmed and cooled can ferment more slowly, even if the recipe looks correct.
-
Time controls both set and flavor. Acidification drives texture, while side products build with continued metabolism.
Example: A “just-set” yogurt might taste fine but be less aromatic than one incubated to the same pH endpoint. Conversely, over-incubation can make it overly tangy and sometimes grainier as the gel tightens further.
Quick Reference: What You Should Expect
When the starter cultures are healthy and conditions are right, you’ll see a predictable sequence: milk thickens as pH falls, the surface becomes smooth, and the aroma shifts from “milk” toward “yogurt” as fermentation proceeds. If any of those steps stall, the cause is usually one of the metabolic control points: temperature, starter activity, or incubation time.
2.2 Milk Composition and How It Affects Texture
Texture in yogurt is mostly a story about proteins, water, and how heat changes them. The starter cultures do the acid work, but the milk decides how the protein network will hold that acid in place. If you want consistent thickness, you need to understand what’s in the milk before you worry about the incubation timer.
The Protein Network That Sets the Texture
Milk proteins are mainly casein (the big structural player) and whey proteins (the supporting cast). During heating, casein micelles behave like tiny clusters that can either stay well-dispersed or clump more tightly depending on temperature and how the milk was processed. When fermentation lowers pH, casein micelles lose stability and aggregate into a gel. A thicker yogurt usually means a gel that forms with a tighter, more uniform structure.
Easy example: If you compare two milks—one with higher protein and one with lower protein—the higher-protein milk typically yields a firmer set. That’s not magic; there’s simply more building material for the gel.
Fat Content and Its Role in Mouthfeel
Fat doesn’t form the gel, but it changes how the gel feels. Fat globules can interfere with how closely proteins pack, and they also affect perceived creaminess. Higher fat often gives a smoother, less “wobbly” texture, even if the gel firmness is similar. Lower-fat milk can still make thick yogurt, but it may feel thinner because the gel is less cushioned by fat.
Easy example: Whole milk yogurt often tastes richer and feels thicker even when you measure similar firmness. Skim milk yogurt can be tangier and more “clean-cut” in texture.
Lactose and How It Controls Acid Speed
Lactose is the main sugar that cultures convert into lactic acid. More lactose generally supports a steadier acidification curve, which influences how quickly the gel forms and how completely it sets. However, lactose content varies less dramatically than protein and processing effects, so it’s usually a secondary lever for texture.
Easy example: If two batches reach the same final pH but one took longer, the texture can differ because the protein network had more time to reorganize while acid was building.
Minerals and Water Binding
Calcium and phosphate help stabilize casein micelles. As pH drops, calcium phosphate equilibrium shifts, which encourages micelles to come together. Milk with different mineral balances can therefore set differently. Water binding also matters: a stronger gel traps water more effectively, reducing whey separation.
Easy example: Two milks with similar protein can still separate differently after chilling because their mineral composition and processing history affect how water is held.
Processing Effects That Change Behavior
Homogenization and pasteurization are texture influencers because they change particle size and protein structure.
- Homogenization: Breaks fat globules into smaller sizes. Smaller fat globules spread more evenly, which can improve smoothness and reduce the chance of fat pooling.
- Heat treatment: Higher heat can denature whey proteins. Denatured whey proteins can interact with casein, strengthening the gel and often improving firmness.
Easy example: Ultra-high-heat (UHT) milk can behave differently from standard pasteurized milk. Even if both are safe, their protein interactions may produce a different set.
A Practical Way to Predict Texture Outcomes
Instead of guessing, use a simple mental model: more protein + appropriate heat history + controlled acidification = better set.
- Choose milk with higher protein if you want a firmer yogurt.
- Use a consistent heating step if your recipe calls for it.
- Incubate to a target endpoint rather than relying only on time.
- Chill promptly to stabilize the gel and reduce ongoing acid changes.
Easy example: If your yogurt is consistently runny, check whether you changed milk brands, switched from whole to low-fat, or altered heating. Those changes often explain the texture more than the starter amount.
Mind Map: Milk Composition and Texture
Quick Texture Troubleshooting Using Composition
If your yogurt is too soft, the usual composition-related suspects are lower protein milk, reduced heat treatment, or a set that didn’t reach the right pH. If it’s grainy, the issue is often over-aggressive heating or uneven temperature during incubation, which affects how the protein network forms. If it separates quickly, the gel may be too weak to hold water, which can happen with lower protein, different mineral balance, or inconsistent incubation.
Easy example: Keep the milk brand and fat level constant for a few batches. Then change only one variable at a time—like incubation endpoint—so you can connect texture changes to the underlying composition behavior.
2.3 Acidification and Protein Coagulation Mechanisms
The Core Idea of Yogurt Set
Yogurt thickens because milk proteins change shape as acidity rises. The starter cultures convert lactose into lactic acid, lowering pH. As pH drops, casein proteins lose the stability that keeps them dispersed, then cluster into a gel network that traps water.
From Lactose to Lactic Acid
Milk contains lactose, a sugar that lactic acid bacteria can ferment. During incubation, they metabolize lactose and produce lactic acid as a primary end product. The key practical point is that acid production is time- and temperature-dependent: warmer incubation speeds metabolism, so the pH falls faster.
A useful mental model is “acid is the switch.” Early in incubation, the milk still looks like milk because proteins remain stable. Later, once enough acid accumulates, the switch flips and thickening begins.
pH as the Control Knob
Casein micelles in milk are stabilized by calcium phosphate and surface charge. As pH decreases, the surface charge becomes less negative, reducing repulsion between micelles. At a critical pH range, micelles aggregate instead of staying apart.
In practice, you don’t need a lab to benefit from this. If you incubate too briefly, pH may not reach the aggregation range, so the yogurt stays thin. If you incubate too long or too hot, the gel can become overly tight and grainy, and whey separation becomes more likely.
Protein Coagulation Without the Drama
Coagulation here is not like egg curdling from heat alone. It’s a two-step story: first, acid changes the chemistry of casein micelles; second, micelles aggregate into a continuous gel.
As aggregation proceeds, the gel network forms pores. Water and dissolved whey components become trapped inside. That trapped water is why yogurt feels creamy rather than watery.
What Heat Does and Does Not Do
Heat matters before and during incubation, but it plays a different role than acid.
- Preheating milk denatures whey proteins (like beta-lactoglobulin). These proteins can interact with casein micelles, strengthening the gel and improving thickness.
- Incubation temperature mainly controls the rate of acidification.
If you skip preheating, you can still make yogurt, but the set may be weaker. If you overheat milk, you can increase the risk of a tight, sometimes rubbery texture because the protein interactions become less forgiving.
Timeline of a Typical Set
A yogurt batch is usually a sequence of phases:
- Lag phase: bacteria adapt; little thickening yet.
- Acidification phase: pH drops steadily; micelles begin approaching the aggregation threshold.
- Gelation phase: aggregation accelerates; the milk visibly thickens.
- Post-set phase: after incubation ends, acidification slows in the fridge, and the gel stabilizes.
This timeline explains why “end point” matters. Stopping incubation at the right moment gives a smooth gel. Continuing too long pushes the system further, which can change texture.
Mind Map: Acidification and Coagulation
Example: Predicting Texture from Incubation Choices
Suppose you incubate at a steady temperature but change only time.
- Shorter time: the pH may not reach the aggregation range. You might see a custard-like surface but the body remains loose. Stirring breaks the structure easily.
- Correct time: the gel forms before you stop incubation. After chilling, the yogurt holds shape and releases whey slowly if at all.
- Longer time: acid keeps accumulating. The gel can tighten and expel more whey during chilling, leading to a slightly grainy texture or a more noticeable whey layer.
This is why many home yogurt makers focus on consistent incubation conditions rather than chasing a single “magic” recipe.
Example: Why Preheating Improves Set
If two batches use the same starter and incubation schedule but one batch is preheated more thoroughly, the preheated batch often sets thicker.
The reason is protein chemistry: preheating denatures whey proteins, which then associate with casein micelles during gel formation. That association increases the strength and water-holding capacity of the final network.
A Practical Endpoint You Can Feel
Even without measuring pH, you can use set behavior as feedback. When the yogurt looks uniformly thick and the surface is no longer fluid, you’re near gelation completion. Chilling then firms the gel and slows further acid production.
The mechanism behind that “feel” is straightforward: once micelles have aggregated into a stable network, the system resists stirring, and water becomes trapped rather than free-flowing.
2.4 Flavor Development from Fermentation Byproducts
Flavor in fermented foods is not a single “taste”; it’s a stack of compounds produced as microbes metabolize available nutrients. In yogurt, the main story starts with lactose turning into lactic acid, but the final flavor also depends on smaller byproducts that shape aroma, sweetness perception, and mouthfeel. The trick for home practice is to understand which byproducts are likely to form under your conditions, then steer those conditions toward the flavor you want.
Foundational Pathways That Create Flavor Compounds
Most yogurt flavor compounds come from three linked processes: acid production, protein breakdown, and minor carbohydrate metabolism. Lactic acid lowers pH, which changes how proteins behave and how aroma molecules are perceived. Protein breakdown is limited in yogurt compared with some other ferments, but even small changes matter: peptides and amino acids can become precursors for additional flavor molecules. Minor carbohydrate pathways can produce small amounts of acetaldehyde and other carbonyl compounds, which contribute to the characteristic “yogurt tang” and mild dairy notes.
A practical example: if you incubate too cool, acid forms slowly. You may still get a set, but the pH may not drop as far, leaving a flatter tang and a softer, sometimes looser texture. If you incubate too hot or too long, acid can overshoot, and the same pathways that create tang can also increase harshness and reduce the perception of creamy smoothness.
Byproducts and What They Taste Like
Below is a useful mapping from byproduct families to sensory effects. Not every batch will contain all of them in noticeable amounts, but the pattern helps you troubleshoot.
- Organic acids: Lactic acid dominates. It drives sourness and can also make flavors taste “cleaner” by lowering pH.
- Carbonyl compounds: Small amounts of acetaldehyde add a distinctive dairy aroma. Too little can feel bland; too much can read as sharp or “off” depending on context.
- Alcohols and esters: Usually present at low levels in yogurt. They can add subtle fruity or creamy notes, but excessive formation is more typical when conditions favor broader microbial activity.
- Amino acid derivatives: Limited in yogurt, but they can influence savory depth and lingering flavor.
- Exopolysaccharides: Not a “byproduct” in the same chemical sense, but they’re produced by some starter strains and strongly affect texture, which changes how flavor is perceived.
A concrete example: two yogurts can have the same sourness but different “creaminess.” The one that feels thicker and smoother often has more exopolysaccharides, which slows flavor release and makes the tang seem rounder.
How Conditions Shift Byproduct Profiles
Byproducts are not fixed; they respond to temperature, time, starter activity, milk composition, and oxygen exposure. Even when the same culture is used, these variables change the balance between acidification speed and secondary reactions.
- Temperature: Warmer incubation generally speeds acidification. Faster acid drop can increase tang intensity, but it can also shorten the window for gentle protein interactions that support a smooth finish.
- Time: Longer incubation continues acidification and can increase the perception of sharpness. If you stop at the right endpoint, you get tang without the “too far” feeling.
- Starter amount and health: A strong, active starter tends to produce a predictable acid curve. Weak starter activity can lead to delayed acidification, leaving more time for off-notes to develop.
- Milk heat treatment: Heating denatures whey proteins, improving water binding and supporting a thicker set. Better structure can make aroma feel more integrated.
Mind Map: Flavor Drivers from Fermentation Byproducts
Example: Diagnosing a Batch with “Too Sharp” Flavor
Suppose your yogurt tastes sour and slightly harsh, with a thin mouthfeel. Start with the most likely levers.
- Check incubation endpoint: If you incubated longer than needed, acid likely overshot. The sourness may be correct, but the balance shifts toward sharpness.
- Review temperature: If your incubator runs hot, acid forms quickly and can push the set into a more aggressive profile.
- Assess starter strength: If the starter was old or under-dosed, the culture may have struggled, then surged later, creating a less controlled acid curve.
- Consider milk structure: If the milk wasn’t heated enough or was diluted, the set may be weaker. A looser gel releases acids more abruptly, making tang feel harsher.
A small adjustment often fixes it: shorten incubation time by 15–30 minutes, or lower the incubation temperature slightly while keeping the same endpoint target.
Mind Map: From Byproducts to Practical Adjustments
Putting It Together with an Endpoint Mindset
The most reliable way to manage byproducts is to treat flavor as the result of an acidification curve and a set structure, not as a guess. When you aim for a consistent endpoint, you indirectly control the byproducts that ride along with that endpoint. That’s why “time and temperature” aren’t just process steps; they’re the knobs that decide which compounds show up in meaningful amounts and how they feel in the mouth.
2.5 Troubleshooting Yogurt Failures With Measurable Causes
Yogurt failures usually fall into a few measurable buckets: the culture didn’t acidify enough, the milk proteins didn’t set properly, or contamination introduced competing microbes. The fastest way to troubleshoot is to compare what you did against what you can measure: temperature, time, starter amount, and the final pH or texture.
Mind Map: Yogurt Failure Causes and Measurements
Step 1: Confirm What “Failure” Means
Before changing anything, classify the outcome. If the yogurt is liquid but smells normal, you likely have insufficient acidification or weak culture. If it smells sharp but tastes overly sour and looks grainy, you likely incubated too long or overheated the milk. If it smells rotten, putrid, or shows fuzzy growth, treat it as contamination and discard.
Step 2: Measure pH When Possible
If you have pH strips or a meter, use them. A typical set yogurt often lands around pH 4.5 to 4.2, depending on style and milk. If your yogurt never approaches that range, the culture didn’t do its job. If it drops far below your target and becomes very firm or grainy, you likely overshot the incubation.
If you don’t have pH tools, use a practical proxy: set time and texture. A yogurt that never thickens after your usual incubation window is a “no set” case, not a “maybe it will thicken later” case.
Step 3: Diagnose by Cause with Concrete Checks
Temperature Too Low
Incubation is the most common culprit. Yogurt cultures are heat-sensitive in the sense that they need the right warmth to work quickly. Example: you incubated in a room that felt “warm enough,” but the jar surface stayed cool. Result: the yogurt stays thin and may taste only mildly tangy.
Fix: insulate consistently and verify with a thermometer. If your target is around 42–45°C (108–113°F), aim to keep the bulk of the jar near that range for most of the incubation.
Starter Too Weak or Too Little
Starter strength varies with freshness and how it was handled. Example: you used a starter from the back of the fridge that had been opened and warmed repeatedly. Result: slow acidification and a soft, unstable set.
Fix: use a reliable starter and measure inoculation. If you normally use 2 tablespoons per quart (about 1 liter), don’t “eyeball less” when troubleshooting.
Milk Preparation Problems
Milk heating helps denature whey proteins so the gel forms smoothly. Example: you skipped the heating step and only warmed slightly. Result: the yogurt may taste fine but won’t set well.
Fix: follow your heating method consistently. Heat enough to denature proteins, then cool to the inoculation temperature before adding starter. Avoid adding starter to milk that is too hot, which can reduce culture activity.
Timing Mismatch
Even with correct temperature, stopping too early prevents full gel formation. Example: you checked at the usual time, but your kitchen was cooler than usual. Result: thin yogurt that doesn’t thicken after chilling.
Fix: use an end point. With pH, stop when you reach your target range. Without pH, stop when the yogurt has visibly thickened and tastes tangy rather than just “slightly fermented.”
Over-Incubation or Heat Damage
If yogurt becomes very sour, separates, or turns grainy, you may have incubated too long or overheated the milk. Example: you held milk at a high temperature for too long before cooling, then incubated longer than planned. Result: a curdled texture.
Fix: shorten incubation and tighten your heating step. Consistency matters more than chasing extremes.
Step 4: Use a Simple Decision Table
| Observation | Likely Cause | Measurable Check | First Adjustment |
|---|---|---|---|
| Thin, mild tang | Low acidification | pH stays high or no thickening by end time | Raise incubation stability |
| Firm but grainy | Over-incubation or heat damage | pH too low or whey separation | Shorten incubation and standardize heating |
| Sour but lumpy | Protein coagulation issues | Texture forms unevenly | Avoid stirring during set |
| Bad odor or visible growth | Contamination | Smell and appearance | Discard and sanitize tools |
Step 5: Prevent Repeat Failures with One Change at a Time
When you fix a batch, change only one variable: temperature, starter amount, heating step, or incubation time. Example: if you suspect temperature, don’t also change starter brand and heating method in the same attempt. That way, the next batch tells you which lever actually moved the outcome.
3. Yogurt Making Systems and Equipment
3.1 Choosing Milk Types and Preparing Milk for Consistent Results
Consistent yogurt starts with consistent milk. “Consistent” doesn’t mean identical brands; it means predictable fat, protein, and heat treatment so your starter can do its job without surprises. Think of milk as the substrate and the starter as the worker. If the substrate changes, the worker still works, but the outcome shifts.
Choosing Milk Types
Whole, Low-Fat, and Skim Milk
Whole milk usually produces a thicker, creamier yogurt because fat helps with mouthfeel and slows down how quickly the gel firms. Low-fat milk can still make excellent yogurt, but it often needs a little help to reach the same thickness. Skim milk tends to be thinner unless you adjust protein content or incubation targets.
Practical example: If you switch from whole milk to skim and keep the same incubation time, you may notice a yogurt that tastes tangier and feels looser. The starter acidifies similarly, but the gel structure has less fat support.
Pasteurized, Ultra-Pasteurized, and Shelf-Stable Milk
Pasteurized milk has been heated enough to reduce microbes while keeping proteins mostly cooperative. Ultra-pasteurized (often labeled UHT) is heated more aggressively, which can change how proteins behave during fermentation. Shelf-stable UHT milk can still work, but texture may be thinner or more “custardy” unless you manage incubation and protein.
Practical example: With UHT milk, start with a shorter incubation and check early. You’re aiming for a firm gel, not just a sour taste.
Goat, Sheep, and Plant-Adjacent Dairy
Goat and sheep milk can ferment well, but their protein and fat profiles differ from cow’s milk. Goat milk often makes a tangier yogurt with a distinct flavor. If you’re using it, expect a different baseline and adjust thickness goals rather than trying to force it to behave exactly like cow’s milk.
Practical example: If your goat milk yogurt is thinner than expected, strain it after incubation instead of extending incubation indefinitely.
Preparing Milk for Predictable Fermentation
Standardize Temperature Before Inoculation
Most yogurt failures are not “bad cultures”; they’re mismatched temperatures. Heat the milk to the recipe’s target range, then cool to the inoculation temperature so the starter isn’t shocked.
Rule of thumb: If you inoculate too hot, you can reduce starter activity. If you inoculate too cool, fermentation may stall or take longer, increasing the chance of off flavors.
Heat Treatment for Protein Behavior
Heating does two useful things: it helps denature whey proteins so the gel can set, and it reduces the chance of competing microbes. Many home methods heat to a simmer and then cool, but the key is consistency. Use the same heating approach each time.
Practical example: If one batch is heated until it just steams and another reaches a rolling simmer, you may see different thickness even with the same starter and time.
Cooling and Holding Time
After heating, cool promptly to the inoculation temperature. Long holding at mid-temperatures can encourage unwanted microbial activity and can also affect how the gel forms.
Practical example: If you heat, walk away for 20 minutes, then inoculate, you may get a yogurt that tastes fine but sets poorly.
Mixing and Avoiding Lumps
Stir the milk thoroughly after cooling so the inoculum disperses evenly. If you’re using powdered milk to boost protein, dissolve it completely before inoculation.
Practical example: Powder clumps can create thin pockets that ferment differently, leading to a yogurt that looks uneven when sliced.
Integrated Workflow Mind Map
Mind Map: Choosing Milk and Preparing It for Consistent Yogurt
Quick Decision Guide with Examples
If you want a thick, spoonable yogurt: start with whole milk or add protein (like powdered milk) and aim for a firm set. If you’re using skim or UHT milk: reduce the guesswork by checking for gel formation earlier and strain if needed.
Example: You make two batches on the same day. Batch A uses whole pasteurized milk and sets firmly at your usual incubation time. Batch B uses skim milk and sets later or never fully firms. Instead of extending incubation until it tastes very sour, strain Batch B after chilling to reach the thickness you want.
Common Consistency Traps
- Inoculating at the wrong temperature: starter activity changes quickly.
- Inconsistent heating: protein denaturation varies.
- Uneven mixing: clumps create uneven fermentation.
- Over-incubating to “fix” thin yogurt: sourness increases before structure fully catches up.
A good yogurt is less about chasing a single number and more about controlling the milk variables so the starter produces the same gel every time.
3.2 Starter Handling And Inoculation Methods
Starter cultures are living systems, so handling is mostly about keeping them healthy and predictable. In yogurt, the goal is steady acidification; in other ferments, the goal is selecting the right microbes early enough that they win. The good news: you can get consistent results with a few disciplined steps.
Core Idea: Keep Starters Active and Clean
A starter that is too cold, too old, or contaminated will either ferment slowly or produce off flavors. A starter that is handled cleanly and inoculated at the right moment will usually behave like the recipe expects.
What “Healthy Starter” Means
For yogurt starters, “healthy” typically means:
- They still acidify milk within the expected time window.
- They produce a clean, tangy smell rather than sour-but-weird or bitter notes.
- They form a firm set after incubation.
If you’ve ever had a batch that never thickened, the starter may have been weak, the milk may have been too hot or too cold, or the starter may have been introduced into milk that wasn’t at the target temperature.
Starter Handling Workflow
Use this sequence every time. It’s simple, but it prevents most failures.
- Plan your temperature first. Decide the incubation temperature you’ll use, then bring milk and starter into a compatible range.
- Check starter condition. Look for normal texture and smell. If it smells putrid or shows unusual growth, discard.
- Mix starter smoothly. Avoid clumps so fermentation begins evenly.
- Inoculate promptly. Once mixed, add to milk without long delays.
- Incubate undisturbed. Movement during early acidification can lead to uneven set.
Mind Map: Starter Handling and Inoculation
Inoculation Methods That Actually Matter
Direct Inoculation
Direct inoculation means you mix starter into milk at or near the target incubation temperature. This works well when your starter is not extremely cold.
Example: You’re making yogurt at 43°C. Your starter is refrigerated but not ice-cold. You whisk the starter into a small cup of warm milk, then pour it back into the main pot and stir gently. The key is even distribution before incubation.
Tempering Inoculation
Tempering is useful when your starter is very cold compared to the milk. The goal is to reduce temperature shock so the culture starts working immediately.
Example: Your starter has been in the fridge for a day and feels very firm and cold. You add a few tablespoons of warm milk to the starter, whisk until smooth, then combine with the rest of the milk. This keeps the culture from spending the first part of incubation “warming up” instead of acidifying.
Batch-to-Batch Transfer
Using a portion of finished yogurt as the next starter can be convenient, but it requires consistency. The culture’s performance can drift if you repeatedly transfer from batches that were over-incubated, under-incubated, or stored too long.
Example: You keep a “starter jar” of plain yogurt from a batch that set firmly and tasted pleasantly tangy. You use it within about a week, and you keep the inoculation ratio consistent. If your yogurt starts setting slowly, you switch to a fresh starter source rather than forcing it.
Practical Ratios and Mixing Rules
Exact ratios depend on the culture and recipe, but the logic is consistent:
- Too little starter can mean slow acidification and a weak set.
- Too much starter can shorten the time window and sometimes produce a sharper tang.
Mixing rule: Whisk starter until smooth before combining with milk. Clumps create pockets where fermentation starts later, which can lead to uneven texture.
Quality Checks During and After Incubation
You don’t need lab equipment to catch problems early.
- During incubation: You should notice a clear aroma shift as acid builds. If nothing changes after a reasonable time, the starter may be weak or the temperature may be off.
- After incubation: The set should be cohesive, not watery. If it’s grainy, you may have overheated the milk during preparation or stirred too aggressively after the set began.
Troubleshooting Starter Handling
- Slow set: Starter too cold, too old, or inoculated into milk that wasn’t at the target temperature.
- Thin yogurt: Starter ratio too low or incubation temperature too low.
- Off smell: Contamination or starter spoilage; discard rather than “fixing” it.
The most reliable approach is boring: consistent temperatures, clean tools, smooth mixing, and inoculation done promptly. Fermentation is chemistry with a memory, and your starter handling is the part that decides what that memory becomes.
3.3 Temperature Control Tools and Incubation Strategies
Temperature is the steering wheel for yogurt and the “pace setter” for many other ferments. The microbes you want are mostly happy within a narrow band; outside it, they either slow down or get outcompeted. The goal is not to chase a single perfect number forever, but to keep the fermentation environment stable enough that the recipe’s timing and culture ratios still make sense.
Core Temperature Concepts for Home Fermentation
Start with three practical ideas. First, fermentation speed rises as temperature rises, but flavor and texture can shift too. Second, stability matters more than brief spikes; a tool that overshoots and then swings back can be worse than a tool that stays slightly cooler. Third, “room temperature” is not a constant—kitchens can swing by 5–10°C across a day, which is enough to change outcomes.
For yogurt, a common target range is roughly 40–45°C for thermophilic cultures. For many lacto-fermented foods, the sweet spot is often closer to 18–24°C, but the exact band depends on the starter mix and salt level. Kombucha is different again, since it’s a mixed culture and the brew’s temperature changes both acid production and carbonation behavior.
Tools That Actually Help
A good temperature setup does two things: it measures reliably and it buffers against swings.
1) Thermometer and probe placement Use a digital thermometer with a probe you can keep in contact with the liquid or near the container wall. For thick mixtures, measure near the center rather than only at the edge. If you’re using a thermometer with a clip, test it once by comparing it to a second thermometer in the same spot.
2) Insulated incubators An insulated cooler, insulated bag, or even a small foam box can hold temperature with minimal energy. The trick is to add a heat source that doesn’t create hot spots.
3) Water bath method A water bath is one of the most stable approaches. Place jars in warm water inside a larger container. Water’s heat capacity smooths temperature changes, so the culture experiences a gentler curve.
4) Heating devices with control Heating pads, sous-vide circulators, or seedling mats can work if paired with a controller or if they’re stable enough. Without control, these devices can overshoot, especially when the container is empty or the room is cold.
5) Heat sources and buffers Hot water bottles, microwaved water in sealed bottles, or pre-warmed bricks can provide heat. Always wrap heat sources so they don’t touch the jar directly; direct contact can create a warm pocket that changes texture.
Incubation Strategies That Reduce Variability
Think in terms of “how you maintain temperature” rather than “how long you incubate.”
Strategy A: Water Bath Incubation for Yogurt
- Pre-warm the water bath to your target range.
- Place the filled jars in the bath.
- Stir the water gently once at the start, then leave it alone.
- Check temperature after 15 minutes, then periodically.
Example: If your target is 43°C, aim to start the bath at 44–45°C and expect a small drop as jars come up to temperature. Stop incubation when the yogurt reaches your desired set, not only when the clock says so.
Strategy B: Insulated Cooler with Heat Bottles
- Pre-warm the cooler with a small amount of warm water.
- Replace with jars and add wrapped heat bottles.
- Monitor temperature at jar level.
Example: In a cool room, you might need to refresh heat bottles once. If you see temperature drifting down steadily, replace the bottle before it falls below your culture’s comfort zone.
Strategy C: Controlled Heating with a Circulator
- Set the circulator to the target temperature.
- Use a container large enough that the water level stays stable.
- Keep jars submerged to the same depth.
Example: If you’re making multiple batches, consistent submersion depth reduces batch-to-batch differences in set and tang.
Mind Map: Temperature Control and Incubation
Quick Troubleshooting Logic
If fermentation is slow, first check temperature stability and probe placement. If it’s too fast or tastes harsh, reduce temperature slightly or shorten incubation. If batches vary, standardize the incubation setup: same container size, same jar fill level, same heat source placement, and the same monitoring schedule.
A simple rule of thumb: when you change one variable, keep the rest constant. Temperature control is easier when your system is repeatable, not when it’s “close enough” in a different way each time.
3.4 Incubation Time Management and End Point Recognition
Incubation time is not a single “set it and forget it” number. It’s a control knob that interacts with temperature, starter strength, milk or tea composition, and your desired texture or acidity. The goal is to stop fermentation at the point where the product tastes right and the microbial balance stays stable in the fridge.
Foundational Timing Concepts
Start by separating two ideas: fermentation progress and quality window. Fermentation progress is how fast acid and flavor compounds accumulate. The quality window is the range where the product is pleasant and consistent. If you stop too early, you get a mild, thin result; too late, you get sharper acidity, weaker texture, or off notes.
A practical way to manage time is to use targets rather than guesses. For yogurt, the target is usually a set level of thickening plus a clean tang. For kombucha, the target is typically a measured acidity level and a carbonation plan. Even if you don’t measure pH, you can still use end-point cues like viscosity, aroma, and surface behavior.
Temperature as the Master Multiplier
Temperature changes the speed of microbial metabolism. A small shift can move your end point by hours. Treat temperature control as the first priority, then time becomes predictable.
Example: If your incubation is at 42°C instead of 40°C, yogurt may reach the “set” stage sooner. If you keep the same incubation duration, you’ll overshoot and end up with a firmer curd that can taste more sharply acidic.
Yogurt End Point Recognition
Yogurt end point is when the milk has thickened enough that it holds shape when gently tilted. The key is to avoid stirring during incubation; agitation redistributes curd formation.
Use a two-step check:
- Visual check: the surface should look uniformly set, not watery at the edges.
- Gentle tilt check: tilt the container slightly. If the yogurt jiggles as a cohesive mass, it’s close.
Then apply the “stop rule”: once you hit the set stage, move to refrigeration promptly. Cooling slows further acidification and helps the texture stabilize.
Example: Suppose your usual incubation is 6 hours. If your room is warmer or your starter is very active, you might see the set stage at 5 hours. Stop at the set stage, not the clock.
Kombucha End Point Recognition
Kombucha end point is about balancing acidity with carbonation potential. The first fermentation builds acidity; the second fermentation builds carbonation.
For measurable control, use pH as your anchor. Many home brewers aim for a consistent pH before bottling, then adjust sweetness and flavor additions accordingly.
If you don’t measure pH, use sensory cues with discipline:
- Taste progression: sample with a clean spoon near the end of the expected window.
- Aroma: it should smell pleasantly sour and tea-like, not harsh or solvent-like.
- Sweetness: the drink should taste noticeably less sweet than at the start.
Example: If your first fermentation usually ends when it tastes “dry-tart,” but this batch tastes still sweet after the same time, your tea extraction or sugar availability may differ. Extend in small increments and sample rather than adding a large block of time.
Systematic Timing Workflow
Use a repeatable workflow so you’re not relying on memory.
- Choose a temperature target and hold it steady.
- Define an end-point method for your product: set-stage for yogurt, acidity target for kombucha.
- Plan a check window: start checking at the earliest plausible time, then check at sensible intervals.
- Record what you observe: time, temperature, and what “done” tasted or looked like.
- Stop and stabilize: refrigerate yogurt; bottle kombucha for the next stage.
This workflow turns incubation from a gamble into a controlled process.
Mind Map: Incubation Time and End Point
Common Failure Modes and Fixes
Overset yogurt: texture becomes too firm and tang becomes sharper. Fix by reducing incubation time based on your observed set stage, not the original schedule.
Underset yogurt: curd is loose or watery. Fix by extending incubation in 30–60 minute increments while keeping temperature steady.
Overfermented kombucha: too sour before bottling, leading to harsh taste or difficult carbonation balance. Fix by shortening first fermentation and sampling closer to the expected end.
Underfermented kombucha: still sweet and less sour than desired. Fix by extending first fermentation in small increments and confirming acidity before bottling.
The consistent theme is simple: time is a variable you adjust using end-point evidence, while temperature is the variable you control so those adjustments stay reliable.
3.5 Packaging, Refrigeration, and Storage Stability
Packaging and refrigeration are the last control knobs in yogurt and fermented-food making. Fermentation creates acids and flavors; storage decides how long those results stay pleasant and safe. The key idea is simple: after fermentation, you want to slow microbial activity, limit oxygen exposure where it matters, and prevent temperature swings that restart metabolism.
Packaging Principles That Match the Ferment
Start by separating two goals: protecting the product from contamination and managing gas or oxygen.
- Yogurt and cultured dairy: Keep it sealed to reduce contamination and odor pickup. Oxygen exposure can slightly change flavor over time, especially in flavored batches.
- Kombucha and carbonated ferments: Use containers designed for pressure. During storage, carbonation continues to equilibrate, and oxygen exposure can soften acidity and change aroma.
A practical rule: if the product is still producing gas, treat it like a pressure container. If it is mostly finished, treat it like a sealed chilled food.
Temperature Control That Actually Matters
Refrigeration slows fermentation, but it doesn’t stop it instantly. The difference between a stable cold chain and a warm fridge door is noticeable in texture and tang.
- Target a consistent refrigerator temperature and avoid frequent warm-up cycles. Even short periods at room temperature can shift acidity and flavor.
- Cool quickly after incubation for yogurt. If you let it sit warm while you “get around to chilling,” you keep the culture working and can end up with a firmer, more sour product than intended.
- For kombucha, chill after the final carbonation step. If you bottle and then leave it warm, pressure can rise beyond what the container tolerates.
Storage Stability for Yogurt
Yogurt stability is mostly about acid strength, protein structure, and moisture.
- Plain yogurt generally holds flavor and texture longer than fruit-flavored versions because fruit introduces sugars and enzymes that can shift taste.
- Strained yogurt often stays thicker, but it can also show more whey separation if the container is repeatedly opened and warmed.
Example: Make a plain batch, portion it into small sealed cups, and refrigerate promptly. When you compare it to a single large container that gets opened daily, the portioned cups usually keep a cleaner aroma and fewer texture changes.
Storage Stability for Kombucha
Kombucha changes during storage because microbes and yeast remain active at cold temperatures, just slower.
- Carbonation continues to settle. If you open a bottle and then reseal, you may lose gas and alter mouthfeel.
- Sediment is normal. It’s mostly yeast and microbial cells. What you want to avoid is a strong off odor or excessive cloudiness paired with unpleasant taste.
Example: Bottle two identical batches after second fermentation. Store one upright and one on its side. Over time, the side-stored bottle often shows more sediment movement when opened, but the flavor change is usually similar if temperature is consistent.
Oxygen, Light, and Odor Management
Even in the fridge, oxygen and light can nudge flavor.
- Use airtight lids for yogurt and for kombucha after opening. For kombucha, oxygen exposure after opening can reduce sharpness.
- Minimize headspace when practical. Less air means fewer oxidation-driven flavor shifts.
- Keep strong-smelling foods separate. Yogurt and fermented drinks can absorb odors through packaging and fridge air.
Labeling and Batch Tracking
Storage stability improves when you know what you made and when.
- Label containers with product type, fermentation endpoint, and bottling date.
- For yogurt, note whether it was plain or flavored and whether it was strained.
- For kombucha, note final carbonation target and whether it was bottled with added flavor.
If you need a date example for labeling, use 2026-02-20.
Mind Map: Packaging and Storage Controls
Quick Quality Checks That Prevent Waste
Before using a stored batch, do a short, structured check.
- Smell: Yogurt should smell pleasantly sour and dairy-like. Kombucha should smell tangy and tea-like.
- Taste: If it’s sour in a normal way, it’s usually fine. If it tastes harsh, bitter in an unusual way, or “wrong,” don’t force it.
- Texture: Mild whey separation in yogurt is often acceptable; sliminess or unexpected gas bubbles in yogurt are not.
Example: If a yogurt batch shows slight whey pooling, stir gently and taste. If the flavor is still clean and sour, it’s usable. If the smell is off, discard rather than trying to “fix” it.
Practical Storage Workflow
Use a repeatable sequence so you don’t rely on memory.
- Finish fermentation at the intended endpoint.
- Portion into appropriate containers.
- Seal tightly.
- Refrigerate promptly and keep temperature stable.
- Label with product details and date.
- Check quality once before serving, then store unopened.
This workflow reduces the two biggest causes of storage problems: slow cooling and inconsistent handling after the batch is already made.
4. Yogurt Variations and Functional Uses
4.1 Strained Yogurt and Thickening Techniques
Strained yogurt is simply yogurt with some whey removed. That whey is mostly water plus dissolved sugars and minerals, so removing it concentrates proteins and gives you a thicker spoonable texture. The key is doing it consistently: control the starting yogurt, control the straining time, and control how much whey you let go.
What Determines Thickness
Thickness comes from three linked factors. First, the yogurt’s protein network: warmer incubation and adequate starter activity help proteins coagulate into a firm gel. Second, the amount of whey you remove: longer straining drains more liquid, but it also changes tang and mouthfeel. Third, the strain method: gravity-only straining yields a different texture than pressing, because pressing can squeeze out more whey quickly and sometimes makes the final product slightly grainier.
A practical way to think about it: if your yogurt is already weak or thin, straining can only do so much. If your yogurt sets well, straining becomes a predictable dial.
Straining Methods That Behave Predictably
Use a fine mesh strainer or a yogurt strainer lined with cheesecloth or a reusable filter. Set it over a bowl so whey can collect without touching the yogurt. Keep the setup in the refrigerator to slow further fermentation while you drain.
Gravity straining is the default. It’s gentle and repeatable. Start with plain, fully set yogurt, then strain at least 2 hours for a soft, spreadable result.
Controlled pressing speeds things up. Wrap the curds, then apply light pressure for short bursts. If you press too hard, you can force out more liquid than intended and increase the chance of a slightly crumbly texture.
Warm straining can thicken faster, but it also increases the risk of uneven texture and continued fermentation. For most home batches, cold straining is the safer choice.
Step-by-Step Workflow with Integrated Checks
- Make yogurt to a firm set. Incubate until the yogurt is clearly gelled, not just “slightly thick.” If it wobbles like loose custard, straining will produce a thin final product.
- Cool briefly before straining. Let the yogurt chill so the gel firms up and whey releases more cleanly.
- Strain in the fridge. Line the strainer, pour in yogurt, and cover loosely. Refrigeration keeps flavor stable and reduces the chance of unwanted microbial growth.
- Stop at your target texture. Check at 2 hours, then again at 4 hours. For a thick, spoon-stand texture, many people stop around 6–8 hours.
- Reserve whey if you want it. Whey is useful for thinning sauces or for baking hydration, but it will keep only as long as your yogurt would. If you don’t plan to use it, discard.
Mind Map: Straining Logic and Texture Outcomes
Examples You Can Repeat
Example 1: Soft spread (about 2 hours). Strain plain yogurt for 2 hours in the fridge. You’ll get a texture that spreads easily and holds a gentle peak when spooned.
Example 2: Thick spoonable (about 4 hours). Strain for 4 hours. The spoon leaves a more defined trail, and the yogurt feels creamy rather than watery.
Example 3: Dense and sliceable (about 6–8 hours). Strain longer until the curds look compact. If it starts to look dry at the edges, stop and taste—thickness is useful, but dryness is a texture mismatch.
Example 4: Fixing a too-thin batch. If your starting yogurt is runny, strain anyway, but expect limited improvement. Next time, focus on getting a firmer set before straining rather than relying on longer draining to compensate.
Common Mistakes and What They Cause
If you strain warm yogurt, you may get uneven thickness and a looser curd structure. If you press hard, you can squeeze out liquid too quickly and end up with a slightly grainy texture. If you over-drain, the product can taste sharper and feel dry, especially when stirred with sweeteners.
The simplest rule: treat straining time as your dial, but treat yogurt set quality as the foundation. When both are right, thickening becomes repeatable rather than mysterious.
4.2 Greek Style Yogurt Using Filtration and Drainage
Greek style yogurt is regular yogurt that has been strained to remove some whey. The result is thicker, tangier, and more spoon-stable. The key science is simple: you’re not “making it Greek,” you’re shifting water content and concentrating proteins and solids.
Foundation: What Straining Changes
Milk proteins form a gel during incubation as acidity rises. When you strain, you physically separate that gel from whey. The gel stays; the watery fraction drains away. Because whey carries some lactose and minerals, straining also changes taste: less sweetness, more tang.
A practical way to think about it: if plain yogurt is a soft set, straining turns it into a thicker set by reducing free liquid. That’s why the same starter and incubation can yield different thickness depending on how long you drain.
Equipment and Setup
You need three things: a straining medium, a container, and a way to keep temperature safe.
- Straining medium: cheesecloth, a fine-mesh sieve lined with cloth, or a dedicated yogurt strainer.
- Container: a bowl to catch whey, plus a rack or the sieve itself so the yogurt doesn’t sit in liquid.
- Temperature control: keep everything cold after incubation. Straining is best done promptly so the yogurt stays within safe handling time.
Example: If you use cheesecloth, wet it first and wring it out. This reduces sticking and helps the first whey release smoothly.
Step-by-Step Filtration Method
- Make plain yogurt first. Incubate until it sets cleanly. If it’s under-set, straining can produce a grainy texture.
- Cool briefly. Let the yogurt cool to a warm-cool range so it drains steadily without melting. If it’s too hot, it can thin and separate unevenly.
- Line and drain. Pour yogurt into the lined strainer. Cover loosely and let it drain in the refrigerator.
- Decide your target thickness. Drain time is your dial. Start checking early.
- Stir only if needed. For a smooth Greek style texture, stir gently after draining. Over-stirring can loosen the gel.
A concrete example: For a “classic spoonable” texture, drain about 4–6 hours. For a thicker, spreadable style, drain 8–12 hours. If you drain overnight, expect a firmer set and more tang.
Mind Map: Filtration and Drainage Variables
Advanced Details Without the Confusion
1) Straining medium affects texture. Cheesecloth can trap more fine particles, sometimes giving a slightly smoother result. Fine mesh can drain faster and may leave a slightly different mouthfeel.
2) Drain time is not linear. Early hours remove most free whey. Later hours remove more bound water, which changes thickness but also increases tang. That’s why checking at intervals matters.
3) Avoid squeezing. Pressing the curd forces gel particles through the cloth and can create a grainy, uneven texture. Let gravity do the work.
4) Whey management. Whey is normal to collect; it’s not a failure. If you plan to use whey in cooking, keep it refrigerated and use promptly.
Troubleshooting with Clear Causes
- Watery Greek yogurt: The base yogurt may have been too soft, or the drain time was too short. Next batch, ensure the plain yogurt sets firmly before straining and extend draining in 1–2 hour increments.
- Grainy texture: This often comes from under-set yogurt or aggressive handling. Use a properly set base and avoid stirring during draining.
- Too sour: Either the base yogurt was over-incubated or it drained too long. Shorten incubation next time and reduce drain time.
Example: A Reliable “Spoonable” Batch
Make plain yogurt, then strain in the fridge for 5 hours. You’ll typically get a thick, spoonable texture that holds a peak. If it’s slightly looser than desired, drain 1 more hour rather than jumping to overnight. Small adjustments keep the process predictable.
Storage and Use
Store strained yogurt covered in the refrigerator. It will thicken slightly as it chills, and it may loosen a bit after stirring. Use within a reasonable window for best texture and flavor, and keep it cold from the moment straining starts.
4.3 Thermophilic Versus Mesophilic Approaches for Yogurt Style Ferments
Yogurt “style” ferments can be made with different starter cultures, and the temperature you choose is the easiest lever to pull. The two common approaches are thermophilic (warm-loving) and mesophilic (moderate-loving). The practical difference is not just comfort; it changes how fast acid forms, how the proteins set, and how forgiving the process is when your kitchen runs a little hot or cold.
Mind Map: Thermophilic Versus Mesophilic Yogurt Style Ferments
Foundational Differences That Matter in Practice
Thermophilic ferments are usually incubated around 40–45°C. At these temperatures, the starter bacteria multiply quickly and produce acid efficiently, which helps milk proteins coagulate into a firm gel. If you’ve ever watched a yogurt set happen in a predictable window, that’s often thermophilic behavior.
Mesophilic ferments run at cooler temperatures, commonly 20–30°C. Acid still forms, but the pace is slower. That means timing matters more, and small variations in room temperature can shift both texture and tang. Mesophilic yogurt style results can be deliciously mild, but they may be softer unless you manage incubation carefully.
Choosing a Temperature Like a Scientist, Not a Guess
Start with your goal: firm spoonable yogurt or a softer, tangier-than-milk but gentler set. If you want consistency, thermophilic incubation is usually easier because the temperature range is narrower and the fermentation tends to reach a gel point reliably.
A simple workflow works for both approaches:
- Heat milk to improve protein structure.
- Cool to the starter’s target temperature.
- Inoculate and mix gently.
- Incubate without moving the jars.
- Stop fermentation when the gel forms and the acidity is where you like it.
For thermophilic yogurt style, you can often incubate until the surface looks set and the yogurt jiggles as a single mass. For mesophilic yogurt style, you may need to use a pH check or a longer, more controlled incubation window, because the gel can be less dramatic.
Starter Activity and Milk Preparation
Starter cultures behave differently, so “same recipe, different culture” is not a safe assumption. Thermophilic cultures typically tolerate warm incubation well, and they often produce a clean, cohesive curd. Mesophilic cultures can be more sensitive to temperature drift, and their slower acid production can leave more room for subtle differences in milk composition to show up.
Milk preparation still matters. Heating milk changes how proteins interact, which affects thickness and mouthfeel. Cooling to the correct inoculation temperature is critical: too hot can reduce starter activity, and too cool can delay acidification.
End Point Targets and How to Stop at the Right Moment
Instead of relying only on the clock, use at least one measurable or observable signal.
- pH approach: Aim for a pH that matches your taste and texture preference. Lower pH generally means more tang and firmer coagulation, but overdoing it can lead to a sharper flavor and sometimes a grainier texture.
- Gel approach: Thermophilic ferments often reach a clear set sooner. Mesophilic ferments may set more slowly and can remain softer even when pleasantly acidic.
A practical example: if your thermophilic yogurt is consistently thin, try incubating a bit longer or confirming your incubation temperature is truly in range. If your mesophilic yogurt is too thin, check that the room temperature is stable and consider extending incubation while monitoring gel formation.
Troubleshooting with Cause-and-Effect
If the yogurt is too thin, the most common causes are insufficient acidification (temperature too low, incubation too short, or starter activity reduced). If it’s overly sharp or grainy, you likely incubated past the point where the proteins were at their best.
If flavor is weak, it usually means the fermentation didn’t reach the acidity level you expect. For thermophilic batches, this can happen when milk was too hot at inoculation or when the starter dose was too low. For mesophilic batches, it can happen when the room temperature was lower than you thought.
Example: Two Jars, One Method, Different Temperatures
Make two identical jars using the same milk and the same starter type you plan to compare.
- Jar A thermophilic: incubate around 42°C.
- Jar B mesophilic: incubate in a stable 24–26°C environment.
Check both at the same relative time point, then again when Jar A has clearly set. You’ll likely notice Jar A reaches a firmer gel earlier, while Jar B may still be soft but increasingly tangy. Stop each jar based on its own end point signal, not the other jar’s schedule.
Quick Decision Guide
Choose thermophilic when you want predictable set and straightforward temperature control. Choose mesophilic when you prefer a gentler, slower fermentation and you’re willing to monitor end points more closely. Either way, the best results come from matching starter type, incubation temperature, and stopping criteria to the behavior of that specific culture.
4.4 Flavoring With Fruit, Spices, and Sweeteners Without Compromising Safety
Flavoring yogurt should not change the rules of fermentation and storage. The goal is simple: add ingredients in a way that preserves acidity, avoids introducing risky microbes, and keeps texture stable.
Foundational Safety Logic for Flavoring
Yogurt is already acidic, which discourages many unwanted organisms. That protection depends on two things: you must keep the yogurt within safe temperature ranges during handling, and you must avoid adding ingredients that dilute acidity too much or bring in contaminants.
A practical way to think about it is “when and how” you add flavor:
- After fermentation, before storage is usually safest because the yogurt is already acidified.
- During fermentation can work for some spices and dry powders, but fruit additions often add water and sugars that can shift texture and encourage surface changes if temperatures are mishandled.
Fruit Flavoring That Stays Predictable
Fruit can be added in three main forms, each with a different safety and texture profile.
Whole or Chopped Fruit
Use small amounts and keep pieces cold. Wash well, pat dry, and avoid letting fruit sit at room temperature while you prepare the batch.
Example: Stir 2–3 tablespoons of thawed frozen berries into a cup of plain yogurt, then refrigerate immediately. The yogurt’s acidity will do the heavy lifting, while the cold fruit limits microbial growth during mixing.
Fruit Purees and Compotes
Purees are easier to distribute evenly, but they can thin yogurt. Choose a thicker compote or reduce puree slightly.
Example: Simmer berries with a splash of water until thick, cool to refrigerator temperature, then mix in 1–2 tablespoons per serving. Cooling matters because warm fruit can raise the yogurt temperature and slow the “stay safe” effect of acidity.
Dried Fruit and Concentrates
Dried fruit is low in free water, which helps texture. Concentrates like fruit syrups can be sticky and sweet, so use small amounts.
Example: Add chopped dried apricots to strained yogurt after chilling. If you want a smoother result, soak dried fruit in cold water briefly, drain, then mix.
Spice Flavoring Without Texture Surprises
Spices are usually low-risk when used correctly, but they can clump and they can change perceived acidity.
Whole Spices
Whole spices release flavor slowly. Toasting briefly in a dry pan can improve aroma, but cool completely before mixing.
Example: Toast cumin seeds for 30–60 seconds, cool, then grind and stir a pinch into yogurt. If you taste and it’s flat, add more gradually rather than dumping in a lot at once.
Ground Spices and Powders
Ground spices disperse faster. Start with small amounts because yogurt’s tang can make spices taste sharper.
Example: Add cinnamon to sweet yogurt in increments of 1/8 teaspoon per cup, then taste after 10 minutes of refrigeration. The flavor often rounds out as the yogurt chills.
Herbal Add-Ins
Fresh herbs are best treated like produce: rinse, dry, and add after fermentation.
Example: Mix finely chopped mint into yogurt right before serving. If you mix hours ahead, the mint can darken and release bitterness.
Sweeteners That Don’t Undermine Safety
Sweeteners don’t “cancel” yogurt safety, but they can affect how quickly the yogurt warms and how the flavor develops. Use sweeteners with a plan.
Granulated Sugar
Sugar dissolves slowly in cold yogurt. Dissolve it in a small amount of warm water, cool, then mix.
Example: Dissolve 1 teaspoon sugar in 1 tablespoon warm water, cool to fridge temperature, then stir into 1 cup yogurt.
Honey and Syrups
Honey and syrups are flavorful but can be sticky and uneven. Add after chilling and mix thoroughly.
Example: Stir 1 tablespoon honey into a cup of yogurt, then let it sit in the fridge for 15 minutes before tasting.
Fruit-Based Sweetening
If you’re already using fruit compote, you may not need extra sweetener. Taste the compote first, then adjust.
Example: If your berry compote is already sweet, skip added sugar and focus on spice balance like a pinch of salt or cinnamon.
Salt and Acidity Balance
A small amount of salt can make fruit and spices taste more “complete” without making the yogurt salty.
Example: Add 1/16 to 1/8 teaspoon salt per cup when flavoring with fruit. Taste after chilling; salt can seem stronger when warm.
Mind Map: Flavoring Workflow and Safety Checks
Integrated Example: Three Flavor Profiles from One Base
Start with the same plain, fully set yogurt. Chill it, then portion into three cups.
- Berry-Cinnamon: Mix 2 tablespoons cooled berry compote plus 1/8 teaspoon cinnamon and a tiny pinch of salt.
- Vanilla-Almond: Stir 1 teaspoon vanilla extract and 1 tablespoon finely ground toasted almond into cold yogurt.
- Cumin-Lime (Savory): Add a pinch of ground cumin, 1–2 teaspoons lime juice, and salt to taste.
Taste each after 10–15 minutes of refrigeration. If a flavor seems too sharp, wait a bit longer rather than adding more ingredients immediately; chilling changes how acidity and aroma read.
4.5 Using Yogurt in Cooking and Baking with Texture Control
Yogurt changes texture because it brings three things to the kitchen: acidity, water, and milk proteins. The trick is to decide which of those you want to dominate. In a batter, you usually want acidity to help tenderness and flavor. In a sauce, you want proteins to thicken without turning grainy. In baked goods, you want moisture and a stable structure, not curdled bits.
Texture Basics You Can Predict
Acidity and protein behavior. Yogurt’s lactic acid nudges milk proteins toward coagulation. At gentle heat, that can thicken sauces and batters smoothly. At high heat or rapid temperature changes, proteins can clump into visible curds.
Water content and dilution. Yogurt contains free water plus water held within proteins. If you substitute yogurt for a dry ingredient, you’re also adding water. That affects crumb, browning, and how quickly a cake sets.
Fat level and viscosity. Whole-milk yogurt is thicker and more forgiving. Low-fat yogurt tends to be thinner and can separate more easily in hot mixtures.
Practical Rules That Prevent Graininess
- Warm yogurt before high heat. If a recipe heats dairy directly, temper yogurt by mixing it with a small amount of warm base first. For example, stir 2–3 tablespoons of warm soup broth into yogurt, then whisk that mixture back into the pot.
- Use moderate heat for yogurt sauces. Keep the sauce at a simmer at most. If you see bubbles, reduce heat and stir.
- Add yogurt after the main cooking step when possible. Stir it in at the end for dressings, creamy soups, and pan sauces.
- Choose the right yogurt style. Strained yogurt behaves like a thicker dairy ingredient. It’s ideal for dips, fillings, and dense cakes. Regular yogurt works better when you want a lighter crumb.
Baking Applications with Controlled Outcomes
1. Cakes and quick breads. Yogurt can replace part of the liquid and part of the fat, depending on the recipe. Start with a conservative substitution: replace about half the liquid with yogurt, then adjust if the batter looks too thick. If the batter is already wet, use yogurt as the liquid replacement rather than adding extra.
Example: For a lemon loaf that calls for 1 cup milk, use 1/2 cup yogurt plus 1/2 cup milk. Mix yogurt into the wet ingredients, then fold in dry ingredients. Bake as directed. The loaf should be tender and moist without a sour edge because the recipe’s sugar and lemon balance the acidity.
2. Muffins and pancakes. Yogurt improves tenderness by softening gluten development and adding moisture. Because these batters are usually cooked at moderate temperatures, yogurt rarely curdles if you don’t overheat the pan.
Example: Replace 1/2 cup buttermilk with 1/2 cup plain yogurt in pancake batter. Let the batter rest 5–10 minutes. You’ll often get a slightly thicker batter and a more tender bite.
3. Cheesecake and custard-style fillings. These are where texture control matters most. Use strained yogurt for a thicker set, and bake gently. Overbaking drives proteins to tighten and can cause graininess.
Example: Swap 1:1 with strained yogurt in a cheesecake filling. Bake at a lower temperature and stop when the center jiggles slightly. Cool gradually to reduce cracking and separation.
Cooking Applications with Controlled Outcomes
1. Creamy sauces and soups. Yogurt works best when it’s whisked into a warm base off the boil. If the sauce needs thickening, let it reduce first, then add yogurt.
Example: For a creamy tomato soup, simmer tomatoes and aromatics until reduced. Turn off heat, whisk in yogurt, then return to very low heat just to warm through.
2. Marinades and braises. Yogurt can tenderize and add flavor, but it can also burn if exposed to direct high heat for long periods. Use it for shorter cooking or cover the food.
Example: Coat chicken in yogurt, garlic, and spices. Refrigerate, then bake covered until cooked through. Uncover near the end to brown.
3. Dressings and cold sauces. Cold applications avoid curdling entirely. The main texture variable becomes thickness.
Example: Mix yogurt with olive oil, lemon juice, salt, and grated cucumber. If it’s too thin, add a spoon of strained yogurt or let it sit 10 minutes so water redistributes.
Mind Map: Texture Control with Yogurt
Quick Troubleshooting That Actually Helps
- Grainy sauce: Turn off heat, whisk vigorously, and strain if needed. Next time, temper yogurt and keep heat lower.
- Curdled soup or stew: You likely added yogurt while boiling. Next time, add off-heat and warm gently.
- Runny baked goods: You may have added too much yogurt water. Reduce substitution or increase dry ingredients slightly.
- Too thick or heavy: Use regular yogurt instead of strained, or reduce the amount and add a bit more liquid.
A Simple Texture Checklist Before You Start
Decide your target texture first: smooth sauce, tender crumb, or thick set. Then pick yogurt type, plan the heat level, and choose when to add it. If you do those three steps, yogurt becomes a predictable ingredient rather than a surprise science experiment.
5. Kombucha Science and Brewing Parameters
5.1 SCOBY Biology and How It Drives Fermentation
A SCOBY is not a single organism. It’s a living community that turns sweet tea into a sour, lightly carbonated drink. In kombucha, the community mainly includes acetic acid bacteria (AAB), lactic acid bacteria (LAB), and yeasts. Their jobs overlap, but the division of labor is what makes the process reliable when conditions are right.
What a SCOBY Actually Is
The “blob” you see is mostly a cellulose matrix produced by AAB. Yeasts and LAB live within and around that matrix, where nutrients and oxygen gradients form naturally. The matrix matters because it creates a stable home base: microbes can stay put while acids and gases move through the culture.
A practical way to think about it: the SCOBY is the kitchen counter, not the recipe. The recipe is your tea, sugar, temperature, and oxygen exposure.
The Core Microbial Roles
Yeasts
Yeasts ferment sugars into ethanol and other small compounds. They prefer conditions that allow sugar uptake and moderate oxygen availability. If you taste a fresh brew and it’s only mildly sour, that often means the yeasts have been working but the acid producers haven’t caught up yet.
Acetic Acid Bacteria
AAB convert ethanol into acetic acid and other acids. They also build cellulose when oxygen is available. That’s why kombucha often develops a thicker SCOBY layer during the first fermentation, when the brew is exposed to air.
Lactic Acid Bacteria
LAB convert sugars and fermentation intermediates into lactic acid and contribute to overall acidity and flavor complexity. They tend to do well as the environment becomes more acidic, which is why their influence grows as fermentation progresses.
How Fermentation Progresses over Time
Early on, yeasts ramp up sugar consumption. Ethanol rises, and the brew starts to taste less sweet. As ethanol accumulates, AAB gain a clear substrate to convert into acids. Acidity increases, and the pH drop changes which microbes can thrive.
This is the key feedback loop: acids lower pH, which restricts some microbes and favors others. The SCOBY community shifts toward acid tolerance, so the brew becomes more sour and less sweet even if sugar is still present.
Oxygen, Carbon Dioxide, and Why Containers Matter
Oxygen is not optional for AAB. During first fermentation, oxygen exposure supports acid production and cellulose formation. During second fermentation, oxygen is reduced because you’re bottling; that encourages carbonation while limiting further cellulose growth.
Carbon dioxide comes from yeast metabolism and subsequent reactions. It dissolves into the liquid and later forms bubbles in the bottle. If you bottle too early, you can end up with underdeveloped flavor and weak carbonation.
Mind Map: SCOBY Biology and Fermentation Drivers
Example: Reading What the SCOBY Is Telling You
If your brew smells mostly like sweet tea with a faint tang after a few days, yeasts may be active but acid production may be lagging. Common causes include cooler temperatures, low sugar, or insufficient oxygen exposure due to an overly tight cover.
If the brew becomes sharply sour quickly but tastes thin and lacks complexity, yeast activity may have slowed early. That can happen when the starter is very acidic at the start or when temperature is too low.
Example: A Simple Cause-and-Effect Checklist
- Too little sourness: check temperature and oxygen access during first fermentation.
- Too much sweetness: confirm sugar was added and that fermentation time was sufficient.
- Slow activity: verify the starter liquid was included, not just a SCOBY disc.
- Excessive surface growth: oxygen exposure is high; it’s usually not a problem unless you see unusual colors or off odors.
Case Study: One Batch, Two Outcomes
On a warm day, a brewer starts a batch on 2026-02-20 using the same tea recipe and starter volume. The SCOBY forms a new layer faster and the brew reaches a balanced sourness sooner. On a cooler day, the same setup produces a thinner SCOBY and a longer timeline to reach comparable acidity. The difference isn’t the “strength” of the SCOBY; it’s the metabolic rate of the community under the same nutrient and oxygen conditions.
5.2 Tea Selection, Sugar Sources, and Extraction Effects
Tea selection sets the starting conditions for kombucha: it determines what nutrients are available, how much bitterness and tannins you’ll get, and how quickly the brew acidifies. Sugar sources determine what the microbes can actually eat during the first fermentation, while extraction effects determine how much of the tea’s soluble compounds make it into the liquid.
Tea Selection: What Changes When You Switch Teas
Start with the tea’s processing style. Black tea is typically the most forgiving for beginners because it provides a steady stream of soluble compounds and a robust flavor base. Green tea tends to taste cleaner and can ferment well, but it often shows more sensitivity to under-extraction or temperature swings. Oolong sits between the two, and white tea is usually delicate enough that small changes in steeping can noticeably shift flavor.
Leaf form matters too. Whole leaves often extract more slowly and can produce a smoother cup, while broken leaf or bagged tea extracts faster and can taste harsher if steeped too long. If you’re aiming for consistency, choose one tea type and one brand format, then control steeping time and temperature.
Sugar Sources: Feeding the Culture Without Guesswork
Sugar is the main energy input for kombucha microbes. The simplest approach is white cane sugar, because it dissolves predictably and doesn’t introduce extra flavors that complicate troubleshooting. Brown sugar, raw sugar, and molasses add minerals and flavor compounds, but they also change the taste profile and can make batches harder to compare.
If you use honey or maple syrup, remember that they contain sugars plus additional compounds. That can be pleasant, but it also means the microbes may behave differently batch to batch. For controlled results, treat these as “flavor additions” rather than the primary sugar source.
A practical rule: use enough sugar to support fermentation, but don’t rely on tea sweetness. Tea contributes little fermentable sugar compared to added sugar.
Extraction Effects: Steeping Controls the Brew’s Chemistry
Extraction is about how much tea material transfers into the water. Steeping too short can leave you with a thin, underdeveloped flavor and fewer soluble compounds. Steeping too long can increase tannins and bitterness, which can make the finished kombucha taste dry even when fermentation is going well.
Temperature influences extraction speed. Hotter water extracts faster, but it can also pull more harshness from some teas. Cooler steeping often yields a gentler cup, but it may under-extract if time is too short.
To keep extraction effects consistent, control three variables: water temperature, steeping time, and tea-to-water ratio. If you change any one, expect the flavor and perceived acidity to shift.
Mind Map: Tea, Sugar, and Extraction Interactions
Example: Controlled Switch from Black to Green Tea
You brewed a batch with black tea using the same sugar amount and the same steeping time. Now you switch to green tea but keep everything else identical. If the result tastes flatter or less complex, the green tea likely under-extracted. Increase steeping time slightly while keeping temperature consistent, then taste again after the same fermentation duration.
If the green tea tastes too sharp or dry, you may have over-extracted tannins. Reduce steeping time or lower steeping temperature while keeping sugar constant. The key is to change only one variable at a time so you can attribute the shift.
Example: Sugar Source Change and What It Does to Flavor
Make two batches with identical tea and steeping. Batch A uses white cane sugar; Batch B uses brown sugar at the same total weight. Batch B will often taste rounder or more caramel-like, but it may also ferment slightly differently because the added compounds can affect microbial metabolism and flavor perception. If you’re troubleshooting fermentation speed, keep sugar type constant first, then experiment with alternatives.
Example: Extraction Timing for Consistent Bitterness
Suppose you steep tea for 10 minutes and your kombucha tastes consistently bitter. Try 7 minutes next time while keeping tea ratio and temperature the same. If bitterness drops without changing fermentation progress, you’ve confirmed that extraction was pulling too many tannins. If bitterness remains, the cause may be fermentation stage or tea type rather than steeping.
Practical Takeaway for This Section
Choose a tea type you can reproduce, use a predictable primary sugar source, and control extraction by standardizing steeping time, temperature, and ratio. When those three are stable, differences in flavor and acidity are easier to interpret and troubleshoot.
5.3 Oxygen, Acidity, and Carbon Dioxide Formation
In kombucha, three forces shape what you taste and what you see: oxygen availability, acidity (measured as pH), and carbon dioxide (CO₂). They interact through the SCOBY community, which includes yeast and acetic-acid bacteria. Your job is not to control every microbe directly; it’s to manage the environment so the right processes dominate.
Oxygen: Where Fermentation Gets Its “Direction”
Oxygen mainly affects the acetic-acid bacteria, which prefer oxygen to convert ethanol into acetic acid. In practical terms, oxygen exposure is higher at the surface and lower in the middle and bottom of the jar. That’s why a SCOBY often forms a thicker layer at the top.
A simple way to think about oxygen is as a switch between two pathways:
- With more oxygen, ethanol tends to be oxidized toward acetic acid.
- With less oxygen, yeast fermentation can proceed to produce more ethanol and CO₂.
You can see the oxygen effect in the jar’s behavior. If you cover the jar with a breathable cloth, you still allow oxygen exchange, but you limit dust and insects. If you seal too tightly, oxygen drops and the system shifts toward yeast-heavy fermentation, which can increase sweetness and reduce the sharpness you expect.
Acidity: The pH Drop and Why It Matters
Acidity rises as fermentation produces organic acids. Yeast and bacteria contribute different acids, but the overall trend is a falling pH over time. Lower pH does two important things:
- It suppresses many unwanted microbes.
- It changes the balance of flavors, making the drink taste more tart and less “tea-forward.”
In a typical first fermentation, you’re aiming for a controlled pH decline rather than a race to the lowest number. If you stop too early, the drink can taste flat or overly sweet. If you go too long, it can become harsh and overly vinegary.
A practical target approach is to measure pH near the end of your usual window. For many home setups, the “ready” zone often falls around the mid-to-high 2s to low 3s, but the exact number depends on your tea strength, sugar level, and how much oxygen exchange you allow.
Carbon Dioxide: Yeast Work and Gas Management
CO₂ comes primarily from yeast converting sugars into ethanol and CO₂. In first fermentation, CO₂ mostly escapes because the setup is not fully sealed. That’s why first-fermented kombucha is usually lightly fizzy at most.
During second fermentation, you bottle and trap CO₂. Yeast then consumes added sugars (from fruit juice, puree, or a measured amount of sugar) and produces more gas. The result is carbonation.
CO₂ formation is constrained by two factors:
- Sugar availability: more fermentable sugar generally means more CO₂.
- Acidity: as pH drops, yeast activity can slow, so CO₂ production may taper.
This is why two bottles made from the same batch can carbonate differently if one bottle gets more sugar or if the bottles are stored at different temperatures.
Integrated Process Flow
The system is easiest to understand as a loop: yeast produces ethanol and CO₂; oxygen enables bacteria to convert ethanol into acids; rising acidity changes the pace of yeast and bacteria.
    flowchart TD
  A[Tea + Sugar + Starter] --> B[Yeast Fermentation]
  B --> C[CO2 + Ethanol]
  C --> D[Acetic Acid Bacteria]
  D --> E[Acetic Acid + Lower pH]
  E --> F[Microbial Balance Shifts]
  F --> B
Mind Map: Oxygen, Acidity, Carbon Dioxide
Example: Same Batch, Different Oxygen Exposure
Imagine two identical first-fermentation jars using the same tea and starter. Jar A is covered with a breathable cloth. Jar B is covered with an airtight lid but opened briefly once per day.
- Jar A: oxygen exchange supports acetic-acid bacteria, so pH drops steadily and the flavor becomes tart without needing extreme time.
- Jar B: oxygen is limited, so ethanol accumulates longer and acid formation can lag. When you open Jar B, you add oxygen intermittently, which can create uneven acid development.
Both jars may reach a similar pH eventually, but the flavor trajectory and the balance of acids can differ.
Example: Bottling for Controlled Carbonation
Suppose you bottle the same first-fermented kombucha into 12 bottles. You add fruit puree to 6 bottles and only a small measured sugar amount to the other 6.
- Fruit puree bottles: more fermentable material can mean faster CO₂ production and earlier carbonation.
- Measured sugar bottles: carbonation tends to be more predictable because the sugar input is consistent.
If you notice one set carbonating much faster, check two variables first: how much sugar was actually added and whether the bottles sat at different temperatures.
Practical Takeaway for End Point Decisions
Use oxygen management to keep the process stable, use pH to decide when acidity is at the level you want, and use bottling conditions to decide how much CO₂ you trap. When these three are aligned, kombucha tastes intentional rather than accidental.
5.4 Brew Strength, Batch Size, and Consistency Planning
Brew strength is the relationship between what you put in (tea, sugar, and water) and what you get out (acidity, flavor, and carbonation). Batch size is the practical constraint: it determines how much time, space, and attention you can give each step. Consistency planning ties both together so your kombucha tastes like the same drink from batch to batch, not like a surprise science experiment.
Brew Strength as a Control System
Start with a simple rule: keep the tea-to-water ratio and sugar-to-water ratio stable, then let fermentation do its job. If you change either ratio, you change the starting conditions for the microbes.
- Tea strength affects flavor compounds and tannins. Stronger tea often produces a more assertive taste and can shift how quickly the brew reaches a sour balance.
- Sugar strength affects how much food the microbes have early on. More sugar can increase fermentation intensity, but it also means you may need more time to reach the same final acidity.
- Water volume affects dilution. If you top up with extra water mid-batch, you lower effective concentrations and slow the trajectory toward your target.
A practical example: if your usual batch uses 1 liter of water with 6 g of tea and 60 g of sugar, then doubling to 2 liters should use 12 g tea and 120 g sugar. If you instead double only the water, the brew will be weaker and likely finish less sour.
Batch Size Planning Without Losing Your Mind
Choose a batch size that matches your bottling rhythm. Second fermentation requires attention to carbonation, so your batch size should fit your schedule.
Consider three constraints:
- Fermentation vessel capacity: leave headspace so the brew can circulate and foam without overflowing.
- Storage space: you need room for bottles during carbonation and then in the fridge.
- Time consistency: if you can only check and bottle every 2–3 days, plan batch size so you are not forced to extend steps unpredictably.
A useful planning approach is to define a “weekly output” target. For example, if you want 6 bottles per week and each bottle is 330 ml, your weekly volume is about 2 liters. Then you can brew a batch that yields that volume after accounting for losses and headspace.
Consistency Targets and What to Measure
Consistency comes from choosing measurable targets and adjusting only one variable at a time.
Common home targets include:
- Starting conditions: tea ratio, sugar ratio, and starter volume.
- Temperature: stable warmth reduces batch-to-batch drift.
- End point: acidity and taste balance. Even without a pH meter, you can use a repeatable tasting method, but a pH reading makes adjustments faster.
Example workflow: you brew with the same tea and sugar ratios for three batches. If batch A tastes sharper than batch B at bottling, check whether temperature differed or whether the batch sat longer before bottling. Then adjust one factor—usually time or temperature—rather than changing tea and sugar simultaneously.
Mind Map: Brew Strength, Batch Size, Consistency
Example: Scaling a Recipe with Guardrails
Suppose your standard first fermentation uses:
- 1.5 L water
- 9 g tea
- 90 g sugar
- 150 ml starter
If you scale to 3.0 L, double everything except the starter proportion if your starter is already strong and you want the same fermentation speed. Most of the time, you can keep starter volume proportional to water.
- 3.0 L water
- 18 g tea
- 180 g sugar
- 300 ml starter
Guardrail: keep the same starter percentage and fermentation temperature. If you change those, you may need a different time to reach the same acidity.
Example: Diagnosing Inconsistency Quickly
If one batch tastes too sweet at bottling, the usual causes are insufficient fermentation time, cooler temperature, or lower effective sugar availability.
A systematic fix:
- Confirm you used the same tea and sugar ratios.
- Check whether the batch was fermented at a different temperature.
- If ratios and temperature match, extend first fermentation by a small increment next time.
If one batch tastes too sour, reverse the logic: shorten fermentation time or reduce temperature slightly, while keeping ratios unchanged.
A Simple Planning Template
Use this checklist before brewing so you don’t rely on memory:
- Tea ratio: ___ g per liter
- Sugar ratio: ___ g per liter
- Starter volume: ___ ml per batch
- Water volume: ___ L
- Target temperature: ___ °C
- Bottling day and time: ___
When you fill it out consistently, your brew strength and batch size stop being guesses and start being inputs. That’s the whole trick: controlled starting conditions, measured end points, and one-variable adjustments.
5.5 End Point Targets and How to Measure Them at Home
End point targets are what you aim for when you stop fermentation on purpose. With kombucha, “done” usually means the first fermentation has reached the right balance of acidity, sweetness, and carbonation potential—before you bottle for the second fermentation. The key is to measure the variables that actually change during brewing, not just rely on taste and guesswork.
Define What “End Point” Means for First Fermentation
For first fermentation, you’re mainly steering three things:
- Acidity: produced by organic acids, which also suppress many unwanted microbes.
- Residual sugar: the remaining sweetness that will feed carbonation later.
- Aroma and flavor: the sensory result of acid and yeast activity.
A practical target is to reach a noticeably tart profile while still tasting a hint of sweetness. If it tastes like straight vinegar, you likely overshot; if it tastes only lightly tangy, you likely undershot.
Choose Your Measurement Tools
You can measure end point with increasing precision:
- pH meter: best for consistency. Use it to decide when to stop.
- Hydrometer or refractometer: best for tracking sugar reduction, especially if you want repeatable sweetness.
- Thermometer: helps interpret results because fermentation speed depends on temperature.
- Taste and smell: still useful, but treat them as confirmation rather than the only metric.
If you only have one tool, use a pH meter. If you have both pH and a sugar reading, you can troubleshoot much faster.
Set Reasonable pH Targets by Batch Style
Targets vary with tea strength, starting sugar, temperature, and SCOBY activity. Instead of one universal number, use a range and pair it with sensory checks.
- Typical first fermentation target: pH 2.8 to 3.2.
- Shorter, sweeter style: aim closer to 3.2.
- Tarter style: aim closer to 2.8 to 3.0.
Example: If your batch is at pH 3.3 and tastes only lightly tangy, give it more time. If it’s at pH 2.7 and smells sharp and harsh, stop immediately and refrigerate or proceed to bottling.
Measure pH Correctly at Home
pH readings can lie if you measure at the wrong time or with dirty equipment.
- Measure after mixing: gently swirl the jar so acids distribute evenly.
- Use room-temperature samples: temperature affects pH readings.
- Calibrate the meter: follow your meter’s calibration instructions before brewing.
- Record the starting pH: it helps interpret how fast your batch is acidifying.
A simple workflow: take a sample at the usual day 3 mark, measure pH, taste, then decide whether to continue in 6–12 hour increments.
Use Sugar Proxies When You Don’t Have Sugar Instruments
If you lack a hydrometer or refractometer, you can still estimate residual sweetness using controlled variables.
- Keep starting sugar consistent: same grams per liter each batch.
- Use the same tea and steeping method: tea extraction affects perceived sweetness.
- Taste at the same stage: compare to your own prior batches.
Example: If your last batch at pH 3.1 tasted “pleasantly tart,” and this batch at pH 3.1 tastes harsher, the difference may be temperature or tea strength rather than fermentation time.
Confirm End Point with Sensory Checks
Use a short, repeatable tasting rubric:
- Acid bite: should be noticeable but not burning.
- Aroma: should smell like tea plus tang, not solvent-like.
- Sweetness: should be present enough to support carbonation later.
- Mouthfeel: should feel clean; excessive sliminess is a warning sign.
If pH is in range but the aroma is off, don’t “fix it with time.” Stop and reassess sanitation and ingredient handling.
Plan Bottling Based on End Point and Carbonation Goals
Second fermentation turns residual sugar into carbonation. That means end point affects bottle pressure.
- Higher residual sugar (pH closer to 3.2): more carbonation potential.
- Lower residual sugar (pH closer to 2.8–3.0): less carbonation potential.
Example: If you want gentle bubbles, stop first fermentation nearer 3.2. If you want lively carbonation, stop nearer 2.9—then monitor bottle pressure carefully during the second fermentation.
Mind Map of End Point Measurement
Mind Map: End Point Targets and Home Measurement
A Simple End Point Checklist You Can Reuse
- Measure pH after gentle mixing.
- Confirm pH is within 2.8–3.2.
- Taste for tartness with a hint of sweetness.
- Smell for clean tea-tang character.
- If in range, bottle promptly; if out of range, adjust time in small increments.
This approach keeps your results consistent without turning brewing into a lab experiment. The numbers guide you, and your senses verify that the batch is behaving the way the measurements suggest.
6. Kombucha Brewing Workflows and Sanitation
6.1 Cleanliness Practices for Jars, Tools, and Bottles
Cleanliness in fermentation is less about “sterile” and more about “predictable.” You’re trying to remove unwanted microbes and residues that can interfere with the culture you want. The practical rule is: start with clean, then sanitize right before use, and keep everything protected from recontamination.
The Cleanliness Goal and What It Means
- Remove soil first. Milk film, tea tannins, and vegetable starches can shield microbes from sanitizers.
- Sanitize immediately before contact. Waiting after sanitizing lets dust and airborne microbes land back on surfaces.
- Prevent recontamination. Clean hands, covered containers, and dedicated tools reduce “oops” moments.
A useful mental model: cleaning reduces what’s stuck; sanitizing reduces what remains; handling practices stop new contamination.
Stepwise Workflow for Jars, Tools, and Bottles
Pre-Rinse and Wash
- Pre-rinse with warm water to loosen residues.
- Wash with hot water and dish soap, scrubbing seams, threads, and lids.
- Rinse thoroughly so no soap remains. Soap residue can affect flavor and may slow fermentation.
Example: If you’re reusing a kombucha bottle, rinse until the bottle no longer feels slippery inside. That slipperiness often means residue is still present.
Inspect Before Sanitizing
Sanitizing won’t fix visible grime.
- Check threads and gasket areas for film.
- Look for cloudiness, mineral scale, or sticky spots.
- If you see buildup, repeat washing or use a gentle descaling step appropriate for glass.
Example: A yogurt jar with a faint sour smell may be clean, but if it’s cloudy or has a ring at the bottom, assume residue and rewash.
Sanitize Using a Consistent Method
Choose one sanitizing approach and use it consistently.
- Heat sanitizing works well for glass jars and some metal tools.
- Food-safe chemical sanitizers work for items that can’t tolerate heat.
Key practice: follow the contact time exactly. Short contact time is the most common reason sanitizing “doesn’t seem to work.”
Example: If your sanitizer label says 1 minute, set a timer. If you’re multitasking, you’ll forget without one.
Air-Dry Without Re-Rinsing Unless Required
- Many sanitizers are designed to leave a safe residue after the required contact time.
- If the method requires rinsing, rinse with clean water and then air-dry.
Example: For a no-rinse sanitizer, don’t wipe the inside of a jar with a towel. Towels can reintroduce microbes and lint.
Assemble and Fill with Clean Handling
- Wash hands with soap and dry them.
- Use clean utensils; avoid touching inner surfaces.
- Keep lids off only as long as needed.
Example: When bottling kombucha for a second fermentation, stage bottles on a clean surface and fill one at a time. Don’t leave open bottles sitting while you search for caps.
Mind Map: Cleanliness System for Fermentation Containers
Advanced Details That Matter in Real Batches
Threads, Lids, and Gaskets
Threads trap residue; gaskets trap moisture and can develop odor. Scrub threads and rinse well. If a gasket smells strongly or shows cracking, replace it rather than trying to “sanitize away” the problem.
Example: A lid that seals poorly can let oxygen in during a stage where you want controlled conditions, which then changes flavor and texture.
Bottles with Carbonation Pressure
For carbonated ferments, cleanliness affects both safety and quality.
- Ensure bottles are intact with no chips or cracks.
- Clean the neck and cap area carefully; residue can interfere with sealing.
Example: A tiny chip near the bottle lip can become a leak point. Even if it looks minor, it can cause pressure loss or messy overflow.
Tools and Contact Surfaces
- Use dedicated tools for each ferment type when possible.
- Avoid cross-contact between raw ingredients and finished ferments.
Example: A spoon used to stir raw fruit for kombucha should not go back into a finished batch unless you sanitize it.
Quick Checklist for Each Batch
- Washed with soap and hot water
- Rinsed thoroughly
- Inspected for film or scale
- Sanitized with correct contact time
- Air-dried appropriately
- Filled with clean hands and minimal exposure
If you follow this sequence every time, you’ll spend less effort troubleshooting fermentation outcomes that were never caused by microbes you can’t see.
6.2 Brewing Setup for First Fermentation
A first kombucha batch goes smoothly when you set up for three things: clean contact surfaces, correct fermentation conditions, and a repeatable workflow. The goal is not perfection; it’s control. You want the microbes you intend to grow to win the competition.
Core Setup Checklist
Start with a clean, dedicated brewing area. Use a jar or vessel that won’t react with acids. Glass is the usual choice because it’s nonporous and easy to sanitize. Avoid metal containers for the fermenting liquid.
Sanitizing matters, but so does drying. After cleaning, let items air-dry on a clean surface so you don’t reintroduce rinse water that can carry microbes. Use a breathable cover for the first fermentation so gases can escape while dust and insects stay out.
A practical first batch uses a simple ratio: enough sweet tea to fully submerge the SCOBY and leave headspace. Headspace reduces overflow risk when the SCOBY becomes active and the liquid warms.
Choosing Your Vessel and Cover
Pick a vessel size that matches your target volume and leaves room for bubbling. Too much headspace can slow warming; too little can cause overflow. For most beginners, a 1-gallon jar for about 1 gallon of brew is a straightforward starting point.
Cover the opening with a cloth secured by a band. The cloth should be tight enough to block insects but not so tight that it traps moisture. If you use a lid, it must not be airtight for first fermentation.
Ingredients and Pre-Mixing
Sweet tea is the fuel. Brew your tea first, then dissolve sugar while the tea is still warm. Stir until the sugar disappears; undissolved sugar can settle and create uneven fermentation.
Cool the sweet tea to room temperature before adding the SCOBY. Hot liquid can stress or damage the culture, and it also changes how quickly the batch reaches stable conditions.
Add the starter liquid (from a previous batch or a store-bought starter) before the SCOBY. Starter liquid lowers the initial pH, which helps the desired microbes establish themselves.
Temperature Placement and Stability
Temperature is the steering wheel. Place the jar where it stays within a comfortable range for fermentation, away from direct sun and away from heat sources that cycle on and off. A closet shelf or a kitchen counter away from the stove often works better than a bright windowsill.
Avoid drafty spots near doors or vents. Rapid temperature swings can slow fermentation, increase variability, and make troubleshooting harder.
Workflow for First Fermentation
Use a consistent sequence every time:
- Clean and dry jar, cloth, and tools.
- Brew tea and dissolve sugar.
- Cool to room temperature.
- Pour in starter liquid.
- Add SCOBY gently.
- Cover with breathable cloth.
- Label the jar with start date and target tasting day.
Labeling sounds mundane, but it prevents the most common beginner mistake: tasting too early or too late because the jar “feels like it’s been there forever.”
Mind Map: Brewing Setup for First Fermentation
Example: A First Batch That’s Easy to Repeat
On 2026-02-20, you brew tea and dissolve sugar, then cool it until it feels like room temperature when you hold the container briefly. You pour in starter liquid, then add the SCOBY. The SCOBY may float, sink, or do both over time; that’s normal behavior during early activity.
You place the jar in a stable indoor spot, covered with a cloth secured by a band. You label the jar with the start date and plan to taste around day 7, adjusting based on acidity and flavor rather than guessing.
If the surface looks unusually fuzzy or smells sharply unpleasant, stop and reassess before continuing. Otherwise, taste and proceed to bottling when the flavor matches your target: pleasantly tart, not harsh.
Example: Common Setup Mistakes and Fixes
If your tea is still hot when you add the SCOBY, the batch may take longer to settle and can produce inconsistent results. Fix it by cooling fully before inoculation.
If you cover the jar too tightly, gas can build up and the fermentation environment becomes less stable. Fix it by using a breathable cloth cover.
If you place the jar in direct sun, temperature spikes can speed fermentation unevenly. Fix it by moving the jar to a stable, indirect location.
A good first fermentation is mostly setup discipline. Once the jar is clean, covered correctly, and kept at a steady temperature, the microbes do the rest—within the boundaries you’ve already set.
6.3 Bottling for Second Fermentation and Managing Pressure
Second fermentation is where carbonation gets made. The key idea is simple: you add a small amount of fermentable material (often fruit juice, puree, or sugar), seal the bottle, and let microbes produce CO₂. The “managing pressure” part is about keeping that CO₂ in a safe range while still getting the fizz you want.
Foundational Concepts for Pressure Control
CO₂ pressure rises because gas has nowhere to go once the bottle is sealed. How fast it rises depends on three variables: how much fermentable sugar you add, how active your culture is, and how warm the bottle stays. Temperature is the easiest lever to control at home, so treat it like your main dial.
A practical rule: bottle the same way each time, then adjust only one variable per batch. If you change sugar amount, temperature, and bottle size all at once, troubleshooting becomes guesswork.
Bottling Setup and Sanitation
Start with clean bottles and caps designed for carbonation. Use bottles that can handle pressure, not thin soda bottles that look “close enough.” Rinse away residue, then sanitize everything that touches the liquid: funnel, ladle, and bottle neck.
Before bottling, strain or settle the brew so you don’t bottle large leaf bits. Sediment can increase nucleation points and make carbonation feel uneven from bottle to bottle.
Choosing Bottle Size and Headspace
Headspace is the air space above the liquid. Too little headspace can make pressure spike quickly; too much can reduce carbonation efficiency. For most home setups, leave a consistent headspace across bottles so the only difference is the added flavoring.
Example: if you bottle 500 mL bottles, keep the fill level consistent to within a few millimeters. That consistency matters more than chasing a “perfect” number.
Adding Flavoring and Fermentable Material
Flavoring additions should be small and measured. Fruit puree adds both flavor and fermentable sugars, while fruit juice adds mostly sugars. If you use whole fruit pieces, strain afterward or accept that solids may keep fermenting longer and contribute to more sediment.
A good workflow is to prepare a “bottling mix” for each batch: measure your flavoring per bottle, then add it to the bottle first. Pour the finished first-fermentation liquid over it, then cap immediately.
Sealing and Pressure Targets
You can’t safely “measure” pressure at home without tools, so you manage it by time and temperature. Start with a conservative second-fermentation window, then check bottles early.
Use a two-stage approach:
- Warm conditioning to generate carbonation.
- Cooling to slow fermentation and stabilize the fizz.
Example: place capped bottles at room temperature for the first part of the window, then move them to a cooler spot when you reach the desired taste during a careful test bottle.
The Safe Check Method
Open one bottle at a time for a controlled taste test. Chill the test bottle first to reduce the chance of sudden foaming. When you open it, do so over a sink and keep your face back.
If carbonation is low, you can extend conditioning for the remaining bottles. If carbonation is high, move all bottles to cold storage immediately.
Managing Risk and Avoiding Over-Carbonation
Over-carbonation is the main risk because sealed bottles can build pressure faster than expected. Common causes include too much sugar, warm storage for too long, or bottling when the brew is still very active.
Use these safeguards:
- Keep second fermentation in a temperature-controlled area.
- Use a consistent batch volume and bottle count.
- Start with fewer flavor solids and smaller sugar additions.
- Never leave bottles unattended for long periods during the conditioning window.
Cooling, Storage, and Serving
Once carbonation is where you want it, refrigerate to slow microbial activity. Cold storage also helps the flavor settle and reduces continued gas production.
When serving, pour gently to avoid losing carbonation too quickly. If you notice excessive foam, let the bottle sit chilled for a bit longer before pouring.
Mind Map: Bottling for Second Fermentation and Managing Pressure
Example: A Controlled Bottling Decision
You bottled 6 × 500 mL bottles with measured fruit juice. After 24 hours at a steady room temperature, you chill one bottle for 2 hours, then open it carefully. If it’s lightly carbonated, you return the remaining bottles to the same temperature for 6–8 more hours and then chill again. If it’s already very fizzy, you refrigerate all bottles immediately and skip further conditioning.
This approach keeps the system understandable: time and temperature do the work, and the test bottle tells you whether to continue or stop.
6.4 Flavoring Methods During Or After Fermentation
Flavoring is really two separate jobs: (1) choosing compounds that will taste good after fermentation, and (2) timing when those compounds meet the culture and the acids they create. The culture is busy making acids, alcohols, and aroma molecules; your job is to add flavor in a way that doesn’t fight those processes or create off-notes.
Timing Choices That Control Flavor Outcomes
Flavoring During First Fermentation
Add flavor ingredients while the tea and SCOBY are actively fermenting. This tends to produce a more integrated taste because the acids and carbonation precursors form alongside your added flavors. The tradeoff is that some delicate aromas can fade, and some ingredients can feed microbes in ways you didn’t plan.
A simple example: add ginger slices to the primary brew. Ginger’s spicy oils are partly volatile, so you’ll get a gentler warmth than if you add it after fermentation, but it will blend into the sourness.
Flavoring After First Fermentation
Add flavor after the brew reaches your target acidity, then bottle for second fermentation or chill. This preserves delicate aromatics and gives you more control over sweetness and intensity.
Example: steep hibiscus or add a concentrated fruit puree after first fermentation. You’ll get clearer fruit notes because the culture is no longer producing new acids at the same rate.
Flavoring During Second Fermentation
Second fermentation is mainly about carbonation and short-term aroma development. Ingredients added here should be low-risk and easy to ferment or dissolve. Too much pulp can trap sediment and make bottles harder to manage.
Example: add a small amount of fruit juice concentrate to each bottle. It carbonates and flavors without turning the bottle into a sediment snow globe.
Ingredient Types and What They Tend to Do
Aromatic Additions
Use herbs, spices, citrus zest, and tea blends. These contribute volatile compounds that can diminish during active fermentation. If you want bright top notes, add after first fermentation or during cold steeping.
Example: add orange zest after first fermentation, then let it sit briefly in the finished brew before bottling.
Sugars and Sweeteners
Sugar affects fermentation speed and final acidity balance. In kombucha, extra sugar can increase carbonation and may push sweetness lower than expected because microbes keep working.
Example: if you add honey during second fermentation, start with a small dose and keep batch records, since honey can ferment differently than table sugar.
Fruit and Purees
Fruit brings acids, sugars, and aroma compounds. Purees also add solids that increase sediment. If you want cleaner bottles, strain purees or use juice.
Example: use strained berry puree for a smoother mouthfeel, and keep the amount modest to avoid over-carbonation.
Spices and Bitter Roots
Spices can be antimicrobial or strongly flavored. That’s not automatically bad, but it can slow fermentation or create harsh bitterness if the dose is too high.
Example: add cinnamon sticks during first fermentation for a mellow background note, but avoid grinding cinnamon into powder, which extracts aggressively and clouds the brew.
Practical Methods That Keep Control
Method 1: Steeping in the Finished Brew
Steep flavor ingredients in the completed first-fermentation liquid, then strain before bottling. This is the most predictable approach for delicate flavors.
Example: steep vanilla bean in the finished brew for 12–24 hours, then strain and bottle.
Method 2: Concentrate Then Dose
Make a small flavor concentrate separately, then add measured amounts to the batch. This reduces variability from ingredient size and extraction strength.
Example: simmer ginger in water briefly, cool, and add a measured spoonful per bottle.
Method 3: Per-Bottle Flavoring for Consistency
Add measured flavor to each bottle during bottling. This helps when you want uniform taste across bottles, especially for fruit pieces.
Example: add a pre-measured teaspoon of fruit juice concentrate to each bottle rather than dumping a whole jar into the batch.
Method 4: Layering for Balance
Combine a base flavor added during first fermentation with a top note added after. The base sets the “body,” and the top note sets the “finish.”
Example: ginger during first fermentation, then a small amount of lemon zest after first fermentation.
Mind Map: Flavor Timing and Ingredient Behavior
Example Workflow for a Controlled Batch
- Brew tea and ferment to your usual first-fermentation endpoint.
- Choose one base flavor for integration, such as ginger, and add it during first fermentation if you want a mellow profile.
- After reaching endpoint, add a top note such as citrus zest using steeping in the finished brew.
- Strain, then bottle for second fermentation with a small, measured amount of juice concentrate to support carbonation.
- Taste one bottle after chilling and adjust the next batch by changing only one variable: either steep time, dose, or timing.
This approach keeps the culture’s job clear and your flavor decisions measurable. When you change timing, you change which compounds survive and how acids shape perception, so treat timing as a real ingredient rather than an afterthought.
6.5 Handling Sediment and Preventing Off Notes
Sediment and off notes in kombucha usually come from two things: what’s floating around in the brew (yeast, tea solids, fruit pulp, and microbial byproducts) and what conditions you gave them (oxygen exposure, temperature, sugar level, and bottling pressure). The goal is not to make the drink perfectly clear; it’s to make it taste clean and predictable.
Start with a simple mental model: during first fermentation, the SCOBY community turns sugars into acids and gases. During second fermentation, added flavor ingredients and residual sugars create more fermentation, which increases carbonation and can also increase sediment. Sediment is normal; off notes are the signal that something shifted too far.
What Sediment Means and When It’s Normal
Look for sediment that is fine and evenly distributed, especially after second fermentation. Tea particles and yeast flocculation often settle after chilling. A small amount of cloudy haze is typical.
Sediment becomes a problem when it’s accompanied by sharp, unpleasant aromas (like solvent, rotten egg, or souring that tastes “thin” rather than pleasantly tart) or when bottles swell excessively and then taste harsh.
A Practical Workflow for Cleaner Bottles
- Strain flavor additions before bottling. If you add fruit, use juice or strain pulp. Whole spices are fine in a tea infuser, but loose powders can create gritty sediment.
- Use consistent bottling timing. Bottling too early leaves more residual sugar for later, which can over-carbonate and drive harshness. Bottling too late can mean the brew is already very acidic and flavors taste muted.
- Leave headspace and cap correctly. Too little headspace increases pressure spikes. Too loose a seal wastes carbonation and can encourage unwanted surface growth.
- Chill promptly after the target carbonation. Once bottles reach the desired firmness, move them to refrigeration. Cold slows fermentation and helps sediment settle.
Preventing Off Notes by Controlling the Usual Culprits
1. Over-carbonation and harsh acidity
- Symptom: bottles become rock-hard, then the drink tastes aggressively sharp.
- Fix: shorten second fermentation time, reduce added sugar sources, and chill sooner.
2. Overheating during fermentation
- Symptom: sourness that tastes “rough,” sometimes with a yeasty edge.
- Fix: keep temperature stable and avoid placing jars in direct sun or near heat sources.
3. Too much particulate matter
- Symptom: gritty mouthfeel and muddy aroma.
- Fix: strain fruit and avoid adding large amounts of pulp. If you use ginger or herbs, keep them contained.
4. Oxygen and contamination during handling
- Symptom: unusual surface film, musty smells, or inconsistent batches.
- Fix: sanitize bottles and funnels, minimize open-air time, and keep the SCOBY and starter liquid covered.
Mind Map: Sediment and Off Notes Control
Example: Fruit Second Fermentation Without Muddy Flavor
You brew a tea base for first fermentation, then add strawberry. If you add blended fruit directly, you’ll likely get heavy sediment and a “stewed” aroma. Instead, strain the strawberry mixture through a fine mesh, bottle the strained liquid, and keep the pulp out. After chilling, you’ll still see some yeast sediment, but the aroma stays bright and the mouthfeel is smoother.
Example: Preventing Over-Carbonation with a Simple Check
Choose a consistent second fermentation window. If your bottles become very firm quickly, reduce the time by a few hours next batch and chill earlier. Also keep the same bottle size and headspace. Changing multiple variables at once makes it hard to know what fixed the issue.
Example: When Sediment Is Fine but Taste Is Off
If sediment looks normal but the drink tastes harsh, don’t focus only on filtering. Check fermentation conditions first: temperature stability, bottling timing, and how much sugar you added via flavoring. Filtering after the fact can remove particles, but it won’t correct an imbalance caused by too much residual fermentation.
Quick Decision Guide
- Cloudy but pleasant tart → chill and settle; no action needed.
- Rock-hard bottles → shorten second fermentation next time and chill sooner.
- Gritty mouthfeel → strain flavor ingredients and avoid loose powders.
- Musty or rotten notes → improve sanitation and handling; discard if clearly off.
Sediment management is mostly about reducing unnecessary solids and controlling how far fermentation goes in the bottle. Off notes are usually a process signal, not a mystery ingredient problem.
7. Functional Fermented Foods Beyond Yogurt and Kombucha
7.1 Fermented Vegetables and Lactic Acid Fermentation Basics
Lactic acid fermentation is a controlled souring process where naturally occurring lactic acid bacteria (LAB) convert sugars into lactic acid. That acid lowers pH, which discourages many spoilage organisms while letting the good microbes do their work. The practical goal is simple: create conditions where LAB win, then keep the ferment stable until the flavor and texture are right.
The Core Microbes and What They Do
Most vegetable ferments start with microbes already on the vegetable surface. LAB are the main players because they tolerate salt and produce acid efficiently. Yeasts and other bacteria may appear early, but as acidity rises, they usually lose the competition. This is why “time” matters: the process is not instant, and the pH drop is the real safety lever.
A useful mental model is a race with changing rules. At the start, many microbes can grow. As lactic acid accumulates, the rules shift toward acid-tolerant LAB. Your job is to set the track conditions—especially salt, water exposure, and temperature—so the race ends with a stable, sour ferment.
Salt, Brine, and Why They Control Everything
Salt does three jobs at once: it draws water out of vegetables, it dissolves into the brine to create an environment LAB can handle, and it slows down unwanted microbes. For most vegetable ferments, a common starting point is 2% to 3% salt by weight of water or total brine. If you’re using a jar with vegetables packed tightly, you can estimate brine strength by using a measured salt-to-water ratio and ensuring vegetables stay submerged.
Submersion is non-negotiable. Oxygen exposure encourages surface growth and softening. If you see floating pieces, you need to push them back under brine using a weight or a properly sized fermentation lid.
Temperature and Fermentation Speed
Temperature controls how fast LAB acidify. Warmer ferments sour faster, but they can also soften vegetables if the process runs too hot or too long. Cooler temperatures slow everything down and often produce a cleaner, slower sour profile. A practical approach is to choose a stable room temperature and then judge doneness by taste and texture rather than by guessing.
Texture and Flavor Development
Early on, vegetables may taste only lightly salty and crunchy. As fermentation progresses, you’ll notice a shift: the sourness rises, and the aroma becomes more “pickly” and less like raw vegetables. Texture changes are driven by cell wall breakdown and water movement. Too little salt or too much time can lead to limpness; adequate salt and good submersion help keep crunch.
Step-by-Step Workflow with Integrated Best Practices
- Choose vegetables and prepare them consistently. Cut sizes should be similar so they ferment at the same rate. Wash thoroughly, but don’t scrub so hard that you remove all surface microbes.
- Make brine or use measured salt. If using a brine, dissolve salt in water first. If using direct salting, keep salt amounts consistent across batches.
- Pack tightly and keep everything submerged. Leave headspace for bubbling. Use a weight if needed.
- Ferment at a stable temperature. Check daily once bubbles start. Skim any foam from the surface; it’s usually harmless, but it’s a sign you’re actively fermenting.
- Taste for doneness. Start tasting after a few days, then adjust. When the flavor is pleasantly sour and the crunch is right, move to cold storage to slow fermentation.
Mind Map: Lactic Acid Fermentation of Vegetables
Example: Quick Cabbage Ferment with Clear Targets
Suppose you want a small batch of shredded cabbage. Shred to a consistent thickness so it softens evenly. Weigh the cabbage and add salt at about 2% to 3% of the cabbage weight. Massage until brine forms, then pack tightly into a jar and press down so the cabbage stays under its own brine. Ferment at a steady room temperature, taste after a few days, and stop when it’s pleasantly sour but still crisp. Move to cold storage to slow further acidification.
Example: Sliced Cucumber Ferment with Submersion Control
For cucumbers, cut to similar lengths and pack tightly. Use a measured salt brine so you know the strength. Add brine until cucumbers are fully submerged, then use a weight to keep them down. Check daily at first because cucumber ferments can soften if they run too warm or too long. When the sourness matches your preference and the crunch holds, refrigerate.
Common Failure Points and What They Mean
If a ferment smells strongly rotten rather than sour, or if you see extensive fuzzy growth, something went wrong with sanitation, salt level, or submersion. If it tastes only salty with little sourness after several days, temperature may be too low or salt may be too high, slowing LAB activity. If it’s mushy, the likely causes are insufficient salt, excessive time, or temperature running high.
The good news is that these issues are diagnosable. Each variable—salt, submersion, temperature, and time—leaves a distinct signature in taste and texture, so you can correct the next batch without guessing.
7.2 Fermented Grains and Dough Starters for Home Baking
Fermented grains and dough starters are the home baker’s way of turning flour and water into a living process. The goal is simple: encourage the right microbes to produce acids and gases that improve flavor, texture, and keeping quality. The practical challenge is also simple: control temperature, hydration, and feeding so the starter behaves predictably.
Foundational Concepts for Starter Behavior
A dough starter is usually a mix of flour, water, and time. Wild yeasts and lactic acid bacteria arrive from flour, air, and your hands. Over repeated feedings, the community shifts toward organisms that tolerate your conditions.
Two outcomes matter most. First, acidity: lactic and acetic acids develop as bacteria ferment sugars. This lowers pH, which helps flavor and reduces the chance that unwanted microbes dominate. Second, gas production: yeasts generate carbon dioxide, which expands dough and creates a lighter crumb.
A starter is not “strong” because it looks active. It’s strong because it rises reliably at a known schedule. That reliability comes from consistent feeding ratios and temperatures.
Choosing Ingredients and Hydration
Flour choice shapes fermentation speed and flavor. Whole rye tends to start faster because it contains more minerals and nutrients. Whole wheat also works well. White flour can work too, but it often needs more patience or a slightly warmer setup.
Hydration is the water-to-flour ratio by weight. Higher hydration makes fermentation faster and easier to mix, but it can also make the starter more sensitive to temperature swings. A common starting point is a thick paste (about 100% hydration is equal weights of water and flour) for easier handling, then adjust based on your results.
Example: If your starter smells sharp and rises slowly, try a slightly warmer spot or a shorter interval between feedings. If it rises quickly but collapses early, you may be feeding too infrequently or at too low a temperature.
Building a Starter System
Start with a small amount so you can feed without waste. Use a clean jar and mark the starting level with a rubber band or tape. The rise height and timing tell you more than smell alone.
A practical workflow:
- Day 1–2: Mix flour and water, keep warm, and stir once daily.
- Day 3–5: Begin discarding and feeding on a schedule as bubbles become consistent.
- After stabilization: Feed based on when it peaks, not based on the clock alone.
Mind the “peak” concept. A starter is most useful when it has risen and is beginning to slow. If you use it after it has fully collapsed, you’re often starting with a community that’s already spent its best gas-making window.
Mind Map: Fermented Grains and Dough Starters
Advanced Details That Prevent Common Failures
Temperature Management
Temperature is the fastest way to change behavior. If your kitchen is cool, fermentation may stall. If it’s warm, the starter may peak quickly and then weaken before you’re ready to bake.
A simple fix is to match feeding interval to temperature. If your starter peaks in 4 hours, feeding every 8–12 hours may be too slow. If it peaks in 12–18 hours, feeding every 4–6 hours can starve it.
Feeding Ratios and Predictability
Feeding ratios describe how much old starter you keep relative to fresh flour and water. A larger refresh (more new flour and water) dilutes acids and resets the community, often leading to a more predictable rise.
Example: If your starter smells overly sour and rises weakly, try keeping less old starter and feeding with a larger proportion of fresh flour and water. If it’s rising strongly but you want to bake less often, you can reduce the feeding frequency and store it cooler.
Using Starter in Dough
Starter strength affects dough fermentation. A weak starter leads to dense bread because the dough doesn’t get enough gas and acid development. A strong starter can over-ferment if you extend bulk fermentation too long.
A practical approach is to observe dough rather than rely only on time. Look for a dough that expands and shows a smoother surface after mixing, then increases in volume during bulk fermentation. If it becomes very puffy and slack quickly, shorten bulk next time.
Example: A Starter-to-Bread Day Plan
Morning: Feed the starter so it peaks before you mix dough. If it peaks at midday, mix dough around that time.
Midday: Mix dough with starter, then bulk ferment until it gains noticeable volume and feels aerated when you handle it.
Afternoon: Shape, proof until it holds shape and springs back slowly, then bake. If your bread is sour but not airy, your starter may be too acidic relative to its gas production; adjust feeding ratio or temperature. If it’s airy but bland, you may need a longer fermentation or a slightly cooler schedule to develop more acid.
Mind Map: Troubleshooting Signals
Fermented grains and dough starters reward careful observation. When you track rise timing, adjust temperature, and use starter at its peak, the process becomes repeatable. That repeatability is what turns a “living jar” into a reliable ingredient.
7.3 Fermented Legumes and Safe Preparation Practices
Fermented legumes are mostly about controlling two things: which microbes get the first foothold, and how quickly acidity and salt suppress the rest. Unlike yogurt, you usually aren’t relying on a single dairy culture; you’re managing a whole ecosystem using brine, temperature, and time. The payoff is real: legumes become easier to digest for many people, and their flavor shifts from “bean” to something tangier and more savory.
Foundational Concepts for Fermenting Legumes
Start with the legume’s baseline condition. Dry beans need soaking to reduce cooking time and to leach some water-soluble compounds. Canned beans are already cooked, so they ferment differently: they absorb brine faster, but they also start with less “structure” for microbes to work on.
Next, choose your fermentation style. Most safe home methods for legumes fall into two buckets:
- Salt brine fermentation where legumes sit submerged in a measured salt solution.
- Starter-assisted fermentation where you add a known culture (often from a previous batch) to steer the process.
For safety, brine fermentation is usually the simplest to standardize because salt concentration and submersion are measurable.
Safe Preparation Practices Before Fermentation
Begin with clean equipment and a plan for submersion. Use a jar or crock that can be sealed with an airlock or a lid that prevents dust and insects while still allowing gas release when needed. Weigh your legumes and brine so you can calculate salt accurately.
Soaking and cooking matter for texture and safety. Soak until beans are hydrated and then cook until tender enough to mash slightly between fingers. Under-cooked beans ferment unevenly, leaving pockets that can spoil while the surface looks fine.
Drain well, then cool to a temperature that won’t shock your process. If you’re using a starter, mix it into the brine or combine it with the cooled beans so it disperses rather than clumps.
Brine Ratios and Submersion Control
A practical target for many legume ferments is 2% to 3.5% salt by weight. Here’s the logic: enough salt to slow unwanted microbes, not so much that fermentation stalls. If you’re unsure, start at 2.5% and keep everything submerged.
Submersion is non-negotiable. Use a fermentation weight or a clean, food-safe barrier so beans stay under brine. If beans float, they can form a dry surface that invites mold.
Stepwise Workflow for a Basic Salt-Brined Legume Ferment
- Soak and cook beans until tender.
- Cool to warm-room temperature.
- Prepare brine at your chosen salt percentage.
- Pack jar leaving headspace for bubbling.
- Submerge with a weight and ensure brine covers beans.
- Ferment at a stable room temperature, checking daily for bubbles and surface conditions.
- Taste and adjust when acidity is noticeable and flavor is pleasantly tangy.
- Refrigerate to slow fermentation.
A helpful rule of thumb: if it smells sour and clean, and the brine looks clear-to-hazy rather than slimy and foul, you’re likely on track.
Mind Map: Fermented Legumes Safety System
Troubleshooting Without Guessing
If you see white film on the surface early, it can be harmless yeast or pellicle-like growth, but it still means oxygen exposure. Remove surface growth with a clean utensil, skim carefully, and confirm full submersion. If you see fuzzy mold or detect rotten, putrid, or strongly unpleasant odors, discard the batch.
If fermentation is slow, check salt percentage first and confirm beans were fully submerged. If beans are soft and mushy, they were likely overcooked before fermenting or fermented too warm for too long.
Example: Garlicky Brined Chickpeas
Cook chickpeas until tender, cool, and pack into a jar. Mix brine at 2.5% salt by weight, add smashed garlic cloves, and submerge completely. Ferment at stable room temperature while checking daily. When the brine tastes pleasantly sour and the chickpeas taste tangy rather than flat, refrigerate. The garlic flavor will mellow in the fridge, and the acidity will continue to develop slowly.
Example: Using Canned Beans Carefully
Rinse canned beans thoroughly to reduce residual salt and rinse away canning flavors. Because they’re already cooked, reduce fermentation time and taste earlier. Keep salt brine at 2.5% to 3% and maintain strict submersion. Expect faster brine absorption and a quicker flavor shift.
Case Study: What “Safe” Looks Like in Practice
A batch of lentils in brine at 3% salt stays submerged and develops a mild sour smell within a few days. The brine becomes slightly cloudy, and the lentils taste tangy but not harsh. The surface remains free of fuzzy growth, and texture stays intact. That combination—measured salt, submersion, clean sour aroma, and acceptable texture—is the practical safety profile for home legume fermentation.
7.4 Fermented Beverages Other Than Kombucha
Not every fermented beverage needs a SCOBY and a second fermentation bottle. Many drinks rely on the same core ideas you already used for yogurt and kombucha: a chosen microbe does the work, conditions steer the outcome, and you stop the process when the flavor and safety targets are met. This section focuses on three practical beverage families—lacto-fermented drinks, yeast-fermented drinks, and mixed-culture drinks—so you can predict what will happen when you change one variable.
Foundational Concepts for Non-Kombucha Fermentation
Fermented beverages usually start with a fermentable substrate (sugar, starch, or natural sugars) and a microbial starter (cultures, backslopping, or naturally present microbes). The “steering wheel” is the environment:
- Acidity: Lower pH suppresses many unwanted microbes. Lactic acid bacteria (LAB) are especially good at producing acid steadily.
- Oxygen exposure: Some microbes prefer oxygen; others do not. Oxygen can also change flavor by encouraging different pathways.
- Temperature: Warmer speeds fermentation but can increase off-notes if the culture is stressed.
- Time: Flavor compounds accumulate gradually. Stopping early gives a sharper drink; stopping later gives deeper sourness and sometimes more haze.
A useful mindset is to treat each beverage as a controlled fermentation experiment. If you keep the vessel size, temperature, and sugar level consistent, you can interpret results instead of guessing.
Lacto-Fermented Drinks and Their Logic
Lacto-fermented drinks are typically made by submerging fruit or ginger in a sweetened liquid with salt or added sugar, then letting LAB acidify it. The simplest example is a ginger bug–style soda, where you maintain a small starter of ginger and sugar, then use it to ferment a sweet ginger infusion.
Example: Ginger Bug Soda
- Feed a ginger bug with sugar and stir daily until it shows consistent bubbling.
- Mix ginger infusion with sugar to your chosen sweetness.
- Ferment at room temperature until it tastes pleasantly tart and slightly carbonated.
- Refrigerate to slow fermentation.
Why it works: LAB and associated microbes convert sugars into organic acids. Carbonation comes from ongoing fermentation producing gas, which is why chilling matters.
Best practice: Use a container with headspace and check daily once you see active bubbling. If you bottle, pressure management becomes part of the safety plan.
Yeast-Fermented Drinks and Their Logic
Yeast-driven beverages lean on alcohol and carbonation. The same principles apply, but you must respect yeast behavior: yeast ferments sugars into ethanol and carbon dioxide, and it can also produce fruity or solvent-like notes depending on temperature and nutrient availability.
Example: Simple Fruit Soda with Yeast
- Prepare a fruit infusion and sweeten to a measured level.
- Add a yeast starter or a small amount of active culture.
- Ferment until the drink is pleasantly sweet-tart and lightly carbonated.
- Chill to stabilize.
Best practice: Keep temperature moderate. If it runs too hot, you may get harsh flavors even when fermentation “finishes.”
Mixed-Culture Drinks and Their Logic
Mixed-culture drinks combine LAB and yeast, often creating a balance of sourness and carbonation. This is common in many traditional beverages, but at home you can still control the process by choosing a starter approach and using measurable targets.
Example: Quick Fruit Shrub–Style Fermented Beverage
A shrub is usually vinegar-based, but you can create a fermented version by allowing LAB to acidify a fruit-sugar mixture before dilution.
- Combine fruit with sugar and let it ferment until it smells pleasantly sour and fruity.
- Strain and dilute with water to taste.
- Refrigerate promptly.
Why it works: LAB acidify the mixture, and dilution reduces perceived sharpness while keeping the drink stable.
Best practice: Don’t rely on smell alone. Use a consistent time window and taste checkpoints so you don’t overshoot into harshness.
Mind Map: Non-Kombucha Fermented Beverages
Advanced Details That Prevent Headaches
- Sugar measurement beats guesswork: If you want consistent carbonation, keep sugar level consistent. “A spoonful” varies too much.
- Headspace and container choice matter: Gas needs space. A narrow neck bottle can build pressure faster than a wide jar.
- Straining changes fermentation behavior: Leaving solids can continue fermentation and add flavor, but it also increases haze and sediment.
- Acid and sweetness balance: If a drink tastes too sharp, dilution is safer than adding more sugar mid-fermentation, which can restart activity.
Case Study: Choosing a Beverage Path
Suppose you want a refreshing ginger drink that’s tart but not harsh. A lacto-leaning ginger bug approach gives steady acid and gentle flavor. If you want a more sparkling, wine-like profile, yeast-forward fermentation can deliver stronger carbonation and a drier finish. If you want both sourness and lively bubbles, a mixed-culture method is the most direct route—just keep temperature moderate and taste early.
Practical Integration with Your Existing Skills
You already know how to manage temperature and time for yogurt, and how to manage acidity and carbonation for kombucha. For other fermented beverages, you apply the same discipline with different microbes and substrates. The result is a small set of repeatable workflows: measure sugar, control temperature, monitor taste, and stabilize at the point you like—then stop the process instead of hoping it “works out.”
7.5 Building a Fermentation Library for Repeatable Results
Repeatability comes from turning “I think it’s ready” into “I know what ready looks like.” A fermentation library is your personal set of reference points: starter sources, process targets, sensory checkpoints, and what you did when something went sideways. The goal is not to collect recipes like trophies; it’s to reduce guesswork so each batch starts with the same assumptions.
Start by defining your library scope. Pick one base product per category—plain yogurt, kombucha first fermentation, and one lacto-fermented vegetable. For each, decide what you will standardize first: vessel size, temperature target, salt or sugar ratio, and incubation time window. If you change too many variables at once, your notes become a mystery novel.
Core Library Components
-
Starter lineage and handling Record where your cultures came from and how you treat them. For yogurt, note the starter batch date, storage temperature, and whether you warmed it before inoculation. For kombucha, note SCOBY source, whether you used reserved starter liquid, and how long the SCOBY sat at room temperature before brewing.
-
Process targets and tolerances Write down the numbers you aim for and the range you consider acceptable. Example: yogurt incubation target 42–44°C for 4–6 hours, with “end point” defined by set firmness rather than clock time alone. Kombucha might target a specific acidity window and a measured carbonation plan for bottling.
-
Sensory checkpoints with plain language Sensory notes should be specific enough that someone else could compare. For yogurt: “clean tang, no sulfur smell, firm gel with minimal whey pooling.” For vegetables: “crisp bite, briny aroma, no rotten or putrid notes.” Keep it factual; your nose is a sensor, not a storyteller.
-
Failure modes and fixes A library is most useful when it includes the “what I changed” section. If yogurt is thin, note whether milk was underheated, starter was old, or incubation was too cool. If kombucha tastes flat, note bottling sugar amount, headspace, and time at room temperature.
Mind Map: Library Structure
Batch Record Template That Actually Helps
Use a consistent batch ID and record only variables you can control. Include: batch date (for example, 2026-02-20), product, vessel size, ingredient ratios, temperature target, start and end times, and your end point evidence.
Example entry for plain yogurt:
- Batch ID: Y-2026-02-20-01
- Milk: 1% pasteurized, heated to 85°C, cooled to 43°C
- Starter: 2 tbsp per 1 liter (from last week’s batch)
- Incubation: 43°C for 5 hours
- End point: firm set, minimal whey separation
- Sensory: tangy, clean dairy aroma
If you later get a runny batch, you can compare against this baseline without guessing.
Building the Library Step by Step
Step 1: Create a baseline batch for each product. Run one batch using your best-known method and record everything. Treat it as the “reference.”
Step 2: Add one controlled variation at a time. Change only one variable, such as incubation temperature by 1–2°C or brine strength by 0.5%. Keep the rest identical. This is how you learn cause and effect instead of collecting anecdotes.
Step 3: Define end points using evidence. For yogurt, end point is gel firmness and clean aroma. For vegetables, end point is taste and texture at the right acidity level. For kombucha, end point is acidity plus carbonation plan, not just “it smells right.”
Step 4: Store your notes where you can find them quickly. A library is only a library if it’s searchable. Use a simple folder structure by product, then by batch ID.
Mind Map: Troubleshooting Loop
Example: One Variation That Teaches a Lot
If your lacto-fermented vegetables are consistently soft, don’t immediately change everything. First, keep the brine ratio constant and adjust temperature by moving the jar to a slightly cooler spot. Record the texture at 3, 5, and 7 days. If crispness improves, you’ve learned that your process is temperature-sensitive. If it doesn’t, your next likely lever is oxygen exposure (headspace and keeping vegetables submerged).
A good fermentation library turns your kitchen into a lab with fewer rules and better notes. Once you have baselines, every new batch becomes a controlled comparison rather than a coin toss.
8. Salt, Brine, Water Chemistry, and Texture Control
8.1 Salt Levels and Their Effects on Microbial Selection
Salt is one of the simplest levers you can pull in fermentation: it changes which microbes can grow, how fast they grow, and what textures you get. In lactic acid fermentations (like many vegetable ferments), the goal is usually to encourage lactic acid bacteria (LAB) while discouraging organisms that cause softening, off odors, or surface scum.
Foundational Concepts: What Salt Does
Salt affects fermentation in three main ways.
First, it lowers water activity. Microbes need available water to function; higher salt makes that harder. LAB are generally more salt-tolerant than many spoilage bacteria, so they gain a relative advantage.
Second, salt slows growth rates. Even salt-tolerant LAB don’t grow instantly; they work within a narrower comfort zone. That means higher salt often leads to slower acidification, which can matter for safety and texture.
Third, salt influences enzyme activity and cell stress. Texture problems often show up when the wrong organisms dominate early, before acid levels rise. Salt helps by shaping that early microbial lineup.
A practical way to think about it: salt is not a “sterilizer.” It’s a bouncer at the door. It decides who gets to enter and how long they stay.
Microbial Selection: Who Wins at Different Salt Levels
At low salt, more microbes can grow, including those that produce gas, bitterness, or softening enzymes. LAB still may win eventually, but the margin for error shrinks because acidification can be slower.
At moderate salt, LAB typically dominate more reliably. Acid builds steadily, and the fermentation tends to stay crisp rather than mushy. This is the zone most home ferments aim for.
At high salt, LAB growth can become sluggish. You may still get fermentation, but it can take longer to reach the sourness and stability you want. Some ferments can also taste overly salty before they taste properly fermented.
How to Use Salt Systematically
Salt level is only meaningful when paired with two other variables: brine coverage and temperature.
Brine coverage matters because microbes on the surface have different access to oxygen and nutrients. If vegetables float, you often get uneven fermentation regardless of salt.
Temperature matters because salt-tolerance is not the same as salt-immunity. Warmer temperatures speed everything up, including both LAB and potential troublemakers. Cooler temperatures slow growth, which can be helpful for control but may extend the time before acid rises.
A systematic approach is to choose a target salt range, ensure full submersion, and then monitor for acidification and texture rather than relying on time alone.
Mind Map: Salt Levels and Microbial Selection
Examples: Turning Salt into Predictable Results
Example: Cucumber Slices for Crunch
If you ferment thin cucumber slices at a low salt level, you may see rapid bubbling but also faster softening. The likely reason is that acidification lags behind the activity of other microbes. Raising salt to a moderate level typically gives you steadier sourness and better crunch because LAB can dominate sooner.
Example: Carrot Sticks for Even Fermentation
Carrots are dense and can ferment unevenly if pieces are large. With moderate salt and full submersion, LAB acidifies the brine around the sticks, and the interior catches up. If salt is too low, you can get a tangy exterior with a less pleasant interior because microbial activity isn’t uniform.
Example: Cabbage for Reliable Sourness
Cabbage ferments are often forgiving, but salt still sets the pace. Moderate salt helps LAB produce enough acid to suppress unwanted growth while keeping the cabbage firm. If salt is high, you may need more time to reach the same sourness, and the cabbage can taste flat or overly salty before it tastes fully fermented.
Troubleshooting Logic: Adjusting Salt Without Guessing
If your ferment is softening early, salt may be too low for your temperature and vegetable thickness. Increase salt next time and keep pieces smaller or ensure tighter packing so brine reaches all surfaces.
If your ferment is slow to sour, salt may be too high or temperature too cool. Next time, reduce salt slightly or raise temperature within safe, comfortable room ranges. The key is to change one variable at a time so you can learn what actually caused the outcome.
Quick Reference: Choosing a Salt Level
Use moderate salt as your baseline for most vegetable ferments where you want consistent crispness and reliable acidification. Use lower salt only when you can control temperature well and keep everything fully submerged. Use higher salt when you need slower fermentation, but expect longer time to reach the same sourness.
Salt is a selection tool. When you pair it with good coverage and sensible temperature, you’re not just making food salty—you’re steering the microbial community toward the outcome you want.
8.2 Brine Ratios and How to Calculate for Any Vessel Size
Brine is just salt dissolved in water, but the ratio matters because it steers which microbes get the first say. For lactic acid vegetable fermentation, you’re aiming for enough salt to slow unwanted growth while still letting lactic acid bacteria do their job. The practical goal is repeatability: once you know how to calculate salt for your vessel size, you can scale any recipe without guessing.
Foundational Brine Ratios That Actually Work
Most home vegetable ferments use one of these targets:
- 2% brine: 2 g salt per 100 g water. Often used for mild flavors and shorter ferments, but it’s less forgiving.
- 3% brine: 3 g salt per 100 g water. A common “default” for many cabbage and mixed vegetable ferments.
- 5% brine: 5 g salt per 100 g water. Used when vegetables are delicate, very watery, or you want extra microbial control.
A quick sanity check: if your brine tastes salty like seawater, you’re probably too high for typical vegetable ferments. If it tastes barely salty, you’re likely too low.
The Core Calculation Method
Use this relationship:
- Salt (g) = Water (g) × Brine Percent / 100
The only tricky part is deciding what “water” means in your setup.
Step 1: Decide Your Water Basis
You’ll usually have two options:
- Add water to cover vegetables: You measure the water you add, then calculate salt from that water.
- Use vegetable brine release: You salt the vegetables directly and let them draw out liquid. In that case, you’re not measuring water up front, so you either:
- use a recipe that specifies salt by vegetable weight, or
- estimate water by using a known ratio from prior batches.
For learning and consistency, option 1 is easiest: measure water, calculate salt, then pour.
Step 2: Measure Vessel Volume in a Usable Way
If you’re filling a jar, you can measure how much water it holds by doing a “dry run” with water only. Pour the water into a measuring jug, note the volume, then convert.
A handy conversion:
- 1 milliliter (mL) water ≈ 1 gram (g) water
So 500 mL water is about 500 g water.
Step 3: Calculate Salt
Example: You want 3% brine and you need 600 mL water.
- Water = 600 g
- Salt = 600 × 3 / 100 = 18 g salt
That’s it. Pour, stir until dissolved, then add vegetables.
Example Calculations for Common Jar Sizes
Assume you’re using measured water to cover vegetables.
-
Quart jar, 1,000 mL water, 3% brine
- Salt = 1,000 × 3 / 100 = 30 g
-
Half-pint jar, 250 mL water, 2% brine
- Salt = 250 × 2 / 100 = 5 g
-
Large jar, 1,500 mL water, 5% brine
- Salt = 1,500 × 5 / 100 = 75 g
If you’re using a scale, weigh salt directly. If you’re using teaspoons, remember that spoon measurements vary by salt grain size, so they’re fine for rough work but not for consistent results.
Mind Map: Brine Ratio Calculation Workflow
Advanced Details That Prevent Common Mistakes
-
Salt type matters for measurement, not chemistry. Table salt, kosher salt, and pickling salt differ in density. Weighing in grams avoids the “same teaspoon, different salt” problem.
-
Coverage is part of the brine system. If vegetables float above the brine, you’ll get uneven fermentation and more surface growth. Use a weight or a method that keeps everything submerged.
-
Don’t confuse brine percent with “salt added to vegetables.” A recipe that says “2.5% by vegetable weight” is a different calculation than “2.5% brine by water.” Both can work, but mixing the two approaches leads to wrong salt levels.
-
Temperature affects speed, not ratio. Warmer temperatures ferment faster, but the salt percent still determines which microbes dominate. Keep your ratio correct even if you adjust temperature.
Quick Reference Calculation Table
| Brine Percent | Salt per 100 g Water |
|---|---|
| 2% | 2 g |
| 3% | 3 g |
| 5% | 5 g |
Use the table as a shortcut: multiply the “salt per 100 g water” number by your water amount in hundreds of grams.
A Practical Mini-Workflow You Can Repeat
- Measure how much water your jar needs to cover vegetables.
- Convert mL to grams.
- Pick your brine percent (often 3% for a first pass).
- Weigh salt using Salt = Water × percent / 100.
- Dissolve, pour, submerge, and then let time do the rest.
Once you can do those five steps, brine ratios stop being a mystery and start being a controllable variable.
8.3 Water Hardness, Minerals, and Their Impact on Fermentation
Water Hardness and Minerals Foundations
Water hardness is mainly about dissolved calcium (Ca²⁺) and magnesium (Mg²⁺). For home fermentation, these ions matter because they change how microbes behave, how enzymes work, and how proteins and textures set. Soft water often ferments “easier” in the sense that it’s less likely to interfere, while very hard water can nudge outcomes—sometimes subtly, sometimes enough to notice in thickness, clarity, or carbonation.
Hardness is usually described as mg/L of calcium carbonate (CaCO₃). You don’t need lab equipment to use this idea: you can treat hardness as a knob that shifts results, then compensate with process control (temperature, time, salt level, and starter amount).
How Minerals Influence Fermentation
Calcium Effects
Calcium can strengthen cell walls and influence how lactic acid bacteria (LAB) and acetic acid bacteria operate. In yogurt, calcium also interacts with milk proteins, which can affect curd firmness. In brined vegetable ferments, calcium can contribute to firmer textures because pectin in plant cell walls is less likely to break down as quickly.
Practical implication: if your yogurt is consistently looser than expected, hard water may be part of the story, especially if you’re using water to dissolve starter, clean equipment with residues, or adjust recipes with added water.
Magnesium Effects
Magnesium is essential for many enzymes, but too much can shift microbial balance. In practice, magnesium tends to be less noticeable than calcium for texture, yet it can still affect fermentation speed and the “feel” of the final product.
Practical implication: if kombucha tastes flatter or finishes slower than usual at the same sugar and temperature, mineral composition may be contributing, even when pH drops normally.
Carbonate and Bicarbonate Buffering
The most important mineral-related variable for fermentation is not just hardness—it’s alkalinity. Carbonate and bicarbonate ions resist pH change. Since fermentation works by acidifying the medium, higher alkalinity can slow the pH drop and require more time to reach the same sourness.
Practical implication: two waters with the same hardness can behave differently if one has higher alkalinity. If you measure pH, you’ll see the difference as a slower descent.
Mind Map: Water Hardness and Fermentation
Yogurt: What to Expect and How to Adjust
Yogurt relies on LAB producing lactic acid and causing milk proteins to coagulate. Hard water can influence protein behavior and the rate of acidification indirectly through buffering.
Example: You make yogurt with the same milk and starter, but after switching to a new water source for rinsing equipment and for any added water, your yogurt sets later and ends slightly looser. Fix it by keeping incubation temperature steady and using a consistent endpoint: stop when the yogurt reaches a target thickness and acidity rather than relying only on clock time. If you have a pH meter, aim for a consistent pH range across batches.
If you don’t measure pH, use a process marker: the moment the curd holds a spoon line without immediately flowing back. Then refrigerate promptly to slow further changes.
Kombucha: Acidity Pace and Carbonation
Kombucha’s flavor depends on how quickly the brew acidifies and how much CO₂ forms during the second fermentation. Higher alkalinity can slow acidification, which can make the brew taste less sharp at the same time point.
Example: Your first fermentation reaches the usual color and aroma, but the second fermentation produces less carbonation than before. Mineral buffering may have left the brew at a higher pH, reducing how efficiently the culture shifts during bottling. Adjust by checking pH before bottling and extending first fermentation only until it reaches your usual acidity target.
Also keep sugar consistent. Minerals change the rate; sugar changes the available substrate. If you change both, troubleshooting becomes guesswork.
Brined Vegetables: Crispness and Softening
In lacto-fermented vegetables, salt selects for LAB and helps prevent unwanted microbes. Calcium can support firmer textures, but alkalinity can still slow acidification, which indirectly affects crispness because softer textures often correlate with slower acidification.
Example: Your sauerkraut is safe but turns less crisp than expected. If your salt ratio is correct and the fermentation temperature is stable, test whether your water has higher alkalinity. A practical adjustment is to keep salt at the recipe’s target and extend fermentation time until the flavor is properly tangy and the texture stabilizes. Don’t compensate by lowering salt unless you’re also prepared to monitor safety closely.
Advanced Details Without the Lab Coat
Using pH as the Bridge Between Water and Microbes
Hardness and minerals rarely “cause” one single outcome. They change the medium’s resistance to pH change and the way proteins and plant cell structures behave. pH measurement turns those effects into something you can control.
A simple workflow: measure pH at the start and at the usual decision point. If the pH drop is slower, extend time or adjust process variables that affect acid production (temperature and starter activity) rather than changing multiple things at once.
Keeping Variables Clean
Minerals can also show up as residues. If you rinse jars with hard water and don’t dry properly, you can leave mineral films that affect surface contact. Use hot water and thorough drying, then proceed with your normal sanitation steps.
Quick Reference: What to Do When Water Changes
- If acidity arrives late, extend fermentation to your pH or sensory endpoint.
- If texture shifts, keep temperature and salt/sugar constant and adjust time to the same endpoint.
- If carbonation is weak, verify acidity before bottling and keep sugar consistent.
- If results vary batch to batch, record water source and endpoint pH so you can separate “water effects” from “process effects.”
8.4 Texture Outcomes for Vegetables and Fermented Doughs
Texture is the visible result of microbial activity plus physical structure. In vegetables, the structure is mostly cell walls and water movement. In doughs, it’s the gluten network (or starch gel) and how gas and acids change it. The same fermentation principles apply—control salt, temperature, time, and oxygen—but the texture targets differ.
Foundational Texture Levers
Salt and osmosis. Salt pulls water out of vegetable cells and selects for lactic acid bacteria. Too little salt means softening and surface growth; too much can slow fermentation and leave a “stalled” crunch. A practical rule is to aim for a brine strong enough that vegetables taste pleasantly salty, not harsh.
Temperature and speed. Warmer ferments move faster, but they also increase enzyme activity and can accelerate softening. Cooler ferments often preserve crispness longer because the process is slower and more predictable.
Time and acid strength. Acidification changes pectin behavior in vegetables and affects proteins and starches in doughs. In both cases, texture improves up to a point; after that, continued breakdown can turn crisp into limp or springy into gummy.
Oxygen exposure. Vegetables in brine are mostly anaerobic, which favors lactic acid fermentation. Doughs are often mixed with some oxygen at the start, then become more anaerobic as fermentation proceeds. Oxygen mainly affects surface behavior and off flavors.
Vegetables in Brine: What “Good” Looks Like
Crispness comes from intact cell walls and limited enzymatic breakdown. When fermentation is on track, you’ll see steady bubbling early, then calmer activity as acidity rises. The brine should stay clear to lightly cloudy, and the vegetables should remain submerged.
Example: Crunchy sauerkraut-style cabbage. Shred cabbage, salt it, and pack tightly so liquid covers the cabbage. If the cabbage is already tender before fermentation, it will soften faster; start with firm heads. Expect a firmer bite when you keep the ferment cool and avoid long delays between packing and the first acidification.
Common texture failures and causes.
- Soft, mushy vegetables: often too little salt, warm temperatures, or vegetables not fully submerged.
- Slimy brine: usually insufficient salt or contamination that allows unwanted microbes to dominate.
- Wrinkled, dry surface: vegetables exposed to air or brine level dropping.
Vegetables in Brine: Advanced Control
Brine clarity and sediment. Light cloudiness is normal as fermentation progresses. Heavy, foul-smelling sediment suggests the wrong microbial mix or temperature swings.
Packing density. Tightly packed vegetables reduce oxygen pockets. Oxygen pockets can lead to uneven fermentation, where some pieces acidify while others remain vulnerable to softening.
Size and uniformity. Smaller pieces ferment faster and can become tender sooner. For consistent texture, cut to similar thickness.
Fermented Doughs: What Changes Texture
Dough texture is a balance of gas retention, gluten development, and starch hydration. Fermentation adds two key effects: it produces acids that influence gluten behavior, and it generates gas that expands the dough.
Example: Lactic sourdough-like dough with controlled tang. Use a starter that is active and fed on a schedule you can repeat. Mix dough to the intended hydration, then ferment at a temperature that matches your goal. If you ferment too long, the dough can lose strength and collapse, producing a dense crumb.
Key texture outcomes.
- More rise, open crumb: usually comes from adequate fermentation time plus sufficient gluten strength.
- Tight crumb: often from under-fermentation or dough that was too cold to expand.
- Gummy or gummy-dense crumb: can result from over-fermentation, excessive acidity, or under-baking.
Fermented Doughs: Systematic Troubleshooting
Start by separating fermentation issues from baking issues.
- If dough rises then collapses: likely over-fermentation or dough too weak from low gluten development.
- If dough barely rises: starter activity may be low, dough may be too cold, or fermentation time may be insufficient.
- If crumb is gummy: check bake completion first; fermentation can contribute, but under-baking is a frequent culprit.
Practical adjustment example. If your dough is consistently over-proofed, reduce fermentation time or lower the temperature. If it’s under-proofed, increase time or warm slightly, but keep the dough’s handling consistent so you’re changing one variable at a time.
Mind Map: Texture Outcomes for Vegetables and Fermented Doughs
Putting It Together: A Unified Texture Workflow
For vegetables, set salt and packing first, then keep temperature steady and ensure full submersion. For doughs, set starter activity and dough hydration first, then control fermentation temperature and time so the dough reaches expansion without losing strength. In both cases, texture is a measurable outcome of process control, not a lucky accident.
8.5 Preventing Softening, Sliminess, and Unwanted Growth
Preventing Softening, Sliminess, and Unwanted Growth
Softening and sliminess usually mean the “good” microbes are losing the competition—or the environment lets the wrong organisms take over. The fix is rarely one magic trick; it’s a chain of small controls: salt or acidity, temperature, oxygen exposure, and cleanliness. Think of it as keeping the fermentation on a short leash.
Foundational Causes and What They Look Like
Softening in vegetables often comes from too-weak brine or brine dilution, which reduces the lactic acid bacteria’s advantage. You may notice leaves that go limp, surfaces that look slightly wrinkled, or a texture that turns from crisp to rubbery to mushy.
Sliminess is commonly linked to surface growth and biofilm-forming microbes that thrive when oxygen is available and salt is too low. The slime can appear as a slick layer, stringy strands, or a “slippery” feel even when the smell is only mildly off.
Unwanted growth includes mold, fuzzy patches, or colored films. Mold is usually aerobic and shows up on the surface, especially when the ferment is not fully submerged or when headspace is large.
A useful rule: if the ferment smells pleasantly sour and tastes cleanly acidic, the process is likely progressing. If it smells musty, rotten, or “wet basement,” treat it as a contamination event and discard.
Core Prevention System
Start with the environment that favors the right microbes.
-
Use the correct salt level
- For lactic vegetable ferments, salt is the gatekeeper. Too little salt slows acidification and allows slime-formers to gain ground.
- Example: If you’re making a 1-liter jar brine and you consistently under-measure salt, you’ll often see softening within a few days. Correcting the salt ratio usually restores crispness.
-
Keep everything submerged
- Exposure to air encourages surface films and mold. Even if the liquid is salty, the top layer can become a different ecosystem.
- Example: In a cabbage ferment, if you pack too loosely, the top may float. Using a weight and ensuring brine covers the vegetables prevents surface issues.
-
Control temperature
- Warm temperatures speed fermentation, but they also increase the chance of off outcomes if the process overshoots or stalls.
- Example: A ferment kept in a hot kitchen may reach “tangy” quickly, yet develop softening later. Moving it to a steadier, cooler spot often stabilizes texture.
-
Manage oxygen exposure intentionally
- Some ferments tolerate oxygen at the surface if they acidify fast. Others need strict submersion.
- Example: For brined vegetables, minimize oxygen by using weights and filling jars appropriately.
-
Maintain cleanliness without over-sanitizing
- Clean tools reduce the chance of introducing unwanted organisms. Over-sanitizing isn’t the goal; consistent sanitation is.
- Example: If you reuse a jar without washing thoroughly, you may see recurring sliminess in the same style of ferment.
Mind Map: Texture and Growth Control
Monitoring and Early Intervention
Check your ferment at predictable intervals. Look for bubbles, a steady sour smell, and a brine that remains clear or only slightly hazy. A thin white film can be harmless in some contexts, but fuzzy growth, strong discoloration, or a rotten odor is not a “wait and see” situation.
If you spot a surface film early and the ferment smells cleanly sour, you can often correct the immediate cause by improving submersion and reducing oxygen exposure. Remove the film with clean utensils, then confirm that brine fully covers the vegetables. If the film returns quickly, treat that as evidence that the underlying conditions—usually salt level, packing, or temperature—need adjustment.
Practical Examples That Tie It Together
-
Crisp Sauerkraut Scenario: You weigh salt carefully, pack tightly, and keep cabbage under brine with a weight. Result: faster acidification, fewer slime cues, and a texture that stays crisp.
-
Slimy Pickles Scenario: You use a light salt ratio and skip a weight. Result: vegetables float, oxygen reaches the surface, and slime appears. Fixing salt measurement and adding a weight typically resolves the issue.
-
Moldy Top Scenario: You leave too much headspace and the top layer dries slightly. Result: mold appears on the surface. Fixing jar fill level and ensuring full submersion prevents recurrence.
Corrective Actions That Don’t Create New Problems
When something goes wrong, avoid “patching” without addressing the cause. If there’s mold or a clearly unpleasant odor, discard rather than trying to salvage. For future batches, adjust one variable at a time: salt ratio first, then submersion method, then temperature stability. That order prevents you from chasing symptoms while the real driver stays in place.
9. Measurement, Monitoring, and Data Driven Troubleshooting
9.1 Using pH, Temperature, and Time to Guide Fermentation
Using pH, Temperature, and Time to Guide Fermentation
Fermentation is a controlled shift in chemistry. You guide it by managing three levers: pH (how acidic the mix becomes), temperature (how fast microbes work), and time (how long you let the process run). When you treat these as a system, troubleshooting becomes less guessy and more like problem-solving.
pH as the Process Checkpoint
pH tells you where the fermentation is in its “acidification arc.” Most lactic fermentations and yogurt-style ferments follow a predictable pattern: pH drops as microbes convert sugars into organic acids. In practice, you don’t need to chase a single magic number; you need a target range that matches the food.
- Yogurt-style ferments: Aim for a firm set and a tang that matches your preference. Measure pH near the end of incubation, not at the start.
- Kombucha-style ferments: pH is a strong indicator of acid development, but carbonation and flavor also depend on sugar and oxygen exposure.
A useful habit: record the pH at the same stage each time. For example, “pH at 6 hours” is more actionable than “pH sometime today.”
Temperature as the Speed Dial
Temperature changes reaction rates and microbial growth. Warmer conditions generally speed acid production, but they can also push off-flavors if the culture composition or milk/tea chemistry isn’t aligned.
A practical example: if your yogurt is consistently too runny, you might be incubating too warm (fast acidification can outpace proper protein network formation) or too cool (slow acidification can yield weak structure). Temperature control is the difference between “close enough” and “repeatable.”
Time as the Completion Timer
Time is not just duration; it’s the accumulation of acid and flavor compounds. Two batches at the same temperature can diverge if starter strength, sugar availability, or starting pH differs.
Think of time as the final step after you’ve set temperature and starter conditions. If pH is your checkpoint, time is your schedule. You can shorten time if pH reaches target early, or extend it if pH is lagging.
Mind Map: The Three Levers in Practice
How to Measure Without Making It Complicated
Use a calibrated pH meter or reliable strips, but measure consistently. For pH meters, rinse and blot the probe between samples. For strips, read promptly and under steady lighting.
Temperature measurement matters too. If your incubation vessel is insulated, the “room temperature” is not the relevant number. Measure the actual liquid temperature where fermentation happens.
Example: Yogurt Incubation with a pH Stop Rule
Start with a consistent inoculation ratio and milk prep. Incubate at your chosen temperature and begin checking pH toward the end of the expected window.
- Batch A: At 6 hours, pH is already near your target range. Stop incubation and refrigerate to slow further acidification.
- Batch B: At 6 hours, pH is still higher than target. Continue incubation in short increments, checking again after a measured interval.
This approach prevents the common “incubate until it feels right” trap, where texture cues can lag behind chemistry.
Example: Troubleshooting a Slow Ferment
If pH drops too slowly, temperature is the first suspect, then starter strength, then starting sugar availability.
- Confirm the actual incubation temperature.
- Verify starter handling. A starter that sat warm too long or was diluted too much can underperform.
- Check the recipe’s sugar source. For vegetable ferments, salt concentration affects which microbes dominate and how quickly acid forms.
Advanced Detail: Using pH and Temperature Together
Temperature affects how quickly pH changes, so you can estimate progress. If your pH drop rate is slower than usual at the same temperature, something upstream changed: starter viability, ingredient composition, or sanitation.
A simple record sheet turns this into a repeatable system:
- Starting pH
- Incubation temperature
- pH at a fixed time
- Final pH and sensory outcome
When you keep those variables aligned, you can adjust one lever at a time and learn what actually works for your setup.
9.2 Sensory Evaluation Methods with Clear Acceptance Criteria
Sensory evaluation is how you decide whether a batch is “good enough” without waiting for a lab report. For fermented foods, the goal is not to chase a single perfect flavor; it’s to confirm that the batch matches the expected profile for safety, quality, and repeatability.
What to Evaluate First
Start with the senses in a fixed order so you don’t accidentally bias yourself. Use this sequence every time:
- Appearance: color, clarity, surface film, bubbles, and any unusual growth.
- Aroma: first sniff from a distance, then a closer sniff after gentle agitation.
- Taste: small sample, then a second sample after you notice acidity and aftertaste.
- Texture: mouthfeel, thickness, carbonation feel, and any sliminess.
A practical rule: if appearance suggests contamination, stop. Don’t “taste test” your way out of a safety problem.
Build Acceptance Criteria That Match Your Target
Acceptance criteria are short statements that define what “within spec” means. They should be measurable or at least consistently describable.
For each product, define three bands:
- Pass: meets expected profile.
- Borderline: still acceptable but needs adjustment next time.
- Fail: discard or do not consume.
Yogurt Style Acceptance Criteria Example
- Appearance: uniform off-white to pale yellow; no visible mold.
- Aroma: clean tang like cultured dairy; no solvent or rotten notes.
- Taste: noticeable sourness that feels smooth, not harsh; no bitterness.
- Texture: cohesive gel; no watery separation beyond a small amount of whey.
Borderline example: slightly thin gel and mild sourness—often a sign of under-incubation or too much heat loss.
Fail example: fuzzy growth, strong off-odors, or a slimy texture that persists after chilling.
Kombucha Style Acceptance Criteria Example
- Appearance: tea color appropriate to your tea; mild cloudiness is normal.
- Aroma: tea-forward with lactic tang and light fermentation notes.
- Taste: balanced sourness; carbonation should feel lively but not sharp.
- Mouthfeel: no “stale” or musty character.
Borderline example: very low carbonation and flat aroma—often indicates under-fermentation or weak bottling conditions.
Fail example: persistent mold-like specks or a sourness that tastes unpleasantly sharp with off-aromas.
Use Structured Scoring Instead of Vibes
A simple scoring sheet reduces argument with yourself. Rate each category on a 0–3 scale:
- 0: clearly wrong
- 1: off but not catastrophic
- 2: acceptable
- 3: matches target
Then set a minimum total for “Pass.” For example, require:
- Aroma and taste must be at least 2
- Appearance must be at least 2
- Texture can be 1 only if taste and aroma are 2+
This prevents a batch from passing because it “looks fine” while tasting wrong.
Mind Map: Sensory Evaluation Workflow
Practical Example: One Batch, Three Decisions
Imagine you’re evaluating a plain yogurt.
- Appearance: smooth and uniform, no surface fuzz → Pass.
- Aroma: clean cultured smell → Pass.
- Taste: sourness is strong and slightly bitter → Borderline.
- Texture: gel is cohesive but a bit grainy → Borderline.
Decision: label as Borderline, eat only if your household accepts it, and adjust next batch by lowering incubation time or checking starter strength.
Now imagine kombucha.
- Appearance: normal cloudiness, no growth → Pass.
- Aroma: tea with tang → Pass.
- Taste: sour but also musty → Fail.
Decision: discard. The musty note is not something you “fix” with chilling.
Keep Notes That Actually Help
Write short, consistent notes tied to your criteria. Use the format: Category: observation → likely cause to test next time.
Example: “Aroma: sharp vinegar edge → check sugar amount and bottling time.”
This turns sensory evaluation into a feedback loop instead of a memory game.
9.3 Common Defects and Root Cause Analysis
When a batch goes sideways, the goal is not to guess harder—it’s to narrow the cause. Start by separating defects into three buckets: microbial imbalance, process drift, and packaging or handling issues. Then confirm with simple observations you can make without lab gear: smell, surface appearance, texture, carbonation, and whether the defect shows up immediately or after storage.
Mind Map: Defect to Root Cause Path
Step 1: Observe with Specific Signals
Smell is often the fastest clue. Sour and tangy usually means the right microbes are doing their job. Sharp, solvent-like, or rotten notes point to contamination or an oxygen/temperature mismatch.
Surface appearance matters. A thin, uniform film can be normal in some ferments, but fuzzy growth, colored spots, or patchy textures are not. If you see anything that looks like mold, treat it as a discard signal.
Texture tells you whether fermentation progressed evenly. Yogurt that’s grainy can come from overheating milk, while watery separation can come from under-incubation or insufficient protein setting.
Acidity and carbonation are process outcomes. If kombucha tastes flat and sweet, fermentation likely stopped early or sugar was insufficient. If it’s overly fizzy or foams aggressively, bottling pressure was too high.
Step 2: Classify Defects into Three Buckets
- Microbial imbalance: the wrong organisms dominate, often from contamination, incorrect temperature, or starter mismatch.
- Process drift: the intended organisms are present, but conditions were off—time, temperature, salt, sugar, or oxygen.
- Handling and packaging issues: the ferment was fine, then got disrupted by dirty tools, warm storage, or incorrect sealing.
Mind Map: Yogurt Defects and Likely Causes
Example: Grainy Yogurt from Temperature Overshoot
You incubate at a target range, but the container sits on a warm surface and runs hotter than expected. The proteins coagulate too aggressively, producing a grainy mouthfeel. Root cause confirmation is straightforward: compare the incubation temperature you measured (not the room temperature) with your target range, and check whether the batch was disturbed during the set. Correction is to stabilize incubation temperature and avoid moving or stirring the jars until fully set.
Mind Map: Kombucha Defects and Likely Causes
Example: Flat Kombucha from Under-Sugaring
A batch tastes sweet after the first fermentation because the microbes didn’t have enough fermentable sugar. The fix is not “ferment longer forever,” because longer time can also increase harshness. Instead, verify the sugar amount you used, ensure it dissolved fully, and keep the first fermentation within your temperature target. For second fermentation, measure the added flavoring sugar consistently so carbonation lands in a predictable range.
Step 3: Confirm with Evidence from Your Process
Use a quick checklist: What changed since the last good batch? Common culprits are a new thermometer, a different jar size, a different starter source, or a change in how long bottles sat warm after sealing. If you keep batch notes, you can often identify the defect’s cause by comparing time and temperature first, then sugar or salt.
Step 4: Correct Without Starting Over
If the defect is likely process drift, you can adjust next time with minimal waste. For yogurt, correct incubation temperature and avoid stirring during set. For kombucha, correct sugar dosing and manage second-fermentation warmth and timing. If the defect is likely contamination—especially mold-like growth—discard and reset sanitation practices before attempting another batch.
Mind Map: Cross-Cutting Handling Issues
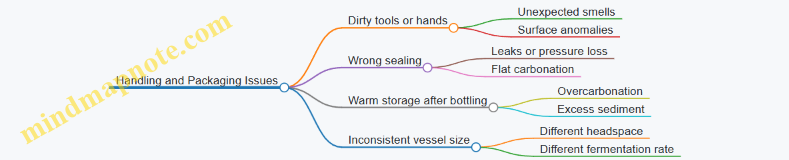
Example: Overcarbonation from Warm Bottling Window
You bottle for carbonation and leave bottles in a warm spot longer than usual. The result is aggressive fizz and possible foaming. Root cause confirmation is the storage temperature and duration after sealing. Correction is to bottle at the same temperature you used previously and to check carbonation earlier, then refrigerate promptly once the target is reached.
Practical Root Cause Summary
Most defects trace back to one of five levers: temperature, time, sugar or salt, oxygen exposure, and sanitation. Observe the symptom, classify the bucket, then adjust the matching lever next batch. That approach turns troubleshooting from a guessing game into a repeatable process.
9.4 Corrective Actions Without Starting Over
When a batch goes sideways, the goal is to fix the specific constraint that caused the defect, not to “reset everything and hope.” The fastest path to a good outcome is to (1) identify the failure mode, (2) confirm which variable is out of range, and (3) apply the smallest correction that restores the right environment for the microbes you want.
Step 1: Identify the Failure Mode
Start with what you can observe without guessing.
- Smell is off: sour-but-clean, buttery, yeasty, or truly rancid.
- Texture is wrong: thin where it should be thick, slimy where it should be firm, curdled where it should be smooth.
- Surface growth appears: harmless film, fuzzy mold, or patchy discoloration.
- Fermentation pace is slow: little bubbling, minimal acidification, or no carbonation.
A useful rule: if you see fuzzy mold, discard. If you see a thin film or sediment, you may be able to correct—especially in kombucha—because you’re often dealing with surface yeast or incomplete fermentation rather than outright contamination.
Step 2: Confirm the Likely Variable
Match symptoms to likely causes.
- Too warm too fast often causes harsh flavors, weak structure, or runaway activity.
- Too cool slows acidification and leaves more time for unwanted organisms.
- Wrong salt or sugar changes microbial selection and can cause softness or stalled fermentation.
- Starter handling errors (old, diluted, or contaminated starter) reduce performance.
- Sanitation lapses introduce competitors that may not outcompete immediately.
If you can measure temperature and pH, do it. If you can’t, use time plus sensory cues, but keep corrections conservative.
Step 3: Apply the Smallest Effective Correction
Corrections depend on the product.
Yogurt Style Fixes
- Too thin: often under-incubation or insufficient solids. Correct by extending incubation in a stable warm environment until set forms. If the milk was too hot during heating or cooled too quickly, you may need a fresh starter; however, you can still try a short re-incubation before discarding.
- Grainy or separated: usually overheating milk or aggressive stirring after inoculation. If curd is already formed, gently mix only if needed for uniformity; otherwise, strain to salvage texture.
- Sour but not set: give it more time at the target temperature. Yogurt cultures keep working as long as the environment stays stable.
Kombucha Fixes
- Stalled first fermentation: check tea strength, sugar availability, and temperature. If the brew is still clean-smelling and not moldy, you can add a small amount of fresh sweet tea and continue fermentation.
- Too sweet after bottling: carbonation may be low. You can move bottles to a warmer spot for a short period, then refrigerate once carbonation is achieved.
- Harsh or overly vinegary: reduce fermentation time next batch, but for the current batch you can dilute with plain tea or chill sooner to slow further acidification.
- Sediment and haze: often normal. If it smells acceptable, swirl gently and proceed with bottling or refrigeration.
Lacto Fermented Vegetables Fixes
- Softening: commonly too warm, too little salt, or vegetables not fully submerged. If the brine is still clean and the smell is pleasant, you can replace with correctly mixed brine and re-submerge.
- Surface scum: skim it if it’s not fuzzy and the brine remains clean. Improve the barrier method (weights, air exclusion) to prevent recurrence.
Mind Map: Corrective Actions Workflow
Example: Yogurt That Won’t Set
A batch incubated at a slightly cool temperature for too long can taste pleasantly tangy but remain loose. Instead of discarding, keep it in the same warm zone and avoid opening the container repeatedly. After the set begins, stop incubation and refrigerate promptly. If it never thickens after a reasonable additional window, the starter may be weak; then you can decide whether to strain for thickness or restart with a fresh starter.
Example: Kombucha That’s Too Sweet After Bottling
If bottles are still sweet and carbonation is low, move them to a warmer area for a short, controlled period. Re-check by opening one bottle carefully to release pressure and assess carbonation. Once the target fizz is reached, refrigerate to slow fermentation. If the brew smells clean and there’s no fuzzy growth, this is a correction, not a gamble.
Example: Vegetables with Surface Scum
A thin, harmless film can appear when vegetables are exposed to air. Skim the surface if it’s not fuzzy, then ensure full submersion with a clean weight. If the brine tastes too salty or too weak, correct it by replacing with properly mixed brine. The key is restoring the environment so lactic acid bacteria regain dominance.
Verification and Stop Rules
After any correction, verify with one measurable cue: set formation for yogurt, carbonation for kombucha, and brine cleanliness plus firmness for vegetables. Stop further intervention once the batch reaches the intended state, because extra time or extra handling can push the flavor and texture past the point you wanted.
9.5 Keeping Batch Records for Reliable Outcomes
Batch records turn “it seemed fine” into “it was fine because…” When you ferment at home, small differences—milk fat, tea strength, room temperature, jar cleanliness—can shift results. A good record captures those variables in a way you can actually use later, including when something goes wrong.
What to Record and Why It Matters
Start with a simple rule: record inputs, record process conditions, and record outcomes. Inputs explain why the batch behaved as it did; process conditions explain how it changed; outcomes tell you what to repeat.
Inputs
- Date started (use a consistent format). Example: 2026-02-20.
- Product type and batch size. Example: 1 liter milk for yogurt; 2 liters tea for kombucha.
- Ingredients with measurable details. Example: milk type (whole, skim), starter amount (tablespoons or grams), tea type and grams per liter, sugar type and grams per liter.
- Water source or water treatment for brines and kombucha. Example: filtered tap vs. bottled.
Process Conditions
- Target and actual temperature. Example: incubator set to 43°C; measured at 41°C.
- Time checkpoints. Example: “incubated 6 hours, checked at 5.5 hours.”
- Sanitation steps. Example: “bottles rinsed with hot water, then air-dried.”
- Vessel details. Example: jar size, lid type, whether cloth cover was used.
Outcomes
- Sensory notes with specifics. Example: yogurt “clean tang, no bitterness, set firmly.” Kombucha “tea flavor present, carbonation moderate, no harsh vinegar note.”
- Measured acidity if you track it. Example: pH 4.2 at end of first fermentation.
- Texture and separation. Example: “whey released slightly after refrigeration” or “no separation after 24 hours.”
- Yield and losses. Example: “strained 650 g from 1 liter.”
A Practical Template You Can Reuse
Keep one page per batch. If you ferment weekly, you’ll thank yourself later.
Batch Record Template
- Batch ID: ________
- Date Started: ________
- Ferment Type: ________
- Batch Size: ________
- Ingredients: ________
- Starter Amount: ________
- Temperature: target ________ / actual ________
- Time: start ________ / end ________ / checkpoints ________
- Vessel and Cover: ________
- Sanitation Notes: ________
- End Point Measurements: pH ________ / other ________
- Sensory Outcome: ________
- Storage Conditions: fridge temp ________ / time ________
- Result Rating: repeat? yes/no and why ________
Mind Map: Batch Records That Actually Help
Examples That Show the Logic
Example 1: Yogurt That Set Too Soft
- Record shows: milk heated to 80°C, cooled to 43°C; incubation 6 hours; starter 2 tablespoons per liter.
- Outcome: “soft gel, slight whey after 12 hours.”
- Likely cause from the record: incubation temperature was actually 39°C.
- Adjustment you document: “incubate until measured 42–43°C; keep same starter and time.”
Example 2: Kombucha With Flat Carbonation
- Record shows: second fermentation 24 hours; bottles filled to 90% capacity; sugar added during flavoring was 10 g per liter.
- Outcome: “little fizz, sweet tea taste.”
- Likely cause from the record: too little fermentable sugar or too short time.
- Adjustment you document: “increase sugar to 20 g per liter and check carbonation at 18 hours.”
Turning Notes into Decisions
A record is only useful if you convert it into an action. After each batch, write one sentence answering: “What will I do differently next time, if anything?” If nothing changes, say why. That prevents you from “tweaking” based on memory instead of evidence.
Common Mistakes to Avoid
- Recording only outcomes. You can’t diagnose without inputs and conditions.
- Mixing multiple changes at once. If you change starter, temperature, and time together, the record can’t tell you which one mattered.
- Using vague time. “Overnight” is fine for your calendar, not for your troubleshooting.
- Forgetting storage notes. Refrigeration can change texture and separation, especially for strained products.
A reliable batch record is short, consistent, and honest about what you measured versus what you guessed. Over time, your own data becomes the clearest guide you have.
10. Safety Practices for Fermented Foods
10.1 Risk Factors for Contamination and Spoilage
Contamination and spoilage are usually not mysterious. They happen when the “wrong” microbes get a foothold, when conditions stop favoring the microbes you want, or when handling breaks the chain of control. In home fermentation, the goal is simple: reduce opportunities for unwanted organisms, then keep the environment pointed toward safe acidification and fermentation.
Risk Factors That Start the Problem
1. Dirty or poorly sanitized equipment is the most common entry point. Even if your starter is healthy, a jar rim with dried residue can seed the next batch. A practical example: if you reuse a spoon that touched sweet fruit during bottling, you can accidentally introduce yeasts that compete with your intended fermentation.
2. Cross-contamination during handling happens when “clean” and “dirty” tasks share the same workspace. Example: pouring kombucha into bottles with a funnel that previously handled raw fruit can move surface microbes into the drink.
3. Contaminated ingredients include tap water with unusual microbial load, unwashed produce, or milk that is already compromised. For yogurt, milk that smells off or has been stored too long can lead to weak acidification and a higher chance of off flavors.
4. Inadequate starter management can turn a reliable culture into a weak one. If you let yogurt starter sit warm for hours or repeatedly dilute kombucha starter without maintaining feeding and temperature, you reduce the dominance of the desired microbes.
Risk Factors That Let Spoilage Win
5. Temperature outside the target range changes which microbes grow fastest. Example: fermenting yogurt too cool slows acidification, giving other organisms time to multiply. Fermenting too warm can push rapid acid production but also increase the chance of texture defects and sourness that tastes “harsh” rather than clean.
6. Time that exceeds the plan matters because fermentation is not a one-way switch. If you keep kombucha at room temperature long after it reaches your desired acidity, you may encourage unwanted yeasts and more sediment than you want.
7. Oxygen exposure when it shouldn’t happen is a factor for some ferments. Kombucha’s surface film is normal, but letting other oxygen-loving contaminants enter during bottling can create off aromas. For lacto-fermented vegetables, oxygen at the surface can lead to softening and surface growth.
8. Sugar and nutrient imbalance can shift the microbial lineup. Example: using very low sugar in kombucha can lead to slow fermentation and inconsistent carbonation, while too much sugar without proper bottling control can raise pressure and encourage yeast-driven changes.
9. Salt and brine errors affect vegetable ferment safety and texture. Too little salt can reduce lactic acid dominance, while too much salt can slow fermentation and leave vegetables under-acidified.
Risk Factors That Hide in Plain Sight
10. Poor sealing and pressure management create two problems: leaks and uncontrolled carbonation. Example: bottles that aren’t properly capped for second fermentation can release carbonation early, while over-pressurized bottles can leak and spread sticky residue that’s hard to clean.
11. Inconsistent end points are a silent risk. If you rely only on “it looks done,” you may miss that your batch reached acidity slowly due to cooler rooms or weaker starter. Measuring pH or using a consistent time-and-temperature target reduces surprises.
12. Storage conditions after fermentation determine whether spoilage continues. Example: leaving finished yogurt at warm room temperature for extended periods can allow surviving contaminants to grow even if the fermentation started well.
Mind Map: Risk Factors for Contamination and Spoilage
Example: A Systematic Diagnosis Workflow
If a batch tastes “off” or develops surface growth, treat it like troubleshooting a process, not like guessing. First, ask whether the contamination likely entered during equipment contact (did anything touch the ferment that wasn’t clean?). Next, check whether conditions favored the wrong microbes by reviewing temperature and time. Then confirm whether the ferment reached the expected end point; for yogurt, that’s consistent thickening and tang, and for vegetables it’s firm texture with a clean sour profile. Finally, examine storage and packaging: leaks, residue, or warm holding can turn a borderline batch into a spoiled one.
Practical Guardrails That Reduce Risk
Use a “clean-to-dirty” workflow: sanitize tools, then handle ingredients, then bottle or pack, and only then clean up. Keep fermentation temperatures stable, and don’t extend time just because you’re busy. Measure when possible, and when you can’t, standardize your process so you’re not comparing batches made under different conditions.
10.2 Mold, Yeast, and Surface Growth Identification Basics
Surface growth in fermented foods is usually one of three things: harmless yeast, benign-to-problematic molds, or mixed surface films that include both. The goal is not to guess from vibes; it’s to use consistent visual cues plus a simple smell-and-appearance check to decide what to do next.
What You Are Looking At
Start with the surface pattern, because it tells you how the organism is growing.
- Yeast tends to form a thin film or patchy surface layer. It often looks slightly cloudy or matte, and it may leave a faint residue when you gently wipe.
- Mold typically appears as fuzzy, hairlike, or powdery growth. It can be green, white, gray, black, or even pinkish, and it grows outward in distinct colonies.
- Mixed films can look like a uniform pellicle (common in some ferments) or like a raft-like layer. These can be normal in certain processes, but they still need evaluation.
A key rule: acid-resistant growth is less likely to be mold. Many properly fermented foods become acidic enough that mold struggles. If your ferment stayed near neutral pH, mold has a much easier time.
Visual Identification Cues That Actually Help
Use these cues in order, because they reduce false alarms.
- Texture
- Film-like and smooth suggests yeast or a pellicle.
- Fuzzy, filamentous, or powdery suggests mold.
- Color and distribution
- Yeast often looks uniform or patchy without sharp colony edges.
- Mold often shows distinct colonies with clear boundaries.
- Surface behavior
- If you can stir and the growth disperses into the liquid, it leans yeast-like.
- If it stays as a surface colony with a “stuck” look, it leans mold-like.
If you’re unsure, treat it as mold. In food safety terms, “probably fine” is not a useful category.
Smell Checks Without Making Things Worse
Smell is a tool, not a permission slip.
- Yeast smells can be bread-like, bready, or mildly alcoholic.
- Mold often smells musty, earthy, or like damp paper.
- Off odors that are sharp, rotten, or putrid are a discard signal regardless of appearance.
Do the smell check quickly and close to the container opening. Don’t stir aggressively; you’re trying to observe, not aerate.
The pH and Time Context
Appearance alone can mislead, especially when a ferment is young or under-acidified.
- Young ferments may show surface films before acidity fully develops.
- Under-salted or under-fermented batches are more likely to support mold.
- Temperature swings can slow acid production and give molds more time to establish.
If you have pH strips, use them. A ferment that is clearly acidic is less likely to be mold-dominated, though it doesn’t make mold impossible.
Mind Map: Surface Growth Decision Path
Practical Examples You Can Compare
Example 1: Thin, cloudy film on lacto-fermented vegetables You see a pale, uniform film across the surface. It wipes off with a spoon, and the smell is tangy with a faint bready note. The ferment has been running at a steady cool room temperature and tastes appropriately sour. This pattern fits yeast or a pellicle-like film. Skim if your process normally allows surface films, and keep the vegetables submerged.
Example 2: White fuzzy patches on kombucha-like ferment You notice cottony growth with clear colony edges. The smell is musty rather than tangy, and the growth looks raised and filamentous. Even if the liquid is somewhat sour, the texture and smell point to mold. Discard the batch and sanitize equipment before starting again.
Example 3: Powdery spots on a brined ferment Small powdery dots appear and expand over a day. The color is gray-green and the spots don’t wipe away cleanly. The odor is damp and earthy. Powdery, expanding colonies are classic mold behavior. Discard.
What to Do When You Find Mold
If mold is present, do not salvage by removing the surface. Mold can send microscopic structures below the surface, and fermentation conditions can hide spread. Discard the batch, clean the vessel thoroughly, and review the variables that affect acidification and oxygen exposure.
Prevention Tied to Identification
Good identification is also prevention. If you repeatedly see yeast-like films, you may be dealing with normal surface activity, but you still want consistent submersion and stable temperature. If you repeatedly see mold-like colonies, focus on acidity development, salt/brine accuracy, and minimizing oxygen exposure where your process calls for it.
When you can name the likely organism and connect it to the process conditions, you stop treating each batch like a mystery novel and start treating it like a controlled experiment.
10.3 Safe Handling of Bottled Carbonated Ferments
Bottled carbonated ferments—think second-fermentation kombucha or any drink you bottle after adding fermentable sugar—store pressure. That pressure is the main safety variable, so safe handling starts with controlling how much gas gets made and how you respond if something goes off.
Core Principle: Pressure Management
Carbonation comes from microbes converting sugar into acids and carbon dioxide. More sugar, warmer temperatures, and longer times generally increase gas production. Your job is to set a predictable “gas window” and then keep bottles in conditions that don’t turn a small mistake into a big one.
Example: If you bottle kombucha with fruit juice and leave it at room temperature for two extra days, you’re not just adding flavor—you’re giving the microbes extra time to generate more CO₂. A bottle that was comfortable at 24 hours can become dangerously pressurized at 48 hours.
Bottle Choice and Preparation
Use bottles designed for carbonation (thick glass or bottles rated for pressure). Thin glass and old bottles are a bad match because they can fail under stress.
Before filling:
- Inspect bottles for chips, cracks, and deep scratches.
- Clean and sanitize bottles and caps so you don’t seed unwanted microbes.
- Ensure caps seal properly; a weak seal can cause under-carbonation or inconsistent pressure.
Example: A bottle with a hairline crack may look fine when empty, but it can fail after pressure builds. If you’ve ever heard a “tick” when tapping a bottle, treat it as suspect.
Filling Targets and Headspace
Overfilling reduces headspace and increases the chance of foaming and cap blow-offs during active fermentation. Underfilling can also be problematic because it changes how pressure builds relative to the liquid volume.
A practical approach is to follow your base recipe’s fill level and keep it consistent across batches. Consistency matters because pressure behavior is batch-specific.
Example: If one batch is filled to the shoulder and another to the neck, the second batch may carbonate faster and reach higher pressure sooner, even if the recipe looks identical.
Temperature Control During Second Fermentation
Second fermentation is where pressure rises. Keep bottles in a stable temperature range and avoid placing them in direct sun or near heat sources.
- Warmer temperatures speed gas production.
- Cooler temperatures slow it down, giving you more time to check.
Example: If your kitchen runs hot in the afternoon, move bottles to a cooler spot or shorten the second-fermentation time. The goal is predictable pressure, not maximum carbonation.
Timing and Checkpoints
Instead of “wait until it tastes right,” use checkpoints. Start checking earlier than you think you need to, especially for the first time with a new recipe.
A simple routine:
- Bottle and label the batch with the start time.
- Check at the earliest expected window.
- Continue checking at reasonable intervals until you hit your target carbonation.
- Move to refrigeration promptly once targets are met.
Example: If your usual kombucha second fermentation is 24–36 hours, check at 18–20 hours the first time you change sugar amount or temperature. That single early check can prevent over-pressurization.
How to Test Without Creating a Mess
You need a way to assess carbonation safely. The safest method is to use a pressure-rated bottle and avoid repeated opening.
If you must vent to test:
- Do it over a sink or tray.
- Wear eye protection.
- Open slowly and keep your face away from the opening.
Example: Quick “burps” done repeatedly can release gas unevenly and encourage foaming. One careful test is better than many rushed ones.
Refrigeration as a Pressure Stop
Chilling slows microbial activity and helps stabilize carbonation. Refrigerate bottles as soon as they reach the carbonation level you want.
If you refrigerate too early, carbonation may be low. If you refrigerate too late, pressure can keep rising even in the cold, especially if bottles are still actively fermenting.
Example: A batch that tastes “not quite fizzy” at the end of room-temperature time may still carbonate slightly in the fridge, so don’t assume the first cold day is the final carbonation state.
Recognizing Unsafe Bottles
Do not “test” a bottle that shows warning signs. Remove it from the rest of the batch and handle it cautiously.
Warning signs include:
- Bulging or visibly distorted bottle shape.
- Hissing that continues strongly after refrigeration.
- Leaking around caps.
- Unusual odors combined with excessive pressure.
Example: If a bottle is leaking at the cap, it may have lost seal integrity and could be contaminated. Don’t try to salvage it by re-capping.
Mind Map: Safe Handling Workflow
Case Example: Kombucha Bottled with Fruit
You bottle kombucha after first fermentation and add fruit for flavor. Fruit can add fermentable sugars, so pressure may rise faster than with plain sugar.
- Use pressure-rated bottles and inspect them.
- Keep bottles in a stable room temperature area.
- Label the start time and check earlier than usual.
- When carbonation is at your target, refrigerate immediately.
- If any bottle bulges or leaks, separate it and do not attempt to re-cap.
This workflow keeps the “gas math” under control: you’re not guessing, you’re measuring with time, temperature, and consistent bottle handling.
10.4 Storage Temperatures and Shelf Life Management
Storage temperature is the steering wheel for fermented foods: it slows down microbial activity, changes texture, and affects how long flavors stay pleasant. The goal is not to “freeze” fermentation forever, but to keep the dominant microbes in control while minimizing spoilage risks.
Core Temperature Rules
Most fermented foods follow a simple pattern: colder storage slows acid production and gas formation, while warmer storage speeds them up. Refrigeration is the default for yogurt and most fermented foods after fermentation is complete. Room-temperature storage is usually reserved for products that are meant to continue fermenting under controlled conditions, such as some bottled carbonated ferments.
A practical way to think about shelf life is to separate three processes:
- Microbial activity: lactic acid bacteria, yeast, and other survivors continue working at different rates.
- Chemical changes: acidity, oxidation, and breakdown of proteins or sugars shift flavor and texture.
- Physical changes: separation, softening, and carbonation loss or gain.
Lower temperatures reduce all three, but they do not stop them completely.
Yogurt Storage Targets
Plain yogurt is typically stored refrigerated. At refrigerator temperatures, the culture remains active but slows down, so the yogurt becomes more tangy over time. Texture can also tighten slightly as proteins continue to hold water.
Example: If you incubate yogurt until it reaches a thick set, then refrigerate promptly, you can expect a stable texture for several days. If you leave it warm for hours after incubation, it will keep acidifying and may become thinner or overly sour sooner.
Best practice: Cool quickly after fermentation ends, then store at a consistent refrigerator temperature. Consistency matters more than chasing a perfect number.
Kombucha Storage Targets
Kombucha is trickier because it often contains both acids and carbonation. After bottling, yeast can keep producing gas, especially if the drink is still sweet enough.
Example: If you bottle a second fermentation with added fruit juice, store it cold earlier to slow further carbonation. If you store it warm, pressure rises faster and the drink can become aggressively fizzy.
Best practice: Once you reach your preferred taste and carbonation during second fermentation, move it to refrigeration to slow yeast activity. Open bottles carefully because pressure can build even in the fridge.
Fermented Vegetables and Brined Foods
For lacto-fermented vegetables, the key storage variable is whether the brine stays oxygen-limited and salty enough to keep unwanted microbes from gaining ground. Temperature affects how quickly acidity rises and how fast vegetables soften.
Example: A jar kept colder will usually maintain crunch longer. A jar kept warmer will acidify faster and may soften sooner, even if it remains safe.
Best practice: Keep vegetables submerged and use an airlock or weight system where appropriate. If the brine level drops, top up with properly prepared brine rather than plain water.
Shelf Life Management That Actually Works
Shelf life is not a single number; it’s a range based on starting conditions and handling. Use a simple decision system that combines time, temperature, and sensory checks.
Mind Map: Storage Temperature and Shelf Life
Sensory Checks with Clear Acceptance Rules
Use sensory evaluation as a final gate, not as a substitute for safe handling.
- Yogurt: Look for a clean, sour aroma and a uniform texture. Mild whey separation is common; stir before judging. Discard if you see unusual colors, strong off odors, or slimy films.
- Kombucha: Expect sourness and a pleasant fermented aroma. Sediment is normal. Discard if there is fuzzy growth, rotten odors, or flavors that are clearly putrid.
- Fermented Vegetables: Expect tangy, briny aroma. Surface yeast can sometimes appear as harmless film, but fuzzy or colored mold is a discard signal.
Example: If a vegetable jar smells sharply unpleasant rather than tangy, do not “salvage” by removing the top layer. The risk is not limited to the surface.
Discard Rules and Handling Discipline
When in doubt, discard. The most common storage failures come from warm holding, inconsistent refrigeration, and jars that are not sealed or kept submerged.
Best practice: Label jars and bottles with the fermentation end date, not the start date. That way, you track the period when the product is already in its storage phase.
If you want a concrete workflow, use this sequence: cool promptly, refrigerate consistently, keep brine coverage, and check sensory quality at regular intervals. That combination is boring in the best way: it prevents most problems before they become noticeable.
10.5 When to Discard and How to Prevent Recurrence
Discarding fermented foods is less about fear and more about pattern recognition. Your goal is to stop before a small safety issue becomes a full batch problem, then adjust the process so the same failure mode can’t repeat.
Foundational Decision Rules
Start with three questions: What did you observe? How does it compare to your normal batch? How much time has passed since you noticed the issue?
- If you see fuzzy or spreading mold, discard immediately. Mold can look like harmless “specks,” but fuzzy growth is the key sign.
- If there is a strong off odor that doesn’t match your product’s normal range, discard. For example, yogurt should smell tangy and dairy-like; kombucha should smell pleasantly sour with tea notes.
- If the texture is radically wrong for the style, discard. Yogurt should be uniformly set; vegetables in brine should stay crisp or at least firm, not collapse into a slimy mass.
- If you suspect contamination and can’t verify pH or acidity, discard. Measuring is not optional when you’re unsure.
A practical rule: if you can’t explain the issue with a known, controllable variable (like temperature overshoot or a forgotten lid), treat it as contamination and discard.
Mind Map: Discard Triggers and Prevention Levers
Systematic Troubleshooting by Product Type
Yogurt
If yogurt fails, the most common causes are temperature drift, starter mishandling, or milk preparation issues.
- When to discard yogurt: discard if you see mold, detect a rotten or “beyond sour” smell, or find it never set after a reasonable incubation window.
- When it’s probably salvageable: if it set but is slightly thin, it may be a temperature or incubation-time shortfall; you can still refrigerate and use it quickly, but only if there’s no off odor or visible growth.
- How to prevent recurrence: use a thermometer you trust, keep incubation stable, and avoid repeatedly warming starter cultures.
Example: You incubated at a higher-than-usual room temperature and the yogurt separated into watery whey early. Next time, reduce incubation time and confirm the temperature with the same thermometer.
Kombucha
Kombucha failures often involve oxygen exposure, sugar/tea ratios, or bottling pressure.
- When to discard kombucha: discard if you see fuzzy mold, smell something putrid, or notice persistent cloudiness that doesn’t match your normal “yeast sediment” pattern.
- When it’s probably a process issue: if it’s too sweet or not sour enough, it’s usually under-fermented; you can extend first fermentation if the liquid is otherwise clean and smells right.
- How to prevent recurrence: keep brewing vessels clean, measure sugar and tea strength, and bottle with consistent timing so carbonation is predictable.
Example: After bottling, one jar foamed excessively and smelled harsh. Discard that jar, then check your bottling timing and ensure you’re using the same sugar amount per batch.
Fermented Vegetables in Brine
Vegetable ferments are sensitive to salt ratio and surface exposure.
- When to discard: discard if you see mold, strong foul odor, or extensive softening with sliminess.
- When it’s probably recoverable: if there’s harmless surface yeast (often a film) and the brine still tastes properly sour and salty, you may be able to skim and keep fermenting—only if there’s no mold and the smell is correct.
- How to prevent recurrence: keep vegetables fully submerged, use the correct salt percentage, and avoid introducing air pockets.
Example: You noticed a few floating pieces after a day. Remove them, ensure full submersion, and verify your salt ratio next batch.
Prevention Workflow That Actually Works
Use a simple loop: Observe → Decide → Record → Adjust one variable. Record what you measured (temperature, time, salt/sugar, pH if available) and what you saw (odor, texture, surface appearance). Then change only one factor next time so you can tell what fixed the problem.
Quick Reference Checklist
- Discard now: fuzzy/spreading mold, putrid odor, radically wrong texture, or no way to confirm acidity when unsure.
- Prevent recurrence: sanitize consistently, control temperature and time, keep oxygen exposure appropriate for the ferment, and keep recipes measured.
If you treat discard decisions as data rather than judgment, you’ll reduce waste and improve reliability without needing guesswork.
11. Practical Recipes with Controlled Variables
11.1 Plain Yogurt with Consistent Incubation Targets
Plain yogurt is a simple system with a few controllable variables: starter strength, milk preparation, incubation temperature, and time. Consistency comes from treating incubation like a measured process rather than a “set it and hope” activity.
Core Idea and What “Consistent” Means
Consistent incubation targets mean you hit the same temperature range for the same duration each batch, so the culture reaches a predictable acidity level. In practice, that produces a similar set, tang, and spoonable thickness after chilling.
A useful mental model: temperature controls how fast the starter acidifies; time controls how far it acidifies. If either drifts, the final yogurt changes.
Ingredients and Setup That Make Incubation Easier
Use fresh, refrigerated milk and a reliable starter (store-bought plain yogurt with live cultures, or a previous batch). Heat milk to the recipe’s target (commonly around 180°F/82°C, then cool to inoculation temperature). This step reduces competing microbes and helps proteins set smoothly.
Before you start, decide your targets:
- Inoculation temperature: the temperature at which you mix in the starter.
- Incubation temperature: the temperature you hold while the yogurt sets.
- Incubation time: how long you maintain that temperature.
Incubation Targets and How to Choose Them
For most home setups, a practical target is 110°F to 115°F (43°C to 46°C). This range is warm enough for steady acidification without being so hot that you risk thin yogurt or overly sharp flavor.
Choose a time window that matches your equipment stability. Many batches set in 4 to 8 hours, but the exact time depends on how close your incubation temperature stays to target.
If you want repeatability, use a two-step approach:
- Hold temperature at your target.
- Stop based on set and acidity cues rather than only the clock.
Mind Map: Incubation Control Loop
Step-by-Step Workflow with Built-In Checks
- Heat and cool milk: Heat to your chosen pasteurization step, then cool to inoculation temperature (often around 110°F/43°C). If you inoculate too hot, you can weaken the culture’s performance.
- Inoculate: Whisk starter into a small amount of warm milk, then combine with the rest. This reduces clumps and helps the culture distribute evenly.
- Incubate at target temperature: Place jars in a warm, insulated spot. Use a thermometer to confirm the environment, not just the jar surface.
- Check set at the midpoint: Start checking around halfway through your expected time. A gentle tilt should show a cohesive gel rather than sloshing.
- Stop at your end point: Once the yogurt sets, move it to the refrigerator. Chilling slows further acidification, which is how you lock in your tang.
Concrete Example: Two Batches, One Method
Batch A: Incubate at 112°F (44°C) for 6 hours. You get a firm set and mild tang.
Batch B: Incubate at 112°F (44°C) for 6 hours again, but your kitchen is cooler and your incubator loses heat. If you notice the temperature drifting to 108°F (42°C) for long stretches, expect a softer set and less tang even if the clock matches.
The lesson is straightforward: if temperature drifts, time alone can’t guarantee the same outcome.
Advanced Details That Improve Repeatability
- Use the same container geometry: Narrow jars lose heat faster than wider ones. Keep jar size consistent.
- Avoid frequent opening: Every check cools the environment. If you must check, do it quickly.
- Standardize starter amount: If you use “a spoonful” one time and “a thicker dollop” another, you change the effective culture load.
- Chill promptly and consistently: The refrigerator temperature affects how quickly the gel firms and how much acid continues to build.
Troubleshooting with Cause-to-Action Mapping
If yogurt is runny, first suspect incubation temperature being low or incubation ending too early. If it’s overly sour, incubation likely ran too hot or too long. If it’s grainy, focus on milk handling: overheating beyond the intended step or rough stirring during set can contribute.
Practical Target Summary
Pick one set of targets and stick to it for several batches:
- Incubation temperature: 110–115°F (43–46°C)
- Incubation time: 4–8 hours, stop when set forms
- Chill immediately after set
That combination turns yogurt from a guessing game into a repeatable process with measurable control.
11.2 Strained Yogurt with Predictable Thickness
Strained yogurt is yogurt that has been drained to remove some whey. The thickness you get is mostly determined by three levers: how much whey you remove, how long you drain, and how the yogurt was made in the first place. If you control those levers, you can hit a repeatable texture instead of playing “guess the spoon.”
Foundational Concept: What Straining Changes
During incubation, milk proteins form a gel as acidity rises. Straining doesn’t create a new gel; it separates liquid whey from that existing gel. The more whey you remove, the thicker the final product. However, draining too aggressively can make the texture grainy or overly tight, especially if the gel was weak to begin with.
Practical example: Make two batches of the same yogurt. Strain one for 4 hours and the other for 12 hours. The longer-drained batch will be thicker, but it may also feel drier and slightly less creamy.
Step 1: Start with Yogurt That Sets Cleanly
Predictable straining starts before straining. Use a yogurt base that forms a stable gel.
- Use consistent milk and heat treatment. Higher solids (often from whole milk or milk powder) generally produce a sturdier gel.
- Incubate at a stable temperature. A wandering temperature can weaken the gel, which then drains unevenly.
- Stop at the right acidity. If the yogurt is under-set, it will release whey quickly and can end up watery even after draining.
Practical example: If your yogurt looks loose right after incubation, straining will not magically fix it. You’ll get a thin, fast-draining curd.
Step 2: Choose Your Straining Setup
The goal is controlled drainage, not a messy science fair.
- Fine-mesh sieve plus cheesecloth or a nut milk bag. This is the most repeatable setup.
- Coffee filters. They can work, but they may slow drainage inconsistently depending on brand.
- Avoid thick terry towels. They can trap curd unevenly and are harder to standardize.
Practical example: Use the same bag type each time. If you switch from cheesecloth to a bag, your drainage rate can change even with identical yogurt.
Step 3: Control Drain Time with a Simple Target
Drain time is your main “thickness dial.” Instead of guessing, use a time-and-temperature approach.
- Temperature: Drain in the refrigerator for a slower, cleaner separation.
- Time: Start with a baseline and adjust.
A practical baseline for many home setups:
- 4 hours: creamy, spoonable thickness
- 8 hours: thick, spreadable
- 12–16 hours: very thick, closer to a firm spread
Practical example: If you want a texture similar to store-bought thick Greek-style yogurt, aim for 8–12 hours, then stop and stir once.
Step 4: Prevent Texture Problems
Two common issues come from mismatched conditions.
- Grainy texture: Often caused by over-draining or a weak gel. If you notice graininess, reduce drain time next batch.
- Watery final product: Usually under-set yogurt or too-short draining. Extend drain time or verify incubation consistency.
Practical example: If your strained yogurt separates into a watery layer after chilling, your starting gel likely didn’t set firmly enough.
Step 5: Finish and Store Correctly
After draining, stir to homogenize the curd. Then refrigerate in a covered container.
- Stir once after draining. This evens out any minor separation.
- Chill promptly. Cold storage stabilizes the gel.
- Use within a reasonable window. The exact time depends on your sanitation and starting conditions, but treat it as a fresh dairy product.
Practical example: If you plan to use it as a dip, stir thoroughly and portion into small containers so you don’t repeatedly warm the whole batch.
Mind Map: Strained Yogurt Thickness Control
Example: A Repeatable Thickness Plan
- Make plain yogurt with consistent milk and incubation.
- Chill the yogurt briefly so it drains more predictably.
- Strain at refrigerator temperature using the same bag type.
- Stop at a chosen time: 8 hours for spreadable thickness.
- Stir once, then refrigerate.
If the result is too thick, reduce drain time by 2–4 hours next batch. If it’s too thin, increase drain time by 2–4 hours. This approach changes only one variable at a time, so your adjustments stay interpretable.
11.3 Kombucha With Measured Acidity and Controlled Carbonation
Kombucha’s two big knobs are acidity and carbonation. Acidity tells you how far the tea has fermented; carbonation tells you how much gas you’ll get when you bottle. If you measure both, you can repeat results instead of guessing.
Foundations: What You Measure and Why
Start with first fermentation (1F). During 1F, yeast and bacteria work together to convert tea sugars into acids and other compounds. The drink becomes more sour over time, and the pH drops.
Then comes second fermentation (2F). In 2F, you add a small amount of fermentable material (often fruit juice or sugar) and seal the container. Yeast makes CO₂, which dissolves into the liquid. More sealed time and more added sugar usually mean more carbonation, but only if you don’t overshoot.
A practical target is to bottle when 1F acidity is in a consistent range for your setup. Many home brewers aim for a pH around 2.8–3.2 before bottling, then adjust 2F time to reach the carbonation level they want. Use pH as your anchor, not just taste.
Mind Map: Acidity and Carbonation Control
Step-by-Step Workflow with Measured Acidity
-
Brew a consistent base tea. Use the same tea type, the same grams per liter, and the same steep time. If you change tea strength, you change how much sugar the microbes can process and how fast acids accumulate.
-
Standardize your starting sugar. If your recipe uses sugar, keep the amount per liter consistent. If you use honey or other sweeteners, keep them consistent too, because yeast behavior differs.
-
Incubate at a stable temperature. Temperature is the fastest way to change fermentation speed. If your kitchen swings from cool to warm, your pH will drop at different rates.
-
Measure pH near the end of 1F. Don’t wait for “it tastes right.” Taste is useful, but pH gives you a repeatable checkpoint. Take a sample, measure pH, and decide whether to bottle.
-
Bottle when pH is in your chosen band. For example, if your last successful batch bottled at pH 3.0, aim for pH 3.0 again. If you bottle higher (less acidic), you’ll likely need more 2F time to reach the same carbonation.
Controlled Carbonation in Second Fermentation
Carbonation control is mostly about two variables: how much fermentable material you add and how long you let it run.
-
Choose a conservative 2F addition. If you’re using fruit juice, start with a small measured amount per bottle. If you’re using sugar, use a measured quantity per volume. The goal is to give yeast enough food to generate CO₂ without turning your bottles into pressure experiments.
-
Use time windows, not open-ended waiting. Check carbonation periodically. A common approach is to start checking after 12–18 hours, then continue in shorter intervals.
-
Use a gentle bottle check. When bottles feel firmer than before, carbonation is rising. Don’t rely only on feel; open one bottle carefully to confirm. If it hisses strongly and sprays, you overshot.
Example: One Batch, Two Outcomes
Scenario A: Consistent acidity, moderate carbonation.
- 1F: Bottle at pH 3.0.
- 2F: Add a small measured amount of juice.
- 2F time: Stop after about 18 hours, then refrigerate.
Scenario B: Same acidity, higher carbonation.
- 1F: Bottle at pH 3.0 again.
- 2F: Use the same juice amount.
- 2F time: Extend to about 24 hours before refrigerating.
Because pH at bottling is the same, the main difference is CO₂ production time. If Scenario B is too fizzy, reduce 2F time next time rather than changing 1F.
Troubleshooting with Logic
- Too flat: pH at bottling was too high, or 2F addition was too low, or 2F time was too short.
- Too sharp and still flat: 1F ran long enough to build acids, but 2F didn’t generate enough CO₂. Keep 1F timing steady and adjust 2F.
- Over-carbonated: reduce 2F addition or shorten 2F time. Also confirm you’re refrigerating promptly when you hit your target.
Mind Map: Practical Targets and Checks
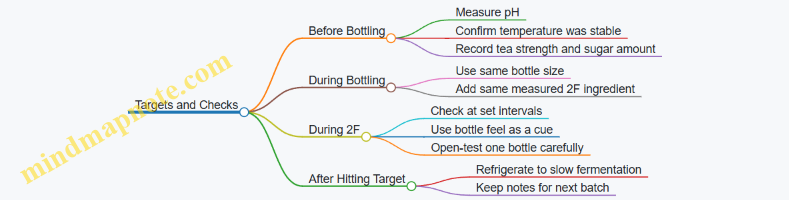
Measured acidity gives you a reliable starting point; controlled carbonation turns that starting point into a consistent drink. Once you treat pH and 2F time as your two main levers, kombucha becomes a repeatable process rather than a guessing game.
11.4 Lacto Fermented Vegetables with Brine Calculations
Lacto fermented vegetables rely on lactic acid bacteria (LAB) that convert sugars into lactic acid. That acid lowers pH, which discourages most spoilage organisms while letting the desired microbes do their work. The brine is the control system: it supplies water, dissolves salt, and creates an environment where LAB can win.
Core Concepts Before You Weigh Anything
Start with three variables you can measure: salt concentration, temperature, and time. Salt concentration shapes which microbes dominate. Temperature sets how fast LAB acidify. Time determines how sour and soft the vegetables become.
A practical rule: use enough salt to keep the fermentation stable, but not so much that it stalls. For most home vegetable ferments, a common target is 2% to 3% salt by weight of water. If you prefer a single starting point, 2.5% is a reliable middle.
Brine Calculations That Don’t Require Guessing
You have two common approaches: calculate salt from the water you add, or calculate salt from the total brine mixture. The water-based method is usually simpler.
Water-based method
- Decide your target salt percentage, such as 2.5%.
- Measure the water you will use to make brine.
- Multiply water weight by the salt fraction.
Example: You add 1000 g water and want 2.5% salt.
- Salt needed = 1000 × 0.025 = 25 g salt.
If you’re using a smaller batch, the math scales cleanly. For 750 g water at 2.5%:
- Salt = 750 × 0.025 = 18.75 g.
For kitchen practicality, round to a sensible precision, like 19 g, then keep notes so you can tune later.
What counts as “salt”
Use non-iodized salt or salt without anti-caking agents if possible. Table salt can work, but additives may affect clarity and taste. Avoid “seasoning salts” that include spices or sugar.
Step-by-Step Workflow with Integrated Best Practices
- Choose vegetables with a firm texture. Cabbage, carrots, cucumbers, green beans, and radishes ferment well because they hold structure.
- Cut to consistent sizes. Smaller pieces ferment faster and soften sooner. If you want crunch, keep pieces similar and not too thin.
- Pack tightly in a clean jar. Tight packing reduces oxygen exposure at the surface.
- Create a brine that covers the vegetables. Vegetables must stay submerged. If they float, use a fermentation weight.
- Add brine and keep the headspace reasonable. Leave space for bubbling and foam.
- Ferment at a stable temperature. Warmer temperatures speed acidification; cooler temperatures slow it. Either way, stability beats constant adjustment.
- Check daily after the first few days. Look for surface film, off smells, or signs of spoilage. Normal fermentation can produce bubbles and mild tang.
- Taste and stop when you like it. Once the flavor is right, move to refrigeration to slow further fermentation.
Mind Map: Lacto Fermented Vegetables with Brine Calculations
Example: Cabbage Kraut with 2.5% Brine
You want a 1-liter jar batch. Suppose you estimate you’ll need about 900 g of brine to cover the packed cabbage.
- Target salt: 2.5%
- Water weight: 900 g
- Salt needed: 900 × 0.025 = 22.5 g
Weigh 22.5 g salt, dissolve in 900 g water, then pour over tightly packed shredded cabbage. If you notice the cabbage releases enough liquid to cover itself, you can still use the brine method by measuring the total liquid you end up with and adjusting salt accordingly. The key is that the final salt concentration in the jar should match your target.
Example: Mixed Vegetables with Measured Brine
For mixed vegetables, you may not know how much liquid they release. Use the brine-first approach.
- Pack vegetables into the jar.
- Add water to cover, then pour it out and weigh it.
- Make brine using that water weight.
If the weighed water is 800 g and you target 2.5%:
- Salt = 800 × 0.025 = 20 g
This method keeps salt concentration consistent even when vegetables behave differently.
Troubleshooting with Clear Causes
If fermentation seems slow and flavor stays mild, check temperature and confirm salt concentration. If vegetables soften too quickly, reduce temperature or cut pieces larger next time. If you see fuzzy growth, don’t taste to “test.” Surface problems can come from poor submersion, loose packing, or contamination during handling.
The practical takeaway: brine calculations give you a repeatable starting point, and careful submersion and monitoring determine whether that starting point turns into a clean, tangy ferment.
11.5 Fermented Dough Starters with Feeding Schedules
A fermented dough starter is a living mix of flour and water where wild yeasts and lactic acid bacteria (LAB) grow together. Your job is not to “make it work” once, but to keep the microbial community in a steady rhythm. That rhythm comes from feeding schedules, hydration, and temperature—three knobs that determine how fast the starter rises, how sour it gets, and how reliably it performs in bread.
Foundational Concepts That Drive Feeding
Starter activity is a timing problem. After feeding, microbes consume available sugars and starch breakdown products. As they eat, gas production rises, then slows when food runs low. If you feed too early, the starter may never reach peak strength. If you feed too late, acidity climbs and the starter can become sluggish.
Temperature sets the pace. Warmer conditions speed fermentation; cooler conditions slow it. A starter kept at room temperature will usually need more frequent feeding than one stored in the refrigerator.
Hydration shapes texture and fermentation. A thicker starter (lower water) tends to ferment more slowly and can be easier to manage if your kitchen runs warm. A looser starter (higher water) spreads microbes more evenly and often rises more predictably, but it can also run out of food faster.
Mind Map: Starter Feeding Logic
Feeding Schedules That Match Real Life
Start by choosing a schedule based on how often you can feed. The simplest approach is to feed at a consistent time relative to peak activity.
Room temperature schedule for daily bakers. Feed once per day, ideally when the starter has risen and is starting to level off. If it peaks in 4–6 hours, you need either smaller feed ratios or more frequent feedings. If it peaks in 10–14 hours, daily feeding is usually enough.
Two-feed schedule for fast starters. If your starter peaks quickly, do two feedings on baking days. Feed once in the morning, then again in the afternoon or early evening. This keeps the starter in its strongest window when you mix dough.
Refrigerator schedule for occasional bakers. Store the starter in the fridge and feed about once per week. Before baking, take it out, feed it at room temperature, and allow it to rise to peak. Many bakers do one room-temperature feed for mild results, but two room-temperature feeds often improve predictability.
Example: A Simple Daily Plan
Use a consistent ratio so you can learn your starter’s timing. For instance, keep a small starter amount and feed it with equal weights of flour and water.
Example feeding ratio: 20 g active starter + 40 g water + 40 g flour.
If your starter typically peaks in about 8 hours at your room temperature, feed it so it reaches peak around your mixing time. If it peaks in 5 hours, reduce the starter amount or increase the fresh flour and water. If it peaks in 12–14 hours, you can increase the starter amount or shorten the interval.
Advanced Details Without Guesswork
How to interpret “peak.” Peak is when the starter has risen noticeably and bubbles are visible throughout, but the surface is no longer climbing. A starter that smells sharply alcoholic and looks collapsed may be past its best window.
How to adjust sourness. Feeding earlier relative to peak tends to keep acidity milder. Feeding later, closer to or after collapse, increases sourness because LAB have more time to produce acids.
How to switch flour types. When changing flour, do it gradually over several feedings. For example, move from 100% white flour to 50% whole grain over three to five feedings. This prevents sudden changes in fermentation speed and flavor.
Mind Map: Troubleshooting by Feeding Window
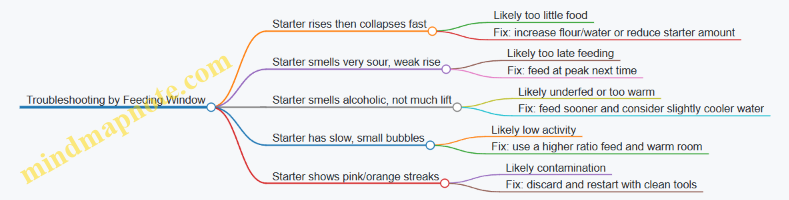
Example: Two-Stage Build for Baking Day
If you want dependable lift, build the starter in two stages.
- Evening feed: Feed at room temperature and let it rise to peak.
- Morning feed: Feed again at room temperature, then mix dough when it reaches peak or just after.
This approach reduces the risk that your starter is strong but out of sync with your dough schedule.
Feeding Schedule Checklist
- Feed at a consistent time relative to peak.
- Keep hydration and flour type stable for at least several feedings while learning timing.
- Adjust only one variable at a time when troubleshooting.
- Record rise time, peak height, and aroma after each feed so you can predict the next one.
A good feeding schedule is less about perfection and more about repeatability. Once your starter’s peak timing is consistent, bread becomes a controlled fermentation process rather than a guessing game.
12. Scaling Batches and Maintaining Starters
12.1 Scaling Yogurt Batches Without Losing Texture
Scaling yogurt is mostly about keeping the fermentation “microclimate” the same for every spoonful. Texture comes from two things you can control: how thoroughly the milk proteins coagulate during incubation, and how much acid is produced before you stop the process. When you scale, you’re changing volume, surface area, heat loss, and mixing behavior—so you need a repeatable way to preserve the same targets.
Foundational Targets That Must Stay Constant
Start by treating your recipe like a set of ratios plus a set of process endpoints.
-
Starter ratio stays fixed. If your base batch uses 2% starter by weight, keep that percentage when scaling. Example: 1 liter milk at 2% starter means 20 g starter; 5 liters means 100 g starter.
-
Heat treatment stays consistent. Yogurt texture improves when milk is heated enough to denature whey proteins and then cooled to inoculation temperature. Example: if you heat to 85°C for 10 minutes before cooling, keep the same temperature and time for any batch size. If your pot is deeper, the heating time may need adjustment so the whole volume reaches the target.
-
Incubation temperature stays stable. A 1–2°C drop can slow acidification and change the final gel. Example: if your incubator holds 43°C, don’t rely on a “close enough” setting when scaling; use a thermometer and confirm the actual milk temperature.
-
Incubation time is adjusted to reach the same endpoint. Instead of assuming time scales linearly, use a stopping rule based on thickness and acidity. Example: if your 1-liter batch reaches a firm set at 6 hours, your 5-liter batch might reach it at 5.5 or 7 hours depending on heat distribution.
Scaling Workflow That Preserves Protein Coagulation
Follow a workflow that prevents uneven heating and uneven inoculation.
-
Choose the same vessel geometry when possible. Texture is sensitive to heat gradients. If you scale from a shallow pot to a tall one, the center may lag behind the edges.
-
Heat to the same internal temperature. For larger volumes, stir during the heating phase and verify with a probe thermometer. Example: heat until the coldest point (often the center) reaches your target.
-
Cool uniformly before inoculation. Don’t inoculate while parts of the milk are still too hot. Example: cool to 43°C, then stir gently and wait 2–3 minutes so temperature evens out.
-
Inoculate with thorough but gentle mixing. Over-stirring can introduce foam and slightly affect surface behavior, but under-mixing creates streaks of different acidity. Example: whisk the starter into a small portion of milk first, then pour back and stir just until uniform.
-
Incubate without disturbance. Once the culture starts working, avoid moving the container or jostling it. Example: wrap the vessel consistently and place it where the incubator temperature won’t fluctuate.
Practical Example with Controlled Variables
Suppose your standard batch is:
- 1 liter milk
- 20 g starter (2%)
- Incubate at 43°C until set
You want 3 liters.
- Starter becomes 60 g (still 2%).
- Heat milk to the same pre-incubation treatment, then cool to 43°C.
- Incubate at 43°C, but check for set rather than assuming 3× the time.
A simple set check: tilt the container slightly. A properly set yogurt will jiggle as a cohesive gel rather than slosh like liquid. If it’s still loose, continue incubation in 15–30 minute increments.
Mind Map: Scaling Yogurt Without Losing Texture
Troubleshooting When Texture Changes After Scaling
If your scaled batch is too soft, the most common causes are a lower effective incubation temperature, uneven heating, or stopping too early. Fix by confirming milk temperature with a probe and using the same set-check rule.
If your scaled batch is too firm or grainy, you may have overheated the milk, cooled too slowly before inoculation, or incubated longer than your endpoint. Fix by verifying the pre-incubation heat step and shortening incubation until the set-check matches your standard.
Quick Scaling Checklist
- Starter ratio unchanged
- Milk heated and cooled uniformly
- Incubation temperature verified at the milk, not the device
- Stop by set endpoint, not by assumed time
- Mix inoculation uniformly, then leave it alone
When you keep those five constraints aligned, scaling becomes a math problem with a thermometer attached—no mystery required.
12.2 Scaling Kombucha Batches While Preserving SCOBY Health
Scaling kombucha is mostly about keeping the fermentation environment consistent while you increase volume. The SCOBY is not a magic ingredient; it’s a living community that responds to the same inputs each time. When those inputs drift, the culture “works,” but the flavor, acidity, and carbonation can wander.
Foundational Scaling Rules
Start by choosing a baseline batch you already trust. Use the same tea type, sugar source, and brewing strength. Then scale by ratio, not by guesswork. For example, if your reliable batch uses 1 liter of water, 1/4 cup sugar, and 1/2 cup starter liquid, scaling to 5 liters means multiplying each ingredient by 5.
SCOBY health depends on two things you can control: acidity and oxygen exposure. Starter liquid provides acidity and microbes; fresh tea provides nutrients. If you scale up without enough starter, the batch takes longer to acidify, which increases the chance of off flavors. If you scale up with too much starter, the batch can acidify quickly and taste sharp before the tea fully develops.
Starter Liquid and SCOBY Proportions
A practical approach is to scale starter liquid first, because it sets the microbial starting point. If your baseline uses 10–20% starter liquid by volume, keep that range when scaling. Example: if you brew 2 liters and use 250 mL starter, that’s 12.5%. For a 10-liter batch, aim for about 1.25 liters starter.
SCOBY mass matters too, but less than starter liquid. If you have a thick, active SCOBY, you can use less physical thickness than you think. What matters is that the culture is already producing acid and aroma in your current cycle. If your SCOBY is sluggish, scaling will only make the sluggishness louder.
Temperature Consistency as Volume Grows
Larger volumes change heat retention. A 1-liter batch may hold temperature near your target, while a 10-liter batch can cool more slowly at the edges and warm unevenly. Use a thermometer and place the vessel where airflow and sunlight are stable. If you incubate in a warm spot, stir gently once after inoculation so the starting temperature is even.
Example: if your baseline incubates at 24–26°C, don’t scale to a larger vessel and assume the same temperature will happen. Measure the actual brew temperature after inoculation, then adjust placement or insulation.
Oxygen, Vessel Choice, and Surface Area
First fermentation is typically open to oxygen. Scaling changes surface area-to-volume ratio, which affects how quickly the culture acidifies and how much oxidation occurs. If you scale volume but keep the same jar size, the surface area shrinks relative to volume and the batch can ferment differently.
Use a vessel that preserves surface area as much as possible. If you must use one large vessel, consider splitting into two fermenters rather than one. Example: instead of one 10-liter container, use two 5-liter containers with similar surface area to your baseline.
Sugar, Tea Strength, and Timing
Sugar is the fuel; tea is the substrate. Keep sugar concentration consistent with your baseline recipe. If you increase sugar without increasing tea strength, the batch can taste harsh or finish too dry. If you increase tea strength without matching sugar, fermentation may slow.
Timing should be managed by targets, not calendar days. Use your baseline end point: when the brew tastes pleasantly tart and the aroma is clean, it’s ready to bottle. If you scale up and fermentation runs longer, that often means starter was low, temperature was lower, or vessel oxygen conditions changed.
Mind Map: Scaling Inputs and SCOBY Health
Example Workflow for a Larger Batch
Assume your baseline is 2 liters with 250 mL starter liquid, brewed tea at your usual strength, and sugar at your usual concentration. To scale to 8 liters, multiply everything by 4: use 1 liter starter liquid and 8 liters of total brew volume.
Then choose equipment. If your baseline uses a wide container that gives good surface area, use two 4-liter fermenters rather than one 8-liter fermenter if the surface area-to-volume ratio would drop. Incubate in the same temperature zone you used before, and measure the brew temperature after inoculation.
Finally, bottle based on sensory targets you already trust. If the batch tastes cleanly tart at the same relative stage as your baseline, proceed. If it’s still mild, give it more time rather than forcing it by schedule.
Batch Records That Actually Help
Write down the scaled ratios and the observed end point. Include starter volume, tea strength, sugar concentration, incubation temperature, and the day you bottled. When something changes, these notes tell you whether the cause is input drift (ratios), environment drift (temperature or vessel), or culture drift (starter quality).
12.3 Starter Maintenance Schedules for Ongoing Use
A starter is a living process you can repeat. The goal of maintenance is simple: keep the right microbes dominant, keep fermentation conditions stable, and avoid “mystery drift” where each batch slowly changes.
Start by separating maintenance into three layers: culture source, fermentation environment, and handling routine. Culture source is where the microbes come from. Environment is temperature, salt/sugar, and oxygen exposure. Handling routine is how you store, refresh, and transfer without accidentally starving or over-acidifying the culture.
Core Maintenance Concepts
-
Refresh before decline. Starters don’t fail instantly; they weaken gradually as nutrients run low and acidity rises. If you wait too long between refreshes, you’ll see slower starts, weaker flavor, or inconsistent texture.
-
Use a consistent transfer ratio. A common pattern is “small inoculation into fresh medium” for growth, or “equal parts transfer” for stability. Pick one ratio and stick with it for a given starter.
-
Match storage to your schedule. Refrigeration slows fermentation, but it doesn’t stop it. Room-temperature storage accelerates activity and requires more frequent feeding.
-
Keep a single reference batch. When you refresh, make one batch as your baseline. If something goes wrong later, you can compare new results to the reference.
Yogurt Starter Maintenance Schedule
Yogurt cultures are typically maintained by using a portion of finished yogurt as the next inoculation.
- Daily or near-daily routine: Keep a small jar of plain yogurt in the fridge. Use it as starter within 7 days for best consistency.
- Weekly routine: If you ferment once per week, use the most recent plain yogurt as starter and refresh it by making one “practice batch” before committing to a larger batch.
- Longer gaps: If you skip more than a couple of weeks, expect some variability. The fix is to do two consecutive yogurt batches, using the first batch’s yogurt as the starter for the second.
Practical example: If your usual incubation is 4–6 hours and your starter is older, you may need to extend incubation by 30–60 minutes to reach the same set. Measure the set time rather than guessing.
Kombucha SCOBY Maintenance Schedule
Kombucha maintenance is about keeping the SCOBY and liquid healthy without letting the brew become too acidic.
- Active brewing cycle: When brewing regularly, keep the SCOBY in a jar with enough starter liquid to cover it. Use the “mother” liquid as part of each new batch.
- Feeding interval: If you brew every 7–14 days, the SCOBY usually stays stable. If you brew less often, increase the starter liquid portion so the new batch starts with more buffering capacity.
- SCOBY thickness changes: A thicker SCOBY isn’t automatically better. What matters is consistent fermentation behavior: similar sourness at bottling time and predictable carbonation.
Practical example: If your second fermentation produces weak carbonation, check whether your SCOBY has been sitting too long between brews. Shorten the interval or increase starter liquid in the next batch.
Lacto Fermented Starters and Vegetable Brine Maintenance
For vegetable ferments, you often rely on brine rather than a separate “starter jar.” Still, you can maintain a brine culture.
- Brine culture refresh: Keep a small jar of brine culture at cool room temperature or in the fridge depending on your pace. Refresh it when it becomes very sour and slow to re-acidify new vegetables.
- Use within a predictable window: Many home ferments behave best when the brine culture is refreshed every 2–4 weeks.
Practical example: If your cabbage ferments start softening early, the brine may be too depleted or too warm. Refresh the brine culture and keep the ferment at a steadier temperature.
Handling Routine That Prevents Drift
Use the same steps each time:
- Label and date each refresh. Use a simple label with starter type and refresh date.
- Keep transfers clean and fast. Minimize time the starter is exposed to air and warm temperatures.
- Avoid mixing “generations” blindly. If you have multiple starter jars, keep them separate until you confirm they behave the same.
- Record one measurement per batch. For yogurt, note set time and thickness. For kombucha, note sourness at the end of first fermentation. For vegetables, note firmness at day 3 and day 7.
A Simple Weekly Plan
Choose one day for refresh and one day for use. Example: refresh on March 1 and use on March 2–8 for yogurt; for kombucha, brew on a consistent 7–10 day cadence.
If you follow a schedule, you reduce the number of variables you’re guessing about. That’s the real maintenance trick: fewer surprises, more repeatable fermentation.
12.4 Rotating, Splitting, and Storing Cultures Safely
Cultures are living systems, so “safe storage” is really “stable conditions.” The goal is to keep the dominant microbes active enough to recover quickly, while preventing unwanted organisms from taking over. The same principles apply across yogurt starters and SCOBY-based ferments, but the practical details differ.
Core Principles for Safe Culture Handling
Start with a clean workflow: wash hands, sanitize tools, and avoid touching culture surfaces. Next, treat time and temperature as the two knobs you control. Short, cool storage slows fermentation; warm storage speeds it. Finally, keep a clear separation between “culture” and “food.” If you mix old and new without tracking, you lose the ability to troubleshoot later.
Rotating Cultures Without Losing Performance
Rotation means using a fresh portion of your culture regularly while keeping a backup. For yogurt starters, rotate by using the newest active batch to inoculate the next batch, then set aside a small portion for backup storage. For kombucha SCOBY, rotate by brewing on schedule and saving a portion of the starter liquid plus SCOBY for the next cycle.
A practical rule: never let your culture sit in a “stalled” state for too long. If it has been too warm too long, it may shift toward less desirable flavors or weaker acid production. If it has been too cold for too long, it may recover slowly. Your rotation schedule should match your typical fermentation time.
Splitting Cultures for Redundancy and Control
Splitting reduces risk and improves consistency. Instead of relying on one container, you create multiple smaller backups so a single mishap doesn’t wipe out your supply.
For yogurt, split by dividing a small amount of finished yogurt into separate starter portions. Use one portion immediately for the next batch, and store the others as backups. Label each portion with the date it was made and the intended use window.
For SCOBY, splitting usually involves separating the SCOBY and pairing it with starter liquid. The liquid carries acids and microbial balance, so it matters as much as the SCOBY itself. If you split without enough starter liquid, the new unit may struggle to restart.
Storing Cultures Safely by Type
Yogurt Starters
Refrigeration is the most common approach. Store starter yogurt in small, sealed containers so you minimize temperature swings and contamination. Keep it plain; added sugar or fruit can change microbial balance and complicate future batches.
When you’re ready to use it, let the starter warm briefly so it doesn’t shock the microbes. Then inoculate milk using your usual temperature target and incubation time.
SCOBY and Starter Liquid
SCOBY storage works best when the starter liquid remains acidic. Store in a clean jar with breathable coverage (not airtight), because the system still needs gas exchange. Keep it in a stable cool location so fermentation slows rather than stalls.
If you notice excessive surface film changes or strong off-odors, don’t guess. Compare to your normal baseline: color, smell, and how quickly it restarts after brewing.
Mind Map: Culture Rotation, Splitting, and Storage
Example: Yogurt Starter Rotation Plan
You make yogurt on Saturdays. Use the freshest batch to inoculate the next Saturday batch, and store two backup portions in the refrigerator: one for use in the following week, and one as a longer backup. If the backup starts producing noticeably weaker thickening or a sourness that seems off, switch back to the freshest batch and discard the questionable backup.
Example: SCOBY Splitting and Storage Workflow
After a successful brew, you separate the SCOBY into two units. Each unit gets a portion of starter liquid so acidity and microbial balance travel together. One unit brews next week; the other stays in cool storage. When you restart the stored unit, brew with a consistent tea and sugar strength, then observe how quickly it reaches your usual acidity and carbonation behavior.
Recovery Checks and Discard Triggers
Recovery checks are simple observations that prevent wasted batches. Watch for restart speed, expected sourness development, and normal aroma. If you see fuzzy growth that doesn’t match your typical surface appearance, or if the smell is clearly putrid rather than pleasantly sour, discard the culture and start from a known-good backup.
Practical Labeling That Actually Helps
Label each container with: culture type, date prepared, and intended use window. For yogurt, also note whether it was plain or strained. For SCOBY, note the batch it came from and whether it includes starter liquid. This turns troubleshooting from guesswork into a short list of likely causes.
Summary
Rotate to keep performance consistent, split to reduce risk, and store under conditions that slow fermentation without changing the microbial balance too much. If you track sources and use recovery checks, you’ll spend less time wondering and more time making reliable fermented food.
12.5 Standard Operating Procedures for Repeatable Fermentation
Repeatable fermentation is mostly about controlling inputs and recording what you did. A good Standard Operating Procedure (SOP) turns “I think it went well” into “these conditions produced this result,” so the next batch starts from the same baseline.
Core SOP Mindset
Start every batch by defining three things: target culture, target conditions, and target end point. Then keep everything else boringly consistent: vessel size, mixing method, temperature control, and sanitation steps. If you change one variable, record it clearly so you know what caused the difference.
Mind Map: SOP Flow for Repeatable Fermentation
Step 1: Define Batch Identity and Targets
Create a batch ID and write down targets before you start. For yogurt, targets might include incubation temperature and a time window; for kombucha, targets might include starting sugar strength and an acidity range. Keep targets measurable when possible. If you cannot measure pH, use consistent time and temperature and document sensory cues, but treat it as a fallback.
Example: Batch Y-0420: yogurt, 43°C target, 6–8 hours incubation window, starter at 2 tablespoons per quart, then refrigerate immediately after set.
Step 2: Sanitation and Equipment Readiness
Sanitation is not a vibe; it is a checklist. Use clean, non-reactive vessels and tools. For kombucha, keep hands and utensils dry and clean to reduce unwanted microbes. For yogurt, avoid cross-contamination from other ferments.
Example: Before starting, wipe counters, wash jars, and air-dry. Then set out a dedicated ladle for the starter so you do not reuse utensils that touched other foods.
Step 3: Standardize Inputs
Consistency comes from repeatable measurements.
- Starter amount: Use the same inoculation ratio each time.
- Substrate strength: Use the same milk fat level or tea concentration and sugar amount.
- Water and salt: If you use brine, calculate salt by weight and keep it stable.
Example: Kombucha batch K-0420: same tea brand and steep time, same sugar grams per liter, same bottle size for second fermentation.
Step 4: Control Temperature Like It Matters
Temperature is the steering wheel. Use a thermometer you trust, and place the ferment where temperature swings are minimal. If you use a warm spot like an insulated container, preheat it so the first hour is not a slow ramp.
Example: Start incubation only after the substrate reaches the target range. If it takes 30 minutes to warm up, note that delay so your “incubation time” is not misleading.
Step 5: Monitor with Clear End Point Checks
Monitoring prevents both under-fermentation and over-fermentation.
- Yogurt end point: Look for a clean set and stable thickness; if you measure, use a consistent time-to-set approach.
- Kombucha end point: Check acidity and carbonation readiness; do not rely only on taste because sweetness can mask sharpness.
Example: If yogurt sets early, stop incubation at the set point rather than waiting for the maximum time.
Step 6: Handle the Transition to Storage
The transition is where many batches drift.
- Refrigeration timing: Chill promptly after reaching the end point.
- Bottling pressure management: For carbonated ferments, keep bottle sizes consistent and avoid overfilling.
Example: After kombucha reaches target acidity, bottle the same volume each time and cap immediately to keep carbonation predictable.
Step 7: Record Deviations and Results
A record should fit on one page per batch.
- Batch ID
- Date started
- Culture and inoculation amount
- Substrate details
- Temperature profile
- End point readings
- Sensory notes
- Deviations (power outage, warmer room, different jar)
Example: “Room warmer than usual; set occurred 45 minutes earlier; next batch reduce incubation time by 30 minutes.”
Step 8: Build a Repeatability Loop
After three batches, compare patterns. If outcomes vary, adjust one factor at a time.
- If texture is inconsistent, revisit inoculation amount and temperature stability.
- If acidity is off, revisit sugar/salt measurement and time-to-end-point method.
- If surface issues appear, revisit sanitation and oxygen exposure rules.
Example: If kombucha is consistently too sweet, shorten first fermentation by a fixed interval and keep everything else unchanged for the next two batches.
Mind Map: SOP Checklist for Each Batch
A strong SOP does not eliminate judgment; it makes judgment smaller and more reliable. When you can point to the exact conditions that produced a result, troubleshooting stops being guesswork and becomes a controlled experiment.