Vibe Coding with AI Agents
1. Foundations of Vibe Coding with AI Agents
1.1 Defining Vibe Coding as Intent Driven Software Creation
Vibe coding with AI agents is software creation where you start from what you want the system to do, not from what code you already know how to write. “Intent driven” means the agent is guided by a clear goal, constraints, and acceptance checks. “Vibe” is the practical part: you can express intent in natural language, and the agent translates it into structured work units that produce code you can verify.
Core Idea: Intent Becomes Work
Intent driven creation has three layers that stay connected from the first sentence to the final commit.
- Intent is the user-facing outcome. Example: “Users can reset their password using a token.”
- Specification is the agent-executable description. Example: token expiry, error messages, and required fields.
- Implementation is the code plus tests that satisfy the specification.
A common failure mode is skipping the specification layer. If you only say “make password reset work,” the agent may generate plausible code that misses edge cases like expired tokens or rate limiting.
What “Good Intent” Looks Like
Good intent has four properties: outcome clarity, scope boundaries, observable behavior, and constraints.
- Outcome clarity: Name the feature and the user action.
- Scope boundaries: Say what is included and excluded.
- Observable behavior: Define what changes and what responses appear.
- Constraints: Add rules about security, data handling, and performance.
Example: From Vague to Executable
Vague intent: “Add password reset.”
Intent with structure: “Implement password reset for email accounts. Users request a reset link; the link expires after 30 minutes; submitting a new password invalidates the token; invalid or expired tokens return a generic message; attempts are rate limited per IP.”
Notice how the second version includes behavior and constraints that can be checked by tests.
Mind Map: Intent Driven Creation
How Agents Use Intent
Agents don’t “understand” intent the way humans do; they follow it as a set of instructions that shape decisions. The practical trick is to make intent easy to map into tasks.
A useful mapping is: intent → artifacts.
- If the intent mentions “token expiry,” the agent should produce code that stores expiry and tests that simulate time.
- If the intent mentions “generic message,” the agent should produce consistent error responses and tests that assert exact text.
- If the intent mentions “rate limiting,” the agent should produce middleware or service logic and tests that hit the limit.
This is why intent should mention observables. Observables become assertions.
A Minimal Intent Template
Use a template so every feature starts with the same scaffolding.
Feature: <what users can do>
Inputs: <what the system receives>
Outputs: <what the system returns or changes>
Rules: <constraints and edge cases>
Acceptance Criteria:
- <Given ... When ... Then ...>
- <Given ... When ... Then ...>
Non Goals:
- <what you will not implement>
Keep non-goals short. They prevent the agent from “helpfully” adding features you didn’t ask for.
Example: Intent Template Applied to Password Reset
Feature: Password reset via email token
Inputs: email, new password, reset token
Outputs: password updated, token invalidated
Rules:
- token expires after 30 minutes
- invalid/expired token returns generic message
- rate limit reset requests per IP
Acceptance Criteria:
- Given an expired token When submitting new password Then password is not changed
- Given a valid token When password is updated Then token is invalidated
Non Goals:
- account recovery for non-email identities
The “Vibe” Part That Still Stays Testable
Vibe coding feels fast because you can start with natural language, but it stays reliable because the agent must convert that language into testable artifacts. The goal is not to guess what you meant; it’s to force meaning into a form that can be checked.
When intent is well-formed, the rest of the workflow becomes mechanical: the agent drafts a plan, generates code, and produces tests that demonstrate the behavior you described. When intent is vague, the workflow becomes guesswork, and tests either fail or pass for the wrong reasons.
A good rule: if you can’t write at least two acceptance criteria from your intent, the intent is not yet ready for autonomous code generation.
1.2 Understanding AI Agents as Tool Using Problem Solvers
An AI agent is best understood as a problem-solving tool that can take actions, not just produce text. The key shift is that the agent has a loop: it interprets the goal, decides what to do next, uses tools to gather or change information, and checks whether it moved closer to the goal. When that loop is explicit, the behavior becomes easier to reason about and easier to test.
What Makes an Agent Different from a Chat
A chat model answers questions; an agent works toward an outcome. The difference shows up in three places.
First, an agent has a target state. For example, “Create a REST endpoint that validates input and returns a consistent error shape” is a target state. A chat response might describe how to do it, but an agent can generate files, run checks, and revise until the endpoint compiles and passes tests.
Second, an agent uses tools. Tools are concrete capabilities such as reading a repository, executing a command, calling an API, or writing a file. Without tools, the agent is mostly a text generator.
Third, an agent performs verification. Verification can be simple, like checking that a file exists and matches a required interface, or more involved, like running unit tests and interpreting failures.
The Core Loop for Problem Solving
A practical agent loop can be described in four steps.
- Interpret the intent: identify inputs, outputs, constraints, and acceptance checks.
- Plan the next action: choose the smallest step that reduces uncertainty.
- Act using tools: read, compute, edit, or run.
- Verify: confirm the step worked, then either continue or stop.
A useful mental model is that the agent is a careful intern with a checklist. It can draft code, but it also checks compilation and tests before claiming success.
Tools as Interfaces to Reality
Tools turn “what the model thinks” into “what the system can prove.” Common tool categories include:
- File tools for reading and writing source code.
- Command tools for running tests, linters, or build steps.
- Query tools for fetching data from a database or service.
- Schema tools for validating JSON shapes or types.
When you design an agent workflow, you should decide which facts must be obtained from tools rather than inferred. For instance, whether a function name exists in the codebase should come from a repository search tool, not from memory.
Mind Map: Agent Loop and Responsibilities
Example: Building a Validation Endpoint
Suppose the intent is: “Add an endpoint that accepts a JSON body with email and age. Reject invalid emails and negative ages. Return errors as { "errors": [ { "field": "...", "message": "..." } ] }.”
A tool-using agent would proceed like this:
- Interpret the target state: identify the route, request schema, response schema, and error format.
- Plan the smallest step: locate the existing routing pattern and error handling conventions.
- Act: search the repository for the router module, open the relevant controller file, and inspect how other endpoints format errors.
- Verify: run tests or a targeted command to ensure the new endpoint compiles.
- Iterate: if tests fail due to mismatched error shape, adjust the response mapping and rerun.
The important detail is that the agent does not “hope” the error format is correct. It checks it against tests or schema validation.
Example: Debugging with Evidence
Consider a failing test: “Expected status 400 but got 500.” A tool-using agent should treat this as evidence, not a mystery.
- It reads the stack trace from the test output.
- It opens the referenced file and line.
- It identifies whether the failure is due to missing validation logic, a thrown exception, or a misconfigured route.
- It changes only the smallest part needed, then reruns the same test.
This approach keeps the agent’s work grounded in observable signals.
Designing Agent Boundaries That Prevent Wandering
Even a good problem solver can waste time if the boundaries are vague. Clear boundaries include:
- Scope: which files or modules may be edited.
- Stop conditions: what counts as “done,” such as “all tests pass” or “contract tests for this endpoint pass.”
- Non-goals: what the agent must not attempt, like refactoring unrelated modules.
A simple rule helps: every action should be traceable to an acceptance check.
Mind Map: What Verification Looks Like
A Practical Definition You Can Use
For day-to-day engineering, define an AI agent as: a system that repeatedly converts an intent into tool actions and uses verification signals to decide whether to continue or stop. That definition keeps the focus on controllable behavior, not just impressive text generation.
1.3 Mapping Human Intent to Agent Workflows
Human intent is messy: it includes goals, preferences, constraints, and the occasional “make it feel right.” Mapping that intent to an agent workflow means turning ambiguity into a sequence of actions with checkpoints. The result should be something you can review, test, and rerun when requirements change.
Start with intent decomposition. Take a single user goal and split it into (1) observable outcomes, (2) decision points, and (3) tool actions. Observable outcomes are things you can verify: a response schema, a database migration, a UI state, or a log entry. Decision points are where the agent must choose between alternatives: which fields to store, which error codes to return, or which validation rules to apply. Tool actions are the concrete operations: read files, run tests, call an API, or generate code.
Next, define an execution contract. The contract is a compact agreement between “what the human wants” and “what the agent will do.” It includes inputs, outputs, constraints, and acceptance criteria. If you skip the contract, the agent will try to be helpful in ways you cannot reliably measure.
A practical workflow usually looks like this: interpret intent → propose a plan → generate artifacts → validate against criteria → request targeted human input when blocked. The key is that validation happens repeatedly, not only at the end.
Mind Map: Intent to Workflow Mapping
Turning Goals into Acceptance Criteria
Acceptance criteria are the bridge between intent and execution. For example, if the goal is “Add a password reset endpoint,” the criteria should specify request/response shapes, error behavior, and side effects.
Example intent:
- Goal: “Enable password reset.”
- Constraint: “Tokens must expire in 30 minutes.”
- Preference: “Return generic messages to avoid account enumeration.”
Mapped acceptance criteria:
- POST /password-reset/request
- Input: email
- Output: 200 with message “If the account exists, you’ll receive an email.”
- Side effects: create reset token with expiry timestamp
- POST /password-reset/confirm
- Input: token, newPassword
- Output: 200 on success
- Errors: 400 for invalid/expired token; no account existence leakage
This structure tells the agent what “done” means and where it must be careful.
Identifying Decision Points Early
Decision points prevent the agent from guessing. Typical ones include:
- Data model choices: token storage format, hashing strategy
- Security choices: rate limiting, generic responses
- Integration choices: which email sender module to use
Example decision point:
- “Should reset tokens be stored hashed?”
If the system already hashes tokens elsewhere, the agent can reuse that invariant. If not, the workflow should pause and ask a single question rather than generating two competing implementations.
Designing the Plan with Checkpoints
A plan is not a long narrative; it is a step list with validation moments. For the password reset feature, checkpoints might be:
- Generate API contract and error mapping.
- Generate data model and migration.
- Implement request endpoint.
- Implement confirm endpoint.
- Add tests for success and failure paths.
- Run lint and test suite.
Each checkpoint should produce evidence: a contract file, a migration diff, or test output. When evidence fails, the agent should revise the specific step, not restart everything.
Example Workflow Template
Use a repeatable template so intent mapping stays consistent across features.
1) Intent summary
2) Outcomes and acceptance criteria
3) Constraints and invariants
4) Decision points requiring human input
5) Proposed plan with checkpoints
6) Generated artifacts
7) Validation evidence
8) Remaining questions
Handling Missing Information Without Losing Momentum
When intent lacks details, the agent should ask targeted questions. The workflow should separate “unknowns” from “assumptions.” Unknowns block execution; assumptions can be tested or constrained.
Example:
- Unknown: “Which email provider do we use?”
- Assumption: “We will follow existing email template conventions.”
The agent can proceed with code that calls the existing email abstraction, while asking only about the provider configuration if it is not already standardized.
Mind Map: Escalation Rules
Mapping human intent to agent workflows is ultimately about making the invisible visible: outcomes become criteria, preferences become constraints, and uncertainty becomes explicit questions. Once that structure exists, the agent can generate code with fewer surprises and more evidence.
1.4 Establishing Boundaries for Safe Deterministic Engineering
Safe deterministic engineering means you can predict what the agent will do, constrain where it can do it, and verify outcomes with minimal surprises. The goal is not to remove creativity; it’s to prevent the agent from “helpfully” changing the rules while you’re not looking.
Start with a Contract Between Intent and Execution
A boundary begins as a contract. You define what the agent must produce, what it must not touch, and how it should behave when it cannot comply.
- Output contract: exact artifacts (files, functions, schemas) and their expected shape.
- Behavior contract: how to handle uncertainty (ask questions, stop, or propose a bounded alternative).
- Change contract: which directories, modules, and dependencies are allowed to change.
Example: If the intent is “Add a password reset endpoint,” the contract might require: create POST /reset-password, add validation rules, update only auth module, and include tests. The agent is not allowed to refactor unrelated user profile code.
Constrain Tool Use with Explicit Capabilities
Agents often fail at boundaries because tool access is too broad. Give them capabilities that match the task.
- Read-only tools for discovery: search, inspect, summarize.
- Write tools for production: create or edit only specified paths.
- Command tools for verification: run tests, linters, type checks.
Example: For a feature implementation, allow read across the repo, allow write only under src/auth/ and tests/auth/, and allow run only test auth and lint auth.
Use Guardrails That Fail Closed
When a boundary is violated, the system should stop or request clarification rather than “fixing” the problem silently.
- Fail closed on scope drift: if the agent proposes edits outside allowed paths, reject the patch.
- Fail closed on missing prerequisites: if required inputs are absent, ask for them.
- Fail closed on format mismatch: if output doesn’t match the required schema, do not proceed.
Example: The agent generates a handler but forgets to add a test. Instead of accepting partial work, the pipeline rejects the change and asks for the missing test.
Separate Planning from Writing
A common failure mode is letting the agent write code while it is still deciding what it means. Split the workflow into phases with different permissions.
- Plan phase: produce a short change plan and a file list.
- Write phase: apply changes only to the approved file list.
- Verify phase: run checks and report pass/fail.
Example: The plan phase might list src/auth/routes.ts, src/auth/service.ts, and tests/auth/reset-password.test.ts. If the write phase tries to touch src/billing/, it is blocked.
Define Determinism with Repeatable Verification
Determinism is not “the agent always succeeds.” It’s “the same inputs lead to the same checks and comparable results.”
- Deterministic commands: pinned test scripts, stable environment variables.
- Deterministic outputs: formatting rules, stable code generation templates.
- Deterministic evaluation: pass/fail criteria tied to tests and static checks.
Example: Require that every change passes unit tests and type checks before it can be merged, even if the agent claims the code “looks right.”
Mind Map: Boundaries That Keep Generation Predictable
Example: A Boundary-First Patch Workflow
Scenario: Add an endpoint and its tests.
- Intent: “Create
POST /reset-passwordwith email validation and rate limiting.” - Contract:
- Allowed writes:
src/auth/andtests/auth/. - Required artifacts: route handler, service function, validation, tests.
- Disallowed: changes to billing, UI, or database migrations unless explicitly requested.
- Allowed writes:
- Plan phase output:
- File list and a brief mapping from requirements to functions.
- Write phase enforcement:
- If the agent edits outside
src/auth/, the patch is rejected.
- If the agent edits outside
- Verify phase:
- Run
test authandlint auth. - If tests fail, the agent is asked to produce a minimal fix within the same scope.
- Run
This workflow keeps the agent’s “helpfulness” inside a box you can measure.
Example: Handling Uncertainty Without Breaking Boundaries
When the agent lacks information, boundaries decide what happens next.
- Ask when the missing detail affects correctness.
- Stop when continuing would require guessing hidden rules.
- Propose bounded alternatives only when the alternatives are explicitly allowed by the contract.
Example: If rate limiting strategy is unspecified, the agent should ask which algorithm and where configuration lives, rather than inventing a new config system.
A Practical Checklist for Boundary Setup
- Scope allowed paths and block everything else.
- Split plan and write permissions.
- Require tests and static checks as the gate.
- Use fail-closed rules for drift and missing requirements.
- Make tool access match the phase.
Boundaries are easiest to maintain when they are concrete: specific paths, specific checks, and specific stop conditions. Once those are in place, deterministic engineering becomes less about hope and more about procedure.
1.5 Overview of the Workflow from Intent to Code
A reliable vibe-coding workflow is less about “getting code fast” and more about turning a human goal into a sequence of concrete, checkable steps. The core idea is simple: intent becomes structured requirements, requirements become abstractions and contracts, and contracts become generated artifacts that are tested and reviewed.
The Workflow in One Pass
Start with intent. Then tighten it into acceptance criteria. Next, choose the right abstractions so the agent can generate small, coherent pieces instead of one giant blob. After that, orchestrate generation with tools and feedback loops, and finish by validating with tests and quality gates.
A practical way to think about the workflow is as five layers:
- Intent layer: what the user wants and why it matters.
- Specification layer: what must be true, including edge cases.
- Design layer: how the system will represent the problem.
- Generation layer: what files and code blocks to produce.
- Verification layer: how to prove the result works.
Each layer reduces ambiguity from the previous one.
Mind Map: Intent to Code Pipeline
Step 1: Intent to Acceptance Criteria
Intent is often vague: “Add a feature to manage invoices.” Acceptance criteria make it executable. For example, instead of “invoices can be created,” specify: “A user can create an invoice with line items; totals are computed server-side; invalid currency codes return a 400 with a structured error body.”
A useful practice is to include three categories in every acceptance set:
- Happy path: the normal flow.
- Boundary conditions: empty lists, maximum sizes, unusual but valid inputs.
- Failure modes: missing permissions, malformed payloads, and downstream errors.
This structure gives the agent a target for both code and tests.
Step 2: Abstraction Choices That Keep Generation Small
Once requirements are clear, the design layer decides how to represent them. If you skip abstraction, the agent tends to generate tightly coupled code that is hard to test.
A simple example: for invoice creation, define a domain object like InvoiceDraft and a service like InvoiceService.createFromDraft(...). The agent can then generate:
- a data model for drafts and persisted invoices,
- a service method that computes totals,
- an API handler that validates input and calls the service.
Because each piece has a contract, regeneration can be targeted. If totals computation fails a test, you only revisit the service, not the entire API.
Step 3: Orchestrate Generation with Tools and State
In a workflow, orchestration is the “how” of tool use. The agent should follow a plan that maps requirements to artifacts. For instance:
- Read existing routing and auth patterns.
- Generate a new endpoint file.
- Generate or update the service.
- Add tests that cover acceptance criteria.
State management matters because the agent must remember what it already produced and what remains. Without it, the agent may regenerate the same file with conflicting changes.
A practical checklist for orchestration:
- Keep a list of required artifacts.
- Record which artifacts are complete.
- After each generation step, run the smallest verification that can catch the most likely mistakes.
Step 4: Verify Early, Then Tighten
Verification is not a final ceremony. It’s a sequence of checks that progressively increase confidence.
A typical order:
- Compile or type check to catch structural issues.
- Unit tests for deterministic logic like totals computation.
- Integration tests for request/response behavior and auth.
- Static analysis for style and common defects.
If a test fails, the workflow should guide the agent to diagnose the specific contract it violated. For example, if the API returns 200 but the test expects 400 for invalid currency, the agent should inspect validation logic and error mapping, not rewrite the domain model.
Step 5: Iterate Without Losing the Plot
Iteration is targeted regeneration guided by evidence. The goal is to preserve behavior that already passed checks while fixing the failing part.
A clean loop looks like this:
- Identify the failing requirement or test.
- Locate the artifact responsible for that contract.
- Regenerate only that artifact and its immediate dependencies.
- Re-run the relevant verification steps.
When this loop is followed, the workflow becomes predictable: intent changes lead to specification changes, which lead to design and code changes, which lead to test updates and re-verification.
A Concrete Mini Example
Suppose the intent is: “Users can create invoices and see totals immediately.” The acceptance criteria specify totals calculation rules and error responses. The design layer introduces InvoiceService and a request DTO. The generation layer creates the endpoint, service method, and tests. Verification runs unit tests for totals and an integration test for the endpoint response. If the integration test fails due to currency validation, the next iteration updates only the validation and error mapping, then re-runs the integration test.
That’s the workflow: each step narrows ambiguity, and each narrowing is backed by a check.
2. Intent Modeling and Requirements That Agents Can Execute
2.1 Writing Executable Intent Statements with Acceptance Criteria
Executable intent statements are the bridge between “what we want” and “what the agent should produce.” The trick is to write intent in a way that can be checked, not just admired. Acceptance criteria do the checking.
The Core Idea: Intent That Can Be Verified
Start with a single sentence that describes the outcome, then list observable criteria that prove the outcome is correct. If a criterion can’t be tested or inspected, it’s probably a wish, not an acceptance rule.
A good intent statement has three properties:
- Outcome clarity: someone can tell what “done” looks like.
- Scope boundaries: what is included and what is not.
- Verification hooks: criteria that map to tests, logs, or UI states.
A Practical Template You Can Reuse
Use this structure for each feature or change request:
- Intent: “Build/modify X so that Y happens for Z.”
- Inputs: what data or events trigger the behavior.
- Outputs: what the system must produce.
- Acceptance Criteria: numbered, testable statements.
- Non Goals: explicit exclusions.
Here’s a compact example.
Example: Password Reset Endpoint
Intent: Implement a password reset endpoint so users can set a new password after verifying a reset token.
Inputs: POST request with { email, token, newPassword }.
Outputs: JSON response with success or specific error codes.
Acceptance Criteria:
- A valid token updates the user password and invalidates the token.
- An expired token returns
400with error codeTOKEN_EXPIRED. - A token for a different email returns
400with error codeTOKEN_EMAIL_MISMATCH. - Passwords shorter than 12 characters return
400with error codeWEAK_PASSWORD. - All error responses include a
messagefield suitable for UI display.
Non Goals:
- No email sending logic in this change.
- No UI work beyond the API contract.
Notice how each criterion points to something you can assert in tests: status codes, error codes, and token invalidation.
Acceptance Criteria as a Test Plan in Disguise
Write acceptance criteria so they can be turned into tests with minimal interpretation. A useful pattern is Given–When–Then, even if you don’t write it explicitly.
- Given: preconditions (token exists, user exists, token expired).
- When: the action (POST with fields).
- Then: the expected result (status, body, side effects).
If you include side effects, specify them. For example, “token invalidated” should mean “token no longer matches in the database” or “a used_at field is set.” Ambiguity here causes agent churn.
Mind Map: From Intent to Executable Checks
Common Failure Modes and How to Fix Them
- Vague intent: “Improve performance of search.” Fix by stating the measurable target and what counts as success (e.g., “p95 latency under 200ms for 95% of queries”).
- Criteria without observables: “Return appropriate errors.” Fix by naming exact error codes and status codes.
- Missing constraints: “Validate input.” Fix by listing required fields, formats, and limits.
- No scope boundaries: “Add caching.” Fix by stating cache key rules and invalidation behavior, or explicitly excluding it.
Advanced Details: Making Intent Agent-Friendly
When agents generate code, they need fewer decisions. Reduce decision load by specifying:
- Data contracts: field names, types, and required/optional status.
- Error taxonomy: a small set of error codes with consistent structure.
- Side-effect semantics: what must happen in storage, and what must not.
- Ordering and idempotency: whether repeated requests should be safe.
Example: Idempotency Criterion
Add this to acceptance criteria when relevant:
- “If the same reset token is used twice, the second request returns
400withTOKEN_ALREADY_USEDand does not change the password again.”
That one sentence prevents a whole class of subtle bugs.
A Final Checklist Before You Hand It to an Agent
- Can every acceptance criterion be asserted by a test or inspected in logs?
- Are thresholds and formats explicitly stated?
- Are non goals listed so the agent doesn’t “help” by doing extra work?
- Do inputs and outputs form a clear contract?
If you can answer “yes” to all four, your intent is executable, and your acceptance criteria are doing real work instead of just looking official.
2.2 Translating User Goals into System Behaviors
User goals are what people want; system behaviors are what software does. The translation step turns vague intent into concrete, testable actions, while keeping the agent’s work bounded by what the system can actually observe and enforce.
Start with Goal Statements That Can Be Checked
A usable goal statement has three parts: a measurable outcome, a scope, and a success condition. For example, “Users can manage their subscriptions” is too broad. A better goal is “A user can pause an active subscription and later resume it, and the UI reflects the current status.” The key is that the success condition can be verified by reading state, not by trusting a description.
When you write the goal, also list what the system must not do. “Pause” should not delete billing history, and “resume” should not create duplicate charges. Those negatives become constraints that prevent the agent from generating behaviors that look plausible but violate expectations.
Convert Outcomes into Behavior Contracts
Once the goal is checkable, translate it into behavior contracts: inputs, state changes, and outputs. A behavior contract answers four questions.
- What triggers the behavior? Example: a user clicks “Pause.”
- What state changes are required? Example: subscription status becomes
paused, and a pause timestamp is stored. - What outputs are produced? Example: the API returns the updated status, and the UI shows “Paused.”
- What invariants must hold? Example: a paused subscription cannot be “active” in any read model.
These contracts are the bridge between human intent and agent-generated code. They also give you a stable target for tests.
Define the System’s Vocabulary and Boundaries
Agents struggle when they invent terms. Define a small vocabulary for the domain: statuses, events, and identifiers. For subscriptions, you might use active, paused, canceled. For events, you might use subscription_paused and subscription_resumed. Boundaries clarify where the system is authoritative. If billing is handled by an external provider, the system should treat provider responses as inputs and avoid generating behaviors that assume it can directly control billing.
A practical boundary rule: if the system cannot observe something, it should not enforce it. Instead, it records what it knows and exposes that knowledge.
Use a Behavior Decomposition Mind Map
The decomposition should move from user-facing actions to internal steps, then to data and checks. The mind map below is a template you can reuse.
Mind Map: Translating User Goals into System Behaviors
Example: Pausing and Resuming Subscriptions
User goal: “Users can pause and later resume a subscription, and the system shows the correct status.”
Behavior contracts:
- Pause trigger:
POST /subscriptions/{id}/pause - State change: set
status = paused, setpaused_at, append audit entry - Outputs: return
{ id, status, paused_at } - Invariants:
- Only
activesubscriptions can be paused - Pausing must be idempotent: repeating the pause returns the same state
- Only
Resume trigger: POST /subscriptions/{id}/resume
- State change: set
status = active, setresumed_at, append audit entry - Outputs: return
{ id, status, resumed_at } - Invariants:
- Only
pausedsubscriptions can be resumed - Resuming must not create a second active record; it updates the existing one
- Only
Edge cases to specify:
- Pausing a
canceledsubscription returns a clear error code. - Resuming after a network retry should not duplicate audit entries.
These details are not “nice to have.” They determine what code the agent should generate and what tests must exist.
Add Behavior Checks That Prevent Drift
After contracts are written, add verification rules that keep the system honest.
- Transition table: enumerate allowed status transitions and reject everything else.
- Idempotency keys: ensure repeated requests produce the same final state.
- Read model consistency: define whether the UI reads from the same source as the write path.
A small transition table is often enough to stop the agent from inventing extra statuses or skipping validation.
Translate into Agent-Friendly Tasks
Finally, package the behaviors into agent tasks that mirror your contracts.
- Task A: generate API handlers for pause and resume with validation and idempotency.
- Task B: generate domain logic that enforces the transition table.
- Task C: generate tests that cover success, forbidden transitions, and retry behavior.
- Task D: generate UI state mapping from API responses.
When the tasks are aligned to contracts, the agent’s output becomes easier to review because every file change can be traced back to a specific behavior requirement.
2.3 Capturing Constraints for Data, Performance, and Security
Constraints are the guardrails that keep an agent from producing code that merely “works on the happy path.” In vibe coding with AI agents, constraints also become machine-checkable inputs: they shape what the agent generates, what it refuses to generate, and how it validates the result.
Data Constraints That Prevent Silent Wrongness
Start with data constraints because they determine correctness more than any algorithmic flourish.
Define the data contract. Specify schemas, required fields, allowed values, and nullability. For example, if you’re building an invoice API, state that amount is a non-negative decimal with two fractional digits, and currency must match an ISO-4216 code.
Specify data provenance and transformations. If the agent will map from one representation to another, require explicit transformation rules. Example: “Convert created_at from UTC in the database to ISO-8601 with timezone offset in the API response.” This prevents the classic “it’s the same time, just in a different timezone” bug.
Add validation boundaries. Tell the agent where validation happens: request layer, domain layer, or persistence layer. A practical rule: validate structural correctness at the boundary (request), enforce business invariants in the domain, and keep persistence constraints as a last line of defense.
Constrain identifiers and uniqueness. State uniqueness rules and their scope. Example: “email is unique per tenant, not globally.” Without this, the agent may generate a global unique index and break multi-tenant behavior.
Performance Constraints That Keep Systems Responsive
Performance constraints should be measurable and tied to user-visible outcomes.
Set latency budgets per operation. Example: “POST /orders must respond within 300ms at p95 for 95% of requests when the database is healthy.” The agent can then choose efficient queries, avoid N+1 patterns, and limit synchronous work.
Constrain throughput and concurrency. Example: “Handle 200 requests per second sustained for 10 minutes.” This pushes the agent toward connection pooling, bounded queues, and careful locking.
Define resource limits. Specify memory and CPU expectations for batch jobs. Example: “A nightly report must run under 2GB RAM.” That discourages loading entire tables into memory.
Require query discipline. Add constraints like “No unbounded scans without a limit,” and “All list endpoints must support pagination with limit capped at 100.” These are easy for agents to follow when written as explicit rules.
State caching rules. If caching is allowed, define invalidation behavior. Example: “Cache product pricing for 60 seconds; invalidate on price update events.” The agent can then implement consistent cache keys and TTLs.
Security Constraints That Make Risk Concrete
Security constraints should be specific enough to test.
Define authentication and authorization boundaries. Example: “Every request must include a tenant identifier derived from the authenticated principal; clients cannot supply it.” This prevents horizontal privilege escalation.
Constrain input handling. Require parameterized queries and strict parsing. Example: “Reject payloads larger than 1MB and enforce content-type application/json.” The agent can add request size limits and schema validation.
Specify secrets handling. State that credentials must come from environment variables or a secret manager and must never be logged. Also require redaction in error paths.
Add secure defaults. Example: “Use HTTPS-only cookies with SameSite=Lax and HttpOnly=true.” The agent can generate safe cookie settings without guessing.
Define audit logging requirements. Example: “Log authorization failures with user id and action, but never log raw tokens or passwords.” This gives the agent a clear rule for what to include.
Mind Map: Constraints and How They Flow into Code
Example Constraint Set for an Orders Endpoint
Use constraints as a compact spec the agent can follow.
Intent: “Create an order for the authenticated tenant.”
Data constraints:
tenant_idis derived from the auth context; ignore any client-provided value.items[]must be non-empty; each item hassku(string, length 3–40) andquantity(integer, 1–1000).currencymust be ISO-4216;amountis computed server-side, never accepted from the client.
Performance constraints:
- p95 latency under 300ms for typical carts.
- List endpoints must paginate with
limitmax 100.
Security constraints:
- Reject payloads over 1MB.
- Use parameterized queries.
- Log authorization failures without tokens.
Turning Constraints into Agent-Checkable Rules
When you write constraints, include a “how to verify” clause. For instance: “Enforce limit <= 100 and add a test that fails when limit=101.” This converts constraints from vibes into checks, and it reduces the chance the agent will treat them as optional suggestions.
2.4 Creating Traceable Requirement Artifacts for Agent Iterations
Traceable requirement artifacts are the connective tissue between what a stakeholder wants and what an agent generates. When iterations happen, you need to answer three questions quickly: What did we intend? What did the agent change? Did the change satisfy the intent? This section builds a practical system for capturing intent, linking it to outputs, and keeping evidence tidy.
Core Idea: Intent Becomes an Artifact, Not a Sentence
Start by treating each requirement as a small, testable unit. A good artifact has four parts: a stable identifier, a plain-language goal, measurable acceptance criteria, and a record of which generated files or commits were produced to satisfy it.
Artifact Anatomy
Use a consistent structure so agents and humans read the same thing.
- Requirement ID: Example
REQ-2.4-Auth-001. - Goal: One sentence describing user value.
- Acceptance Criteria: Bullet points that can be checked.
- Assumptions: Facts the team is relying on.
- Non-Goals: What is explicitly out of scope.
- Evidence Links: References to tests, code locations, or PR sections.
A requirement without acceptance criteria is like a ticket with no destination; agents can still “work,” but you cannot verify correctness.
Traceability Model: From Requirement to Evidence
Traceability is easiest when you define the direction of linkage.
- Requirement → Generated Artifacts: Which files, endpoints, schemas, or UI components were created or modified.
- Generated Artifacts → Verification: Which tests or checks prove behavior.
- Verification → Outcome: Whether the acceptance criteria are met.
Keep the linkage lightweight. You do not need a perfect graph; you need enough structure to explain decisions during review.
Mind Map: Traceable Requirement Artifacts
Example: A Requirement Artifact for an API Endpoint
Imagine the team is adding an endpoint to list orders. The artifact should be specific enough that an agent can generate code and tests without guessing.
Requirement ID: REQ-2.4-Orders-List-001
Goal: Return a paginated list of orders for an authenticated user.
Acceptance Criteria:
- Given a valid session,
GET /api/ordersreturns JSON withitemsandpage. itemscontains only orders belonging to the authenticated user.- Pagination uses
limitandcursorquery parameters. - If
limitis missing, default to 20. - If the user has no orders, return an empty
itemsarray.
Assumptions:
- Authentication middleware attaches
userIdto the request context. - Orders are stored with
ownerUserId.
Non-Goals:
- Sorting by arbitrary fields.
- Admin-level access.
Evidence Links:
- Code:
src/routes/orders.tsandsrc/services/orders.ts - Tests:
tests/orders.list.test.ts - Verification: “All tests passing in CI for this PR”
When the agent iterates, you update the evidence links and verification status rather than rewriting the entire requirement.
Example: Iteration Trace in Practice
Suppose the first agent run generates the endpoint but forgets the default limit. You keep the requirement artifact stable and record what changed.
- Iteration 1
- Evidence links added: route and service files.
- Verification status:
Fail. - Notes: “Default limit not applied when query param missing.”
- Iteration 2
- Evidence links updated: same files plus a small helper for pagination defaults.
- Tests updated: added a test case for missing
limit. - Verification status:
Pass.
This approach prevents “requirement drift,” where the team gradually changes the goal to match whatever the agent produced.
Advanced Detail: Evidence Without Overpromising
Evidence links should point to concrete artifacts, not vague claims. Prefer references that reviewers can open quickly.
- File-level evidence: list paths for modified or added files.
- Test-level evidence: name the specific test cases or snapshots.
- Behavior evidence: cite the acceptance criteria bullets that the tests cover.
If a requirement is partially implemented, mark it explicitly. Partial progress is fine; silent mismatch is not.
Mind Map: Evidence and Status
Practical Checklist for Agents and Humans
Before accepting an iteration, confirm:
- The requirement ID in the artifact matches the ID referenced in the agent’s change log.
- Each acceptance criteria bullet has at least one evidence pointer (test or code location).
- Non-goals remain non-goals; if something new appears, it gets its own requirement artifact.
- The verification status is updated with a reason that a reviewer can understand in under a minute.
Traceable artifacts turn iteration from guesswork into a controlled conversation between intent and implementation. The agent still writes code, but the team keeps the receipts.
2.5 Building a Requirements Checklist for Code Generation Quality
A requirements checklist is your quality gate between “intent” and “generated code.” It prevents the common failure mode where the agent produces something that compiles but doesn’t satisfy the actual contract. The checklist should be written so a human can score it quickly, and so an agent can use it to decide what to generate next.
Start with What “Done” Means
Begin by turning requirements into measurable outcomes. Each item on the checklist should map to one of three outcomes: behavior, structure, or safety.
- Behavior: The system does the right thing for the right inputs.
- Structure: The code matches the intended design boundaries.
- Safety: The system resists invalid inputs, misuse, and data mishandling.
A practical rule: if you cannot test or inspect an item, it probably belongs in a different section of the spec.
Mind Map: Requirements Checklist Coverage
Checklist Structure That Scales
Use a consistent ordering so the agent and reviewer don’t argue about where things belong.
1) Coverage
- Acceptance Criteria Coverage: Every criterion has a corresponding test or explicit reasoning artifact.
- Edge Case Coverage: Each criterion includes at least one edge case input (empty, max size, invalid format, missing fields).
Example: If the requirement says “Reject negative quantities,” the checklist demands tests for -1, 0, and a non-numeric payload.
2) Contract Fidelity
- API Contract Matches Spec: Request/response fields, status codes, and error shapes match the spec.
- Data Model Alignment: Generated models reflect required types, optionality, and constraints.
Example: If the spec says email is required and must be lowercase, the checklist requires either a validation rule or a normalization step, plus tests that prove it.
3) Abstraction and Boundaries
- Separation of Concerns: Business logic is not embedded in transport handlers.
- Interface Contracts: Dependencies are injected or abstracted so tests can replace them.
Example: The checklist rejects a design where an HTTP handler directly queries the database without a service layer when the spec calls for a service boundary.
4) Deterministic Behavior
- No Hidden State: The code avoids implicit global state that changes results between runs.
- Stable Error Handling: Errors follow a consistent mapping from domain errors to API responses.
Example: If the spec defines NotFound as HTTP 404 with { code: "not_found" }, the checklist requires that mapping in all relevant endpoints.
5) Safety and Validation
- Input Validation: Every externally supplied field is validated for type, range, and format.
- Authorization Checks: The code verifies permissions at the correct layer.
- Injection Resistance: Queries and commands use parameterization rather than string concatenation.
Example: For a search endpoint, the checklist requires parameterized filters and tests for special characters.
Example: A Compact Checklist Template
Use this as a scoring rubric. Each item is pass/fail with a short evidence note.
Requirements Checklist
- Coverage
- Each acceptance criterion has a test or proof note
- Edge cases included for each criterion
- Contract Fidelity
- API fields and status codes match spec
- Error responses match the defined shape
- Abstraction
- Transport layer calls a service boundary
- Dependencies are injectable for tests
- Determinism
- No hidden global state affects outputs
- Error handling is consistent across endpoints
- Safety
- Input validation exists for all external fields
- Authorization enforced where spec requires
- Parameterized data access used
Example: Evidence Notes That Actually Help
When an item fails, the evidence note should point to the exact mismatch.
- Bad note: “Tests missing.”
- Better note: “Criterion A3 expects 404 with
{code:"not_found"}; current handler returns 400.”
This level of specificity lets the agent regenerate only what’s wrong, instead of redoing everything.
Verification Flow That Prevents Last-Minute Surprises
Run the checklist in the same order as your build pipeline: inspect contracts first, then validate behavior, then confirm safety. If contract fidelity fails, tests will often fail too, so catching it early saves time.
A simple workflow: generate code → run static checks → run unit tests → run integration tests → complete checklist evidence notes → only then approve.
If you keep the checklist tight and evidence-driven, it becomes a shared language between intent, code, and review—without turning every change into a debate.
3. Abstraction Layers for Reliable Autonomous Generation
3.1 Choosing the Right Abstraction Level for Each Task
Abstraction level is the “distance” between an agent’s instructions and the final code. Too low, and the agent drowns in details; too high, and it guesses. The goal is to pick the smallest level that still lets the agent act confidently.
Start with the Task Shape
A good abstraction choice depends on what kind of work the task is.
- Transformations convert one representation to another (request → domain object, object → SQL row). These tolerate medium abstraction because the mapping is explicit.
- Compositions assemble existing parts (controller → service → repository). These benefit from higher abstraction because wiring is repetitive.
- Creations invent new behavior (new validation rule, new endpoint). These need lower abstraction so the agent can see edge cases.
- Investigations answer “what should we do” (find existing patterns, locate data flow). These should stay high until facts are gathered.
A quick rule: if the task’s success depends on exact syntax or edge-case handling, go lower. If it depends on consistent structure and reuse, go higher.
Use a Three-Layer Ladder
Think in layers that the agent can move between.
- Intent layer states the outcome and constraints.
- Interface layer defines inputs, outputs, and contracts.
- Implementation layer contains the code details.
For each task, decide which layer is the “landing zone.” The agent can still reference other layers, but you should anchor it.
- If you want the agent to generate a new module, anchor at the interface layer first, then drop to implementation.
- If you already have a contract, anchor at implementation to avoid re-deriving the API.
- If you’re exploring, anchor at intent, then request concrete artifacts before coding.
Mind Map: Abstraction Selection
Abstraction Selection Mind Map
Concrete Examples That Show the Difference
Example: Endpoint Generation
Suppose you need a POST /invoices endpoint.
- Too high abstraction: “Create an endpoint that saves invoices.” The agent may choose arbitrary request fields and error formats.
- Better: Provide the interface layer contract: request schema, response shape, status codes, and validation rules. Then ask for implementation.
A practical prompt structure is:
- Intent: “Create invoice endpoint.”
- Interface: “Accept
{customerId, lineItems}; return{invoiceId}; 400 on invalid items.” - Implementation: “Use existing service and repository patterns; write tests for success and invalid cases.”
This keeps the agent from inventing contracts while still letting it write correct code.
Example: Business Rule Implementation
Now add a rule: “Line items must have non-negative quantity; totals must match sum of line totals.”
- Too high abstraction: “Add validation for invoice totals.” The agent might validate only one side.
- Better: Anchor at implementation details for the rule function: specify the exact checks, rounding behavior, and failure messages. Then require unit tests that cover boundary values like
0, empty lists, and mismatched totals.
Here, lower abstraction prevents “almost correct” logic.
Quality Signals and What They Mean
When abstraction is wrong, symptoms show up quickly.
- Contract mismatch (tests fail due to wrong shapes or status codes) suggests the agent guessed the interface. Tighten the interface layer and re-run.
- Boilerplate repetition suggests you stayed too low. Raise abstraction by pointing to existing helpers, base classes, or shared patterns.
- Hidden assumptions (works for the happy path, breaks on edge cases) suggests missing preconditions. Add explicit invariants and at least one concrete example input and expected output.
- Drift across layers (implementation contradicts the contract) suggests the agent was given conflicting instructions. Re-anchor: contract first, then implementation.
A Simple Selection Checklist
Before generating code, answer these in order:
- What is the task shape: transformation, composition, creation, or investigation?
- Which layer should be the landing zone: intent, interface, or implementation?
- Do we already have a contract the agent must follow?
- What are the top two edge cases that could break correctness?
- What quality signal would tell us abstraction is wrong?
If you can answer those five questions, you can usually pick the right abstraction level on the first try. And if you can’t, that’s not a failure—it’s a sign you need to gather facts or tighten the contract before asking for code.
3.2 Designing Interfaces and Contracts for Agent Collaboration
Agent collaboration works only when “what to send” and “what to expect back” are unambiguous. Interfaces and contracts turn messy conversation into predictable engineering work: inputs are shaped, outputs are validated, and failures are handled in a way that keeps the workflow moving.
Start with Shared Vocabulary and Non Negotiable Invariants
Before designing any interface, define a small set of terms that every agent uses the same way. For example, decide what “intent” means (a user goal plus acceptance criteria), what “spec” means (a structured description of behaviors), and what “artifact” means (code, tests, or configuration). Then define invariants that must never change across agents, such as:
- Every artifact includes a stable identifier (path or logical name).
- Every generated change includes a rationale tied to a specific acceptance criterion.
- Every tool call includes an explicit target (file path, endpoint, or command).
A practical rule: if an agent can’t point to an invariant, it should not be allowed to proceed.
Define Interface Shapes for Requests and Responses
Treat each agent interaction like an API. Use a request schema that includes the minimum context needed to act, and a response schema that includes both results and verification signals.
Request fields (typical):
task_id: stable correlation key.goal: the intent slice being addressed.constraints: explicit limits (time, dependencies, security rules).inputs: references to existing artifacts.expected_outputs: what the caller wants back.
Response fields (typical):
artifacts: list of created/modified items.checks: pass/fail signals (formatting, compilation, tests).assumptions: only if required to proceed.errors: structured failure reasons and remediation hints.
Here is a compact contract example for a “code generation” agent.
{
  "task_id": "feat-login-001",
  "goal": "Implement POST /login",
  "constraints": {
    "auth": "session-cookie",
    "no_new_deps": true,
    "validation": "strict"
  },
  "inputs": {
    "routes": "src/routes/auth.ts",
    "models": "src/models/user.ts"
  },
  "expected_outputs": ["src/routes/auth.ts", "src/tests/auth.test.ts"]
}
Use Contracts to Separate Planning from Execution
A common failure mode is letting planning and execution blur. Contracts should enforce separation:
- The planner produces a spec and a change plan.
- The executor produces code and tests.
- The reviewer produces a verdict and a list of required fixes.
This separation reduces “agent drift” because each role has a narrow output contract.
Add Verification Signals Instead of Vibes
Interfaces should include checks that are cheap to compute and meaningful. For example, after code generation, require:
- “File compiles” (or at least typechecks).
- “Tests exist for each acceptance criterion.”
- “No forbidden patterns” (like raw string interpolation in queries).
When checks fail, the response must include remediation instructions that are actionable, not generic.
Mind Map: Interface and Contract Components
Diagram: Collaboration Flow with Contract Gates
    flowchart TD
  A[Caller creates task_id and goal slice] --> B[Planner request contract]
  B --> C[Planner returns spec + change plan]
  C --> D[Executor request contract]
  D --> E[Executor returns artifacts + checks]
  E --> F{Checks pass?}
  F -- Yes --> G[Reviewer request contract]
  F -- No --> H[Remediation loop with targeted fixes]
  H --> D
  G --> I{Reviewer verdict}
  I -- Approved --> J[Commit-ready output]
  I -- Changes needed --> H
Example: Contract-Driven Error Remediation
Suppose the executor fails a “tests exist” check. The response should specify exactly what is missing and where. A good error payload looks like this:
{
  "task_id": "feat-login-001",
  "errors": [
    {
      "code": "MISSING_TESTS",
      "message": "No test covers acceptance criterion AC-3",
      "missing": {"criterion": "AC-3", "file": "src/tests/auth.test.ts"},
      "remediation": "Add a test for invalid password returns 401"
    }
  ],
  "checks": {"tests_exist": false, "typecheck": true}
}
This structure lets the planner or executor regenerate only the relevant slice instead of rewriting everything.
Advanced Details That Prevent Drift
Contracts become powerful when they include boundaries:
- Scope boundaries: expected outputs list prevents silent extra work.
- Constraint boundaries: forbidden actions are explicit (no new dependencies, no schema changes unless requested).
- Context boundaries: inputs are references, not free-form summaries, so agents don’t invent missing files.
- Stop conditions: if checks fail in a way that indicates a broken assumption, the workflow halts and requests clarification.
When you design interfaces this way, collaboration stops being a conversation and becomes a controlled sequence of verifiable steps.
3.3 Modeling Domain Concepts With Clear Data Structures
Good autonomous code generation starts with a domain model that humans can read and agents can transform without guessing. “Clear data structures” means you represent concepts with explicit types, constraints, and relationships, so the agent can generate code that compiles and behaves predictably.
Start with Domain Concepts, Not Screens
Pick the nouns that carry meaning in your problem: Customer, Invoice, Subscription, Policy, Shipment. Then decide what each noun must remember. For example, an Invoice is not just an ID; it has a status, line items, totals, and an audit trail. When you model these explicitly, the agent can generate handlers, persistence, and tests without inventing fields.
A practical rule: if a concept changes over time, model its lifecycle states and transitions. If it never changes, model it as immutable. This reduces “mystery fields” and makes validation rules obvious.
Define Entities, Value Objects, and Aggregates
Use three buckets.
- Entities have identity and can change:
Order,User. - Value Objects are defined by their values and are interchangeable when equal:
Money,EmailAddress,Address. - Aggregates are clusters of consistency:
Ordermight ownOrderLineand enforce invariants.
Example: Money should not be a loose pair of numbers. It should carry currency and enforce rounding rules. That way, generated code can’t accidentally add USD to EUR.
Make Invariants Executable Through Types
Invariants are rules that must always hold. Encode them in the data structure, not only in prose.
- Use constrained types:
EmailAddressvalidates format. - Use enums for states:
InvoiceStatusprevents invalid strings. - Use non-empty collections where required:
lineItemsmust have at least one item.
Here’s a compact TypeScript example showing how structure guides correctness:
type InvoiceStatus = 'Draft' | 'Issued' | 'Paid' | 'Canceled';

type Money = {
  currency: 'USD' | 'EUR';
  amountCents: number; // invariant: integer cents
};

type InvoiceLine = {
  sku: string;
  description: string;
  unitPrice: Money;
  quantity: number; // invariant: > 0
};

type Invoice = {
  id: string;
  status: InvoiceStatus;
  customerId: string;
  lineItems: InvoiceLine[]; // invariant: non-empty
  totals: { subtotal: Money; tax: Money; total: Money };
};
The agent can now generate: serializers, database schemas, and calculations that respect the same constraints.
Model Relationships with Clear Ownership
Ambiguity about ownership causes inconsistent code. Decide whether relationships are:
- References: store an ID and load details elsewhere (
customerId). - Composition: store nested data inside the aggregate (
lineItemsinsideInvoice).
For code generation, composition is easier to keep consistent because the aggregate can enforce invariants in one place.
Mind Map: Domain Modeling Decisions
Translate Modeling into Agent-Ready Artifacts
To keep generation coherent, produce a small set of artifacts per concept.
- Type definition: the shape and constraints.
- State transition rules: what changes
statusand when. - Computation rules: how
totalsare derived fromlineItems. - Persistence mapping: which fields are stored directly and which are derived.
Example: if totals.total is derived, the agent should not accept client input for it. Instead, it should compute totals server-side during Issued and Paid transitions.
Case Example: Invoice Totals Without Guesswork
Suppose requirements say totals must always match line items. Model totals as derived and generate code accordingly.
- Data structure:
InvoiceincludeslineItemsandtotals. - Invariant:
totals.total = subtotal + tax. - Implementation rule: totals are recomputed whenever
lineItemschange.
This prevents a common failure mode where generated code updates line items but forgets to update totals. The model makes the dependency explicit, so the agent can follow it.
Advanced Detail: Versioning and Backward Compatibility
When concepts evolve, keep the structure stable and add explicit migration paths. Use versioned schemas or additive fields with clear defaults. If you must rename a field, represent both during a transition and document the mapping rule inside the data structure notes you provide to the agent.
A simple pattern: keep InvoiceLine stable, and introduce a new value object for the renamed concept rather than silently changing meaning. That keeps generated code consistent across iterations and avoids “same name, different meaning” bugs.
3.4 Separating Concerns Using Modules, Services, and Adapters
Separating concerns is the difference between “the code works” and “the code stays understandable when it changes.” In vibe coding with AI agents, this separation also gives the agent clear boundaries: it can generate behavior without guessing how the rest of the system is wired.
Core Idea: Three Layers with Different Responsibilities
Think of the system as three kinds of places:
- Modules hold domain logic and policies. They should not know about HTTP, databases, or message queues.
- Services orchestrate use cases by coordinating modules and calling ports. They translate intent into steps.
- Adapters handle external details. They convert between the outside world (requests, files, SQL rows) and your internal shapes.
A helpful rule: if a file imports a web framework, it’s probably an adapter. If it imports your domain types and implements a use case, it’s probably a service.
Mind Map: Where Code Belongs
Separating Concerns Mind Map
Modules: Keep Rules Close to the Meaning
Modules should express “what must be true.” For example, a billing policy module can enforce that refunds cannot exceed paid amount.
Best practice: make module functions deterministic and side-effect free when possible. That makes agent-generated code easier to test and easier to refactor.
Example module shape:
RefundPolicychecks limits and returns either a valid refund amount or a structured error.InvoiceTotalscomputes totals from line items without reading a database.
When the agent generates these, require it to output explicit inputs and outputs. If it tries to reach for global state, you’ll catch it immediately.
Services: Orchestrate Use Cases, Not Details
Services coordinate steps: validate intent, call modules, call ports, and decide what response to return.
Best practice: keep services thin but not empty. A service should contain the “why,” not the “how.” For instance, it should decide the sequence: calculate totals, check refund policy, persist changes, then return a result.
Example service responsibilities:
- Start a transaction when persistence is involved.
- Call
RefundPolicyfrom the module. - Call a
PaymentStoreport to load and save data. - Map domain errors into use case errors (for example, “RefundTooLarge”).
Adapters: Translate the Outside World
Adapters convert formats and handle side effects. An HTTP adapter turns a request into a use case call, and then turns the result into an HTTP response.
Best practice: adapters should be boring. If an adapter contains business rules, move those rules into a module and have the adapter call the service.
Example adapter responsibilities:
- Parse JSON and validate basic request shape.
- Call the service with internal types.
- Serialize the service result into JSON.
- Handle framework-specific concerns like status codes.
Ports: The Contract Between Services and Adapters
Ports are interfaces that define what services need from the outside. Services depend on ports, not on adapters.
Best practice: define ports in the same place as the service’s use case or in a shared “application” layer, so the agent can generate consistent signatures.
A simple port example:
PaymentStoreexposesgetInvoice(invoiceId)andsaveRefund(refund).- The database adapter implements those methods.
- A test adapter can implement them with in-memory data.
Example: Refund Use Case with Clean Boundaries
Below is a compact sketch showing the separation. The key is that the service uses ports and modules, while adapters handle transport.
// Module
export function computeRefund(paidAmount: number, requested: number) {
  if (requested <= 0) return { ok: false, error: "InvalidAmount" };
  if (requested > paidAmount) return { ok: false, error: "RefundTooLarge" };
  return { ok: true, refundAmount: requested };
}
// Port
export interface PaymentStore {
  getInvoice(invoiceId: string): Promise<{ paidAmount: number }>;
  saveRefund(invoiceId: string, amount: number): Promise<void>;
}

// Service
export async function refundInvoice(
  invoiceId: string,
  requested: number,
  store: PaymentStore
) {
  const invoice = await store.getInvoice(invoiceId);
  const result = computeRefund(invoice.paidAmount, requested);
  if (!result.ok) return { ok: false, error: result.error };
  await store.saveRefund(invoiceId, result.refundAmount);
  return { ok: true };
}
// Adapter sketch
// HTTP adapter parses request and calls refundInvoice
// DB adapter implements PaymentStore
Advanced Detail: How to Guide an Agent to Stay in Bounds
- Constrain imports. If a generated module imports an HTTP library, reject it and ask for a pure module version.
- Require explicit contracts. Services should accept ports as parameters; adapters should construct those ports.
- Use error types consistently. Domain errors belong to modules; service errors belong to use cases; adapters map those to transport responses.
- Keep transactions in services. If persistence spans multiple calls, the service coordinates the transaction so modules remain unaware of storage mechanics.
Practical Checklist for Separation
- Modules: deterministic logic, no framework imports, no I/O.
- Services: orchestration, transaction boundaries, port calls.
- Adapters: parsing/serialization, framework and I/O code.
- Ports: interfaces that services depend on, implemented by adapters.
When these boundaries are consistent, vibe coding becomes less about “getting code generated” and more about “getting the right code in the right place.”
3.5 Defining Invariants and Preconditions to Prevent Drift
Autonomous code generation tends to “drift” when the agent’s understanding of the system changes mid-flight. Drift shows up as mismatched assumptions: a function signature that no longer matches the interface, a validation rule that silently disappears, or a data model that compiles but violates business rules. Invariants and preconditions are the antidote: they are statements that must remain true across iterations, and they give the agent a stable target to aim at.
Invariants as Always True Statements
An invariant is a property that should hold before and after every relevant operation. Think of it as a rule the code must never break, even if the implementation changes. Invariants are most useful when they are:
- Concrete: they refer to specific fields, states, or relationships.
- Checkable: you can test them or validate them at runtime.
- Scoped: you define where they apply, such as “within a single request” or “for all persisted records.”
Example invariant for an order system: “Every persisted order has a non-empty customerId and a total equal to the sum of line items.” If the agent regenerates the pricing logic, the invariant still forces consistency.
Preconditions as Required Inputs and States
A precondition is what must be true when a function or workflow starts. Preconditions prevent the agent from generating code that assumes “happy path” inputs. They also clarify error handling: if a precondition fails, the system should return a specific error rather than producing partial results.
Example precondition for createInvoice(orderId): “The order exists and is in Paid status.” If the agent generates a workflow that invoices unpaid orders, the precondition is violated.
Choosing the Right Level of Enforcement
Not every invariant needs the same enforcement strength. Use a layered approach:
- Type-level constraints: make invalid states unrepresentable when possible.
- Domain validation: check invariants at boundaries like request handlers and service methods.
- Persistence constraints: enforce critical invariants in the database schema.
- Runtime assertions: use targeted checks in internal workflows where failures indicate a bug.
This layering reduces drift because the agent can’t “get away with it” by changing one layer while ignoring another.
Mind Map: Invariants and Preconditions
Writing Invariants That Survive Refactors
A common failure mode is writing invariants in vague terms like “data should be valid.” Replace that with a measurable statement.
Good invariant format:
- Subject: what entity or state.
- Rule: the relationship or constraint.
- Scope: where it must hold.
Example: “For all persisted Order records, total equals the sum of lineItems[].price * quantity, and lineItems is non-empty.” The agent can regenerate code and still be forced to preserve the relationship.
Writing Preconditions That Clarify Control Flow
Preconditions should pair with a predictable failure mode. If the agent knows the error contract, it is less likely to improvise.
Example precondition with error behavior:
- Preconditions: “
orderIdexists and order status isPaid.” - Failure: return
404if missing,409if not paid.
Even if the agent changes internal structure, it must keep the same externally observable behavior.
Example: Guarding a Workflow Against Drift
Suppose the agent generates a workflow payOrder(orderId, payment).
- Invariant: “After payment succeeds, order status becomes
PaidandpaymentReferenceis stored.” - Preconditions: “Order exists; status is not already
Paid.”
A drift-resistant implementation pattern is to validate preconditions up front, then perform the state transition, then verify the invariant.
function payOrder(orderId: string, payment: Payment): Result {
  const order = repo.findOrder(orderId);
  if (!order) return Err('NotFound');
  if (order.status === 'Paid') return Err('Conflict');

  const receipt = paymentGateway.charge(payment);
  repo.updateOrder(orderId, {
    status: 'Paid',
    paymentReference: receipt.reference,
  });

  const updated = repo.findOrder(orderId);
  if (updated.status !== 'Paid' || !updated.paymentReference) {
    return Err('InvariantViolation');
  }
  return Ok(updated);
}
The final invariant check is intentionally redundant in a healthy system, but it catches agent mistakes like forgetting to persist paymentReference.
Example: Database Constraints as Invariant Backstops
When invariants protect core data integrity, encode them in the database. For example, if every invoice must reference a paid order, you can enforce it with a constraint or trigger-like mechanism appropriate to your database.
Even if the agent regenerates service logic, the database constraint stops invalid writes and forces the agent to reconcile the mismatch.
Testing Invariants and Preconditions Together
Tests should cover both the “allowed” and “rejected” paths.
- Precondition tests: verify the correct error type and status code when inputs are invalid.
- Invariant tests: verify relationships after successful operations, not just that the function returns
Ok.
When tests are written in terms of invariants and preconditions, the agent’s future edits have fewer degrees of freedom, which is exactly what you want to prevent drift.
4. Agent Architecture and Orchestration Patterns
4.1 Selecting Agent Roles for Planning, Coding, and Review
Selecting agent roles is less about “who talks most” and more about “who owns which decisions.” When roles are clear, you get fewer contradictory edits, faster convergence, and reviews that actually catch issues instead of re-litigating requirements.
Role Boundaries That Prevent Chaos
Start with three responsibilities that map cleanly to planning, coding, and review.
- Planning owns intent-to-steps translation. It turns acceptance criteria into a sequence of tasks, identifies dependencies, and defines what “done” means for each step.
- Coding owns implementation. It produces code artifacts that satisfy the plan, including tests and wiring.
- Review owns verification and critique. It checks correctness, style, edge cases, and whether the implementation matches the acceptance criteria.
A practical rule: only one role should be allowed to change the “shape” of the solution at a time. Planning can propose structure; coding can implement it; review can request changes but should not redesign the architecture.
A Simple Role Map for Most Features
Use this baseline for a single feature slice.
- Planner Agent: produces a task list, file-level plan, and test plan.
- Coder Agent: implements tasks in small commits, runs tests, and reports results.
- Reviewer Agent: validates against acceptance criteria, checks for regressions, and enforces quality gates.
If you have only one agent, you can still simulate roles by using separate prompts and separate “approval” steps. The key is separation of authority, not the number of agents.
Mind Map: Roles and Their Outputs
Planning Agent: What It Should Decide
The planner should produce decisions that reduce ambiguity for the coder.
- Task granularity: break work into steps that can be tested independently. For example, “Add endpoint skeleton” and “Implement validation rules” are separate tasks.
- Interface contracts: define request/response shapes and error formats before writing business logic.
- Test boundaries: specify which tests prove each acceptance criterion. If a criterion is about sorting, the planner should require deterministic ordering tests.
Example: Planning a “Create Order” Feature
Acceptance criteria might say: “Reject negative quantities with a 400 and a structured error.” The planner turns that into:
- Add validation function and map it to HTTP 400
- Define error payload fields (e.g.,
code,message,details) - Add unit tests for validation and an integration test for the endpoint
This prevents the coder from guessing the error schema.
Coding Agent: How It Should Work
The coder’s job is to implement the plan without silently changing it.
- Small commits: implement one task at a time, then run the relevant tests.
- Contract-first behavior: use the planned interfaces and error formats exactly.
- Deviation reporting: if the coder discovers a mismatch (like an existing endpoint already uses a different error schema), it should stop and ask for a resolution rather than patching inconsistently.
Example: Coding with a Guardrail
If the plan says “error payload includes code,” the coder should fail tests when the payload omits it. That way, review focuses on correctness, not detective work.
Review Agent: What It Should Verify
A good reviewer checks alignment and evidence.
- Criterion mapping: each acceptance criterion gets a pass/fail judgment with a short justification.
- Edge cases: confirm boundary behavior (empty lists, maximum lengths, invalid IDs).
- Quality gates: ensure formatting, linting, and static checks are satisfied.
- Test adequacy: verify that tests cover the stated behavior, not just the happy path.
Example: Review Checklist for Validation
- Negative quantity returns 400
- Error payload matches schema
- Error
codeis stable - Unit test covers negative, zero, and positive
- Integration test confirms endpoint behavior
If any item fails, the reviewer requests targeted fixes.
Mind Map: Authority Flow
Advanced Details Without Overcomplication
When features get larger, add two refinements.
- Specialized planner roles: split planning into “architecture planner” and “test planner” when the domain has tricky invariants.
- Review modes: use “fast review” for small diffs and “full review” for changes that touch contracts, security checks, or data models.
These refinements keep review time proportional to risk.
A Concrete Workflow You Can Reuse
- Planner outputs task list, file map, and test strategy.
- Coder implements the first task and runs the specified tests.
- Reviewer checks criterion mapping and test adequacy.
- Repeat until all criteria pass.
This workflow works because each role has a narrow job and a clear definition of completion. The result is less churn and more confidence in what changed and why.
4.2 Orchestrating Multi Step Workflows with State Management
Multi step workflows are where intent turns into working software. The hard part is not generating code once; it’s keeping the system consistent while it plans, edits, tests, and recovers from mistakes. State management is the discipline that makes those steps line up.
Core Idea of Workflow State
Workflow state is a structured record of what the agent has done, what it decided, and what it still needs. Without it, you get repeated work, contradictory edits, and “it passed once” behavior.
A practical state model usually includes:
- Goal: the intent and acceptance criteria.
- Plan: the ordered steps and their expected outputs.
- Artifacts: file paths, generated snippets, and test reports.
- Decisions: key choices like API shape or data model assumptions.
- Progress: which steps are complete, which are blocked, and why.
- Constraints: non negotiables like style rules, performance limits, and security checks.
Mind Map: State Management in Multi Step Workflows
Step Orchestration Pattern
A reliable orchestrator runs steps in a loop: select next step → execute → validate → update state. Each step should declare what “done” means.
A simple sequence for code changes looks like:
- Plan step: produce a list of edits and the rationale for each.
- Generate step: write code for one bounded slice.
- Validate step: run unit tests and static checks.
- Repair step: fix only what failed, using the failure output as input.
- Integrate step: ensure the slice composes with existing code.
The orchestrator updates state after every step, not only at the end. That way, a failure doesn’t erase context.
State Transitions That Prevent Drift
Drift happens when later steps assume earlier changes that never actually landed. To prevent that, treat state updates as transactional.
Use these rules:
- Write before you trust: after editing a file, record the exact path and a checksum or diff summary.
- Gate on evidence: mark a step complete only after validation passes.
- Record assumptions: if you choose an API signature, store it in decisions so later steps reuse it.
- Scope repairs: when tests fail, repair the smallest set of files that explain the failure.
Example: Building a Feature Slice with State
Imagine you’re adding a “create order” endpoint.
Initial state includes:
- Goal: endpoint behavior and response shape.
- Constraints: input validation rules and authorization requirements.
- Plan: data model update, endpoint handler, service logic, tests.
After the generate step, state records:
- Artifacts:
orders/models.py,orders/api.py,orders/tests/test_create_order.py. - Decisions: request fields, error codes, and transaction boundaries.
After validation, state records:
- Test results: failing test name and the assertion message.
- Lint results: specific rule violations.
Repair step uses that evidence:
- If the failure says “missing field in response,” update the serializer and rerun only the relevant tests.
- If lint complains about naming, fix names without changing logic.
This keeps the workflow honest: every state change corresponds to a concrete outcome.
Example: Handling Partial Failures Without Losing Context
Suppose the endpoint compiles but one integration test fails due to a contract mismatch.
Instead of regenerating everything, the orchestrator:
- Marks the integration step as blocked with the failure summary.
- Locates the contract boundary (e.g., request/response schema).
- Updates only the mismatched layer.
- Revalidates the integration test and then the unit tests that cover the boundary.
State makes the repair targeted, which reduces the chance of introducing new failures.
Mind Map: Orchestration Loop
Minimal State Schema for Implementation
A compact schema helps keep the workflow consistent across steps.
{
  "goal": {"intent": "...", "acceptance": ["..."]},
  "plan": [{"id": "step1", "dependsOn": [], "done": false}],
  "artifacts": [{"path": "orders/api.py", "diff": "..."}],
  "decisions": {"responseShape": "..."},
  "progress": {"currentStep": "step1", "blocked": []},
  "constraints": {"auth": "required", "validation": "strict"}
}
Practical Guardrails
- Dependency tracking: don’t run a step that assumes a file hasn’t been generated.
- Retry with intent: retries should change something based on the failure, not just re-run generation.
- Stop conditions: if a step fails repeatedly with the same root cause, record it and halt so humans can intervene.
With these pieces in place, multi step workflows become predictable: each step has a job, state records the proof, and repairs stay focused on what actually broke.
4.3 Tool Use Design for Files, Commands, and APIs
Tool use is where intent turns into concrete work. A good design makes tool calls predictable, auditable, and easy to test. The trick is to treat tools as interfaces with contracts, not as magic buttons.
Core Principle: Separate Planning from Execution
Start by having the agent produce a tool plan before it touches anything. The plan should list each tool call, its inputs, and what success looks like. Execution then follows the plan exactly, with validation after each step.
Example: If the intent is “Add a health endpoint,” the plan should specify:
- Which file(s) to edit
- Which function(s) to create
- Which route registration to update
- Which command to run to verify tests
This separation prevents the agent from “thinking while typing,” which is how subtle mistakes sneak in.
File Tools: Deterministic Edits with Guardrails
File operations are the most common failure point because they mix text manipulation with project structure.
Choose the Right File Operation
Prefer narrow operations over broad rewrites.
- Read: fetch current content and relevant sections
- Patch: apply minimal changes near the target
- Write: replace only when you can regenerate the entire file safely
Add File Safety Checks
Before writing, validate:
- The target path exists (or is allowed to be created)
- The change location matches expected markers (like a function signature)
- The resulting file still parses or compiles
A simple success criterion for a patch is: “Only the intended region changed.” You can enforce this by comparing diffs and rejecting large unexpected modifications.
Example: Patch a Route Registration
The agent should:
- Read the router module
- Locate the existing route table
- Insert a new entry
- Re-run tests
Plan
- Read: src/server/routes.ts
- Patch: add GET /health handler
- Run: npm test

Execution
- Confirm file contains routes registry
- Insert handler entry next to other GET routes
- Verify diff touches only routes.ts
- Run tests and ensure health handler is reachable
Command Tools: Controlled Side Effects
Commands can change the world: install dependencies, run migrations, or delete files. Treat them like transactions.
Constrain Commands with Policies
Define allowed commands and required flags.
- Allow read-only commands freely (like
test,lint,typecheck) - Require explicit confirmation for destructive commands
- Pin working directories and environment variables
Capture Command Context
Always record:
- Command string
- Working directory
- Environment variables used
- Exit code and stderr/stdout
This turns debugging from guesswork into a replayable story.
Example: Run Tests After Code Generation
The agent should run the smallest verification command that matches the change scope.
Plan
- Run: npm test -- --runInBand
- If failures: read failing test output
- Patch code and re-run only affected test suite

Execution
- Execute in repo root
- Store logs
- On failure, do not regenerate everything; patch the specific failing module
API Tools: Contract-First Requests
API calls should be designed around schemas and idempotency.
Use Request Schemas and Response Validation
For each API tool call, specify:
- Endpoint and method
- Required headers
- Request body schema
- Expected response schema
Then validate the response before using it. If the response doesn’t match, the agent should treat it as a tool failure, not as “unexpected but usable.”
Prefer Idempotent Operations
When possible:
- Use PUT for upserts
- Include idempotency keys for POST operations
- Avoid “create then check then create again” patterns
Example: Create a Record Safely
The agent should send a deterministic payload and handle “already exists” responses.
Plan
- Call POST /items with idempotency key
- If 409 conflict: fetch existing item by key
- Return item id

Execution
- Validate response schema
- If conflict, validate fetch response schema
- Stop after first successful resolution
Mind Map: Tool Use Design
Putting It Together: A Single Workflow Pattern
Use one consistent loop:
- Produce a tool plan
- Execute tool calls in order
- Validate outputs immediately
- If validation fails, patch only the failing layer
- Re-run the smallest verification step
This pattern keeps the agent from turning every failure into a full rewrite, and it keeps changes traceable from intent to artifact.
Common Failure Modes and Fixes
- Over-editing files: enforce diff limits and marker-based patches
- Command drift: restrict allowed commands and lock working directories
- API misuse: validate schemas and treat mismatches as failures
- No verification: require a post-step check after each meaningful change
When tool use is designed this way, the agent’s work becomes less like “typing with confidence” and more like engineering with receipts.
4.4 Implementing Feedback Loops for Iterative Refinement
Feedback loops turn “generate once” into “improve with evidence.” In agent-driven coding, the loop is not just about re-prompting; it is about collecting signals, choosing the smallest corrective action, and locking in what worked.
The Core Loop from Signal to Change
A practical loop has five stages:
- Define the success signal: a test suite passing, a linter clean run, or a specific acceptance criterion.
- Collect evidence: failing test output, type errors, diff summaries, or runtime logs.
- Localize the fault: decide whether the issue is in requirements, abstraction, orchestration, or generated code.
- Generate a targeted fix: change only the minimal surface area that addresses the fault.
- Re-verify and record: rerun the same checks and store the outcome so the loop can learn.
A good loop is boring in one way: it repeats the same verification steps every time. That consistency makes improvements measurable rather than vibes-based.
Mind Map: Feedback Loop Components
Designing Signals That Actually Guide Fixes
Not all signals are equal. Prefer signals that point to a specific location.
- Unit tests guide logic and edge cases. If a test fails with “expected 3 got 2,” the fix is usually local.
- Type checks guide interface mismatches. If a function signature no longer matches a contract, the fix is often mechanical.
- Static analysis guides correctness and style consistency. If a rule flags a risky pattern, you can treat it as a correctness hint.
When signals conflict, treat that as evidence of an abstraction problem. For example, if tests pass but a contract check fails, the code may satisfy behavior while violating shape or invariants.
Evidence Collection Without Noise
Agents should receive evidence in a structured form. A common mistake is dumping entire logs, which forces the agent to re-scan everything.
Use a compact “failure packet”:
- failing test name(s)
- first relevant stack trace lines
- the exact assertion message
- the file paths involved
- current diff summary
This keeps the agent focused on the smallest actionable region.
Fault Localization with a Simple Triage Matrix
Before generating a fix, classify the fault. A lightweight triage prevents the loop from thrashing.
- Requirements mismatch: tests fail because the expected behavior is wrong or missing.
- Abstraction mismatch: interfaces or data structures don’t align with the intended model.
- Logic bug: tests fail for a specific scenario; types and contracts look fine.
- Orchestration/tooling error: commands fail, files aren’t found, or generation steps didn’t run.
A useful rule: if the same failure repeats across regenerations, it is usually a requirements or abstraction issue, not a random logic slip.
Targeted Fixes with Minimal Diffs
Targeted fixes reduce regression risk. Instead of “regenerate the whole feature,” narrow the change:
- If a single function fails, update only that function and its direct helpers.
- If a contract fails, update the interface adapter layer rather than rewriting business logic.
- If a data model is wrong, regenerate the model and migrations, then rerun tests.
Example: Iterative Refinement for a Failing Unit Test
Suppose a test expects calculateTotal(items) to ignore items marked as archived.
Iteration 1 evidence
- Test
calculateTotal_ignoresArchivedfails - Types and lint pass
Localization
- Logic bug in filtering behavior
Targeted fix
- Update the filter predicate inside
calculateTotal.
Iteration 2 verification
- Rerun the same unit test set
- Confirm no other tests regress
If the fix passes, record the rationale: “Filtering predicate updated to exclude archived items.” That note becomes a checklist item for future similar features.
Mind Map: Fix Decision Rules
A Compact Loop Template
Use the same loop structure for every agent run.
for attempt in 1..N:
  run verification gates
  if all pass:
    record outcome and stop
  evidence = collect_failure_packet()
  fault = triage(evidence)
  patch_plan = choose_minimal_fix(fault)
  apply_patch(patch_plan)
  rerun verification gates
Recording Outcomes So the Loop Learns
After each attempt, store:
- what failed (signal)
- where it failed (evidence)
- what was changed (minimal diff)
- why it was changed (fault classification)
- whether it worked (verification result)
This turns iteration into a controlled process. The agent still generates code, but the system makes sure each new attempt is anchored to evidence rather than repeating the same guess with new wording.
4.5 Handling Errors with Retries and Targeted Remediation
Autonomous code generation fails in predictable ways: tools time out, the model produces code that doesn’t compile, or the agent misreads the intent and edits the wrong files. The goal is not to “try again until it works,” but to retry only when the failure is likely transient, and to remediate precisely when the failure is structural.
Error Taxonomy That Drives Decisions
Start by classifying failures into three buckets, because each bucket implies a different recovery strategy.
- Transient tool failures: network timeouts, rate limits, temporary filesystem locks, flaky test infrastructure.
- Deterministic build failures: compilation errors, missing imports, type mismatches, failing unit tests.
- Intent or workflow failures: wrong file paths, missing requirements, incomplete edits, inconsistent API contracts.
A practical rule: if the same command fails twice with the same inputs, treat it as deterministic and stop “blind retrying.”
Mind Map: Retry and Remediation Flow
Retries That Don’t Waste Time
For transient failures, use a bounded retry policy with exponential backoff and jitter. Preserve the exact command and inputs so you don’t accidentally change the problem while retrying.
Example: a test runner times out.
- Attempt 1: run tests with a 60s timeout.
- Attempt 2: wait 2s, rerun with the same timeout.
- Attempt 3: wait 6s, rerun.
- Stop after 3 attempts and surface the logs.
If the failure is a rate limit, the backoff should be longer than for a short network hiccup. If the failure is a filesystem lock, a short backoff often resolves it.
Targeted Remediation for Deterministic Failures
Deterministic failures require extracting actionable signals and editing only the relevant slice.
- Collect the smallest evidence set: compiler output, failing test names, and the diff the agent produced.
- Map signals to code regions: parse file paths from errors, then locate the corresponding functions or modules.
- Regenerate only what’s needed: ask the agent to rewrite the specific function, interface, or mapping layer rather than the entire feature.
- Re-run the narrowest validation first: compile or a single failing test before the full suite.
Example: a failing unit test expects calculateTotal(items) to treat missing quantities as zero, but the generated code throws when quantity is null.
- Evidence: stack trace points to
calculateTotal. - Remediation: update the null-handling logic inside that function.
- Validation: rerun the single test that failed, then run the full unit suite.
This approach reduces churn and keeps the agent from “fixing” unrelated code.
Targeted Remediation for Intent and Workflow Failures
When the agent edits the wrong thing, retries won’t help until you correct the workflow.
Common symptoms:
- The diff touches files outside the intended module.
- The generated API doesn’t match the spec’s request/response shape.
- Tests fail because the behavior is missing rather than incorrect.
Remediation steps:
- Re-validate file selection: confirm the agent’s working directory and the paths it was allowed to modify.
- Reconcile contracts: compare the spec’s endpoint schema or domain rules to the generated types.
- Patch with constraints: instruct the agent to keep existing public interfaces stable and only adjust the internal logic.
Example: the spec says the endpoint returns { "status": "ok", "id": ... }, but the generated code returns { "success": true, "data": ... }.
- Evidence: contract mismatch in integration test.
- Remediation: update the response mapping layer to match the spec while leaving the underlying service logic unchanged.
Stop Conditions That Prevent Infinite Loops
Define when to stop automatically:
- Success: compile and required tests pass.
- Attempts exceeded: e.g., 3 retries for transient failures.
- No new information: the same error repeats and the diff is unchanged.
- Escalation required: the agent cannot map errors to code regions, or the spec artifacts are missing.
A useful practice is to log a short “failure summary” each time: error class, top signal, and the remediation action taken. That summary becomes the input for the next iteration.
Minimal Example Workflow
1. Run build and unit tests.
2. If tool timeout occurs, retry up to 3 times with backoff.
3. If compilation fails, parse file paths and regenerate only the failing module.
4. If a single test fails, patch only the function it exercises.
5. If contract mismatches occur, update the response/request mapping layer.
6. After each remediation, run the narrowest validation that can confirm the fix.
7. Stop on success or when the same error repeats without a meaningful diff.
This structure keeps the agent from thrashing and gives each iteration a clear job: either wait out a transient issue, or make a precise correction tied to evidence.
5. Prompting for Engineering Outcomes Without Ambiguity
5.1 Converting Natural Language into Structured Instructions
Natural language is great for humans and messy for agents. Structured instructions turn “build a feature” into a sequence of actions with explicit inputs, outputs, constraints, and checks. The goal is not to write more words; it’s to remove ambiguity so the agent can execute without guessing.
Start with Intent, Not Tasks
Begin by separating what you want from how you want it done.
- Intent: the user outcome or business goal.
- Task: the implementation steps that achieve the outcome.
- Evidence: how you will know it’s correct.
Example intent: “Users can reset their password using a link that expires.”
Example tasks: “Add endpoint, validate token, update password, send email.”
Example evidence: “Token expires after 30 minutes; invalid tokens return 400; password is hashed; tests cover both paths.”
Use a Stable Instruction Template
A reliable structure keeps every request consistent. Use the same sections each time so the agent learns your project’s rhythm.
Instruction template
- Goal: one sentence describing the outcome.
- Inputs: data sources, files, APIs, environment variables.
- Outputs: exact artifacts to produce (files, functions, tests).
- Constraints: security, performance, style, dependencies.
- Assumptions: what the agent may assume if not provided.
- Acceptance Criteria: measurable checks.
- Tooling Rules: what tools it may use and what it must not do.
- Verification Plan: how to run tests and what to inspect.
Convert Sentences into Fields
Take a natural request and map each phrase to a field. When a phrase doesn’t fit, you either need a missing detail or you must rewrite it.
Natural language: “Make the dashboard faster and show the top five orders.”
Structured version:
- Goal: “Improve dashboard load time and display top five orders by total amount.”
- Inputs: “Orders table, existing dashboard endpoint, current query.”
- Outputs: “Updated query, updated UI component, tests.”
- Constraints: “No new external services; keep response under 300ms for 95th percentile in staging; preserve existing filters.”
- Assumptions: “Orders totals are stored as
grand_total.” - Acceptance Criteria: “Top five orders sorted descending; dashboard renders without errors; performance test shows improvement; unit tests pass.”
- Tooling Rules: “May edit only files under
dashboard/andapi/.” - Verification Plan: “Run unit tests, run performance script, verify UI snapshot.”
Mind Map: Instruction Components
Add “What to Do When You’re Missing Info”
Agents need a policy for uncertainty. Without it, they either invent details or stall.
Use one of these rules:
- Ask First: If required fields are missing, request clarification.
- Proceed With Defaults: If safe defaults exist, proceed and list them.
- Generate Options: If multiple designs fit, produce two approaches and ask you to choose.
Example rule in the instruction: “If the token expiry duration is not specified, ask; do not guess.”
Specify Output Shape Like a Contract
Ambiguity often hides in formatting. Tell the agent exactly what to output.
For code generation, include:
- File paths: where changes go.
- Function signatures: parameters and return types.
- Test names: what to create.
- Error handling: status codes and messages.
Example output contract:
- “Create
api/password-reset.tswithrequestReset(email)andconfirmReset(token, newPassword).” - “Add tests in
api/password-reset.test.tscovering expired token and invalid token.”
Include a Verification Plan That Matches the Acceptance Criteria
A good verification plan is not “run tests.” It’s “run tests that prove the criteria.”
Example verification plan:
- “Run
npm testand ensurepassword-resetsuite passes.” - “Run
npm run perf:dashboardand confirm p95 < 300ms.” - “Manually verify UI shows top five orders with correct formatting.”
Example: From Request to Structured Instruction
Natural language: “Add a comment feature to posts. Users should only see comments for published posts.”
Structured instruction:
- Goal: “Enable comments on posts while ensuring comments are only visible for published posts.”
- Inputs: “Existing
postsschema, current post detail endpoint, comment model if any.” - Outputs: “New comment endpoints, UI rendering updates, database migrations, tests.”
- Constraints: “Only published posts may return comments; do not expose draft content; sanitize comment text.”
- Assumptions: “Post status field is
statuswith valuespublishedanddraft.” - Acceptance Criteria: “Draft post detail returns no comments; published post detail returns comments sorted by creation time descending; tests cover both cases.”
- Tooling Rules: “Edit only
api/,ui/, anddb/directories.” - Verification Plan: “Run unit and integration tests; verify response payloads for draft vs published.”
Structured instructions are the bridge between intent and execution. Once you consistently map natural language into fields, agent behavior becomes more predictable, and your reviews become about correctness rather than guesswork.
5.2 Using Templates for Consistent Agent Inputs
Templates turn “good vibes” into repeatable engineering inputs. Instead of asking an agent to infer structure every time, you provide a stable scaffold: what the agent is doing, what it must produce, what it must not do, and how success is measured. Consistency reduces variance, which reduces debugging time.
The Core Idea of Input Templates
An input template is a fixed form with variable fields. The fixed parts encode your engineering standards; the variable parts capture the specific task. A useful template answers four questions every run:
- Intent: What outcome are we aiming for?
- Scope: What is included and excluded?
- Constraints: What rules must hold?
- Acceptance: How do we verify the result?
A practical rule: if you cannot write acceptance criteria in plain language, the template will not save you.
Template Anatomy That Prevents Common Failure Modes
Start with a short header, then move into structured sections.
- Task Summary: One paragraph describing the user story or engineering goal.
- Inputs: Links to files, schemas, logs, or pasted snippets. Keep them labeled.
- Assumptions: Only what you are explicitly willing to treat as true.
- Constraints: Technology choices, performance limits, security rules, and style conventions.
- Deliverables: Exact artifacts to output, such as code files, tests, and a short change log.
- Acceptance Criteria: Bullet list of checks that map to behavior.
- Non Goals: What the agent must refuse to do.
- Quality Checks: Linting, formatting, test commands, and review checklist.
When templates include “Non Goals,” agents stop doing the extra work that looks helpful but breaks scope.
Mind Map: Template Components
Example Template for a Small Feature
Use a template even for small tasks. Here’s a compact version for generating a new endpoint and tests.
Task Summary:
Add a GET /v1/orders/{id} endpoint that returns an order and its line items.

Inputs:
- Existing repository structure: (paste tree)
- Order model schema: (paste)
- Current routing pattern: (paste one example route)

Assumptions:
- Authentication middleware already populates req.user
- Database access uses the existing repository layer

Constraints:
- Use existing ORM and error mapping conventions
- Return 404 when the order does not exist
- Validate id as a positive integer

Deliverables:
- New route handler file
- Any required service/repository changes
- Unit tests for success, 404, and invalid id

Acceptance Criteria:
- Tests pass with `npm test`
- Response JSON matches the documented shape
- No new public endpoints beyond GET /v1/orders/{id}

Non Goals:
- No UI changes
- No new authentication logic

Quality Checks:
- Run formatter and linter
- Ensure tests cover edge cases
Notice how each section points the agent to a specific kind of output. The agent can still be creative in implementation, but it cannot be vague about what to produce.
Template Variables and How to Keep Them Safe
Variables should be narrow and typed in your head, even if you do not enforce types in the template itself.
- id: only the raw value, not a sentence about it
- schema: paste the exact schema text
- error trace: include the full stack, not a summary
If you must summarize, do it in a dedicated “Assumptions” section so the agent knows what is inferred.
Example: Filling the Template Without Breaking Structure
When you fill the template, preserve labels and ordering. Here’s a filled fragment for invalid id handling.
Constraints:
- Validate id as a positive integer

Acceptance Criteria:
- For id = -1, return 400 with {"error":"invalid_id"}
- For id = 0, return 400 with {"error":"invalid_id"}
- For id = "abc", return 400 with {"error":"invalid_id"}
This turns “validate id” into concrete checks. The agent can implement validation and tests without guessing what “invalid” means.
Advanced Detail: Template Variants by Task Type
You can keep one master template and derive variants. For example:
- Spec to Plan: fewer deliverables, more acceptance checks
- Plan to Code: stronger deliverables list, explicit file paths
- Bug Fix: inputs include failing test output and reproduction steps
The key is that each variant changes the emphasis, not the meaning. The agent should always see intent, scope, constraints, and acceptance criteria.
Practical Checklist Before You Send the Template
- Every deliverable has a target location or naming expectation.
- Every constraint is testable or enforceable.
- Non goals are explicit enough to prevent “helpful” scope creep.
- Acceptance criteria include at least one edge case.
A template is not a script that forces identical code; it’s a contract that forces consistent thinking.
5.3 Specifying Output Formats for Deterministic Code Artifacts
Deterministic code generation starts with one boring idea: the agent must know what “done” looks like. Output formats are the contract between intent and artifacts. When the contract is precise, you can validate results mechanically, review them faster, and regenerate only what’s wrong.
The Output Format Contract
An output format should define four things: (1) artifact type, (2) required fields, (3) constraints on content, and (4) error handling behavior.
- Artifact type: file, patch, test report, or checklist.
- Required fields: filenames, code blocks, summaries, and acceptance evidence.
- Content constraints: no extra files, no placeholders, consistent naming.
- Error behavior: what to do when information is missing.
A practical rule: if you cannot validate the output with a simple script or checklist, the format is too vague.
Foundational Building Blocks
Start with a minimal schema that every generation step can follow.
- Scope: list what the agent will produce.
- Files: provide exact filenames and paths.
- Code blocks: wrap code in fenced blocks with language tags.
- Rationale: keep it short and tied to acceptance criteria.
- Verification: include commands to run and what should pass.
Here’s a compact example of a deterministic “file bundle” format.
{
  "bundle": {
    "goal": "Add POST /orders endpoint",
    "files": [
      {
        "path": "src/routes/orders.ts",
        "content": "```ts\n// code here\n```"
      },
      {
        "path": "src/tests/orders.test.ts",
        "content": "```ts\n// tests here\n```"
      }
    ],
    "verification": {
      "commands": ["npm test"],
      "expected": "All tests pass"
    }
  }
}
Notice what’s missing: no wandering explanations, no “maybe” files, no “feel free to adjust.” The agent either outputs the required structure or it fails the contract.
Mind Map: Output Format Components
Choosing Between File Bundles and Patch Bundles
A file bundle is easiest when you generate new files or replace whole modules. A patch bundle is better when you must modify existing code without disturbing unrelated sections.
- File bundle: agent outputs full contents for each listed file.
- Patch bundle: agent outputs diffs with clear targets.
If your workflow includes code review, patch bundles reduce noise. If your workflow includes clean regeneration, file bundles reduce complexity.
Enforcing Constraints That Prevent “Almost Right” Output
Deterministic formats should include constraints that stop common failure modes.
- Stable ordering: list files in a consistent order so diffs are predictable.
- No placeholders: require concrete implementations, not “TODO” stubs.
- Exact paths: require paths relative to repo root.
- Single source of truth: if the agent outputs both a summary and code, the summary must match the code.
A small but effective constraint is “no additional files.” If the agent needs a new dependency, it must request it explicitly in an error field rather than silently adding it.
Example: Endpoint Generation Output
Below is a deterministic format for an endpoint change that includes both code and a verification plan.
{
  "bundle": {
    "goal": "Create Orders API endpoint",
    "scope": ["POST /orders"],
    "files": [
      {
        "path": "src/routes/orders.ts",
        "content": "```ts\nexport async function postOrder(req, res) {\n  // validate body\n  // create order\n  // return 201\n}\n```"
      },
      {
        "path": "src/tests/orders.test.ts",
        "content": "```ts\nimport { postOrder } from '../routes/orders';\n// tests for 201 and 400\n```"
      }
    ],
    "verification": {
      "commands": ["npm test", "npm run lint"],
      "expected": "Orders tests pass; lint clean"
    },
    "acceptanceEvidence": [
      "Returns 201 with created order on valid input",
      "Returns 400 on missing required fields"
    ]
  }
}
The acceptance evidence is not a poem; it’s a checklist that mirrors the acceptance criteria you already wrote.
Validation Workflow That Matches the Format
Once you have a format, validation becomes straightforward.
- Schema validation: confirm required fields exist and paths are present.
- File materialization: write each file path and content to disk.
- Static checks: run formatter, linter, and type checker.
- Test execution: run the commands listed in verification.
- Contract failure handling: if schema validation fails, regenerate with the same format and a narrower scope.
This is where determinism pays off: the agent’s output can be judged quickly, and iteration targets the exact mismatch.
Advanced Detail: Error Fields That Keep You Moving
When inputs are missing, the agent should output a structured error rather than partial code.
- error.type: missing_spec, conflicting_requirements, tool_failure
- error.details: what’s missing and where
- error.requestedInputs: exact items needed to proceed
A deterministic error format prevents the agent from guessing, and it prevents you from reviewing broken artifacts.
Summary
Specifying output formats is how you turn “write code” into “produce verifiable artifacts.” A good format defines structure, constraints, and validation behavior. With that contract in place, agents can generate confidently, and humans can review efficiently without playing detective.
5.4 Controlling Scope with Explicit Boundaries and Exclusions
When an AI agent is asked to “build a feature,” it will often do extra work that feels helpful but isn’t requested. Scope control is how you keep the agent productive and the output reviewable. The core idea is simple: you define what the agent must do, what it must not do, and how it should behave when it encounters missing information.
Start with a Single Outcome Statement
Write one sentence that names the deliverable and the success condition. Then attach acceptance criteria that can be checked without reading the agent’s mind.
Example outcome statement:
- “Generate the POST /invoices endpoint, including request validation, persistence, and a success response, so that the provided integration test passes.”
Acceptance criteria examples:
- Returns 201 with JSON body containing invoiceId.
- Rejects missing customerId with 400.
- Uses the existing InvoiceRepository interface.
This outcome statement becomes the anchor for both inclusion and exclusion.
Define Boundaries as a Contract, Not a Vibe
Boundaries answer: “Where does the work start and stop?” Use four boundary types.
- File and module boundaries
- Include:
src/invoices/*,src/routes/invoices.ts. - Exclude:
src/billing/*.
- Behavior boundaries
- Include: validation rules for
customerIdandlineItems. - Exclude: tax calculation logic.
- Integration boundaries
- Include: call
InvoiceRepository.create. - Exclude: adding new database migrations.
- Time and iteration boundaries
- Include: one pass to implement and one pass to fix failing tests.
- Exclude: refactoring unrelated modules “for cleanliness.”
A practical rule: if a boundary can’t be tested or verified, it’s probably too fuzzy.
Use Explicit Exclusions to Prevent “Helpful” Detours
Exclusions should be concrete and phrased as “do not.” They work best when they target common agent detours.
Common detours and good exclusions:
- Schema changes: “Do not create migrations or alter existing tables.”
- New UI: “Do not add frontend components or routes.”
- Auth redesign: “Do not change authentication middleware; reuse existing guards.”
- Performance work: “Do not add caching or background jobs.”
- New libraries: “Do not introduce new dependencies; use existing validation utilities.”
If you exclude something, also say what to do instead. For example: “If a migration is required, stop and ask for the migration plan.”
Add a Missing-Information Protocol
Agents often stall or guess when requirements are incomplete. Specify a protocol.
Protocol example:
- If required inputs are missing (e.g., field names, error format), the agent must produce a short “Questions List” and wait.
- If only optional details are missing, the agent must choose defaults explicitly and document them in a
DECISIONS.mdnote.
This prevents silent assumptions from turning into hidden scope creep.
Provide a Scope Checklist the Agent Must Follow
A checklist makes scope enforcement mechanical.
- Implement only the specified endpoint(s).
- Use existing repository and validation helpers.
- Do not add migrations or new dependencies.
- Add or update tests only for the included behavior.
- If an excluded change is required, stop and ask.
- Confirm acceptance criteria are satisfied.
Mind Map: Scope Control Inputs and Outputs
Example: Intent Block for an Endpoint Task
Use a structured intent block so the agent can’t “interpret” your scope into something else.
Outcome: Implement POST /invoices so the integration test passes.
Included:
- src/routes/invoices.ts
- request validation for customerId and lineItems
- persistence via InvoiceRepository.create
Excluded:
- No new migrations
- No new dependencies
- No changes to auth middleware
- No frontend work
Missing info rule:
- If error response format is unclear, ask before coding.
Checklist:
- Only touch included files
- Add/update tests only for included behavior
- Verify acceptance criteria
Example: How Exclusions Change Agent Behavior
Suppose the agent proposes a migration to add a status column. With exclusions, the correct response is not “ignore it,” but “stop and ask.”
- Agent should respond: “I can’t add migrations. Do you want a migration plan or should I map status to an existing field?”
That single sentence keeps the agent aligned with your boundaries while still moving the work forward.
Review for Scope Drift Using a Two-Pass Method
First pass: scan for forbidden categories (migrations, new dependencies, unrelated modules). Second pass: verify every included change ties back to acceptance criteria. If a change doesn’t map to a criterion, it’s either scope drift or a missing criterion—both are fixable.
Scope control isn’t about restricting creativity; it’s about making the agent’s effort match the deliverable you actually want.
5.5 Validating Prompt Assumptions Against Project Reality
A prompt is only as good as the assumptions it smuggles in. Validation is the step where you compare what the prompt implies against what the repository, domain, and constraints actually allow. The goal is not to make the prompt “perfect”; it is to prevent the agent from confidently generating code that cannot compile, cannot run, or cannot satisfy the acceptance criteria.
Start with Assumption Inventory
First, extract assumptions from the prompt into a checklist. Treat each assumption as a testable claim about the project.
- Environment assumptions: language version, framework version, build tool, runtime.
- Repository assumptions: folder layout, existing modules, naming conventions, dependency strategy.
- Domain assumptions: data fields, business rules, edge cases, terminology.
- Tool assumptions: which tools the agent can call, what credentials it has, which commands are allowed.
- Output assumptions: expected file paths, exported symbols, API shapes, test locations.
A simple technique: rewrite the prompt as “The agent will…” sentences, then mark each sentence as either verifiable or ambiguous.
Validate Against Concrete Project Signals
Next, confirm each assumption using local evidence. Evidence can be code, docs inside the repo, failing tests, or CI configuration.
- Compile-time signals: existing types, interfaces, and imports show the real API surface.
- Behavioral signals: tests and fixtures reveal how the system expects inputs.
- Operational signals: scripts and CI steps reveal the correct commands and environment variables.
If the prompt says “add a new endpoint,” verify the routing pattern first. If it says “use the existing repository layer,” locate that layer and match its conventions.
Mind Map: Assumption Validation Flow
Use a Reality Check Template
When assumptions are many, use a compact template to force specificity. This template is meant to be filled before generation.
- Assumption: what the prompt implies.
- Evidence: where you expect to find it.
- Status: confirmed, contradicted, or unknown.
- Action: keep, revise prompt, or request clarification.
Example: If the prompt requests “use UserRepository,” but the repo uses AccountsRepository, the status becomes contradicted and the action becomes “revise output contract and imports.”
Example: Endpoint Prompt That Fails Reality
Prompt assumption: “Create POST /api/invoices/preview using the existing controller pattern.”
Reality checks you should perform:
- Search for existing controller base classes and route registration style.
- Confirm whether the project uses
/apiprefix or a different base path. - Verify request/response DTO naming conventions.
If you discover routes are registered via a router.ts file and the prompt assumes decorators, you should update the prompt to match the actual mechanism. Otherwise the agent will generate code that looks right but never gets wired.
Example: Data Model Assumptions with Edge Cases
Prompt assumption: “InvoicePreview includes taxRate as a number.”
Reality checks:
- Inspect existing invoice models and migrations.
- Check how tax is represented elsewhere: percentage vs decimal, rounding rules, and currency handling.
If the repo stores tax as an integer basis-point value, the prompt must reflect that. Otherwise tests will fail and the agent will likely “fix” symptoms by changing types without aligning business logic.
Verification Loop with Targeted Checks
After updating the prompt, run targeted verification rather than waiting for full CI.
- Static checks: type checking, linting, formatting.
- Unit tests: the ones closest to the changed behavior.
- Contract checks: request/response schema validation if present.
When a check fails, map the failure back to the assumption that caused it. If the failure is “unknown route,” it points to routing assumptions. If it is “type mismatch,” it points to output contract assumptions.
Case Study: Tightening Scope When Evidence Is Unknown
Suppose the prompt says “implement authorization for the new endpoint.” Evidence is unknown because the repo uses a shared policy system.
A good validation response is to constrain the prompt:
- Ask the agent to reuse the existing policy function by name once found.
- If the policy name is unknown, instruct the agent to generate only the endpoint skeleton and leave authorization wiring as a TODO with a clear placeholder.
This prevents the agent from inventing security logic. It also keeps the work incremental: you can still get compilation and basic routing working while authorization details are confirmed.
Practical Checklist for Prompt Validation
Before generation, ensure:
- Every “will” statement in the prompt has a corresponding project signal.
- Output paths and symbols match existing patterns.
- Domain fields match the actual models and tests.
- Tool permissions and allowed commands are consistent with the workflow.
Validation is the boring part that saves you from the expensive part. It turns “the agent guessed” into “the agent matched the repository,” which is the only kind of confidence that holds up.
6. From Specifications to Code Generation Pipelines
6.1 Building a Generation Pipeline from Requirements to Modules
A generation pipeline turns requirements into modules in a controlled sequence, so the agent produces code that is consistent, testable, and easy to review. The key idea is to treat generation like engineering work: each step has inputs, outputs, and checks.
Start with Requirements That Can Be Checked
Requirements should be written as behaviors, not vibes. For each feature, capture: (1) user intent, (2) acceptance criteria, (3) constraints, and (4) observable outputs. Then convert those into a “verification plan” the pipeline can use.
Example requirement fragment:
- Intent: “Create an invoice for a customer.”
- Acceptance criteria: “Invoice total equals sum of line items minus discounts; currency is stored; invalid customer ID returns 404.”
- Constraints: “No floating point for money; use integer cents.”
- Observable outputs: “POST /invoices returns invoice ID and totals.”
This becomes the pipeline’s contract for what “done” means.
Define Module Boundaries Before Generating Code
Before code appears, decide what modules exist and what each owns. A practical rule: a module should have one reason to change. For the invoice example, you might split into:
invoicedomain module (entities, calculations)invoice-apimodule (HTTP handlers)invoice-repomodule (persistence)invoice-testsmodule (tests and fixtures)
The pipeline should generate boundaries first, then implementations.
Use a Stepwise Pipeline with Explicit Artifacts
A good pipeline produces intermediate artifacts that can be validated. Typical artifacts:
spec.md: normalized requirements and acceptance criteriacontracts.json: request/response shapes and error codesdomain-model.md: entities and invariantsmodule-plan.md: files, responsibilities, and dependenciesgenerated/: code outputschecks/: test results and static analysis summaries
Each artifact is an input to the next step, which reduces “surprise edits” later.
Generate Plans, Then Implement, Then Verify
A reliable sequence is:
- Plan: map acceptance criteria to modules and functions.
- Implement: generate code per module plan.
- Verify: run tests and static checks.
- Repair: only regenerate the failing parts.
This prevents the common failure mode where the agent writes everything at once and debugging becomes guesswork.
Mind Map of the Pipeline Flow
Mind Map: Requirements to Modules Generation Pipeline
Example Module Plan for an Invoice Feature
A module plan should be specific enough that a reviewer can predict file contents. Example plan:
invoice/domain/invoice.tsInvoiceentity withtotalCents()method- Invariant: totals computed from integer cents
invoice/domain/discount.ts- Discount application rules
invoice-api/routes.tsPOST /invoiceshandler- Error mapping: invalid customer ID to 404
invoice-repo/invoiceRepo.tscreateInvoice()persistence method
The pipeline uses this plan to generate code in the same order as responsibilities.
Example Contracts for Deterministic Integration
Contracts reduce ambiguity between modules. Example JSON contract shapes:
- Request:
customerId(string),lines(array of{sku, qty, unitPriceCents}),discountCents(optional) - Response:
invoiceId,currency,subtotalCents,discountCents,totalCents - Errors:
{ code: "CUSTOMER_NOT_FOUND" }with HTTP 404
When contracts are explicit, the agent can generate DTOs and mapping code without inventing fields.
Advanced Detail: Layered Verification and Targeted Regeneration
Verification should be layered so failures point to the right place:
- Domain tests catch calculation mistakes (e.g., discount math).
- Repository tests catch persistence mapping issues.
- API tests catch request/response and error codes.
When a test fails, regenerate only the module that owns the failing layer. For example, if totalCents() is wrong, regenerate invoice/domain/* and re-run domain tests before touching API code.
Practical Checklist for Pipeline Readiness
- Requirements include acceptance criteria and observable outputs.
- Module boundaries are defined before implementation.
- Intermediate artifacts exist and are versioned in the repo.
- Generation is stepwise with verification after each major layer.
- Repair loop is targeted by failing layer, not by “rewrite everything.”
With these pieces in place, the pipeline becomes a repeatable path from intent to modules, and reviews become about correctness and design rather than chasing inconsistencies.
6.2 Generating Data Models and Migrations with Checks
Data models and migrations are where intent meets reality: the agent can propose structures, but checks decide whether those structures actually fit the system. The goal is simple—generate models and migrations that compile, migrate cleanly, and match the acceptance criteria.
Start with Intent to Schema Mapping
Begin by translating each acceptance criterion into schema needs. For example, if the feature requires “users can create invoices with line items,” you need at least: an invoices table, an invoice_items table, foreign keys, and constraints that prevent empty items.
A practical mapping rule: every user-visible field becomes a column (or a derived value), every relationship becomes a foreign key, and every rule becomes either a constraint, a validation check, or application logic.
Define the Model Contract Before Writing Migrations
Before generating migrations, lock down the model contract:
- Identifiers: primary keys, uniqueness rules, and natural keys.
- Cardinality: one-to-many vs many-to-many.
- Nullability: which fields are required at creation time.
- Defaults: values that should exist even when the client omits them.
This prevents the common failure mode where the agent generates a migration that “works” but doesn’t match how the API expects to create records.
Generate Models with Deterministic Types
Use explicit types rather than “best guess” inference. For instance, money should be stored as an integer in minor units (cents) or a fixed-precision decimal, not a floating type.
Example model sketch (conceptual):
Invoice:id,customer_id,status,issued_at,currency,total_centsInvoiceItem:id,invoice_id,sku,description,quantity,unit_price_cents,line_total_cents
Then add invariants that are safe to enforce in the database:
quantity > 0unit_price_cents >= 0line_total_cents = quantity * unit_price_cents(either computed in code or enforced via triggers; most teams enforce via code plus tests)
Generate Migrations with Order and Idempotence
Migrations should be generated in a sequence that respects dependencies:
- Create parent tables first (e.g.,
customers, theninvoices). - Add child tables next (e.g.,
invoice_items). - Add indexes and constraints after columns exist.
Checks to include during generation:
- Foreign key correctness: referenced table and column names must match.
- Constraint coverage: uniqueness and not-null constraints reflect the model contract.
- Index strategy: indexes for foreign keys and common query filters.
Mind Map: Model and Migration Checks
Example: Invoice Models and a Safe Migration Plan
Assume the acceptance criteria include:
- An invoice belongs to a customer.
- An invoice has at least one item.
- Each item references an invoice.
A safe migration plan:
- Create
invoiceswithcustomer_idnot null. - Create
invoice_itemswithinvoice_idnot null. - Add an index on
invoice_items.invoice_id. - Add a check constraint that
quantity > 0.
Then enforce “at least one item” with a combination of application validation and a database-friendly approach. If you can’t express it as a simple constraint, validate in the service layer and back it with tests.
Checks That Catch Real Problems Early
Use a small, repeatable checklist after generation:
- Schema sanity: tables exist, columns have expected types, and nullability matches the contract.
- Constraint verification: uniqueness and check constraints are present and correct.
- Migration replay: run migrations from an empty database and confirm the final schema matches expectations.
- Model-to-migration alignment: ensure the ORM model definitions correspond to the migration output.
Advanced Detail: Handling Renames and Backfills
When a field changes meaning, treat it as a migration with intent:
- Rename: preserve data by renaming the column rather than dropping and recreating.
- Backfill: if a new column is required, add it nullable first, populate it, then set it not null.
- Transitional compatibility: update the application in a way that works during the migration window.
A concrete pattern: add currency as nullable, backfill with a default for existing rows, then alter it to not null. This avoids breaking existing data while keeping the final schema strict.
Quick Example of a Backfill Sequence
If you add currency to invoices and existing invoices lack it:
- Add
currencycolumn as nullable. - Update existing rows to a chosen default.
- Alter
currencyto not null. - Update the model so new records always set currency.
This sequence keeps the system consistent at each step, which is exactly what checks are for: not just “migration succeeded,” but “system remained coherent.”
6.3 Producing API Endpoints and Client Contracts
API endpoints are where intent becomes something other code can call. The goal is not just to “make it work,” but to make it predictable: stable request/response shapes, clear error behavior, and contracts that clients can implement without reading your mind.
Start with Endpoint Intent and Boundaries
Each endpoint should answer three questions before any code is written: what it does, what it does not do, and what inputs it expects. A practical way is to derive the endpoint contract directly from acceptance criteria.
Example: “Create an order” becomes an endpoint that accepts an order draft and returns an order summary. It should not also handle payment processing or inventory reservation unless those are explicitly part of the same acceptance criteria.
A simple checklist to keep boundaries crisp:
- Inputs: required fields, optional fields, and validation rules
- Outputs: success payload shape and status code
- Errors: validation errors, not found, conflict, and unexpected failures
- Side effects: what changes in storage and what does not
Define the Contract Shape Before Implementation
Client contracts are the shared language between server and client. Treat them as first-class artifacts: request schema, response schema, and error schema.
A good contract includes:
- Resource naming: nouns in paths (e.g.,
/orders) - Method semantics: GET reads, POST creates, PUT replaces, PATCH updates, DELETE removes
- Consistent identifiers:
idfields and their types - Pagination conventions for list endpoints
- Error envelope: a stable structure for all failures
Mind map: endpoint contract components
Mind Map: Endpoint Contract Components
Choose Status Codes and Error Semantics
Clients need reliable meaning from status codes. For example:
201 Createdfor successful creation, often with aLocationheader200 OKfor successful reads and updates that return the updated resource204 No Contentfor deletes when no body is returned400 Bad Requestfor schema or validation failures401 Unauthorizedand403 Forbiddenfor auth and authorization404 Not Foundwhen the resource identifier does not exist409 Conflictfor concurrency or uniqueness conflicts
Error responses should be consistent. A stable error envelope reduces client branching.
Example error envelope (conceptual):
code: machine-readable string likevalidation_errormessage: short summarydetails: optional array or object for field-level issues
Generate Endpoints from a Contract-First Template
When producing endpoints with an agent, the safest pattern is contract-first: define schemas and then implement handlers that conform to them.
A minimal contract-first approach:
- Write request and response schemas for each endpoint.
- Implement handler logic that returns exactly those shapes.
- Add validation middleware that rejects invalid requests with the error envelope.
- Add integration tests that assert both status codes and payload shapes.
Example: POST /orders contract and handler behavior
- Request:
customerId,items[],notes? - Success:
201with{ id, customerId, total, status } - Validation errors:
400with field errors - Conflict:
409if an idempotency key is reused with different content
Keep Client Contracts Implementable
Client contracts should be easy to map into code. That means predictable naming, stable types, and minimal surprises.
Practical rules:
- Use camelCase or snake_case consistently across the entire API.
- Avoid polymorphic response shapes unless absolutely necessary.
- Prefer explicit nullability over “missing means something.”
- Document which fields are read-only (server sets them) versus writable (client sends them).
Mind map: client implementation concerns
Mind Map: Client Implementation Concerns
Example Endpoint Contract in JSON Schema Style
Below is a compact example of how a request and response can be specified so both sides agree on structure.
{
  "endpoint": "POST /orders",
  "request": {
    "customerId": "string",
    "items": [{"sku": "string", "qty": "integer"}],
    "notes": "string?"
  },
  "response": {
    "status": 201,
    "body": {
      "id": "string",
      "customerId": "string",
      "total": "number",
      "status": "string"
    }
  },
  "errors": {
    "400": {"code": "validation_error", "details": "field errors"},
    "409": {"code": "conflict", "details": "idempotency or uniqueness"}
  }
}
Validate with Contract Tests
Contract tests are the bridge between “looks right” and “is right.” For each endpoint, assert:
- The server rejects invalid requests with the correct error envelope.
- The server returns the exact success payload shape.
- Headers like
Location(when applicable) are present and correct.
A simple contract test strategy:
- Use representative valid inputs.
- Use one invalid input per major validation rule.
- Use one conflict scenario per endpoint that can conflict.
Put It Together with a Worked Example
Suppose the acceptance criteria say: “Create an order returns an order id and total, and rejects empty items.” The endpoint contract becomes the source of truth:
- Request schema requires
itemswith at least one element. - Handler validates
itemsbefore writing. - On success, handler returns
{ id, customerId, total, status }with201. - On failure, handler returns
400withcode: validation_errorand field-level details.
That is the whole trick: the endpoint is not just a function; it is a promise with a shape, a meaning, and a testable behavior.
6.4 Implementing Business Logic With Testable Functions
Business logic is where intent becomes behavior. To keep agent-generated code from turning into a pile of “it works on my machine” branches, implement logic as small, testable functions with explicit inputs, explicit outputs, and minimal hidden state. The goal is simple: when a test fails, you should know which rule broke and why.
Core Idea: Functions That Speak in Rules
Start by converting requirements into rules. A rule has a condition and a result. For example, “If the user is under 18, block checkout” becomes a function that takes age and returns an authorization decision.
Best practice: prefer pure functions for rule evaluation. A pure function depends only on its arguments and returns a value. That makes it easy to test and easy for an agent to generate correctly.
Example rule function:
- Input:
ageandcountry - Output:
allowedandreason - No database calls, no HTTP calls, no global variables.
Designing Function Boundaries
Business logic often sits between two worlds: data access and user-facing responses. Keep those worlds separate.
- Adapters layer handles I/O: reading from repositories, calling external services, formatting HTTP responses.
- Logic layer handles rules: computing totals, validating eligibility, enforcing invariants.
- Orchestration layer coordinates: calls logic functions in the right order.
Best practice: each logic function should do one job. If you find yourself writing a function that both validates input and calculates totals and also logs events, split it.
A Practical Pattern for Testable Logic
Use a “compute then decide” structure.
- Compute intermediate values with deterministic functions.
- Decide outcomes with small predicate functions.
- Return a structured result that tests can assert on.
Example: Order Pricing Rules
type PricingInput = { subtotal: number; coupon?: string };

type PricingResult = {
  total: number;
  appliedCoupon?: string;
  warnings: string[];
};

export function computeTotal(input: PricingInput): PricingResult {
  const warnings: string[] = [];
  let total = input.subtotal;

  if (total < 0) warnings.push("Subtotal cannot be negative");

  if (input.coupon === "SAVE10" && total >= 50) {
    total = total * 0.9;
    return { total, appliedCoupon: "SAVE10", warnings };
  }

  if (input.coupon === "SAVE10") warnings.push("Coupon not eligible");
  return { total, warnings };
}
This function is testable because it has no side effects. It also returns warnings, which lets you encode “soft failures” without throwing exceptions everywhere.
Testing Strategy That Mirrors Rules
Write tests that map directly to acceptance criteria.
Test cases to cover:
- Coupon eligible: subtotal 50+ and coupon
SAVE10 - Coupon ineligible: subtotal below 50
- No coupon: coupon missing
- Edge input: negative subtotal
import { computeTotal } from "./pricing";

describe("computeTotal", () => {
  test("applies SAVE10 when subtotal is eligible", () => {
    const r = computeTotal({ subtotal: 100, coupon: "SAVE10" });
    expect(r.total).toBe(90);
    expect(r.appliedCoupon).toBe("SAVE10");
  });

  test("warns when SAVE10 is not eligible", () => {
    const r = computeTotal({ subtotal: 20, coupon: "SAVE10" });
    expect(r.total).toBe(20);
    expect(r.appliedCoupon).toBeUndefined();
    expect(r.warnings).toContain("Coupon not eligible");
  });
});
Keep tests focused on outputs. If you need to assert on warnings, treat them as part of the contract.
Mind Map: From Intent to Testable Logic
Advanced Details Without the Usual Mess
- Use explicit result types. If a rule can fail, return
{ ok: false, error: ... }or include warnings. Avoid throwing for expected conditions; tests become simpler. - Guard invariants early. If subtotal must be non-negative, decide whether to clamp, reject, or warn. The choice should match the requirement, not personal preference.
- Compose functions, don’t nest complexity. If pricing has multiple rules, compute each rule’s effect separately, then combine.
- Keep time and randomness out of logic. If you need “current date,” pass it in as an argument. Tests then remain deterministic.
Example: Eligibility Decision as a Predicate
type EligibilityInput = { age: number };

type EligibilityResult = { allowed: boolean; reason?: string };

export function canCheckout(input: EligibilityInput): EligibilityResult {
  if (input.age < 18) return { allowed: false, reason: "Under 18" };
  return { allowed: true };
}
A predicate like this is small enough that an agent can generate it reliably, and tests can cover every branch with minimal effort.
Putting It Together in the Logic Layer
When you implement business logic with testable functions, you get three practical benefits: predictable behavior, easy-to-target failures, and code that agents can iterate on without breaking unrelated rules. The trick is to treat each rule as a function with a contract, then let tests enforce that contract one case at a time.
6.5 Wiring Components with Configuration and Dependency Injection
Wiring is where “it compiles” becomes “it behaves.” In an agent-driven code generation pipeline, wiring is also where small mismatches—wrong config key, missing dependency, swapped environment—turn into confusing runtime failures. Dependency injection (DI) and configuration discipline keep those failures local and explainable.
Core Wiring Concepts
DI separates what a component needs from how it gets it. Configuration separates values from code paths. Together, they let generated code stay stable while environments change.
A practical rule: every component should declare dependencies explicitly (constructor parameters or function arguments), and every environment-specific value should come from a configuration object, not from scattered literals.
Mind Map: Wiring Responsibilities
Configuration That Fails Fast
Start by defining a typed configuration object that mirrors the needs of your app. Then validate it once at startup. This prevents “null pointer surprises” later.
Example configuration shape:
database.urlhttp.portauth.jwtIssuerauth.jwtAudience
Validation checks should include presence, basic format, and cross-field consistency. For instance, if auth.enabled is false, you can skip JWT issuer/audience checks.
Example: Typed Config with Validation
type AppConfig = {
  httpPort: number;
  databaseUrl: string;
  authEnabled: boolean;
  jwtIssuer?: string;
  jwtAudience?: string;
};

function loadConfig(env: Record<string, string>): AppConfig {
  const httpPort = Number(env.HTTP_PORT);
  if (!Number.isFinite(httpPort)) throw new Error("HTTP_PORT must be a number");

  const databaseUrl = env.DATABASE_URL;
  if (!databaseUrl) throw new Error("DATABASE_URL is required");

  const authEnabled = env.AUTH_ENABLED === "true";
  const jwtIssuer = env.JWT_ISSUER;
  const jwtAudience = env.JWT_AUDIENCE;

  if (authEnabled) {
    if (!jwtIssuer) throw new Error("JWT_ISSUER is required when AUTH_ENABLED is true");
    if (!jwtAudience) throw new Error("JWT_AUDIENCE is required when AUTH_ENABLED is true");
  }

  return { httpPort, databaseUrl, authEnabled, jwtIssuer, jwtAudience };
}
The Composition Root
The composition root is the single place where you assemble the object graph. Generated code should avoid “hidden wiring” inside business logic. If a service needs a repository, it should receive it, not create it.
A clean pattern:
- Load and validate config.
- Create infrastructure objects (DB client, HTTP server, loggers).
- Create domain services.
- Register handlers/controllers.
- Start the server.
Mind Map: Composition Root Flow
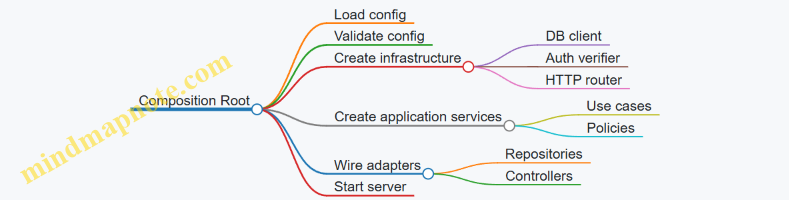
Wiring with Interfaces and Contracts
Interfaces make wiring predictable. If your code generator emits an OrderRepository interface, the composition root can bind it to a concrete implementation like SqlOrderRepository.
This also helps agents: when they regenerate a repository implementation, the rest of the app keeps compiling because the contract stays stable.
Example: DI-Friendly Interfaces and Wiring
interface UserRepository {
  findById(id: string): Promise<{ id: string; email: string } | null>;
}

class SqlUserRepository implements UserRepository {
  constructor(private dbUrl: string) {}
  async findById(id: string) { /* query db */ return null; }
}

class AuthService {
  constructor(private users: UserRepository) {}
  async requireUser(id: string) {
    const u = await this.users.findById(id);
    if (!u) throw new Error("User not found");
    return u;
  }
}

function buildApp(config: AppConfig) {
  const users: UserRepository = new SqlUserRepository(config.databaseUrl);
  const auth = new AuthService(users);
  return { auth };
}
Lifecycle and Resource Cleanup
Not all dependencies are equal. A DB client often behaves like a singleton because it manages connection pools. Request-scoped objects (like per-request context) should not be stored globally.
If your generated code uses a DI container, still keep lifecycle rules explicit: register singletons for shared resources, and create new instances for request-bound state.
Example: Server Startup with Explicit Cleanup
async function startServer(config: AppConfig) {
  const users = new SqlUserRepository(config.databaseUrl);
  const auth = new AuthService(users);

  const server = createHttpServer({
    port: config.httpPort,
    onRequest: (req) => handleRequest(req, auth)
  });

  await server.listen();
  return async () => {
    await server.close();
    // close db pool if your repository owns it
  };
}
Wiring Errors That Agents Should Avoid
Common wiring failures are mechanical:
- Missing registration: a dependency is never constructed.
- Wrong config mapping:
HTTP_PORTparsed as NaN. - Contract drift: implementation no longer matches interface.
To reduce these, keep wiring code small, deterministic, and testable. A good wiring test checks that buildApp returns an object graph where key methods can be called with fakes and validated config.
Integrated Takeaway
In an intent-to-code pipeline, wiring is the bridge between generated modules and real runtime behavior. Treat configuration as validated input, treat DI as explicit dependency declaration, and treat the composition root as the only assembly point. That combination makes generated systems easier to reason about, easier to test, and less likely to fail in surprising ways.
7. Testing Strategies for Agent Generated Software
7.1 Designing Test Plans from Acceptance Criteria
A good test plan starts by treating acceptance criteria as a contract, not a checklist. Each criterion should map to one or more test ideas that prove the system behaves correctly under realistic conditions. If you can’t explain what would count as “done” for a criterion, the plan will drift into vague testing.
Step 1: Normalize Acceptance Criteria into Testable Claims
Rewrite each acceptance criterion into a testable claim with three parts: trigger, expected outcome, and scope. For example, a criterion like “Users can reset passwords” becomes:
- Trigger: user submits a valid reset request
- Expected outcome: system sends a reset link and invalidates previous links
- Scope: applies to the password reset endpoint only
This normalization prevents a common failure mode: tests that check the UI but not the behavior, or tests that check behavior but not the constraints.
Step 2: Build a Coverage Matrix That Links Criteria to Test Types
Not every criterion needs the same depth. Use a matrix to decide where each criterion is verified.
| Acceptance Criterion | Unit Tests | Integration Tests | End to End Tests | Security Checks |
|---|---|---|---|---|
| Valid reset request creates token | Token generation rules | Token storage and expiry | User flow from request to reset | Token secrecy, rate limits |
| Invalid reset request returns error | Validation helpers | Endpoint error mapping | Optional UI message | No token leakage |
A practical rule: if a criterion depends on multiple components (DB + API + email), you need at least one integration test. If it depends on user-visible behavior, add an end to end test.
Step 3: Derive Test Inputs Using Equivalence Classes and Boundaries
For each criterion, list input categories that should behave the same way. Then add boundary cases that often break assumptions.
Example for a “create order” criterion:
- Equivalence classes: valid SKU list, empty list, list with unknown SKU
- Boundaries: max item count, max total quantity, zero quantity
- Format edges: whitespace in IDs, unusual but valid characters
This approach keeps the plan systematic: you’re not guessing inputs; you’re enumerating behavior groups.
Step 4: Specify Oracles and Observability
A test needs an oracle: a concrete way to decide pass or fail. Oracles can be response codes, persisted records, emitted events, or side effects like email dispatch.
Example oracle set for password reset:
- HTTP status is 200 for valid request
- A reset token record exists with correct user ID
- Token expiry is within expected window
- No reset token is returned in the response body
If you can’t observe the oracle, you’ll end up asserting the wrong thing.
Step 5: Plan for Negative Paths and Error Mapping
Acceptance criteria often describe the happy path. Your test plan should still cover failure modes that users and systems actually hit.
Include tests for:
- Missing required fields
- Invalid formats
- Expired tokens
- Reused tokens
- Conflicting states (e.g., user disabled)
- Downstream failures (email service unavailable)
For each negative test, define the expected error mapping: status code, error message shape, and whether the system must avoid leaking sensitive details.
Step 6: Add Non-Functional Checks That Are Still Testable
Some acceptance criteria imply non-functional requirements. Keep them concrete.
Examples:
- Rate limiting: repeated reset requests from same account return 429 after threshold
- Performance guardrails: endpoint responds within a defined time budget under normal load
- Data integrity: token invalidation happens atomically with reset request creation
Only include non-functional checks that you can measure in the test environment.
Step 7: Turn the Plan into Executable Test Cases
For each criterion, produce a small set of test cases with consistent structure:
- Name
- Preconditions
- Steps
- Expected outcome
- Oracle details
Example test case outline for “invalid reset request returns error”:
- Preconditions: user exists; no token record for the provided token
- Steps: call reset endpoint with invalid token
- Expected outcome: 400 or 404 per spec; response contains no token details
- Oracle: no new token record created; audit log entry created
Mind Map: Acceptance Criteria to Test Plan
Example: Mini Test Plan from Three Criteria
Assume these acceptance criteria for a password reset feature:
- Valid reset request sends a link and expires previous links.
- Invalid reset request returns an error without revealing token validity.
- Reset with an expired token fails and does not change the password.
A compact plan:
- Unit: token expiry calculation; request validation rules
- Integration: DB writes for token creation and invalidation; endpoint error mapping
- End to End: user requests reset, receives link, resets password successfully
- Security checks: ensure token is never returned in responses; verify rate limiting on repeated requests
- Negative tests: invalid token format; expired token; reused token
This structure ensures each criterion is tested in the right place, with clear pass/fail signals and minimal redundancy.
7.2 Writing Unit Tests for Deterministic Behavior
Deterministic unit tests produce the same results every time, on every machine, with no hidden dependencies. The goal is simple: when a test fails, you should know whether the logic changed or the environment did.
Core Idea: Test Behavior, Not Timing
A unit test should focus on one unit of logic: a function, a method, or a small class. If your code reads the current time, random numbers, environment variables, files, or network responses, your test must control those inputs. Otherwise, you’ll get failures that look like “flakiness,” which is just uncertainty wearing a lab coat.
Start by identifying nondeterministic sources:
- Time:
now,Date,Instant - Randomness:
Math.random, UUID generation - External state: environment variables, filesystem, HTTP
- Concurrency: thread scheduling, async race conditions
Then replace them with injected values or test doubles.
Arrange Act Assert with Controlled Inputs
Use a consistent structure:
- Arrange: set up inputs and dependencies with fixed values
- Act: call the unit under test
- Assert: verify outputs and side effects
A deterministic test often includes two kinds of assertions:
- Value assertions: returned data equals an expected value
- Interaction assertions: a dependency was called with exact arguments
Mind Map: Deterministic Unit Test Checklist
Example: Fixing Time and UUID Generation
Suppose you have a function that creates an invoice reference using the current date and a generated ID.
type Clock = { nowIso: () => string };
type IdGen = { next: () => string };

function makeInvoiceRef(clock: Clock, ids: IdGen): string {
  const date = clock.nowIso().slice(0, 10);
  const id = ids.next();
  return `INV-${date}-${id}`;
}
A deterministic unit test injects a fake clock and a fake ID generator.
test('makeInvoiceRef uses fixed date and id', () => {
  const clock = { nowIso: () => '2026-02-15T10:00:00Z' };
  const ids = { next: () => 'A1B2C3' };

  const ref = makeInvoiceRef(clock, ids);

  expect(ref).toBe('INV-2026-02-15-A1B2C3');
});
This test never depends on the machine’s clock or randomness. If the format changes, the failure points directly to the behavior.
Example: Testing Error Paths Without Guesswork
Determinism also applies to failures. If your unit throws on invalid input, test the exact error type and message (or error code) produced by the logic.
function parseAmount(input: string): number {
  const n = Number(input);
  if (!Number.isFinite(n) || n <= 0) {
    throw new Error('Amount must be a positive number');
  }
  return n;
}

test('parseAmount rejects zero', () => {
  expect(() => parseAmount('0')).toThrow('Amount must be a positive number');
});
Avoid tests that only check “it throws something.” That makes debugging slower because you lose the specific contract.
Advanced Detail: Handling Asynchrony Deterministically
Async code becomes deterministic when you remove timing assumptions.
- Prefer returning promises from the unit and awaiting them in the test.
- Avoid sleeps like
await new Promise(r => setTimeout(r, 50)). - If you use timers, use a fake timer mechanism and advance time explicitly.
When you must test concurrency, isolate the unit so it doesn’t depend on scheduling. For example, pass in a queue or a scheduler abstraction rather than letting the unit spawn uncontrolled tasks.
Mind Map: Assertions That Stay Stable
Practical Rules That Prevent Flaky Tests
- One test, one behavior: if you test multiple behaviors, a failure may not tell you which part broke.
- No hidden globals: avoid reading mutable module-level state unless you reset it inside the test.
- No real IO: replace filesystem and network with fakes that return fixed data.
- Use explicit inputs: if a function reads from the environment, pass those values in.
- Name tests like contracts: “rejects zero amount” is more useful than “test parseAmount.”
Deterministic unit tests are not just about reliability; they’re about making the code’s contract visible. When the test reads like a specification, you spend less time guessing and more time fixing.
7.3 Creating Integration Tests for End to End Flows
Integration tests prove that multiple parts work together: the request enters the system, data moves through layers, side effects happen, and the response matches the contract. Unit tests can tell you that a function is correct; integration tests tell you that the plumbing is correct. The goal is to test behavior at boundaries without turning the test suite into a slow, flaky museum of everything.
Start with a Flow Map That Matches User Intent
Pick one end to end flow that represents a real user action, such as “create an order and confirm it.” Write the flow as steps with observable inputs and outputs. Each step should map to a system boundary: HTTP endpoint, database transaction, message publish, and external call (if any).
A good integration test has three parts: arrange state, act through the public boundary, and assert on outcomes. For example, arrange by creating a test user and clearing relevant tables; act by calling the HTTP endpoint; assert by checking the HTTP response and verifying database state.
Define What “End to End” Means for Your System
Not every dependency must be real. Decide which dependencies are in scope and which are replaced.
- In scope: your API layer, service layer, persistence layer, and any internal adapters.
- Out of scope: third-party services that are not essential to the flow contract.
- Replace with: fakes or stubs for external calls, and deterministic fixtures for time and randomness.
This keeps tests stable while still catching integration mistakes like wrong SQL, missing transaction commits, mismatched DTO fields, or incorrect status codes.
Mind Map: Integration Test Anatomy
Build Assertions That Prove Data Integrity
For an order creation flow, assert both the response and the persisted model. Response assertions catch contract drift; database assertions catch mapping and transaction issues.
Use a small set of assertions that cover the critical invariants:
- The order exists with the expected customer id.
- The total equals the sum of line items.
- The status transitions to the correct initial state.
- No duplicate rows were created.
If your system uses an outbox table for events, assert that the outbox record exists and contains the correct payload fields. This is often more reliable than trying to observe asynchronous delivery.
Example: End to End Integration Test Skeleton
import request from "supertest";
import { app } from "../src/app";
import { db } from "../src/db";

test("creates an order and persists totals", async () => {
  await db.clearTables(["orders", "order_items", "outbox"]);
  const user = await db.users.create({ email: "[email protected]" });

  const res = await request(app)
    .post("/api/orders")
    .send({ customerId: user.id, items: [{ sku: "A1", qty: 2 }] });

  expect(res.status).toBe(201);
  expect(res.body).toMatchObject({ customerId: user.id, status: "PENDING" });

  const order = await db.orders.findById(res.body.id);
  expect(order.total).toBe( /* expected total */ 200);
  const items = await db.orderItems.findByOrderId(order.id);
  expect(items).toHaveLength(1);
});
This skeleton shows the core pattern: clear state, seed prerequisites, call the public endpoint, then verify persistence. Replace the expected total with a deterministic fixture or a known price table seeded in the test.
Mind Map: Choosing Assertions and Boundaries
Handle Failure Paths Without Guessing
Add at least one test for a failure path that crosses boundaries. For instance, if the request references an unknown SKU, assert that:
- The API returns a 400 with a stable error code.
- No order row exists.
- No outbox record exists.
This prevents a common integration bug where validation happens too late, after partial writes.
Keep Tests Fast Enough to Run Often
Use a dedicated test database or a transaction-per-test strategy. Ensure cleanup is deterministic, and avoid waiting on real timeouts. If you must wait for asynchronous work, prefer polling a database condition with a short timeout rather than sleeping.
Example: Failure Path with No Side Effects
test("rejects unknown sku without persisting", async () => {
  await db.clearTables(["orders", "order_items", "outbox"]);
  const user = await db.users.create({ email: "[email protected]" });

  const res = await request(app)
    .post("/api/orders")
    .send({ customerId: user.id, items: [{ sku: "NOPE", qty: 1 }] });

  expect(res.status).toBe(400);
  expect(res.body).toMatchObject({ code: "SKU_NOT_FOUND" });
  expect(await db.orders.count()).toBe(0);
  expect(await db.outbox.count()).toBe(0);
});
Wrap Up with a Practical Checklist
- The test calls the public boundary.
- The test asserts response contract and persisted invariants.
- Side effects are asserted via deterministic storage like an outbox.
- Failure paths assert “no partial writes.”
- Dependencies are stubbed so the test checks your integration, not someone else’s uptime.
A single well-chosen end to end integration test can catch more real defects than ten isolated unit tests, because it verifies the handoffs where bugs actually hide.
7.4 Using Property Based Checks for Input Robustness
Property based testing checks that a program behaves correctly for many inputs, not just a few hand-picked examples. For input robustness, the key idea is to state what must always be true: parsing should accept valid shapes, reject invalid ones, and never crash or hang. When you combine this with agent generated code, you get a safety net that catches edge cases the agent did not anticipate.
Core Properties for Input Handling
Start by separating three layers of behavior:
- Parsing correctness: given an input, the parser returns either a valid value or a structured error.
- Validation correctness: given a parsed value, the validator accepts it only if it satisfies constraints.
- Safety correctness: for any input, the system terminates quickly and does not throw unexpected exceptions.
A useful property format is: For all inputs X, if X meets condition C then result R holds; otherwise result is an error of type E. This keeps tests aligned with intent rather than incidental implementation.
Mind Map: Property Based Checks for Robustness
Designing Generators That Teach the Test
Property based frameworks rely on generators. If your generator only produces “nice” inputs, your properties will look green while real users still find the cracks. Use three generator categories:
- Valid generators: produce inputs that satisfy constraints. This verifies the happy path across many variations.
- Invalid generators: produce inputs that violate one constraint at a time. This helps you confirm error classification is precise.
- Adversarial generators: produce extreme or unusual inputs such as empty strings, very long strings, whitespace variations, and boundary numeric values.
A practical trick is to mirror your validation rules in the generator. If you have a rule like “age must be between 0 and 120,” generate ages at -1, 0, 1, 119, 120, 121, plus random values in between.
Example Property Set for a Simple Parser
Imagine an endpoint that accepts a JSON payload with age and email. The parser should never crash, and it should classify errors consistently.
Property 1: Termination and No Unexpected Exceptions
- For any input string, parsing either returns a result or a structured error.
Property 2: Valid Inputs Parse Successfully
- For any generated valid payload, parsing returns a value with
agein range andemailmatching the expected pattern.
Property 3: Invalid Inputs Produce the Right Error Type
- If
ageis out of range, the error should beAgeOutOfRange. - If
emailis malformed, the error should beEmailInvalid.
Here is a compact illustration in a language-agnostic style (the exact API varies by library):
property "parser never crashes" for all inputString:
  result = parsePayload(inputString)
  assert result is Ok or Error
  assert result.error is one of known error types
And a second property for classification:
property "age out of range is classified" for all age:
  assume age < 0 or age > 120
  payload = { age: age, email: validEmail }
  result = parsePayload(toJson(payload))
  assert result == Error(AgeOutOfRange)
Shrinking and Debugging the First Failure
When a property fails, the framework typically shrinks the input to a minimal counterexample. Treat that minimal input as a specification bug, not just a test bug. If the counterexample is “age = 121 but error is EmailInvalid,” your code likely validates fields in the wrong order or reuses an error mapping.
To keep debugging systematic:
- Confirm the generator produced the intended category (valid vs invalid).
- Check whether the parser or validator is responsible for the mismatch.
- Ensure error types are stable and not dependent on incidental parsing details.
Integrating Robustness Properties into Agent Generated Code
When agents generate parsing and validation logic, ask them to expose invariants in code structure: separate parsing from validation, and use explicit error types. Then property based tests can target those boundaries.
A robust workflow is:
- Generate code.
- Add properties that cover parsing correctness, validation correctness, and safety correctness.
- Run the properties before accepting the change.
This turns “works on my examples” into “works on the whole shape of the problem,” which is exactly what input robustness needs.
7.5 Automating Test Execution and Interpreting Failures
Automated test execution is the part of the workflow that turns “we wrote tests” into “we know what broke.” The goal is not just to run tests, but to run them in a consistent way, capture useful signals, and translate failures into concrete next actions.
What to Automate First
Start with a single command that runs the right tests for the right scope.
- Fast feedback loop: unit tests on every change.
- Confidence loop: integration tests on merges or nightly runs.
- Quality loop: linting and static checks alongside tests so failures don’t hide behind style or type issues.
A practical rule: if developers can’t run the test suite in under a minute locally, the automation will be ignored.
A Minimal Test Runner Contract
Your automation should standardize three things: environment, selection, and reporting.
- Environment: pin runtime versions and set required variables.
- Selection: support “all,” “changed,” and “single test.”
- Reporting: produce machine-readable output plus a human-readable summary.
Here’s a compact example using a typical Node-style layout.
# Run Unit Tests
npm test -- --reporter=default

# Run Only Tests Matching a Pattern
npm test -- --testNamePattern="checkout"

# Run Integration Tests
npm run test:integration
If you use a CI system, keep the job steps aligned with these commands so local and CI behavior match.
Interpreting Failures Like a Mechanic
Test failures are not all the same. Treat them as different categories with different debugging moves.
Compilation and Import Errors
These failures usually mean the test never truly ran.
- Check the test runner output for missing modules, syntax errors, or environment variables.
- Confirm that the test file is discovered by the runner.
Example: a generated test imports createInvoice but the implementation exports createInvoiceV2. The failure is a naming mismatch, not a logic bug.
Setup and Fixture Failures
If beforeEach or test fixtures fail, the rest of the suite may be noise.
- Fix the earliest failing setup first.
- Avoid re-running the entire suite repeatedly; rerun only the affected test file.
Example: a database fixture tries to connect to localhost in CI. The tests fail consistently, but the code is fine.
Assertion Failures
These indicate a mismatch between expected behavior and actual behavior.
- Compare the assertion’s “expected” to the domain rule it represents.
- Inspect the inputs used by the test; generated code often changes parameter shapes.
Example: expected totalCents equals 1999, but actual is 2000. That’s usually rounding or currency conversion logic, not a random flake.
Timeouts and Flaky Behavior
Timeouts often come from slow dependencies, missing awaits, or deadlocks.
- Check whether the test waits for the right event.
- Increase timeouts only after verifying the wait condition.
Example: a test expects an async job to finish but never triggers the job runner in the test environment.
Mind Map: Failure Interpretation Workflow
Capturing Context Automatically
When a test fails, you want the “why” without rerunning everything.
- Include request/response payloads for API tests, but redact secrets.
- Log key state transitions for workflow tests.
- Attach artifacts like generated files or snapshots when relevant.
Example: if a generated endpoint returns 400 instead of 200, store the request body and the validation errors in the test output so you can see the mismatch immediately.
A Repeatable Debug Loop
Use a loop that minimizes wasted time.
- Read the first failure and classify it (import, fixture, assertion, timeout).
- Re-run only the failing test file to confirm it’s deterministic.
- Inspect the smallest unit of code related to the failing assertion or fixture.
- Update code or tests so the behavior matches the acceptance criteria.
- Re-run the same scope before running broader suites.
This loop keeps the feedback tight and prevents “fixing” the symptom while leaving the cause intact.
Example: From Failure Output to Action
Suppose your test output says:
TypeError: Cannot read properties of undefined (reading 'id')
Action path:
- It’s likely a fixture or input shape issue.
- Check the test setup that creates the object with
id. - Verify whether the generated code changed the field name (for example,
invoiceIdvsid). - Fix the mapping or update the test inputs to match the contract.
Once the test passes, you’ve confirmed both the behavior and the contract alignment.
Mind Map: Automation and Debugging Signals
Automating execution and interpreting failures are two halves of the same system: one produces consistent evidence, the other turns that evidence into targeted fixes. When both are disciplined, agent-generated code becomes easier to trust because it fails in ways you can explain.
8. Code Review, Static Analysis, and Quality Gates
8.1 Establishing Quality Gates with Linters and Formatters
Quality gates are the boring part that saves you from exciting bugs. In a vibe-coding workflow, linters and formatters act like a first reviewer: they catch mechanical issues before an agent wastes time generating logic on top of broken structure.
Quality Gates as a Pipeline, Not a Vibe
A practical quality gate has three layers:
- Syntax and parseability: the code must compile or at least parse.
- Style and structure: formatting and lint rules enforce consistent shape.
- Safety heuristics: targeted lint rules prevent common foot-guns.
The key is ordering. Run formatting first, then lint. If lint runs before formatting, you get noisy diffs and the agent “fixes” style repeatedly.
Mind Map: Linters and Formatters Quality Gates
Choosing Formatters That Produce Deterministic Output
A formatter should be deterministic: the same input yields the same output. That matters because agents often re-run steps, and nondeterministic formatting creates churn.
Best practice: pick one formatter for each language ecosystem. If you use both a formatter and a linter that can reformat, you’ll get tug-of-war diffs.
Example: Suppose an agent generates a TypeScript file with inconsistent spacing. A formatter normalizes it so the diff focuses on real logic changes.
Linter Rules with Clear Severity
Not every lint rule should block merges. Use severity to match intent:
- Error: must fix before merge (e.g., unused variables that break builds).
- Warning: allowed temporarily but tracked (e.g., minor style preferences).
- Info: documentation for humans (e.g., suggestions).
Example: If your linter flags no-unused-vars as an error, the agent cannot land code that fails compilation. If prefer-const is a warning, you still keep momentum while the team gradually tightens standards.
Wiring Quality Gates into the Workflow
Quality gates should run in two places:
- Locally: fast feedback before pushing.
- CI: enforcement for everyone, including missed local runs.
Best practice: make CI fail with actionable output. If the failure message doesn’t tell you what to run, developers will guess, and agents will repeat the same mistake.
Example: A Minimal CI Step
Below is a conceptual setup that runs formatting checks and linting. Adjust commands to your stack.
# 1) Check Formatting Without Rewriting
formatter --check .

# 2) Lint with Rules That Block Merges
linter --max-warnings=0 .
If you want auto-fix, do it in a separate step so CI remains predictable.
# Optional: Auto-Fix in CI Is Usually Avoided for PRs
# because it can create unexpected diffs.
formatter --write .
linter --fix .
Handling Generated Code Without Blind Spots
Agents often generate files that are either:
- Fully owned by the generator (safe to format and lint), or
- Partially owned by humans (linting should still apply).
Best practice: decide explicitly. If you exclude generated code, exclude it for a reason and keep the exclusion narrow.
Example: If you generate API clients, you can exclude them from style rules but still enforce basic safety checks like “no unused imports” to prevent build failures.
Keeping Rules Cohesive with Abstractions
Lint rules should reinforce your abstraction boundaries. If your architecture says “domain logic lives in services,” then lint can enforce patterns like:
- no direct database calls in controllers
- no business logic in route handlers
Example: A rule that forbids importing db from routes/* prevents the agent from bypassing your intended layers.
A Practical Checklist for Gate Setup
- One formatter, one source of truth.
- Formatting check runs before lint.
- Lint errors map to build-breaking issues.
- Warnings are visible but not merge-blocking unless you choose otherwise.
- CI output includes the exact command to fix failures.
- Generated code exclusions are intentional and documented in config.
- Rules align with your module boundaries.
When these pieces are in place, the agent’s job becomes easier: it can focus on intent and abstractions, while linters and formatters handle the mechanical consistency that humans would otherwise have to police by eye.
8.2 Applying Static Analysis to Catch Common Defects
Static analysis finds problems without running the program, which makes it fast, repeatable, and great at catching the boring mistakes that slip into agent-generated code. The goal is not to eliminate every warning; it’s to triage them into actionable categories and fix the ones that affect correctness, security, or maintainability.
What Static Analysis Actually Checks
Start with the three buckets most tools cover.
- Syntax and type issues: missing imports, unreachable code, mismatched types, wrong function signatures.
- Control flow and data flow issues: null dereferences, uninitialized variables, incorrect branching, unused results.
- Rule-based style and risk patterns: insecure APIs, hardcoded secrets, unsafe string handling, suspicious comparisons.
A useful mental model is “static analysis is a set of heuristics plus some formal checks.” When a warning is precise, it’s usually worth fixing immediately. When it’s vague, you should confirm by reading the surrounding code and tests.
A Systematic Workflow for Agent Generated Code
Static analysis works best when you treat it like a pipeline.
- Run the baseline on the current branch to see what already exists. This prevents you from attributing old issues to the new agent changes.
- Focus on the diff by filtering warnings to files or line ranges touched by the agent. If your tool supports it, use “changed lines” mode.
- Classify each warning into correctness, security, or hygiene. Correctness and security get priority.
- Fix with intent: update the code so the underlying issue disappears, not just to silence the warning.
- Re-run analysis to ensure the fix didn’t create new issues.
This workflow keeps the feedback loop tight and avoids the classic failure mode: “we fixed the warning, but the bug stayed.”
Mind Map: Static Analysis Triage
Common Defects and How Static Analysis Catches Them
Null and Initialization Errors
Agent code often assumes values exist. Static analysis can flag dereferences of possibly null values or use of uninitialized variables.
Example: a handler reads a request field and passes it to a function that expects a non-empty string.
function normalizeEmail(email?: string) {
  return email.trim().toLowerCase();
}

// Agent generated call site
const email = req.body.email;
const normalized = normalizeEmail(email);
A type checker or linter may warn that email can be undefined. The fix is to enforce the contract at the boundary.
function normalizeEmail(email: string) {
  return email.trim().toLowerCase();
}

const emailRaw = req.body.email;
if (typeof emailRaw !== 'string' || emailRaw.trim() === '') {
  throw new Error('email is required');
}
const normalized = normalizeEmail(emailRaw);
Signature Mismatches and Incorrect Return Types
Static analysis catches cases where an agent swaps parameter order, returns the wrong shape, or forgets to handle an error path.
Example: a function declared to return User returns { id: ... } only. A type checker flags the missing fields, and tests confirm the runtime behavior.
Unsafe String Handling and Injection Patterns
Rule-based checks often detect string concatenation into queries or shell commands.
Example: building a SQL query with user input.
query = "SELECT * FROM users WHERE email = '" + email + "'"
rows = db.execute(query)
A security rule should warn about injection risk. The correct fix uses parameterized queries.
query = "SELECT * FROM users WHERE email = ?"
rows = db.execute(query, (email,))
Authorization and Logic Gaps
Static analysis can’t prove authorization correctness, but it can catch common structural mistakes: missing checks, inverted conditions, or inconsistent role comparisons.
Example: a guard that returns early on the wrong condition.
if user.Role == "admin" {
  return nil // agent intended to block admins
}
A linter may not know the intent, but it can flag unreachable code paths or suspicious comparisons. The real fix comes from aligning the guard with the acceptance criteria and adding a focused test for the blocked role.
Advanced Details That Reduce False Positives
- Prefer narrow fixes: if a warning points to a helper function, fix the helper rather than adding suppressions at every call site.
- Use consistent contracts: when you standardize on “inputs are validated at boundaries,” many null-related warnings disappear.
- Treat suppression as a last resort: if you must suppress, attach it to a specific line and ensure a test covers the behavior that suppression claims is safe.
- Keep rule sets aligned with the project: mismatched configurations create noise, and noise makes triage slower.
Mind Map: Defect Categories to Fix First
A Practical Triage Example
Suppose static analysis reports 18 warnings after an agent adds a new endpoint. You start by filtering to changed lines and find:
- 2 security warnings about query construction
- 3 correctness warnings about possibly missing request fields
- 13 hygiene warnings about unused variables and formatting
You fix the 2 security warnings first, then the 3 correctness warnings, and only then address hygiene. This order ensures you don’t waste time polishing code paths that might still be wrong.
When the warnings drop to near zero on changed lines, you run the endpoint’s tests and stop. That’s the point: static analysis guides targeted fixes, not endless cleanup.
8.3 Performing Agent Assisted Code Reviews with Checklists
Agent-assisted reviews work best when you treat the checklist as a contract: it defines what “good” means, what evidence counts, and what to do when evidence is missing. The goal is not to rubber-stamp generated code, but to make review outcomes consistent across humans and runs.
Start with Review Inputs and Evidence
Before reading code, confirm the review has the artifacts it needs: the intent/spec, the generated diff, the test results, and any tool logs (lint, typecheck, build). If any are missing, the checklist should explicitly mark the item as “cannot verify” rather than guessing.
Example checklist header fields
- Spec section(s) covered by this diff
- Commands run and their outputs
- Tests added or updated
- Files changed and why
A small habit helps: reviewers should write one sentence stating the expected behavior change, then compare it to what the diff actually does.
Use a Checklist with Tiers, Not a Single Flat List
A flat list causes either fatigue or missed critical issues. Use tiers so the agent and the human both know what must be checked first.
Tier 1: Safety and correctness
- No broken builds or failing tests
- No obvious security issues (authz checks, injection risks)
- No data contract mismatches (schema, serialization)
Tier 2: Maintainability
- Clear naming and separation of concerns
- Error handling is consistent and actionable
- Interfaces and types match the abstraction level
Tier 3: Completeness and ergonomics
- Edge cases covered by tests
- Logging and observability are sufficient for debugging
- Documentation matches behavior
Mind Map of Review Signals and Actions
Mind Map: Agent Assisted Code Review Checklist
Checklist Items with Concrete Pass/Fail Criteria
Each checklist item should have a measurable criterion and a “what to do” response.
Correctness item: “All acceptance criteria are represented in code or tests.”
- Pass: each criterion maps to a test or an explicit code path
- Fail: missing mapping; request a targeted test or implementation
Security item: “Authorization is enforced at the boundary.”
- Pass: request handlers validate permissions before data access
- Fail: checks occur only in the UI or after fetching sensitive data; request relocation
Data contract item: “Schema changes include migration and compatibility handling.”
- Pass: migration exists and API serialization matches
- Fail: migration missing or API assumes old fields; request migration and version-safe parsing
Example Review Workflow for a Generated Endpoint
Suppose an agent generated a POST /invoices endpoint. The human review uses the checklist to avoid vague feedback.
Step 1: Evidence scan
- Confirm tests ran and the new test covers “invalid customer id returns 400.”
Step 2: Tier 1 checks
- Verify authz happens before loading customer records.
- Verify input validation rejects malformed payloads.
Step 3: Tier 2 checks
- Ensure the handler delegates business logic to a service function.
- Ensure errors map to stable response shapes.
Step 4: Tier 3 checks
- Add a test for “duplicate invoice number returns conflict.”
- Confirm logs include request id and invoice id on success.
Template for Agent Assisted Review Notes
Use a consistent note format so the agent can produce actionable output.
Checklist Result
- Tier 1 Safety and Correctness
  - Build/tests: PASS (commands: ...)
  - Security: FAIL (authz check occurs after data fetch)
  - Data contracts: PASS (schema + serialization match)
- Tier 2 Maintainability
  - Error handling: WARN (inconsistent status mapping)
- Tier 3 Completeness and Ergonomics
  - Edge cases: FAIL (missing duplicate invoice test)

Requested Changes
1) Move authz before customer lookup; add test for forbidden access.
2) Add duplicate invoice conflict test and align error mapping.
Diagram for a Single Checklist Item
    flowchart TD
  A[Checklist Item] --> B[Define Pass Criteria]
  B --> C[Locate Evidence]
  C --> D{Evidence Found?}
  D -->|Yes| E[Mark PASS or WARN]
  D -->|No| F[Mark CANNOT VERIFY]
  E --> G[If FAIL Request Changes]
  F --> G[Request Missing Artifacts]
  G --> H[Scope Fixes for Regeneration]
Common Failure Modes and How the Checklist Prevents Them
-
“Looks right” approvals happen when evidence is not required. Tier 1 forces build/test and security checks to be verified.
-
Overfitting to the diff happens when reviewers ignore spec coverage. The checklist ties each change to acceptance criteria.
-
Feedback that can’t be executed happens when notes lack pass/fail criteria. The template requires requested changes to be specific and testable.
A checklist that is strict about evidence may feel slower at first, but it reduces the number of review cycles caused by ambiguity. The agent becomes a reliable assistant, and the human review becomes a decision, not a guessing game.
8.4 Enforcing Style, Naming, and Architectural Conventions
Style and naming are not cosmetic rules; they are compression for human attention. When an agent generates code, it will follow patterns more reliably than it will invent new ones. Your job is to make the “right way” obvious to both the agent and the reviewers.
Establishing Conventions That Survive Autonomous Edits
Start with three layers of conventions: formatting, naming, and architecture. Formatting is the easiest to enforce mechanically. Naming is next, because it affects readability and refactoring safety. Architecture is last, because it requires the most judgment.
A practical approach is to define a short “convention contract” that every generated change must satisfy:
- Formatting contract: one formatter, one linter, no exceptions.
- Naming contract: consistent casing, file layout, and semantic prefixes.
- Architecture contract: where code is allowed to live, and what it is allowed to call.
Mind Map: Convention Enforcement Flow
Naming Rules That Prevent Refactoring Breakage
Naming conventions should encode intent and reduce ambiguity. If your domain uses “Invoice” and “Bill” interchangeably, the agent will mirror the inconsistency and you will pay later.
Use these rules as defaults:
- Domain entities:
Invoice,Customer,PaymentSchedule. - DTOs and request/response shapes:
CreateInvoiceRequest,InvoiceResponse. - Services:
InvoiceService,AuthService. - Repositories:
InvoiceRepository. - Errors:
InvoiceNotFoundError,InvalidPaymentMethodError.
When the agent writes a new function, require it to choose a name that matches the verb and the scope. For example, prefer calculateOutstandingAmount(invoiceId) over doCalc(invoiceId) because the former is searchable and testable.
Example: Naming with Clear Boundaries
// Good: names encode role and scope
export function calculateOutstandingAmount(invoiceId: string): number {
  // ...
}

export class InvoiceService {
  constructor(private repo: InvoiceRepository) {}

  async getInvoiceOrThrow(invoiceId: string): Promise<Invoice> {
    const inv = await this.repo.findById(invoiceId);
    if (!inv) throw new InvoiceNotFoundError(invoiceId);
    return inv;
  }
}
Architectural Conventions That Keep Changes Local
Architectural rules should be simple enough to check. A common pattern is strict layer direction:
- API layer: validates input, maps HTTP to domain calls.
- Service layer: coordinates use cases, contains business logic.
- Repository layer: performs persistence and query details.
To enforce this, define allowed imports per layer. If the agent tries to import a repository from the API layer, fail the build and ask for a rewrite.
Example: Enforcing Layer Direction
// api/invoices.ts
import { InvoiceService } from "../services/invoiceService";

export async function getInvoice(req: Request) {
  const invoiceId = req.params.invoiceId;
  return new InvoiceService(/* injected */).getInvoiceOrThrow(invoiceId);
}
// services/invoiceService.ts
import { InvoiceRepository } from "../repositories/invoiceRepository";

export class InvoiceService {
  constructor(private repo: InvoiceRepository) {}

  async getInvoiceOrThrow(invoiceId: string) {
    const inv = await this.repo.findById(invoiceId);
    if (!inv) throw new Error("InvoiceNotFound");
    return inv;
  }
}
Quality Gates That Make Style Non-Negotiable
A convention contract only works if it is enforced. Use gates in this order:
- Format check: fail fast.
- Lint: catch unused imports, shadowing, and unsafe patterns.
- Static analysis: catch type errors and obvious logic issues.
- Architectural checks: verify imports and directory boundaries.
Keep the gates deterministic. If the agent can’t predict the outcome, it will waste iterations.
Example: A Minimal Checklist for Agent Output
- Files are in the correct directory for their layer.
- No cross-layer imports.
- Naming matches the contract for exported symbols.
- Formatter output is identical to the committed version.
- Lint passes with zero warnings.
Handling Exceptions Without Creating a Convention Escape Hatch
Sometimes you must break a rule, but exceptions should be explicit and rare. Use a single mechanism for exceptions, such as a narrowly scoped suppression comment with a reason tied to a specific rule. If you allow “temporary” exceptions, they become permanent, and the agent learns the wrong lesson.
A good rule of thumb: if an exception would be repeated across multiple files, it is not an exception anymore. Update the convention contract instead, then regenerate with the corrected rules.
Putting It Together in Review
During review, focus on three questions:
- Does the code follow the naming contract so intent is obvious?
- Are changes localized to the correct architectural layer?
- Would a second agent run produce the same structure without extra instructions?
If the answers are yes, you get the best of both worlds: autonomous generation that still looks like it belongs in your codebase.
8.5 Managing Technical Debt During Iterative Generation
Iterative generation is great at producing working slices quickly, but it also creates a specific kind of debt: the code that “passes today” while quietly making tomorrow harder. Managing that debt is less about stopping iteration and more about steering it with constraints, checkpoints, and small, repeatable cleanup moves.
Core Idea: Debt Comes from Mismatched Intent
Technical debt during generation usually appears when the agent’s interpretation of intent drifts from the team’s real constraints. The mismatch can be subtle: a function that works but hides side effects, a schema that matches the example but not the invariants, or a test that checks the happy path but not the failure modes.
A practical rule: every iteration must produce (1) new behavior, (2) evidence it matches intent, and (3) a record of what was assumed. When any of the three is missing, debt accumulates.
Debt Inventory: Classify Before You Fix
Before refactoring, categorize debt so you fix the right thing first.
- Interface debt: public contracts drift, names become inconsistent, or types don’t reflect domain meaning.
- Behavior debt: edge cases are missing, error handling is inconsistent, or business rules are duplicated.
- Test debt: tests exist but don’t fail when they should, or they’re too coupled to implementation.
- Structure debt: layering is blurred, modules grow without boundaries, or configuration is scattered.
- Tooling debt: formatting, linting, or static checks are skipped, so regressions slip in.
A quick inventory method: during review, tag each change with one category. If you can’t tag it, the change is probably unclear and needs rework.
Mind Map: Debt Management Loop
Checkpoints That Prevent Debt from Spreading
Use checkpoints that are cheap enough to run every iteration.
- Contract checkpoint: confirm that generated code respects existing interfaces. If the agent proposes a new shape, require a migration plan or an adapter layer.
- Invariant checkpoint: verify preconditions and invariants are enforced at boundaries. For example, if an order total must be non-negative, enforce it at input parsing and again before persistence.
- Evidence checkpoint: require at least one test that fails without the new behavior and one test that covers a likely failure mode.
- Quality gate checkpoint: run formatting, linting, and static analysis. Skipping these is a debt multiplier.
Example: Refactoring Interface Debt Without Stalling
Suppose an agent generates an endpoint that returns a raw database model. It works, but it leaks internal fields and makes later changes painful.
A debt-aware fix is to introduce a response contract and map internally.
Before
- GET /orders/123 returns { id, user_id, internal_notes, total_cents }

After
- GET /orders/123 returns { id, totalCents, status }
- internal_notes stays server-side
- mapping happens in a dedicated adapter
This refactor is small, but it prevents interface debt from turning into behavior debt later.
Example: Turning Test Debt into Confidence
If the agent adds only a happy-path test, failures will be discovered late. Add one targeted test that exercises an error boundary.
Happy path
- Create order with valid items
- Assert 201 and response fields

Failure mode
- Create order with empty items
- Assert 400 and a clear error code
The key is to make the failure test independent of implementation details. It should assert intent-level outcomes.
Advanced Detail: Keep Cleanup Local and Bounded
When you refactor, bound the scope so you don’t erase evidence.
- Prefer extraction over rewriting: move logic into a new module and keep the old call path until tests confirm behavior.
- Refactor in the same iteration as the failing evidence: if a test reveals drift, fix the drift immediately rather than waiting for a “cleanup sprint.”
- Use a single source of truth: duplicated business rules are the fastest route to behavior debt.
Definition of Done for Generated Changes
A generated change is “done” when:
- Acceptance criteria are covered by tests that would fail if the behavior regresses.
- Interfaces match the project’s contracts or are adapted safely.
- Quality gates run and pass.
- Any assumptions are documented in the change record so reviewers can challenge them.
When these conditions hold, technical debt becomes manageable: it shows up as a tagged category, gets fixed with bounded refactors, and leaves behind clearer contracts instead of mystery meat.
9. Security and Privacy Controls in Agent Workflows
9.1 Threat Modeling for Generated Code Paths
Generated code expands your attack surface in two ways: it adds new logic, and it adds new ways for inputs to reach that logic. Threat modeling for these paths starts with a simple question: “Where can untrusted data enter, and what should never happen as a result?” From there, you map risks to concrete code behaviors, then choose controls that fit the abstraction level you’re working at.
Core Concepts That Keep Modeling Grounded
Trust boundaries mark where data changes status. For example, an HTTP request body is untrusted; a validated domain object is trusted. Assets are the things you must protect, like user accounts, order totals, or internal service credentials. Threats are specific ways assets can be harmed, such as unauthorized access or data tampering. Controls are the mechanisms that reduce likelihood or impact, like validation, authorization checks, and safe query construction.
A practical modeling rule: treat every generated function as a potential boundary crossing. Even “pure” helpers can become dangerous if they accept raw strings and later build queries, file paths, or HTML.
Step by Step Threat Modeling for Agent Generated Code
Identify Generated Code Paths
Start by listing the code the agent produced or modified: controllers, handlers, service methods, database queries, template rendering, and background jobs. For each path, record the entry points and the transformations.
Example: a generated endpoint POST /invoices might accept JSON, map it to a model, call a service, write to the database, and return a response. Each arrow is a place where assumptions can break.
Classify Inputs and Their Intended Shape
For each entry point, specify what “valid” looks like. Generated code often assumes types are correct, but runtime inputs are not. Define:
- Required fields and allowed formats
- Maximum lengths
- Allowed enums
- Whether fields are optional or mutually exclusive
Example: if customerId must be a UUID, validation should reject non-UUID strings before any database call.
Enumerate Threats per Path
Use a small set of threat categories that map cleanly to code:
- Injection: SQL, command, template, or path injection
- Authorization bypass: missing or incorrect permission checks
- Data exposure: returning sensitive fields or verbose errors
- Integrity violations: incorrect calculations, race conditions, or mass assignment
- Denial of service: expensive queries, unbounded loops, large payloads
Then attach each threat to a concrete failure mode in the generated code.
Example: if the agent generated a query using string concatenation, the injection threat becomes “attacker-controlled fragments alter the query.”
Choose Controls at the Right Layer
Controls should match the abstraction level:
- At the boundary: schema validation, size limits, strict parsing
- In the domain layer: invariants like “invoice total cannot be negative”
- At the data layer: parameterized queries, ORM protections, transaction boundaries
- At the authorization layer: centralized policy checks
A common mistake is relying on downstream checks that never run on invalid input. Boundary validation prevents that.
Validate Controls with Targeted Tests
Threat modeling should end with tests that fail when controls fail. For each threat, write at least one test that proves the control works.
Example tests:
- Reject payloads with invalid UUIDs
- Ensure unauthorized users cannot access another user’s invoice
- Confirm error responses do not include stack traces
- Verify queries use parameters rather than concatenated strings
Mind Map: Threat Modeling for Generated Code Paths
Concrete Examples That Map Threats to Code Behaviors
Example: Preventing SQL Injection in Generated Queries
If the agent generates a repository method that accepts a search term, require parameterized queries. The threat is not “SQL injection exists,” but “user input reaches query construction without parameters.” Your control is to enforce parameterization and add a test with a payload like %' OR 1=1 -- to confirm it is treated as data.
Example: Preventing Authorization Bypass in Generated Endpoints A generated handler might fetch an invoice by ID and return it. The threat is “ID is not enough to authorize access.” The control is to scope the lookup to the caller’s identity or permissions, then test with two users where one must receive a not-found or forbidden response.
Example: Preventing Data Exposure Through Response Shaping Generated code may return entire model objects. The threat is “sensitive fields leak through serialization.” The control is explicit response DTOs or field filtering, plus a test that asserts the response does not contain fields like internal notes or secret tokens.
Practical Output: A Threat Checklist You Can Use Immediately
For each generated path, confirm these items:
- Validation runs before any side effects
- Authorization is enforced for every resource access
- Queries are parameterized and file paths are normalized
- Responses filter sensitive fields and map errors safely
- Tests cover at least one negative case per threat category
When these checks are consistent across generated code, you reduce the chance that “it compiled” becomes “it’s exploitable.”
9.2 Preventing Injection Risks in Inputs and Queries
Injection happens when untrusted input is interpreted as code or structure rather than data. In practice, the risk usually appears in two places: query construction (SQL, NoSQL, search) and command construction (shell, file paths, template rendering). The fix is consistent: keep the boundary between “data” and “instructions” hard, then validate what you accept.
Core Principle: Parameterize and Separate
Start with the simplest rule: never concatenate user input into a query string. Parameterization forces the database driver to treat input as values. For example, instead of building "SELECT ... WHERE email = '" + email + "'", use placeholders and pass email separately.
-- Unsafe
SELECT id, name FROM users WHERE email = '" + :email + "';

-- Safe
SELECT id, name FROM users WHERE email = :email;
Even if the input contains quotes or SQL keywords, the driver sends it as a value. That single change removes an entire class of injection bugs.
Inputs Are Not Queries
A common mistake is to parameterize SQL but still build other interpreters from raw input. If you accept a “filter” string and later turn it into a query language, you’ve recreated the same boundary problem. The safe approach is to accept structured inputs (fields, operators, values) and map them to a fixed set of query templates.
Example: a search endpoint that accepts { "field": "status", "op": "eq", "value": "active" } should only allow field from a whitelist and op from a whitelist, then bind value as a parameter.
Validation That Matches the Threat
Validation is not just “check length.” It should reflect how the input could be misused.
- Type validation: if
userIdmust be an integer, reject anything else. - Format validation: emails, UUIDs, and ISO dates have predictable shapes.
- Range validation: pagination limits prevent resource abuse that can amplify injection impact.
- Character validation: for fields that must be alphanumeric, enforce it; for free text, allow it but keep it parameterized.
A helpful mental model: validation reduces the number of ways an attacker can craft a payload; parameterization ensures that even a crafted payload stays data.
Query Construction Patterns That Stay Safe
Use a small number of safe patterns and reuse them.
- Fixed query with optional filters: build the query structure using boolean logic, but bind every value.
- Whitelisted dynamic ordering: allow only known column names for
ORDER BY. - Escaped identifiers only when unavoidable: identifiers (table/column names) cannot be parameterized like values, so you must whitelist them.
// Safe dynamic ordering via whitelist
const allowedSort = { createdAt: 'created_at', name: 'name' };
const sortKey = allowedSort[req.query.sort] ? allowedSort[req.query.sort] : 'created_at';
const dir = req.query.dir === 'desc' ? 'DESC' : 'ASC';

const sql = `SELECT * FROM users WHERE status = $1 ORDER BY ${sortKey} ${dir}`;
const rows = await db.query(sql, [req.query.status]);
Notice what is not parameterized: sortKey and dir are controlled by whitelists, so they can’t become injected syntax.
Mind Map: Injection Defense Workflow
Advanced Details: Where Injection Hides
Injection often survives because the dangerous step is one layer removed.
- ORM “raw” escapes: methods that accept raw fragments can reintroduce injection if you pass user input.
- Template rendering: if you render templates with user-controlled expressions, you can trigger template injection.
- JSON query languages: some NoSQL drivers accept query objects; if you allow user input to directly shape operators, you can create query logic injection.
A practical rule: if user input can influence the shape of the query language, you must sanitize the shape via whitelists and mapping.
Example: Safe vs Unsafe Filter Handling
Unsafe approach: accept filterSql and run it.
Safe approach: accept field, op, and value, then map to a fixed template.
type Filter = { field: 'status' | 'role'; op: 'eq' | 'ne'; value: string };

const fieldMap = { status: 'status', role: 'role' };
const opMap = { eq: '=', ne: '!=' };

function buildWhere(f: Filter) {
  const col = fieldMap[f.field];
  const op = opMap[f.op];
  return { clause: `${col} ${op} $1`, params: [f.value] };
}
This keeps the query language under your control while still letting users filter.
Testing for Confidence
Write tests that prove the boundary holds.
- SQL payload tests: include quotes, comment markers, and tautologies as input values.
- Identifier tests: attempt to inject into
sortorfieldparameters and confirm the whitelist rejects or defaults. - Operator-shape tests: for structured filters, ensure unknown operators never reach the query builder.
When tests fail, the failure should point to the boundary: either a value was concatenated into structure, or a shape was not whitelisted.
Summary of the System
Prevent injection by enforcing three layers: parameterize values, whitelist any query structure elements, and validate input types and formats. If you do those consistently, even clever payloads remain boring data—exactly what you want.
9.3 Handling Secrets and Credentials Safely in Tooling
Secrets show up in tooling in three common places: environment variables, configuration files, and API calls made by agents. The goal is not to “hide” secrets perfectly; it’s to prevent accidental disclosure through logs, prompts, artifacts, and overly broad tool access.
Core Principles for Secret Safety
Start with least privilege. If a tool only needs read access to a database, give it a read-only credential and scope it to the smallest dataset possible. Next, treat secrets as data with strict handling rules: they should never be printed, embedded into prompts, or written to generated files. Finally, assume that any string can leak—so you design your tooling to redact and validate at the boundaries.
A practical mental model is “secrets flow through pipes.” Pipes include: the process environment, the agent runtime, the tool wrapper, and the logging layer. If you secure only one pipe, the others will eventually leak something.
Secret Boundaries in an Agent Workflow
Define where secrets are allowed to exist.
- Allowed zones: the tool execution environment and in-memory variables inside a single tool call.
- Forbidden zones: agent prompts, model-visible messages, tool request/response payloads stored as artifacts, and any persistent logs.
To make this concrete, decide that tool wrappers receive a secret handle (like a credential name or token reference) rather than the raw secret. The wrapper resolves the handle inside the execution sandbox.
Redaction and Logging Rules That Actually Work
Logging is where secrets most often escape. Use three layers of defense:
- Structured logging with redaction: redact known secret patterns before they reach the logger.
- Log allowlists: log only safe fields, such as request IDs, endpoint names, and status codes.
- No prompt echoing: never log the full prompt or full tool payload when it contains credentials.
If you must log something for debugging, log a hash or a short fingerprint of the secret value. That lets you correlate runs without exposing the secret.
Credential Storage and Retrieval Patterns
Prefer a secrets manager or OS-level credential store over plain files. When you do need local development support, use a separate credential source for each environment and ensure generated code never hardcodes values.
A reliable pattern is:
- Agent receives intent and credential references.
- Tool wrapper resolves references to raw secrets at runtime.
- Tool wrapper returns results without including credential material.
Tool Access Control for Agents
Agents should not have a universal “run anything” tool. Instead, create narrowly scoped tools with explicit capabilities.
- A “read customer profile” tool should not be able to write orders.
- A “generate report” tool should not have access to production database credentials.
Enforce this in two places: tool definitions and runtime checks. Tool definitions prevent accidental use; runtime checks prevent misconfiguration from turning into a breach.
Example: Safe Tool Wrapper Behavior
The wrapper below demonstrates three rules: resolve secrets internally, never print them, and redact any accidental echoes.
def run_tool_with_secret_ref(secret_ref, request):
    secret = resolve_secret(secret_ref)  # internal only
    try:
        # Do Not Log Secret or Full Request Payload
        result = call_external_api(
            auth_header=f"Bearer {secret}",
            payload=request,
        )
        return result
    finally:
        secret = None  # reduce lifetime in memory
If your logging layer might still capture headers, add a redaction filter that removes Authorization and any token-like fields before persistence.
Mind Map: Secret Handling in Tooling
Verification Checklist for Teams
Before you trust a workflow, verify it with tests and reviews that target leakage paths.
- Redaction tests: feed a fake token through the tool wrapper and assert logs contain no token substrings.
- Artifact checks: ensure generated files and stored tool transcripts exclude credential fields.
- Schema validation: require tool payload schemas to mark credential fields as “non-serializable” so they cannot be persisted.
When these checks pass, you’ve reduced the chance that a credential survives long enough to escape its intended boundary. That’s the whole job: keep secrets where they belong, and make it hard for them to wander.
9.4 Validating Authorization and Authentication Logic
Authorization and authentication are easiest to get wrong in the same way: code looks reasonable, but the system’s real decision points aren’t tested. Validation means you prove two things: (1) the caller is who they claim to be, and (2) the system grants only the actions they’re allowed to take.
Authentication Validation
Start with the smallest unit: the identity proof. If you use tokens, validate them in a strict order.
- Presence and format: reject missing headers and malformed tokens before any parsing side effects.
- Signature and issuer: verify the cryptographic signature and expected issuer/audience so a token from another system can’t be replayed.
- Time validity: check expiration and, if you use it, not-before. A common bug is accepting expired tokens because the check is buried behind a “decode succeeded” branch.
- Subject mapping: convert the token subject into an internal user identifier and ensure the user exists and is active.
- Session state checks: if you support revocation or password changes, confirm the token still matches current state.
A practical example is a middleware that returns the same error shape for all auth failures, while logging the specific reason internally.
function requireAuth(req, res, next) {
  const token = extractBearer(req.headers);
  if (!token) return res.status(401).json({ error: "unauthorized" });

  const claims = verifyToken(token, {
    issuer: "my-issuer",
    audience: "my-api",
    clockToleranceSeconds: 10,
  });
  if (!claims) return res.status(401).json({ error: "unauthorized" });

  const user = findUserById(claims.sub);
  if (!user || !user.active) return res.status(401).json({ error: "unauthorized" });

  req.auth = { userId: user.id, roles: user.roles };
  next();
}
Validation here is not “it compiles.” It’s “every failure mode returns 401 and never reaches protected handlers.”
Authorization Validation
Authorization is a decision, not a vibe. You validate it by making the policy explicit and testing it against concrete resource scenarios.
- Define the policy inputs: actor identity, action, and resource. If you omit any one, you’ll end up with accidental broad access.
- Choose a policy model: role-based checks are fine for coarse permissions; object-level checks require resource ownership or attributes.
- Enforce at the boundary: check authorization before you fetch sensitive data when possible, and always before you return it.
- Prevent confused deputy behavior: never let a client supply the “resource owner” field that your authorization logic trusts.
- Fail closed: unknown roles, missing attributes, or policy errors should deny by default.
A clean pattern is a single authorization function that takes action and resource identifiers derived from the server, not the client.
function can(actor, action, resource) {
  if (!actor) return false;
  if (actor.roles.includes("admin")) return true;

  if (action === "read:project") {
    return resource.ownerId === actor.userId;
  }

  if (action === "update:project") {
    return resource.ownerId === actor.userId && resource.status === "active";
  }

  return false;
}
Then validate the boundary in the handler: load only what you need to decide, or decide using a minimal lookup.
Mind Map: Authentication and Authorization Validation
Integrated Testing Approach
Validation becomes reliable when tests mirror the decision points.
- Authentication tests: missing token, malformed token, wrong issuer, expired token, and token for a disabled user. Each should produce 401 and never call the handler.
- Authorization tests: same user, different resource owner; different action; and resources in different states (like inactive projects). Each should produce 403 when authenticated but not allowed.
- Endpoint tests: verify that the response body never includes sensitive fields for unauthorized requests, even if the handler would otherwise serialize them.
A small but effective rule: every authorization check should have at least one “allowed” test and one “denied” test that differs by exactly one input (action, owner, or resource state). That keeps failures interpretable.
Common Validation Gaps
- Trusting client-provided ownership: if the client sends
ownerId, authorization must ignore it and use server-derived ownership. - Inconsistent checks across endpoints: one route uses
can()and another uses a different ad hoc condition. Consolidate policy logic. - Leaky error handling: returning 404 for unauthorized resources can hide enumeration, but it can also mask authorization bugs. Pick a consistent approach and test it.
Validation is the boring part that saves you from the exciting part. When authentication and authorization are tested at the exact boundaries where decisions are made, the rest of the code can stay focused on business logic.
9.5 Auditing Logging and Data Handling for Privacy Compliance
Privacy compliance starts with a simple question: what personal data do you record, where does it go, and who can see it. Logging is often the biggest “accidental data collector,” because it’s convenient to print variables when debugging. The fix is not to log less everywhere; it’s to log with intent, structure, and reviewable rules.
Privacy Logging Foundations
Begin by classifying data you might log:
- Personal data: identifiers like email, user IDs tied to individuals, IP addresses, device IDs.
- Sensitive data: credentials, payment details, health info, precise location.
- Non-personal data: aggregate counts, feature flags, internal error codes.
Then define a logging policy with three constraints:
- Purpose limitation: each log field must support a specific operational need (debugging, incident response, audit trail).
- Data minimization: avoid raw values when a derived or hashed form is enough.
- Retention control: logs should expire on a schedule consistent with their purpose.
A practical rule: if a value is not needed to answer a question during incident response, don’t log it. If you do need it, consider whether you can log a stable surrogate instead.
Designing Audit Logs That Answer Real Questions
Audit logs differ from application logs. Audit logs record security-relevant events and administrative actions, such as:
- user sign-in and sign-out
- permission changes
- access to exported data
- administrative configuration updates
For each audit event, capture:
- who (user ID or actor ID)
- what (action type)
- when (timestamp)
- where (resource or tenant)
- outcome (success or failure)
- evidence (request ID, correlation ID)
Avoid logging full request bodies in audit logs. If you must include context, store references like request_id and keep the payload out of the audit stream.
Example: instead of logging "email": "[email protected]" in an audit record, log "actor_user_id": "u_1842" and keep email out of the audit log entirely.
Data Handling Rules for Log Content
Use a field-by-field approach:
- Identifiers: log IDs, not raw emails or phone numbers.
- Secrets: never log tokens, passwords, API keys, or session cookies.
- Free text: sanitize or truncate; treat it as untrusted input.
- Errors: log error codes and safe summaries; keep stack traces behind access controls when they might include sensitive values.
A useful technique is “structured logging with redaction.” Redaction applies before the log line is emitted.
function logEvent(eventType, fields):
  redacted = {}
  for (k, v) in fields:
    if k in ["password", "token", "authorization", "ssn", "card_number"]:
      redacted[k] = "[REDACTED]"
    else if k in ["email", "phone"]:
      redacted[k] = hashStable(v)
    else:
      redacted[k] = v
  writeStructuredLog({"type": eventType, **redacted})
Access Controls and Operational Boundaries
Privacy compliance fails when logs are readable by the wrong people. Apply layered controls:
- Role-based access to log storage and dashboards.
- Separate environments so test logs don’t mix with production.
- Least privilege for services that write logs.
- Immutable audit storage for audit logs to preserve integrity.
Also define operational boundaries:
- who can run ad-hoc queries over logs
- how long ad-hoc exports can live
- how incident responders access sensitive fields
Mind Map: Privacy Compliance for Logging and Data Handling
Verification and Ongoing Checks
Compliance isn’t a one-time setup. Build verification into the workflow:
- Schema review: require a log schema for each event type.
- Redaction tests: unit tests that confirm sensitive fields are removed or transformed.
- Retention checks: automated jobs that verify log deletion policies.
- Sampling audits: periodic checks that audit logs contain required fields and no forbidden fields.
Example test cases:
- A request containing
authorization: Bearer ...must produce a log line withauthorizationset to"[REDACTED]". - An audit event for “export data” must include
actor_user_id,resource_id,outcome, andrequest_id.
Example: End-to-End Logging for a Data Export
When a user exports their data, the system should:
- Write an audit log with actor ID, resource ID, outcome, and correlation IDs.
- Write application logs with operational details that exclude exported content.
- Store the export file separately with access controls, and log only a reference ID.
If an export fails, include a safe error code and the correlation ID so support can trace the issue without exposing the payload. This keeps the audit trail useful while preventing logs from becoming a second copy of personal data.
10. Observability and Debugging for Autonomous Development
10.1 Instrumenting Applications with Traces and Metrics
Instrumentation is how you turn “something went wrong” into “here is what happened, where, and why it likely happened.” Traces show the path of a request across services and time; metrics summarize behavior over many requests. Used together, they let you debug quickly without staring at logs like they’re a novel.
Core Concepts and What Each Signal Answers
Traces answer: “What path did this specific request take?” A trace is a tree of spans, where each span represents a timed unit of work (HTTP handler, database query, queue publish).
Metrics answer: “How is the system behaving overall?” Metrics are numbers over time: request rate, error rate, latency percentiles, queue depth, and resource usage.
Logs answer: “What exactly did the system say at that moment?” Logs are still useful, but traces and metrics tell you where to look first.
A practical rule: instrument the boundaries (incoming requests, outgoing calls, and background jobs) and the expensive or failure-prone operations (database access, external APIs, serialization).
Designing Trace Coverage That Matches Real Work
Start with the request entry points: HTTP endpoints, message consumers, scheduled jobs. Ensure each entry point creates or continues a trace context. Then propagate that context through:
- Outgoing HTTP calls and RPC calls
- Database queries
- Queue or stream messages
If you miss propagation, you’ll get partial traces that look like they were written by someone who stopped mid-sentence.
Example: Correlation IDs and Span Naming
Use a stable correlation identifier for humans and a trace context for systems. Span names should be consistent and low-cardinality.
HTTP GET /orders -> span name: http.server GET /orders
DB query -> span name: db.query SELECT orders by id
Queue publish -> span name: mq.publish orders.created
Avoid putting raw user IDs or full SQL strings into span names. Keep labels (attributes) for filtering, but also keep them bounded.
Metrics That Support Debugging, Not Just Dashboards
Metrics should map to decisions you’ll actually make during incidents.
Latency: track p50, p95, p99 for request duration and for key downstream calls. If only p99 exists, you’ll miss early warning.
Errors: track error rate by endpoint and by error type (timeout, validation, upstream 5xx). “Errors” without breakdown is like saying “the car is broken.”
Saturation: track CPU, memory, thread pool queue length, and database connection pool utilization. When latency rises, saturation tells you whether it’s capacity or contention.
Work queues: track queue depth and processing lag for background jobs. If queue depth grows while processing time stays flat, you have throughput mismatch.
Mind Map: Instrumentation Plan
Sampling and Cardinality Controls
Tracing every request can be expensive. Sampling reduces cost, but it must preserve debuggability. A common approach is:
- Sample a fixed percentage for normal traffic
- Always sample traces for errors and timeouts
Metrics also need cardinality discipline. High-cardinality labels (like user_id, session_id, or raw URLs with IDs) explode storage and slow queries. Prefer grouping by stable dimensions: endpoint template, service name, and error category.
Turning Signals into Actionable Alerts
Alerts should be tied to a specific symptom and a likely cause. For example:
- If p95 latency rises and error rate stays flat, suspect downstream slowness or lock contention.
- If error rate rises with timeouts, suspect network, upstream availability, or thread pool exhaustion.
- If queue depth rises while processing time rises, suspect downstream dependencies or database contention.
Use traces to confirm the hypothesis: filter by the time window, then inspect spans for the slowest or failing components.
Example: Minimal Instrumentation Checklist
A small checklist prevents “we instrumented everything” from turning into “we instrumented nothing useful.”
- Create a trace at each entry point
- Propagate context through outgoing calls and messages
- Add spans around database and external API calls
- Emit metrics for request duration, error rate, and saturation
- Add queue depth and processing lag for background work
- Enforce low-cardinality attributes and safe sampling
When this is in place, debugging becomes a sequence: observe metrics, narrow with traces, then use logs for the exact message and payload details.
10.2 Capturing Reproducible Debug Context for Agent Runs
Reproducible debug context is the difference between “it failed” and “we can fix it.” For agent runs, reproducibility means you can replay the same intent, tools, inputs, and environment signals, then observe the same failure surface. The goal is not perfect determinism; it is controlled enough that a second run produces the same class of behavior.
What to Capture First
Start with the smallest set that explains outcomes.
- Intent and acceptance criteria: the exact text the agent was asked to satisfy.
- Task graph and step order: which steps ran, in what sequence, and which were skipped.
- Tool calls: command names, endpoints, parameters, and returned status codes.
- Inputs and artifacts: files read, files written, and any generated intermediate outputs.
- Environment signals: runtime versions, OS details, feature flags, and relevant config.
- Model and decoding settings: model identifier plus temperature/top-p and any safety or policy toggles.
- Timing and resource hints: timeouts, retry counts, and whether partial results were used.
A practical rule: if you cannot answer “what exactly did it see and do?” you have not captured enough.
Mind Map: Reproducible Debug Context
How to Structure a Debug Bundle
Treat the debug bundle like a build artifact. It should be self-contained, readable, and stable in naming.
Recommended Bundle Layout
run.json: intent, model settings, step graph, and summary.trace.log: chronological events with timestamps and correlation IDs.tools/: one file per tool call containing request and response metadata.artifacts/: snapshots or hashes of inputs and outputs.env.json: versions, config, and feature flags.validation/: test results, lint outputs, and schema checks.
When storage is tight, store hashes for large files and keep the exact content for small config and prompts.
Capturing Tool Calls Without Losing Meaning
Tool calls are where most “cannot reproduce” bugs hide. Record both the request and the response metadata, including error bodies when safe.
Example: a failing database migration often depends on the exact SQL, schema state, and migration tool version.
{
  "tool": "db.migrate",
  "request": {
    "migration": "2026_03_01_add_index.sql",
    "transaction": true
  },
  "response": {
    "status": "error",
    "exitCode": 1,
    "stderr": "relation \"users\" does not exist"
  },
  "context": {
    "dbVersion": "15.4",
    "schema": "public"
  }
}
If the tool call depends on external state, capture the state identifier too, such as a database snapshot ID or a schema version number.
Capturing Decisions and Branches
Agents often fail because a branch was taken under a mistaken assumption. Log the decision inputs, not just the final choice.
- The condition that triggered the branch.
- The evidence the agent used, such as a file snippet or a tool result.
- The chosen action and its parameters.
This turns “it chose the wrong thing” into “it chose based on X, but X was missing.”
Replay: Make It Possible to Run Again
Replay does not mean rerunning everything blindly. It means rerunning the same harness with the same captured inputs.
- Freeze inputs: use the captured prompt and artifact snapshots.
- Stub or record tools: either replay recorded tool responses or run tools in a controlled environment.
- Use the same validation harness: tests and linters must be the same commands with the same config.
If you cannot stub a tool, at least capture enough metadata to recreate the environment state.
Mind Map: Failure Surface Mapping
Example: A Minimal Repro Workflow
Suppose an agent generates code that fails a unit test. Your triage should narrow the problem quickly.
- Compare
validation/results across runs to confirm the failing test name and assertion. - Identify the step that produced the file containing the failing function.
- Extract the tool calls and inputs used for that step.
- Re-run only the generation step using the captured intent and artifacts, then run the same test command.
If the failure persists, the bug is in the generation logic or assumptions. If it disappears, the missing piece is usually an environment signal or an unstubbed tool dependency.
Common Gaps That Break Reproducibility
- Logging only the final error without the tool request.
- Capturing prompts but not the exact acceptance criteria.
- Recording environment versions but not config flags.
- Storing generated files without the intermediate artifacts that influenced them.
- Running tests with different commands or different working directories.
A good debug bundle makes these gaps obvious, because each missing field corresponds to a question you can no longer answer.
Practical Checklist
Before you close a failing run, verify you have: intent text, step order, tool request/response metadata, artifact snapshots or hashes, environment versions and flags, model settings, and the exact validation outputs. If you can answer “what did it see and do?” you can usually fix it without guessing.
10.3 Diagnosing Failures Across Generated Layers
When generated code fails, the fastest path to a fix is to treat the system as a stack of layers, each with its own failure modes. A good diagnosis starts by locating the first observable mismatch between intent, behavior, and assumptions—then working downward (inputs) and upward (outputs) until the root cause becomes obvious.
Start with the Failure Surface
First, classify the failure by where it becomes visible:
- Build-time: compilation errors, missing imports, type mismatches.
- Test-time: assertion failures, flaky tests, contract violations.
- Run-time: exceptions, timeouts, incorrect status codes.
- Behavior-time: “works” but returns wrong data, violates invariants, or breaks a workflow.
A practical trick: write down the smallest reproduction input and the exact expected vs actual outcome. If you cannot state both precisely, you are still debugging the spec, not the code.
Trace the Layer Boundaries
Generated systems usually include these layers:
- Interface layer: request/response schemas, routing, serialization.
- Domain layer: entities, invariants, business rules.
- Application layer: orchestration, use cases, transactions.
- Infrastructure layer: database queries, external calls, caching.
Failures often originate at a boundary. For example, a domain invariant might be correct, but the interface layer might map fields incorrectly, causing the invariant to fail later with a confusing error.
Mind Map: Failure Localization
Use Boundary Checks Instead of Guessing
Add small, targeted checks at each boundary. You do not need full observability to start; you need clarity.
Example: Interface mapping bug
Suppose an endpoint accepts userId but the generated code reads id. The domain layer then loads the wrong user and fails an invariant.
A boundary check at the interface layer should log the parsed request fields and the computed domain key before any database call.
Request parsed: { userId: "u-123" }
Domain key computed: "u-999"  <-- mismatch
DB query: getUserById("u-999")
Once you see the mismatch, you fix the mapping, not the domain rule.
Example: Transaction Semantics Mismatch
A common generated failure is “it passes tests but breaks under load.” The root cause is often a transaction boundary issue: the application layer assumes atomicity that the infrastructure layer does not provide.
Symptom: two concurrent requests both create a record that should be unique.
Diagnosis steps:
- Confirm the uniqueness rule exists at the domain level.
- Confirm the database constraint exists at the infrastructure level.
- Check whether the use case wraps the read-modify-write in a transaction.
- Verify error handling: does the code treat constraint violations as expected outcomes or as fatal errors?
If the domain invariant is correct but the database lacks a constraint, you will see race conditions. Fix by adding the constraint and adjusting the use case to handle the resulting error deterministically.
Advanced Details: Error Shape and Contract Drift
Generated code often fails because error shapes changed between layers. For instance, the interface layer might expect { message, code }, while the application layer returns { error, details }. The result is a “successful” HTTP response with an unusable body, or a generic 500 that hides the real issue.
A systematic approach:
- Normalize errors at the application boundary into a stable contract.
- Ensure tests assert the error contract, not just the status code.
- When regenerating, compare the previous and new contract payloads for the failing path.
A Minimal Triage Workflow
- Capture the first failing artifact: compiler error, failing test name, stack trace, or incorrect response.
- Identify the layer boundary nearest to that artifact.
- Add or inspect boundary logs for the failing request path.
- Confirm contract alignment: request schema, domain mapping, and error payload.
- Fix the smallest unit that removes the mismatch.
- Re-run only the relevant tests first, then the full suite.
Case Study: From Stack Trace to Root Cause
A generated endpoint returns 500. The stack trace points to a domain method, but the domain method is only where the symptom appears.
- Boundary log shows
amountis parsed as a string and passed through without conversion. - The domain invariant expects a numeric type and throws.
- The interface layer should coerce
amountto a number and reject invalid formats.
Fixing the interface coercion resolves the domain exception without changing domain logic, and the test suite gains a new case that asserts invalid amount yields a clear 400 with the correct error payload.
Checklist for “Generated Failures”
- Did you compare expected vs actual at the boundary closest to the symptom?
- Did you verify mapping correctness before blaming domain rules?
- Did you confirm transaction and uniqueness semantics in the infrastructure layer?
- Did you assert error payload contracts in tests?
- Did you regenerate only the affected layer to avoid accidental regressions?
10.4 Using Logs and Test Reports to Guide Rewrites
Using Logs and Test Reports to Guide Rewrites
Logs and test reports are the fastest way to turn “the agent changed something” into “we know exactly what to change next.” The trick is to treat them as two coordinated instruments: tests tell you what behavior is wrong, while logs tell you where the system got confused.
Start by deciding what “good evidence” looks like. A useful test failure includes the failing assertion, the input that triggered it, and the call path that reached the assertion. A useful log entry includes a correlation identifier, the component name, and the key state that influenced the decision. If either side is missing, rewrites become guesswork.
Foundational Workflow for Evidence First Rewrites
-
Triage the failure type
- If tests fail at compile or type-check time, the rewrite is usually about interfaces and contracts.
- If unit tests fail, the rewrite targets logic and edge cases.
- If integration tests fail, the rewrite targets wiring, configuration, and data flow.
-
Locate the first divergence Compare the expected behavior to the observed behavior at the earliest point where they differ. Logs help you find that point by showing state transitions, not just errors.
-
Constrain the rewrite Rewrite only the smallest unit that can explain the failure. If multiple tests fail, prioritize the one that fails earliest in the execution path.
-
Re-run with targeted visibility After a rewrite, re-run the same test set. If it passes, you still validate that related tests remain stable.
Mind Map: Evidence Signals and Rewrite Targets
Example: Using Logs to Explain a Unit Test Failure
Suppose a unit test expects a function to reject invalid email formats, but it currently accepts them.
- Test report shows:
expected rejection, got success. - Log snippet (conceptually) shows: the validator receives a normalized string, but the normalization step strips characters that the validator relies on.
A rewrite should therefore adjust normalization or the validator’s input contract, not add more logging or change unrelated business rules.
Here’s a compact pattern for log entries that make this diagnosis possible:
[requestId=R-1842] handler=Signup received email="[email protected]"
[requestId=R-1842] service=Signup normalized email="[email protected]"
[requestId=R-1842] service=Signup validationResult=pass
If the test expects + to be preserved, the rewrite is to stop removing it during normalization.
Example: Using Test Reports to Guide Integration Rewrites
Imagine an integration test fails with a 401 response, but unit tests for authentication pass.
- Test report indicates the failure occurs in the request pipeline.
- Logs show that the authorization middleware runs, but it reads an empty principal from the request context.
The rewrite target is wiring: the authentication handler likely stores the principal under a different key than the authorization middleware expects. Fixing that contract restores behavior without touching the core auth logic.
Advanced Details That Prevent Rewrite Loops
- Match log granularity to decision points: log before and after each branch decision, not only on errors.
- Use consistent identifiers: every test run should produce logs that can be grouped by request or job.
- Treat timeouts as evidence, not noise: a timeout log should include which dependency stalled and what input triggered it.
- Avoid “log-driven refactors”: if logs show the system is already making the correct decision, the failure is probably earlier (input parsing) or later (response mapping).
Mind Map: Common Failure Shapes and Rewrite Moves
Practical Rewrite Checklist for This Section
- Identify the earliest failing test and its input.
- Find the first log entry where observed state diverges from expected state.
- Rewrite the smallest unit that can explain the divergence.
- Re-run the same failing tests and confirm adjacent tests remain stable.
- Ensure the new logs still support the next diagnosis, not just the current one.
10.5 Building Runbooks for Common Agent Failure Modes
Runbooks are short, repeatable procedures that help a team respond consistently when an agent run goes sideways. The goal is not to “fix the agent”; it is to restore correct behavior by narrowing the cause: wrong intent, wrong assumptions, wrong tools, or wrong outputs. A good runbook answers four questions quickly: What failed? Where did it fail? What evidence do we trust? What do we do next?
Failure Mode Mindset
Treat each failure as a hypothesis with a verification step. Start with the most observable signals—logs, tool calls, diffs, and test results—then move to deeper causes like missing constraints or unstable abstractions. This keeps troubleshooting from turning into guesswork.
Mind Map: Common Agent Failure Modes
Runbook Template That Works Under Pressure
Use the same structure for every failure mode:
- Trigger: the exact condition that starts the runbook (e.g., “tests fail in CI after agent regeneration”).
- Stop Conditions: when to halt further agent attempts (e.g., “security policy violation detected”).
- Evidence to Collect: what to paste into the incident note (prompt, tool trace, diff, failing test output).
- Likely Causes: 3–5 hypotheses tied to evidence.
- Step-by-Step Recovery: deterministic actions in order.
- Prevention Update: what spec, contract, or guardrail to change.
Example: Output Format Drift
Trigger: the agent returns code that does not match the expected file layout or schema.
Evidence to Collect: the last structured instruction, the generated artifact list, and the diff against the expected paths.
Likely Causes:
- The output format constraints were not explicit enough.
- The agent did not see the “source of truth” for file names.
- A tool wrapper accepted the output but did not validate structure.
Recovery Steps:
- Stop regeneration and run a local validator that checks file paths and required exports.
- Re-run the agent with a minimal prompt that includes only: acceptance criteria, target file list, and the output schema.
- If the validator fails again, patch the tool wrapper to enforce structure before writing files.
- Update the runbook’s “output contract” section so future runs include the file manifest.
Example: Tool Misuse and Contract Mismatch
Trigger: tool calls succeed but produce incorrect results (e.g., wrong endpoint path, wrong query parameters, or malformed command flags).
Evidence to Collect: tool call trace, request/response payloads, and the mapping from intent to tool arguments.
Likely Causes:
- The agent misunderstood the tool’s contract.
- The tool wrapper lacks argument validation.
- The abstraction layer hides important details.
Recovery Steps:
- Reproduce the tool call with a fixed set of arguments from the trace.
- Add or tighten argument validation in the wrapper (types, required fields, allowed ranges).
- Regenerate only the argument-building layer, not the whole feature.
- Update the spec with a concrete example of the correct tool call.
Example: Infinite Loop or Long Run
Trigger: the agent keeps iterating without reducing the error count or without changing the plan.
Evidence to Collect: iteration log, number of tool calls, and whether diffs or test outcomes improved.
Likely Causes:
- Missing stop conditions.
- Feedback loop not grounded in measurable criteria.
- State not persisted, causing repeated work.
Recovery Steps:
- Enforce a hard cap: max iterations and max tool calls.
- Require a measurable progress check each iteration (e.g., “failing test count decreased” or “diff changed at least one target file”).
- If progress is flat, switch to targeted regeneration: one module at a time with a single acceptance criterion.
- Fix state persistence so the agent can reference prior decisions.
Example: Security or Policy Violation
Trigger: the run attempts disallowed actions, accesses restricted data, or generates unsafe code patterns.
Stop Conditions: immediately halt further agent attempts for that run.
Evidence to Collect: policy violation message, tool trace, and the exact generated snippet or request.
Recovery Steps:
- Remove the offending tool capability or scope for the run.
- Patch the guardrail that failed (input filtering, authorization checks, or code scanning rules).
- Regenerate with a reduced capability set and explicit constraints about allowed operations.
- Update the runbook with the specific policy rule and the minimal safe example.
Mind Map: Evidence First, Then Action
Practical Runbook Cadence
After recovery, write a short “prevention update” that changes one thing: a schema, a validator, a wrapper contract, a checklist item, or a stop condition. If the runbook only documents what happened, it will be useful once. If it changes the system, it will help every future run.
Quick Reference Checklist
- Did we stop when we should?
- Did we collect prompt, tool trace, diff, and failing outputs?
- Did we regenerate only the smallest responsible layer?
- Did we add a guardrail so the same failure cannot recur silently?
11. Practical End to End Projects with Agent Driven Iteration
11.1 Project Setup From Intent to Repository Structure
A good agent-driven workflow starts before any code exists. You’re not just creating a repo; you’re creating a place where intent can be translated into artifacts without losing meaning. The goal of this section is to set up a repository structure that matches how you’ll generate, test, and review code.
Start with Intent Artifacts
Begin by writing three small documents that the agent can treat as inputs.
- Intent statement: one paragraph describing the feature and the user outcome.
- Acceptance criteria: bullet list of observable behaviors.
- Nonfunctional constraints: performance, security, logging, and operational expectations.
Example intent (short on purpose): “Users can create and manage tasks. The system must validate input, prevent unauthorized access, and expose a stable API for clients.”
When these are explicit, the agent can generate the right files the first time instead of improvising.
Choose a Repository Shape That Mirrors Work
A repository should separate concerns so generated changes stay localized. A common layout for a web service looks like this:
docs/for intent, decisions, and acceptance criteria snapshotssrc/for application codetests/for unit and integration testsinfra/for deployment and environment wiringscripts/for repeatable commandstools/for agent helpers like codegen runners
Why this matters: when the agent proposes changes, you can route them to the correct folder and run the correct checks without hunting.
Define Contracts Before Implementations
Before generating endpoints or UI, define the contracts the code must satisfy.
- Data contracts: request/response shapes and validation rules
- Behavior contracts: error codes, pagination rules, idempotency expectations
- Interface contracts: module boundaries and function signatures
A practical trick: create a docs/contracts/ folder and store JSON examples that match acceptance criteria. The agent can use these examples to generate models, validators, and tests with fewer surprises.
Mind Map: Repository Setup from Intent
Map Agent Outputs to Folders
Agents should produce artifacts that land in predictable places. Create a simple mapping so every generated item has a home.
- Generated models and validators go to
src/domain/. - Generated business logic goes to
src/application/. - Generated database or external integrations go to
src/infrastructure/. - Generated endpoints and request routing go to
src/api/. - Generated tests go to
tests/unit/ortests/integration/.
This prevents the common failure mode where code “works” but is scattered across the repo, making review and reruns painful.
Add Quality Gates Early
Quality gates are part of setup, not an afterthought. Add scripts that the agent can run after generating code.
scripts/test.shruns unit tests.scripts/integration.shruns integration tests.scripts/lint.shruns formatting and static checks.
Example command set (keep it small so it’s reliable):
# scripts/lint.sh
set -euo pipefail
# Run Formatter + Linter
# e.g., npm run lint or cargo fmt --check
Then:
# scripts/test.sh
set -euo pipefail
# Run Unit Tests
# e.g., pytest -q or go test ./...
The agent can use these as “stop signs” when output doesn’t meet basic expectations.
Create a Generation Checklist That Matches the Structure
Put a checklist in docs/intent/ so each feature slice has a consistent setup.
Checklist items:
- Acceptance criteria copied into
docs/intent/<feature>/criteria.md. - Contracts examples stored in
docs/contracts/<feature>/. - New code placed in the correct
src/subfolder. - Unit tests added for domain and application logic.
- Integration tests added for API behavior.
- Quality gate scripts pass.
Use a dated snapshot for traceability. For example, store the initial criteria snapshot as 2026-02-xx-style naming (pick a real date you already use in your team process).
Mind Map: Generation Workflow Mapping
Keep the First Slice Small and Honest
For the first feature slice, aim for one vertical path: create the core data model, expose one endpoint, and verify it end to end. This keeps the repository structure honest because every folder you created gets exercised.
When the slice is complete, you should be able to answer two questions quickly: “Where did the agent put the code?” and “Which checks confirm it matches the intent?” If you can’t, adjust the structure now, not after the repo grows teeth.
11.2 Implementing a Feature Slice with Contracts and Tests
A feature slice is a small vertical slice that goes from intent to working behavior: you define the contract, generate the implementation, and lock it down with tests. The key is to keep the slice narrow enough to finish, but complete enough that it proves the workflow.
Feature Slice Goal and Boundaries
Start by writing a single-sentence intent and a list of “in scope” and “out of scope” items. For example, “Create an endpoint that returns a user’s profile summary” is clearer than “Handle user profiles.” Out of scope might include editing profiles, avatar uploads, or admin views.
A good slice has three properties:
- One user-visible outcome.
- One or two data flows.
- One stable contract that tests can assert.
Contracts That Make Code Generation Boring
Contracts are the antidote to agent drift. Define them as artifacts the agent must follow, not suggestions.
Contract Types
- API Contract: request/response shape, status codes, and error format.
- Domain Contract: invariants and mapping rules between domain objects and API DTOs.
- Tooling Contract: how files are named, where code lives, and what commands run tests.
Example Contract
Assume a feature: “Get profile summary.”
- Request:
GET /api/users/{userId}/profile-summary - Success:
200with{ userId, displayName, plan, lastActiveAt } - Not Found:
404with{ errorCode, message } - Invariant:
lastActiveAtis an ISO-8601 string, never null.
Mind Map: Slice Components and Flow
Systematic Implementation Steps
Step 1: Generate the Contract First
Create a small “contract file” in your repo, such as contracts/profile-summary.json, containing the response schema and error schema. Even if the agent writes code, it should still be forced to align with this file.
Step 2: Implement the Domain Mapping
Write a unit-tested function that converts a data record into the API DTO while enforcing invariants.
// profileSummaryMapper.ts
export function mapToProfileSummary(record: any) {
  if (!record) throw new Error('missing record');
  const lastActive = record.lastActiveAt;
  if (!lastActive) throw new Error('lastActiveAt required');

  return {
    userId: String(record.userId),
    displayName: String(record.displayName),
    plan: String(record.plan),
    lastActiveAt: new Date(lastActive).toISOString(),
  };
}
Step 3: Implement the Service Layer
The service should be thin but explicit: fetch data, call the mapper, and translate “not found” into a domain-level signal.
// profileSummaryService.ts
import { mapToProfileSummary } from './profileSummaryMapper';

export async function getProfileSummaryByUserId(repo: any, userId: string) {
  const record = await repo.findUserById(userId);
  if (!record) return { kind: 'not_found' as const };
  const dto = mapToProfileSummary(record);
  return { kind: 'ok' as const, dto };
}
Step 4: Implement the API Endpoint
The API layer should only translate service results into HTTP responses that match the contract.
// profileSummaryRoute.ts
export async function profileSummaryHandler(req: any, res: any, service: any) {
  const userId = req.params.userId;
  const result = await service.getProfileSummaryByUserId(userId);

  if (result.kind === 'not_found') {
    return res.status(404).json({
      errorCode: 'USER_NOT_FOUND',
      message: 'User does not exist',
    });
  }

  return res.status(200).json(result.dto);
}
Tests That Prove the Slice Works
Write tests in layers so failures point to the right place.
Unit Tests for Invariants
- When
lastActiveAtis missing, the mapper throws. - When
lastActiveAtis present, output is ISO-8601.
Integration Tests for Endpoint Behavior
GETreturns200and matches the response shape.GETfor unknown user returns404with the exact error keys.
Contract Tests for Schema Stability
Add a test that validates the response JSON keys and types. This prevents “almost right” outputs that break clients.
Feedback Loop Without Chaos
After each implementation step, run the relevant tests. If the agent produces code that compiles but violates the contract, fix the contract mismatch first, then refactor. The slice is complete when:
- All tests pass.
- The endpoint response matches the contract.
- The invariants are enforced by unit tests, not by hope.
This approach keeps the slice small, the behavior verifiable, and the generated code aligned with intent rather than vibes.
11.3 Iterating on Bugs with Targeted Regeneration
Targeted regeneration means you regenerate only what’s plausibly wrong, using the smallest intent update that fixes the failing behavior. The goal is to avoid the classic “regenerate everything, hope for the best” approach. You’ll get better results by treating each bug as a chain of evidence: failing test → observed behavior → suspected contract break → minimal regeneration scope.
Start with Evidence, Not Guesswork
Begin by pinning the failure to a single reproducible artifact. Prefer a failing unit test over a manual repro, because tests give you a stable target for iteration. When you run the suite, record three things: the exact assertion that fails, the input that triggers it, and the call path in the stack trace.
A practical habit: convert the failure into a short “bug intent” statement. Example: “When createInvoice receives a negative quantity, it must reject with ValidationError and must not write a database row.” This statement becomes the regeneration prompt’s anchor.
Identify the Contract That Broke
Most agent-generated bugs are contract mismatches: a function returns the wrong shape, validation happens in the wrong layer, or an adapter maps fields incorrectly. Use a quick contract checklist:
- Inputs: Are types and constraints enforced at the boundary?
- Outputs: Does the function return the documented result or error type?
- Side effects: Should the database or external calls happen before or after validation?
- Invariants: Are assumptions like “quantity is non-negative” enforced consistently?
If the failing test shows an unexpected side effect, suspect ordering. If it shows a wrong error type or message, suspect mapping and exception handling.
Choose a Minimal Regeneration Scope
Targeted regeneration works best when you regenerate one layer at a time. A useful scope ladder:
- Fix the spec: If the acceptance criteria are wrong or underspecified, update the intent and regenerate only the affected contract.
- Fix the adapter: If data mapping is wrong, regenerate the adapter or mapper, not the domain logic.
- Fix the domain function: If business rules are wrong, regenerate the smallest function that owns the invariant.
- Fix the orchestration: If the workflow calls steps in the wrong order, regenerate the orchestrator or service method.
Regenerating higher layers without fixing lower-layer contracts often produces the same failure with different symptoms.
Mind Map: Bug Iteration Loop
Regenerate with a Tight Intent Update
When you ask the agent to regenerate, include three constraints: preserve public interfaces, keep unrelated behavior unchanged, and regenerate only the chosen scope. Also include the failing test name and the bug intent statement. This reduces “creative interpretation,” which is fun for poems and annoying for code.
Example regeneration instruction (short and concrete):
- “Regenerate only
InvoiceService.createInvoiceand its direct validator. Preserve method signature. Ensure negative quantity triggersValidationErrorbefore any repository call. Update error mapping so the testcreateInvoice_rejects_negative_quantitypasses.”
Verify and Prevent Regression
After regeneration, rerun the full test suite, not just the failing test. If the failing test passes but another fails, treat it as a new evidence set. Often, the new failure reveals a second contract break that the first bug masked.
If tests are sparse, add one targeted test that locks in the corrected behavior, especially around side effects. For example, assert that the repository method was not called when validation fails. That turns “it seems fixed” into “it cannot regress quietly.”
Example: Ordering Bug in Validation
Suppose a test fails because a database row exists even though validation should reject the request.
- Evidence:
createInvoice_rejects_negative_quantityexpectsValidationError, but the repository mock showsinsertInvoicewas called. - Contract Check: side effects happen too early.
- Scope Selection: orchestrator or service method ordering.
- Targeted Regeneration: regenerate only the service method to validate first, then call the repository.
- Verification: rerun tests and add an assertion that
insertInvoiceis never called for invalid input.
Example: Wrong Field Mapping in an Adapter
Suppose an API test fails because the response shows totalAmount as 0 when the input includes line items.
- Evidence: response mismatch, stack trace points to mapper.
- Contract Check: output shape is correct structurally, but values are mapped incorrectly.
- Scope Selection: adapter or mapper.
- Targeted Regeneration: regenerate only the mapping function that computes
totalAmount. - Verification: rerun the API test and the mapper unit test if present.
Targeted regeneration is successful when each iteration reduces uncertainty. You should be able to point to the exact contract you changed, the exact files you regenerated, and the exact test evidence that improved.
11.4 Refactoring Generated Code While Preserving Behavior
Refactoring generated code is mostly about protecting meaning while changing shape. The trick is to treat behavior as a contract: inputs, outputs, side effects, and error handling must remain the same. If you can prove that contract with tests and observability, you can safely improve structure, naming, and boundaries.
Start with a Behavior Baseline
Before touching code, capture what “correct” means. For each function or module you plan to refactor, list:
- Inputs: types, allowed ranges, optional fields.
- Outputs: return values and response payloads.
- Side effects: database writes, network calls, emitted events, logs.
- Failure modes: which errors are thrown or returned, and when.
Then run the existing test suite and record results. If tests are missing, add a thin set that covers the behavior you will preserve. A good first test checks one happy path and one failure path; it’s enough to prevent accidental “helpful” changes.
Refactor in Small, Verifiable Steps
Generated code often has consistent patterns, but also consistent rough edges: long functions, duplicated mapping logic, leaky abstractions, and inconsistent naming. Refactor by making one structural improvement at a time, with tests passing after each step.
A practical sequence:
- Extract pure helpers: move deterministic logic into small functions.
- Introduce named types: replace raw dictionaries and ad-hoc objects.
- Consolidate duplication: unify repeated conversions and validations.
- Tighten interfaces: reduce what callers can misuse.
- Reorganize modules: move code without changing behavior.
Each step should be reversible in your head. If you can’t explain the change in one sentence, it’s too big.
Mind Map: Refactoring Workflow
Example: Extracting a Helper Without Changing Semantics
Suppose generated code builds a response by mixing validation, transformation, and formatting in one function. The refactor goal is to isolate transformation while keeping validation rules identical.
// Before
export function buildUserResponse(input: any) {
  if (!input || !input.id) throw new Error('Missing id');
  const name = input.name ?? 'Unknown';
  const email = input.email?.toLowerCase();
  return { id: input.id, name, email };
}

// After
function normalizeEmail(email: any) {
  return email?.toLowerCase();
}

export function buildUserResponse(input: any) {
  if (!input || !input.id) throw new Error('Missing id');
  const name = input.name ?? 'Unknown';
  const email = normalizeEmail(input.email);
  return { id: input.id, name, email };
}
The behavior-preserving part is the unchanged validation and the unchanged defaulting of name. A test should assert that name becomes Unknown when missing, and that the error message remains Missing id.
Example: Consolidating Validation While Preserving Error Mapping
Generated code sometimes validates fields in multiple places, each with slightly different error messages. Consolidation is safe only if you keep the same error mapping.
A pattern that works:
- Keep the public function’s error behavior unchanged.
- Move shared checks into a helper that returns a structured result.
- Convert that result back into the original error shape.
type ValidationResult =
  | { ok: true }
  | { ok: false; message: string };

function validateCreatePayload(p: any): ValidationResult {
  if (!p?.email) return { ok: false, message: 'Email required' };
  return { ok: true };
}

export function createUser(p: any) {
  const v = validateCreatePayload(p);
  if (!v.ok) throw new Error(v.message);
  // existing creation logic stays the same
}
This keeps the thrown error message identical while removing duplicated checks.
Advanced Details That Commonly Break Behavior
- Ordering changes: refactors that switch from loops to maps can change iteration order. If ordering matters, assert it.
- Default values:
??vs||changes behavior for empty strings and zeros. Preserve the operator. - Error types: tests should check the exact error class or code, not just that “an error happened.”
- Time and randomness: if code uses
Date.now()or random IDs, refactor by injecting a clock or generator so tests remain deterministic. - Database semantics: moving from one query shape to another can change null handling, joins, or pagination boundaries. Verify with integration tests.
Verification Checklist
After each refactor step:
- Tests pass.
- Key logs or emitted events match expectations.
- Response schemas are unchanged.
- Migration scripts are not altered unless you also update tests and fixtures.
Refactoring generated code is less about cleverness and more about discipline: define behavior, change structure in tiny increments, and prove nothing important moved.
11.5 Packaging Deliverables with Documentation and Examples
Packaging is where “it works on my machine” turns into “it works for the next person.” In an agent-driven workflow, you package not only code, but also the intent trail, the assumptions, and the verification steps that prove the code matches the spec.
What to Include in a Deliverable
A complete deliverable usually contains five parts: (1) runnable artifacts, (2) documentation that explains decisions, (3) examples that demonstrate common flows, (4) verification assets like tests and commands, and (5) operational notes for configuration and failure modes.
Start with a minimal runnable target: a single command that builds and runs the system locally. Then add a “how to use” section that maps user goals to endpoints, CLI commands, or UI actions. Finally, include a “how to verify” section that points to the exact test suite and lint/static checks used during generation.
Documentation That Matches How People Actually Work
Good documentation is structured around tasks, not around files. Use three layers.
- Quick Start: prerequisites, one command to run, one command to test, and one command to reproduce a sample scenario.
- Reference: configuration keys, environment variables, API contracts, and error formats.
- Engineering Notes: key invariants, data model decisions, and any constraints that affect correctness.
A practical rule: if a reader can’t answer “what do I run and what should I see” within five minutes, the docs are too abstract.
Examples That Teach Through Execution
Examples should be small, deterministic, and aligned with acceptance criteria. Prefer “happy path plus one edge case.” For each example, include:
- Inputs (request body, CLI args, seed data)
- Expected outputs (status codes, response fields, error messages)
- Verification command (how to run the example and how to confirm it)
Keep examples close to the code they exercise. If the system has multiple layers, show the boundary: e.g., call the public API, not internal functions.
Mind Map: Deliverable Contents and Flow
Mind Map: Documentation Structure That Prevents Confusion

Example: A Minimal Quick Start Template
Use a consistent template so readers don’t hunt for the same facts.

Example: Example-Driven Verification
For each example, include a single verification command that checks both the response and the side effects.
# Example: Create User Then List Users
make example-create-user
make example-list-users
# Expected: List Includes the Created User
Packaging with Traceability Without Overhead
Agents can generate lots of files; packaging keeps them navigable. Include a short “Feature Map” section that ties acceptance criteria to:
- the tests that cover it
- the primary modules involved
- the example(s) that demonstrate it
This prevents the common failure mode where docs describe behavior, but tests don’t actually assert it.
Quality Gates as Part of the Deliverable
Treat verification commands as deliverable content. List the exact commands used during generation, such as formatting, linting, unit tests, and integration tests. If a gate is optional, say so and explain when it’s safe to skip.
A small but effective addition is a “Known Local Setup Issues” section. It should contain only concrete fixes, like missing environment variables or database migrations not applied.
Final Packaging Checklist
Before handing off, confirm that a new developer can:
- run the system from scratch using the Quick Start
- execute at least one example and see expected outputs
- run the verification commands and get consistent results
- locate the tests and docs that correspond to each acceptance criterion
If those four items are true, the deliverable is packaged in a way that survives contact with reality.
12. Operationalizing Vibe Coding in Real Development Teams
12.1 Defining Team Workflows for Agent Assisted Changes
Agent-assisted changes work best when the team treats the agent like a junior engineer with a strong checklist and a short attention span. The goal is not to “hand it the keyboard,” but to define a workflow where intent, artifacts, review, and verification are explicit.
Core Workflow Principles
Start with a single source of truth for what “done” means. In practice, that means every agent-assisted change begins with an intent statement plus acceptance criteria, then produces a small set of traceable artifacts: a plan, a diff, and evidence from tests or checks.
Next, separate responsibilities. The agent can draft code and tests, but the team owns decisions that affect scope, architecture, and risk. That division prevents the common failure mode where the agent produces something that compiles but violates the team’s constraints.
Finally, make the workflow measurable. If the team cannot answer “what changed, why, and how we verified it,” the workflow is too vague.
Roles and Handoffs
A practical setup uses three roles:
- Requestor: writes the intent and acceptance criteria.
- Agent Operator: runs the agent, curates outputs, and ensures required artifacts exist.
- Reviewer: performs code review and approves merge.
The handoff rule is simple: the agent never merges. The operator never merges without a reviewer sign-off. The reviewer never approves without verification evidence.
Artifact Contract for Agent Runs
Define a lightweight contract so every run produces the same shape of output. The operator checks for completeness before review.
Required artifacts
- Intent summary: one paragraph restating the goal.
- Change plan: bullet list of files or modules expected to change.
- Diff: the actual code changes.
- Verification evidence: test commands run and results, plus any static checks.
- Known risks: short list of assumptions or remaining TODOs.
This contract keeps review focused. Reviewers can scan for intent alignment and verification coverage instead of guessing what the agent intended.
Team Workflow Steps
- Create an issue or task with intent and acceptance criteria.
- Run a preflight checklist: confirm inputs, environment, and constraints like supported frameworks and lint rules.
- Generate a plan and require the operator to approve the plan before code generation.
- Generate code and tests.
- Run verification locally or in CI with the same commands the team uses.
- Perform review using a checklist that maps to acceptance criteria.
- Merge only when evidence is present and reviewer approval is recorded.
A small but important detail: plan approval should be fast. If it takes longer than the code generation, the workflow is broken.
Mind Map: Agent Assisted Change Workflow
Example: A Small Change with Evidence
Suppose the team wants to add an endpoint that returns a user profile. The requestor writes acceptance criteria like: “Returns 200 with fields id, email, displayName. Returns 404 for unknown user. Includes request id in response headers.”
The operator runs the agent with a plan requirement: the plan must name the route file, the service function, and the test file. After code generation, the operator runs the same test command used in CI and records the output in the change notes.
During review, the reviewer checks three things in order:
- The diff matches the plan and acceptance criteria.
- Tests cover the 200 and 404 cases, plus the header requirement.
- Error handling uses the team’s standard response shape.
If any evidence is missing, the reviewer requests changes. This keeps the review from turning into a scavenger hunt.
Example: Operator Checklist for Run Completeness
Use a short checklist so operators do not rely on memory.
- Intent summary included
- Plan lists expected files or modules
- Diff present and scoped to the task
- Tests executed with recorded results
- Lint or static checks executed if required
- Known risks section not empty
- No secrets or credentials added
Review Checklist That Maps to Acceptance Criteria
A reviewer checklist should mirror the acceptance criteria structure. If acceptance criteria mention behavior, the checklist should ask about behavior. If it mentions performance constraints, the checklist should ask about them.
A good reviewer checklist also includes “negative checks,” such as ensuring the change does not alter unrelated endpoints or data formats. That prevents accidental coupling, especially when the agent touches shared utilities.
Handling Multi Step Changes Without Chaos
When a change spans multiple modules, require the operator to split the work into smaller pull requests. Each pull request should have its own intent summary, plan, diff, and verification evidence. This reduces the blast radius of mistakes and makes review practical.
If splitting is impossible, the operator must still enforce internal checkpoints: verify each layer with tests before moving to the next. That way, failures are localized instead of discovered only after everything is wired together.
12.2 Managing Branching, Merges, and Review Responsibilities
Branching and merging are where intent meets reality. Agents can generate code quickly, but humans still own the decision to integrate it. The goal is to make integration predictable: every change has a clear purpose, a bounded blast radius, and a review path that matches risk.
Core Principles for Branching
Start with a branch strategy that encodes intent. Use short-lived feature branches for work that changes behavior, and keep them narrow enough that a reviewer can understand the diff without running a full mental simulation.
A practical rule: if the branch changes more than one “story” (for example, data model plus UI plus permissions), split it. Agents are good at producing consistent code across files, but reviewers are responsible for consistency across requirements.
When you create a branch, include three artifacts in the first commit message:
- The user-facing goal (one sentence)
- The acceptance criteria being targeted
- The files or modules likely to change
Example commit message:
- “Add invoice status endpoint. Targets: status transitions and 404 on missing invoice. Touches: invoices service, routes, tests.”
Merge Types and When to Use Them
Not every merge is equal. Treat merge style as a risk control.
- Squash merge for feature branches where you want a clean history and don’t care about intermediate agent iterations.
- Rebase merge when you need linear history and want to keep the branch’s commit structure meaningful.
- Merge commit when you want to preserve the exact sequence of changes for auditability, such as when multiple teams touch the same area.
A simple policy that works: squash by default, merge commit for dependency or security-related changes, and rebase for long-running branches that must stay close to main.
Review Responsibilities That Match Risk
Assign review roles based on what the change can break.
-
Code correctness reviewer
- Focus: tests, edge cases, and whether the implementation matches the acceptance criteria.
- Typical checks: error handling paths, boundary conditions, and contract adherence.
-
Architecture reviewer
- Focus: module boundaries, interface stability, and whether abstractions are used consistently.
- Typical checks: no new circular dependencies, stable public APIs, and clear separation of concerns.
-
Security reviewer
- Focus: authorization, input validation, and secret handling.
- Typical checks: permission checks at the right layer, safe query construction, and no logging of sensitive data.
A lightweight workflow: require one reviewer for low-risk changes (tests-only or refactors with no behavior change), two reviewers for medium-risk changes (new endpoints, new persistence logic), and three for high-risk changes (auth, payments, data migrations).
Mind Map: Branching, Merging, and Review
Integrated Workflow from Branch to Merge
- Create the branch with a clear goal and acceptance criteria.
- Generate code in small iterations and keep each iteration aligned to one acceptance criterion.
- Run targeted tests locally before pushing, especially for the changed modules.
- Open a PR with a structured summary:
- What changed
- Which acceptance criteria are satisfied
- What was intentionally not changed
- How to reproduce tests
- Review using a checklist tied to the PR’s risk level.
- Merge only after CI passes and required reviewers approve.
Example PR Checklist for a Medium-Risk Change
- Acceptance criteria mapping: each criterion has a test or explicit reasoning.
- Error handling: 404/400/500 paths are covered.
- Contract stability: request/response shapes match existing conventions.
- No hidden coupling: new imports do not create dependency loops.
- Observability: logs do not include sensitive fields.
Handling Conflicts Without Losing Intent
When conflicts happen, don’t “accept everything” and hope. Resolve conflicts by re-checking the acceptance criteria and ensuring the final code still satisfies them. If the conflict is between two different stories, split the PR or revert one side to preserve review clarity.
A practical approach: after resolving, run the same test commands the PR summary claims. If the PR summary is wrong, fix it. Reviewers trust the story more when it matches the commands.
12.3 Creating Reusable Intent and Spec Assets Across Projects
Reusable intent and spec assets are the difference between “we can generate code” and “we can generate the right code, consistently.” The goal is to capture decisions once, then reuse them with small, explicit variations.
Start with a simple rule: an asset must be executable by an agent without needing tribal knowledge. That means each asset includes (1) the intent, (2) the boundaries, (3) the interfaces it expects, and (4) the acceptance checks that prove it worked.
What Makes an Asset Reusable
A reusable asset has four properties.
First, it is parameterized. Instead of writing “create a user endpoint,” write “create an endpoint for an entity with fields X, Y, Z, using auth mode A.” Parameters become the only knobs teams turn.
Second, it is contract-first. The asset defines request/response shapes, error formats, and side effects. When the agent knows the contract, it can generate code that fits the surrounding system.
Third, it is test anchored. Every reusable spec includes at least one test strategy: unit tests for pure logic, integration tests for persistence and HTTP, and checks for edge cases.
Fourth, it is versioned. Specs evolve, but changes must be traceable. Treat the spec like an API: breaking changes require a new version.
Asset Types That Work Well in Practice
Use a small set of asset types so teams don’t invent new formats every time.
- Intent Cards: one page describing the goal, constraints, and success criteria.
- Spec Modules: reusable building blocks such as “CRUD endpoint spec,” “pagination spec,” or “audit logging spec.”
- Contract Schemas: request/response and error shapes, written in a machine-readable way.
- Acceptance Checklists: concrete checks that map to tests and static analysis.
A good pattern is composition: an Intent Card references Spec Modules, which reference Contract Schemas. This keeps the intent readable while the details stay structured.
Mind Map: Asset Composition and Flow
Example: Parameterized Intent Card for an API Feature
Below is a compact template that teams can reuse across projects.
Intent Card v1
Goal: Create a {resourceName} API feature.
Parameters:
- resourceName: string
- fields: list of {name, type, required}
- authMode: {public, user, admin}
Boundaries:
- No schema changes outside {resourceName}
- Error format must match ApiError schema
Success Criteria:
- GET /{resourceName}/{id} returns 200 with expected fields
- POST /{resourceName} validates required fields
- Unauthorized requests return correct status and error code
- Integration tests pass for happy path and two edge cases
The key is that the agent can generate code without guessing field names, auth behavior, or error conventions.
Example: Spec Module for Pagination with Acceptance Checks
A pagination spec module should define both behavior and tests.
Spec Module v1: Pagination
Rules:
- Query params: page (>=1), pageSize (1..100)
- Response includes: items, page, pageSize, total
- Ordering is stable by {sortKey}
Edge Cases:
- page beyond range returns empty items with total preserved
- invalid page/pageSize returns ApiError with validation code
Acceptance Checks:
- Unit tests for parameter parsing
- Integration test verifying stable ordering
- Static check for missing total field
Notice how the module names the sort key and the exact response fields. That prevents “almost correct” pagination.
Versioning and Change Control That Prevents Drift
When a spec changes, you need a policy that is easy to follow.
Use semantic versioning at the asset level.
- Patch: bug fixes that don’t change contracts.
- Minor: additive behavior that doesn’t break existing requests.
- Major: contract changes or removed fields.
Also include a short “compatibility note” inside the asset. For example: “v1.2 adds total to responses; v1.1 clients may ignore it.” This note helps reviewers decide whether regeneration is required.
Practical Workflow for Reuse Across Projects
- Pick an Intent Card that matches the feature shape.
- Fill parameters and confirm boundaries align with the target repo.
- Compose Spec Modules and generate contracts first.
- Generate code, then run acceptance checks that are part of the asset.
- If failures occur, update the spec module that caused the mismatch, not just the generated code.
This workflow keeps improvements centralized. The next project benefits immediately, and the team spends less time re-litigating the same decisions.
12.4 Establishing Governance for Tool Access and Permissions
Tool access governance is the part of vibe coding that keeps “it worked on my machine” from becoming “it deleted production.” The goal is simple: every agent action should be authorized, traceable, and constrained to the minimum permissions needed for the task.
Core Principles for Tool Governance
Start with least privilege. If a workflow only needs to read repository files, it should not have permission to write, run commands, or access secrets. Next, require explicit tool allowlists per workflow. An agent that is generating tests should not be able to deploy services.
Finally, treat permissions as part of the specification. When you define an intent, you also define what tools it may use, what scope it may touch, and what evidence it must produce. This turns governance from a policy document into an executable contract.
Permission Model That Matches Real Work
Use a permission model with three layers: identity, capability, and scope.
- Identity answers “who is acting.” In practice, this is the agent role plus the human approver identity when approvals are required.
- Capability answers “what the agent can do.” Examples: read files, write files, run tests, call an internal API, open a pull request.
- Scope answers “where it can act.” Examples: a specific repository path, a specific environment like staging, or a specific service name.
A useful rule: capability without scope is too broad, and scope without capability is too vague.
Tool Access Policy Structure
Define policies as structured rules that map workflow steps to tool permissions. Keep the rules readable so reviewers can reason about them quickly.
Policy fields to include
- Workflow step: e.g., “Generate migration,” “Run unit tests,” “Create PR.”
- Allowed tools: e.g., file system writer, test runner, PR creator.
- Environment scope: e.g., local workspace only, staging only.
- Secret access: either none, or a named secret set.
- Evidence requirements: e.g., test output logs, diff summary, or a checklist.
- Approval gates: which steps require a human confirmation.
Approval Gates That Prevent Costly Mistakes
Not every step needs a human in the loop. Use approvals for actions with irreversible or high-impact outcomes: deploying, rotating secrets, changing production configuration, or granting new tool permissions.
A practical pattern is a two-stage gate for risky operations:
- Plan gate: the agent proposes the exact tool calls and target scope.
- Execute gate: after approval, the system allows the tool calls.
This keeps the agent from “surprising” the system with extra actions.
Auditing and Traceability
Every tool invocation should produce an audit record containing:
- workflow step name
- agent role
- tool name and parameters (redacting secrets)
- target scope
- timestamp
- evidence artifacts produced
- outcome status
When something fails, you want to answer three questions quickly: what was attempted, what was allowed, and what evidence was generated.
Mind Map: Governance for Tool Access and Permissions
Example: Tool Policy for a Feature Slice
Imagine a workflow step called “Generate API endpoint and tests.” The agent should:
- read existing route definitions
- write new controller and test files under a specific directory
- run unit tests locally
- create a pull request
It should not:
- access production secrets
- run integration tests against staging
- execute arbitrary shell commands outside the test runner
A policy reviewer can scan the allowlist and scope and immediately see whether the agent’s permissions match the step’s intent.
Example: Approval Gate for Deployment
For a step named “Deploy to Production,” require:
- plan gate approval with target service, version, and environment
- execute gate approval after the deployment command is fully specified
- secret access limited to the production credential set
- audit record creation for every tool call
If the agent cannot produce the plan evidence (like a diff summary and test results), the system should block execution.
Practical Implementation Checklist
Use this checklist when setting up governance:
- Define identity, capability, and scope for each agent role.
- Create tool allowlists per workflow step.
- Require evidence artifacts for every write or execution step.
- Add approval gates for irreversible actions.
- Log tool calls with redacted secrets.
- Validate parameters against scope before tool execution.
Governance works best when it is boring: explicit rules, narrow permissions, and logs that make accountability straightforward.
12.5 Maintaining Consistency with Versioned Specs and Artifacts
Consistency is what lets you regenerate code without turning every run into a surprise party. In agent-driven development, the main threat is drift: the spec changes, the agent’s interpretation changes, or the generated artifacts stop matching the assumptions that produced them. Versioned specs and artifacts solve this by making intent and output auditable.
The Core Model of Spec and Artifact Versions
Treat a “spec” as the source of truth for behavior, and “artifacts” as the concrete outputs that implement it. Each spec version must declare what it expects, and each artifact version must declare what spec it was generated from.
A practical rule: every generated change should carry three identifiers—specId, specVersion, and artifactVersion. When you review or debug, you can answer: “Which spec produced this code?” and “Which code matches this spec?”
Example: a payment endpoint spec might define request fields, error mapping, and idempotency behavior. The generated endpoint code should embed the spec identifiers in a comment header and store the artifact version in a build-time metadata file.
Versioning Strategy That Agents Can Follow
Use a versioning scheme that is easy to compare and easy to reference in prompts. A simple approach is semantic versioning for specs and monotonically increasing build numbers for artifacts.
- Spec versions change when behavior changes or when constraints tighten.
- Artifact versions change every time generated code is produced, even if the diff is small.
When you update a spec, you should also update a “compatibility note” inside the spec: what remains backward compatible and what does not. Agents can then choose whether to regenerate everything or only the affected modules.
Spec Structure That Prevents Ambiguity
A spec should be structured so agents can map each requirement to a test, a contract, or a code module. Keep each requirement atomic and include acceptance criteria that can be executed.
Use this checklist inside the spec document:
- Intent: one sentence describing the behavior.
- Inputs: fields, types, validation rules.
- Outputs: success payload, error payload, status codes.
- Invariants: rules that must never break.
- Acceptance tests: named tests with expected results.
- Non-goals: what the feature explicitly does not do.
This structure reduces the chance that a regenerated artifact “fills in” missing details differently.
Artifact Traceability That Makes Reviews Faster
Artifacts should include traceability in two places: human-readable headers and machine-readable manifests.
- Headers: short comment block with
specId,specVersion, andartifactVersion. - Manifests: a JSON file listing every generated file and its spec link.
Example manifest entry:
{
  "artifactVersion": "2026.03.15-1042",
  "specId": "payments.create",
  "specVersion": "1.4.0",
  "files": [
    "src/api/payments/create.ts",
    "src/domain/payments/createPolicy.ts",
    "tests/api/payments/create.test.ts"
  ]
}
This lets you quickly detect mismatches, like tests referencing a newer spec than the endpoint code.
Mind Map: Versioned Specs and Artifacts
Drift Detection and Regeneration Scope
Consistency isn’t just documentation; it’s enforcement. Add a lightweight check in your workflow that compares the spec version referenced by tests against the spec version referenced by the implementation.
If the spec changed in a way that affects invariants, regenerate the full slice. If only formatting or non-goal details changed, you can keep existing modules and regenerate only the parts tied to changed acceptance tests.
Example decision rule:
- Spec change touches Invariants or Error Mapping → regenerate implementation + tests.
- Spec change touches Non-goals only → regenerate spec docs only.
- Spec change touches Inputs validation → regenerate endpoint validation and tests.
A Concrete Integrated Example
Suppose orders.cancel spec moves from 2.1.0 to 2.2.0 by tightening cancellation rules for already-shipped orders.
- The spec update includes new acceptance tests:
cancel_rejects_shipped_orders. - The agent generates updated validation logic and updates the error payload mapping.
- The generated files include headers referencing
specId=orders.cancelandspecVersion=2.2.0. - The manifest lists the exact files changed and the new
artifactVersion. - A drift check confirms that the test file and endpoint file both reference
2.2.0.
Now the team can review the diff with confidence: the code and tests correspond to the same spec version, and the traceability artifacts make it obvious what changed and why.